2.9.16.0
Coherent GT for UE4
This tutorial will explain how to create a entire main menu for your game. Before delving in the tutorial, we should point out that:
We'll create a splash screen, a multi-level menu and a loading screen for a Sci-fi themed game which we'll shamelessly call Coherent Labs. You can see the final result in our sample - load and play the ComplexMenu_Map level as a STANDALONE game, otherwise some of the settings won't work. Alternatively, you can see the result in YouTube.
To get there, we need to complete the following subtasks:
To make quick iterations, we'll work in Chrome and when things get in shape we'll move them to UE4. Chrome is not 100% compatible with Coherent GT - in your normal workflow make sure to test your pages in Coherent as well to avoid discrepancies. In this case though, we can ommit this step as everything we'll create is compatible.
One final note - there will be many code snippets in this tutorial, some of them big, some small. Some of the bigger ones might look like a scary wall of text at first but this is because you'll find many explanatory comments near the more important parts of the code.
We begin by creating an index.html file with the following basic contents:
<!DOCTYPE html>
<html>
<head>
<link rel="stylesheet" href="css/common.css"></link>
</head>

<body>
<!- - Include Coherent specific files - ->
<script src="coherent/coherent.js"></script>
</body>
</html>
This files simply includes coherent.js - our JavaScript library the provides the binding with the engine and a stylesheet named common.css.
To complete the directory structure - create the coherent, css and javascript directories. Copy the provided coherent.js to coherent. Create a common.css file in the css directory. This file will contain styles shared by all elements of the sample. Let's begin with the following CSS declarations:
/* Make sure the <html> and <body> tags fill the entire screen */
html, body {
    width: 100%;
    height: 100%;
    margin: 0;
    padding: 0;
    /* And disable scrollbars if something overflows */
    overflow: hidden;
}

/* We'll soon use the <span>, <li>, <p> and <h1> to fill text content
   in the sample. It will be really ugly if the user could select that content
   by dragging with the mouse so disable that */
*/
span, li, p, h1 {
    /*
    -webkit-user-select: none;
}

/* Helper class that we'll use in a second
   adding it to an element essentially removes the element
   from layout / rendering considerations
*/
.hidden {
    display: none;
}

/* Each of our screens (the splash screen, main menu and loading screen)
   should take the entire page
*/
.screen {
    position: absolute;
    width: 100%;
    height: 100%;
    top: 0%;
    left: 0%;
}
That's enough for now, let's move to the actual content.
To make things easier to work we adopt the following convention:
<content> tag.<section> tag.That having been said, here's the plan for the splash screen:
The steps above can be described with the following HTML:
<content id="splash-screen" class="screen">
    <!- - data-display-for controls how long will the section be displayed. See splash_screen.js - ->
    <section data-display-for="2000">
        <!- - An empty section so that we start with a black screen. - ->
    </section>

    <section data-display-for="2000">
        <img id="coherent-gt-logo" src="images/coherent-gt.svg"></img>
        <h1>Powered by Coherent GT</h1>
    </section>

    <section data-display-for="2000">
        <img id="coherent-labs-logo" src="images/coherent_labs.png"></img>
    </section>

    <section data-display-for="5000">
        <p>
        This file is part of Coherent GT, modern user interface library for games.
        </br></br></br>
        Copyright (c) 2012-to infinity and beyond! Coherent Labs AD and/or its licensors.
        All rights reserved in all media.
        </br></br></br>
        This software or source code is supplied under the terms of a license
        agreement and nondisclosure agreement with Coherent Labs Limited and may
        not be copied, disclosed, or exploited except in accordance with the
        terms of that agreement.
        </p>
    </section>
</content>
The code is straightforward - we separated the splash screen over several <section> tags, each containing one of steps outlined above. Note the data-display-for attribute. HTML provides custom data-attributes as a form of adding data to the element. In this case we'll store the duration (in milliseconds) for which the section is displayed on screen. We'll animate it with JavaScript in a second.
You can see that we are using two images - coherent-gt.svg and coherent-labs.png. You can copy them from images directory of the tutorial or alternatively you might use placeholders or your own art.
Let's style the splash screen. Create a css/splash_screen.css file and add the following declarations in it:
#splash-screen {
    background: black;
    color: white;
    font-size: 3em;
    text-align: center;
}

#splash-screen section {
    /* Stretch each section as much as possible */
    position: absolute;
    width: 100%;
    height: 100%;
    top: 0%;
    left: 0%;

    /* Each section begins with opacity 0 */
    opacity: 0;
    /* Animate any changes in the opacity for a nice fade effect */
    transition: opacity 0.5s ease-in;
}

/* By adding the active class, we'll cause the section to fade-in */
#splash-screen .active {
    opacity: 1;
}

#coherent-gt-logo {
    /* Place the Coherent GT logo */
    width: 50%;
    height: 50%;
    margin-top: 10%;

    /* Animate any changes to its transform property with one second delay */
    transition: transform 0.5s ease-out;
    transition-delay: 1s;
}

/* When coherent-gt-logo's section is activated, scale and rotate it */
.active #coherent-gt-logo {
    transform: scale(2.5) rotate(10deg);
}

/* Place the logo of the game */
#coherent-labs-logo {
    margin-top: 30%;
}
We also need to include the stylesheet in index.html:
<head>
<link rel="stylesheet" href="css/common.css"></link>
<link rel="stylesheet" href="css/splash_screen.css"></link>
</head>
...
We've setup everything ready to animate the transitions between the sections. To show a section - we'll add the active class to it and remove the active class from the previous one (if any). This will trigger a smooth transition due to the transition property and we'll get a nice fade in / out effect.
It's time to use JavaScript so go ahead a create an empty javascript/splash_screen.js file. The code for playing the splash screen looks like this:
"use strict";
// This file exposes a single function that plays the splash screen
var playSpashScreen = function (splashScreenSelector) {
    // Get the splash screen DOM element
    var splashScreen = document.querySelector(splashScreenSelector);
    // And its sections
    var sections = splashScreen.children;
    var nextSectionIndex = 0;

    var playNextSection = function () {
        // Are we done?
        if (nextSectionIndex >= sections.length) {
            // Completely hide the splash screen
            splashScreen.classList.add("hidden");
            return;
        }
        if (nextSectionIndex > 0) {
            // Remove the active class from the previous section if there was one
            var currentSection = sections.item(nextSectionIndex - 1);
            currentSection.classList.remove("active");
        }
        // Add the active class to the next section
        var nextSection = sections.item(nextSectionIndex);
        nextSection.classList.add("active");
        nextSectionIndex++;
        // After the milliseconds specified in data-display-for, play the next section
        // Remember to parse the attribute as attributes are always strings
        setTimeout(playNextSection, parseInt(nextSection.dataset.displayFor));
    };
    // Start the slide show
    playNextSection();
};
Add this code to newly created javascript/splash_screen.js. To make things more manageable, let's also create javascript/main.js with the following simple function:
var main = function () {
    "use strict";
    playSpashScreen("#splash-screen");
};

main();
After main.js is loaded, it will immediately execute the main function which will in turn call playSplashScreen.
If you are wondering what's this "use strict"; string on the top of splash_screen.js or inside the main function, it enables JavaScript's strict mode. Strict mode makes JavaScript evaluation more strict (obviously) and causes some common mistakes to fail immediately and explicitly instead of silently.
Now, our code it still won't execute - we have yet to include the scripts in index.html:
...
<!- - Include Coherent specific files - ->
<script src="coherent/coherent.js"></script>
<!- - Include our scripts - ->
<script src="javascript/splash_screen.js"></script>
<script src="javascript/main.js"></script>
</body>
Launch index.html in Chrome (or another webkit-based browser e.g. Safari) and you'll find the splash screen working almost as in the demo above.
The sole thing missing from the splash screen is the Sci-fi font. Arial certainly doesn't fit our use case, we are going to use Orbitron. It matches our purpose and is also free (distributed under the SIL Open Font License). Create a new directory - 3rdparty/orbitron and extract the contents of the archive from the provided link. Now go back to to css/common.css and let's make use of Orbitron:
/* Load Orbitron from disk */
@font-face {
  font-family: "Orbitron";
  /* Note that the path is relative from the current file, not the HTML */
  src: url("../3rdparty/orbitron/orbitron-light.otf") format("opentype");
}

/* Make sure the <html> and <body> tags fill the entire screen */
html, body {
    ...
    /* Use Orbitron everywhere */
    font-family: Orbitron;
    ...
}
The font-family property is inherited so setting it to the <body> will cause every element's font to be set to Orbitron. In this example we loaded the light version of Orbitron but you can also use any of others provided in the archive or any other font you like.
The splash screen now perfectly matches the one we showed earlier.
Having completed the splash screen, we focus on the main menu. This is no doubt the most complex part of the tutorial because we'll have multiple subscreens to navigate to and we'll also need to implement keyboard navigation. Similarly to the splash screen, we'll make a plan:
The menu will be structured in several levels. The hierarchy looks like this:
Home screen
| New Game subcreen
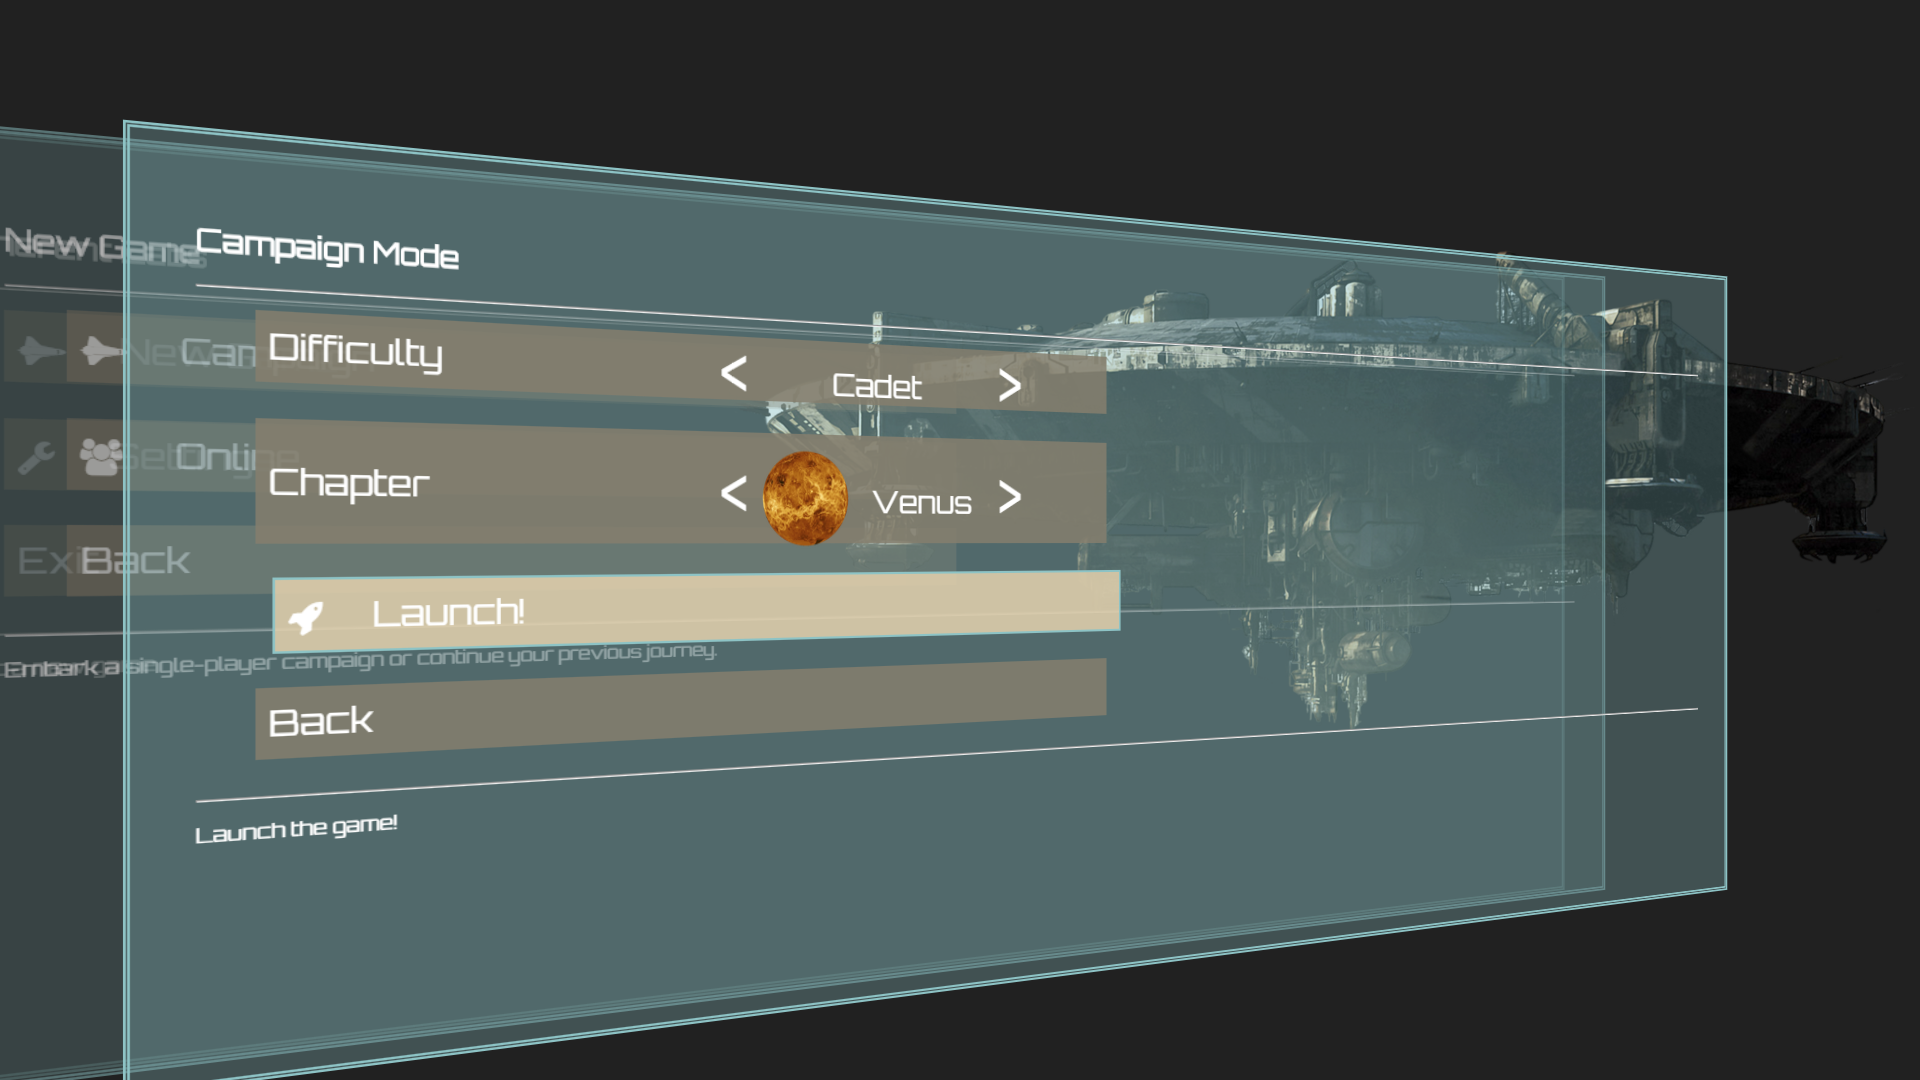
| Campaign Mode subcreen
| Difficulty (discrete value selector)
| Chapter (discrete value selector)
| Launch (button)
| Online
| Settings subsreen
| Video settings subsreen
| Resolution (discrete value selector)
| Shadow quality (discrete value selector)
| Texture quality (discrete value selector)
| Is Fullscreen (checkbox)
| Audio settings subsreen
| Master volume (slider)
| Exit (button)
If two HTML elements overlap, we'll only see the one that has been declared later (although this can be overriden using the z-index property). This means that if we add the main menu after the splash screen in index.html we won't see the splash screen! So instead, we'll add the main menu before the splash screen. We'll do the same for the loading screen later.
Each of the subscreens in our main menu (home, settings, etc.) will be contained in a 3D transformed rectangle to match our scifi theme. Furthermore, we'll fix the colour scheme in order to be consistent across all menus (and later across the loading screen) - we'll only use 5 colours which I'll add to css/common.css for easier tracking:
/* Use only few colors:
    rgb(141,195,197) - light blue
    rgb(228,210,174) - wheat-like
    rgb(133,126,110) - brown-grayish
    rgb(72, 77, 77) - dark gray
    rgb(84, 90, 90) - lighter dark gray
*/
We'll also also use pure black and white sometimes, mostly for text as this provides the best contrast and eases reading.
We'll firstly get the home subscreen done before going for the others. The HTML we need is as follows:
<content id="main-menu-screen" class="screen" >
     <section id="home-subscreen" class="subscreen hidden">
        <h1>Coherent Labs</h1>
        <hr>
        <ul class="menu">
            <!- - Setting tabindex enables focus - ->
            <li tabindex="0"
                data-description="Start a new game"
                data-next-subscreen="game-mode">
                New Game
            </li>
            <li tabindex="0"
                data-description="Change the game's settings"
                data-next-subscreen="settings">
                Settings
            </li>
            <li tabindex="0"
                id="exit-game-button"
                data-description="Exit the game" >
                Exit
            </li>
        </ul>
        <hr>
        <p class="description-display"></p>
    </section>
</content>
There are several key points in this HTML:
subscreen class to style each subscreen<ul>) for the menu with each menu item being a list item (<li>)tabindex property set which allows it to receive focus. We'll see why we need that later. For now it only allows you to cycle through the items using the Tab key in Chrome.data-description attribute. We'll use the information there to display additional info to the player about what each item will do in the paragraph marked with the description-display class.data-next-subscreen tag. We'll use this value to determine which subscreen we need to show next when this item is clicked.hidden class - we'll have a lot of subscreens and each of them will have 3D transformation. If do not hide the unused subscreens, they can cause performance problems because each 3D transformed subscreen will create a new layer. More information regarding layers can be found at html5rocks.comWe'll style the main menu in a separate file to keep up with modularity. Create an empty css/main_menu.css and let's include that in the page:
<head>
<link rel="stylesheet" href="css/common.css"></link>
<link rel="stylesheet" href="css/splash_screen.css"></link>
<link rel="stylesheet" href="css/main_menu.css"></link>
</head>
...
While we are it, let's add the matching javascript/main_menu.js:
...
<script src="javascript/splash_screen.js"></script>
<script src="javascript/main_menu.js"></script>
<script src="javascript/main.js"></script>
...
We begin by firstly adding some styles to the main menu screen:
#main-menu-screen {
    color: white;
    background-color: rgb(33, 33, 33);
    background-image: url(../images/spaceship.png);
    background-repeat: no-repeat;
    background-position: right;
    /* The perspective property controls the strength of the 3D effect.
       Through some trial and error, we've found this values best for the sample.
       See https://developer.mozilla.org/en-US/docs/Web/CSS/perspective for details
    */
    perspective: 2000px;
}
We want to stack our subscreens in a manner that allows the player to see the previous subcreens in the background. We'll achieve this by moving all subscreens out of the screen via a transform:
.subscreen {
    /* Some common subscreen properties.
       Note that we are using the colours we mentioned earlier
    */
    border: 5px double rgb(141, 195, 197);
    background: rgba(141, 195, 197, 0.3);
    width: 90%;
    height: 60%;
    position: absolute;
    left: 10%;
    top: 20%;
    padding: 2.5%;

    /* Move all subscreens to the right and out of the screen by default */
    transform: translateX(2000px) rotateY(30deg);
    /* Animate changes in the transform and opacity */
    transition: transform 0.5s ease-in, opacity 0.5s ease-in;
    overflow: hidden;
}
We'll add a class named indexN to control the visibility of the subcreens. index0 will correspond to the subscreen being the one active currently. index1 will be the subscreen behind the currently active and so on. As we'll never go deeper than 3 subscreens, we only need index0, index1 and index2 but we can also add more should we need them. The following sketch demonstrates that:
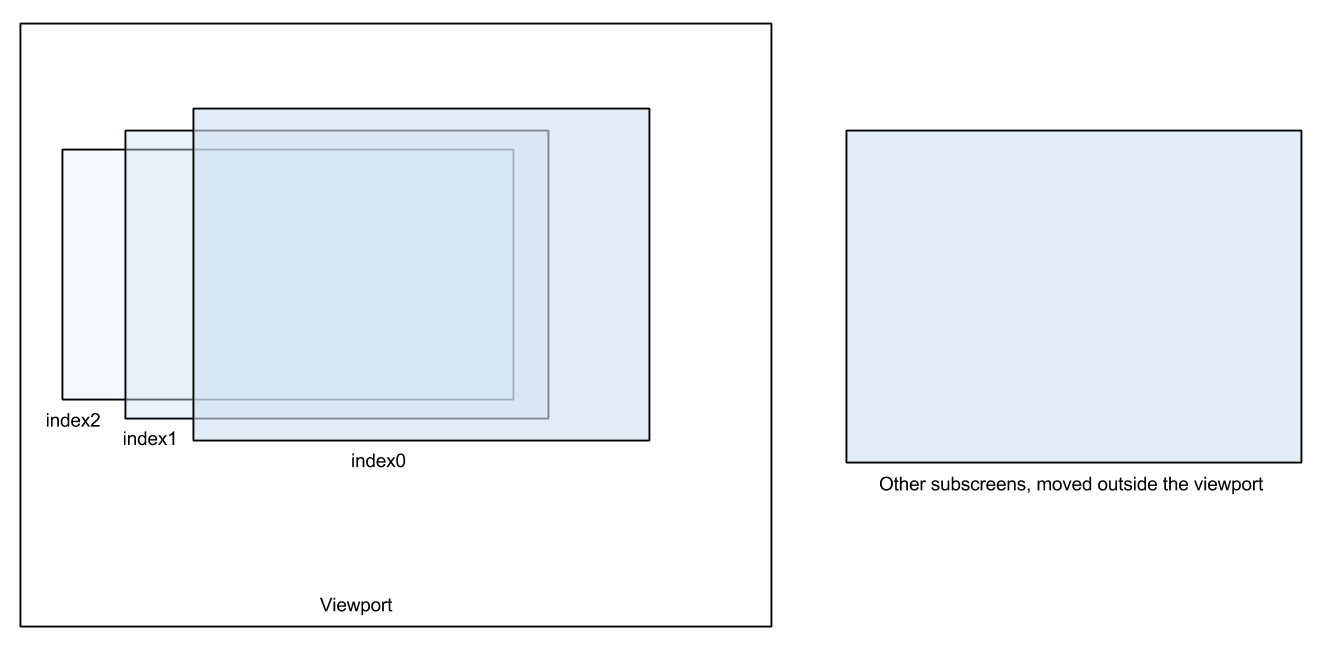
And the following CSS achieves the effect:
/* Remove the translation component */
.subscreen.index0 {
    transform: rotateY(30deg);
}
/* Move the other active subcreens to left and fade them away */
.subscreen.index1 {
    transform: translateX(-150px) rotateY(30deg);
    opacity: 0.5;
}
.subscreen.index2 {
    transform: translateX(-200px) rotateY(30deg);
    opacity: 0.25;
}
Now, how do we update the indices of subscreen? Well, time to fill javascript/main_menu.js with some content:
"use strict";
// This file handles stacking the subscreens in the main menu and adds keyboard navigation

// A stack contaning all active subscreens
var activeSubcreens = [];

// We need to update the CSS classes of the subcreens whenever one is pushed or popped
var updateSubscreens = function () {
    var subscreenCount = activeSubcreens.length;
    for (var i = 0; i <  subscreenCount; i++) {
        var classList = activeSubcreens[i].classList;
        // Remove whatever the subscreen's index was
        // If we just pushed a subcreen, then this subcreen's index was (subcreenCount - 1 - i - 1)
        // If we just popped a subcreen, then this subcreen's index was (subcreenCount + 1 - i - 1)
        // Play it safe and just remove both
        classList.remove("index" + (subscreenCount - i - 2).toString());
        classList.remove("index" + (subscreenCount - i).toString());
        // Add the correct current index
        classList.add("index" + (subscreenCount - i - 1).toString());
    }
    // If an element was focused, reset it
    if (document.activeElement) {
        document.activeElement.blur();
    }
}

var pushSubscreen = function (subscreenName) {
    var id = subscreenName + "-subscreen";
    var subscreen = document.getElementById(id);
    subscreen.classList.remove('hidden');
    // Update the subscreens asynchronously, otherwise no animation will play
    requestAnimationFrame(updateSubscreens);
};

var popSubscreen = function () {
    var subscreen = activeSubcreens.pop();
    subscreen.classList.remove("index0");
    updateSubscreens();
    // Disable the subscreen after its animation has been played
    // This prevents it from being composited as a layer.
    setTimeout(function () {
        subscreen.classList.add('hidden');
    }, 500 /* Subscreen animation lasts for 0.5s */);
};

var initializeMainMenu = function () {
    // Push the main menu
    pushSubscreen("home");
};
The code depends on the fact that the subscreens will get the correct ids in the HTML (see pushSubscreen) so we need to be careful when assigning the id.
If you now load the page, the home screen won't be visible because the stack of active subscreens is empty. We need to initialize the main menu in our main function:
var main = function () {
    "use strict";
    initializeMainMenu();
    playSpashScreen("#splash-screen");
};
And now magically the home subscreen is alive and active. The menu items look terribly though, so it's time we style it as well:
.menu {
    /* Remove the bullets */
    list-style-type: none;
}

.menu li {
    background: rgba(133, 126, 110, 0.85);
    width: 28em;
    font-size: 1.8em;
    margin-bottom: 1em;
    padding-left: 10px;
    transition: background 0.2s linear, transform 0.2s linear;
    transform: translateX(5px);
    line-height: 2em;
}

/* Make the top-level subscreen's items stand out when hovered or focused */
.subscreen.index0 .menu li:focus, .subscreen.index0 .menu li:hover {
    background: rgba(228, 210, 174, 0.85);
    transform: translateX(20px);
    outline: 2px solid rgb(141, 195, 197);
}
This makes a lot of difference!
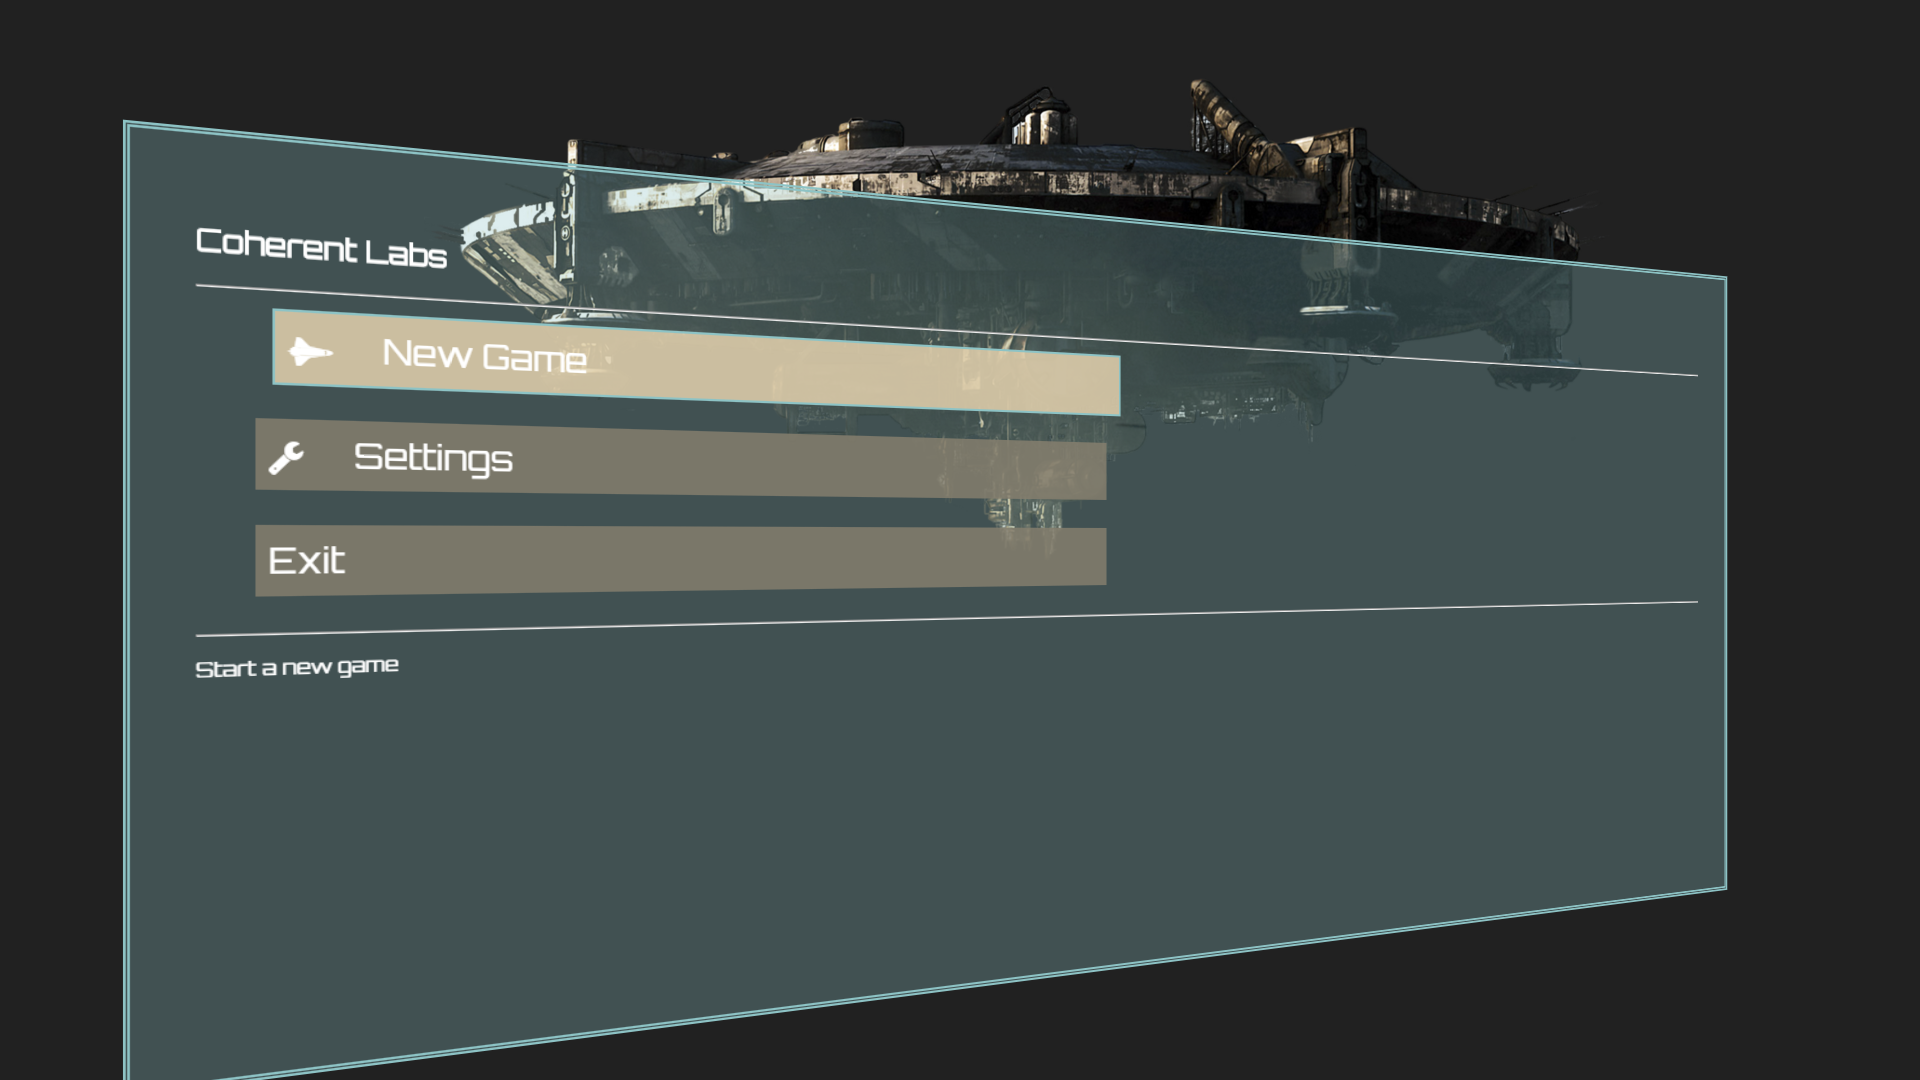
Icons in HTML are simple to add because you don't need to use actual images for each icon and this saves you an entire atlas / spritesheet of tens of icons. The better way of adding icons to your page is via an icon-font. An icon-font is a font whose glyphs are the actual icons instead of the standard unicode letters. This means that each icon is simply a custom character and adding an icon comes to the following steps:
Icon fonts are better than regular icons because:
color property.There are numerous icon fonts available, but to save ourselves some hassle we'll use the most popular one - FontAwesome. It is easy to use and distributed under the SIL Open Font License akin to Orbitron. Adding an icon with Font Awesome is an easy - after extracting the archive in our 3rdparty directory, load the provided CSS file in index.html:
<head>
<!- - Note:
    Directly using FontAwesome can slowdown your UI since it adds a ton of styles,
    some of which completely unneeded for our purposes. It might be a good idea
    to strip away their CSS to a bare minimum in production use, but for the purposes
    of the sample we value simplicity over performance.
-- ->
<link rel="stylesheet" href="3rdparty/font-awesome-4.4.0/css/font-awesome.min.css">
And then we can add any icon from their huge list of over 580 icons with the following HTML:
<i class="fa fa-space-shuttle"></i>
For example, adding icons to our New Game and Settings buttons can be done like this:
...
<li tabindex="0"
    data-description="Start a new game"
    data-next-subscreen="game-mode">
    <i class="fa fa-space-shuttle"></i>New Game
</li>
<li tabindex="0"
    data-description="Change the game's settings"
    data-next-subscreen="settings">
    <i class="fa fa-wrench"></i>Settings
</li>
...
We now focus on navigation with both mouse and keyboard. To do so we need another subscreen since we need to test switching between them as well. Let's add the new game menu:
 <section id="home-subscreen" class="subscreen">
    ...
</section>
<section id="game-mode-subscreen" class="subscreen">
    <h1>New Game</h1>
    <hr>
    <ul class="menu">
        <li tabindex="0"
            data-description="Embark a single-player campaign or continue your previous journey."
            data-next-subscreen="pre-play">
            Campaign
        </li>
        <li tabindex="0"
            id="online-game-button"
            data-description="Venture in the deep space with your comrades.">
            Online
        </li>
        <li tabindex="0"
            data-description="Go to the previous screen"
            class="back-to-previous-menu-button">
            Back
        </li>
    </ul>
    <hr>
    <p class="description-display"></p>
</section>
To navigate between subcreens we only need to call the pushSubsreen / popSubscreen methods we introduced earlier. We'll late need what happens when a subcreen is popped so let's a write a wrapper (although an useless one for now) around popSubscreen:
var confirmPopSubscreen() {
     // For now, do nothing but pop the next subscreen
     popSubscreen();
};
Let's simpify attaching an event handler to a collection of DOM elements by adding a helper method. We'll write it a new JS file - javascript/utilities.js:
var attachEventHandlerToAll = function (selector, event, handler) {
    var matchedElements = document.querySelectorAll(selector);
    for (var i = 0; i < matchedElements.length; i++) {
        var element = matchedElements.item(i);
        element.addEventListener(event, handler);
    }
};
Back in javascript/main_menu.js we'll add a new function that attaches all the event handlers we'll ever need:
var attachMainMenuHandlers = function () {
};
var initializeMainMenu = function () {
    attachMainMenuHandlers();
    // Push the home subcreen
    pushSubscreen("home");
};
When a list item with a data-next-subscreen is clicked, we need to push a new subscreen:
var attachMainMenuHandlers = function () {
    // Discover all buttons that have the data-next-subscreen attribute
    var buttonsSelector = ".subscreen .menu [data-next-subscreen]";
    attachEventHandlerToAll(buttonsSelector, "click", function (args) {
        pushSubscreen(args.target.dataset.nextSubscreen);
    });
};
We currently have only one Back button (in the new game subscreen) but we'll soon one such button for every other subscreen. When any of these is clicked, we need to confirmPopSubscreen:
var attachMainMenuHandlers = function () {
    ...
    var backButtonsSelector = ".back-to-previous-menu-button";
    attachEventHandlerToAll(backButtonsSelector, "click", confirmPopSubscreen);
}
If you are to now test our UI, you'll find you are able to go to the new game menu and back to the home subscreen.
Keyboard navigation is somewhat harder to achieve than mouse navigation because there's no support for it out of box, that's simply how HTML works (although there are some elements that support keyboard navigation out of the box such as checkboxes and sliders as we'll see later). Most notably, keyboard-related events will not be fired on an element unless it has focus...but not every element is focusable by default! This is why we added the tabindex attribute to the <li> tags above - having a non negative value of tabindex make an element focusable.
We'll workaround the problem by taking complete control over the focused element of the page with the following algorithm:
Each of these steps corresponds to several JS lines we'll add to the javascript/main_menu.js.
var attachMainMenuHandlers = function () {
    ...
    // Focus all buttons in the current subscreen on hover
    var focusOnHoverHandler = function (args) {
        // args.target contains the DOM element that was moused over
        var target = args.target;
        var activeMenu = activeSubcreens[activeSubcreens.length - 1].querySelector(".menu");
        // Make sure the target is inside the topmost subscreen
        if (target.parentElement === activeMenu) {
            target.focus();
        }
    }
    var allButtonsSelector = ".subscreen .menu li";
    attachEventHandlerToAll(allButtonsSelector, "mouseover", focusOnHoverHandler);
}
We first create a function that focuses the next menu item - it finds the currently focused item in the menu and focuses the next / previous. If no currently focused item exists, focus the zeroth item in the menu.
var focusMenuItem = function (direction) {
    // The direction can be any integer number, but most often +1 or -1
    var topSubscreen = activeSubcreens[activeSubcreens.length - 1];
    var menu = topSubscreen.querySelector(".menu");
    // document.activeElement stores the currently focused element
    var currentlyFocused = document.activeElement;

    // Find the index of the focused element in its parentElement
    // The element may not be parented by the current subsection, in that case
    // focus the first item in the menu
    var menuItems = menu.children;
    var itemIndex = -1;
    for (var i = 0; i < menuItems.length; i++) {
        if (menuItems.item(i) === currentlyFocused) {
            itemIndex = i;
            break;
        }
    }
    itemIndex = (itemIndex + direction + menuItems.length) % menuItems.length;
    menuItems.item(itemIndex).focus();
};
We next need to attach an event handler on the keydown event and check for the value of the keyCode property that engine will provide to our handler. Key codes are numbers and because if (args.keyCode === 37) is unreadable, we'll add a helper object in our javascript/utilities.js script:
var keyCodes = {
    enter: 13,
    escape: 27,
    space: 32,
    left: 37,
    up: 38,
    right: 39,
    down: 40
};
If you need the code for other keys, a good list can be found in css-tricks.com.
Time to handle those arrows:
var attachMainMenuHandlers = function () {
    ...
    // To handle keyboard navigation, we need to listen for keydown
    // on the document, because our subscreens will never get focus
    // (we're forcing focus on our <li>, remember?)
    document.addEventListener("keydown", function (args) {
        if (args.keyCode === keyCodes.down) {
            focusMenuItem(1);
        }
        else if (args.keyCode === keyCodes.up) {
            focusMenuItem(-1);
        }
    });
}
This one is easy:
var attachMainMenuHandlers = function () {
    ...
    attachEventHandlerToAll(buttonsSelector, "keydown", function (args) {
        if (args.keyCode === keyCodes.enter) {
            pushSubscreen(args.target.dataset.nextSubscreen);
        }
    });
    ...
}
Just as easy:
var attachMainMenuHandlers = function () {
    ...
    attachEventHandlerToAll(backButtonsSelector, "keydown", function (args) {
        if (args.keyCode === keyCodes.enter) {
            confirmPopSubscreen();
        }
    });
    ...
}
Add another else if to the handler we attached on the document's keydown:
// To handle keyboard navigation, we need to listen for keydown
// on the document, because our subscreens will never get focus
// (we're forcing focus on our <li>, remember?)
document.addEventListener("keydown", function (args) {
    if (args.keyCode === keyCodes.down) {
        focusMenuItem(1);
    }
    else if (args.keyCode === keyCodes.up) {
        focusMenuItem(-1);
    }
    else if (args.keyCode === keyCodes.escape) {
        if (activeSubcreens.length > 1) {
            popSubscreen();
        }
    }
});
I admit that the last few paragraphs are a tiny bit more complex but the logic is straightforward and easy to follow.
Go ahead and refresh the page - you'll be able to use the arrows keys, Enter and Escape to move around.
Having completed the navigation we can go back to the more interesting part - building beautiful controls. We first need a discrete value selector. HTML comes with one such ready-to-use control - the <select> tag. It is widely known as a drop-down or pulldown menu in other GUI systems. It does not fit our theme and it also has other disadvantages (hard to use with anything but mouse). This is why, we'll create a custom discrete value selector but we'll make it horizontal instead of vertical.
We'll build the selector out of the following HTML:
<div class="horizontal-select"
<!- - data-active-index will store the index of the currently active option - ->
data-active-index="0">
<span class="previous"><</span>
<span class="options">
<span>Option 1</span>
<span>Option 2</span>
<span>Option 3</span>
</span>
<span class="next">></span>
</div>
Without any styling, this will look like this:

.horizontal-select {
    display: inline-block;
}
.horizontal-select .options > span {
    /* Hide all options by default */
    display: none;
}
.horizontal-select .options > .active {
    /* The width's value once found trough trial and error */
    width: 8.5em;
    /* Display the active option */
    display: inline-block;
    text-align: center;
}
.horizontal-select .previous, .horizontal-select .next {
    display: inline;
    font-size: 2em;
}
As a final touch, let's bring the previous and next buttons to live by attaching some JavaScript to they click and keydown events in a new javascript/horizontal_selects.js:
"use strict";
// This file handles the logic behind our custom horizonal selects
var initializeHorizontalSelects = function () {
    var changeActiveItem = function (select, direction) {
        // direction can be any integer, but is only +1 and -1 in this sample
        var options = select.querySelector(".options");
        var activeElementIndex = parseInt(select.dataset.activeIndex);
        var activeElement = options.children.item(activeElementIndex);
        var listItemCount = options.children.length;
        var nextElementIndex = (activeElementIndex + direction + listItemCount) % listItemCount;
        var nextElement = options.children.item(nextElementIndex);
        activeElement.classList.remove("active");
        nextElement.classList.add("active");
        select.dataset.activeIndex = nextElementIndex;
    };
    attachEventHandlerToAll(".horizontal-select .previous", "click", function (args) {
        changeActiveItem(args.target.parentElement, -1)
    });
    attachEventHandlerToAll(".horizontal-select .next", "click", function (args) {
        changeActiveItem(args.target.parentElement, 1)
    });
    // Since our horizontal selects will never get focus,
    // we need to attach the keydown event handler to their parents
    // (and as we'll only use horizontal lists inside focusable <li> this will work)
    var parents = getParents(".horizontal-select");
    attachEventHandlerToAllInList(parents, "keydown", function (args) {
        if (args.keyCode === keyCodes.right) {
            changeActiveItem(args.target.querySelector(".horizontal-select"), -1)
        }
        else if (args.keyCode === keyCodes.left) {
            changeActiveItem(args.target.querySelector(".horizontal-select"), 1)
        }
    });

    // Go through all selects and add the active class to whatever their data-active-index is set to
    var horizontalSelects = document.querySelectorAll(".horizontal-select");
    for (var i = 0; i < horizontalSelects.length; i++) {
        var select = horizontalSelects.item(i);
        var activeIndex = parseInt(select.dataset.activeIndex);
        var activeElement = select.querySelector(".options").children.item(activeIndex);
        activeElement.classList.add("active");
    }
};
The code above uses a function that have yet to introduce - getParents. It is defined in javascript/utilities.js as:
var getParents = function (selector) {
    var elements = document.querySelectorAll(selector);
    var parents = [];
    for (var i = 0; i < elements.length; i++) {
        parents.push(elements.item(i).parentElement);
    }
    return parents;
};
All it does is to get all the parents of all elements matched by the selector. This allows us to attach a handler to the parents of our horizontal selectors - since the horizontal selectors will never receive focus because we are manually managing focus they won't receive the keydown event so we add our handlers to their parents which will receive it.
Checkboxes in HTML have one single disadvantage - they cannot be styled. Creating custom checkboxes involves a wrapping them in a container and styling the container, while making the actual checkbox invisible:
<label class="custom-checkbox">
    <!- - We'll use this checkbox for the fullscreen option in a second,
          that's the reason behind its name
    - ->
    <input id="fullscreen-checkbox" type="checkbox"/>
    <label for="fullscreen-checkbox"/>
</label>
And some style declarations to css/main_menu.css:
.custom-checkbox {
    height: 100%;
}
.custom-checkbox > input[type=checkbox] {
    /* Remove the checkbox */
    display: none;
}
.custom-checkbox > label {
    /* Style our custom checkbox replacement */
    height: 0.8em;
    width: 1em;
    border: 0.2em double white;
    display: inline-block;
    margin-top: 0.2em;
    transition: border-color 0.2s ease-in, color 0.2s ease-in;
}
.custom-checkbox > label:hover {
    border-color: rgb(72, 77, 77);
    color: rgb(72, 77, 77);
}
.custom-checkbox > input[type=checkbox]:checked + label:after {
    /* Use the checkmark icon from font awesome */
    font-family: FontAwesome;
    content: "\f00c";
    position: relative;
    top: -0.6em;
}
and we're done. Thanks to the for attribute of the label, clicks on it will toggle the checkbox. Although we don't need any JS to get the checkbox working, we need to add keyboard navigation manually. Just like with horizontal selects, we need to add the handler to the parent of our checkbox:
var attachMainMenuHandlers = function () {
    ...
    var checkboxParents = getParents(".custom-checkbox");
    attachEventHandlerToAllInList(checkboxParents, "keydown", function (args) {
        var checkbox = args.target.querySelector("input[type=checkbox]"); // Find the checkbox in its parent
        if (args.keyCode === keyCodes.space) {
            checkbox.checked = !checkbox.checked;
        }
    });
    ...
};
The slider control in HTML can be created with a <input type="range"> tag. We need some additional declarations in css/main_menu.css to make it match our theme:
input[type=range] {
    /* Disable default styling */
    -webkit-appearance: none;
    width: 40%;
    margin: 20.3px 0;
    margin-right: 10%;
    overflow: hidden;
}

input[type=range]:focus {
    outline: none;
}

/* This pseudo-class allows for styling the slider's track */
input[type=range]::-webkit-slider-runnable-track {
    width: 100%;
    height: 10px;
    background: rgb(72, 77, 77);
    border-radius: 0px;
}

/* This pseudo-class allows for styling the slider's thumb (duuh) */
input[type=range]::-webkit-slider-thumb {
    -webkit-appearance: none;
    background: rgb(141,195,197);
    height: 50px;
    width: 40px;
    margin-top: -20.5px;
}

input[type=range]:focus::-webkit-slider-runnable-track {
    background: rgb(84, 90, 90);
}
And just as in the case for the horizontal selects and the checkboxes, we need to attach a handler to the parents of sliders:
var attachMainMenuHandlers = function () {
    ...
    var rangeParents = getParents("input[type=range]");
    attachEventHandlerToAllInList(rangeParents, "keydown", function (args) {
        // Find the range in its parent
        var range = args.target.querySelector("input[type=range]");
        var value = parseFloat(range.value);
        if (args.keyCode === keyCodes.right && value < parseFloat(range.max)) {
            range.stepUp();
        }
        else if (args.keyCode === keyCodes.left && value > parseFloat(range.min)) {
            range.stepDown();
        }
    });
    ...
}
With all the controls ready to be used, it's time to go back to our subscreens and add few more.
I won't list the source code for all the subscreens as it is available in the sample, but for example, the video settings will look like this:
<section id="video-settings-subscreen" class="subscreen">
<h1>Video Settings</h1>
<hr>
<ul class="menu">
<li tabindex="0"
data-description="Change the resolution" >
<label>Resolution</label>
<div id="resolution-select" class="horizontal-select" data-active-index="0">
<span class="previous"><</span>
<span class="options">
<span>1280x1024</span>
<span>1366x768</span>
<span>1600x1200</span>
<span>1920x1080</span>
</span>
<span class="next">></span>
</div>
</li>
<!- - The texture and shadow quality settings go here but are omitted for clarity - ->
<li tabindex="0"
data-description="Whether the game is in fullscreen or windowed mode." >
<label>Go Fullscreen?</label>
<label class="custom-checkbox">
<input id="fullscreen-checkbox" type="checkbox"/>
<label for="fullscreen-checkbox"/>
</label>
</li>
<li tabindex="0"
data-description="Go to the previous screen"
class="back-to-previous-menu-button">
Back
</li>
</ul>
<hr>
<p class="description-display"></p>
</section>
Since we started working on the main menu there was this <p class="description-display"></p> that we dragged along in each subscreen but we never used. Its purpose is to display the contents of the data-description attribute every menu item has. Earlier we made sure to focus the menu items whether they are hovered or navigated to via the keyboard. We now need to attach an event handler to the focus event and update the contents of the description display:
var attachMainMenuHandlers = function () {
    ...
    var allButtonsSelector = ".subscreen .menu li";
    attachEventHandlerToAll(allButtonsSelector, "focus", function (args) {
        var topSubcreen = activeSubcreens[activeSubcreens.length - 1];
        var target = args.target;
        // Make sure the focused element is inside the topmost subscreen
        if (target.parentElement.parentElement === topSubcreen) {
            var descriptionDisplay = topSubcreen.querySelector(".description-display");
            descriptionDisplay.textContent = target.dataset.description;
        }
    });
    ...
}
The HTML standard defines several functions for creating modal windows - window.alert, window.confirm and window.promt but they are not customizable. Instead we'll use the awesome vex.js library that provides customizable modals with a simple API.
To add vex.js to our page we need to also download jQuery as vex depends on it:
<head>
<!- - Note:
    Generally we advice against using jQuery because the library is too general,
    it often overcomplicates simple actions and its performance can be subpar.

    Unfortunately, the vex.js depends on jQuery which
    is the sole reason we are including it.
- ->
<script src="3rdparty/jQuery/jquery-2.1.4.min.js"></script>
<script src="3rdparty/vex/vex.combined.min.js"></script>
<script>vex.defaultOptions.className = "vex-theme-wireframe";</script>
<link rel="stylesheet" href="3rdparty/vex/vex.css" />
<link rel="stylesheet" href="3rdparty/vex/vex-theme-wireframe.css" />
Vex has support for themes and those are downloaded separately. None of the ready-to-use theme matched our theme, so we downloaded vex-theme-wireframe and made some changes - most notably changed the colors to fit the scifi colour scheme. The changes are trivial and I won't list them here but you can find them in the sample.
Let's move onto integrating vex. First of all, vex inserts some HTML elements in the DOM synchronously. This may be a problem because it breaks keyboard navigation - if we show a vex dialog after the user has pressed Enter, vex will insert the HTML elements in the DOM and they'll get the keydown event as well which will immediately close the modal. We make a small change to the functions vex exposes to combat this issue:
// vex.dialog methods insert their dom content synchronously and this causes problems
// with keyboard navigation (if vex modal is shown in a keydown handler, the form gets the keydown event)
// so wrap them in handlers that add the content asynchrously
var getAsyncWrapper = function (func) {
    return function (options) {
        setTimeout(function () { func(options); }, 0);
    };
}

var vexModals = ["confirm", "alert", "prompt"];
for (var i = 0; i < vexModals.length; i++) {
    vex.dialog[vexModals[i]] = getAsyncWrapper(vex.dialog[vexModals[i]]);
}
Now vex will insert its HTML asynchronously and won't receive the keydown events.
The first vex dialog we'll show will be when the user pops the video settings subscreen. We'll ask whether he wants to appply the changes for sure:
var confirmPopSubscreen = function (eventArgs) {
    var topSubscreen = activeSubcreens[activeSubcreens.length - 1];

    if (topSubscreen.id === "video-settings-subscreen") {
        vex.dialog.confirm({
            message: "Save and apply settings?",
            callback: function (answer) {
                if (answer) {
                    popSubscreen();
                }
            }
        });
    }
    else {
        // No confirmation needed
        popSubscreen();
    }
};
Secondly, we'll alert the player that his network connection doesn't work if he tries to play Online:
var attachMainMenuHandlers = function () {
    ...
    var onlineGameButton = document.getElementById("online-game-button");
    var reportNetworkProblems = function () {
        vex.dialog.alert({
            message: "No Internet connection!"
        });
    };
    onlineGameButton.addEventListener("click", reportNetworkProblems);
    onlineGameButton.addEventListener("keydown", function (args) {
       if (args.keyCode === keyCodes.enter)  {
           reportNetworkProblems();
       }
    });
    ...
}
Finally, we'll ask the player about his name when he starts the campaign mode:
var attachMainMenuHandlers = function () {
    ...
    // Start the game when the start game button is clicked
    var startGameButton = document.getElementById("start-game-button");
    var confirmStartGame = function () {
        vex.dialog.prompt({
            message: "Before launching in the stars, captain, the crew wants to know your name...",
            placeholder: "Enter your name",
        });
    };
    startGameButton.addEventListener("click", confirmStartGame);
    startGameButton.addEventListener("keydown", function (args) {
       if (args.keyCode === keyCodes.enter)  {
           confirmStartGame();
       }
    });
    ...
}
This concludes the main menu section of the tutorial.
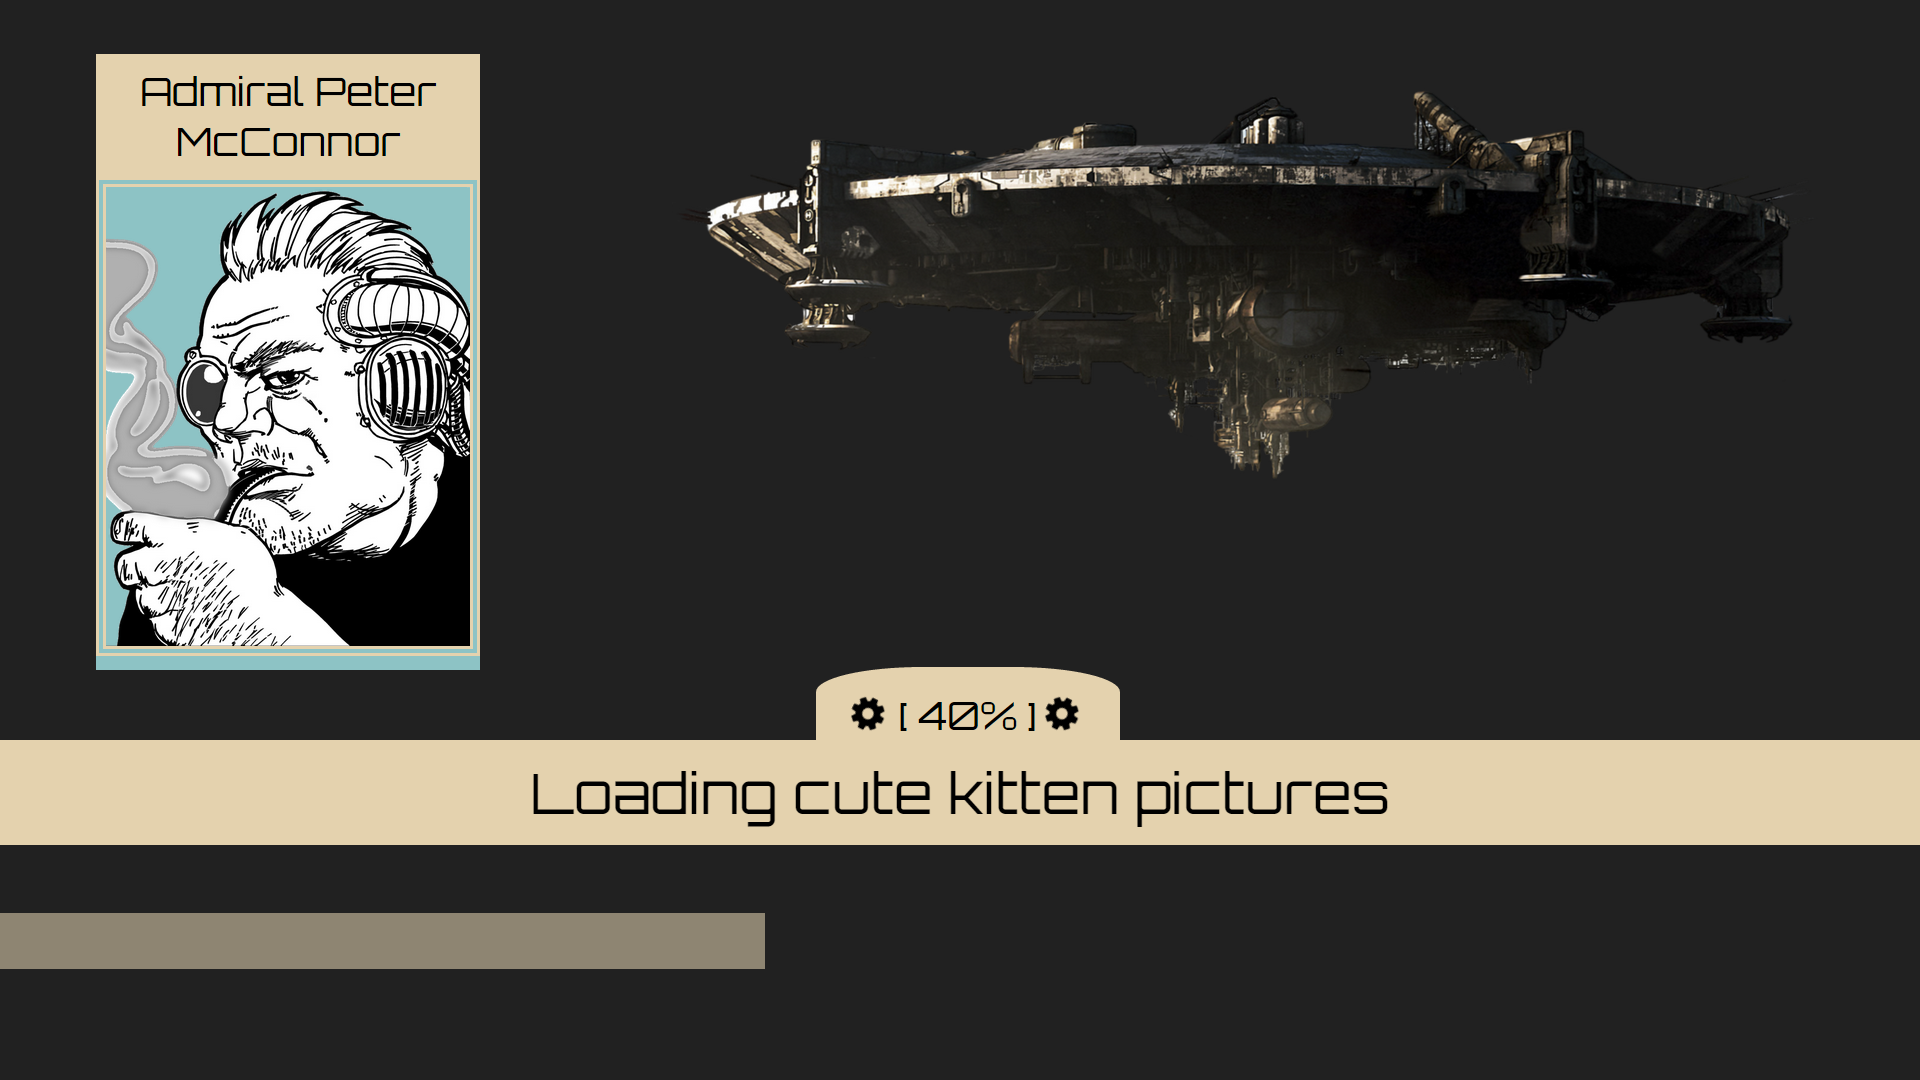
The loading screen will consist of 4 parts:
The following HTML implements the structure:
<content id="loading-screen" class="screen">
    <div class="player-info-container">
        <span id="player-name-display" class="retro-text"></span>
        </br>
        <img id="player-icon"
             src="images/captain_portrait.png">
         </img>
    </div>
    <div class="game-content">
        <img src="images/spaceship.png"></img>
    </div>
    <div class="loading-bar-container">
        <div class="progress-value-display-container retro-text">
            <i class="fa fa-cog fa-spin"></i>
            [<span class="progress-value-display"></span>]
            <i class="fa fa-cog fa-spin"></i>
        </div>
        <p class="progress-information-display retro-text"></p>
        <meter max="1" min="0" value="0" class="loading-bar"></meter>
    </div>
</content>
The <meter tag is the HTML element for loading bars.
Time for styling (as always, in a new file - css/loading_screen.css, which needs to be included in index.html). The CSS places the player's name and icon at top-left part of the screen, the game image in the top-right and loading bar and display at bottom of the page. I won't show you all declarations since we saw similar examples at other places. The only interesting part is the styling for the <meter> element:
meter {
    width: 100%;
    -webkit-appearance: none;
}
meter::-webkit-meter-bar {
    /* Make the unfilled part transparent */
    background: transparent;
    border: none;
}
meter::-webkit-meter-optimum-value {
    background: #d8c9aa;
}
Finally, we need to add code that updates all the values in the loading screen:
var runLoadingScreenAnimation = function (loadingScreen) {
    var loadingBar = loadingScreen.querySelector(".loading-bar");
    var informationDisplay = loadingScreen.querySelector(".progress-information-display");
    var progressDisplay = loadingScreen.querySelector(".progress-value-display");
    var cogIcons = loadingScreen.querySelectorAll(".fa");

    // This method updates the loading bar and display
    // Currently no one is calling it, but we'll change that in the next part of the tutorial
    var updateLoadingScreen = function (progress, action) {
        // Progress with a bounded random value
        loadingBar.value = progress;
        // Update the opacity
        var opacity = progress + 0.2; // Make sure the loading bar is not entirely invisible
        loadingBar.style.opacity = opacity;
        // Tell the player what's going on
        informationDisplay.textContent = action;
        progressDisplay.textContent = (progress * 100).toFixed(0) + "%";
        if (progress >= 1) {
            // Stop the animation on the cogs
            for (var i = 0; i < cogIcons.length; i++) {
                cogIcons.item(i).classList.remove("fa-spin");
            }
            informationDisplay.textContent = "Press any key...";
            document.addEventListener("keydown", function () {
                loadingScreen.classList.add("hidden");
            });
        }
    };
};

var showLoadingScreen = function (selector, playerName) {
    var playerNameDisplay = document.getElementById("player-name-display");
    playerNameDisplay.textContent = playerName;
    var loadingScreen = document.querySelector(selector);
    runLoadingScreenAnimation(loadingScreen);
};
The end result looks like this:
The last step is to integrate the menu in UE4.
Here's the plan:
Notifications coming from the game are implemented via the engine.trigger method, the opposite direction is handled by attaching handlers using engine.on.
Go through the list and implement each of the above:
Edit playNextSection in splash_screen.js:
var playNextSection = function () {
    // Are we done?
    if (nextSectionIndex >= sections.length) {
        engine.trigger("EnteringMainMenu");
        // Completely hide the splash screen
        splashScreen.classList.add("hidden");
        return;
    }
    ...
Edit confirmPopSubscreen in main_menu.js:
var shouldSaveVideoSettings = function (answer) {
    if (answer) {
        var resolution = getHorizontalSelectValue(document.getElementById("resolution-select"));
        var textureQuality = parseInt(document.getElementById("texture-quality-select").dataset.activeIndex);
        var shadowQuality = parseInt(document.getElementById("shadow-quality-select").dataset.activeIndex);
        var isFullscreen = document.getElementById("fullscreen-checkbox").checked;
        engine.trigger("SaveVideoSettings", resolution, textureQuality, shadowQuality, isFullscreen);
        popSubscreen();
    }
};
if (topSubscreen.id === "video-settings-subscreen") {
    vex.dialog.confirm({
        message: "Save and apply settings?",
        callback: shouldSaveVideoSettings
    });
}
Edit attachMainMenuHandler in main_menu.js:
var attachMainMenuHandler = function () {
    ...
    var masterVolumeControl = document.getElementById("master-volume-control");
    masterVolumeControl.addEventListener("change", function () {
        engine.trigger("SaveAudioSettings", parseFloat(masterVolumeControl.value));
    });
    ...
};
Edit confirmStartGame in main_menu.js:
vex.dialog.prompt({
    message: "Before launching in the stars, captain, the crew wants to know your name...",
    placeholder: "Enter your name",
    callback: function (name) {
        // name will be false if the user clicked the Cancel button
        if (name !== false) {
            // Get the selected difficulty the player has chosen
            var rank = getHorizontalSelectValue(document.getElementById("difficulty-selector"));
            engine.trigger("LoadGame", rank, name);
        }
    }
});
Edit attachMainMenuHandlers in main_menu.js:
var attachMainMenuHandler = function () {
    ...
    var exitGameButton = document.getElementById("exit-game-button");
    var exitGame = function () {
        engine.trigger("ExitGame");
    };
    exitGameButton.addEventListener("click", exitGame);
    exitGameButton.addEventListener("keydown", function (args) {
       if (args.keyCode === keyCodes.enter)  {
           exitGame();
       }
    });
    ...
}
Edit main in main.js:
var main = function () {
    ...
    engine.on("ShowSplashScreen", function () {
        playSpashScreen("#splash-screen");
    });
};
Edit main in main.js:
var main = function () {
    ...
    engine.on("ShowLoadingScreen", function (fullPlayerName) {
        document.getElementById("main-menu-screen").classList.add("hidden");
        showLoadingScreen("#loading-screen", fullPlayerName);
    });
};
Edit runLoadingScreenAnimation in loading_screen.js:
var runLoadingScreenAnimation = function (loadingScreen) {
    ...
    engine.on("LoadingProgress", updateLoadingScreen);
};
Setting up the hooks to the engine is great but someone has to call these methods. We now have to launch UE4 and implement the backend.
We won't go through every function call on the UE4 side because, after all, this is a tutorial in Coherent GT, not UE4. We'll only take a look at the glue connecting the game with the UI.
We start off with a fresh level in UE4 and to keep things simple we'll implement everything in the level's blueprint. If you've created the project with 'Starter Content' you'll find the Starter_Music_Cue asset under Content/Audio. Drag it in the level, rename the actor to MenuBackgroundTheme and make sure to deactivate it (Details -> Activation -> Uncheck AutoActivate).
To setup Coherent GT as a HUD, go to Settings -> World Settings -> GameMode Override and select GTGameHUDBP as the HUD class.
Next, open the level blueprint and let's setup the HUD:
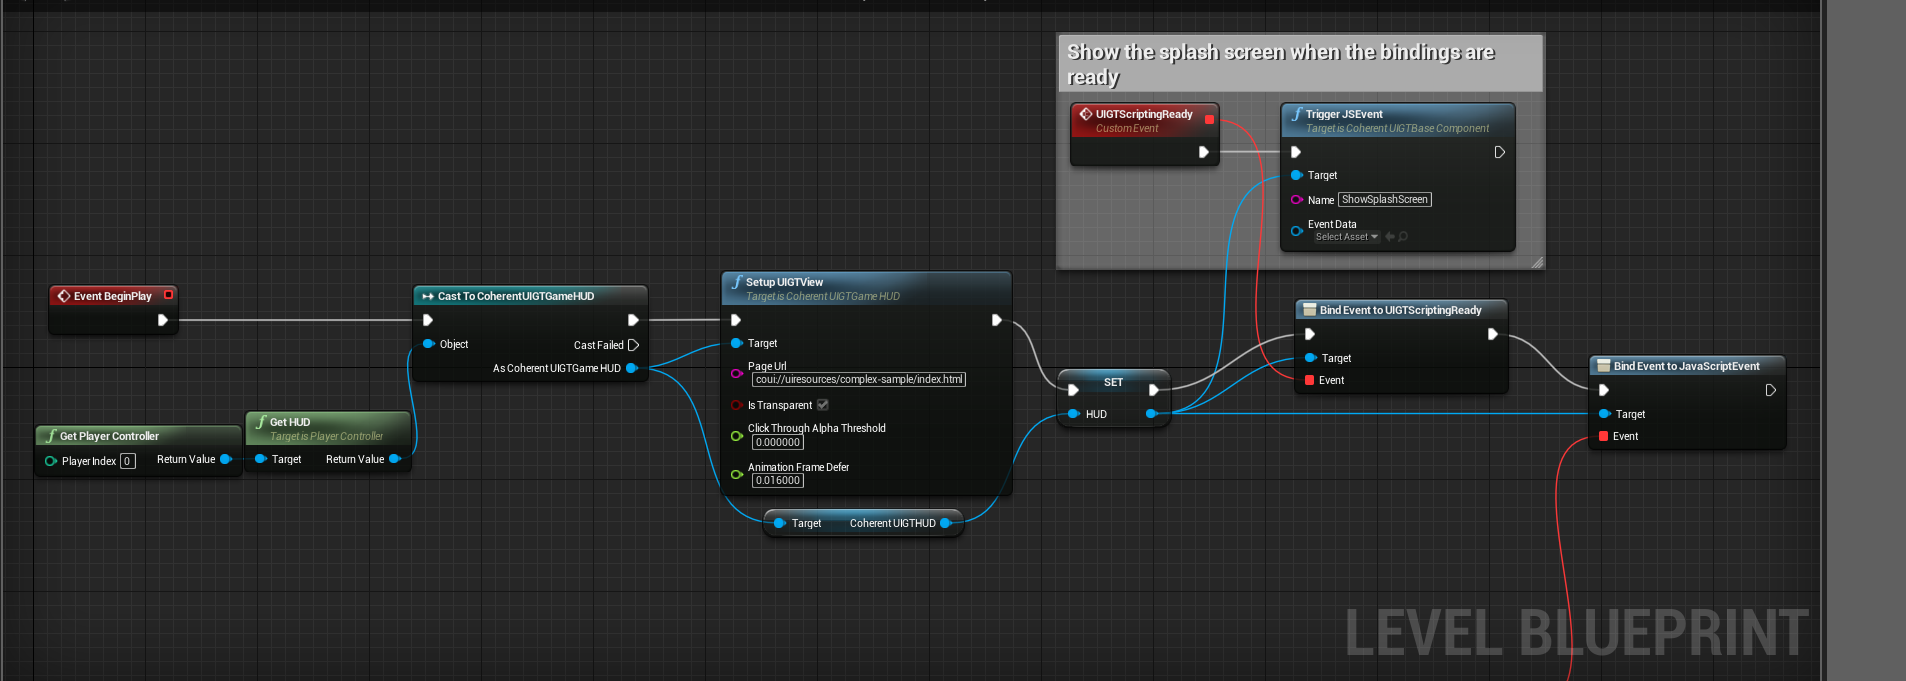
This will make the HUD load the page we just created and will also cause it to display the splash screen once the Coherent GT component is ready for scripting. It's important to only trigger events after the view has become ready for scripting. Otherwise some of the events might be lost.
Next, we need to setup ourselves for the incoming events from the JS.
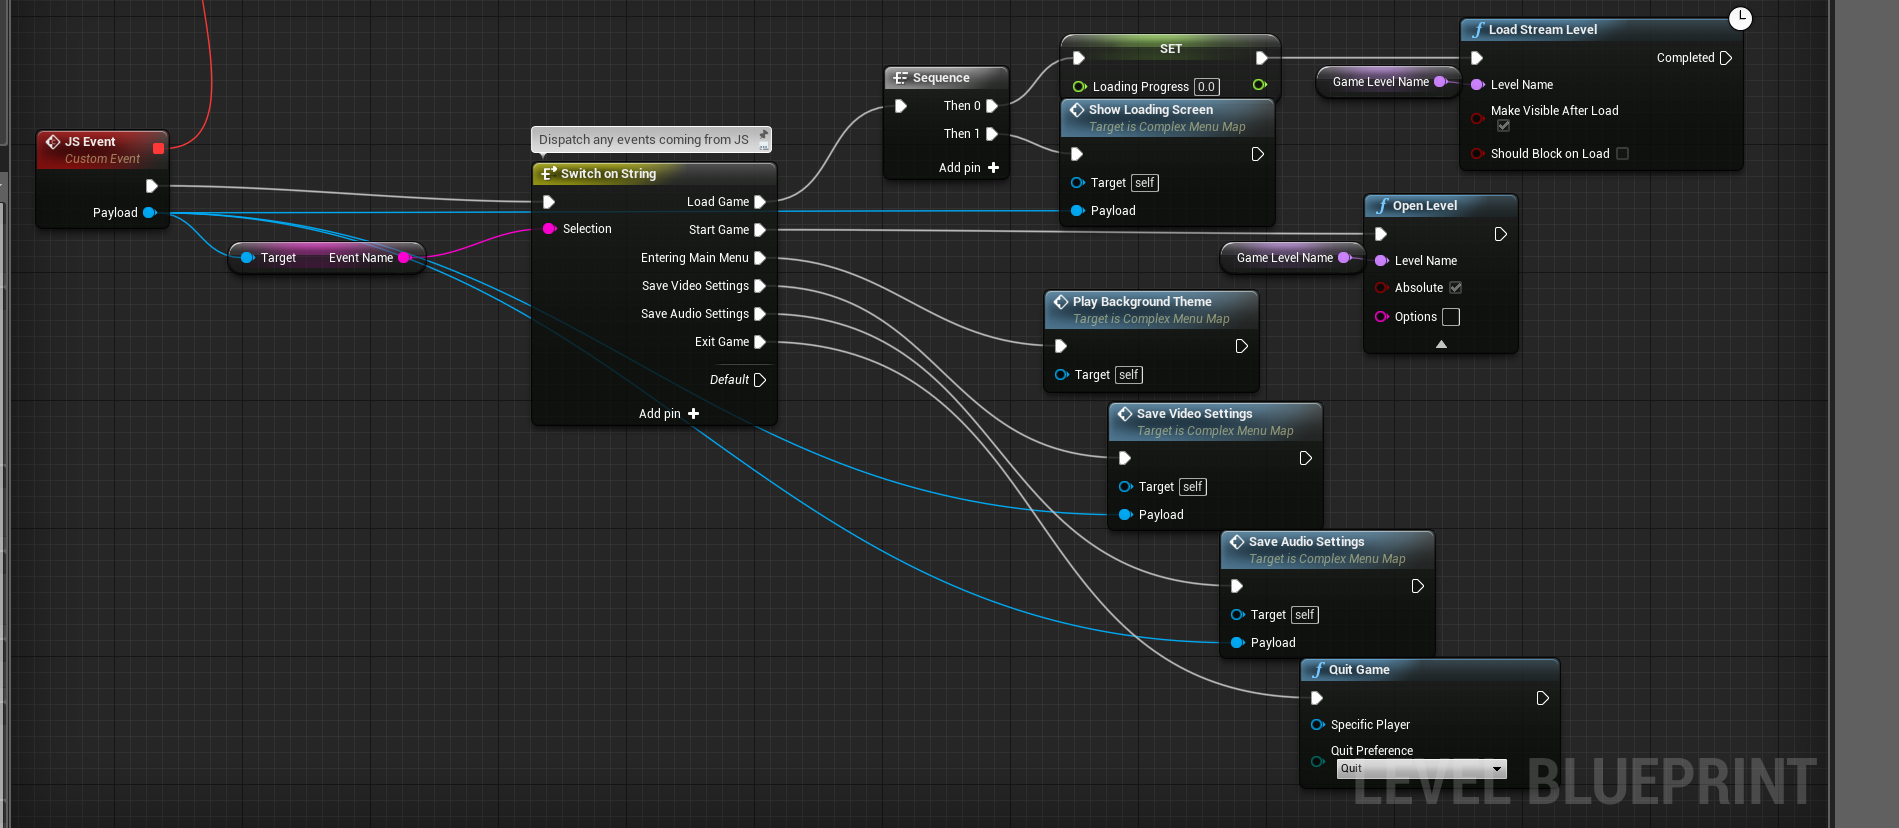
Whenever an event is triggered via engine.trigger the custom JSEvent event node will fire. We then check the name of the event and call the appropriate Blueprint function.
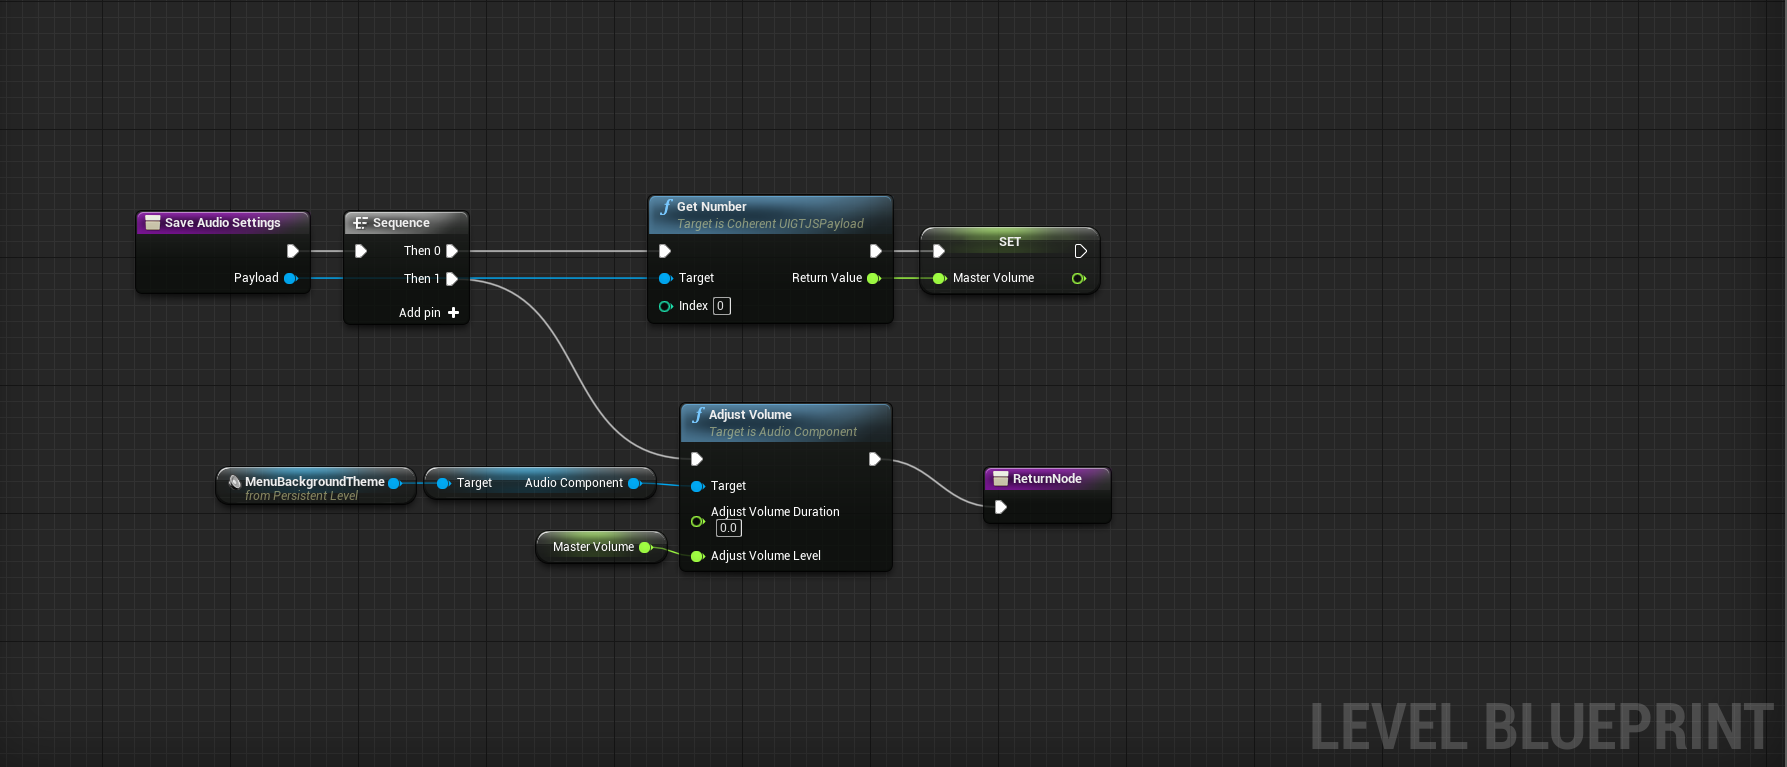
To handle value updates from JS, we need to read the arguments from the CoherentGTJSPayload node passed as an argument to JSEvent. One example of doing this can be found in the SaveAudioSettings function:
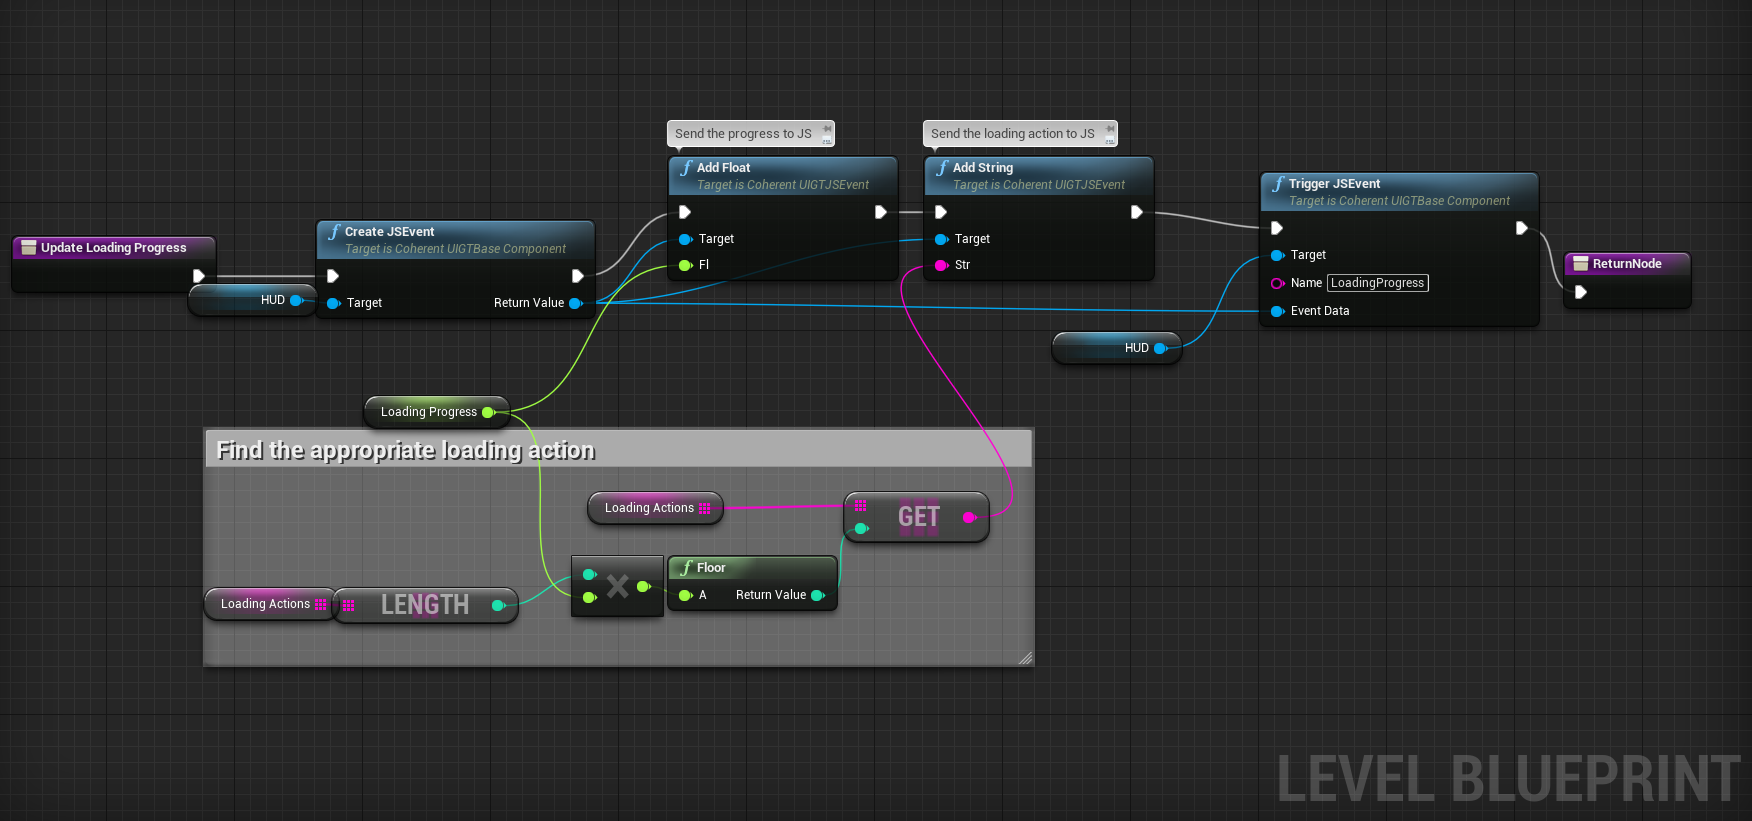
Sending data to JS can be seen in the function that updates the loading progress and action:
This is the end of the line, we've successfully completed the sample, cheers to you for reading over 1500 lines of text!
There are few things we did not cover:
| Resource | License | Chan |
|---|---|---|
| Orbitron font | SIL Open Font License | No |
| jQuery | MIT | No |
| vex.js | MIT | Yes |
| Font Awesome | MIT + SIL Open Font License | No |
| Spaceship art | - | Yes |
| Character portrait | Creative Commons Attribution 3.0 Unported License | No |