2.9.16.0
Coherent GT for UE4
This tutorial will show you how to design the communication between the game and the UI and how to write code that runs correctly under Coherent GT's asynchronous mode.
The sample will simulate the following:
We will also take a separate look at what the designers and the game programmers should do.
The tutorial here follows the creation of the AsyncSample_Map.umap found in the provided sample game. Note that some parts of the example map are skipped for brevity and simplicity (such as styling and animation) in favour of additional emphasis put on the HTMl structure and JS <–> UE4 communication
The page we are going to build contains the following:
When building the UI we will stay away from third party libraries (such as jQuery) as they are too heavy computation-wise and not made with performance in mind. Instead, we'll make use of the provided methods of the document node such as document.getElementById and document.querySelector. Consult the performance guide to see what libraries to avoid when building your UI.
Note that the GameStarted event is of great importance. A naive implementation might decide that the game has begun immediately after StartGame has been triggered but that will not be the case if the game is running under asynchronous mode. By allowing the game to explicitly notify the UI when it has begun one can safely run the game under both synchronous and asynchronous mode.
We'll begin by creating a sample page which we'll test in the browser using the mocking functionality.
We'll split the entire UI in two <section>:
<section id="pregame-menu">
    ...
</section>

<section id="ingame-hud">
    ...
</section>
The #pregame-menu section is easier so let's start with it. We need a clickable button and a heading with the game's name:
<section id="pregame-menu">
    <h1>The awesomest game ever</h1>
    <button id="start-game-button">Start new game</button>
</section>
Next up, our in-game HUD will consist of party group interface:
<section id="ingame-hud" class="hidden" >
    <div id="raiding-party">
        <div class="party-member-container">
            <img class="party-member-portrait" src="party_member_1.png"></img>
            <div>
                <div class="meter orange">
                    <span style="width: 75%"></span>
                </div>
                <div class="meter blue">
                    <span style="width: 75%"></span>
                </div>
            </div>
            <span>Party Member 1</span>
        </div>
    <!- - Code above repeated 3 more times -->
    </div>
    <!- - Store goes here in a second -->
    ...
</section>
Quick explanation of the code above - the #raiding-party will contain all of the raiding party interface. For each party member, we add an <img> for the portrait and two bars using a <div class="meter">. A <span> with variable width will fill the bars. We've added the "hidden" class (defined as .hidden {opacity: 0;}) to the section because it won't be visible until the start button has been clicked.
We also need a store:
<table class="store">
    <thead>
        <tr>
            <th colspan="99">Our store</th>
        </tr>
    </thead>
    <tbody>
        <tr>
            <td align="center">
                <img src="item_icon_1.png"></img>
                </br>
                <span>Item 1</span>
            </td>
            <!- - Some more table items -->
        <!- - Some more table rows -->
    </tbody>
</table>
And a popup element to display the extra info about each item:
<!- - This element is hidden by default and is used to show a popup with info about a specified item -->
<div id="item-data-popup">
    <span>Available items </span>
    <span id="popup-available-item-count">5</span>
    <br>
    <span>Price per unit </span>
    <span id="popup-price-per-unit">20</span>
</div>
Note that for brevity and simplicity, the sample uses hardcoded values for the items and the party members. In production, you might want to use some kind of template-based runtime HTML generation.
Time to make the page interactive! Add some scripts:
<!- - The core Coherent GT library -->
<script src="../coherent.js"></script>
<!- - Additional Coherent GT library providing mocking in the browser -->
<script src="../coherent.mock.js"></script>
<!- - The script containing our HUD's bussiness logic -->
<script src="hud.js"></script>
Now to make sure that clicking the start button actually does something, we'll edit hud.js:
// Make sure that any triggered event happens after the engine is ready
engine.on("Ready", function () {
    document.querySelector("#start-game-button").addEventListener("click", function () {
        engine.trigger("StartGame");
    });
}
We also need to respond to the GameStarted event that the engine will raise:
var beginGame = function () {
    // Remove the main menu
    document.querySelector("#pregame-menu").classList.add("hidden");
    // Show the in-game HUD
    document.querySelector("#ingame-hud").classList.remove("hidden");
};

engine.on("GameStarted", function () {
    beginGame();
});
After the game has begun, it will continuously send RaidPartyDataUpdate events containing the new values of health and mana for each member. We need to slightly modify the previous code:
// Two arrays containing the health and mana bars of the party members
var healthBars = null,
    manaBars = null;
engine.on("GameStarted", function () {
    beginGame();
    // Cache the health and mana bars for faster access
    healthBars = document.querySelectorAll("#raiding-party .meter.orange span");
    manaBars = document.querySelectorAll("#raiding-party .meter.blue span");
});

// RaidPartyDataUpdate will be triggered with the index of the party member
// and his updated health and mana points
engine.on("RaidPartyDataUpdate", function (index, hp, mp) {
    // Note that healthBars / manaBars are instances of NodeList, not plain arrays
    healthBars.item(index).style.width = (hp * 100) + "%";
    manaBars.item(index).style.width = (mp * 100) + "%";
});
Things are starting to get in shape. We only need to implement the store-related functions now:
var beginGame = function () {
    var onStoreItemClicked = function (index) {
        var popup = document.querySelector("#item-data-popup");
        // Magical code to place the popup above the store item
        ..
        popup.classList.remove("hidden");

        // Ask the game for data about the item at the given index
        var promise = engine.call("GetItemData", index);
        // When the game returns the data, update the popup
        promise.success(function (data) {
            // Update the data in the popup
            popup.querySelector("#popup-available-item-count").textContent = data.availableItems;
            popup.querySelector("#popup-price-per-unit").textContent = data.pricePerUnit;
        });
    };

    var attachStoreHandlers = function () {
        // Attach a handler to every item in the store
        var inventoryCells = document.querySelectorAll(".store td");
        for (var i = 0; i < inventoryCells.length; i++) {
            inventoryCells.item(i).addEventListener("click", onStoreItemClicked.bind(undefined, i));
        }
    };

    // Remove the main menu
    document.querySelector("#pregame-menu").classList.add("hidden");
    // Show the in-game HUD
    document.querySelector("#ingame-hud").classList.remove("hidden");
    attachStoreHandlers();
};
The engine.call("GetItemData", index) deserves some attention. Calling engine.call will return a promise object. Promises are a generic concept widely used in asynchronous programming. They represents the output of some computation which hasn't necessarily happened yet. They provide ways to get notified whenever their state changes.
At their most basic, promises guarantee that:
The Promise type implemented in coherent.js is sticks to the Promises/A standard but there are small differences.
Some of the operations allowed on our promises are:
promise.success(func) - registers func to be notified whenever the promise has been resolved. func will be called with a single argument - whatever the corresponding function on the game side returnedpromise.otherwise(func) - registers func to be notified whenever the corresponding function on the game side reported an errorpromise.then(successFunc, otherwiseFunc) - equivalent to promise.success(successFunc); promise.otherwiseFunc(otherwise)By attaching our success handler using:
promise.success(function (data) {
    // Update the data in the popup
    popup.querySelector("#popup-available-item-count").textContent = data.availableItems;
    popup.querySelector("#popup-price-per-unit").textContent = data.pricePerUnit;
});
we update the popup whenever an item is clicked.
Let's say that these pesky game programmers haven't completed their part of the deal, but you need to test the just created UI. You can then mock the communication with the engine using engine.mock and test the interface in Google Chrome:
// Helper function that clamps the given value to the range [min, max]
var clamp = function(min, max, value) {
  return Math.min(Math.max(value, min), max);
};

// engine.isAttached is true only if we are running inside Coherent GT
// so !engine.isAttached tests whether we are running in the browser
if (!engine.isAttached) {
    engine.mock("StartGame", function () {
        // Initialize our dummy game with the generic data
        var healthLevels = [];
        var manaLevels = [];
        for (var i = 0; i < PARTY_SIZE; i++) {
            healthLevels[i] = manaLevels[i] = 0.5;
        }
        setInterval(function () {
            // Randomly update the health and mana of our party members and trigger an update
            // event every 50 ms (50 ms was chosen arbitrarily)
            for (var i = 0; i < PARTY_SIZE; i++) {
                healthLevels[i] = clamp(0, 1, healthLevels[i] + Math.random() * 0.05 - 0.025);
                manaLevels[i] = clamp(0, 1, manaLevels[i] + Math.random() * 0.05 - 0.025);
                engine.trigger("RaidPartyDataUpdate", i, healthLevels[i], manaLevels[i]);
            }
        }, 25)
        // Signal the UI the game has been initialized
        engine.trigger("GameStarted");
    });
    engine.mock("GetItemData", function (index) {
        // Return some dummy values
        return {
            availableItems: index * index,
            pricePerUnit: index * 10
        };
    })
}
Go launch CoUIGTTestFPS/Content/uiresources/async_sample/hud.html in Chrome to see the code above in action. The expected result (after adding proper styling and images) is:
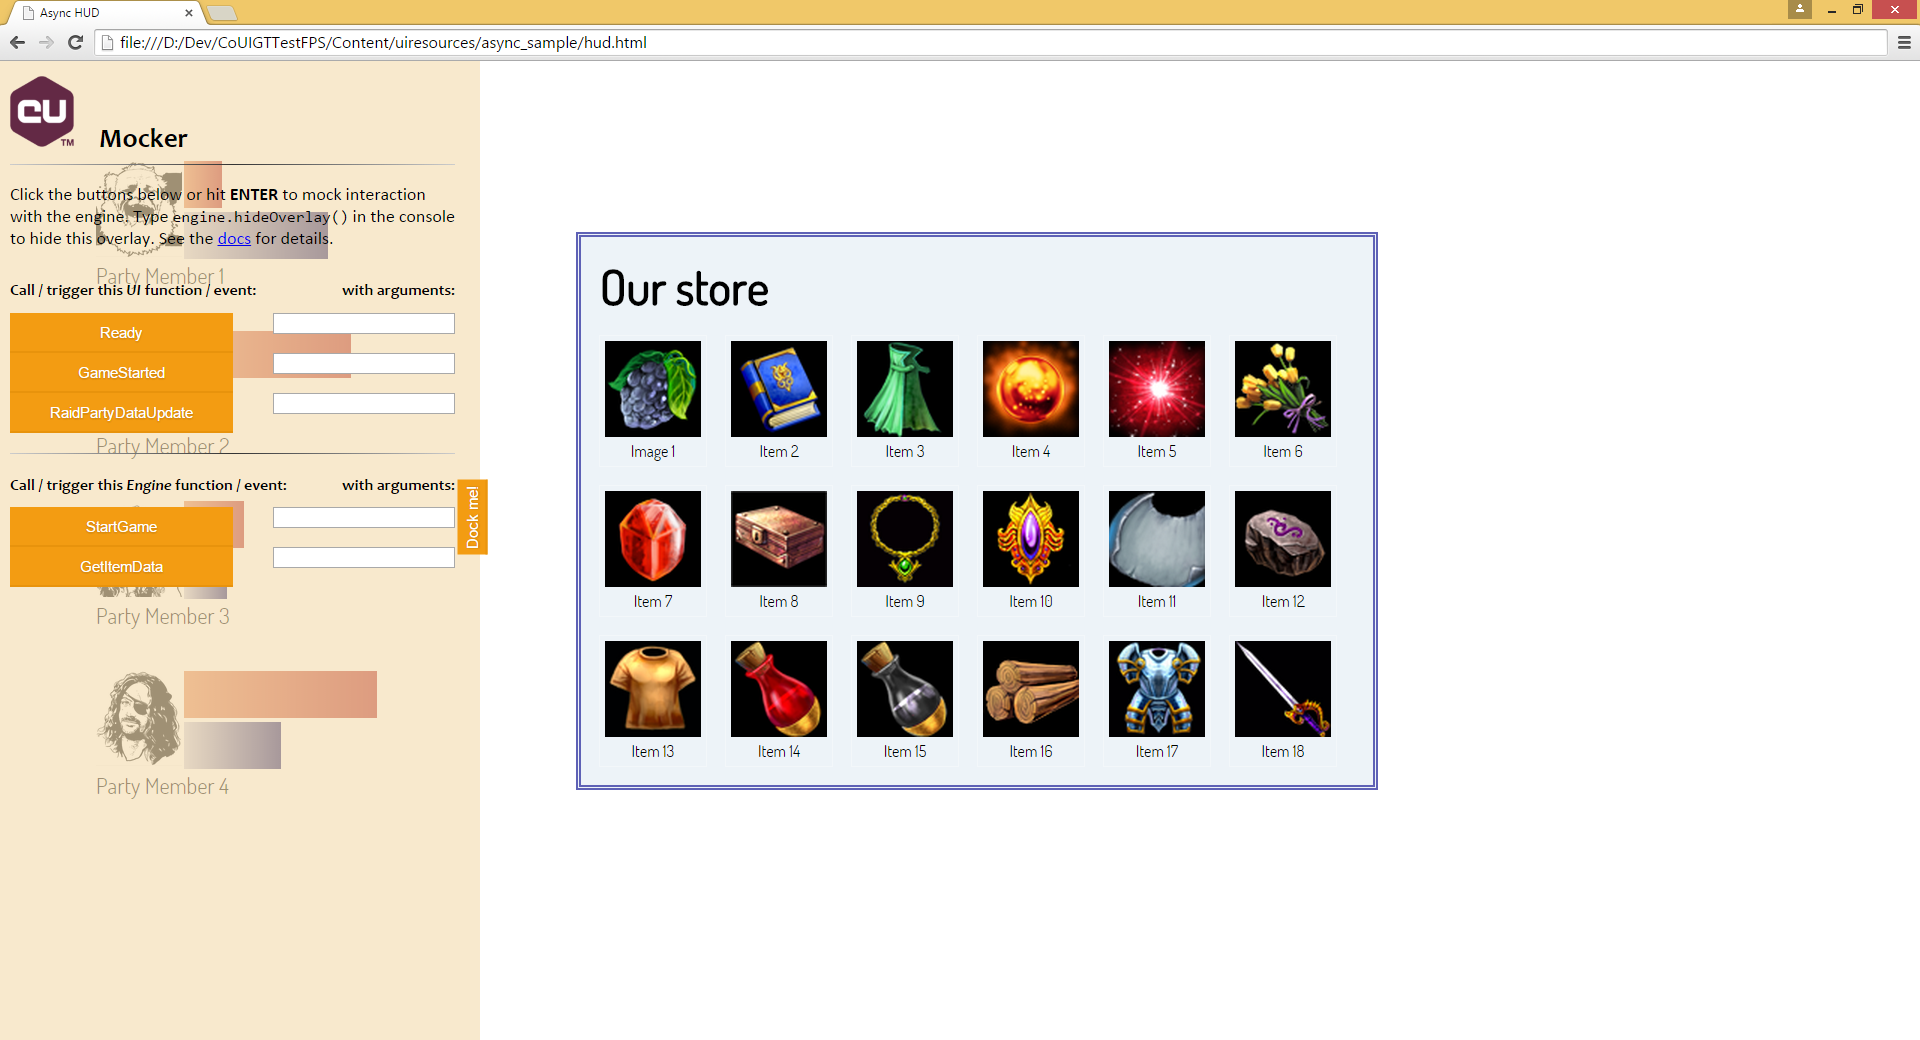
Go ahead and click on the start game button or on the store items and see them update.
Your job as a game developer is to provide the data to the UI. Let's see how do this effortlessly. In order to cover as much ground as possible, some of the code will be in Blueprints and some in C++.
To setup the HUD, we create a new HUD class inheriting from CoherentUIGTGameHUD:
#include "CoherentUIGTGameHUD.h"
#include "CoUIGTTestFPSAsyncSampleHUD.generated.h"

UCLASS()
class ACoUIGTTestFPSAsyncSampleHUD : public ACoherentUIGTGameHUD
{
    GENERATED_UCLASS_BODY()
private:
    // Used to bind GetItemData(int32) to engine.call("GetItemData")
    UFUNCTION()
    void BindUI();
    TMap<FString, int32> GetItemData(int32 ItemIndex);
};
Implementing this class is straightforward:
ACoUIGTTestFPSAsyncSampleHUD::ACoUIGTTestFPSAsyncSampleHUD(const FObjectInitializer& PCIP)
    : Super(PCIP)
{
    // When the underlying Coherent GT View is ready for bindings, bind our function
    CoherentUIGTHUD->ReadyForBindings.AddDynamic(this, &ACoUIGTTestFPSAsyncSampleHUD::BindUI);
}

void ACoUIGTTestFPSAsyncSampleHUD::BindUI()
{
    // Coherent::UIGT::View::BindCall magically hooks up our method to the JavaScript event
    CoherentUIGTHUD->GetView()->BindCall(
        "GetItemData",
        Coherent::UIGT::MakeHandler(this, &ACoUIGTTestFPSAsyncSampleHUD::GetItemData));
}

TMap<FString, int32> ACoUIGTTestFPSAsyncSampleHUD::GetItemData(int32 ItemIndex)
{
    // This example uses TMap to send a JSON-like object to the UI for simplicity
    // but you may also consider using a FIntPoint for better performance
    TMap<FString, int32> Data;
    // Provide some dummy values.
    // In the real world this function will consult a database.
    Data.Add("availableItems", ItemIndex * ItemIndex);
    Data.Add("pricePerUnit", ItemIndex * 10);
    return Data;
}
Now we need to start using this new class. Go to World Settings -> Gamemode Override and replace whatever the current HUD class with ACoUIGTTestFPSAsyncSampleHUD. Of course doing so requires that you also use a GameMode class that's implemented in Blueprint, otherwise you'll need to create one more C++ class for overriding the GameMode. See details here.
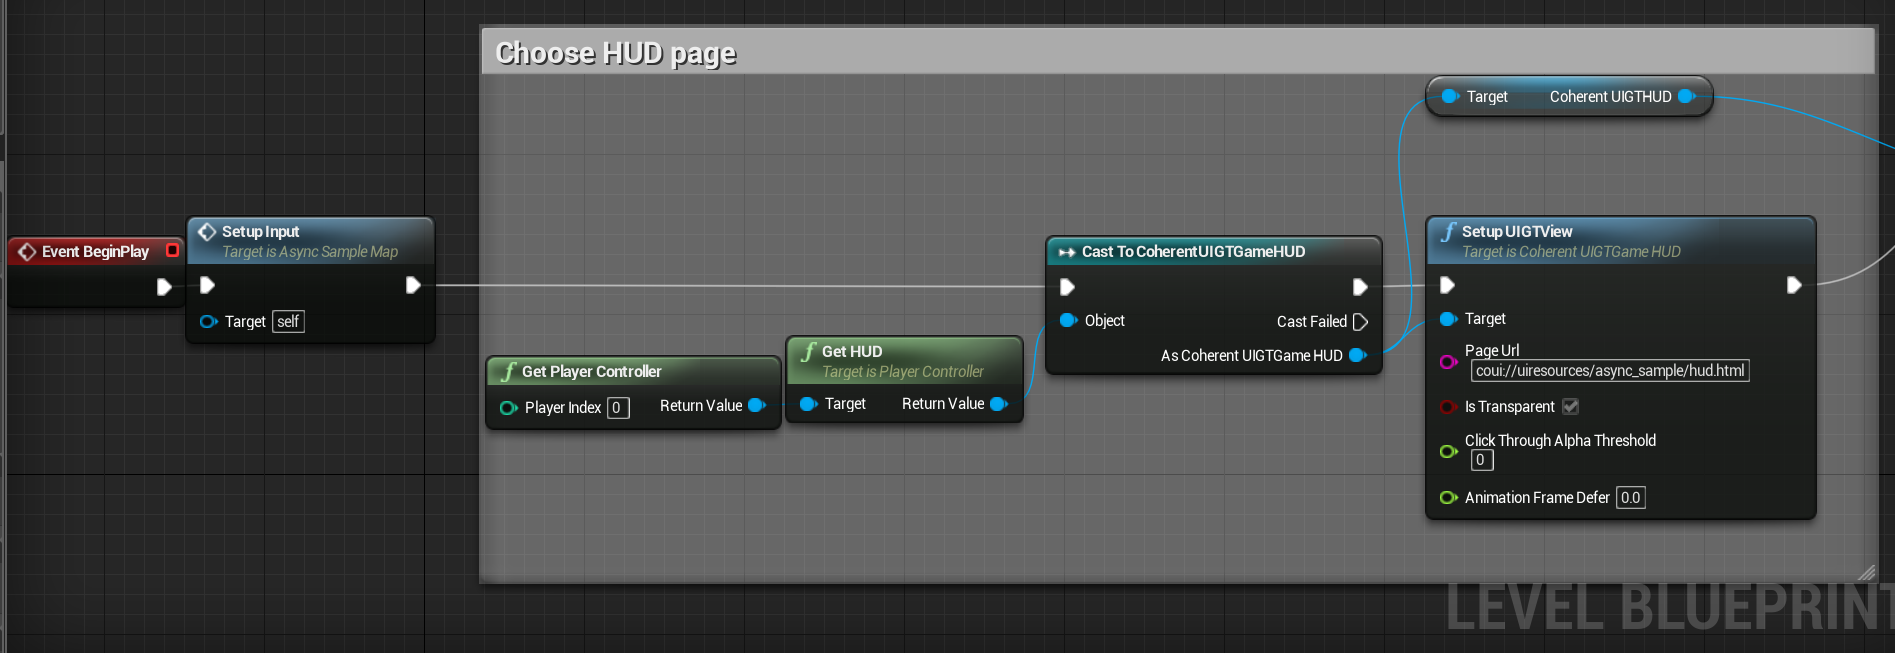
We'll implement the rest of HUD in Blueprint so open up the level blueprint (Blueprints -> Open Level Blueprint). The first step would be to set up the input forwarding to our HUD. Doing so is described in Input (Blueprints) so we won't spend much time here.
Secondly, we need to get the HUD instance and set the page which we'll be showing. In our case, that would be coui://uiresources/async_sample/hud.html.
We also create an object of type CoherentUIGTJSEvent called JSData. We'll use that to send the data to JavaScript but we only need to create a single instance and bind our arrays to it - this object holds pointers to any bound arrays and objects so it always uses the latest and greatest data. Primitive types (numbers, booleans and strings) on the other hand are copied and must be updated per frame but we won't use them in this sample.
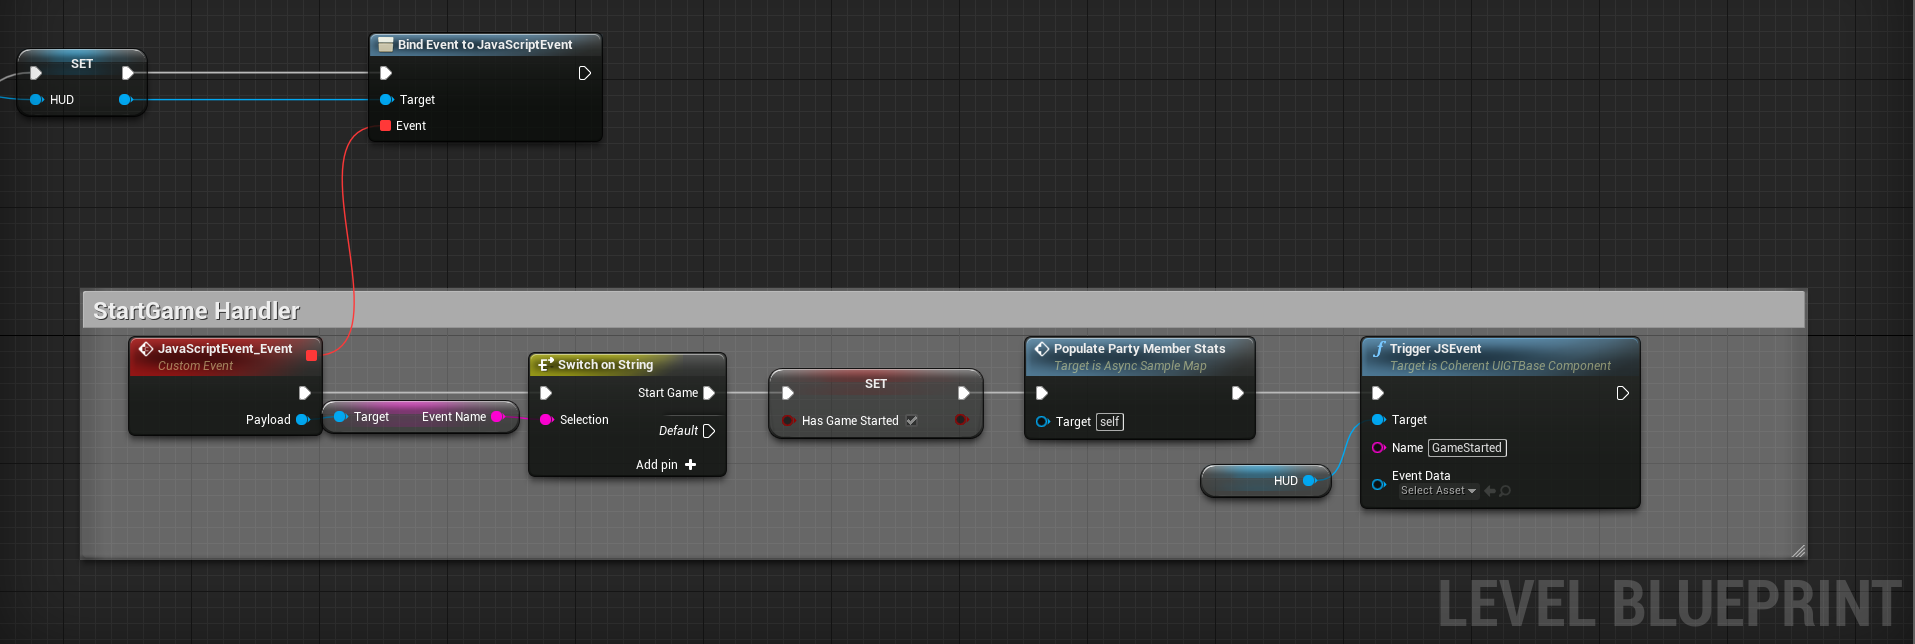
Thirdly, just like we bound GetItemData(int32) in the C++ code, we need to bind a handler to StartGame. To this we create a custom Blueprint event and bind it via Bind Event To JavaScriptEvent. This is also shown in Example_Map.umap (like the input forwarding) so there's no need to get into details. The important thing is the StartGame handler which does two things - populates the stats of each party member and sets HasGameStarted to true.
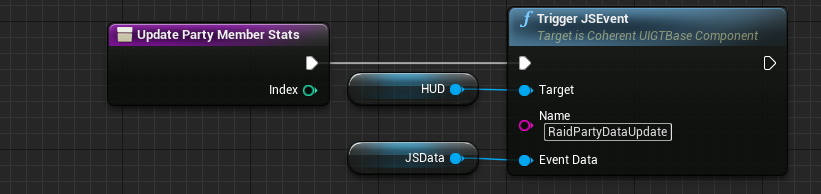
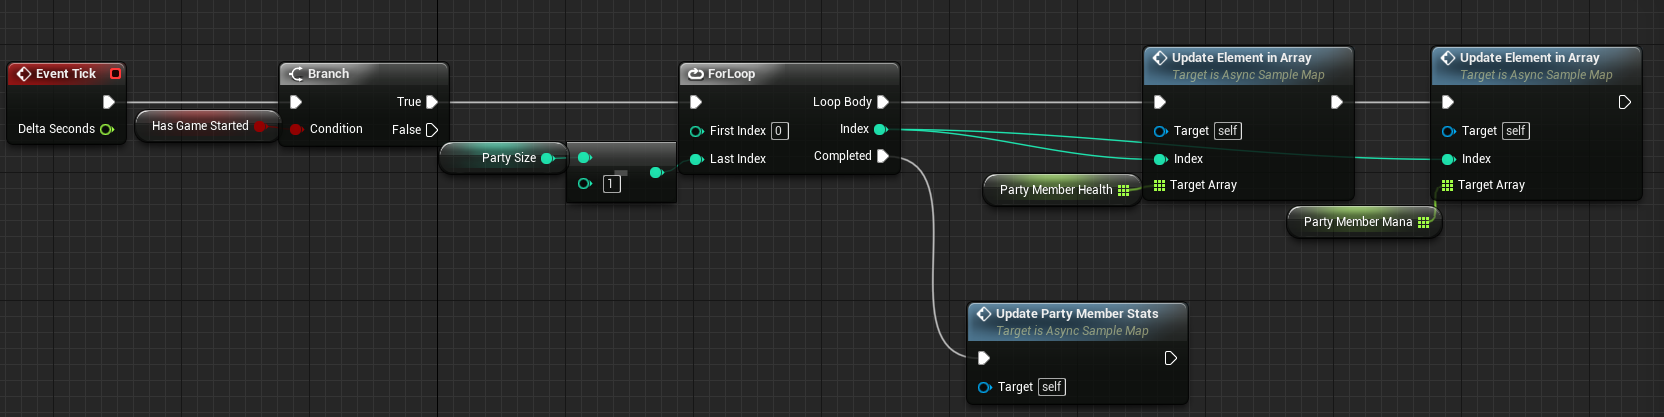
The final part would be to update the party's stats and trigger RaidPartyDataUpdate. We do so by looping over all party members, updating their health and mana and finally sending that to JS:
This completes our journey through the vast UI-binding field. It is important to remember that in this sample we never assumed anything about when exactly an event will be triggered - we only care that it will be triggered at some point. This protects us from failures under asynchronous node. All in all, here's what we did:
engine.call("GetItemData") to GetItemData(int32).engine.trigger) to functions