2.9.16.0
Coherent GT for UE4
You need to make a few changes to your code to use seamless travelling with Coherent GT.
ACoherentUIGTSystem must also be added to the same list.The above steps can be achieved by overriding APlayerController::GetSeamlessTravelActorList in your player controller implementation using the following code (assuming that all objects containing Coherent GT components are tagged with "PreserveCoherentGT"):
void AMyPlayerController::GetSeamlessTravelActorList(bool bToEntry, TArray<AActor*>& ActorList)
{
    // Add the actors containing Coherent GT components
    for (TActorIterator<AActor> It(GetWorld()); It; ++It)
    {
        if (It->Tags.Contains("PreserveCoherentGT"))
        {
            ActorList.Add(*It);
            break;
        }
    }
    // Add the unique instance of ACoherentUIGTSystem
    for (TActorIterator<ACoherentUIGTSystem> It(GetWorld()); It; ++It)
    {
        ActorList.Add(*It);
        break;
    }
}
Finally, make sure that no ACoherentUIGTSystem actor exists in the target level. If this is not the case, the old system and the new one will clash and your views will experience weird behaviour (such as time passing by faster than it should).
Certainly! Coherent GT uses UE4's gamepad data to expose the HTML5 Gamepad API. You don't have to do anything on game side to enable the gamepad input, simply connect your controller, focus a Coherent GT View or UMG widget and you're good to go. See the Gamepad_Map for a sample that utilises this functionality.
There are many ways one can bind the gamepad's buttons and axes. Coherent GT uses the standard gamepad mapping as described by the W3C here.
Important note: the HTML5 gamepad API uses polling instead of events (which the keyboard and mouse use). Due to this, it is mandatory that the state of all gamepads is updated on all views - even those that are not focused. If you have multiple conflicting views reading the gamepad state at the same time, you'll need to use JavaScript to control which view should listen for gamepad inputs.
The system will set to zero all buttons and axes by default. This prevents the case in which a pressed button will continue to be pressed in the UI while the focus is still in the game. However, you can change the gamepad behaviour by calling ACoherentUIGTInputActor::GetGamepadBehaviourDelegate() which will return a delegate you can bind your callback to. For example
auto MyFunc = [](uint32 UserIf) -> EGamepadFocusLostBehaviour
{
    return EGamepadFocusLostBehaviour::ResetState;
}
InputActor->ACoherentUIGTInputActor::GetGamepadBehaviourDelegate().BindLambda(MyFunc);
Your function has to return one of these values: EGamepadFocusLostBehaviour::ResetState - Set the current state to zero. This is default behaviour. EGamepadFocusLostBehaviour::UseCurrentState - Will keep the last known state. Note that this will trigger the behaviour mentioned above. EGamepadFocusLostBehaviour::StateBeforeReset - Will save the last known state, set the current state to zero and once focus is regained by UI that saved state will be reapplied
Note: You cannot bind your function to the delegate from Blueprints, you must use C++.
data-l10n-id attribute and pass the namespace and key of the translated FText e.g: <button data-l10n-id='MyNamespace.MyTextKey'></button>
See the Localization Tutorial for a detailed walkthrough.
Follow the steps outline in Building a Loading Screen.
UE4 supports cross-compilation to Linux. The process is straight-forward and is well-described in the UE4 wiki: https://wiki.unrealengine.com/Compiling_For_Linux
Starting from version 1.8, Coherent GT supports Linux and does not require anything specific to build the game. As on other platforms, you must copy the native Coherent GT and Renoir shared libraries next to the game's executable or in Engine/Binaries/ThirdParty/CoherentUIGT/Linux and Engine/Binaries/ThirdParty/Renoir/Linux respectively.
To build a dedicated server for your game, you have to setup a Server Target. You can check the CoUIGTTestFPSServer.Target.cs file located in our sample game CoUIGTTestFPS/Source/CoUIGTTestFPSServer.Target.cs
You can check the whole procedure of Cooking the data for your server and building it here: https://wiki.unrealengine.com/Standalone_Dedicated_Server
Sure! This can reduce memory consumption and improve startup time but you'll first have to tell us what images are shared. See the preloaded section for explanation about how to set them up.
Yes, any font placed in */Game/Content/Fonts* will be automatically loaded when the game starts. Please note that Coherent GT requires the raw .ttf and .otf files (not the .uasset files that UE4 will generate for them). This means that in order to get your fonts packaged, you'd have to add the Fonts directory under Edit –> Project Settings –> Packaging –> Additional directories to always package.
Any font loaded this way will be available immediately after the game starts to be used as a font-family.
If you are using letterboxing or your game is running on a platform with a constrained safe zone you HUD will be scaled appropriately. However, you might desire the HUD go over game's boundaries and this is possible by checking off the Respect Safe Zone and Respect Letterboxing settings found under Coherent GT -> Options in the UE4 editor. This will cause the HUD to disregard the boundaries. To understand how these properties interact with each other see the following graphic:
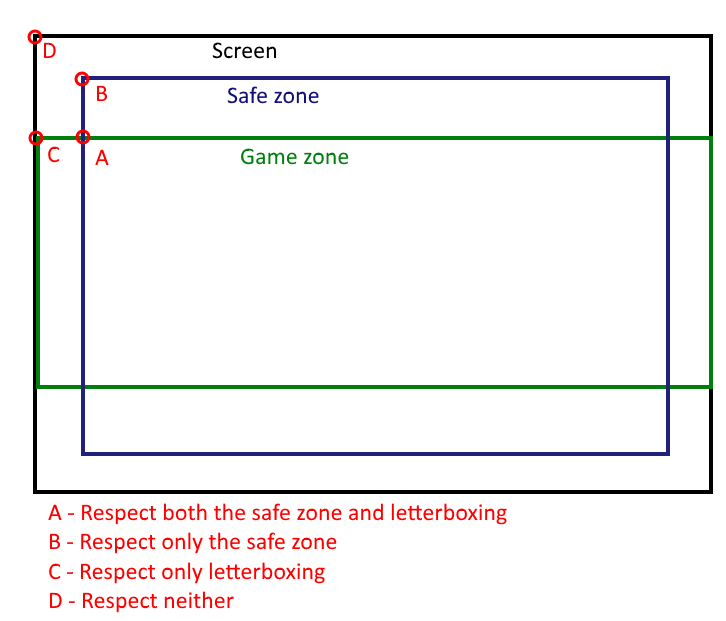
By default Coherent GT will respect both the safe area and letterboxing boundaries.
Simply go to Coherent GT –> Options and check Tick While Game Is Paused
This might happen if something in your UI depends on actor/world updates and must be perfectly in sync to look right. The reason this happens is because our component ticks during TG_StartPhysics and any bindings are sent during TG_DuringPhysics, but cameras are updated between TG_PostPhysics and TG_PostUpdateWork. We've added an option to delay the component's ticks to TG_PostUpdateWork and after any bindings are sent, which makes it so the UI receives the updated bindings before drawing. To enable the option, either enable it from the Editor (click on your GT component and tick Delayed Update) or enable it using SetupUIGTView (the bDelayedUpdate argument - false by default). Alternatively, you can use EnableDelayedUpdate(true) on the component - available in both blueprints and C++.
Set Tick Group node to the BeginPlay event in the blueprint with self as the target and Post Update Work as the tick group (in addition to enabling the option). This is needed, because blueprints tick during StartPhysics by default, which is before the cameras are updated and you will be sending old data (from the previous tick).Imagine that you have the following case:
<img src="foo.png"></img>
Then, in order to save memory and decoding time, you may want GT to automatically load a matching DDS file if one exists.
GT doesn't support automatic fallback to DDS images when they are available but you can achieve it by slightly modifying the plugin following two steps:
void FCoherentUIGTFileHandler::ReadResource function's body in the CoherentUIGTFileHandler.cpp with the following code:FString ResourcePathNonConst = ResourcePath;if (TryUsePreloadedResource(ResourcePathNonConst, Response)){return;}if (ResourcePathNonConst.Contains(TEXT(".png"))){FString ResourcePathDds = ResourcePathNonConst.Replace(TEXT(".png"), TEXT("_compressed.dds"));auto& PlatformFile = FPlatformFileManager::Get().GetPlatformFile();if (PlatformFile.FileExists(*ResourcePathDds))ResourcePathNonConst = ResourcePathDds;}int64 Start = 0;int64 End = 0;bool bIsRangeRequest = IsRangeRequest(Start, End, Request);TArray<uint8> Buffer;int64 FileSize = 0;if (!TryReadFile(ResourcePathNonConst, Start, End, bIsRangeRequest, Buffer, FileSize)){UE_LOG(LogCoherentUIGT, Error, TEXT("Could not read file '%s'."), *ResourcePathNonConst);Response->SignalFailure();Response->Release();return;}SetResponseHeaders(FileSize, Buffer.Num(), Start, bIsRangeRequest, Response);Response->ReceiveData((const char*)Buffer.GetData(), Buffer.Num());Response->SignalSuccess();Response->Release();
You can use DebugSaveNextFrame and BeginDebugFrameSave methods on GT components/UMG widget which will capture rendering frames and save them to files in GameDir/Saved/CoherentUIGT/ folder. This can be useful when debugging rendering related issues.
As of now, these files can only be inspected by our own internal tools and you can't inspect them yourself. However, in the case of a graphics artefact, you can send them to our support team for investigation.
Note this is only for debugging and it has performance implications when used.
DebugSaveNextFrame forces a redraw on the whole UI.BeginDebugFrameSave Starts saving every frame without forcing redraw and actually saving only the changed parts of the UI.The PaintToBackBuffer option in the HUD settings of the Coherent GT plugin allows you to paint directly into the backbuffer of the game. In order to enable this option run the UE4 editor, go to Coherent GT -> Options and under the HUD section check Paint to Back Buffer.
This option improves the rendering performance of GT only when all the UI elements are in layers. That means you can't style your <body> and every child of your <body> must be a layer.
When using this option, there is one less texture on the GPU and also we save GPU time by not drawing this texture to the backbuffer, but drawing directly in the backbuffer. The improvement of the performance scales proportionally to the game resolution and inversely proportional to the size of the elements in the UI. For example, a 4k UI showing only a health bar will benefit more from the option than a 1080p UI with many menus.
The option doesn't work with HUD Components, but only when using a class derived from ACoherentUIGTGameHUD. Also the option isn't supported in PIE mode. The click-through feature, which allows you to determine if the mouse is on a UI Element or on the game, is also not supported when painting directly to the backbuffer.
<img> tags in your html that represent live viewsThere are two ways for setting it up:
static const char* COHERENT_UI_GT_LICENSE = "YourLicenseKey";
FString Function(). A convenient place, where you can bind the desired function which returns your license key is the StartupModule method of your GameModule class. Here is a pseudocode implementation: virtual void StartupModule() override
{
ICoherentUIGTPlugin::Get().OnLicenseKey.BindLambda([]()
{
// Get your license key...
return FString("YourLicenseKey");
});
}
COHERENT_UI_GT_LICENSE variable, e.g. static const char* COHERENT_UI_GT_LICENSE = "";Starting from Coherent GT 2.8.2 the rendering part of our UE4 integration is now separated in its own plugin - CoherentRenderingPlugin. This means that CoherentUIGTPlugin has a dependency on the new rendering plugin (specified in CoherentUIGTPlugin.uplugin). That resulted in the following structural changes:
FCohRenoirBackend rendering backend is now moved from CoherentUIGTPlugin to CoherentRenderingPlugin, along with all relevant source files (with a Coh prefix).FCoherentUIGTFileManipulator is now FRenderingFileManipulator and is also moved from CoherentUIGTPlugin to CoherentRenderingPlugin.RenoirBackend, RenoirBackends and RenoirCore are moved from the CoherentUIGT module (Engine/Source/ThirdParty/CoherentUIGT/include) to the new Renoir module (Engine/Source/ThirdParty/Renoir/include).Engine/Source/ThirdParty/Renoir/lib) so that the module can load the Renoir dynamic library.Engine/Binaries/ThirdParty/CoherentUIGT) to the new Renoir module (Engine/Binaries/ThirdParty/Renoir).This is what the new structure looks like:
|-Engine
  |-Binaries
    |-ThirdParty
      |-CoherentUIGT // No Renoir binaries and symbols in this folder anymore
      |-Renoir
        |-Win32
          |-RenoirCore.WindowsDesktop.dll
          |-RenoirCore.WindowsDesktop.pdb
        |-Win64
          |-RenoirCore.WindowsDesktop.dll
          |-RenoirCore.WindowsDesktop.pdb
        |-...
  |-Plugins
    |-Runtime
      |-Coherent
        |-CoherentRenderingPlugin
        |-CoherentUIGTPlugin
  |-Source
    |-ThirdParty
      |-CoherentUIGT
        |-include
          |-Coherent
            |-UIGT
        |-lib
      |-Renoir
        |-include
          |-RenoirBackend
          |-RenoirBackends
          |-RenoirCore
        |-lib
          |-Win32
            |-RenoirCore.WindowsDesktop.lib
          |-Win64
            |-RenoirCore.WindowsDesktop.lib
          |-...
Depending on whether you use our installer or an archive, there are some steps required to transition to Coherent GT 2.8.2+:
Make sure you check the Clean install option during installation. If you don't, this will lead to compiler errors due to redefinition of Renoir-related code caused by source file duplication in both CoherentUIGTPlugin and CoherentRenderingPlugin.
If you're using Coherent GT as a game-only plugin, you will have to delete the <YourGameRoot>/Plugins/Runtime/Coherent/CoherentUIGTPlugin folder before running GamePlugin.bat. This is required to avoid that same issue mentioned in the Using installer section above.
If you are using a version of Unreal Engine up to 4.16 (inclusive), you will have to:
CoherentRenderingPlugin\Shaders\Private to the Engine\Shaders folder. From UE 4.17 and onwards, the engine supports keeping shaders inside the plugin's directory so you don't have to do anything, but before that, the shader files must reside inside the Engine.