This document outlines the changes you need to apply in order to upgrade from GT 1.x version to GT 2.0. The API contains breaking changes which are focused around improving usability, simplifying the existing concepts, and giving users more control over certain aspects of GT.
Unlike GT 1.x, GT 2.0 runs with JIT enabled where possible - Windows, OSX, and Linux. This provides a huge boost to JS performance but it also means that the difference between console (PS4 / XB1) code and PC will be even bigger. In order to make the most out of the limited console hardware, you have to measure performance console - first if your game is targeting consoles at all. While you may have done this until now, it will be even more important with the increased JS performance disparity between the platforms.
There are four new methods for memory management:
Coherent::MemoryManagementGT::IAllocator::AlignedAllocate - returns aligned allocated memory.Coherent::MemoryManagementGT::IAllocator::AlignedDeallocate - frees aligned memory.Coherent::MemoryManagementGT::IAllocator::VirtualAllocate.Coherent::MemoryManagementGT::IAllocator::VirtualFree.VirtualAllocate and VirtualFree allow GT to request memory for specific usages, including requesting executable memory - a feature that is critical for JIT to be able to work. Both of those methods map trivially to VirtualAlloc / VirtualFree on Windows and mmap on POSIX systems.
See the Quick start's Memory management section for more information and a Windows implementation. For full implementation for all supported platforms you can refer to our samples.
The following changes are related to Preloaded textures:
Coherent::UIGT::ResourceResponseUIGT::PreloadedImageData struct has been renamed to Coherent::UIGT::ResourceResponseUIGT::UserImageData. UserImageData has a new member, ImageHandle, which is used only for live views. This new member can be ignored for preloaded textures.Coherent::UIGT::ResourceResponseUIGT::ReceivePreloadedImage has been renamed to Coherent::UIGT::ResourceResponseUIGT::ReceiveUserImage.See the preloaded textures's documentation for more information.
We simplified the live views API by reducing them to preloaded textures that you can update dynamically
Coherent::UIGT::ViewListener::OnLiveViewSizeRequest and Coherent::UIGT::ViewRenderer::SetLiveViewTexture.Live views are implemented as dynamic preloaded textures. They are handled in the Coherent::UIGT::ResourceHandler::OnResourceRead method of your resource handler, just like the preloaded textures. A basic example implementation would be:
void MyResourceHandler::OnResourceRead(const Coherent::UIGT::ResourceRequestUIGT* request,
    Coherent::UIGT::ResourceResponseUIGT* response)
{
    const std::string url = request->GetURL();
    auto texture = liveViewTextures[url];

    // This texture isn't loaded yet, let Coherent GT read the raw file.
    if (!texture)
    {
        ReadRawFile(request, response);
        return;
    }

    // Tell Coherent GT that the image is a live view
    using ImageData = Coherent::UIGT::ResourceResponseUIGT::UserImageData;
    ImageData data;
    data.Width = texture->Width;
    data.Height = texture->Height;
    data.Format = texture->Format;
    data.Texture = texture->Resource;
    data.ImageHandle = texture->UniqueHandle;
    response->ReceiveUserImage(data);
    response->SignalSuccess();
    response->Release();
}
The only difference is that you have to set a unique unsigned number for the ImageHandle and whenever the live view changes, you should notify GT via the Coherent::UIGT::UISystem::UserImagesChanged method, passing the corresponding ImageHandles as argument.
See the live view's documentation for more information.
If you want to make use of all the new features coming up with ES6/ES7 but you do not want to change it manually, consider using the Lebab library. The following is an example of Lebab’s code migration:
SkinnedMesh.prototype.update = function (camera) {
    camera = camera || createCamera();
    this.camera = camera;
};
Migrating via Lebab:
class SkinnedMesh {
    update(camera=createCamera()) {
        this.camera = camera;
    }
}
Overriding ::-webkit-inner-spin-button:before and ::-webkit-inner-spin-button:after is not possible after the WebKit update. The standard way of changing input arrow style is to have both arrows in the same image, override ::-webkit-inner-spin-button and set it there. The following is an example:
<style>
input[type=number]::-webkit-inner-spin-button {
    -webkit-appearance: none;
    background: url('arrows.png') no-repeat center center;
    width: 14px;
    height: 14px;
    padding: 4px;
    position: relative;
}
</style>
<input type="number" />
border: solid 100px rgba(255, 255, 0, 0.0);
border-image: url(border.png);
As long as the border-color has positive alpha value the image will be displayed.
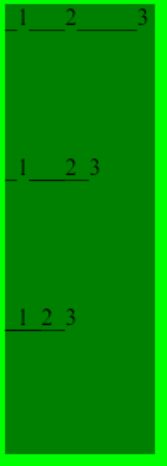
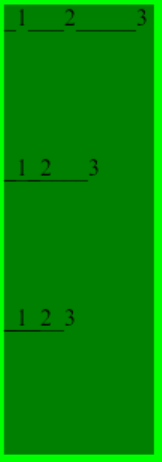
In Coherent GT 1.x, Elements with position: absolute which are children of a flexbox container (that is, a container with display: flex) were treated as if they had flex-grow: 0 and flex-basis: 0 because that's what the standard required. Currently, the standard demands that these elements' position is based on the align-self / align-items / align-contents and justify-content properties Coherent GT 2.x complies with the newer standard. See align-items for more details.
For example, if you have a flexbox container with align-items: center and the container has an absolutely positioned child with top: auto then the computed value of top will differ between the two versions.
top will be computed to 0px and the child will appear at the top of the container.top value equal to half of the container's height.If you have two elements and the first one has position: relative while the second one has position: absolute:


<html>
   <style>
       .parent {
           width: 100px;
           height: 100px;
           left: auto;
           right: auto;
           background-color: green;
           display: flex;
           flex-direction: row;
       }
   </style>
   <head>
       <title>Absolutely-Positioned Flex Children</title>
   </head>
   <body>
       <div class="parent" style="position: relative">
           <div class="child1" style="position: relative"> _1</div>
           <div class="child2" style="position: relative"> ___2</div>
           <div class="child3" style="position: relative"> _____3</div>
       </div>
       <div class="parent" style="position: relative">
           <div class="child1" style="position: relative"> _1</div>
           <div class="child2" style="position: absolute"> ___2</div>
           <div class="child3" style="position: relative"> _____3</div>
       </div>
       <div class="parent" style="position: relative">
           <div class="child1" style="position: absolute"> _1</div>
           <div class="child2" style="position: absolute"> ___2</div>
           <div class="child3" style="position: absolute"> _____3</div>
       </div>
   </body>
</html>
To migrate your assets to Coherent GT 2.x and preserve their old look, you should do one of the following:
display: flex on the parent containerOverriding the seperate properties of transition works a bit differently in Coherent GT 2.x. Previously, if you used the transition property to set an animation and then overrode the transition-duration, transition-timing-function and transition-delay properties, transition-property would be computed to all. In Coherent GT 2.x, however, transition-property will be computed to whatever property you've used in the transition property. This is the standard behavior.
Example:
<style>
    .uibutton {
        transition: transform, 1s, ease-in, 0.5s;
    }

    .someparent .uibutton {
        transition-duration: 1.2s;
        transition-timing-function: ease-out;
        transition-delay: 0.6s;
    }
</style>

<div class="someparent">
    <ul>
        <li id="somebutton" class="uibutton">Some button</li>
    </ul>
</div>
In Coherent GT 1.x the transition-property property of somebutton would have a value of all. In Coherent GT 2.x it would be transform.
To migrate your assets to Coherent GT 2.x and preserve their old look, you should add transition-property: all; to the overrides.
Downscaled raster images in Coherent GT 2.x might look different than Coherent GT 1.x in some resolutions if they have very small details. For example, if you have an image, which contains borders that are 1px thin, they might appear very thinned (or even completely disappear) when the image is downscaled e.g. when using transform: scale with a value less than 1.
To fix this, you can:
@media (max-width: 600px) { ... }
The ViewInfo::EnableExperimentalMediaSourceAPI option has been removed. Although our MSE playback performed well in certain situations, we decided it's not worth it keeping around in its current unstable state. We have plans for reintroducing MSE playback in a future version. Until then, YouTube videos will only be played at their lowest quality due to the algorithm behind the YouTube player which refuses to play any other quality if MSE are missing.