2.9.16.0
Coherent GT for UE4
The purpose of this tutorial is to show you how in a few simple steps to use the built-in localization feature of UE4 along with Coherent GT. For a localization ready sample you can check our localized menu map - MenuLocalization_Map, located in the CoUIGTTestFPS sample project. At the end of this tutorial, you will know everything you need to create a localized UI with Coherent GT.
The localization workflow is the following:
In this step we will tag the buttons that will have their text translated in the HTML and declare that we want translation for a text entry.
The Menu map loads the coui://UIResources/LocalizedMenu/menu.html page, which will be our starting point. In the page you can find some CSS includes, JavaScript includes and most importantly – the 3 menu buttons. In the button tag of the start button we will add a property called data-l10n-id and set its key to MenuNamespace.StartButton e.g.
<button id="play" class="btn btn-large btn-primary" type="button" data-l10n-id="MenuNamespace.StartButton">Play</button>
The name of the “data-l10n” tag can be anything you would like, as long as it starts with “data-“.
Note: To demonstrate how the current localization language can be changed at runtime, there are two additional buttons that switch the current language to English/Spanish.
Now we have to declare that we want a translation for the “StartButton” key. In the menu.html file we will add a comment containing the following declaration:
It doesn't matter where in the HTML page the comment is, in my case I placed it right after the Doctype HTML declaration. Now, what is this C++ like declaration and why we need it? NSLOCTEXT is a C++ macro, used by UE4 that declares a new localization text. It takes 3 parameters:
The UE4 localization system works with three types of files:
Now, back to the practical part. The generation of the manifest, archive and locres files happens with the help of a Unreal Engine commandlet called GatherText. Commandlets are mini-programs with a specific purpose. In this case the commandlet reads a configuration file and executes the steps defined in it. The commandlet is called with:
PathToEditor/Editor.exe PathToGame/Game.uproject -run=GatherText -config=PathToConfig/Config.ini
or in my case:
F:\3_UE\unreal\Engine\UE4\Engine\Binaries\Win64\UE4Editor.exe F:\3_UE\unreal\CoUIGTTestFPS\CoUIGTTestFPS.uproject -run=GatherText -config="F:\3_UE\unreal\CoUIGTTestFPS\Config\LocSettings.ini" -log > localization.log
Note: The -log > localization.log bit is optional and is used to generate a localization.log file. The log will be created in your current working directory and will contain the output log of the GatherText commandlet. If something goes wrong, you can check in the log what and where.
The configuration LocSettings.ini file contains a list of settings and series of steps that will be executed by the GatherText commandlet. The config that I have used is the following:
[CommonSettings]
SourcePath=F:/3_UE/unreal/CoUIGTTestFPS/Content/Localization/Game
DestinationPath=F:/3_UE/unreal/CoUIGTTestFPS/Content/Localization/Game
ManifestName=LocalizedText.manifest
ArchiveName=LocalizedText.archive
NativeCulture=en
CulturesToGenerate=en
CulturesToGenerate=es

;Get all FTexts from source code
[GatherTextStep0]
CommandletClass=GatherTextFromSource
SearchDirectoryPaths=../../CoUIGTTestFPS/Source/CoUIGTTestFPS/
SearchDirectoryPaths=../../CoUIGTTestFPS/Content/uiresources
;File extensions that will be parsed
FileNameFilters=*.cpp
FileNameFilters=*.h
FileNameFilters=*.html

;Generate Manifest
[GatherTextStep1]
CommandletClass=GenerateGatherManifest
DestinationPath=F:/3_UE/unreal/CoUIGTTestFPS/Content/Localization/Game

;Generate Archives
[GatherTextStep2]
CommandletClass=GenerateGatherArchive
bPurgeOldEmptyEntries=true

;Generate Localized Text Resource
[GatherTextStep3]
CommandletClass=GenerateTextLocalizationResource
ResourceName=LocalizedText.locres
Most of the options in the configuration file are self-explanatory, but there are some things which I would like to point out:
CulturesToGenerate=en and CulturesToGenerate=es – used to generate English and Spanish localization. For every language/locale you want to have a localization, you must add a row there with the language/region code.SourceFileSearchFilters=*.html – used to tell the parser to look inside .html files.SourcePath and DestinationPath pointing to F:/3_UE/unreal/CoUIGTTestFPS/Content/Localization/Game – this is a default path used to find .locres files by the engine. If your files are in it, they should be automatically loaded by the engine.After you have run the commandlet, in
`YourGame/Content/Localization/Game`
you should have the following folder structure:
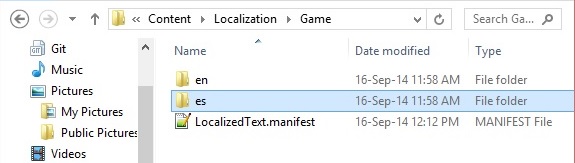
Now we would like to translate the key for StartButton (from section 1) in Spanish. In order to do so, navigate to YourGame/Content/Localization/Game/es and open the LocalizedText.archive. In the Translation field you should enter the translation of Start Button in Spanish.
"Subnamespaces": [
{
    "Namespace": "MenuNamespace",
    "Children": [
        {
            "Source":
            {
                "Text": "Start Button"
            },
            "Translation":
            {
                "Text": "Botón de inicio"
            }
        },
        {
            "Source":
            {
                "Text": "StartButton Translation in every language"
            },
            "Translation":
            {
                "Text": "Botón de Inicio"
            }
        }
    ]
},
After we have filled the empty translation fields, we have to run the same commandlet again:
F:\3_UE\unreal\Engine\UE4\Engine\Binaries\Win64\UE4Editor.exe F:\3_UE\unreal\CoUIGTTestFPS\CoUIGTTestFPS.uproject -run=GatherText -config="F:\3_UE\unreal\CoUIGTTestFPS\Config\LocSettings.ini" -log > loc.log
Once the translation strings are filled, re-running the commandlet will not erase the existing translation entries and will re-generate the binary .locres file. If you are not sure if the Spanish translation made it to the .locres file, you can open the YourGame/Content/Localization/Game/es/LocalizedText.locres file with hex editor and inspect its contents.
After we have generated the locres files with the localized tests it is time to head to the UI again and bind it to the game.
Coherent GT will automatically translate the elements tagged with data-l10n-id using the default locale. To dynamically change the language, we create two buttons:
// menu.html
<button id="english" type="button" class="btn btn-large btn-primary">Switch to English</button>
<button id="spanish" type="button" class="btn btn-large btn-primary">Switch to Spanish</button>

// menu.js
document.getElementById('english').onclick = function () {
    engine.call('SwitchToEnglish').then(function (){
        // engine.reloadLocalization will refresh all localized elements
        // It's important to call this method after SwitchToEnglish has completed
        engine.reloadLocalization();
    });
};
document.getElementById('spanish').onclick = function () {
    engine.call('SwitchToSpanish').then(function (){
        engine.reloadLocalization();
    });
};
void ACoUIGTTestFPSMenuHUD::SwitchToEnglish()
{
    FInternationalization::Get().SetCurrentCulture("en");
}

void ACoUIGTTestFPSMenuHUD::SwitchToSpanish()
{
    FInternationalization::Get().SetCurrentCulture("es");
}
// In the HUD's constructor
CoherentUIGTHUD->ReadyForBindings.AddDynamic(this,
   &ACoUIGTTestFPSMenuHUD::BindUI);

void ACoUIGTTestFPSMenuHUD::BindUI()
{
    CoherentUIGTHUD->GetView()->BindCall("SwitchToEnglish",
        Coherent::UIGT::MakeHandler(this, &ACoUIGTTestFPSMenuHUD::SwitchToEnglish));
    CoherentUIGTHUD->GetView()->BindCall("SwitchToSpanish",
        Coherent::UIGT::MakeHandler(this, &ACoUIGTTestFPSMenuHUD::SwitchToSpanish));
}
By default Coherent GT disables localization to allow faster loading. To enable it, inside UE4's editor navigate to Coherent GT -> Options and check Enable Localization. By doing this, Coherent GT will automatically translate any elements tagged with the data-l10n-id attribute.