2.9.16
Coherent GT
A modern user interface library for games
The purpose of this document is to guide you through the UI development process. It goes over all the major phases and describes the software and technologies used. Please note that this a general workflow guide. For detailed documentation of Coherent GT please refer to the Coherent GT Documentation chm file or the documentation section on coherent-labs.com .
Coherent GT is a graphical user interface system specially designed for games. Game developers and UI artists can use standard modern HTML, CSS, and JavaScript to design and implement game UI and interaction.
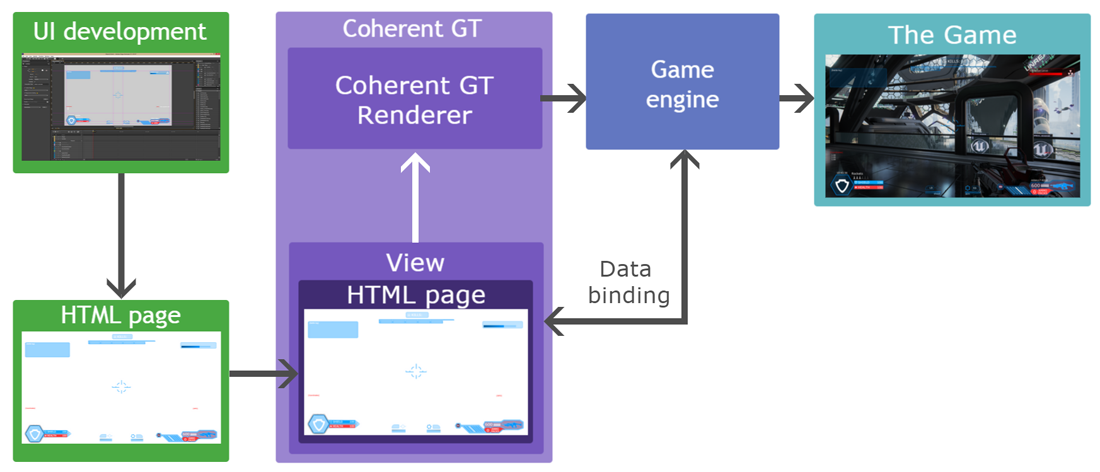
Above you can see the basic functional diagram of Coherent GT. Essentially the result of the UI development (discussed further on in detail) is a HTML page that is placed inside of Coherent GT View. The Coherent GT View is basically a HTML5 page and the JavaScript context for it. The View allows you to perform various operations on the page, such as resizing, navigating to a different URL, sending input events, executing custom JavaScript code and so on. The HTML content in the View is rendered by the Coherent GT Renderer to a texture that is passed to the game engine which displays it in the game.
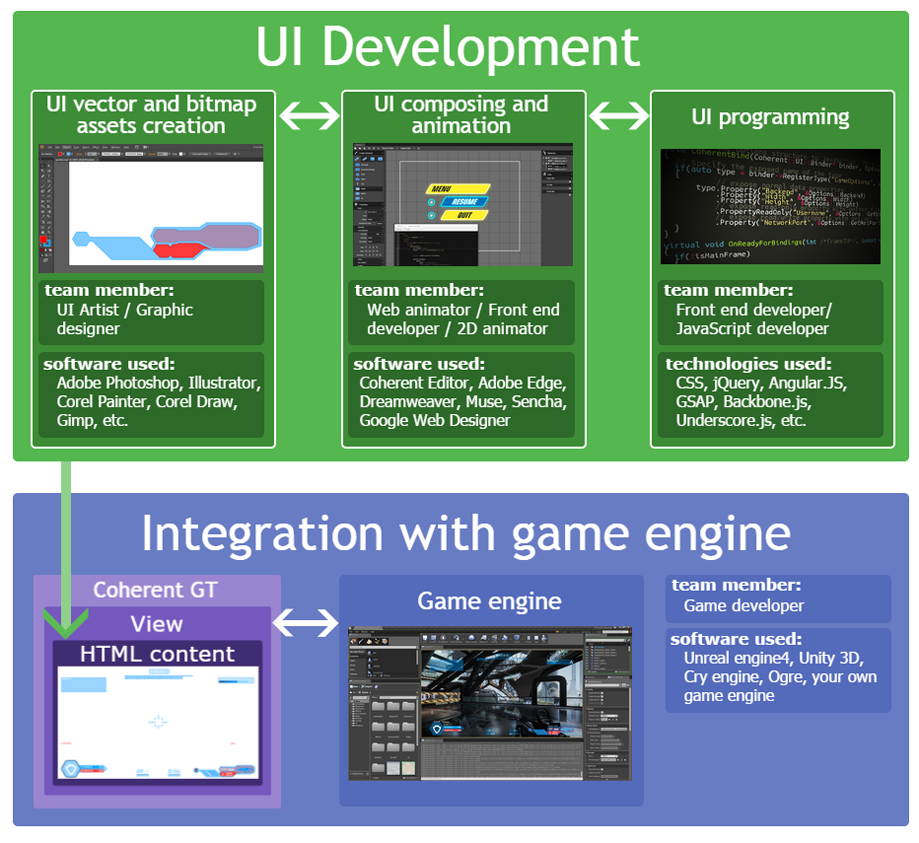
The HTML UI development process can be broken down in three major tasks – UI vector and bitmap assets design, UI composing and animation and UI programming. All three tasks can be carried out in parallel and the combined result is HTML page/pages that are displayed in Coherent GT view/views that are integrated in the game engine. The tasks are discussed in greater detail further on in the guide but in the diagram above you can see the team member involved and the software used for each phase.
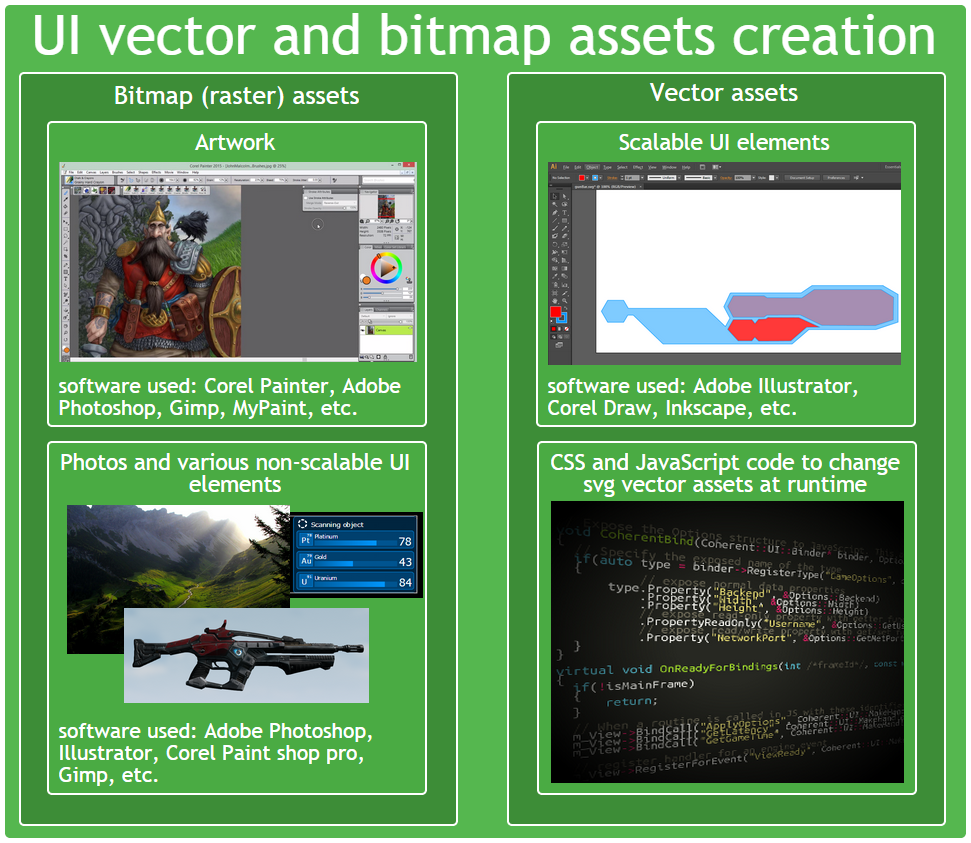
Although you can create basic shapes such as circles, rectangles, ellipses directly with HTML elements very often you'll need more complex shapes for your UI. These shapes are typically created as bitmap (raster) or vector images by UI artist or a graphic designer. Bitmap (raster) graphics images broadly speaking represent the image as rectangular grid of pixels. Bitmap images are used for all sorts of UI elements: artwork, photos and detailed UI elements. Their major drawback is that their quality degrades if they are scaled. Vector images on the other hand are based on geometrical primitives and scale perfectly regardless of the size of the UI. Furthermore the file size of the generated files is smaller than that of raster images. Coherent GT even supports SVG vector images that can be modified by CSS/JS at runtime (check the SVG images section for more information). The major drawback of vector images is that they are actually rendered at runtime and complex images might have effect on the performance. It is advisable to use vector images only when the UI has to be scaled for large resolutions or when you design simple shapes. On the diagram above you can see the software used for the different types of UI image assets.
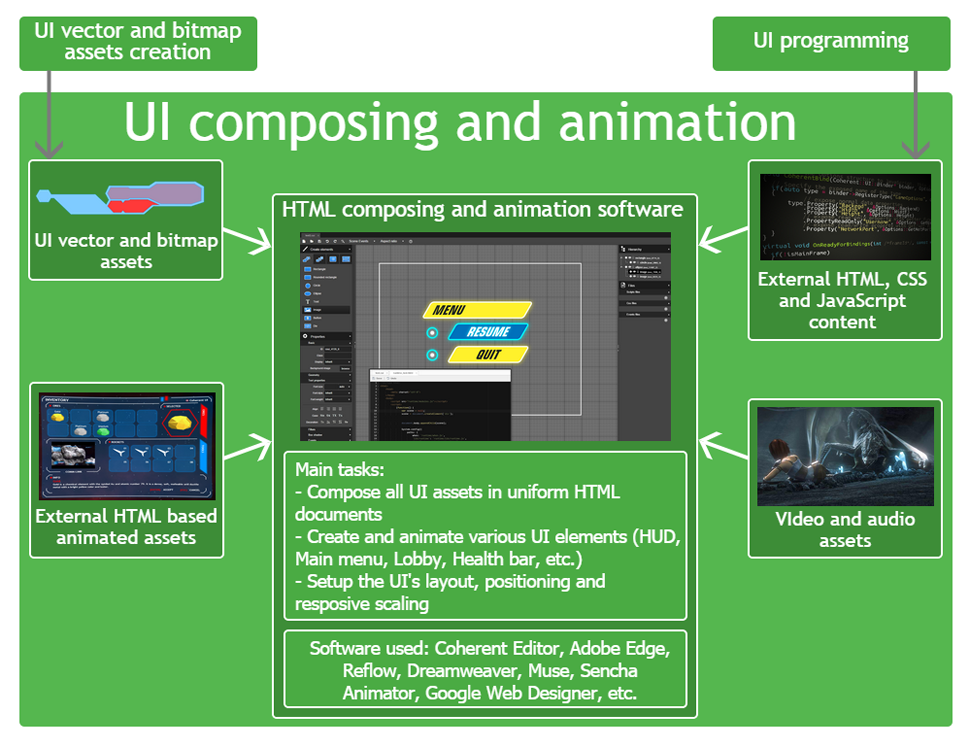
This stage is typically carried out by Web animator, Front end developer or 2D animator It has three main tasks:
The Coherent Editor's quick start guide is available here.
Of course using the Coherent Editor is optional. In this stage you can also use any standard HTML editor such as Adobe Dreamweaver, Edge Animaate, Muse, Sublime Text, Notepad++, Webstorm and others.

This stage is very closely related to the UI composing and animation stage and it's typically carried out by a Front end developer or a JavaScript developer. It has three main tasks:
Again these tasks can be easily done in the Coherent Editor.
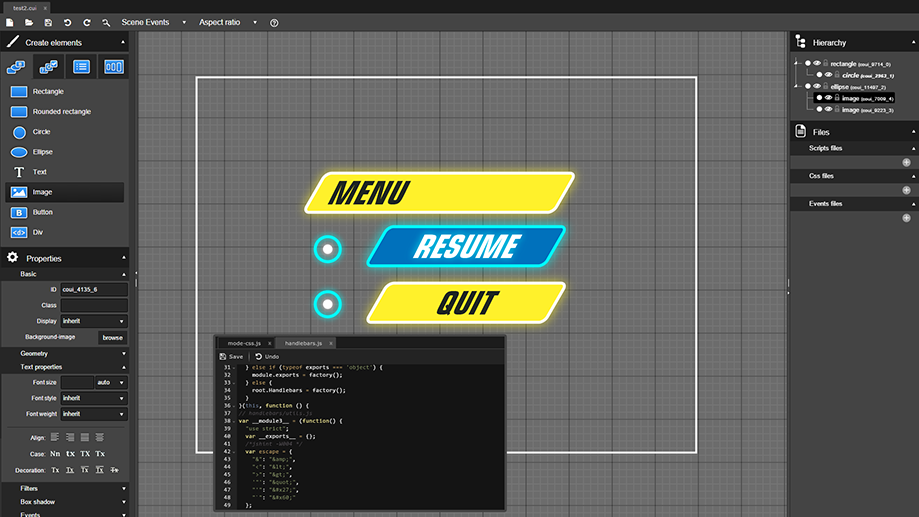
Data binding events can be set directly in the Events panel of the Editor.
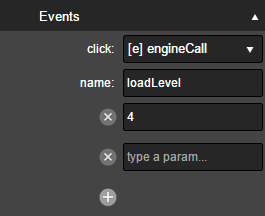
Additional JavaScript libraries or CSS files can be imported in the Files panel.
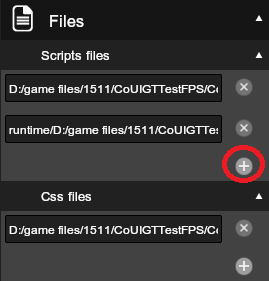
Furthermore the Coherent Editor has a code editor that you can use to write your own JavaScript code or CSS styles.
Again using the Coherent Editor is optional. In this stage you can also use any standard HTML editor such as Adobe Dreamweaver, Edge Animate, Muse, Sublime Text, Notepad++, Webstorm and others.
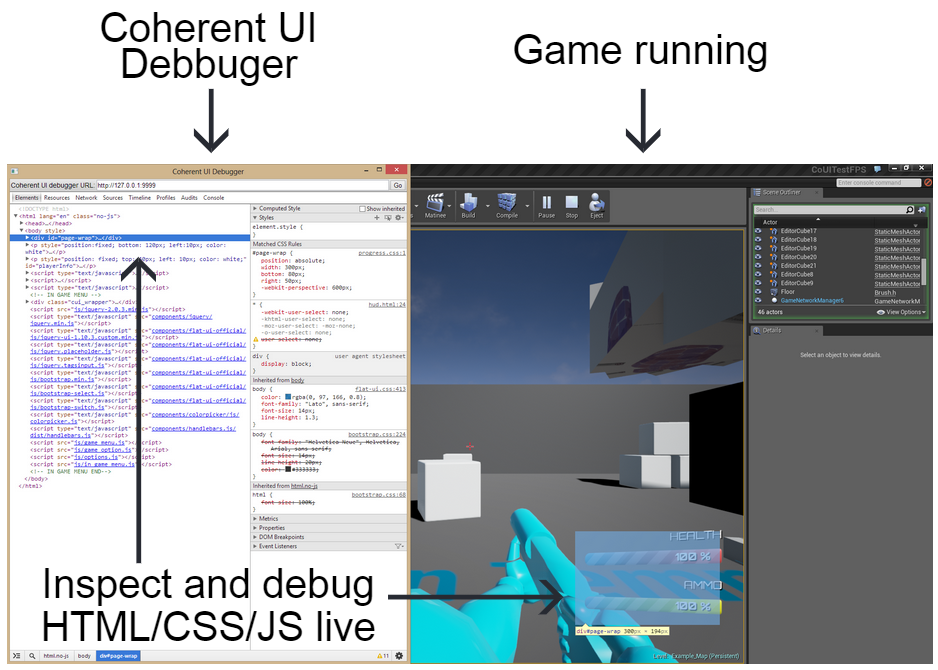
In this stage you can also use the Coherent GT Debugger in collaboration with the game developer to debug for HTML/CSS/JS errors.
This phase is typically carried out by a game developer. He is responsible for adding the Coherent GT View component and setting its settings in the game engine. Furthermore the game developer also writes the game engine binding code. Coherent GT is pre-integrated with Unreal engine 4 and Unity 3D but you can integrate it with other game engines as well.
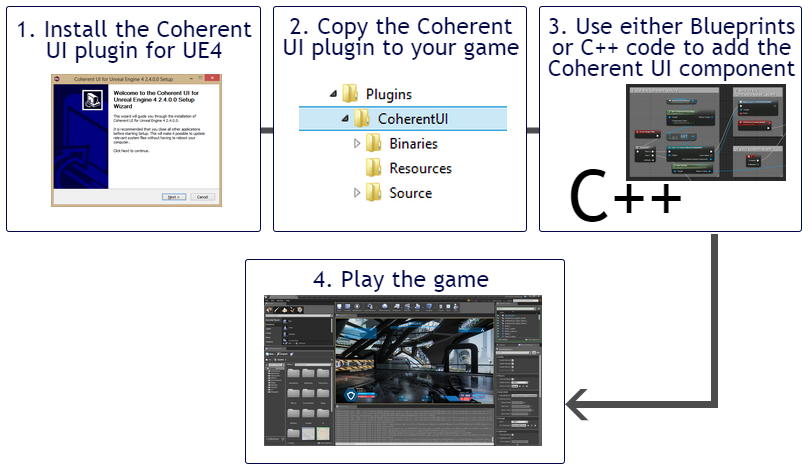
To integrate Coherent GT in your Unreal engine 4 project first install the plug-in via the installer. Then copy the plug-in files to your project and use either blueprints or C++ code to add the Coherent GT View component. For more information please refer to the Coherent GT UE4 guide.
Apart from Unreal engine 4 and Unity 3D you can easily integrate Coherent GT in your own game engine. Please follow the Coherent GT Quick Start Guide.
You can use the Coherent GT Debugger to inspect and debug your UI live. To do this just run your game (either in editor or as standalone), start the Coherent GT Debugger and you'll see a list of the HMTL pages of your UI. Choose one and you can track layout and styling issues, check for errors and set breakpoints for JavaScript, monitor loading time and many more and see the effect live. The Coherent GT Debugger's functionality is quite similar to the DevTool of Google Chrome - https://developer.chrome.com/devtools#devtools-window
Web technologies offer many different approaches that you can use to position and scale your UI however in most cases the best approach is to use viewport units. Viewport units (vw and vh) can be used both for the position and size. vw is 1/100th of the rendered viewport width and vh is 1/100th rendered viewport height. Using these units allows the UI to be responsive and properly scaled and positioned regardless of the screen resolution. The position can be anchored using properties such as "top", "bottom", "right" and "left" while the size of the elements defined by "width" and "height" properties.
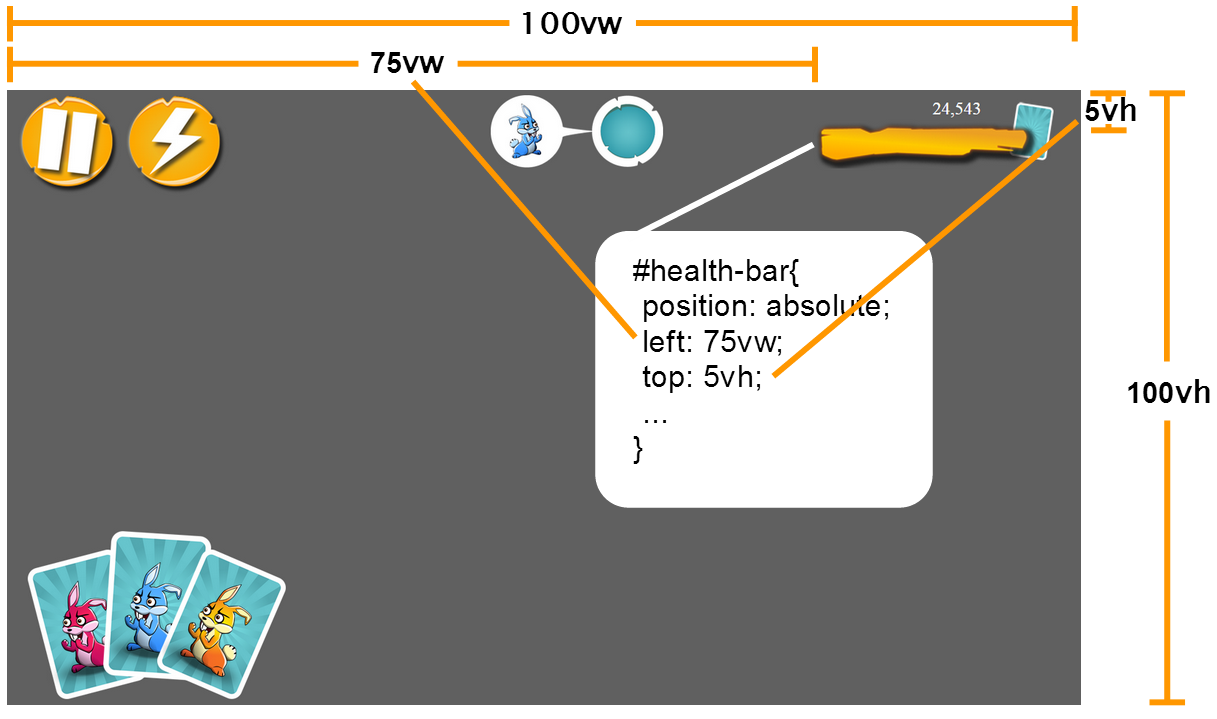
For example here are the styles for the plank that represents the health bar in the sample above:
#health-bar{
    position: absolute;
    left: 75vw;
    top: 5vh;
    width: 21vw;
    height: 11vh;
    background-image: url('img/healthBarFull.png');
    background-size: contain;
    background-repeat: no-repeat;
}
It has "left" property set to "75vw" and "top" property set to "5vh". This will effectively make the health bar appear at 75% of the viewport width and 5% from the viewport height. You can also use vmin units that are 1/100th of the smallest side and vmax units that represent 1/100th of the largest side. One possible problem with viewport units however is that if you have nested HTML elements you might want to have them scale their position and size relative to their parent and not to the viewport. To achieve this you can use percent units(%). They work the same way as viewport units but instead of 1/100 of the viewport size they represent 1% of the size of the parent element.
Creating responsive UI in the Coherent Editor is very easy as both viewport and percent units are fully supported.
For more information about viewport, percent as well as other CSS units you can check the following article - http://www.w3schools.com/cssref/css_units.asp
Different styles for different screen sizes
In some cases you might want to have different visual look of your UI for different screen size. For example you might want to use 100px by 100px image file for button on a 1024x768 screen but use 400px by 400px image for a larger screen. In such cases you can use CSS media queries. To make it work you just need to specify the range in which these styles should apply using “max-width” and “min-width”.
@media all and (max-width: 699px) and (min-width: 520px) {
  #sidebar ul li a {
    padding-left: 21px;
    background: url(../images/email.png) left center no-repeat;
    }
}
For more information about media queries you can check the following article - https://developer.mozilla.org/en-US/docs/Web/CSS/Media_Queries/Using_media_queries
Sometimes (especially in larger projects) you might have several UI developers working on the same HTML file. For example you might have a HUD.html file for a shooter game and you'll want one UI developer to work on the minimap, one of healthbar and so on.
This is very easy to do in the Coherent Editor. Each UI developer can work on a part of the UI and then export it as widget. Then the chief developer just needs to import all the individual widgets in the main UI composition.
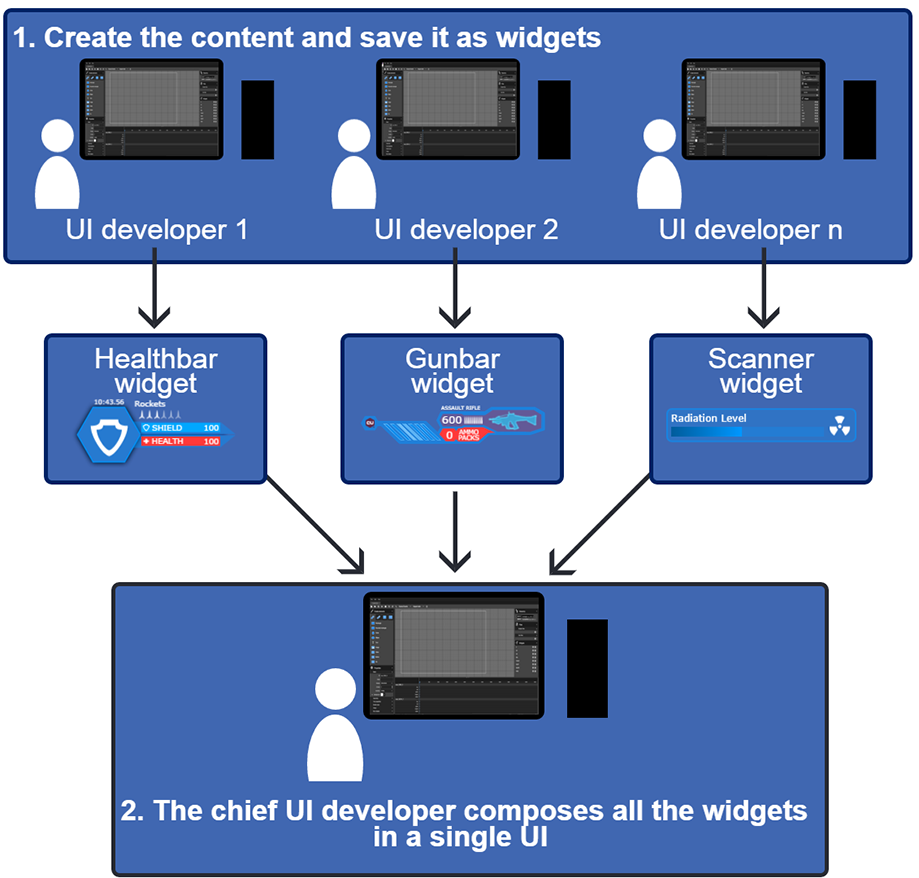
Alternativly can use JavaScript libraries. In this case you can break the page in several separate pages for each of the main elements (for example minimap.html, healthbar.html). Then just use JavaScript libraries like curl.js, require.js, or jQuery load to load them in the main html page.
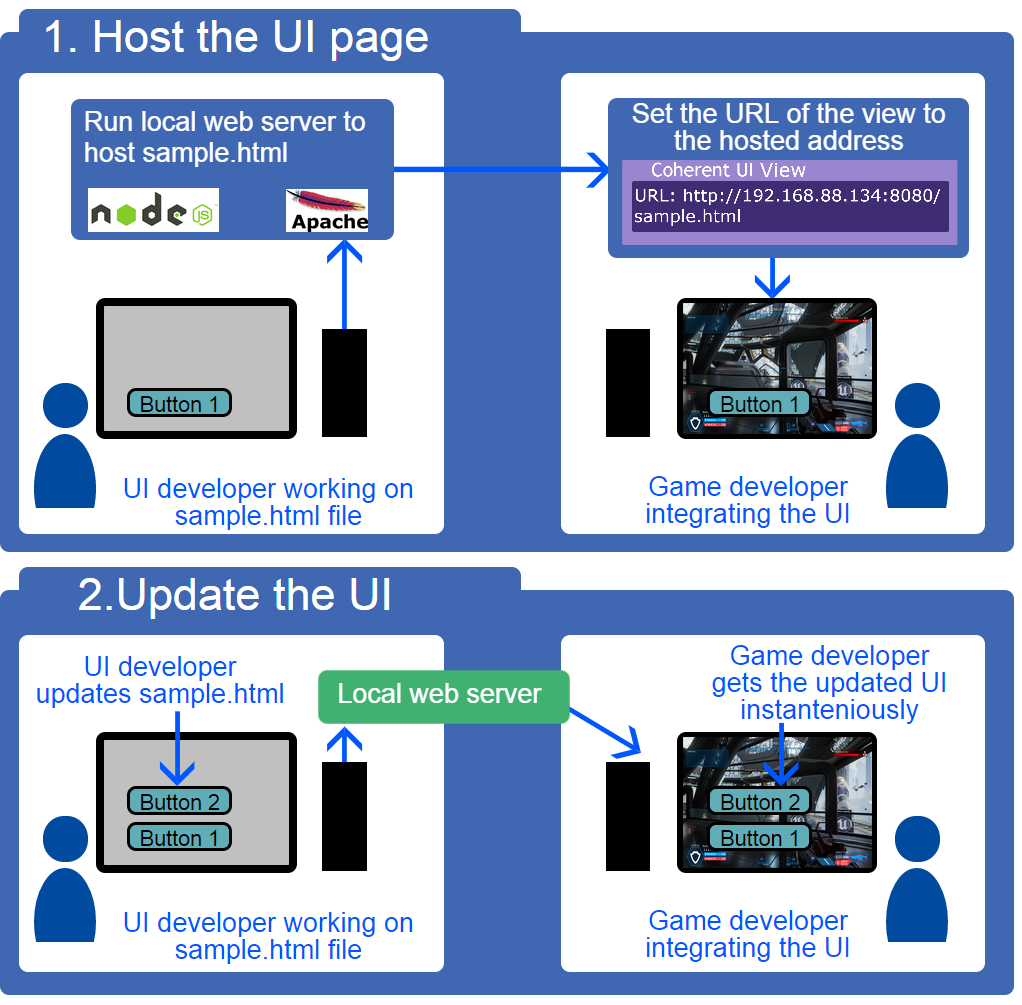
During the development stage, you can host the currently developed HTML pages so that they can be accessed by other computers in your company. You can use simple web server like node.js and start it on the computer of the person developing the HTML page. Then just set the address of the Coherent View to match the IP address of the hosted page. That way the game developer can see the changes in the UI instantaneously. This can really speed up the workflow between the web designer and the game developer. After the UI is finalized just update the URL of the views to the local html files.
Using SVG image assets has many advantages. You can directly copy/paste svg elements between Adobe Illustrator and Adobe Edge speeding up the design process. Adobe Illustrator has an "preserve illustrator editing" option when saving as svg. It allows you to make the exported svg files editable and use just one file (instead of for example editing .ai file and exporting as .png). Furthermore the size of the svg image files is very small compared to raster images. Being vector based svg images scale perfectly with no decrease in quality even at very large resolutions (4K and above). However note that complex SVG graphics can be computationally expensive so use them with caution.
You can even use CSS/JS to modify svg images at runtime. Here are a few excellent tutorials how to modify svg imags with CSS/JS:
Google Closure compiler (https://developers.google.com/closure/compiler/) is a tool for making JavaScript download and run faster. You can use it to reduce the size of your JavaScript, check for errors and improve the overall performance of your UI.
It has three optimization levels: