2.9.16
Coherent GT
A modern user interface library for games
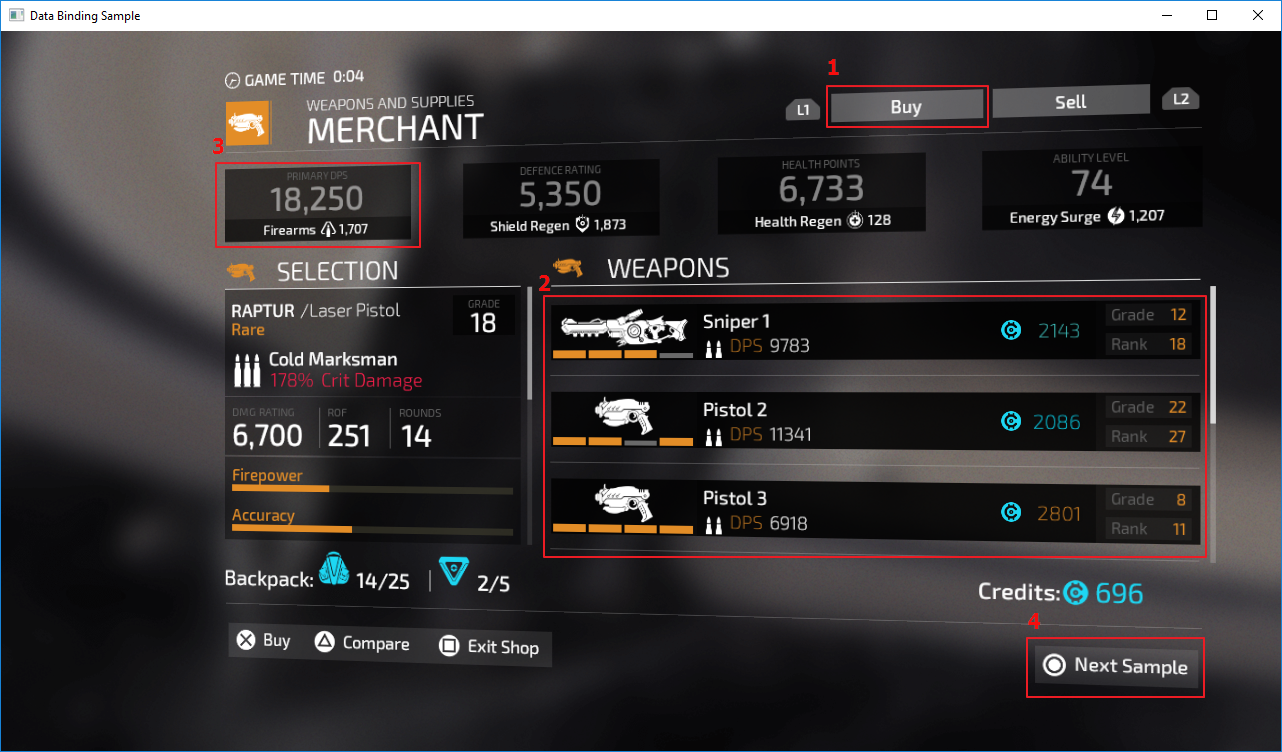
This is a short tutorial that will demonstrate how to use the Selenium testing framework to automate the testing of your game UI. For the purpose of this example the GT Data Binding Sample will be used.
CoherentUIGT\Samples\UI\C++\Sample_DataBinding\Sample_DataBinding.sln
CoherentUIGT\Samples\UI\bin\Sample_DataBinding.exe
cd CoherentUIGT\Samples\UI\C++\Sample_SeleniumUIAutomation
npm install selenium-webdriver
cd ..\..\bin
node ..\C++\Sample_SeleniumUIAutomation\JSSample.js
This is a basic sample test file written in JS.
'use strict';

var webdriver = require('selenium-webdriver');
var capabilities = webdriver.Capabilities.phantomjs();

// The correct path to the sample
capabilities.set('phantomjs.binary.path', './Sample_DataBinding.exe');
var driver = new webdriver.Builder().withCapabilities(capabilities).build();

// TEST 1
// Verify that a displayed text label value is as expected
function getTextTest() {
    console.log('Test 1 starting: Verify a simple text label');
    console.log('Expected text: Buy');

    return driver.wait(webdriver.until.elementLocated(webdriver.By.xpath("//div[@id='buyButtonText']")), 5 * 1000)
        .then(el => {
            return el.getText();
        })
        .then(text => {
            console.log('Actual text: ', text);

            if (text === 'Buy'){
                console.log('Text label is correct!\n');
            } else {
                console.log('\x1b[31m', 'WARNING: Text label is not correct!!!\n', '\x1b[0m');
            }
        });
}

// TEST 2
// Verify the count of multiple similar elements.
// The elements are added from the Structural Data-binding and are coming from the C++ side of the sample.
function getWeaponsCountTest() {
    console.log('Test 2 starting: Verify the count of multiple similar elements');
    console.log('Expected count: 6');

    return driver.wait(webdriver.until.elementsLocated(webdriver.By.xpath("//div[@data-bind-for='i:']")), 5 * 1000)
    .then(el => {
        return el.length;
    })
    .then(count => {
        console.log('Actual count: ', count);
        if(count === 6){
            console.log('Count is correct!\n');

        } else {
            console.log('\x1b[31m', 'WARNING: Count is wrong!!!\n', '\x1b[0m');
        }
    });
}

// TEST 3
// Verify hover element transformation
function getHoverStateTest() {
    console.log('Test 3 starting: Verify hover element transformation');
    console.log('Expected transformation matrix: matrix(1.1, 0, 0, 1.1, 0, 0)');

    var sequence = new webdriver.ActionSequence(driver);

    return driver.wait(webdriver.until.elementsLocated(webdriver.By.xpath("//div[@id='damageStat']")), 5 * 1000)
    .then(loaded => {
        driver.findElement(webdriver.By.xpath("//div[@id='damageStat']"))
        .then(element => {

            sequence.mouseMove(element).perform();

            // This sleep is needed as the button transformation is not instant and we need the end state
            driver.sleep(2000);

            element.getCssValue('-webkit-transform').then(transform => {
                console.log('Actual matrix: ', transform);

                if (transform === 'matrix(1.1, 0, 0, 1.1, 0, 0)') {
                    console.log('Transformation is applied!\n');
                } else {
                    console.log('\x1b[31m', 'WARNING: Transformation is not applied!!!\n', '\x1b[0m');
                }
            });
        });
    });
}

// TEST 4
// Verify hover element color change
function getRGBColorValueTest() {
    console.log('Test 4 starting: Verify hover element color change');
    console.log('Expected default color: rgba(255, 255, 255, 0.0980392)');

    var sequence = new webdriver.ActionSequence(driver);

    return driver.wait(webdriver.until.elementsLocated(webdriver.By.xpath("//div[@id='nextSample']")), 5 * 1000)
    .then(loaded => {
        driver.findElement(webdriver.By.xpath("//div[@id='nextSample']"))
        .then(element => {
            element.getCssValue('background-color').then(defColor => {
                console.log('Actual default color: ', defColor);

                if (defColor === 'rgba(255, 255, 255, 0.0980392)') {
                    console.log('Default color is correct!\n');
                } else {
                    console.log('\x1b[31m', 'WARNING: Default color is not correct!!!\n', '\x1b[0m');
                }
            });

            sequence.mouseMove(element).perform();

            driver.sleep(1000);

            element.getCssValue('background-color').then(hoverColor => {
                console.log('Expected hover color: rgba(227, 141, 39, 0.298039)');
                console.log('Actual hover color: ', hoverColor);

                // The hoverColor is coming from shop.css file line 95.
                // Selenium is not returning the last value as 0.3 but 0.298039 instead - floating point error.
                if (hoverColor === 'rgba(227, 141, 39, 0.298039)') {
                    console.log('Hover color is correct!\n');
                } else {
                    console.log('\x1b[31m', 'WARNING: Hover color is not correct!!!\n', '\x1b[0m');
                }
            });
        });
    });
}

// Function needed to run the tests in order
function runTestsOrdered() {
    return getTextTest()
    .then(() => getWeaponsCountTest())
    .then(() => getHoverStateTest())
    .then(() => getRGBColorValueTest());
}

// This is where we start the execution
runTestsOrdered();
Once the test is executed, the sample will be launched and log messages will be printed in the console. A successful run will look like this:

An unsuccessful run will produce the following log:

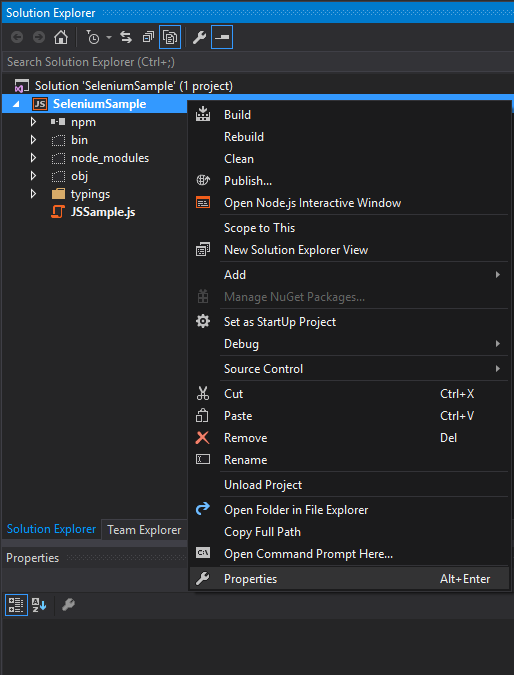
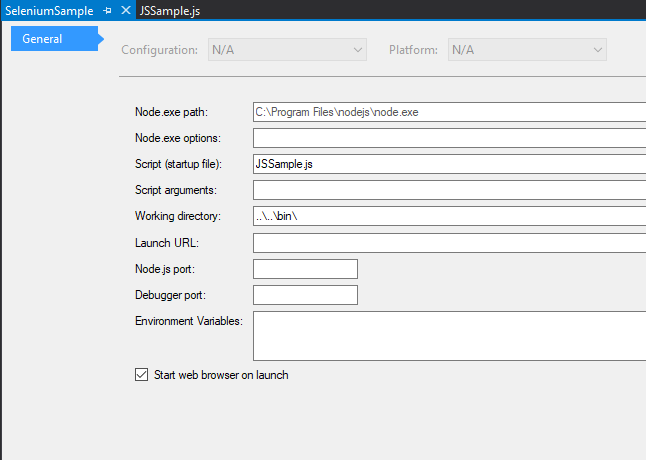
How to run the test sample using Visual Studio (enabled for JS development)
Prerequisites:
Steps: