Creating an interface for customizing character appearance
7/16/2024
Kaloyan Geshev
If you’ve already reviewed the tutorial on displaying 3d objects in the UI you’re familiar with the Live Views feature. This feature allows rendering dynamic textures from the engine directly into the UI.
Leveraging this powerful feature, this tutorial will guide you through creating a dedicated screen for changing a character’s appearance directly from the UI in the game.
Prerequisites
For this tutorial we’ll be extending a sample that we have, called Parallax UI which utilizes React 18 with React Router 6.
Apart from that we’ll be using our component scrollable container and the Interaction Manager library to help with the keyboard interactions.
For the 3D models we’ll use the free Stylized Character Kit assets.
Getting started
For this project we are going to use Unreal Engine 5.3 and with blueprints to update the game based on the UI interactions.
We’ll be using an existing project with Gameface integrated, but you can also do it for a blank project, which can be set up by following the documentation .
Creating the character
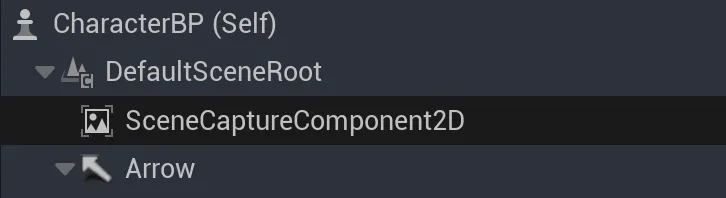
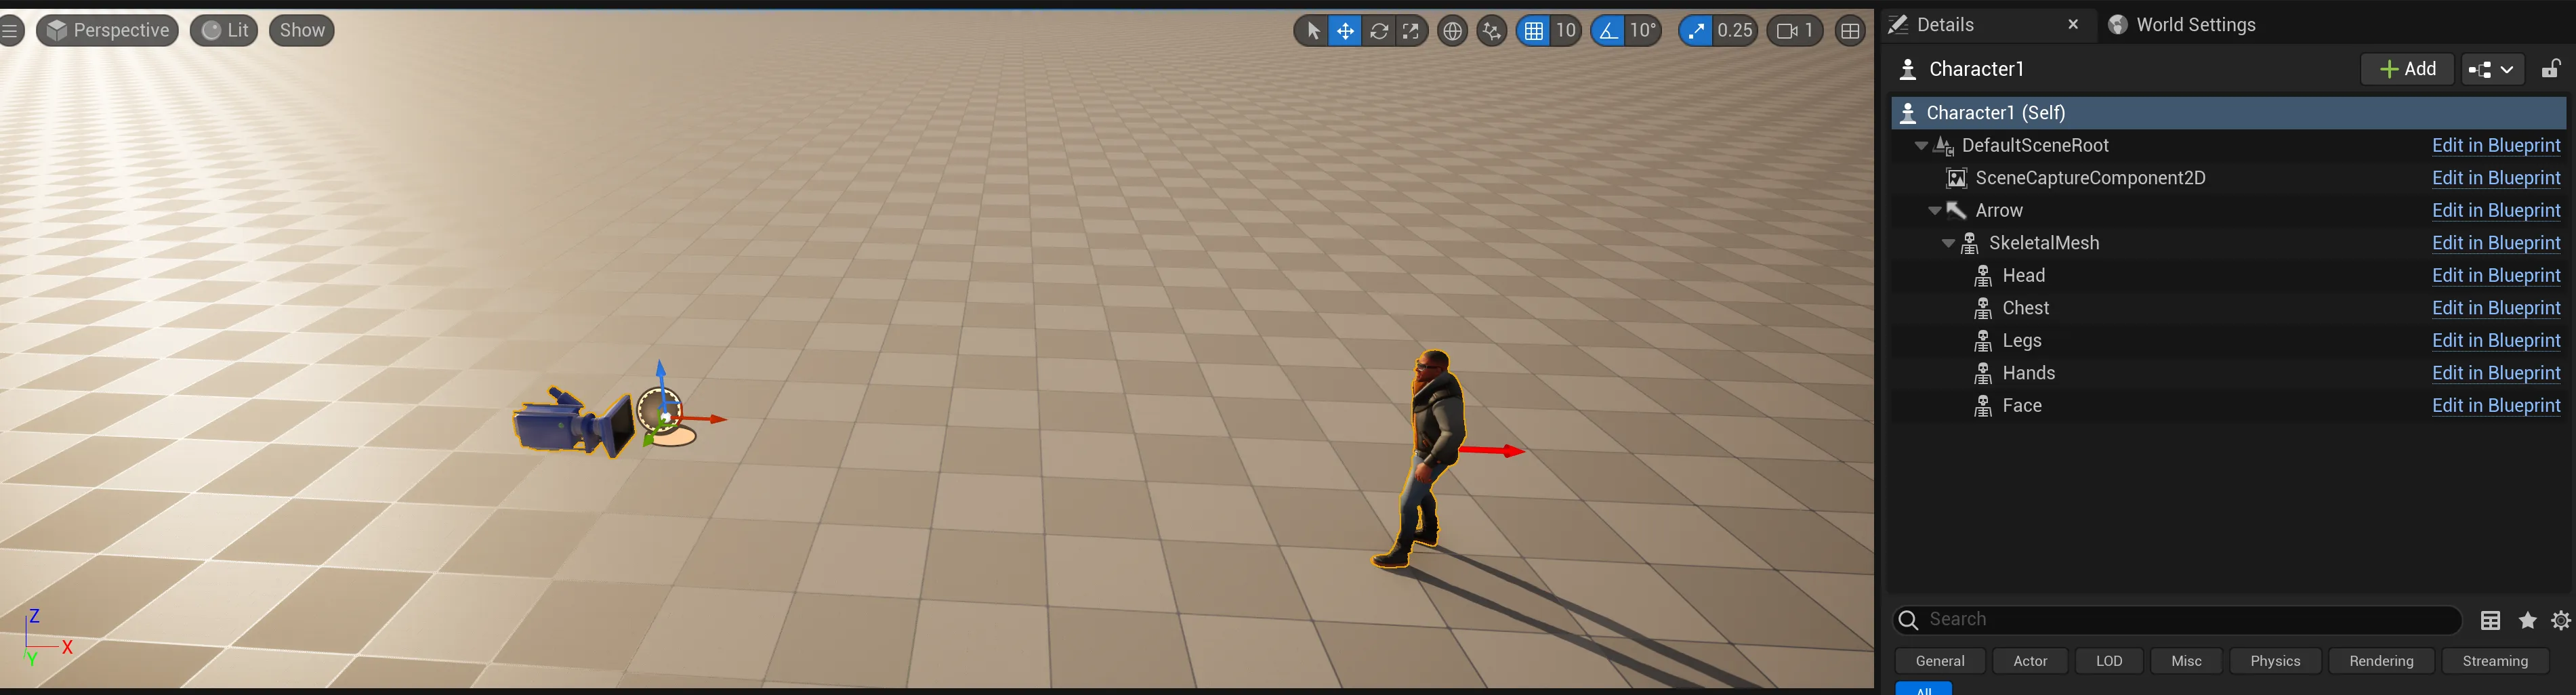
First, we’ll create a Blueprint Class called CharacterBP to contain our 3D character model. Inside we’ll add a SceneCaptureComponent2D for the camera that renders onto our UI, along with an Arrow component that will hold the character’s mesh.
The arrow will be used later for implementing logic to rotate the character.
Adding character meshes
After completing the previous step, it’s time to add the character meshes to our blueprint:
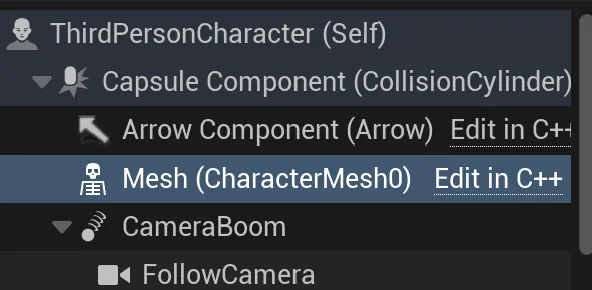
- After adding the Stylized Character Kit to your project, access its models by navigating to
All/Content/SCK_Casual01/Blueprintsin theContent Browserand opening theThirdPersonCharacterblueprint. Copy theMesh (CharacterMesh0)from there.
- Open the
CharacterBPcreated earlier and paste the mesh inside theArrow.
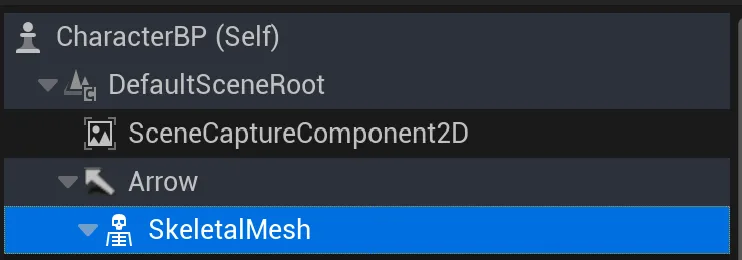
- Configure the
SkeletalMesh:- Change the
Skeletal Mesh Assetin theDetailsmenu to one of the kit meshes, e.gMESH_PC_03. - Set the
Animation Modein theDetailsmenu toUse Animation Blueprint. - Set the
Anim Classin theDetailsmenu toThirdPerson_AnimBP_Cto apply animations to the mesh. - Set the visibility of the
SkeletalMeshto false.
- Change the
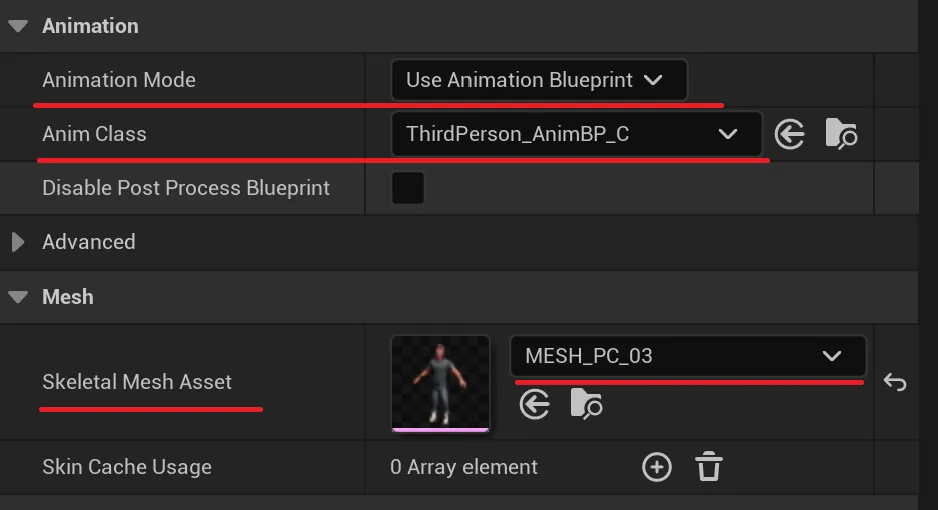

This sets the default mesh for the character and enables animations via the ThirdPerson_AnimBP_C class.
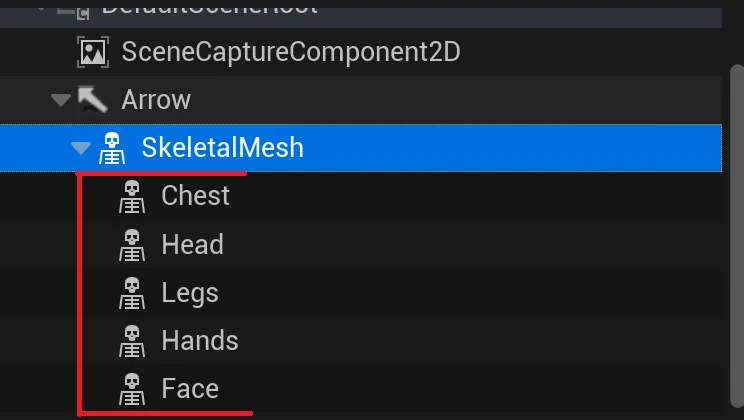
- Create new
SkeletalMeshfor each character parts that you want to enable for customization inside theSkeletalMeshcreated in the previous steps. For example create theChest,Head,Legs,HandsandFace.
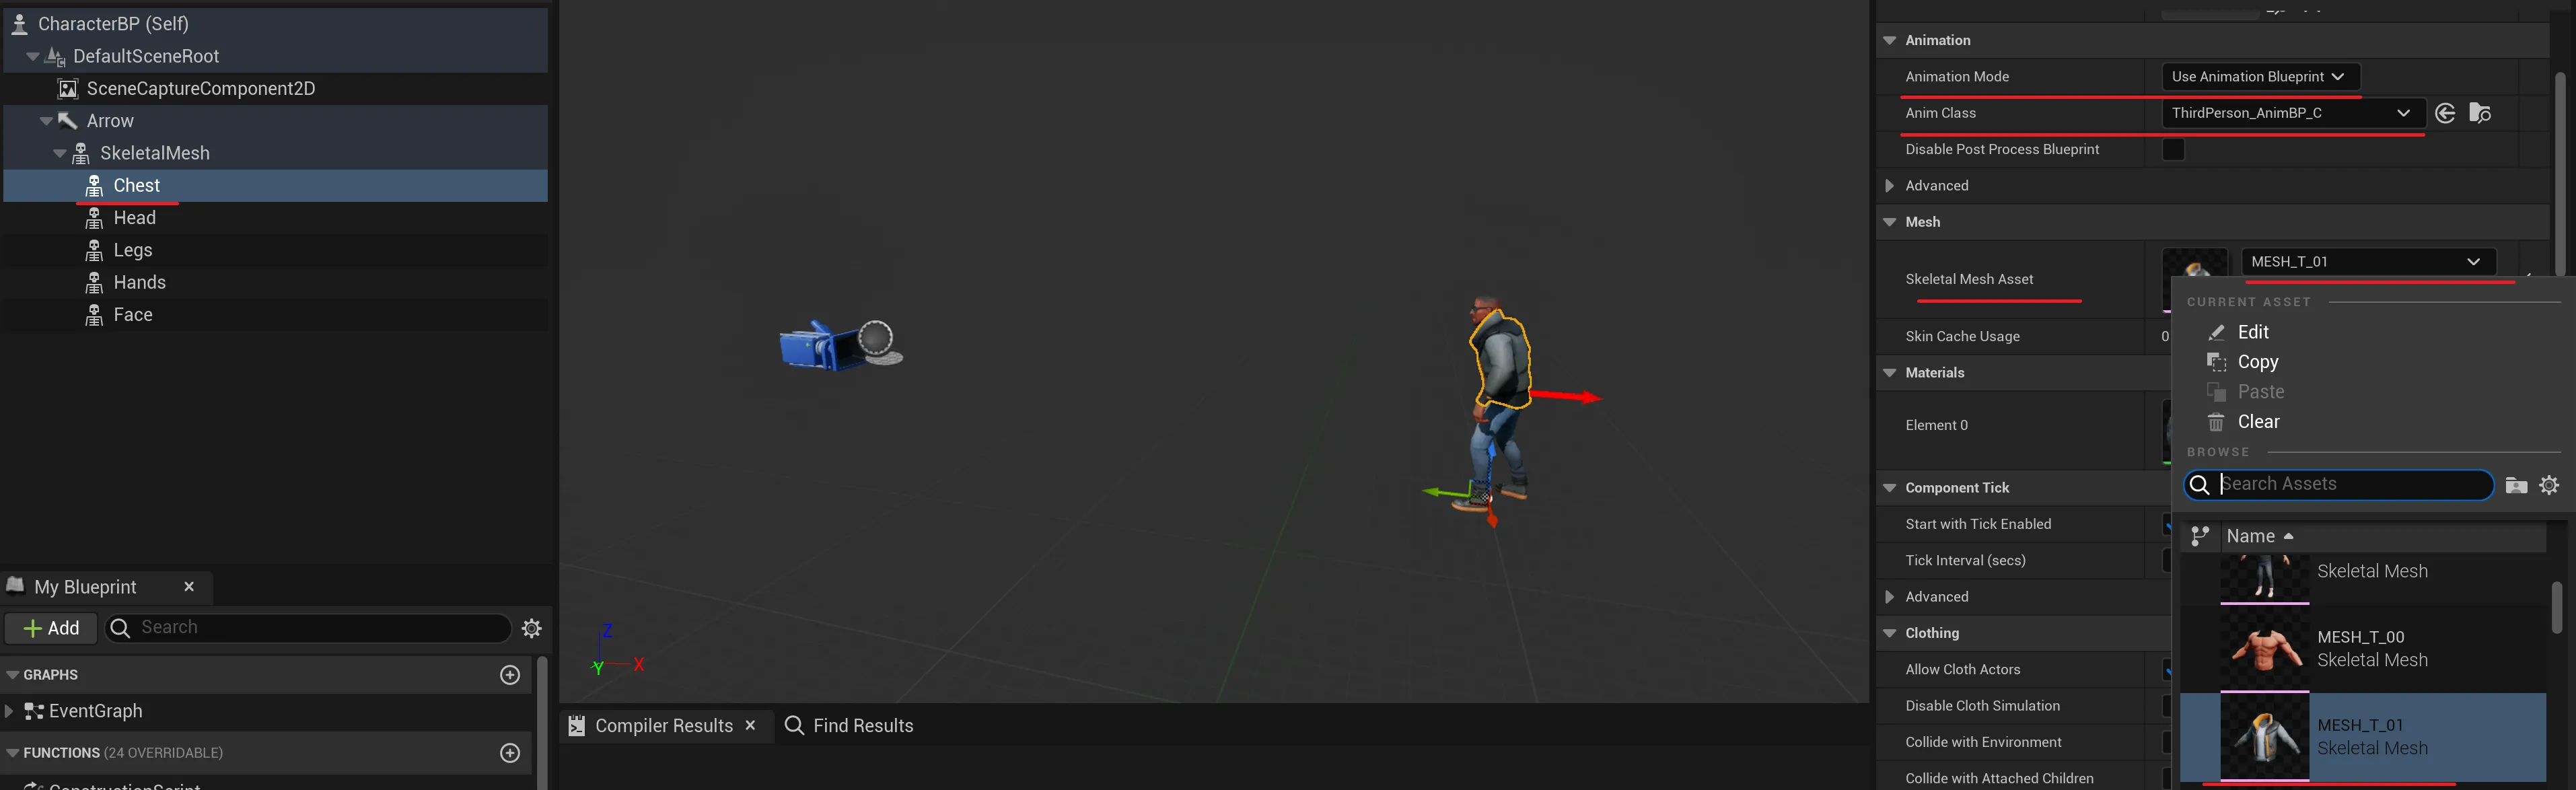
- Setup the new meshes. Change the
Skeletal Mesh Asset,Animation modeandAnimation Classfor each part as done previously for theSkeletalMesh. For example, for the chest:- Change the
Skeletal Mesh Assetto one of the chest meshes, e.g.,MESH_T_01. - Set the
Animation ModetoUse Animation Blueprint. - Set the
Anim ClasstoThirdPerson_AnimBP_C.
- Change the
Setting up the live view
In our case it’s pretty straightforward, we’ll follow the guide in our documentation . Since we’ll be showing the character in our UI, we’ll need to follow the second part of the tutorial in the documentation for Transparent Live Views .
Ensure you place the CharacterBP onto the level map. Without this, nothing will render in our RenderTarget!
Defining the changeable character body parts
In the CharacterBP blueprint, set arrays with options for changing the character’s body parts.
We’ll demonstrate this for the chest options, but the process is the same for other parts.
- Create a new variable
ChestOptionsof typeArray of Skeletal Mesh Object References.
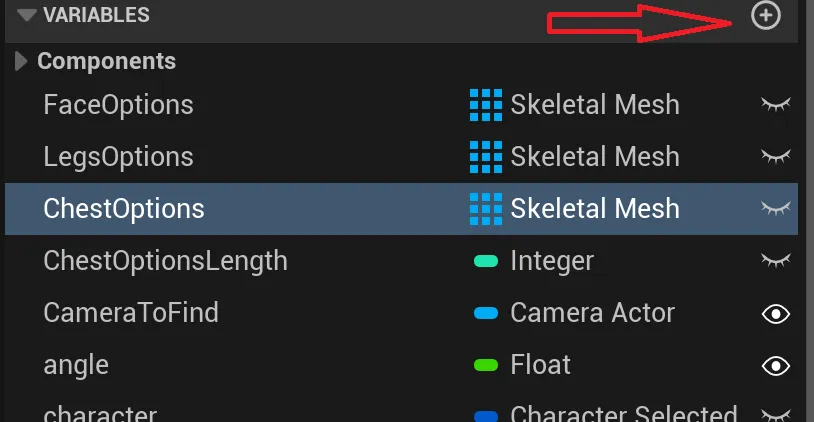
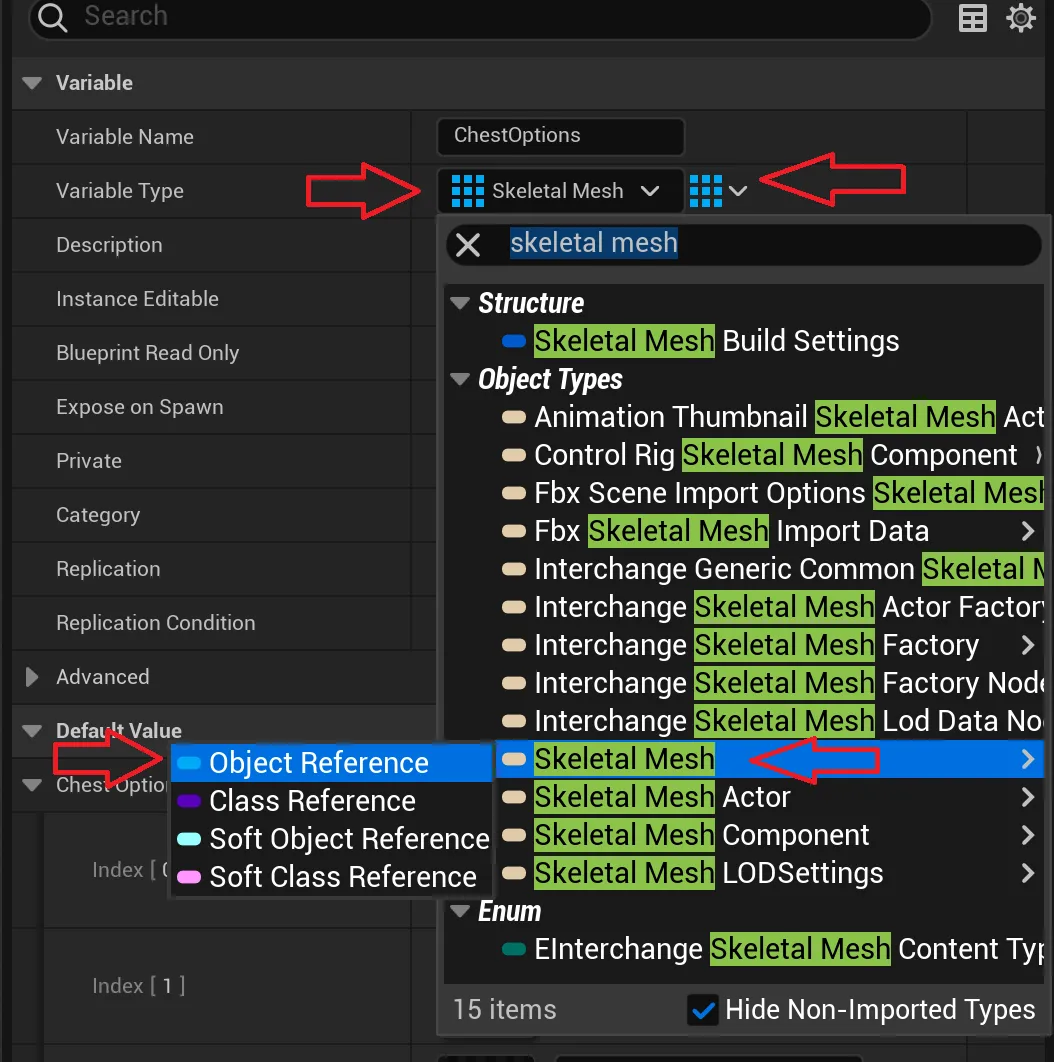
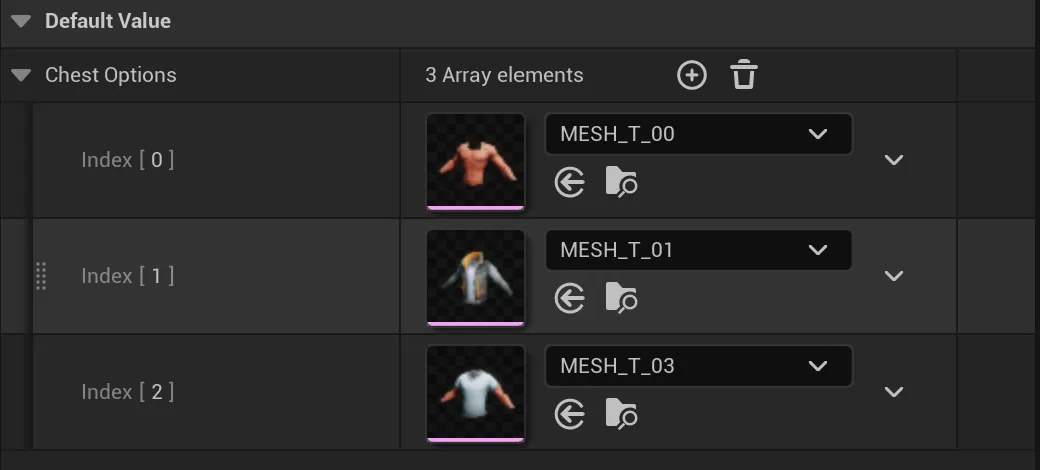
- Set the default value of
Chest Optionsto include all customizable chests. In our example, the Stylized Character Kit provides 3 chests, so add 3 items and set their values to the corresponding chest meshes.
- Repeat these steps for the face and legs to enable customization for these parts.
Create methods for changing body parts
We will create a method to change the current mesh for the chest. The steps are similar for other body parts.
To do that create a new function inside the CharacterBP called ChangeChest with following definition:
   Begin Object Class=/Script/BlueprintGraph.K2Node_FunctionEntry Name="K2Node_FunctionEntry_0" ExportPath="/Script/BlueprintGraph.K2Node_FunctionEntry'/Game/CharacterBP.CharacterBP:ChangeChest.K2Node_FunctionEntry_0'"
   ExtraFlags=201457664
   FunctionReference=(MemberName="ChangeChest")
   bIsEditable=True
   NodePosX=-112
   NodePosY=96
   NodeGuid=2EDFCA6349D95953170A8E88B8C40754
   CustomProperties Pin (PinId=88E6A04849F0EBBE0A4BFABAE0E47377,PinName="then",Direction="EGPD_Output",PinType.PinCategory="exec",PinType.PinSubCategory="",PinType.PinSubCategoryObject=None,PinType.PinSubCategoryMemberReference=(),PinType.PinValueType=(),PinType.ContainerType=None,PinType.bIsReference=False,PinType.bIsConst=False,PinType.bIsWeakPointer=False,PinType.bIsUObjectWrapper=False,PinType.bSerializeAsSinglePrecisionFloat=False,LinkedTo=(K2Node_CallFunction_0 5C8456164B3669D2459F2381B69383EC,),PersistentGuid=00000000000000000000000000000000,bHidden=False,bNotConnectable=False,bDefaultValueIsReadOnly=False,bDefaultValueIsIgnored=False,bAdvancedView=False,bOrphanedPin=False,)
   CustomProperties Pin (PinId=C01F2328434C3A9215F1478DBCF5DAED,PinName="index",Direction="EGPD_Output",PinType.PinCategory="int",PinType.PinSubCategory="",PinType.PinSubCategoryObject=None,PinType.PinSubCategoryMemberReference=(),PinType.PinValueType=(),PinType.ContainerType=None,PinType.bIsReference=False,PinType.bIsConst=False,PinType.bIsWeakPointer=False,PinType.bIsUObjectWrapper=False,PinType.bSerializeAsSinglePrecisionFloat=False,LinkedTo=(K2Node_GetArrayItem_0 572B1AEE479F5FC5C19E529050991A3C,),PersistentGuid=00000000000000000000000000000000,bHidden=False,bNotConnectable=False,bDefaultValueIsReadOnly=False,bDefaultValueIsIgnored=False,bAdvancedView=False,bOrphanedPin=False,)
   CustomProperties UserDefinedPin (PinName="index",PinType=(PinCategory="int"),DesiredPinDirection=EGPD_Output)
End Object
Begin Object Class=/Script/BlueprintGraph.K2Node_CallFunction Name="K2Node_CallFunction_0" ExportPath="/Script/BlueprintGraph.K2Node_CallFunction'/Game/CharacterBP.CharacterBP:ChangeChest.K2Node_CallFunction_0'"
   FunctionReference=(MemberParent="/Script/CoreUObject.Class'/Script/Engine.SkeletalMeshComponent'",MemberName="SetSkeletalMeshAsset")
   NodePosX=592
   NodePosY=80
   NodeGuid=C14662E043DFBD683A38D58C5661F399
   CustomProperties Pin (PinId=5C8456164B3669D2459F2381B69383EC,PinName="execute",PinToolTip="
Exec",PinType.PinCategory="exec",PinType.PinSubCategory="",PinType.PinSubCategoryObject=None,PinType.PinSubCategoryMemberReference=(),PinType.PinValueType=(),PinType.ContainerType=None,PinType.bIsReference=False,PinType.bIsConst=False,PinType.bIsWeakPointer=False,PinType.bIsUObjectWrapper=False,PinType.bSerializeAsSinglePrecisionFloat=False,LinkedTo=(K2Node_FunctionEntry_0 88E6A04849F0EBBE0A4BFABAE0E47377,),PersistentGuid=00000000000000000000000000000000,bHidden=False,bNotConnectable=False,bDefaultValueIsReadOnly=False,bDefaultValueIsIgnored=False,bAdvancedView=False,bOrphanedPin=False,)
   CustomProperties Pin (PinId=62FE79504CD38291B306F1AA274D9BEB,PinName="then",PinToolTip="
Exec",Direction="EGPD_Output",PinType.PinCategory="exec",PinType.PinSubCategory="",PinType.PinSubCategoryObject=None,PinType.PinSubCategoryMemberReference=(),PinType.PinValueType=(),PinType.ContainerType=None,PinType.bIsReference=False,PinType.bIsConst=False,PinType.bIsWeakPointer=False,PinType.bIsUObjectWrapper=False,PinType.bSerializeAsSinglePrecisionFloat=False,PersistentGuid=00000000000000000000000000000000,bHidden=False,bNotConnectable=False,bDefaultValueIsReadOnly=False,bDefaultValueIsIgnored=False,bAdvancedView=False,bOrphanedPin=False,)
   CustomProperties Pin (PinId=FB46D2AD4172F0B195A7FF99643AFD3C,PinName="self",PinFriendlyName=NSLOCTEXT("K2Node", "Target", "Target"),PinToolTip="Target
Skeletal Mesh Component Object Reference",PinType.PinCategory="object",PinType.PinSubCategory="",PinType.PinSubCategoryObject="/Script/CoreUObject.Class'/Script/Engine.SkeletalMeshComponent'",PinType.PinSubCategoryMemberReference=(),PinType.PinValueType=(),PinType.ContainerType=None,PinType.bIsReference=False,PinType.bIsConst=False,PinType.bIsWeakPointer=False,PinType.bIsUObjectWrapper=False,PinType.bSerializeAsSinglePrecisionFloat=False,LinkedTo=(K2Node_VariableGet_0 566836C34417879E1E3272B49DF14EC1,),PersistentGuid=00000000000000000000000000000000,bHidden=False,bNotConnectable=False,bDefaultValueIsReadOnly=False,bDefaultValueIsIgnored=False,bAdvancedView=False,bOrphanedPin=False,)
   CustomProperties Pin (PinId=2DBD715B49B773088AA1E79B370DB522,PinName="NewMesh",PinToolTip="New Mesh
Skeletal Mesh Object Reference",PinType.PinCategory="object",PinType.PinSubCategory="",PinType.PinSubCategoryObject="/Script/CoreUObject.Class'/Script/Engine.SkeletalMesh'",PinType.PinSubCategoryMemberReference=(),PinType.PinValueType=(),PinType.ContainerType=None,PinType.bIsReference=False,PinType.bIsConst=False,PinType.bIsWeakPointer=False,PinType.bIsUObjectWrapper=False,PinType.bSerializeAsSinglePrecisionFloat=False,LinkedTo=(K2Node_GetArrayItem_0 E81B43C141279385C1FA778231FB6E09,),PersistentGuid=00000000000000000000000000000000,bHidden=False,bNotConnectable=False,bDefaultValueIsReadOnly=False,bDefaultValueIsIgnored=False,bAdvancedView=False,bOrphanedPin=False,)
End Object
Begin Object Class=/Script/BlueprintGraph.K2Node_VariableGet Name="K2Node_VariableGet_3" ExportPath="/Script/BlueprintGraph.K2Node_VariableGet'/Game/CharacterBP.CharacterBP:ChangeChest.K2Node_VariableGet_3'"
   VariableReference=(MemberName="ChestOptions",MemberGuid=D395FAB347336D4D9FB9309C42D9A171,bSelfContext=True)
   NodePosX=176
   NodePosY=160
   ErrorType=1
   NodeGuid=B4F8E2574B124CA943AB8AB1EC983A1C
   CustomProperties Pin (PinId=3264FE044D40A1ECAB6250B028D53714,PinName="ChestOptions",Direction="EGPD_Output",PinType.PinCategory="object",PinType.PinSubCategory="",PinType.PinSubCategoryObject="/Script/CoreUObject.Class'/Script/Engine.SkeletalMesh'",PinType.PinSubCategoryMemberReference=(),PinType.PinValueType=(),PinType.ContainerType=Array,PinType.bIsReference=False,PinType.bIsConst=False,PinType.bIsWeakPointer=False,PinType.bIsUObjectWrapper=False,PinType.bSerializeAsSinglePrecisionFloat=False,LinkedTo=(K2Node_GetArrayItem_0 2820CCF74037277D72C64CB19DEF095F,),PersistentGuid=00000000000000000000000000000000,bHidden=False,bNotConnectable=False,bDefaultValueIsReadOnly=False,bDefaultValueIsIgnored=False,bAdvancedView=False,bOrphanedPin=False,)
   CustomProperties Pin (PinId=46BBFD5A440F2072A6911284E48263AF,PinName="self",PinFriendlyName=NSLOCTEXT("K2Node", "Target", "Target"),PinType.PinCategory="object",PinType.PinSubCategory="",PinType.PinSubCategoryObject="/Script/Engine.BlueprintGeneratedClass'/Game/CharacterBP.CharacterBP_C'",PinType.PinSubCategoryMemberReference=(),PinType.PinValueType=(),PinType.ContainerType=None,PinType.bIsReference=False,PinType.bIsConst=False,PinType.bIsWeakPointer=False,PinType.bIsUObjectWrapper=False,PinType.bSerializeAsSinglePrecisionFloat=False,PersistentGuid=00000000000000000000000000000000,bHidden=True,bNotConnectable=False,bDefaultValueIsReadOnly=False,bDefaultValueIsIgnored=False,bAdvancedView=False,bOrphanedPin=False,)
End Object
Begin Object Class=/Script/BlueprintGraph.K2Node_GetArrayItem Name="K2Node_GetArrayItem_0" ExportPath="/Script/BlueprintGraph.K2Node_GetArrayItem'/Game/CharacterBP.CharacterBP:ChangeChest.K2Node_GetArrayItem_0'"
   bReturnByRefDesired=False
   NodePosX=336
   NodePosY=224
   NodeGuid=35A0E76C4CBAEB483EE7EDB13C1327DB
   CustomProperties Pin (PinId=2820CCF74037277D72C64CB19DEF095F,PinName="Array",PinType.PinCategory="object",PinType.PinSubCategory="",PinType.PinSubCategoryObject="/Script/CoreUObject.Class'/Script/Engine.SkeletalMesh'",PinType.PinSubCategoryMemberReference=(),PinType.PinValueType=(),PinType.ContainerType=Array,PinType.bIsReference=False,PinType.bIsConst=False,PinType.bIsWeakPointer=False,PinType.bIsUObjectWrapper=False,PinType.bSerializeAsSinglePrecisionFloat=False,LinkedTo=(K2Node_VariableGet_3 3264FE044D40A1ECAB6250B028D53714,),PersistentGuid=00000000000000000000000000000000,bHidden=False,bNotConnectable=False,bDefaultValueIsReadOnly=False,bDefaultValueIsIgnored=False,bAdvancedView=False,bOrphanedPin=False,)
   CustomProperties Pin (PinId=572B1AEE479F5FC5C19E529050991A3C,PinName="Dimension 1",PinType.PinCategory="int",PinType.PinSubCategory="",PinType.PinSubCategoryObject=None,PinType.PinSubCategoryMemberReference=(),PinType.PinValueType=(),PinType.ContainerType=None,PinType.bIsReference=False,PinType.bIsConst=False,PinType.bIsWeakPointer=False,PinType.bIsUObjectWrapper=False,PinType.bSerializeAsSinglePrecisionFloat=False,DefaultValue="0",AutogeneratedDefaultValue="0",LinkedTo=(K2Node_FunctionEntry_0 C01F2328434C3A9215F1478DBCF5DAED,),PersistentGuid=00000000000000000000000000000000,bHidden=False,bNotConnectable=False,bDefaultValueIsReadOnly=False,bDefaultValueIsIgnored=False,bAdvancedView=False,bOrphanedPin=False,)
   CustomProperties Pin (PinId=E81B43C141279385C1FA778231FB6E09,PinName="Output",Direction="EGPD_Output",PinType.PinCategory="object",PinType.PinSubCategory="",PinType.PinSubCategoryObject="/Script/CoreUObject.Class'/Script/Engine.SkeletalMesh'",PinType.PinSubCategoryMemberReference=(),PinType.PinValueType=(),PinType.ContainerType=None,PinType.bIsReference=False,PinType.bIsConst=False,PinType.bIsWeakPointer=False,PinType.bIsUObjectWrapper=False,PinType.bSerializeAsSinglePrecisionFloat=False,LinkedTo=(K2Node_CallFunction_0 2DBD715B49B773088AA1E79B370DB522,),PersistentGuid=00000000000000000000000000000000,bHidden=False,bNotConnectable=False,bDefaultValueIsReadOnly=False,bDefaultValueIsIgnored=False,bAdvancedView=False,bOrphanedPin=False,)
End Object
Begin Object Class=/Script/BlueprintGraph.K2Node_VariableGet Name="K2Node_VariableGet_0" ExportPath="/Script/BlueprintGraph.K2Node_VariableGet'/Game/CharacterBP.CharacterBP:ChangeChest.K2Node_VariableGet_0'"
   VariableReference=(MemberName="Chest",bSelfContext=True)
   NodePosX=352
   NodePosY=160
   NodeGuid=E4B153D54CFA84635DAAD3BD99111CBA
   CustomProperties Pin (PinId=566836C34417879E1E3272B49DF14EC1,PinName="Chest",Direction="EGPD_Output",PinType.PinCategory="object",PinType.PinSubCategory="",PinType.PinSubCategoryObject="/Script/CoreUObject.Class'/Script/Engine.SkeletalMeshComponent'",PinType.PinSubCategoryMemberReference=(),PinType.PinValueType=(),PinType.ContainerType=None,PinType.bIsReference=False,PinType.bIsConst=False,PinType.bIsWeakPointer=False,PinType.bIsUObjectWrapper=False,PinType.bSerializeAsSinglePrecisionFloat=False,LinkedTo=(K2Node_CallFunction_0 FB46D2AD4172F0B195A7FF99643AFD3C,),PersistentGuid=00000000000000000000000000000000,bHidden=False,bNotConnectable=False,bDefaultValueIsReadOnly=False,bDefaultValueIsIgnored=False,bAdvancedView=False,bOrphanedPin=False,)
   CustomProperties Pin (PinId=C607B84B49946C28247CF5A0EA39D791,PinName="self",PinFriendlyName=NSLOCTEXT("K2Node", "Target", "Target"),PinType.PinCategory="object",PinType.PinSubCategory="",PinType.PinSubCategoryObject="/Script/Engine.BlueprintGeneratedClass'/Game/CharacterBP.CharacterBP_C'",PinType.PinSubCategoryMemberReference=(),PinType.PinValueType=(),PinType.ContainerType=None,PinType.bIsReference=False,PinType.bIsConst=False,PinType.bIsWeakPointer=False,PinType.bIsUObjectWrapper=False,PinType.bSerializeAsSinglePrecisionFloat=False,PersistentGuid=00000000000000000000000000000000,bHidden=True,bNotConnectable=False,bDefaultValueIsReadOnly=False,bDefaultValueIsIgnored=False,bAdvancedView=False,bOrphanedPin=False,)
End Object
The method takes the new index for the chest from the previously defined array and updates it directly in the Chest mesh.
Implementing Body Part Changes
To change a character’s body part, we will subscribe to a custom event from the frontend, which will call the methods we created for changing a body part. We will follow the UI Scripting with C++ guide to define the custom event and make it usable in our blueprints. This event will have two arguments:
- customizationType - String. Specifies the type of customization requested, either
Chest,LegsorFace. - index - Number. The index of the item to use for the character’s appearance, defined in the
ChestOptions,FaceOptions, orLegsOptionsarrays from the previous steps.
To enable this, we will create a new C++ class extending the CohtmlGameHUD class defined by the Gameface Plugin.
1#pragma once2
3#include "CoreMinimal.h"4#include "CohtmlGameHUD.h"5#include "MyCohtmlGameHUD.generated.h"6
7UCLASS()8class AMyCohtmlGameHUD : public ACohtmlGameHUD9{10  GENERATED_BODY()11
12public:13  virtual void BeginPlay() override;14  UFUNCTION(BlueprintImplementableEvent, BlueprintCallable, Category = Gameplay)15  void CustomizeCharacterEvent(const FString& customizationType, const int index);16private:17  UFUNCTION()18  void BindUI();19};
Here we define the handler that will be executed when the JavaScript event CustomizeCharacterEvent is triggered.
The implementation is as follows:
1#include "MyCohtmlGameHUD.h"2
3void AMyCohtmlGameHUD::BeginPlay()4{5  Super::BeginPlay();6  CohtmlHUD->ReadyForBindings.AddDynamic(this, &AMyCohtmlGameHUD::BindUI);7}8void AMyCohtmlGameHUD::BindUI()9{10  CohtmlHUD->GetView()->RegisterForEvent("customizeCharacter", cohtml::MakeHandler(this, &AMyCohtmlGameHUD::CustomizeCharacterEvent));11}
In the BindUI method, we register the customizeCharacter event, which will be triggered from the frontend.
Once the custom event is set up in C++, it can be accessed in the coherentBP blueprint. This allows us to use the event to change the character’s body part by setting up the following blueprint:
   Begin Object Class=/Script/BlueprintGraph.K2Node_Event Name="K2Node_Event_3" ExportPath="/Script/BlueprintGraph.K2Node_Event'/Game/coherentBP.coherentBP:EventGraph.K2Node_Event_3'"
   EventReference=(MemberParent="/Script/CoreUObject.Class'/Script/CohtmlPlugin.MyCohtmlGameHUD'",MemberName="CustomizeCharacterEvent")
   bOverrideFunction=True
   NodePosX=-864
   NodePosY=1856
   NodeGuid=52CB234E499BE17E68A7F8B2C7B5EBD0
   CustomProperties Pin (PinId=B70A3CAE48C54F0D3FDDE3B28643A7A8,PinName="OutputDelegate",Direction="EGPD_Output",PinType.PinCategory="delegate",PinType.PinSubCategory="",PinType.PinSubCategoryObject=None,PinType.PinSubCategoryMemberReference=(MemberParent="/Script/CoreUObject.Class'/Script/CohtmlPlugin.MyCohtmlGameHUD'",MemberName="CustomizeCharacterEvent"),PinType.PinValueType=(),PinType.ContainerType=None,PinType.bIsReference=False,PinType.bIsConst=False,PinType.bIsWeakPointer=False,PinType.bIsUObjectWrapper=False,PinType.bSerializeAsSinglePrecisionFloat=False,PersistentGuid=00000000000000000000000000000000,bHidden=False,bNotConnectable=False,bDefaultValueIsReadOnly=False,bDefaultValueIsIgnored=False,bAdvancedView=False,bOrphanedPin=False,)
   CustomProperties Pin (PinId=B0AA04D1409CDC61E1E9AC806F68C6D3,PinName="then",Direction="EGPD_Output",PinType.PinCategory="exec",PinType.PinSubCategory="",PinType.PinSubCategoryObject=None,PinType.PinSubCategoryMemberReference=(),PinType.PinValueType=(),PinType.ContainerType=None,PinType.bIsReference=False,PinType.bIsConst=False,PinType.bIsWeakPointer=False,PinType.bIsUObjectWrapper=False,PinType.bSerializeAsSinglePrecisionFloat=False,LinkedTo=(K2Node_CallFunction_19 66D06FE44B71DC2D654194BC8666B719,),PersistentGuid=00000000000000000000000000000000,bHidden=False,bNotConnectable=False,bDefaultValueIsReadOnly=False,bDefaultValueIsIgnored=False,bAdvancedView=False,bOrphanedPin=False,)
   CustomProperties Pin (PinId=C4CCC76342CCCD3CDDF9CBB70AC77F1A,PinName="customizationType",PinToolTip="Customization Type
String",Direction="EGPD_Output",PinType.PinCategory="string",PinType.PinSubCategory="",PinType.PinSubCategoryObject=None,PinType.PinSubCategoryMemberReference=(),PinType.PinValueType=(),PinType.ContainerType=None,PinType.bIsReference=False,PinType.bIsConst=False,PinType.bIsWeakPointer=False,PinType.bIsUObjectWrapper=False,PinType.bSerializeAsSinglePrecisionFloat=False,LinkedTo=(K2Node_SwitchString_0 23303B084105BB2F46DDA49CF1DBD899,),PersistentGuid=00000000000000000000000000000000,bHidden=False,bNotConnectable=False,bDefaultValueIsReadOnly=False,bDefaultValueIsIgnored=False,bAdvancedView=False,bOrphanedPin=False,)
   CustomProperties Pin (PinId=3612E5A74EFE4C5F413FDF9EEA782BA1,PinName="index",PinToolTip="Index
Integer",Direction="EGPD_Output",PinType.PinCategory="int",PinType.PinSubCategory="",PinType.PinSubCategoryObject=None,PinType.PinSubCategoryMemberReference=(),PinType.PinValueType=(),PinType.ContainerType=None,PinType.bIsReference=False,PinType.bIsConst=True,PinType.bIsWeakPointer=False,PinType.bIsUObjectWrapper=False,PinType.bSerializeAsSinglePrecisionFloat=False,DefaultValue="0",AutogeneratedDefaultValue="0",LinkedTo=(K2Node_CallFunction_16 0735AB5748738F1A1B55928565E8E40B,K2Node_CallFunction_20 1B42576A40867CCA47F046BFE2500DFE,K2Node_CallFunction_21 0CF5B56E4EAF022AE56354B587F1FA80,K2Node_SetFieldsInStruct_6 BB2686F74BA836E1C75F69A99CDC8A6E,K2Node_SetFieldsInStruct_7 FC89BDDF464C83D6D6D89EB6FBCA6689,K2Node_SetFieldsInStruct_4 B0F6EFE14FEAB6B067C1389D6710CDD1,),PersistentGuid=00000000000000000000000000000000,bHidden=False,bNotConnectable=False,bDefaultValueIsReadOnly=False,bDefaultValueIsIgnored=False,bAdvancedView=False,bOrphanedPin=False,)
End Object
Begin Object Class=/Script/BlueprintGraph.K2Node_SwitchString Name="K2Node_SwitchString_0" ExportPath="/Script/BlueprintGraph.K2Node_SwitchString'/Game/coherentBP.coherentBP:EventGraph.K2Node_SwitchString_0'"
   PinNames(0)="Chest"
   PinNames(1)="Face"
   PinNames(2)="Legs"
   NodePosX=-144
   NodePosY=1856
   NodeGuid=70C002834C7301A52D046BADA4D0CE5E
   CustomProperties Pin (PinId=7689986F493D65F52FCC42BA563C6653,PinName="Default",Direction="EGPD_Output",PinType.PinCategory="exec",PinType.PinSubCategory="",PinType.PinSubCategoryObject=None,PinType.PinSubCategoryMemberReference=(),PinType.PinValueType=(),PinType.ContainerType=None,PinType.bIsReference=False,PinType.bIsConst=False,PinType.bIsWeakPointer=False,PinType.bIsUObjectWrapper=False,PinType.bSerializeAsSinglePrecisionFloat=False,PersistentGuid=00000000000000000000000000000000,bHidden=False,bNotConnectable=False,bDefaultValueIsReadOnly=False,bDefaultValueIsIgnored=False,bAdvancedView=False,bOrphanedPin=False,)
   CustomProperties Pin (PinId=A1370EC44EFF5001DF2DBF9D86392286,PinName="execute",PinType.PinCategory="exec",PinType.PinSubCategory="",PinType.PinSubCategoryObject=None,PinType.PinSubCategoryMemberReference=(),PinType.PinValueType=(),PinType.ContainerType=None,PinType.bIsReference=False,PinType.bIsConst=False,PinType.bIsWeakPointer=False,PinType.bIsUObjectWrapper=False,PinType.bSerializeAsSinglePrecisionFloat=False,LinkedTo=(K2Node_CallFunction_19 414F1FCF4E05BCF8E405D299431EAAAD,),PersistentGuid=00000000000000000000000000000000,bHidden=False,bNotConnectable=False,bDefaultValueIsReadOnly=False,bDefaultValueIsIgnored=False,bAdvancedView=False,bOrphanedPin=False,)
   CustomProperties Pin (PinId=23303B084105BB2F46DDA49CF1DBD899,PinName="Selection",PinType.PinCategory="string",PinType.PinSubCategory="",PinType.PinSubCategoryObject=None,PinType.PinSubCategoryMemberReference=(),PinType.PinValueType=(),PinType.ContainerType=None,PinType.bIsReference=False,PinType.bIsConst=False,PinType.bIsWeakPointer=False,PinType.bIsUObjectWrapper=False,PinType.bSerializeAsSinglePrecisionFloat=False,LinkedTo=(K2Node_Event_3 C4CCC76342CCCD3CDDF9CBB70AC77F1A,),PersistentGuid=00000000000000000000000000000000,bHidden=False,bNotConnectable=False,bDefaultValueIsReadOnly=False,bDefaultValueIsIgnored=False,bAdvancedView=False,bOrphanedPin=False,)
   CustomProperties Pin (PinId=1BA2F89A4DA14ADC505BC6905889FF44,PinName="NotEqual_StriStri",PinType.PinCategory="object",PinType.PinSubCategory="",PinType.PinSubCategoryObject="/Script/CoreUObject.Class'/Script/Engine.KismetStringLibrary'",PinType.PinSubCategoryMemberReference=(),PinType.PinValueType=(),PinType.ContainerType=None,PinType.bIsReference=False,PinType.bIsConst=False,PinType.bIsWeakPointer=False,PinType.bIsUObjectWrapper=False,PinType.bSerializeAsSinglePrecisionFloat=False,DefaultObject="/Script/Engine.Default__KismetStringLibrary",PersistentGuid=00000000000000000000000000000000,bHidden=True,bNotConnectable=True,bDefaultValueIsReadOnly=True,bDefaultValueIsIgnored=False,bAdvancedView=False,bOrphanedPin=False,)
   CustomProperties Pin (PinId=93E2322B40B1FC66670716BCD41F599E,PinName="Chest",Direction="EGPD_Output",PinType.PinCategory="exec",PinType.PinSubCategory="",PinType.PinSubCategoryObject=None,PinType.PinSubCategoryMemberReference=(),PinType.PinValueType=(),PinType.ContainerType=None,PinType.bIsReference=False,PinType.bIsConst=False,PinType.bIsWeakPointer=False,PinType.bIsUObjectWrapper=False,PinType.bSerializeAsSinglePrecisionFloat=False,LinkedTo=(K2Node_CallFunction_16 4C37B305414E0447A6DCA18706223AF5,),PersistentGuid=00000000000000000000000000000000,bHidden=False,bNotConnectable=False,bDefaultValueIsReadOnly=False,bDefaultValueIsIgnored=False,bAdvancedView=False,bOrphanedPin=False,)
   CustomProperties Pin (PinId=DBFDBD7248F124DB48CC24A7ACB49F2F,PinName="Face",Direction="EGPD_Output",PinType.PinCategory="exec",PinType.PinSubCategory="",PinType.PinSubCategoryObject=None,PinType.PinSubCategoryMemberReference=(),PinType.PinValueType=(),PinType.ContainerType=None,PinType.bIsReference=False,PinType.bIsConst=False,PinType.bIsWeakPointer=False,PinType.bIsUObjectWrapper=False,PinType.bSerializeAsSinglePrecisionFloat=False,LinkedTo=(K2Node_CallFunction_20 27D5E3354B6405846CA137ABBBF0029B,),PersistentGuid=00000000000000000000000000000000,bHidden=False,bNotConnectable=False,bDefaultValueIsReadOnly=False,bDefaultValueIsIgnored=False,bAdvancedView=False,bOrphanedPin=False,)
   CustomProperties Pin (PinId=A1A87DA74417F090CD0A609F6AAC68E5,PinName="Legs",Direction="EGPD_Output",PinType.PinCategory="exec",PinType.PinSubCategory="",PinType.PinSubCategoryObject=None,PinType.PinSubCategoryMemberReference=(),PinType.PinValueType=(),PinType.ContainerType=None,PinType.bIsReference=False,PinType.bIsConst=False,PinType.bIsWeakPointer=False,PinType.bIsUObjectWrapper=False,PinType.bSerializeAsSinglePrecisionFloat=False,LinkedTo=(K2Node_CallFunction_21 9AD9E488438A6C39E3BC6F8B3EA3303E,),PersistentGuid=00000000000000000000000000000000,bHidden=False,bNotConnectable=False,bDefaultValueIsReadOnly=False,bDefaultValueIsIgnored=False,bAdvancedView=False,bOrphanedPin=False,)
End Object
Begin Object Class=/Script/BlueprintGraph.K2Node_CallFunction Name="K2Node_CallFunction_16" ExportPath="/Script/BlueprintGraph.K2Node_CallFunction'/Game/coherentBP.coherentBP:EventGraph.K2Node_CallFunction_16'"
   FunctionReference=(MemberParent="/Script/Engine.BlueprintGeneratedClass'/Game/CharacterBP.CharacterBP_C'",MemberName="ChangeChest",MemberGuid=E965F4DF4EA8CCB414B7A780BB592E6E)
   NodePosX=272
   NodePosY=1840
   NodeGuid=C635D5324A2D385B7406B4B58035C859
   CustomProperties Pin (PinId=4C37B305414E0447A6DCA18706223AF5,PinName="execute",PinToolTip="
Exec",PinType.PinCategory="exec",PinType.PinSubCategory="",PinType.PinSubCategoryObject=None,PinType.PinSubCategoryMemberReference=(),PinType.PinValueType=(),PinType.ContainerType=None,PinType.bIsReference=False,PinType.bIsConst=False,PinType.bIsWeakPointer=False,PinType.bIsUObjectWrapper=False,PinType.bSerializeAsSinglePrecisionFloat=False,LinkedTo=(K2Node_SwitchString_0 93E2322B40B1FC66670716BCD41F599E,),PersistentGuid=00000000000000000000000000000000,bHidden=False,bNotConnectable=False,bDefaultValueIsReadOnly=False,bDefaultValueIsIgnored=False,bAdvancedView=False,bOrphanedPin=False,)
   CustomProperties Pin (PinId=6AEFB1A74AA9BCA33EC127A2323A88E4,PinName="then",PinToolTip="
Exec",Direction="EGPD_Output",PinType.PinCategory="exec",PinType.PinSubCategory="",PinType.PinSubCategoryObject=None,PinType.PinSubCategoryMemberReference=(),PinType.PinValueType=(),PinType.ContainerType=None,PinType.bIsReference=False,PinType.bIsConst=False,PinType.bIsWeakPointer=False,PinType.bIsUObjectWrapper=False,PinType.bSerializeAsSinglePrecisionFloat=False,LinkedTo=(K2Node_SetFieldsInStruct_6 AEC897EA429B39725F5D7B828910E54A,),PersistentGuid=00000000000000000000000000000000,bHidden=False,bNotConnectable=False,bDefaultValueIsReadOnly=False,bDefaultValueIsIgnored=False,bAdvancedView=False,bOrphanedPin=False,)
   CustomProperties Pin (PinId=78D68539423DC09B85186682F0590C10,PinName="self",PinFriendlyName=NSLOCTEXT("K2Node", "Target", "Target"),PinToolTip="Target
Character BP Object Reference",PinType.PinCategory="object",PinType.PinSubCategory="",PinType.PinSubCategoryObject="/Script/Engine.BlueprintGeneratedClass'/Game/CharacterBP.CharacterBP_C'",PinType.PinSubCategoryMemberReference=(),PinType.PinValueType=(),PinType.ContainerType=None,PinType.bIsReference=False,PinType.bIsConst=False,PinType.bIsWeakPointer=False,PinType.bIsUObjectWrapper=False,PinType.bSerializeAsSinglePrecisionFloat=False,LinkedTo=(K2Node_Knot_0 441BE21242DDDF1B250A06BB4C311702,),PersistentGuid=00000000000000000000000000000000,bHidden=False,bNotConnectable=False,bDefaultValueIsReadOnly=False,bDefaultValueIsIgnored=False,bAdvancedView=False,bOrphanedPin=False,)
   CustomProperties Pin (PinId=0735AB5748738F1A1B55928565E8E40B,PinName="index",PinToolTip="Index
Integer",PinType.PinCategory="int",PinType.PinSubCategory="",PinType.PinSubCategoryObject=None,PinType.PinSubCategoryMemberReference=(),PinType.PinValueType=(),PinType.ContainerType=None,PinType.bIsReference=False,PinType.bIsConst=False,PinType.bIsWeakPointer=False,PinType.bIsUObjectWrapper=False,PinType.bSerializeAsSinglePrecisionFloat=False,DefaultValue="0",AutogeneratedDefaultValue="0",LinkedTo=(K2Node_Event_3 3612E5A74EFE4C5F413FDF9EEA782BA1,),PersistentGuid=00000000000000000000000000000000,bHidden=False,bNotConnectable=False,bDefaultValueIsReadOnly=False,bDefaultValueIsIgnored=False,bAdvancedView=False,bOrphanedPin=False,)
End Object
Begin Object Class=/Script/BlueprintGraph.K2Node_CallFunction Name="K2Node_CallFunction_19" ExportPath="/Script/BlueprintGraph.K2Node_CallFunction'/Game/coherentBP.coherentBP:EventGraph.K2Node_CallFunction_19'"
   FunctionReference=(MemberParent="/Script/CoreUObject.Class'/Script/Engine.GameplayStatics'",MemberName="GetActorOfClass")
   NodePosX=-560
   NodePosY=1712
   NodeGuid=32406493421D92EA3471149AE0B6E046
   CustomProperties Pin (PinId=66D06FE44B71DC2D654194BC8666B719,PinName="execute",PinType.PinCategory="exec",PinType.PinSubCategory="",PinType.PinSubCategoryObject=None,PinType.PinSubCategoryMemberReference=(),PinType.PinValueType=(),PinType.ContainerType=None,PinType.bIsReference=False,PinType.bIsConst=False,PinType.bIsWeakPointer=False,PinType.bIsUObjectWrapper=False,PinType.bSerializeAsSinglePrecisionFloat=False,LinkedTo=(K2Node_Event_3 B0AA04D1409CDC61E1E9AC806F68C6D3,),PersistentGuid=00000000000000000000000000000000,bHidden=False,bNotConnectable=False,bDefaultValueIsReadOnly=False,bDefaultValueIsIgnored=False,bAdvancedView=False,bOrphanedPin=False,)
   CustomProperties Pin (PinId=414F1FCF4E05BCF8E405D299431EAAAD,PinName="then",Direction="EGPD_Output",PinType.PinCategory="exec",PinType.PinSubCategory="",PinType.PinSubCategoryObject=None,PinType.PinSubCategoryMemberReference=(),PinType.PinValueType=(),PinType.ContainerType=None,PinType.bIsReference=False,PinType.bIsConst=False,PinType.bIsWeakPointer=False,PinType.bIsUObjectWrapper=False,PinType.bSerializeAsSinglePrecisionFloat=False,LinkedTo=(K2Node_SwitchString_0 A1370EC44EFF5001DF2DBF9D86392286,),PersistentGuid=00000000000000000000000000000000,bHidden=False,bNotConnectable=False,bDefaultValueIsReadOnly=False,bDefaultValueIsIgnored=False,bAdvancedView=False,bOrphanedPin=False,)
   CustomProperties Pin (PinId=00A1D7184935AFC33FCF3486F0C63B5D,PinName="self",PinFriendlyName=NSLOCTEXT("K2Node", "Target", "Target"),PinType.PinCategory="object",PinType.PinSubCategory="",PinType.PinSubCategoryObject="/Script/CoreUObject.Class'/Script/Engine.GameplayStatics'",PinType.PinSubCategoryMemberReference=(),PinType.PinValueType=(),PinType.ContainerType=None,PinType.bIsReference=False,PinType.bIsConst=False,PinType.bIsWeakPointer=False,PinType.bIsUObjectWrapper=False,PinType.bSerializeAsSinglePrecisionFloat=False,DefaultObject="/Script/Engine.Default__GameplayStatics",PersistentGuid=00000000000000000000000000000000,bHidden=True,bNotConnectable=False,bDefaultValueIsReadOnly=False,bDefaultValueIsIgnored=False,bAdvancedView=False,bOrphanedPin=False,)
   CustomProperties Pin (PinId=E233A633461C053ECF732282FFB8F1CD,PinName="WorldContextObject",PinType.PinCategory="object",PinType.PinSubCategory="",PinType.PinSubCategoryObject="/Script/CoreUObject.Class'/Script/CoreUObject.Object'",PinType.PinSubCategoryMemberReference=(),PinType.PinValueType=(),PinType.ContainerType=None,PinType.bIsReference=False,PinType.bIsConst=True,PinType.bIsWeakPointer=False,PinType.bIsUObjectWrapper=False,PinType.bSerializeAsSinglePrecisionFloat=False,PersistentGuid=00000000000000000000000000000000,bHidden=True,bNotConnectable=False,bDefaultValueIsReadOnly=False,bDefaultValueIsIgnored=False,bAdvancedView=False,bOrphanedPin=False,)
   CustomProperties Pin (PinId=2DA477714391CF18B7298CB03FBE44B3,PinName="ActorClass",PinType.PinCategory="class",PinType.PinSubCategory="",PinType.PinSubCategoryObject="/Script/CoreUObject.Class'/Script/Engine.Actor'",PinType.PinSubCategoryMemberReference=(),PinType.PinValueType=(),PinType.ContainerType=None,PinType.bIsReference=False,PinType.bIsConst=False,PinType.bIsWeakPointer=False,PinType.bIsUObjectWrapper=True,PinType.bSerializeAsSinglePrecisionFloat=False,DefaultObject="/Game/CharacterBP.CharacterBP_C",PersistentGuid=00000000000000000000000000000000,bHidden=False,bNotConnectable=False,bDefaultValueIsReadOnly=False,bDefaultValueIsIgnored=False,bAdvancedView=False,bOrphanedPin=False,)
   CustomProperties Pin (PinId=ED47C0414463FA1DA0459197161AF46A,PinName="ReturnValue",Direction="EGPD_Output",PinType.PinCategory="object",PinType.PinSubCategory="",PinType.PinSubCategoryObject="/Script/Engine.BlueprintGeneratedClass'/Game/CharacterBP.CharacterBP_C'",PinType.PinSubCategoryMemberReference=(),PinType.PinValueType=(),PinType.ContainerType=None,PinType.bIsReference=False,PinType.bIsConst=False,PinType.bIsWeakPointer=False,PinType.bIsUObjectWrapper=False,PinType.bSerializeAsSinglePrecisionFloat=False,LinkedTo=(K2Node_Knot_0 2E9681A44D5F222CCF538BAEB00F2E6C,K2Node_Knot_1 32B817114B86FFFF389887AF145B2586,K2Node_Knot_2 1548253A4A5A75B6DD6C51981B01A6E8,),PersistentGuid=00000000000000000000000000000000,bHidden=False,bNotConnectable=False,bDefaultValueIsReadOnly=False,bDefaultValueIsIgnored=False,bAdvancedView=False,bOrphanedPin=False,)
End Object
Begin Object Class=/Script/BlueprintGraph.K2Node_CallFunction Name="K2Node_CallFunction_20" ExportPath="/Script/BlueprintGraph.K2Node_CallFunction'/Game/coherentBP.coherentBP:EventGraph.K2Node_CallFunction_20'"
   FunctionReference=(MemberParent="/Script/Engine.BlueprintGeneratedClass'/Game/CharacterBP.CharacterBP_C'",MemberName="ChangeFace",MemberGuid=6C3B2D9A49587298A7C2C68D885CD3F8)
   NodePosX=272
   NodePosY=2000
   NodeGuid=CFCCE59B491335EA18CEC59F53C2EEFB
   CustomProperties Pin (PinId=27D5E3354B6405846CA137ABBBF0029B,PinName="execute",PinToolTip="
Exec",PinType.PinCategory="exec",PinType.PinSubCategory="",PinType.PinSubCategoryObject=None,PinType.PinSubCategoryMemberReference=(),PinType.PinValueType=(),PinType.ContainerType=None,PinType.bIsReference=False,PinType.bIsConst=False,PinType.bIsWeakPointer=False,PinType.bIsUObjectWrapper=False,PinType.bSerializeAsSinglePrecisionFloat=False,LinkedTo=(K2Node_SwitchString_0 DBFDBD7248F124DB48CC24A7ACB49F2F,),PersistentGuid=00000000000000000000000000000000,bHidden=False,bNotConnectable=False,bDefaultValueIsReadOnly=False,bDefaultValueIsIgnored=False,bAdvancedView=False,bOrphanedPin=False,)
   CustomProperties Pin (PinId=244E3AC44F414447D1D3B9885E688192,PinName="then",PinToolTip="
Exec",Direction="EGPD_Output",PinType.PinCategory="exec",PinType.PinSubCategory="",PinType.PinSubCategoryObject=None,PinType.PinSubCategoryMemberReference=(),PinType.PinValueType=(),PinType.ContainerType=None,PinType.bIsReference=False,PinType.bIsConst=False,PinType.bIsWeakPointer=False,PinType.bIsUObjectWrapper=False,PinType.bSerializeAsSinglePrecisionFloat=False,LinkedTo=(K2Node_SetFieldsInStruct_7 AEC897EA429B39725F5D7B828910E54A,),PersistentGuid=00000000000000000000000000000000,bHidden=False,bNotConnectable=False,bDefaultValueIsReadOnly=False,bDefaultValueIsIgnored=False,bAdvancedView=False,bOrphanedPin=False,)
   CustomProperties Pin (PinId=61181EB74FC262A2BBE5AB836EBDED90,PinName="self",PinFriendlyName=NSLOCTEXT("K2Node", "Target", "Target"),PinToolTip="Target
Character BP Object Reference",PinType.PinCategory="object",PinType.PinSubCategory="",PinType.PinSubCategoryObject="/Script/Engine.BlueprintGeneratedClass'/Game/CharacterBP.CharacterBP_C'",PinType.PinSubCategoryMemberReference=(),PinType.PinValueType=(),PinType.ContainerType=None,PinType.bIsReference=False,PinType.bIsConst=False,PinType.bIsWeakPointer=False,PinType.bIsUObjectWrapper=False,PinType.bSerializeAsSinglePrecisionFloat=False,LinkedTo=(K2Node_Knot_1 BB738BAE44109CC9DCB794B1CF66323B,),PersistentGuid=00000000000000000000000000000000,bHidden=False,bNotConnectable=False,bDefaultValueIsReadOnly=False,bDefaultValueIsIgnored=False,bAdvancedView=False,bOrphanedPin=False,)
   CustomProperties Pin (PinId=1B42576A40867CCA47F046BFE2500DFE,PinName="index",PinToolTip="Index
Integer",PinType.PinCategory="int",PinType.PinSubCategory="",PinType.PinSubCategoryObject=None,PinType.PinSubCategoryMemberReference=(),PinType.PinValueType=(),PinType.ContainerType=None,PinType.bIsReference=False,PinType.bIsConst=False,PinType.bIsWeakPointer=False,PinType.bIsUObjectWrapper=False,PinType.bSerializeAsSinglePrecisionFloat=False,DefaultValue="0",AutogeneratedDefaultValue="0",LinkedTo=(K2Node_Event_3 3612E5A74EFE4C5F413FDF9EEA782BA1,),PersistentGuid=00000000000000000000000000000000,bHidden=False,bNotConnectable=False,bDefaultValueIsReadOnly=False,bDefaultValueIsIgnored=False,bAdvancedView=False,bOrphanedPin=False,)
End Object
Begin Object Class=/Script/BlueprintGraph.K2Node_Knot Name="K2Node_Knot_0" ExportPath="/Script/BlueprintGraph.K2Node_Knot'/Game/coherentBP.coherentBP:EventGraph.K2Node_Knot_0'"
   NodePosX=192
   NodePosY=1776
   NodeGuid=FA1E41304C76F5A284C812BD03C67B3D
   CustomProperties Pin (PinId=2E9681A44D5F222CCF538BAEB00F2E6C,PinName="InputPin",PinType.PinCategory="object",PinType.PinSubCategory="",PinType.PinSubCategoryObject="/Script/Engine.BlueprintGeneratedClass'/Game/CharacterBP.CharacterBP_C'",PinType.PinSubCategoryMemberReference=(),PinType.PinValueType=(),PinType.ContainerType=None,PinType.bIsReference=False,PinType.bIsConst=False,PinType.bIsWeakPointer=False,PinType.bIsUObjectWrapper=False,PinType.bSerializeAsSinglePrecisionFloat=False,LinkedTo=(K2Node_CallFunction_19 ED47C0414463FA1DA0459197161AF46A,),PersistentGuid=00000000000000000000000000000000,bHidden=False,bNotConnectable=False,bDefaultValueIsReadOnly=False,bDefaultValueIsIgnored=True,bAdvancedView=False,bOrphanedPin=False,)
   CustomProperties Pin (PinId=441BE21242DDDF1B250A06BB4C311702,PinName="OutputPin",Direction="EGPD_Output",PinType.PinCategory="object",PinType.PinSubCategory="",PinType.PinSubCategoryObject="/Script/Engine.BlueprintGeneratedClass'/Game/CharacterBP.CharacterBP_C'",PinType.PinSubCategoryMemberReference=(),PinType.PinValueType=(),PinType.ContainerType=None,PinType.bIsReference=False,PinType.bIsConst=False,PinType.bIsWeakPointer=False,PinType.bIsUObjectWrapper=False,PinType.bSerializeAsSinglePrecisionFloat=False,LinkedTo=(K2Node_CallFunction_16 78D68539423DC09B85186682F0590C10,),PersistentGuid=00000000000000000000000000000000,bHidden=False,bNotConnectable=False,bDefaultValueIsReadOnly=False,bDefaultValueIsIgnored=False,bAdvancedView=False,bOrphanedPin=False,)
End Object
Begin Object Class=/Script/BlueprintGraph.K2Node_Knot Name="K2Node_Knot_1" ExportPath="/Script/BlueprintGraph.K2Node_Knot'/Game/coherentBP.coherentBP:EventGraph.K2Node_Knot_1'"
   NodePosX=144
   NodePosY=1776
   NodeGuid=B269DA124B2F636D1E7D66B4475DC065
   CustomProperties Pin (PinId=32B817114B86FFFF389887AF145B2586,PinName="InputPin",PinType.PinCategory="object",PinType.PinSubCategory="",PinType.PinSubCategoryObject="/Script/Engine.BlueprintGeneratedClass'/Game/CharacterBP.CharacterBP_C'",PinType.PinSubCategoryMemberReference=(),PinType.PinValueType=(),PinType.ContainerType=None,PinType.bIsReference=False,PinType.bIsConst=False,PinType.bIsWeakPointer=False,PinType.bIsUObjectWrapper=False,PinType.bSerializeAsSinglePrecisionFloat=False,LinkedTo=(K2Node_CallFunction_19 ED47C0414463FA1DA0459197161AF46A,),PersistentGuid=00000000000000000000000000000000,bHidden=False,bNotConnectable=False,bDefaultValueIsReadOnly=False,bDefaultValueIsIgnored=True,bAdvancedView=False,bOrphanedPin=False,)
   CustomProperties Pin (PinId=BB738BAE44109CC9DCB794B1CF66323B,PinName="OutputPin",Direction="EGPD_Output",PinType.PinCategory="object",PinType.PinSubCategory="",PinType.PinSubCategoryObject="/Script/Engine.BlueprintGeneratedClass'/Game/CharacterBP.CharacterBP_C'",PinType.PinSubCategoryMemberReference=(),PinType.PinValueType=(),PinType.ContainerType=None,PinType.bIsReference=False,PinType.bIsConst=False,PinType.bIsWeakPointer=False,PinType.bIsUObjectWrapper=False,PinType.bSerializeAsSinglePrecisionFloat=False,LinkedTo=(K2Node_CallFunction_20 61181EB74FC262A2BBE5AB836EBDED90,),PersistentGuid=00000000000000000000000000000000,bHidden=False,bNotConnectable=False,bDefaultValueIsReadOnly=False,bDefaultValueIsIgnored=False,bAdvancedView=False,bOrphanedPin=False,)
End Object
Begin Object Class=/Script/BlueprintGraph.K2Node_CallFunction Name="K2Node_CallFunction_21" ExportPath="/Script/BlueprintGraph.K2Node_CallFunction'/Game/coherentBP.coherentBP:EventGraph.K2Node_CallFunction_21'"
   FunctionReference=(MemberParent="/Script/Engine.BlueprintGeneratedClass'/Game/CharacterBP.CharacterBP_C'",MemberName="ChangeLegs",MemberGuid=A5BD456742E2A38FBDD52FA7C8D385A9)
   NodePosX=272
   NodePosY=2160
   NodeGuid=2485477642831F9B113604A62ABC58F3
   CustomProperties Pin (PinId=9AD9E488438A6C39E3BC6F8B3EA3303E,PinName="execute",PinToolTip="
Exec",PinType.PinCategory="exec",PinType.PinSubCategory="",PinType.PinSubCategoryObject=None,PinType.PinSubCategoryMemberReference=(),PinType.PinValueType=(),PinType.ContainerType=None,PinType.bIsReference=False,PinType.bIsConst=False,PinType.bIsWeakPointer=False,PinType.bIsUObjectWrapper=False,PinType.bSerializeAsSinglePrecisionFloat=False,LinkedTo=(K2Node_SwitchString_0 A1A87DA74417F090CD0A609F6AAC68E5,),PersistentGuid=00000000000000000000000000000000,bHidden=False,bNotConnectable=False,bDefaultValueIsReadOnly=False,bDefaultValueIsIgnored=False,bAdvancedView=False,bOrphanedPin=False,)
   CustomProperties Pin (PinId=8AA84C5946A861E0581712AF8FD6A152,PinName="then",PinToolTip="
Exec",Direction="EGPD_Output",PinType.PinCategory="exec",PinType.PinSubCategory="",PinType.PinSubCategoryObject=None,PinType.PinSubCategoryMemberReference=(),PinType.PinValueType=(),PinType.ContainerType=None,PinType.bIsReference=False,PinType.bIsConst=False,PinType.bIsWeakPointer=False,PinType.bIsUObjectWrapper=False,PinType.bSerializeAsSinglePrecisionFloat=False,LinkedTo=(K2Node_SetFieldsInStruct_4 AEC897EA429B39725F5D7B828910E54A,),PersistentGuid=00000000000000000000000000000000,bHidden=False,bNotConnectable=False,bDefaultValueIsReadOnly=False,bDefaultValueIsIgnored=False,bAdvancedView=False,bOrphanedPin=False,)
   CustomProperties Pin (PinId=98EF9E5B44CEE5B98E2D04BBBB0E7E9C,PinName="self",PinFriendlyName=NSLOCTEXT("K2Node", "Target", "Target"),PinToolTip="Target
Character BP Object Reference",PinType.PinCategory="object",PinType.PinSubCategory="",PinType.PinSubCategoryObject="/Script/Engine.BlueprintGeneratedClass'/Game/CharacterBP.CharacterBP_C'",PinType.PinSubCategoryMemberReference=(),PinType.PinValueType=(),PinType.ContainerType=None,PinType.bIsReference=False,PinType.bIsConst=False,PinType.bIsWeakPointer=False,PinType.bIsUObjectWrapper=False,PinType.bSerializeAsSinglePrecisionFloat=False,LinkedTo=(K2Node_Knot_2 663D55F74D5FEA2A23A2F88F110182ED,),PersistentGuid=00000000000000000000000000000000,bHidden=False,bNotConnectable=False,bDefaultValueIsReadOnly=False,bDefaultValueIsIgnored=False,bAdvancedView=False,bOrphanedPin=False,)
   CustomProperties Pin (PinId=0CF5B56E4EAF022AE56354B587F1FA80,PinName="index",PinToolTip="Index
Integer",PinType.PinCategory="int",PinType.PinSubCategory="",PinType.PinSubCategoryObject=None,PinType.PinSubCategoryMemberReference=(),PinType.PinValueType=(),PinType.ContainerType=None,PinType.bIsReference=False,PinType.bIsConst=False,PinType.bIsWeakPointer=False,PinType.bIsUObjectWrapper=False,PinType.bSerializeAsSinglePrecisionFloat=False,DefaultValue="0",AutogeneratedDefaultValue="0",LinkedTo=(K2Node_Event_3 3612E5A74EFE4C5F413FDF9EEA782BA1,),PersistentGuid=00000000000000000000000000000000,bHidden=False,bNotConnectable=False,bDefaultValueIsReadOnly=False,bDefaultValueIsIgnored=False,bAdvancedView=False,bOrphanedPin=False,)
End Object
Begin Object Class=/Script/BlueprintGraph.K2Node_Knot Name="K2Node_Knot_2" ExportPath="/Script/BlueprintGraph.K2Node_Knot'/Game/coherentBP.coherentBP:EventGraph.K2Node_Knot_2'"
   NodePosX=48
   NodePosY=1776
   NodeGuid=41BB3E8547319C63A75259B40DDB1F37
   CustomProperties Pin (PinId=1548253A4A5A75B6DD6C51981B01A6E8,PinName="InputPin",PinType.PinCategory="object",PinType.PinSubCategory="",PinType.PinSubCategoryObject="/Script/Engine.BlueprintGeneratedClass'/Game/CharacterBP.CharacterBP_C'",PinType.PinSubCategoryMemberReference=(),PinType.PinValueType=(),PinType.ContainerType=None,PinType.bIsReference=False,PinType.bIsConst=False,PinType.bIsWeakPointer=False,PinType.bIsUObjectWrapper=False,PinType.bSerializeAsSinglePrecisionFloat=False,LinkedTo=(K2Node_CallFunction_19 ED47C0414463FA1DA0459197161AF46A,),PersistentGuid=00000000000000000000000000000000,bHidden=False,bNotConnectable=False,bDefaultValueIsReadOnly=False,bDefaultValueIsIgnored=True,bAdvancedView=False,bOrphanedPin=False,)
   CustomProperties Pin (PinId=663D55F74D5FEA2A23A2F88F110182ED,PinName="OutputPin",Direction="EGPD_Output",PinType.PinCategory="object",PinType.PinSubCategory="",PinType.PinSubCategoryObject="/Script/Engine.BlueprintGeneratedClass'/Game/CharacterBP.CharacterBP_C'",PinType.PinSubCategoryMemberReference=(),PinType.PinValueType=(),PinType.ContainerType=None,PinType.bIsReference=False,PinType.bIsConst=False,PinType.bIsWeakPointer=False,PinType.bIsUObjectWrapper=False,PinType.bSerializeAsSinglePrecisionFloat=False,LinkedTo=(K2Node_CallFunction_21 98EF9E5B44CEE5B98E2D04BBBB0E7E9C,),PersistentGuid=00000000000000000000000000000000,bHidden=False,bNotConnectable=False,bDefaultValueIsReadOnly=False,bDefaultValueIsIgnored=False,bAdvancedView=False,bOrphanedPin=False,)
End Object
By using the Customization Type argument, we can determine which character mesh should be replaced with a new one selected from the array by the given Index.
Preserving the active index of the selected body part
To allow the Frontend to know which item is selected for the Chest, Face, and Legs, we need to create a binding model that will be accessible in the UI. This will enable us to retrieve this information.
To achieve this, we first need to define a structure called CharacterSelectedParts that will hold the active index for each customizable character part.
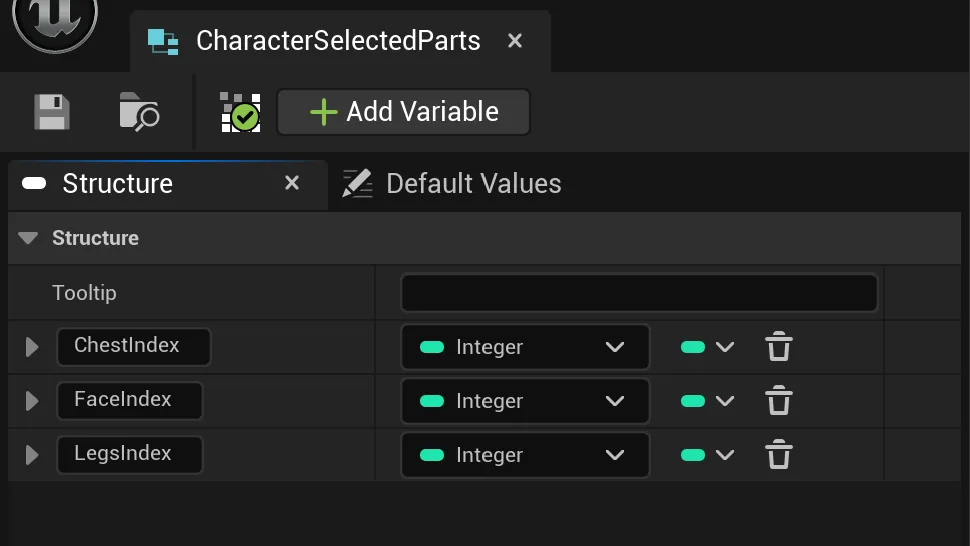
For instance, if the chest with index 1 is currently selected, the ChestIndex should be set to 1.
Once the structure is created, we need to create a binding model from it.
To do this, we must wait for the ReadyForBindings event and then create the model.
The blueprint below illustrates this process.
   Begin Object Class=/Script/BlueprintGraph.K2Node_CustomEvent Name="K2Node_CustomEvent_0" ExportPath="/Script/BlueprintGraph.K2Node_CustomEvent'/Game/coherentBP.coherentBP:EventGraph.K2Node_CustomEvent_0'"
   CustomFunctionName="ReadyForBindings"
   NodePosX=-304
   NodePosY=-2592
   ErrorType=3
   NodeGuid=18806A3643BE699A308944A43F5C1673
   CustomProperties Pin (PinId=5CC237924E00B37904FBEA8E54379F6B,PinName="OutputDelegate",Direction="EGPD_Output",PinType.PinCategory="delegate",PinType.PinSubCategory="",PinType.PinSubCategoryObject=None,PinType.PinSubCategoryMemberReference=(MemberParent="/Script/Engine.BlueprintGeneratedClass'/Game/coherentBP.coherentBP_C'",MemberName="ReadyForBindings",MemberGuid=18806A3643BE699A308944A43F5C1673),PinType.PinValueType=(),PinType.ContainerType=None,PinType.bIsReference=False,PinType.bIsConst=False,PinType.bIsWeakPointer=False,PinType.bIsUObjectWrapper=False,PinType.bSerializeAsSinglePrecisionFloat=False,LinkedTo=(K2Node_AddDelegate_0 4F7DD7F541BD304488877582A833160C,),PersistentGuid=00000000000000000000000000000000,bHidden=False,bNotConnectable=False,bDefaultValueIsReadOnly=False,bDefaultValueIsIgnored=False,bAdvancedView=False,bOrphanedPin=False,)
   CustomProperties Pin (PinId=0CAE98AB4973DEC1D51995A205A8F239,PinName="then",Direction="EGPD_Output",PinType.PinCategory="exec",PinType.PinSubCategory="",PinType.PinSubCategoryObject=None,PinType.PinSubCategoryMemberReference=(),PinType.PinValueType=(),PinType.ContainerType=None,PinType.bIsReference=False,PinType.bIsConst=False,PinType.bIsWeakPointer=False,PinType.bIsUObjectWrapper=False,PinType.bSerializeAsSinglePrecisionFloat=False,LinkedTo=(K2Node_CallFunction_0 6D57407B4C76880C2BCDD4BA2F81E7FF,),PersistentGuid=00000000000000000000000000000000,bHidden=False,bNotConnectable=False,bDefaultValueIsReadOnly=False,bDefaultValueIsIgnored=False,bAdvancedView=False,bOrphanedPin=False,)
End Object
Begin Object Class=/Script/BlueprintGraph.K2Node_CallFunction Name="K2Node_CallFunction_0" ExportPath="/Script/BlueprintGraph.K2Node_CallFunction'/Game/coherentBP.coherentBP:EventGraph.K2Node_CallFunction_0'"
   FunctionReference=(MemberParent="/Script/CoreUObject.Class'/Script/Engine.GameplayStatics'",MemberName="GetActorOfClass")
   NodePosX=-64
   NodePosY=-2576
   NodeGuid=204DDBEB430E8E0D423087A229EC7776
   CustomProperties Pin (PinId=6D57407B4C76880C2BCDD4BA2F81E7FF,PinName="execute",PinToolTip="
Exec",PinType.PinCategory="exec",PinType.PinSubCategory="",PinType.PinSubCategoryObject=None,PinType.PinSubCategoryMemberReference=(),PinType.PinValueType=(),PinType.ContainerType=None,PinType.bIsReference=False,PinType.bIsConst=False,PinType.bIsWeakPointer=False,PinType.bIsUObjectWrapper=False,PinType.bSerializeAsSinglePrecisionFloat=False,LinkedTo=(K2Node_CustomEvent_0 0CAE98AB4973DEC1D51995A205A8F239,),PersistentGuid=00000000000000000000000000000000,bHidden=False,bNotConnectable=False,bDefaultValueIsReadOnly=False,bDefaultValueIsIgnored=False,bAdvancedView=False,bOrphanedPin=False,)
   CustomProperties Pin (PinId=03002F334383C20EDDB9C0B96808FDC4,PinName="then",PinToolTip="
Exec",Direction="EGPD_Output",PinType.PinCategory="exec",PinType.PinSubCategory="",PinType.PinSubCategoryObject=None,PinType.PinSubCategoryMemberReference=(),PinType.PinValueType=(),PinType.ContainerType=None,PinType.bIsReference=False,PinType.bIsConst=False,PinType.bIsWeakPointer=False,PinType.bIsUObjectWrapper=False,PinType.bSerializeAsSinglePrecisionFloat=False,LinkedTo=(K2Node_VariableSet_3 87E629A144EF95ACE590D7977AADC989,),PersistentGuid=00000000000000000000000000000000,bHidden=False,bNotConnectable=False,bDefaultValueIsReadOnly=False,bDefaultValueIsIgnored=False,bAdvancedView=False,bOrphanedPin=False,)
   CustomProperties Pin (PinId=496C77384FB972D30BED8C8635856413,PinName="self",PinFriendlyName=NSLOCTEXT("K2Node", "Target", "Target"),PinToolTip="Target
Gameplay Statics Object Reference",PinType.PinCategory="object",PinType.PinSubCategory="",PinType.PinSubCategoryObject="/Script/CoreUObject.Class'/Script/Engine.GameplayStatics'",PinType.PinSubCategoryMemberReference=(),PinType.PinValueType=(),PinType.ContainerType=None,PinType.bIsReference=False,PinType.bIsConst=False,PinType.bIsWeakPointer=False,PinType.bIsUObjectWrapper=False,PinType.bSerializeAsSinglePrecisionFloat=False,DefaultObject="/Script/Engine.Default__GameplayStatics",PersistentGuid=00000000000000000000000000000000,bHidden=True,bNotConnectable=False,bDefaultValueIsReadOnly=False,bDefaultValueIsIgnored=False,bAdvancedView=False,bOrphanedPin=False,)
   CustomProperties Pin (PinId=9B5D7C1A4776FA07374D68AB288374E5,PinName="WorldContextObject",PinToolTip="World Context Object
Object Reference",PinType.PinCategory="object",PinType.PinSubCategory="",PinType.PinSubCategoryObject="/Script/CoreUObject.Class'/Script/CoreUObject.Object'",PinType.PinSubCategoryMemberReference=(),PinType.PinValueType=(),PinType.ContainerType=None,PinType.bIsReference=False,PinType.bIsConst=True,PinType.bIsWeakPointer=False,PinType.bIsUObjectWrapper=False,PinType.bSerializeAsSinglePrecisionFloat=False,PersistentGuid=00000000000000000000000000000000,bHidden=True,bNotConnectable=False,bDefaultValueIsReadOnly=False,bDefaultValueIsIgnored=False,bAdvancedView=False,bOrphanedPin=False,)
   CustomProperties Pin (PinId=78B0BD63461CD148A98F94A1F6FBC751,PinName="ActorClass",PinToolTip="Actor Class
Actor Class Reference

Class of Actor to find. Must be specified or result will be empty.",PinType.PinCategory="class",PinType.PinSubCategory="",PinType.PinSubCategoryObject="/Script/CoreUObject.Class'/Script/Engine.Actor'",PinType.PinSubCategoryMemberReference=(),PinType.PinValueType=(),PinType.ContainerType=None,PinType.bIsReference=False,PinType.bIsConst=False,PinType.bIsWeakPointer=False,PinType.bIsUObjectWrapper=True,PinType.bSerializeAsSinglePrecisionFloat=False,DefaultObject="/Game/CharacterBP.CharacterBP_C",PersistentGuid=00000000000000000000000000000000,bHidden=False,bNotConnectable=False,bDefaultValueIsReadOnly=False,bDefaultValueIsIgnored=False,bAdvancedView=False,bOrphanedPin=False,)
   CustomProperties Pin (PinId=C9EBB28E4914C0DA3502329A779DA8E1,PinName="ReturnValue",PinToolTip="Return Value
Character BP Object Reference

Actor of the specified class.",Direction="EGPD_Output",PinType.PinCategory="object",PinType.PinSubCategory="",PinType.PinSubCategoryObject="/Script/Engine.BlueprintGeneratedClass'/Game/CharacterBP.CharacterBP_C'",PinType.PinSubCategoryMemberReference=(),PinType.PinValueType=(),PinType.ContainerType=None,PinType.bIsReference=False,PinType.bIsConst=False,PinType.bIsWeakPointer=False,PinType.bIsUObjectWrapper=False,PinType.bSerializeAsSinglePrecisionFloat=False,LinkedTo=(K2Node_VariableSet_3 BFDA54CD41B16DE182E93898274385F7,),PersistentGuid=00000000000000000000000000000000,bHidden=False,bNotConnectable=False,bDefaultValueIsReadOnly=False,bDefaultValueIsIgnored=False,bAdvancedView=False,bOrphanedPin=False,)
End Object
Begin Object Class=/Script/BlueprintGraph.K2Node_VariableSet Name="K2Node_VariableSet_3" ExportPath="/Script/BlueprintGraph.K2Node_VariableSet'/Game/coherentBP.coherentBP:EventGraph.K2Node_VariableSet_3'"
   VariableReference=(MemberName="Character BP",MemberGuid=E9793DD144E0786AC008F0B458E4C76C,bSelfContext=True)
   NodePosX=352
   NodePosY=-2560
   NodeGuid=39FB8405436B0AAA3C21ABA154ECDA41
   CustomProperties Pin (PinId=87E629A144EF95ACE590D7977AADC989,PinName="execute",PinType.PinCategory="exec",PinType.PinSubCategory="",PinType.PinSubCategoryObject=None,PinType.PinSubCategoryMemberReference=(),PinType.PinValueType=(),PinType.ContainerType=None,PinType.bIsReference=False,PinType.bIsConst=False,PinType.bIsWeakPointer=False,PinType.bIsUObjectWrapper=False,PinType.bSerializeAsSinglePrecisionFloat=False,LinkedTo=(K2Node_CallFunction_0 03002F334383C20EDDB9C0B96808FDC4,),PersistentGuid=00000000000000000000000000000000,bHidden=False,bNotConnectable=False,bDefaultValueIsReadOnly=False,bDefaultValueIsIgnored=False,bAdvancedView=False,bOrphanedPin=False,)
   CustomProperties Pin (PinId=A7EDED1B431A0C4F7117B29F3D612F7F,PinName="then",Direction="EGPD_Output",PinType.PinCategory="exec",PinType.PinSubCategory="",PinType.PinSubCategoryObject=None,PinType.PinSubCategoryMemberReference=(),PinType.PinValueType=(),PinType.ContainerType=None,PinType.bIsReference=False,PinType.bIsConst=False,PinType.bIsWeakPointer=False,PinType.bIsUObjectWrapper=False,PinType.bSerializeAsSinglePrecisionFloat=False,LinkedTo=(K2Node_SetFieldsInStruct_3 2363D525443F0139243CA2A2EE1B24E8,),PersistentGuid=00000000000000000000000000000000,bHidden=False,bNotConnectable=False,bDefaultValueIsReadOnly=False,bDefaultValueIsIgnored=False,bAdvancedView=False,bOrphanedPin=False,)
   CustomProperties Pin (PinId=BFDA54CD41B16DE182E93898274385F7,PinName="Character BP",PinType.PinCategory="object",PinType.PinSubCategory="",PinType.PinSubCategoryObject="/Script/Engine.BlueprintGeneratedClass'/Game/CharacterBP.CharacterBP_C'",PinType.PinSubCategoryMemberReference=(),PinType.PinValueType=(),PinType.ContainerType=None,PinType.bIsReference=False,PinType.bIsConst=False,PinType.bIsWeakPointer=False,PinType.bIsUObjectWrapper=False,PinType.bSerializeAsSinglePrecisionFloat=False,LinkedTo=(K2Node_CallFunction_0 C9EBB28E4914C0DA3502329A779DA8E1,),PersistentGuid=00000000000000000000000000000000,bHidden=False,bNotConnectable=False,bDefaultValueIsReadOnly=False,bDefaultValueIsIgnored=False,bAdvancedView=False,bOrphanedPin=False,)
   CustomProperties Pin (PinId=05BE2D224FEBCB31F45034888AAF49F1,PinName="Output_Get",PinToolTip="Retrieves the value of the variable, can use instead of a separate Get node",Direction="EGPD_Output",PinType.PinCategory="object",PinType.PinSubCategory="",PinType.PinSubCategoryObject="/Script/Engine.BlueprintGeneratedClass'/Game/CharacterBP.CharacterBP_C'",PinType.PinSubCategoryMemberReference=(),PinType.PinValueType=(),PinType.ContainerType=None,PinType.bIsReference=False,PinType.bIsConst=False,PinType.bIsWeakPointer=False,PinType.bIsUObjectWrapper=False,PinType.bSerializeAsSinglePrecisionFloat=False,PersistentGuid=00000000000000000000000000000000,bHidden=False,bNotConnectable=False,bDefaultValueIsReadOnly=False,bDefaultValueIsIgnored=False,bAdvancedView=False,bOrphanedPin=False,)
   CustomProperties Pin (PinId=63EE8F75453B031EA0909488DE52E425,PinName="self",PinFriendlyName=NSLOCTEXT("K2Node", "Target", "Target"),PinType.PinCategory="object",PinType.PinSubCategory="",PinType.PinSubCategoryObject="/Script/Engine.BlueprintGeneratedClass'/Game/coherentBP.coherentBP_C'",PinType.PinSubCategoryMemberReference=(),PinType.PinValueType=(),PinType.ContainerType=None,PinType.bIsReference=False,PinType.bIsConst=False,PinType.bIsWeakPointer=False,PinType.bIsUObjectWrapper=False,PinType.bSerializeAsSinglePrecisionFloat=False,PersistentGuid=00000000000000000000000000000000,bHidden=True,bNotConnectable=False,bDefaultValueIsReadOnly=False,bDefaultValueIsIgnored=False,bAdvancedView=False,bOrphanedPin=False,)
End Object
Begin Object Class=/Script/BlueprintGraph.K2Node_VariableGet Name="K2Node_VariableGet_3" ExportPath="/Script/BlueprintGraph.K2Node_VariableGet'/Game/coherentBP.coherentBP:EventGraph.K2Node_VariableGet_3'"
   VariableReference=(MemberName="Character",MemberGuid=5C39AE5A464E72A9223C75947D3B7D4E,bSelfContext=True)
   NodePosX=384
   NodePosY=-2432
   NodeGuid=26996D374DF7076AFE9BC79829EE279F
   CustomProperties Pin (PinId=9080AB154D09137C4C3E7FBA1AC1BABD,PinName="Character",Direction="EGPD_Output",PinType.PinCategory="struct",PinType.PinSubCategory="",PinType.PinSubCategoryObject="/Script/Engine.UserDefinedStruct'/Game/CharacterSelectedParts.CharacterSelectedParts'",PinType.PinSubCategoryMemberReference=(),PinType.PinValueType=(),PinType.ContainerType=None,PinType.bIsReference=False,PinType.bIsConst=False,PinType.bIsWeakPointer=False,PinType.bIsUObjectWrapper=False,PinType.bSerializeAsSinglePrecisionFloat=False,LinkedTo=(K2Node_SetFieldsInStruct_3 F1410A7645C7C6529F0E7C89A09073A7,),PersistentGuid=00000000000000000000000000000000,bHidden=False,bNotConnectable=False,bDefaultValueIsReadOnly=False,bDefaultValueIsIgnored=False,bAdvancedView=False,bOrphanedPin=False,)
   CustomProperties Pin (PinId=A26ED67B434FE5079BAA4091ACD96073,PinName="self",PinFriendlyName=NSLOCTEXT("K2Node", "Target", "Target"),PinType.PinCategory="object",PinType.PinSubCategory="",PinType.PinSubCategoryObject="/Script/Engine.BlueprintGeneratedClass'/Game/coherentBP.coherentBP_C'",PinType.PinSubCategoryMemberReference=(),PinType.PinValueType=(),PinType.ContainerType=None,PinType.bIsReference=False,PinType.bIsConst=False,PinType.bIsWeakPointer=False,PinType.bIsUObjectWrapper=False,PinType.bSerializeAsSinglePrecisionFloat=False,PersistentGuid=00000000000000000000000000000000,bHidden=True,bNotConnectable=False,bDefaultValueIsReadOnly=False,bDefaultValueIsIgnored=False,bAdvancedView=False,bOrphanedPin=False,)
End Object
Begin Object Class=/Script/BlueprintGraph.K2Node_SetFieldsInStruct Name="K2Node_SetFieldsInStruct_3" ExportPath="/Script/BlueprintGraph.K2Node_SetFieldsInStruct'/Game/coherentBP.coherentBP:EventGraph.K2Node_SetFieldsInStruct_3'"
   bMadeAfterOverridePinRemoval=True
   ShowPinForProperties(0)=(PropertyName="ChestIndex_10_E01AE90C40234F85A1A374B8E837866F",PropertyFriendlyName="ChestIndex",bShowPin=True,bCanToggleVisibility=True)
   ShowPinForProperties(1)=(PropertyName="FaceIndex_11_1E2B2283464DE3601BE986BD11943D8A",PropertyFriendlyName="FaceIndex",bShowPin=True,bCanToggleVisibility=True)
   ShowPinForProperties(2)=(PropertyName="LegsIndex_12_B3D8EE734EEEF4FE799552A7766CE943",PropertyFriendlyName="LegsIndex",bShowPin=True,bCanToggleVisibility=True)
   StructType="/Script/Engine.UserDefinedStruct'/Game/CharacterSelectedParts.CharacterSelectedParts'"
   NodePosX=608
   NodePosY=-2576
   NodeGuid=3E6B5C6646EE232A3F5346885A765FD2
   CustomProperties Pin (PinId=2363D525443F0139243CA2A2EE1B24E8,PinName="execute",PinType.PinCategory="exec",PinType.PinSubCategory="",PinType.PinSubCategoryObject=None,PinType.PinSubCategoryMemberReference=(),PinType.PinValueType=(),PinType.ContainerType=None,PinType.bIsReference=False,PinType.bIsConst=False,PinType.bIsWeakPointer=False,PinType.bIsUObjectWrapper=False,PinType.bSerializeAsSinglePrecisionFloat=False,LinkedTo=(K2Node_VariableSet_3 A7EDED1B431A0C4F7117B29F3D612F7F,),PersistentGuid=00000000000000000000000000000000,bHidden=False,bNotConnectable=False,bDefaultValueIsReadOnly=False,bDefaultValueIsIgnored=False,bAdvancedView=False,bOrphanedPin=False,)
   CustomProperties Pin (PinId=C452B2C147457F0EB49F6CA90A9E0590,PinName="then",Direction="EGPD_Output",PinType.PinCategory="exec",PinType.PinSubCategory="",PinType.PinSubCategoryObject=None,PinType.PinSubCategoryMemberReference=(),PinType.PinValueType=(),PinType.ContainerType=None,PinType.bIsReference=False,PinType.bIsConst=False,PinType.bIsWeakPointer=False,PinType.bIsUObjectWrapper=False,PinType.bSerializeAsSinglePrecisionFloat=False,LinkedTo=(K2Node_CallFunction_10 C4CAAEBD424A2210978072BF12E8BE48,),PersistentGuid=00000000000000000000000000000000,bHidden=False,bNotConnectable=False,bDefaultValueIsReadOnly=False,bDefaultValueIsIgnored=False,bAdvancedView=False,bOrphanedPin=False,)
   CustomProperties Pin (PinId=F1410A7645C7C6529F0E7C89A09073A7,PinName="StructRef",PinType.PinCategory="struct",PinType.PinSubCategory="",PinType.PinSubCategoryObject="/Script/Engine.UserDefinedStruct'/Game/CharacterSelectedParts.CharacterSelectedParts'",PinType.PinSubCategoryMemberReference=(),PinType.PinValueType=(),PinType.ContainerType=None,PinType.bIsReference=True,PinType.bIsConst=False,PinType.bIsWeakPointer=False,PinType.bIsUObjectWrapper=False,PinType.bSerializeAsSinglePrecisionFloat=False,LinkedTo=(K2Node_VariableGet_3 9080AB154D09137C4C3E7FBA1AC1BABD,),ReferencePassThroughConnection=K2Node_SetFieldsInStruct_3 CF1A805F44E2A1075283E5B6104F8CC9,PersistentGuid=00000000000000000000000000000000,bHidden=False,bNotConnectable=False,bDefaultValueIsReadOnly=False,bDefaultValueIsIgnored=False,bAdvancedView=False,bOrphanedPin=False,)
   CustomProperties Pin (PinId=CF1A805F44E2A1075283E5B6104F8CC9,PinName="StructOut",PinToolTip="Reference to the input struct",Direction="EGPD_Output",PinType.PinCategory="struct",PinType.PinSubCategory="",PinType.PinSubCategoryObject="/Script/Engine.UserDefinedStruct'/Game/CharacterSelectedParts.CharacterSelectedParts'",PinType.PinSubCategoryMemberReference=(),PinType.PinValueType=(),PinType.ContainerType=None,PinType.bIsReference=True,PinType.bIsConst=False,PinType.bIsWeakPointer=False,PinType.bIsUObjectWrapper=False,PinType.bSerializeAsSinglePrecisionFloat=False,LinkedTo=(K2Node_CallFunction_10 6169CF5F4ABAF3FCEC793384CD296165,),ReferencePassThroughConnection=K2Node_SetFieldsInStruct_3 F1410A7645C7C6529F0E7C89A09073A7,PersistentGuid=00000000000000000000000000000000,bHidden=False,bNotConnectable=False,bDefaultValueIsReadOnly=False,bDefaultValueIsIgnored=False,bAdvancedView=False,bOrphanedPin=False,)
   CustomProperties Pin (PinId=F508F3F64B9BE10A63AEFEB9786DBA2F,PinName="ChestIndex_10_E01AE90C40234F85A1A374B8E837866F",PinFriendlyName=NSLOCTEXT("", "8D65E3CA4C0EAAC430D7ABA8DF9698EE", "ChestIndex"),PinToolTip="Chest Index
Integer",PinType.PinCategory="int",PinType.PinSubCategory="",PinType.PinSubCategoryObject=None,PinType.PinSubCategoryMemberReference=(),PinType.PinValueType=(),PinType.ContainerType=None,PinType.bIsReference=False,PinType.bIsConst=False,PinType.bIsWeakPointer=False,PinType.bIsUObjectWrapper=False,PinType.bSerializeAsSinglePrecisionFloat=False,DefaultValue="1",AutogeneratedDefaultValue="0",PersistentGuid=E01AE90C40234F85A1A374B8E837866F,bHidden=False,bNotConnectable=False,bDefaultValueIsReadOnly=False,bDefaultValueIsIgnored=False,bAdvancedView=False,bOrphanedPin=False,)
   CustomProperties Pin (PinId=EA9DB00243A9584E70124FA25097C64C,PinName="FaceIndex_11_1E2B2283464DE3601BE986BD11943D8A",PinFriendlyName=NSLOCTEXT("", "A591962045CE3A4F63DF05B75EE7AB95", "FaceIndex"),PinToolTip="Face Index
Integer",PinType.PinCategory="int",PinType.PinSubCategory="",PinType.PinSubCategoryObject=None,PinType.PinSubCategoryMemberReference=(),PinType.PinValueType=(),PinType.ContainerType=None,PinType.bIsReference=False,PinType.bIsConst=False,PinType.bIsWeakPointer=False,PinType.bIsUObjectWrapper=False,PinType.bSerializeAsSinglePrecisionFloat=False,DefaultValue="0",AutogeneratedDefaultValue="0",PersistentGuid=1E2B2283464DE3601BE986BD11943D8A,bHidden=False,bNotConnectable=False,bDefaultValueIsReadOnly=False,bDefaultValueIsIgnored=False,bAdvancedView=False,bOrphanedPin=False,)
   CustomProperties Pin (PinId=24DCF0AD4D31E2BBAE9D3EBBDBB3D803,PinName="LegsIndex_12_B3D8EE734EEEF4FE799552A7766CE943",PinFriendlyName=NSLOCTEXT("", "B56B5A4B49EE4D37DC1736B18C2F4E0B", "LegsIndex"),PinToolTip="Legs Index
Integer",PinType.PinCategory="int",PinType.PinSubCategory="",PinType.PinSubCategoryObject=None,PinType.PinSubCategoryMemberReference=(),PinType.PinValueType=(),PinType.ContainerType=None,PinType.bIsReference=False,PinType.bIsConst=False,PinType.bIsWeakPointer=False,PinType.bIsUObjectWrapper=False,PinType.bSerializeAsSinglePrecisionFloat=False,DefaultValue="1",AutogeneratedDefaultValue="0",PersistentGuid=B3D8EE734EEEF4FE799552A7766CE943,bHidden=False,bNotConnectable=False,bDefaultValueIsReadOnly=False,bDefaultValueIsIgnored=False,bAdvancedView=False,bOrphanedPin=False,)
End Object
Begin Object Class=/Script/BlueprintGraph.K2Node_CallFunction Name="K2Node_CallFunction_10" ExportPath="/Script/BlueprintGraph.K2Node_CallFunction'/Game/coherentBP.coherentBP:EventGraph.K2Node_CallFunction_10'"
   FunctionReference=(MemberParent="/Script/CoreUObject.Class'/Script/CohtmlPlugin.CohtmlBaseComponent'",MemberName="CreateDataModelFromStruct")
   NodePosX=1056
   NodePosY=-2592
   NodeGuid=9BC1D3954F2267CB2E4908B5B51E07CD
   CustomProperties Pin (PinId=C4CAAEBD424A2210978072BF12E8BE48,PinName="execute",PinToolTip="
Exec",PinType.PinCategory="exec",PinType.PinSubCategory="",PinType.PinSubCategoryObject=None,PinType.PinSubCategoryMemberReference=(),PinType.PinValueType=(),PinType.ContainerType=None,PinType.bIsReference=False,PinType.bIsConst=False,PinType.bIsWeakPointer=False,PinType.bIsUObjectWrapper=False,PinType.bSerializeAsSinglePrecisionFloat=False,LinkedTo=(K2Node_SetFieldsInStruct_3 C452B2C147457F0EB49F6CA90A9E0590,),PersistentGuid=00000000000000000000000000000000,bHidden=False,bNotConnectable=False,bDefaultValueIsReadOnly=False,bDefaultValueIsIgnored=False,bAdvancedView=False,bOrphanedPin=False,)
   CustomProperties Pin (PinId=F36848D541477B2201D251BE429A963D,PinName="then",PinToolTip="
Exec",Direction="EGPD_Output",PinType.PinCategory="exec",PinType.PinSubCategory="",PinType.PinSubCategoryObject=None,PinType.PinSubCategoryMemberReference=(),PinType.PinValueType=(),PinType.ContainerType=None,PinType.bIsReference=False,PinType.bIsConst=False,PinType.bIsWeakPointer=False,PinType.bIsUObjectWrapper=False,PinType.bSerializeAsSinglePrecisionFloat=False,PersistentGuid=00000000000000000000000000000000,bHidden=False,bNotConnectable=False,bDefaultValueIsReadOnly=False,bDefaultValueIsIgnored=False,bAdvancedView=False,bOrphanedPin=False,)
   CustomProperties Pin (PinId=4A9CC8CB4DE7D8AEAF77A3A915CE60AF,PinName="self",PinFriendlyName=NSLOCTEXT("K2Node", "Target", "Target"),PinToolTip="Target
Gameface Base Component Object Reference",PinType.PinCategory="object",PinType.PinSubCategory="",PinType.PinSubCategoryObject="/Script/CoreUObject.Class'/Script/CohtmlPlugin.CohtmlBaseComponent'",PinType.PinSubCategoryMemberReference=(),PinType.PinValueType=(),PinType.ContainerType=None,PinType.bIsReference=False,PinType.bIsConst=False,PinType.bIsWeakPointer=False,PinType.bIsUObjectWrapper=False,PinType.bSerializeAsSinglePrecisionFloat=False,LinkedTo=(K2Node_VariableGet_4 0EBA57D84A91A9A2ADA4419D6F9D68C0,),PersistentGuid=00000000000000000000000000000000,bHidden=False,bNotConnectable=False,bDefaultValueIsReadOnly=False,bDefaultValueIsIgnored=False,bAdvancedView=False,bOrphanedPin=False,)
   CustomProperties Pin (PinId=BB20B70B4CE7DD3213F9CD806070EA9C,PinName="Name",PinToolTip="Name
String",PinType.PinCategory="string",PinType.PinSubCategory="",PinType.PinSubCategoryObject=None,PinType.PinSubCategoryMemberReference=(),PinType.PinValueType=(),PinType.ContainerType=None,PinType.bIsReference=False,PinType.bIsConst=False,PinType.bIsWeakPointer=False,PinType.bIsUObjectWrapper=False,PinType.bSerializeAsSinglePrecisionFloat=False,DefaultValue="CharacterSelectedParts",PersistentGuid=00000000000000000000000000000000,bHidden=False,bNotConnectable=False,bDefaultValueIsReadOnly=False,bDefaultValueIsIgnored=False,bAdvancedView=False,bOrphanedPin=False,)
   CustomProperties Pin (PinId=6169CF5F4ABAF3FCEC793384CD296165,PinName="Struct",PinToolTip="Struct
Character Selected Parts Structure (by ref)",PinType.PinCategory="struct",PinType.PinSubCategory="",PinType.PinSubCategoryObject="/Script/Engine.UserDefinedStruct'/Game/CharacterSelectedParts.CharacterSelectedParts'",PinType.PinSubCategoryMemberReference=(),PinType.PinValueType=(),PinType.ContainerType=None,PinType.bIsReference=True,PinType.bIsConst=False,PinType.bIsWeakPointer=False,PinType.bIsUObjectWrapper=False,PinType.bSerializeAsSinglePrecisionFloat=False,LinkedTo=(K2Node_SetFieldsInStruct_3 CF1A805F44E2A1075283E5B6104F8CC9,),PersistentGuid=00000000000000000000000000000000,bHidden=False,bNotConnectable=False,bDefaultValueIsReadOnly=False,bDefaultValueIsIgnored=False,bAdvancedView=False,bOrphanedPin=False,)
End Object
Begin Object Class=/Script/BlueprintGraph.K2Node_VariableGet Name="K2Node_VariableGet_4" ExportPath="/Script/BlueprintGraph.K2Node_VariableGet'/Game/coherentBP.coherentBP:EventGraph.K2Node_VariableGet_4'"
   VariableReference=(MemberName="CohtmlHUD",bSelfContext=True)
   NodePosX=784
   NodePosY=-2336
   NodeGuid=2E19C54C4CAD66387407D58B1C94695D
   CustomProperties Pin (PinId=0EBA57D84A91A9A2ADA4419D6F9D68C0,PinName="CohtmlHUD",PinFriendlyName=NSLOCTEXT("", "2A4DBBD4415810580578B78915AFB4B0", "Gameface HUD"),Direction="EGPD_Output",PinType.PinCategory="object",PinType.PinSubCategory="",PinType.PinSubCategoryObject="/Script/CoreUObject.Class'/Script/CohtmlPlugin.CohtmlHUD'",PinType.PinSubCategoryMemberReference=(),PinType.PinValueType=(),PinType.ContainerType=None,PinType.bIsReference=False,PinType.bIsConst=False,PinType.bIsWeakPointer=False,PinType.bIsUObjectWrapper=False,PinType.bSerializeAsSinglePrecisionFloat=False,LinkedTo=(K2Node_CallFunction_10 4A9CC8CB4DE7D8AEAF77A3A915CE60AF,),PersistentGuid=00000000000000000000000000000000,bHidden=False,bNotConnectable=False,bDefaultValueIsReadOnly=False,bDefaultValueIsIgnored=False,bAdvancedView=False,bOrphanedPin=False,)
   CustomProperties Pin (PinId=EAE050A0452D794DECF0D4B72AC64585,PinName="self",PinFriendlyName=NSLOCTEXT("K2Node", "Target", "Target"),PinType.PinCategory="object",PinType.PinSubCategory="",PinType.PinSubCategoryObject="/Script/CoreUObject.Class'/Script/CohtmlPlugin.CohtmlGameHUD'",PinType.PinSubCategoryMemberReference=(),PinType.PinValueType=(),PinType.ContainerType=None,PinType.bIsReference=False,PinType.bIsConst=False,PinType.bIsWeakPointer=False,PinType.bIsUObjectWrapper=False,PinType.bSerializeAsSinglePrecisionFloat=False,PersistentGuid=00000000000000000000000000000000,bHidden=True,bNotConnectable=False,bDefaultValueIsReadOnly=False,bDefaultValueIsIgnored=False,bAdvancedView=False,bOrphanedPin=False,)
End Object
Update the active body parts index
After defining the struct for the active body part indexes, we need to update the model with the relevant active indexes whenever a character’s appearance changes. This involves enhancing the blueprint we’ve defined for changing the character’s appearance.
   Begin Object Class=/Script/BlueprintGraph.K2Node_Event Name="K2Node_Event_3" ExportPath="/Script/BlueprintGraph.K2Node_Event'/Game/coherentBP.coherentBP:EventGraph.K2Node_Event_3'"
   EventReference=(MemberParent="/Script/CoreUObject.Class'/Script/CohtmlPlugin.MyCohtmlGameHUD'",MemberName="CustomizeCharacterEvent")
   bOverrideFunction=True
   NodePosX=-864
   NodePosY=1856
   NodeGuid=52CB234E499BE17E68A7F8B2C7B5EBD0
   CustomProperties Pin (PinId=B70A3CAE48C54F0D3FDDE3B28643A7A8,PinName="OutputDelegate",Direction="EGPD_Output",PinType.PinCategory="delegate",PinType.PinSubCategory="",PinType.PinSubCategoryObject=None,PinType.PinSubCategoryMemberReference=(MemberParent="/Script/CoreUObject.Class'/Script/CohtmlPlugin.MyCohtmlGameHUD'",MemberName="CustomizeCharacterEvent"),PinType.PinValueType=(),PinType.ContainerType=None,PinType.bIsReference=False,PinType.bIsConst=False,PinType.bIsWeakPointer=False,PinType.bIsUObjectWrapper=False,PinType.bSerializeAsSinglePrecisionFloat=False,PersistentGuid=00000000000000000000000000000000,bHidden=False,bNotConnectable=False,bDefaultValueIsReadOnly=False,bDefaultValueIsIgnored=False,bAdvancedView=False,bOrphanedPin=False,)
   CustomProperties Pin (PinId=B0AA04D1409CDC61E1E9AC806F68C6D3,PinName="then",Direction="EGPD_Output",PinType.PinCategory="exec",PinType.PinSubCategory="",PinType.PinSubCategoryObject=None,PinType.PinSubCategoryMemberReference=(),PinType.PinValueType=(),PinType.ContainerType=None,PinType.bIsReference=False,PinType.bIsConst=False,PinType.bIsWeakPointer=False,PinType.bIsUObjectWrapper=False,PinType.bSerializeAsSinglePrecisionFloat=False,LinkedTo=(K2Node_CallFunction_19 66D06FE44B71DC2D654194BC8666B719,),PersistentGuid=00000000000000000000000000000000,bHidden=False,bNotConnectable=False,bDefaultValueIsReadOnly=False,bDefaultValueIsIgnored=False,bAdvancedView=False,bOrphanedPin=False,)
   CustomProperties Pin (PinId=C4CCC76342CCCD3CDDF9CBB70AC77F1A,PinName="customizationType",PinToolTip="Customization Type
String",Direction="EGPD_Output",PinType.PinCategory="string",PinType.PinSubCategory="",PinType.PinSubCategoryObject=None,PinType.PinSubCategoryMemberReference=(),PinType.PinValueType=(),PinType.ContainerType=None,PinType.bIsReference=False,PinType.bIsConst=False,PinType.bIsWeakPointer=False,PinType.bIsUObjectWrapper=False,PinType.bSerializeAsSinglePrecisionFloat=False,LinkedTo=(K2Node_SwitchString_0 23303B084105BB2F46DDA49CF1DBD899,),PersistentGuid=00000000000000000000000000000000,bHidden=False,bNotConnectable=False,bDefaultValueIsReadOnly=False,bDefaultValueIsIgnored=False,bAdvancedView=False,bOrphanedPin=False,)
   CustomProperties Pin (PinId=3612E5A74EFE4C5F413FDF9EEA782BA1,PinName="index",PinToolTip="Index
Integer",Direction="EGPD_Output",PinType.PinCategory="int",PinType.PinSubCategory="",PinType.PinSubCategoryObject=None,PinType.PinSubCategoryMemberReference=(),PinType.PinValueType=(),PinType.ContainerType=None,PinType.bIsReference=False,PinType.bIsConst=True,PinType.bIsWeakPointer=False,PinType.bIsUObjectWrapper=False,PinType.bSerializeAsSinglePrecisionFloat=False,DefaultValue="0",AutogeneratedDefaultValue="0",LinkedTo=(K2Node_CallFunction_16 0735AB5748738F1A1B55928565E8E40B,K2Node_CallFunction_20 1B42576A40867CCA47F046BFE2500DFE,K2Node_CallFunction_21 0CF5B56E4EAF022AE56354B587F1FA80,K2Node_SetFieldsInStruct_6 BB2686F74BA836E1C75F69A99CDC8A6E,K2Node_SetFieldsInStruct_7 FC89BDDF464C83D6D6D89EB6FBCA6689,K2Node_SetFieldsInStruct_4 B0F6EFE14FEAB6B067C1389D6710CDD1,),PersistentGuid=00000000000000000000000000000000,bHidden=False,bNotConnectable=False,bDefaultValueIsReadOnly=False,bDefaultValueIsIgnored=False,bAdvancedView=False,bOrphanedPin=False,)
End Object
Begin Object Class=/Script/BlueprintGraph.K2Node_SwitchString Name="K2Node_SwitchString_0" ExportPath="/Script/BlueprintGraph.K2Node_SwitchString'/Game/coherentBP.coherentBP:EventGraph.K2Node_SwitchString_0'"
   PinNames(0)="Chest"
   PinNames(1)="Face"
   PinNames(2)="Legs"
   NodePosX=-144
   NodePosY=1856
   NodeGuid=70C002834C7301A52D046BADA4D0CE5E
   CustomProperties Pin (PinId=7689986F493D65F52FCC42BA563C6653,PinName="Default",Direction="EGPD_Output",PinType.PinCategory="exec",PinType.PinSubCategory="",PinType.PinSubCategoryObject=None,PinType.PinSubCategoryMemberReference=(),PinType.PinValueType=(),PinType.ContainerType=None,PinType.bIsReference=False,PinType.bIsConst=False,PinType.bIsWeakPointer=False,PinType.bIsUObjectWrapper=False,PinType.bSerializeAsSinglePrecisionFloat=False,PersistentGuid=00000000000000000000000000000000,bHidden=False,bNotConnectable=False,bDefaultValueIsReadOnly=False,bDefaultValueIsIgnored=False,bAdvancedView=False,bOrphanedPin=False,)
   CustomProperties Pin (PinId=A1370EC44EFF5001DF2DBF9D86392286,PinName="execute",PinType.PinCategory="exec",PinType.PinSubCategory="",PinType.PinSubCategoryObject=None,PinType.PinSubCategoryMemberReference=(),PinType.PinValueType=(),PinType.ContainerType=None,PinType.bIsReference=False,PinType.bIsConst=False,PinType.bIsWeakPointer=False,PinType.bIsUObjectWrapper=False,PinType.bSerializeAsSinglePrecisionFloat=False,LinkedTo=(K2Node_CallFunction_19 414F1FCF4E05BCF8E405D299431EAAAD,),PersistentGuid=00000000000000000000000000000000,bHidden=False,bNotConnectable=False,bDefaultValueIsReadOnly=False,bDefaultValueIsIgnored=False,bAdvancedView=False,bOrphanedPin=False,)
   CustomProperties Pin (PinId=23303B084105BB2F46DDA49CF1DBD899,PinName="Selection",PinType.PinCategory="string",PinType.PinSubCategory="",PinType.PinSubCategoryObject=None,PinType.PinSubCategoryMemberReference=(),PinType.PinValueType=(),PinType.ContainerType=None,PinType.bIsReference=False,PinType.bIsConst=False,PinType.bIsWeakPointer=False,PinType.bIsUObjectWrapper=False,PinType.bSerializeAsSinglePrecisionFloat=False,LinkedTo=(K2Node_Event_3 C4CCC76342CCCD3CDDF9CBB70AC77F1A,),PersistentGuid=00000000000000000000000000000000,bHidden=False,bNotConnectable=False,bDefaultValueIsReadOnly=False,bDefaultValueIsIgnored=False,bAdvancedView=False,bOrphanedPin=False,)
   CustomProperties Pin (PinId=1BA2F89A4DA14ADC505BC6905889FF44,PinName="NotEqual_StriStri",PinType.PinCategory="object",PinType.PinSubCategory="",PinType.PinSubCategoryObject="/Script/CoreUObject.Class'/Script/Engine.KismetStringLibrary'",PinType.PinSubCategoryMemberReference=(),PinType.PinValueType=(),PinType.ContainerType=None,PinType.bIsReference=False,PinType.bIsConst=False,PinType.bIsWeakPointer=False,PinType.bIsUObjectWrapper=False,PinType.bSerializeAsSinglePrecisionFloat=False,DefaultObject="/Script/Engine.Default__KismetStringLibrary",PersistentGuid=00000000000000000000000000000000,bHidden=True,bNotConnectable=True,bDefaultValueIsReadOnly=True,bDefaultValueIsIgnored=False,bAdvancedView=False,bOrphanedPin=False,)
   CustomProperties Pin (PinId=93E2322B40B1FC66670716BCD41F599E,PinName="Chest",Direction="EGPD_Output",PinType.PinCategory="exec",PinType.PinSubCategory="",PinType.PinSubCategoryObject=None,PinType.PinSubCategoryMemberReference=(),PinType.PinValueType=(),PinType.ContainerType=None,PinType.bIsReference=False,PinType.bIsConst=False,PinType.bIsWeakPointer=False,PinType.bIsUObjectWrapper=False,PinType.bSerializeAsSinglePrecisionFloat=False,LinkedTo=(K2Node_CallFunction_16 4C37B305414E0447A6DCA18706223AF5,),PersistentGuid=00000000000000000000000000000000,bHidden=False,bNotConnectable=False,bDefaultValueIsReadOnly=False,bDefaultValueIsIgnored=False,bAdvancedView=False,bOrphanedPin=False,)
   CustomProperties Pin (PinId=DBFDBD7248F124DB48CC24A7ACB49F2F,PinName="Face",Direction="EGPD_Output",PinType.PinCategory="exec",PinType.PinSubCategory="",PinType.PinSubCategoryObject=None,PinType.PinSubCategoryMemberReference=(),PinType.PinValueType=(),PinType.ContainerType=None,PinType.bIsReference=False,PinType.bIsConst=False,PinType.bIsWeakPointer=False,PinType.bIsUObjectWrapper=False,PinType.bSerializeAsSinglePrecisionFloat=False,LinkedTo=(K2Node_CallFunction_20 27D5E3354B6405846CA137ABBBF0029B,),PersistentGuid=00000000000000000000000000000000,bHidden=False,bNotConnectable=False,bDefaultValueIsReadOnly=False,bDefaultValueIsIgnored=False,bAdvancedView=False,bOrphanedPin=False,)
   CustomProperties Pin (PinId=A1A87DA74417F090CD0A609F6AAC68E5,PinName="Legs",Direction="EGPD_Output",PinType.PinCategory="exec",PinType.PinSubCategory="",PinType.PinSubCategoryObject=None,PinType.PinSubCategoryMemberReference=(),PinType.PinValueType=(),PinType.ContainerType=None,PinType.bIsReference=False,PinType.bIsConst=False,PinType.bIsWeakPointer=False,PinType.bIsUObjectWrapper=False,PinType.bSerializeAsSinglePrecisionFloat=False,LinkedTo=(K2Node_CallFunction_21 9AD9E488438A6C39E3BC6F8B3EA3303E,),PersistentGuid=00000000000000000000000000000000,bHidden=False,bNotConnectable=False,bDefaultValueIsReadOnly=False,bDefaultValueIsIgnored=False,bAdvancedView=False,bOrphanedPin=False,)
End Object
Begin Object Class=/Script/BlueprintGraph.K2Node_CallFunction Name="K2Node_CallFunction_16" ExportPath="/Script/BlueprintGraph.K2Node_CallFunction'/Game/coherentBP.coherentBP:EventGraph.K2Node_CallFunction_16'"
   FunctionReference=(MemberParent="/Script/Engine.BlueprintGeneratedClass'/Game/CharacterBP.CharacterBP_C'",MemberName="ChangeChest",MemberGuid=E965F4DF4EA8CCB414B7A780BB592E6E)
   NodePosX=272
   NodePosY=1840
   NodeGuid=C635D5324A2D385B7406B4B58035C859
   CustomProperties Pin (PinId=4C37B305414E0447A6DCA18706223AF5,PinName="execute",PinToolTip="
Exec",PinType.PinCategory="exec",PinType.PinSubCategory="",PinType.PinSubCategoryObject=None,PinType.PinSubCategoryMemberReference=(),PinType.PinValueType=(),PinType.ContainerType=None,PinType.bIsReference=False,PinType.bIsConst=False,PinType.bIsWeakPointer=False,PinType.bIsUObjectWrapper=False,PinType.bSerializeAsSinglePrecisionFloat=False,LinkedTo=(K2Node_SwitchString_0 93E2322B40B1FC66670716BCD41F599E,),PersistentGuid=00000000000000000000000000000000,bHidden=False,bNotConnectable=False,bDefaultValueIsReadOnly=False,bDefaultValueIsIgnored=False,bAdvancedView=False,bOrphanedPin=False,)
   CustomProperties Pin (PinId=6AEFB1A74AA9BCA33EC127A2323A88E4,PinName="then",PinToolTip="
Exec",Direction="EGPD_Output",PinType.PinCategory="exec",PinType.PinSubCategory="",PinType.PinSubCategoryObject=None,PinType.PinSubCategoryMemberReference=(),PinType.PinValueType=(),PinType.ContainerType=None,PinType.bIsReference=False,PinType.bIsConst=False,PinType.bIsWeakPointer=False,PinType.bIsUObjectWrapper=False,PinType.bSerializeAsSinglePrecisionFloat=False,LinkedTo=(K2Node_SetFieldsInStruct_6 AEC897EA429B39725F5D7B828910E54A,),PersistentGuid=00000000000000000000000000000000,bHidden=False,bNotConnectable=False,bDefaultValueIsReadOnly=False,bDefaultValueIsIgnored=False,bAdvancedView=False,bOrphanedPin=False,)
   CustomProperties Pin (PinId=78D68539423DC09B85186682F0590C10,PinName="self",PinFriendlyName=NSLOCTEXT("K2Node", "Target", "Target"),PinToolTip="Target
Character BP Object Reference",PinType.PinCategory="object",PinType.PinSubCategory="",PinType.PinSubCategoryObject="/Script/Engine.BlueprintGeneratedClass'/Game/CharacterBP.CharacterBP_C'",PinType.PinSubCategoryMemberReference=(),PinType.PinValueType=(),PinType.ContainerType=None,PinType.bIsReference=False,PinType.bIsConst=False,PinType.bIsWeakPointer=False,PinType.bIsUObjectWrapper=False,PinType.bSerializeAsSinglePrecisionFloat=False,LinkedTo=(K2Node_Knot_0 441BE21242DDDF1B250A06BB4C311702,),PersistentGuid=00000000000000000000000000000000,bHidden=False,bNotConnectable=False,bDefaultValueIsReadOnly=False,bDefaultValueIsIgnored=False,bAdvancedView=False,bOrphanedPin=False,)
   CustomProperties Pin (PinId=0735AB5748738F1A1B55928565E8E40B,PinName="index",PinToolTip="Index
Integer",PinType.PinCategory="int",PinType.PinSubCategory="",PinType.PinSubCategoryObject=None,PinType.PinSubCategoryMemberReference=(),PinType.PinValueType=(),PinType.ContainerType=None,PinType.bIsReference=False,PinType.bIsConst=False,PinType.bIsWeakPointer=False,PinType.bIsUObjectWrapper=False,PinType.bSerializeAsSinglePrecisionFloat=False,DefaultValue="0",AutogeneratedDefaultValue="0",LinkedTo=(K2Node_Event_3 3612E5A74EFE4C5F413FDF9EEA782BA1,),PersistentGuid=00000000000000000000000000000000,bHidden=False,bNotConnectable=False,bDefaultValueIsReadOnly=False,bDefaultValueIsIgnored=False,bAdvancedView=False,bOrphanedPin=False,)
End Object
Begin Object Class=/Script/BlueprintGraph.K2Node_CallFunction Name="K2Node_CallFunction_19" ExportPath="/Script/BlueprintGraph.K2Node_CallFunction'/Game/coherentBP.coherentBP:EventGraph.K2Node_CallFunction_19'"
   FunctionReference=(MemberParent="/Script/CoreUObject.Class'/Script/Engine.GameplayStatics'",MemberName="GetActorOfClass")
   NodePosX=-560
   NodePosY=1712
   NodeGuid=32406493421D92EA3471149AE0B6E046
   CustomProperties Pin (PinId=66D06FE44B71DC2D654194BC8666B719,PinName="execute",PinToolTip="
Exec",PinType.PinCategory="exec",PinType.PinSubCategory="",PinType.PinSubCategoryObject=None,PinType.PinSubCategoryMemberReference=(),PinType.PinValueType=(),PinType.ContainerType=None,PinType.bIsReference=False,PinType.bIsConst=False,PinType.bIsWeakPointer=False,PinType.bIsUObjectWrapper=False,PinType.bSerializeAsSinglePrecisionFloat=False,LinkedTo=(K2Node_Event_3 B0AA04D1409CDC61E1E9AC806F68C6D3,),PersistentGuid=00000000000000000000000000000000,bHidden=False,bNotConnectable=False,bDefaultValueIsReadOnly=False,bDefaultValueIsIgnored=False,bAdvancedView=False,bOrphanedPin=False,)
   CustomProperties Pin (PinId=414F1FCF4E05BCF8E405D299431EAAAD,PinName="then",PinToolTip="
Exec",Direction="EGPD_Output",PinType.PinCategory="exec",PinType.PinSubCategory="",PinType.PinSubCategoryObject=None,PinType.PinSubCategoryMemberReference=(),PinType.PinValueType=(),PinType.ContainerType=None,PinType.bIsReference=False,PinType.bIsConst=False,PinType.bIsWeakPointer=False,PinType.bIsUObjectWrapper=False,PinType.bSerializeAsSinglePrecisionFloat=False,LinkedTo=(K2Node_SwitchString_0 A1370EC44EFF5001DF2DBF9D86392286,),PersistentGuid=00000000000000000000000000000000,bHidden=False,bNotConnectable=False,bDefaultValueIsReadOnly=False,bDefaultValueIsIgnored=False,bAdvancedView=False,bOrphanedPin=False,)
   CustomProperties Pin (PinId=00A1D7184935AFC33FCF3486F0C63B5D,PinName="self",PinFriendlyName=NSLOCTEXT("K2Node", "Target", "Target"),PinToolTip="Target
Gameplay Statics Object Reference",PinType.PinCategory="object",PinType.PinSubCategory="",PinType.PinSubCategoryObject="/Script/CoreUObject.Class'/Script/Engine.GameplayStatics'",PinType.PinSubCategoryMemberReference=(),PinType.PinValueType=(),PinType.ContainerType=None,PinType.bIsReference=False,PinType.bIsConst=False,PinType.bIsWeakPointer=False,PinType.bIsUObjectWrapper=False,PinType.bSerializeAsSinglePrecisionFloat=False,DefaultObject="/Script/Engine.Default__GameplayStatics",PersistentGuid=00000000000000000000000000000000,bHidden=True,bNotConnectable=False,bDefaultValueIsReadOnly=False,bDefaultValueIsIgnored=False,bAdvancedView=False,bOrphanedPin=False,)
   CustomProperties Pin (PinId=E233A633461C053ECF732282FFB8F1CD,PinName="WorldContextObject",PinToolTip="World Context Object
Object Reference",PinType.PinCategory="object",PinType.PinSubCategory="",PinType.PinSubCategoryObject="/Script/CoreUObject.Class'/Script/CoreUObject.Object'",PinType.PinSubCategoryMemberReference=(),PinType.PinValueType=(),PinType.ContainerType=None,PinType.bIsReference=False,PinType.bIsConst=True,PinType.bIsWeakPointer=False,PinType.bIsUObjectWrapper=False,PinType.bSerializeAsSinglePrecisionFloat=False,PersistentGuid=00000000000000000000000000000000,bHidden=True,bNotConnectable=False,bDefaultValueIsReadOnly=False,bDefaultValueIsIgnored=False,bAdvancedView=False,bOrphanedPin=False,)
   CustomProperties Pin (PinId=2DA477714391CF18B7298CB03FBE44B3,PinName="ActorClass",PinToolTip="Actor Class
Actor Class Reference

Class of Actor to find. Must be specified or result will be empty.",PinType.PinCategory="class",PinType.PinSubCategory="",PinType.PinSubCategoryObject="/Script/CoreUObject.Class'/Script/Engine.Actor'",PinType.PinSubCategoryMemberReference=(),PinType.PinValueType=(),PinType.ContainerType=None,PinType.bIsReference=False,PinType.bIsConst=False,PinType.bIsWeakPointer=False,PinType.bIsUObjectWrapper=True,PinType.bSerializeAsSinglePrecisionFloat=False,DefaultObject="/Game/CharacterBP.CharacterBP_C",PersistentGuid=00000000000000000000000000000000,bHidden=False,bNotConnectable=False,bDefaultValueIsReadOnly=False,bDefaultValueIsIgnored=False,bAdvancedView=False,bOrphanedPin=False,)
   CustomProperties Pin (PinId=ED47C0414463FA1DA0459197161AF46A,PinName="ReturnValue",PinToolTip="Return Value
Character BP Object Reference

Actor of the specified class.",Direction="EGPD_Output",PinType.PinCategory="object",PinType.PinSubCategory="",PinType.PinSubCategoryObject="/Script/Engine.BlueprintGeneratedClass'/Game/CharacterBP.CharacterBP_C'",PinType.PinSubCategoryMemberReference=(),PinType.PinValueType=(),PinType.ContainerType=None,PinType.bIsReference=False,PinType.bIsConst=False,PinType.bIsWeakPointer=False,PinType.bIsUObjectWrapper=False,PinType.bSerializeAsSinglePrecisionFloat=False,LinkedTo=(K2Node_Knot_0 2E9681A44D5F222CCF538BAEB00F2E6C,K2Node_Knot_1 32B817114B86FFFF389887AF145B2586,K2Node_Knot_2 1548253A4A5A75B6DD6C51981B01A6E8,),PersistentGuid=00000000000000000000000000000000,bHidden=False,bNotConnectable=False,bDefaultValueIsReadOnly=False,bDefaultValueIsIgnored=False,bAdvancedView=False,bOrphanedPin=False,)
End Object
Begin Object Class=/Script/BlueprintGraph.K2Node_CallFunction Name="K2Node_CallFunction_20" ExportPath="/Script/BlueprintGraph.K2Node_CallFunction'/Game/coherentBP.coherentBP:EventGraph.K2Node_CallFunction_20'"
   FunctionReference=(MemberParent="/Script/Engine.BlueprintGeneratedClass'/Game/CharacterBP.CharacterBP_C'",MemberName="ChangeFace",MemberGuid=6C3B2D9A49587298A7C2C68D885CD3F8)
   NodePosX=272
   NodePosY=2000
   NodeGuid=CFCCE59B491335EA18CEC59F53C2EEFB
   CustomProperties Pin (PinId=27D5E3354B6405846CA137ABBBF0029B,PinName="execute",PinToolTip="
Exec",PinType.PinCategory="exec",PinType.PinSubCategory="",PinType.PinSubCategoryObject=None,PinType.PinSubCategoryMemberReference=(),PinType.PinValueType=(),PinType.ContainerType=None,PinType.bIsReference=False,PinType.bIsConst=False,PinType.bIsWeakPointer=False,PinType.bIsUObjectWrapper=False,PinType.bSerializeAsSinglePrecisionFloat=False,LinkedTo=(K2Node_SwitchString_0 DBFDBD7248F124DB48CC24A7ACB49F2F,),PersistentGuid=00000000000000000000000000000000,bHidden=False,bNotConnectable=False,bDefaultValueIsReadOnly=False,bDefaultValueIsIgnored=False,bAdvancedView=False,bOrphanedPin=False,)
   CustomProperties Pin (PinId=244E3AC44F414447D1D3B9885E688192,PinName="then",PinToolTip="
Exec",Direction="EGPD_Output",PinType.PinCategory="exec",PinType.PinSubCategory="",PinType.PinSubCategoryObject=None,PinType.PinSubCategoryMemberReference=(),PinType.PinValueType=(),PinType.ContainerType=None,PinType.bIsReference=False,PinType.bIsConst=False,PinType.bIsWeakPointer=False,PinType.bIsUObjectWrapper=False,PinType.bSerializeAsSinglePrecisionFloat=False,LinkedTo=(K2Node_SetFieldsInStruct_7 AEC897EA429B39725F5D7B828910E54A,),PersistentGuid=00000000000000000000000000000000,bHidden=False,bNotConnectable=False,bDefaultValueIsReadOnly=False,bDefaultValueIsIgnored=False,bAdvancedView=False,bOrphanedPin=False,)
   CustomProperties Pin (PinId=61181EB74FC262A2BBE5AB836EBDED90,PinName="self",PinFriendlyName=NSLOCTEXT("K2Node", "Target", "Target"),PinToolTip="Target
Character BP Object Reference",PinType.PinCategory="object",PinType.PinSubCategory="",PinType.PinSubCategoryObject="/Script/Engine.BlueprintGeneratedClass'/Game/CharacterBP.CharacterBP_C'",PinType.PinSubCategoryMemberReference=(),PinType.PinValueType=(),PinType.ContainerType=None,PinType.bIsReference=False,PinType.bIsConst=False,PinType.bIsWeakPointer=False,PinType.bIsUObjectWrapper=False,PinType.bSerializeAsSinglePrecisionFloat=False,LinkedTo=(K2Node_Knot_1 BB738BAE44109CC9DCB794B1CF66323B,),PersistentGuid=00000000000000000000000000000000,bHidden=False,bNotConnectable=False,bDefaultValueIsReadOnly=False,bDefaultValueIsIgnored=False,bAdvancedView=False,bOrphanedPin=False,)
   CustomProperties Pin (PinId=1B42576A40867CCA47F046BFE2500DFE,PinName="index",PinToolTip="Index
Integer",PinType.PinCategory="int",PinType.PinSubCategory="",PinType.PinSubCategoryObject=None,PinType.PinSubCategoryMemberReference=(),PinType.PinValueType=(),PinType.ContainerType=None,PinType.bIsReference=False,PinType.bIsConst=False,PinType.bIsWeakPointer=False,PinType.bIsUObjectWrapper=False,PinType.bSerializeAsSinglePrecisionFloat=False,DefaultValue="0",AutogeneratedDefaultValue="0",LinkedTo=(K2Node_Event_3 3612E5A74EFE4C5F413FDF9EEA782BA1,),PersistentGuid=00000000000000000000000000000000,bHidden=False,bNotConnectable=False,bDefaultValueIsReadOnly=False,bDefaultValueIsIgnored=False,bAdvancedView=False,bOrphanedPin=False,)
End Object
Begin Object Class=/Script/BlueprintGraph.K2Node_Knot Name="K2Node_Knot_0" ExportPath="/Script/BlueprintGraph.K2Node_Knot'/Game/coherentBP.coherentBP:EventGraph.K2Node_Knot_0'"
   NodePosX=192
   NodePosY=1776
   NodeGuid=FA1E41304C76F5A284C812BD03C67B3D
   CustomProperties Pin (PinId=2E9681A44D5F222CCF538BAEB00F2E6C,PinName="InputPin",PinType.PinCategory="object",PinType.PinSubCategory="",PinType.PinSubCategoryObject="/Script/Engine.BlueprintGeneratedClass'/Game/CharacterBP.CharacterBP_C'",PinType.PinSubCategoryMemberReference=(),PinType.PinValueType=(),PinType.ContainerType=None,PinType.bIsReference=False,PinType.bIsConst=False,PinType.bIsWeakPointer=False,PinType.bIsUObjectWrapper=False,PinType.bSerializeAsSinglePrecisionFloat=False,LinkedTo=(K2Node_CallFunction_19 ED47C0414463FA1DA0459197161AF46A,),PersistentGuid=00000000000000000000000000000000,bHidden=False,bNotConnectable=False,bDefaultValueIsReadOnly=False,bDefaultValueIsIgnored=True,bAdvancedView=False,bOrphanedPin=False,)
   CustomProperties Pin (PinId=441BE21242DDDF1B250A06BB4C311702,PinName="OutputPin",Direction="EGPD_Output",PinType.PinCategory="object",PinType.PinSubCategory="",PinType.PinSubCategoryObject="/Script/Engine.BlueprintGeneratedClass'/Game/CharacterBP.CharacterBP_C'",PinType.PinSubCategoryMemberReference=(),PinType.PinValueType=(),PinType.ContainerType=None,PinType.bIsReference=False,PinType.bIsConst=False,PinType.bIsWeakPointer=False,PinType.bIsUObjectWrapper=False,PinType.bSerializeAsSinglePrecisionFloat=False,LinkedTo=(K2Node_CallFunction_16 78D68539423DC09B85186682F0590C10,),PersistentGuid=00000000000000000000000000000000,bHidden=False,bNotConnectable=False,bDefaultValueIsReadOnly=False,bDefaultValueIsIgnored=False,bAdvancedView=False,bOrphanedPin=False,)
End Object
Begin Object Class=/Script/BlueprintGraph.K2Node_Knot Name="K2Node_Knot_1" ExportPath="/Script/BlueprintGraph.K2Node_Knot'/Game/coherentBP.coherentBP:EventGraph.K2Node_Knot_1'"
   NodePosX=144
   NodePosY=1776
   NodeGuid=B269DA124B2F636D1E7D66B4475DC065
   CustomProperties Pin (PinId=32B817114B86FFFF389887AF145B2586,PinName="InputPin",PinType.PinCategory="object",PinType.PinSubCategory="",PinType.PinSubCategoryObject="/Script/Engine.BlueprintGeneratedClass'/Game/CharacterBP.CharacterBP_C'",PinType.PinSubCategoryMemberReference=(),PinType.PinValueType=(),PinType.ContainerType=None,PinType.bIsReference=False,PinType.bIsConst=False,PinType.bIsWeakPointer=False,PinType.bIsUObjectWrapper=False,PinType.bSerializeAsSinglePrecisionFloat=False,LinkedTo=(K2Node_CallFunction_19 ED47C0414463FA1DA0459197161AF46A,),PersistentGuid=00000000000000000000000000000000,bHidden=False,bNotConnectable=False,bDefaultValueIsReadOnly=False,bDefaultValueIsIgnored=True,bAdvancedView=False,bOrphanedPin=False,)
   CustomProperties Pin (PinId=BB738BAE44109CC9DCB794B1CF66323B,PinName="OutputPin",Direction="EGPD_Output",PinType.PinCategory="object",PinType.PinSubCategory="",PinType.PinSubCategoryObject="/Script/Engine.BlueprintGeneratedClass'/Game/CharacterBP.CharacterBP_C'",PinType.PinSubCategoryMemberReference=(),PinType.PinValueType=(),PinType.ContainerType=None,PinType.bIsReference=False,PinType.bIsConst=False,PinType.bIsWeakPointer=False,PinType.bIsUObjectWrapper=False,PinType.bSerializeAsSinglePrecisionFloat=False,LinkedTo=(K2Node_CallFunction_20 61181EB74FC262A2BBE5AB836EBDED90,),PersistentGuid=00000000000000000000000000000000,bHidden=False,bNotConnectable=False,bDefaultValueIsReadOnly=False,bDefaultValueIsIgnored=False,bAdvancedView=False,bOrphanedPin=False,)
End Object
Begin Object Class=/Script/BlueprintGraph.K2Node_CallFunction Name="K2Node_CallFunction_21" ExportPath="/Script/BlueprintGraph.K2Node_CallFunction'/Game/coherentBP.coherentBP:EventGraph.K2Node_CallFunction_21'"
   FunctionReference=(MemberParent="/Script/Engine.BlueprintGeneratedClass'/Game/CharacterBP.CharacterBP_C'",MemberName="ChangeLegs",MemberGuid=A5BD456742E2A38FBDD52FA7C8D385A9)
   NodePosX=272
   NodePosY=2160
   NodeGuid=2485477642831F9B113604A62ABC58F3
   CustomProperties Pin (PinId=9AD9E488438A6C39E3BC6F8B3EA3303E,PinName="execute",PinToolTip="
Exec",PinType.PinCategory="exec",PinType.PinSubCategory="",PinType.PinSubCategoryObject=None,PinType.PinSubCategoryMemberReference=(),PinType.PinValueType=(),PinType.ContainerType=None,PinType.bIsReference=False,PinType.bIsConst=False,PinType.bIsWeakPointer=False,PinType.bIsUObjectWrapper=False,PinType.bSerializeAsSinglePrecisionFloat=False,LinkedTo=(K2Node_SwitchString_0 A1A87DA74417F090CD0A609F6AAC68E5,),PersistentGuid=00000000000000000000000000000000,bHidden=False,bNotConnectable=False,bDefaultValueIsReadOnly=False,bDefaultValueIsIgnored=False,bAdvancedView=False,bOrphanedPin=False,)
   CustomProperties Pin (PinId=8AA84C5946A861E0581712AF8FD6A152,PinName="then",PinToolTip="
Exec",Direction="EGPD_Output",PinType.PinCategory="exec",PinType.PinSubCategory="",PinType.PinSubCategoryObject=None,PinType.PinSubCategoryMemberReference=(),PinType.PinValueType=(),PinType.ContainerType=None,PinType.bIsReference=False,PinType.bIsConst=False,PinType.bIsWeakPointer=False,PinType.bIsUObjectWrapper=False,PinType.bSerializeAsSinglePrecisionFloat=False,LinkedTo=(K2Node_SetFieldsInStruct_4 AEC897EA429B39725F5D7B828910E54A,),PersistentGuid=00000000000000000000000000000000,bHidden=False,bNotConnectable=False,bDefaultValueIsReadOnly=False,bDefaultValueIsIgnored=False,bAdvancedView=False,bOrphanedPin=False,)
   CustomProperties Pin (PinId=98EF9E5B44CEE5B98E2D04BBBB0E7E9C,PinName="self",PinFriendlyName=NSLOCTEXT("K2Node", "Target", "Target"),PinToolTip="Target
Character BP Object Reference",PinType.PinCategory="object",PinType.PinSubCategory="",PinType.PinSubCategoryObject="/Script/Engine.BlueprintGeneratedClass'/Game/CharacterBP.CharacterBP_C'",PinType.PinSubCategoryMemberReference=(),PinType.PinValueType=(),PinType.ContainerType=None,PinType.bIsReference=False,PinType.bIsConst=False,PinType.bIsWeakPointer=False,PinType.bIsUObjectWrapper=False,PinType.bSerializeAsSinglePrecisionFloat=False,LinkedTo=(K2Node_Knot_2 663D55F74D5FEA2A23A2F88F110182ED,),PersistentGuid=00000000000000000000000000000000,bHidden=False,bNotConnectable=False,bDefaultValueIsReadOnly=False,bDefaultValueIsIgnored=False,bAdvancedView=False,bOrphanedPin=False,)
   CustomProperties Pin (PinId=0CF5B56E4EAF022AE56354B587F1FA80,PinName="index",PinToolTip="Index
Integer",PinType.PinCategory="int",PinType.PinSubCategory="",PinType.PinSubCategoryObject=None,PinType.PinSubCategoryMemberReference=(),PinType.PinValueType=(),PinType.ContainerType=None,PinType.bIsReference=False,PinType.bIsConst=False,PinType.bIsWeakPointer=False,PinType.bIsUObjectWrapper=False,PinType.bSerializeAsSinglePrecisionFloat=False,DefaultValue="0",AutogeneratedDefaultValue="0",LinkedTo=(K2Node_Event_3 3612E5A74EFE4C5F413FDF9EEA782BA1,),PersistentGuid=00000000000000000000000000000000,bHidden=False,bNotConnectable=False,bDefaultValueIsReadOnly=False,bDefaultValueIsIgnored=False,bAdvancedView=False,bOrphanedPin=False,)
End Object
Begin Object Class=/Script/BlueprintGraph.K2Node_Knot Name="K2Node_Knot_2" ExportPath="/Script/BlueprintGraph.K2Node_Knot'/Game/coherentBP.coherentBP:EventGraph.K2Node_Knot_2'"
   NodePosX=48
   NodePosY=1776
   NodeGuid=41BB3E8547319C63A75259B40DDB1F37
   CustomProperties Pin (PinId=1548253A4A5A75B6DD6C51981B01A6E8,PinName="InputPin",PinType.PinCategory="object",PinType.PinSubCategory="",PinType.PinSubCategoryObject="/Script/Engine.BlueprintGeneratedClass'/Game/CharacterBP.CharacterBP_C'",PinType.PinSubCategoryMemberReference=(),PinType.PinValueType=(),PinType.ContainerType=None,PinType.bIsReference=False,PinType.bIsConst=False,PinType.bIsWeakPointer=False,PinType.bIsUObjectWrapper=False,PinType.bSerializeAsSinglePrecisionFloat=False,LinkedTo=(K2Node_CallFunction_19 ED47C0414463FA1DA0459197161AF46A,),PersistentGuid=00000000000000000000000000000000,bHidden=False,bNotConnectable=False,bDefaultValueIsReadOnly=False,bDefaultValueIsIgnored=True,bAdvancedView=False,bOrphanedPin=False,)
   CustomProperties Pin (PinId=663D55F74D5FEA2A23A2F88F110182ED,PinName="OutputPin",Direction="EGPD_Output",PinType.PinCategory="object",PinType.PinSubCategory="",PinType.PinSubCategoryObject="/Script/Engine.BlueprintGeneratedClass'/Game/CharacterBP.CharacterBP_C'",PinType.PinSubCategoryMemberReference=(),PinType.PinValueType=(),PinType.ContainerType=None,PinType.bIsReference=False,PinType.bIsConst=False,PinType.bIsWeakPointer=False,PinType.bIsUObjectWrapper=False,PinType.bSerializeAsSinglePrecisionFloat=False,LinkedTo=(K2Node_CallFunction_21 98EF9E5B44CEE5B98E2D04BBBB0E7E9C,),PersistentGuid=00000000000000000000000000000000,bHidden=False,bNotConnectable=False,bDefaultValueIsReadOnly=False,bDefaultValueIsIgnored=False,bAdvancedView=False,bOrphanedPin=False,)
End Object
Begin Object Class=/Script/BlueprintGraph.K2Node_SetFieldsInStruct Name="K2Node_SetFieldsInStruct_6" ExportPath="/Script/BlueprintGraph.K2Node_SetFieldsInStruct'/Game/coherentBP.coherentBP:EventGraph.K2Node_SetFieldsInStruct_6'"
   bMadeAfterOverridePinRemoval=True
   ShowPinForProperties(0)=(PropertyName="ChestIndex_10_E01AE90C40234F85A1A374B8E837866F",PropertyFriendlyName="ChestIndex",bShowPin=True,bCanToggleVisibility=True)
   ShowPinForProperties(1)=(PropertyName="FaceIndex_11_1E2B2283464DE3601BE986BD11943D8A",PropertyFriendlyName="FaceIndex",bCanToggleVisibility=True)
   ShowPinForProperties(2)=(PropertyName="LegsIndex_12_B3D8EE734EEEF4FE799552A7766CE943",PropertyFriendlyName="LegsIndex",bCanToggleVisibility=True)
   StructType="/Script/Engine.UserDefinedStruct'/Game/CharacterSelectedParts.CharacterSelectedParts'"
   NodePosX=720
   NodePosY=1856
   NodeGuid=65221EEF4B56AE993ADF1F95C647303A
   CustomProperties Pin (PinId=AEC897EA429B39725F5D7B828910E54A,PinName="execute",PinType.PinCategory="exec",PinType.PinSubCategory="",PinType.PinSubCategoryObject=None,PinType.PinSubCategoryMemberReference=(),PinType.PinValueType=(),PinType.ContainerType=None,PinType.bIsReference=False,PinType.bIsConst=False,PinType.bIsWeakPointer=False,PinType.bIsUObjectWrapper=False,PinType.bSerializeAsSinglePrecisionFloat=False,LinkedTo=(K2Node_CallFunction_16 6AEFB1A74AA9BCA33EC127A2323A88E4,),PersistentGuid=00000000000000000000000000000000,bHidden=False,bNotConnectable=False,bDefaultValueIsReadOnly=False,bDefaultValueIsIgnored=False,bAdvancedView=False,bOrphanedPin=False,)
   CustomProperties Pin (PinId=823B2A024F04EAFCC3E16AAAB24DDE7B,PinName="then",Direction="EGPD_Output",PinType.PinCategory="exec",PinType.PinSubCategory="",PinType.PinSubCategoryObject=None,PinType.PinSubCategoryMemberReference=(),PinType.PinValueType=(),PinType.ContainerType=None,PinType.bIsReference=False,PinType.bIsConst=False,PinType.bIsWeakPointer=False,PinType.bIsUObjectWrapper=False,PinType.bSerializeAsSinglePrecisionFloat=False,LinkedTo=(K2Node_CallFunction_13 7A2B340B4F72F2FCE0D81FA11D5F73EB,),PersistentGuid=00000000000000000000000000000000,bHidden=False,bNotConnectable=False,bDefaultValueIsReadOnly=False,bDefaultValueIsIgnored=False,bAdvancedView=False,bOrphanedPin=False,)
   CustomProperties Pin (PinId=14887F5E49E75BFD4A3207865A898D8D,PinName="StructRef",PinType.PinCategory="struct",PinType.PinSubCategory="",PinType.PinSubCategoryObject="/Script/Engine.UserDefinedStruct'/Game/CharacterSelectedParts.CharacterSelectedParts'",PinType.PinSubCategoryMemberReference=(),PinType.PinValueType=(),PinType.ContainerType=None,PinType.bIsReference=True,PinType.bIsConst=False,PinType.bIsWeakPointer=False,PinType.bIsUObjectWrapper=False,PinType.bSerializeAsSinglePrecisionFloat=False,LinkedTo=(K2Node_VariableGet_12 688E755E41CD51B477E488BC9A57C17C,),ReferencePassThroughConnection=K2Node_SetFieldsInStruct_6 AF0B500B49A261F430F831AC65189060,PersistentGuid=00000000000000000000000000000000,bHidden=False,bNotConnectable=False,bDefaultValueIsReadOnly=False,bDefaultValueIsIgnored=False,bAdvancedView=False,bOrphanedPin=False,)
   CustomProperties Pin (PinId=AF0B500B49A261F430F831AC65189060,PinName="StructOut",PinToolTip="Reference to the input struct",Direction="EGPD_Output",PinType.PinCategory="struct",PinType.PinSubCategory="",PinType.PinSubCategoryObject="/Script/Engine.UserDefinedStruct'/Game/CharacterSelectedParts.CharacterSelectedParts'",PinType.PinSubCategoryMemberReference=(),PinType.PinValueType=(),PinType.ContainerType=None,PinType.bIsReference=True,PinType.bIsConst=False,PinType.bIsWeakPointer=False,PinType.bIsUObjectWrapper=False,PinType.bSerializeAsSinglePrecisionFloat=False,ReferencePassThroughConnection=K2Node_SetFieldsInStruct_6 14887F5E49E75BFD4A3207865A898D8D,PersistentGuid=00000000000000000000000000000000,bHidden=False,bNotConnectable=False,bDefaultValueIsReadOnly=False,bDefaultValueIsIgnored=False,bAdvancedView=False,bOrphanedPin=False,)
   CustomProperties Pin (PinId=BB2686F74BA836E1C75F69A99CDC8A6E,PinName="ChestIndex_10_E01AE90C40234F85A1A374B8E837866F",PinFriendlyName=NSLOCTEXT("", "DF25703842FCA94E2F9FD281AF5D9573", "ChestIndex"),PinToolTip="Chest Index
Integer",PinType.PinCategory="int",PinType.PinSubCategory="",PinType.PinSubCategoryObject=None,PinType.PinSubCategoryMemberReference=(),PinType.PinValueType=(),PinType.ContainerType=None,PinType.bIsReference=False,PinType.bIsConst=False,PinType.bIsWeakPointer=False,PinType.bIsUObjectWrapper=False,PinType.bSerializeAsSinglePrecisionFloat=False,DefaultValue="0",AutogeneratedDefaultValue="0",LinkedTo=(K2Node_Event_3 3612E5A74EFE4C5F413FDF9EEA782BA1,),PersistentGuid=E01AE90C40234F85A1A374B8E837866F,bHidden=False,bNotConnectable=False,bDefaultValueIsReadOnly=False,bDefaultValueIsIgnored=False,bAdvancedView=False,bOrphanedPin=False,)
End Object
Begin Object Class=/Script/BlueprintGraph.K2Node_VariableGet Name="K2Node_VariableGet_12" ExportPath="/Script/BlueprintGraph.K2Node_VariableGet'/Game/coherentBP.coherentBP:EventGraph.K2Node_VariableGet_12'"
   VariableReference=(MemberName="Character",MemberGuid=5C39AE5A464E72A9223C75947D3B7D4E,bSelfContext=True)
   NodePosX=496
   NodePosY=2064
   NodeGuid=B8B1C01946802D4036A1BB992AAC5E13
   CustomProperties Pin (PinId=688E755E41CD51B477E488BC9A57C17C,PinName="Character",Direction="EGPD_Output",PinType.PinCategory="struct",PinType.PinSubCategory="",PinType.PinSubCategoryObject="/Script/Engine.UserDefinedStruct'/Game/CharacterSelectedParts.CharacterSelectedParts'",PinType.PinSubCategoryMemberReference=(),PinType.PinValueType=(),PinType.ContainerType=None,PinType.bIsReference=False,PinType.bIsConst=False,PinType.bIsWeakPointer=False,PinType.bIsUObjectWrapper=False,PinType.bSerializeAsSinglePrecisionFloat=False,LinkedTo=(K2Node_SetFieldsInStruct_6 14887F5E49E75BFD4A3207865A898D8D,K2Node_SetFieldsInStruct_7 14887F5E49E75BFD4A3207865A898D8D,K2Node_SetFieldsInStruct_4 14887F5E49E75BFD4A3207865A898D8D,),PersistentGuid=00000000000000000000000000000000,bHidden=False,bNotConnectable=False,bDefaultValueIsReadOnly=False,bDefaultValueIsIgnored=False,bAdvancedView=False,bOrphanedPin=False,)
   CustomProperties Pin (PinId=A75C0BFF46BCE3828B39259AF3964458,PinName="self",PinFriendlyName=NSLOCTEXT("K2Node", "Target", "Target"),PinType.PinCategory="object",PinType.PinSubCategory="",PinType.PinSubCategoryObject="/Script/Engine.BlueprintGeneratedClass'/Game/coherentBP.coherentBP_C'",PinType.PinSubCategoryMemberReference=(),PinType.PinValueType=(),PinType.ContainerType=None,PinType.bIsReference=False,PinType.bIsConst=False,PinType.bIsWeakPointer=False,PinType.bIsUObjectWrapper=False,PinType.bSerializeAsSinglePrecisionFloat=False,PersistentGuid=00000000000000000000000000000000,bHidden=True,bNotConnectable=False,bDefaultValueIsReadOnly=False,bDefaultValueIsIgnored=False,bAdvancedView=False,bOrphanedPin=False,)
End Object
Begin Object Class=/Script/BlueprintGraph.K2Node_SetFieldsInStruct Name="K2Node_SetFieldsInStruct_7" ExportPath="/Script/BlueprintGraph.K2Node_SetFieldsInStruct'/Game/coherentBP.coherentBP:EventGraph.K2Node_SetFieldsInStruct_7'"
   bMadeAfterOverridePinRemoval=True
   ShowPinForProperties(0)=(PropertyName="ChestIndex_10_E01AE90C40234F85A1A374B8E837866F",PropertyFriendlyName="ChestIndex",bCanToggleVisibility=True)
   ShowPinForProperties(1)=(PropertyName="FaceIndex_11_1E2B2283464DE3601BE986BD11943D8A",PropertyFriendlyName="FaceIndex",bShowPin=True,bCanToggleVisibility=True)
   ShowPinForProperties(2)=(PropertyName="LegsIndex_12_B3D8EE734EEEF4FE799552A7766CE943",PropertyFriendlyName="LegsIndex",bCanToggleVisibility=True)
   StructType="/Script/Engine.UserDefinedStruct'/Game/CharacterSelectedParts.CharacterSelectedParts'"
   NodePosX=720
   NodePosY=2016
   NodeGuid=F7B947A84E900BC341D8489B0785ACC3
   CustomProperties Pin (PinId=AEC897EA429B39725F5D7B828910E54A,PinName="execute",PinType.PinCategory="exec",PinType.PinSubCategory="",PinType.PinSubCategoryObject=None,PinType.PinSubCategoryMemberReference=(),PinType.PinValueType=(),PinType.ContainerType=None,PinType.bIsReference=False,PinType.bIsConst=False,PinType.bIsWeakPointer=False,PinType.bIsUObjectWrapper=False,PinType.bSerializeAsSinglePrecisionFloat=False,LinkedTo=(K2Node_CallFunction_20 244E3AC44F414447D1D3B9885E688192,),PersistentGuid=00000000000000000000000000000000,bHidden=False,bNotConnectable=False,bDefaultValueIsReadOnly=False,bDefaultValueIsIgnored=False,bAdvancedView=False,bOrphanedPin=False,)
   CustomProperties Pin (PinId=823B2A024F04EAFCC3E16AAAB24DDE7B,PinName="then",Direction="EGPD_Output",PinType.PinCategory="exec",PinType.PinSubCategory="",PinType.PinSubCategoryObject=None,PinType.PinSubCategoryMemberReference=(),PinType.PinValueType=(),PinType.ContainerType=None,PinType.bIsReference=False,PinType.bIsConst=False,PinType.bIsWeakPointer=False,PinType.bIsUObjectWrapper=False,PinType.bSerializeAsSinglePrecisionFloat=False,LinkedTo=(K2Node_CallFunction_13 7A2B340B4F72F2FCE0D81FA11D5F73EB,),PersistentGuid=00000000000000000000000000000000,bHidden=False,bNotConnectable=False,bDefaultValueIsReadOnly=False,bDefaultValueIsIgnored=False,bAdvancedView=False,bOrphanedPin=False,)
   CustomProperties Pin (PinId=14887F5E49E75BFD4A3207865A898D8D,PinName="StructRef",PinType.PinCategory="struct",PinType.PinSubCategory="",PinType.PinSubCategoryObject="/Script/Engine.UserDefinedStruct'/Game/CharacterSelectedParts.CharacterSelectedParts'",PinType.PinSubCategoryMemberReference=(),PinType.PinValueType=(),PinType.ContainerType=None,PinType.bIsReference=True,PinType.bIsConst=False,PinType.bIsWeakPointer=False,PinType.bIsUObjectWrapper=False,PinType.bSerializeAsSinglePrecisionFloat=False,LinkedTo=(K2Node_VariableGet_12 688E755E41CD51B477E488BC9A57C17C,),ReferencePassThroughConnection=K2Node_SetFieldsInStruct_7 AF0B500B49A261F430F831AC65189060,PersistentGuid=00000000000000000000000000000000,bHidden=False,bNotConnectable=False,bDefaultValueIsReadOnly=False,bDefaultValueIsIgnored=False,bAdvancedView=False,bOrphanedPin=False,)
   CustomProperties Pin (PinId=AF0B500B49A261F430F831AC65189060,PinName="StructOut",PinToolTip="Reference to the input struct",Direction="EGPD_Output",PinType.PinCategory="struct",PinType.PinSubCategory="",PinType.PinSubCategoryObject="/Script/Engine.UserDefinedStruct'/Game/CharacterSelectedParts.CharacterSelectedParts'",PinType.PinSubCategoryMemberReference=(),PinType.PinValueType=(),PinType.ContainerType=None,PinType.bIsReference=True,PinType.bIsConst=False,PinType.bIsWeakPointer=False,PinType.bIsUObjectWrapper=False,PinType.bSerializeAsSinglePrecisionFloat=False,ReferencePassThroughConnection=K2Node_SetFieldsInStruct_7 14887F5E49E75BFD4A3207865A898D8D,PersistentGuid=00000000000000000000000000000000,bHidden=False,bNotConnectable=False,bDefaultValueIsReadOnly=False,bDefaultValueIsIgnored=False,bAdvancedView=False,bOrphanedPin=False,)
   CustomProperties Pin (PinId=FC89BDDF464C83D6D6D89EB6FBCA6689,PinName="FaceIndex_11_1E2B2283464DE3601BE986BD11943D8A",PinFriendlyName=NSLOCTEXT("", "2EFBAEB744D8848BABD92F86CF006E93", "FaceIndex"),PinToolTip="Face Index
Integer",PinType.PinCategory="int",PinType.PinSubCategory="",PinType.PinSubCategoryObject=None,PinType.PinSubCategoryMemberReference=(),PinType.PinValueType=(),PinType.ContainerType=None,PinType.bIsReference=False,PinType.bIsConst=False,PinType.bIsWeakPointer=False,PinType.bIsUObjectWrapper=False,PinType.bSerializeAsSinglePrecisionFloat=False,DefaultValue="0",AutogeneratedDefaultValue="0",LinkedTo=(K2Node_Event_3 3612E5A74EFE4C5F413FDF9EEA782BA1,),PersistentGuid=1E2B2283464DE3601BE986BD11943D8A,bHidden=False,bNotConnectable=False,bDefaultValueIsReadOnly=False,bDefaultValueIsIgnored=False,bAdvancedView=False,bOrphanedPin=False,)
End Object
Begin Object Class=/Script/BlueprintGraph.K2Node_SetFieldsInStruct Name="K2Node_SetFieldsInStruct_4" ExportPath="/Script/BlueprintGraph.K2Node_SetFieldsInStruct'/Game/coherentBP.coherentBP:EventGraph.K2Node_SetFieldsInStruct_4'"
   bMadeAfterOverridePinRemoval=True
   ShowPinForProperties(0)=(PropertyName="ChestIndex_10_E01AE90C40234F85A1A374B8E837866F",PropertyFriendlyName="ChestIndex",bCanToggleVisibility=True)
   ShowPinForProperties(1)=(PropertyName="FaceIndex_11_1E2B2283464DE3601BE986BD11943D8A",PropertyFriendlyName="FaceIndex",bCanToggleVisibility=True)
   ShowPinForProperties(2)=(PropertyName="LegsIndex_12_B3D8EE734EEEF4FE799552A7766CE943",PropertyFriendlyName="LegsIndex",bShowPin=True,bCanToggleVisibility=True)
   StructType="/Script/Engine.UserDefinedStruct'/Game/CharacterSelectedParts.CharacterSelectedParts'"
   NodePosX=720
   NodePosY=2176
   NodeGuid=72AE28B8415259905D50CFA08041E67E
   CustomProperties Pin (PinId=AEC897EA429B39725F5D7B828910E54A,PinName="execute",PinType.PinCategory="exec",PinType.PinSubCategory="",PinType.PinSubCategoryObject=None,PinType.PinSubCategoryMemberReference=(),PinType.PinValueType=(),PinType.ContainerType=None,PinType.bIsReference=False,PinType.bIsConst=False,PinType.bIsWeakPointer=False,PinType.bIsUObjectWrapper=False,PinType.bSerializeAsSinglePrecisionFloat=False,LinkedTo=(K2Node_CallFunction_21 8AA84C5946A861E0581712AF8FD6A152,),PersistentGuid=00000000000000000000000000000000,bHidden=False,bNotConnectable=False,bDefaultValueIsReadOnly=False,bDefaultValueIsIgnored=False,bAdvancedView=False,bOrphanedPin=False,)
   CustomProperties Pin (PinId=823B2A024F04EAFCC3E16AAAB24DDE7B,PinName="then",Direction="EGPD_Output",PinType.PinCategory="exec",PinType.PinSubCategory="",PinType.PinSubCategoryObject=None,PinType.PinSubCategoryMemberReference=(),PinType.PinValueType=(),PinType.ContainerType=None,PinType.bIsReference=False,PinType.bIsConst=False,PinType.bIsWeakPointer=False,PinType.bIsUObjectWrapper=False,PinType.bSerializeAsSinglePrecisionFloat=False,LinkedTo=(K2Node_CallFunction_13 7A2B340B4F72F2FCE0D81FA11D5F73EB,),PersistentGuid=00000000000000000000000000000000,bHidden=False,bNotConnectable=False,bDefaultValueIsReadOnly=False,bDefaultValueIsIgnored=False,bAdvancedView=False,bOrphanedPin=False,)
   CustomProperties Pin (PinId=14887F5E49E75BFD4A3207865A898D8D,PinName="StructRef",PinType.PinCategory="struct",PinType.PinSubCategory="",PinType.PinSubCategoryObject="/Script/Engine.UserDefinedStruct'/Game/CharacterSelectedParts.CharacterSelectedParts'",PinType.PinSubCategoryMemberReference=(),PinType.PinValueType=(),PinType.ContainerType=None,PinType.bIsReference=True,PinType.bIsConst=False,PinType.bIsWeakPointer=False,PinType.bIsUObjectWrapper=False,PinType.bSerializeAsSinglePrecisionFloat=False,LinkedTo=(K2Node_VariableGet_12 688E755E41CD51B477E488BC9A57C17C,),ReferencePassThroughConnection=K2Node_SetFieldsInStruct_4 AF0B500B49A261F430F831AC65189060,PersistentGuid=00000000000000000000000000000000,bHidden=False,bNotConnectable=False,bDefaultValueIsReadOnly=False,bDefaultValueIsIgnored=False,bAdvancedView=False,bOrphanedPin=False,)
   CustomProperties Pin (PinId=AF0B500B49A261F430F831AC65189060,PinName="StructOut",PinToolTip="Reference to the input struct",Direction="EGPD_Output",PinType.PinCategory="struct",PinType.PinSubCategory="",PinType.PinSubCategoryObject="/Script/Engine.UserDefinedStruct'/Game/CharacterSelectedParts.CharacterSelectedParts'",PinType.PinSubCategoryMemberReference=(),PinType.PinValueType=(),PinType.ContainerType=None,PinType.bIsReference=True,PinType.bIsConst=False,PinType.bIsWeakPointer=False,PinType.bIsUObjectWrapper=False,PinType.bSerializeAsSinglePrecisionFloat=False,ReferencePassThroughConnection=K2Node_SetFieldsInStruct_4 14887F5E49E75BFD4A3207865A898D8D,PersistentGuid=00000000000000000000000000000000,bHidden=False,bNotConnectable=False,bDefaultValueIsReadOnly=False,bDefaultValueIsIgnored=False,bAdvancedView=False,bOrphanedPin=False,)
   CustomProperties Pin (PinId=B0F6EFE14FEAB6B067C1389D6710CDD1,PinName="LegsIndex_12_B3D8EE734EEEF4FE799552A7766CE943",PinFriendlyName=NSLOCTEXT("", "F13CAF2E4AC0913AAABD64B53C5D5430", "LegsIndex"),PinToolTip="Legs Index
Integer",PinType.PinCategory="int",PinType.PinSubCategory="",PinType.PinSubCategoryObject=None,PinType.PinSubCategoryMemberReference=(),PinType.PinValueType=(),PinType.ContainerType=None,PinType.bIsReference=False,PinType.bIsConst=False,PinType.bIsWeakPointer=False,PinType.bIsUObjectWrapper=False,PinType.bSerializeAsSinglePrecisionFloat=False,DefaultValue="0",AutogeneratedDefaultValue="0",LinkedTo=(K2Node_Event_3 3612E5A74EFE4C5F413FDF9EEA782BA1,),PersistentGuid=B3D8EE734EEEF4FE799552A7766CE943,bHidden=False,bNotConnectable=False,bDefaultValueIsReadOnly=False,bDefaultValueIsIgnored=False,bAdvancedView=False,bOrphanedPin=False,)
End Object
Begin Object Class=/Script/BlueprintGraph.K2Node_VariableGet Name="K2Node_VariableGet_13" ExportPath="/Script/BlueprintGraph.K2Node_VariableGet'/Game/coherentBP.coherentBP:EventGraph.K2Node_VariableGet_13'"
   VariableReference=(MemberName="Character",MemberGuid=5C39AE5A464E72A9223C75947D3B7D4E,bSelfContext=True)
   NodePosX=1088
   NodePosY=2192
   NodeGuid=C1408AEE42773AE02124EE8CA0ECEE88
   CustomProperties Pin (PinId=A4254CF640BE8B5E1A37718C866D245E,PinName="Character",Direction="EGPD_Output",PinType.PinCategory="struct",PinType.PinSubCategory="",PinType.PinSubCategoryObject="/Script/Engine.UserDefinedStruct'/Game/CharacterSelectedParts.CharacterSelectedParts'",PinType.PinSubCategoryMemberReference=(),PinType.PinValueType=(),PinType.ContainerType=None,PinType.bIsReference=False,PinType.bIsConst=False,PinType.bIsWeakPointer=False,PinType.bIsUObjectWrapper=False,PinType.bSerializeAsSinglePrecisionFloat=False,LinkedTo=(K2Node_CallFunction_13 4B9135BE4D7F435035BB9E8B015482F5,),PersistentGuid=00000000000000000000000000000000,bHidden=False,bNotConnectable=False,bDefaultValueIsReadOnly=False,bDefaultValueIsIgnored=False,bAdvancedView=False,bOrphanedPin=False,)
   CustomProperties Pin (PinId=A9957C204D5FDDADEDB95A9792A90D0D,PinName="self",PinFriendlyName=NSLOCTEXT("K2Node", "Target", "Target"),PinType.PinCategory="object",PinType.PinSubCategory="",PinType.PinSubCategoryObject="/Script/Engine.BlueprintGeneratedClass'/Game/coherentBP.coherentBP_C'",PinType.PinSubCategoryMemberReference=(),PinType.PinValueType=(),PinType.ContainerType=None,PinType.bIsReference=False,PinType.bIsConst=False,PinType.bIsWeakPointer=False,PinType.bIsUObjectWrapper=False,PinType.bSerializeAsSinglePrecisionFloat=False,PersistentGuid=00000000000000000000000000000000,bHidden=True,bNotConnectable=False,bDefaultValueIsReadOnly=False,bDefaultValueIsIgnored=False,bAdvancedView=False,bOrphanedPin=False,)
End Object
Begin Object Class=/Script/BlueprintGraph.K2Node_CallFunction Name="K2Node_CallFunction_13" ExportPath="/Script/BlueprintGraph.K2Node_CallFunction'/Game/coherentBP.coherentBP:EventGraph.K2Node_CallFunction_13'"
   bIsConstFunc=True
   FunctionReference=(MemberParent="/Script/CoreUObject.Class'/Script/CohtmlPlugin.CohtmlBaseComponent'",MemberName="UpdateWholeDataModelFromStruct")
   NodePosX=1296
   NodePosY=2000
   ErrorType=1
   NodeGuid=2E22DD5D49881AD862DDB8B4B8A17528
   CustomProperties Pin (PinId=7A2B340B4F72F2FCE0D81FA11D5F73EB,PinName="execute",PinToolTip="
Exec",PinType.PinCategory="exec",PinType.PinSubCategory="",PinType.PinSubCategoryObject=None,PinType.PinSubCategoryMemberReference=(),PinType.PinValueType=(),PinType.ContainerType=None,PinType.bIsReference=False,PinType.bIsConst=False,PinType.bIsWeakPointer=False,PinType.bIsUObjectWrapper=False,PinType.bSerializeAsSinglePrecisionFloat=False,LinkedTo=(K2Node_SetFieldsInStruct_6 823B2A024F04EAFCC3E16AAAB24DDE7B,K2Node_SetFieldsInStruct_7 823B2A024F04EAFCC3E16AAAB24DDE7B,K2Node_SetFieldsInStruct_4 823B2A024F04EAFCC3E16AAAB24DDE7B,),PersistentGuid=00000000000000000000000000000000,bHidden=False,bNotConnectable=False,bDefaultValueIsReadOnly=False,bDefaultValueIsIgnored=False,bAdvancedView=False,bOrphanedPin=False,)
   CustomProperties Pin (PinId=F74182974D979FA9E9DEEDAAADAC7648,PinName="then",PinToolTip="
Exec",Direction="EGPD_Output",PinType.PinCategory="exec",PinType.PinSubCategory="",PinType.PinSubCategoryObject=None,PinType.PinSubCategoryMemberReference=(),PinType.PinValueType=(),PinType.ContainerType=None,PinType.bIsReference=False,PinType.bIsConst=False,PinType.bIsWeakPointer=False,PinType.bIsUObjectWrapper=False,PinType.bSerializeAsSinglePrecisionFloat=False,PersistentGuid=00000000000000000000000000000000,bHidden=False,bNotConnectable=False,bDefaultValueIsReadOnly=False,bDefaultValueIsIgnored=False,bAdvancedView=False,bOrphanedPin=False,)
   CustomProperties Pin (PinId=93A7C4094E5C08282285588FFAAA5094,PinName="self",PinFriendlyName=NSLOCTEXT("K2Node", "Target", "Target"),PinToolTip="Target
Gameface Base Component Object Reference",PinType.PinCategory="object",PinType.PinSubCategory="",PinType.PinSubCategoryObject="/Script/CoreUObject.Class'/Script/CohtmlPlugin.CohtmlBaseComponent'",PinType.PinSubCategoryMemberReference=(),PinType.PinValueType=(),PinType.ContainerType=None,PinType.bIsReference=False,PinType.bIsConst=False,PinType.bIsWeakPointer=False,PinType.bIsUObjectWrapper=False,PinType.bSerializeAsSinglePrecisionFloat=False,LinkedTo=(K2Node_VariableGet_11 8AB6073944F4C19059B69FA9B914CBBD,),PersistentGuid=00000000000000000000000000000000,bHidden=False,bNotConnectable=False,bDefaultValueIsReadOnly=False,bDefaultValueIsIgnored=False,bAdvancedView=False,bOrphanedPin=False,)
   CustomProperties Pin (PinId=4B9135BE4D7F435035BB9E8B015482F5,PinName="Struct",PinToolTip="Struct
Character Selected Parts Structure",PinType.PinCategory="struct",PinType.PinSubCategory="",PinType.PinSubCategoryObject="/Script/Engine.UserDefinedStruct'/Game/CharacterSelectedParts.CharacterSelectedParts'",PinType.PinSubCategoryMemberReference=(),PinType.PinValueType=(),PinType.ContainerType=None,PinType.bIsReference=False,PinType.bIsConst=False,PinType.bIsWeakPointer=False,PinType.bIsUObjectWrapper=False,PinType.bSerializeAsSinglePrecisionFloat=False,LinkedTo=(K2Node_VariableGet_13 A4254CF640BE8B5E1A37718C866D245E,),PersistentGuid=00000000000000000000000000000000,bHidden=False,bNotConnectable=False,bDefaultValueIsReadOnly=False,bDefaultValueIsIgnored=False,bAdvancedView=False,bOrphanedPin=False,)
End Object
Begin Object Class=/Script/BlueprintGraph.K2Node_VariableGet Name="K2Node_VariableGet_11" ExportPath="/Script/BlueprintGraph.K2Node_VariableGet'/Game/coherentBP.coherentBP:EventGraph.K2Node_VariableGet_11'"
   VariableReference=(MemberName="CohtmlHUD",bSelfContext=True)
   NodePosX=1088
   NodePosY=1872
   NodeGuid=74432F5341C929503E844194B4AB4027
   CustomProperties Pin (PinId=8AB6073944F4C19059B69FA9B914CBBD,PinName="CohtmlHUD",PinFriendlyName="Gameface HUD",Direction="EGPD_Output",PinType.PinCategory="object",PinType.PinSubCategory="",PinType.PinSubCategoryObject="/Script/CoreUObject.Class'/Script/CohtmlPlugin.CohtmlHUD'",PinType.PinSubCategoryMemberReference=(),PinType.PinValueType=(),PinType.ContainerType=None,PinType.bIsReference=False,PinType.bIsConst=False,PinType.bIsWeakPointer=False,PinType.bIsUObjectWrapper=False,PinType.bSerializeAsSinglePrecisionFloat=False,LinkedTo=(K2Node_CallFunction_13 93A7C4094E5C08282285588FFAAA5094,),PersistentGuid=00000000000000000000000000000000,bHidden=False,bNotConnectable=False,bDefaultValueIsReadOnly=False,bDefaultValueIsIgnored=False,bAdvancedView=False,bOrphanedPin=False,)
   CustomProperties Pin (PinId=2DA5EC7047C3017FD037B1A6782E85D9,PinName="self",PinFriendlyName=NSLOCTEXT("K2Node", "Target", "Target"),PinType.PinCategory="object",PinType.PinSubCategory="",PinType.PinSubCategoryObject="/Script/CoreUObject.Class'/Script/CohtmlPlugin.CohtmlGameHUD'",PinType.PinSubCategoryMemberReference=(),PinType.PinValueType=(),PinType.ContainerType=None,PinType.bIsReference=False,PinType.bIsConst=False,PinType.bIsWeakPointer=False,PinType.bIsUObjectWrapper=False,PinType.bSerializeAsSinglePrecisionFloat=False,PersistentGuid=00000000000000000000000000000000,bHidden=True,bNotConnectable=False,bDefaultValueIsReadOnly=False,bDefaultValueIsIgnored=False,bAdvancedView=False,bOrphanedPin=False,)
End Object
Here, the Character variable refers to the CharacterSelectedParts struct.
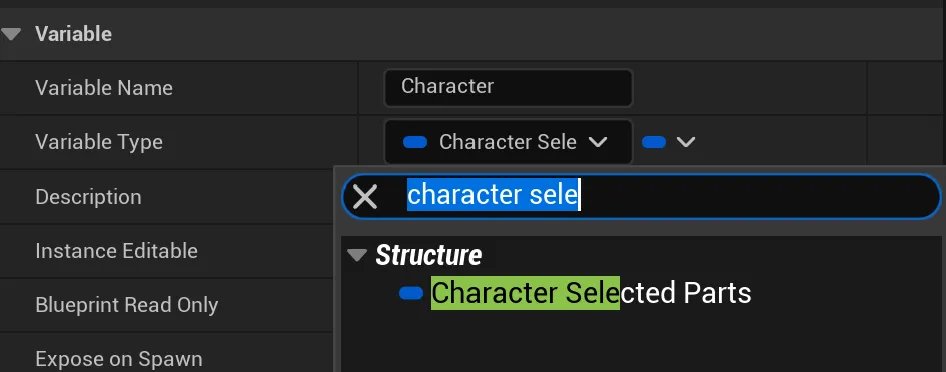
Creating the Frontend
In our Parallax UI project, we’ll create a new page called Customize Character and set it up to match the rest of the UI (we won’t delve into the styling details here).
This page will have two main elements: one for the character customization menu with items for Face, Chest, and Pants, and another for displaying the character preview.
Building the Character Customization Menu and Preview
To create the customization menu, we’ll define the menu items directly in the React component. Note that using our binding system is more efficient, but for simplicity, we’ll define the items directly here. Normally, you’d define the items model on the backend in Unreal and access it via data binding attributes.
1const [selectedMenu, setSelectedMenu] = useState(-1);2const menus = [3 {4 title: 'Face',5 items: [6 './images/edit-character/face_0.png',7 ...8 ],9 },10 {11 title: 'Chest',12 items: [13 './images/edit-character/chest_0.png',14 ...15 ],16 },17 {18 title: 'Legs',19 items: [20 './images/edit-character/legs_0.png',21 ...22 ],23 },24];We will have a state variable for the selected menu, used to toggle between customization menus, and a menus variable holding data for each menu.
To map the state and data, we render the following template:
1<div className="edit-character">2 <div className="edit-character-column edit-character-column-left">3 <div className="title edit-character-info">4 Customize character5 </div>6 <Divider />7 <div className="edit-character-item-container">8 <gameface-scrollable-container9 class="scrollable-container-component"10 automatic11 >12 <component-slot data-name="scrollable-content">13 {menus.map((menu, index) => {14 return (<div key={index} onClick={(event) => { selectMenu(event, index); }} className={`edit-character-item`}>15 <div className="edit-character-item-title">{menu.title}</div>16 <div className={`edit-character-item-items ${selectedMenu === index ? '' : 'edit-character-item-items-hidden'}`}>17 {menu.items.map((itemImage, itemIndex) => {18 return (19 <div20 key={index + '_' + itemIndex}21 onClick={() => { engine.trigger(`customizeCharacter`, menu.title, itemIndex) }}22 style={{ backgroundImage: `url(${itemImage})` }}23 className={`edit-character-item-image`}24 data-bind-class-toggle={`edit-character-item-image-selected:{{CharacterSelectedParts.${menu.title}Index}} === ${itemIndex}`}25 >26 </div>27 )28 })}</div>29 </div>)30 })}31 </component-slot>32 </gameface-scrollable-container>33 </div>34 </div>35 <img36 src="/Script/Engine.TextureRenderTarget2D'/Game/CharacterLiveViewRT.CharacterLiveViewRT'"37 className="edit-character-item-preview"38 />39</div>Key Points to Note:
- Toggling Menus: We toggle the menus by changing the selected menu index.
1<div key={index} onClick={(event) => { selectMenu(event, index); }} className={`edit-character-item`}>1const selectMenu = (event, menuIndex) => {2 if (event.target.classList.contains('edit-character-item-items') ||3 event.target.classList.contains('edit-character-item-image')) return;4
5 if (selectedMenu === menuIndex) {6 setSelectedMenu(-1);7 return;8 }9
10 setSelectedMenu(menuIndex);11}The selectMenu method changes the selected menu index, closes the current menu if it’s selected and you click on it, and prevents toggling if you click on any child element.
- Active Class Toggle: We use the
data-bind-class-toggleattribute to set the active class to the item currently selected on the character. This utilizes theCharacterSelectedPartsmodel created earlier. - Triggering Customization Events: When an item is clicked, we send the
customizeCharacterevent to the engine.
1onClick={() => { engine.trigger(`customizeCharacter`, menu.title, itemIndex) }}- Character Preview: We display the character preview using the live view we created.
1<img2 src="/Script/Engine.TextureRenderTarget2D'/Game/CharacterLiveViewRT.CharacterLiveViewRT'"3 className="edit-character-item-preview"4/>Bonus - Rotating the character and focusing focusing on specific parts for customization
Adjusting the camera position for character customization
To adjust the camera position, we need to register a binding event in JavaScript that will trigger the camera repositioning. For example, we can register an event to focus on the character’s chest.
First, cast the SceneCaptureComponent2D of the CharacterBP blueprint to CohtmlGameHUD and inform the HUD that it is ready for bindings.
   Begin Object Class=/Script/BlueprintGraph.K2Node_Event Name="K2Node_Event_0" ExportPath="/Script/BlueprintGraph.K2Node_Event'/Game/CharacterBP.CharacterBP:EventGraph.K2Node_Event_0'"
   EventReference=(MemberParent="/Script/CoreUObject.Class'/Script/Engine.Actor'",MemberName="ReceiveBeginPlay")
   bOverrideFunction=True
   NodePosX=-448
   NodePosY=-16
   bCommentBubblePinned=True
   NodeGuid=556FD8FC48149DCE0E18328C42CA57DC
   CustomProperties Pin (PinId=DE690A9F44A7126164E61FA2506D4B48,PinName="OutputDelegate",Direction="EGPD_Output",PinType.PinCategory="delegate",PinType.PinSubCategory="",PinType.PinSubCategoryObject=None,PinType.PinSubCategoryMemberReference=(MemberParent="/Script/CoreUObject.Class'/Script/Engine.Actor'",MemberName="ReceiveBeginPlay"),PinType.PinValueType=(),PinType.ContainerType=None,PinType.bIsReference=False,PinType.bIsConst=False,PinType.bIsWeakPointer=False,PinType.bIsUObjectWrapper=False,PinType.bSerializeAsSinglePrecisionFloat=False,PersistentGuid=00000000000000000000000000000000,bHidden=False,bNotConnectable=False,bDefaultValueIsReadOnly=False,bDefaultValueIsIgnored=False,bAdvancedView=False,bOrphanedPin=False,)
   CustomProperties Pin (PinId=1E50F67642D04E8252DD92936292CA6E,PinName="then",Direction="EGPD_Output",PinType.PinCategory="exec",PinType.PinSubCategory="",PinType.PinSubCategoryObject=None,PinType.PinSubCategoryMemberReference=(),PinType.PinValueType=(),PinType.ContainerType=None,PinType.bIsReference=False,PinType.bIsConst=False,PinType.bIsWeakPointer=False,PinType.bIsUObjectWrapper=False,PinType.bSerializeAsSinglePrecisionFloat=False,LinkedTo=(K2Node_CallFunction_0 AE5650D2417A8C50D560B4B28959837C,),PersistentGuid=00000000000000000000000000000000,bHidden=False,bNotConnectable=False,bDefaultValueIsReadOnly=False,bDefaultValueIsIgnored=False,bAdvancedView=False,bOrphanedPin=False,)
End Object
Begin Object Class=/Script/BlueprintGraph.K2Node_CallFunction Name="K2Node_CallFunction_0" ExportPath="/Script/BlueprintGraph.K2Node_CallFunction'/Game/CharacterBP.CharacterBP:EventGraph.K2Node_CallFunction_0'"
   FunctionReference=(MemberParent="/Script/CoreUObject.Class'/Script/Engine.SceneCaptureComponent'",MemberName="ShowOnlyActorComponents")
   NodePosX=224
   NodePosY=-32
   NodeGuid=9EC527424C222FBCA4C2D886E491B67F
   CustomProperties Pin (PinId=AE5650D2417A8C50D560B4B28959837C,PinName="execute",PinToolTip="
Exec",PinType.PinCategory="exec",PinType.PinSubCategory="",PinType.PinSubCategoryObject=None,PinType.PinSubCategoryMemberReference=(),PinType.PinValueType=(),PinType.ContainerType=None,PinType.bIsReference=False,PinType.bIsConst=False,PinType.bIsWeakPointer=False,PinType.bIsUObjectWrapper=False,PinType.bSerializeAsSinglePrecisionFloat=False,LinkedTo=(K2Node_Event_0 1E50F67642D04E8252DD92936292CA6E,),PersistentGuid=00000000000000000000000000000000,bHidden=False,bNotConnectable=False,bDefaultValueIsReadOnly=False,bDefaultValueIsIgnored=False,bAdvancedView=False,bOrphanedPin=False,)
   CustomProperties Pin (PinId=C9627ED047925BE492C2ED8292875066,PinName="then",PinToolTip="
Exec",Direction="EGPD_Output",PinType.PinCategory="exec",PinType.PinSubCategory="",PinType.PinSubCategoryObject=None,PinType.PinSubCategoryMemberReference=(),PinType.PinValueType=(),PinType.ContainerType=None,PinType.bIsReference=False,PinType.bIsConst=False,PinType.bIsWeakPointer=False,PinType.bIsUObjectWrapper=False,PinType.bSerializeAsSinglePrecisionFloat=False,LinkedTo=(K2Node_DynamicCast_0 917AEA744E9924FE476F658EEB5D7CB4,),PersistentGuid=00000000000000000000000000000000,bHidden=False,bNotConnectable=False,bDefaultValueIsReadOnly=False,bDefaultValueIsIgnored=False,bAdvancedView=False,bOrphanedPin=False,)
   CustomProperties Pin (PinId=87E3D0114071A6FE13B2CABFA68DF9E7,PinName="self",PinFriendlyName=NSLOCTEXT("K2Node", "Target", "Target"),PinToolTip="Target
Scene Capture Component Object Reference",PinType.PinCategory="object",PinType.PinSubCategory="",PinType.PinSubCategoryObject="/Script/CoreUObject.Class'/Script/Engine.SceneCaptureComponent'",PinType.PinSubCategoryMemberReference=(),PinType.PinValueType=(),PinType.ContainerType=None,PinType.bIsReference=False,PinType.bIsConst=False,PinType.bIsWeakPointer=False,PinType.bIsUObjectWrapper=False,PinType.bSerializeAsSinglePrecisionFloat=False,LinkedTo=(K2Node_VariableGet_2 B6D3084848ADCD11A0F678954B203751,),PersistentGuid=00000000000000000000000000000000,bHidden=False,bNotConnectable=False,bDefaultValueIsReadOnly=False,bDefaultValueIsIgnored=False,bAdvancedView=False,bOrphanedPin=False,)
   CustomProperties Pin (PinId=2ADD996D4EEAA620918A22AEF45AEE71,PinName="InActor",PinToolTip="In Actor
Actor Object Reference",PinType.PinCategory="object",PinType.PinSubCategory="",PinType.PinSubCategoryObject="/Script/CoreUObject.Class'/Script/Engine.Actor'",PinType.PinSubCategoryMemberReference=(),PinType.PinValueType=(),PinType.ContainerType=None,PinType.bIsReference=False,PinType.bIsConst=False,PinType.bIsWeakPointer=False,PinType.bIsUObjectWrapper=False,PinType.bSerializeAsSinglePrecisionFloat=False,LinkedTo=(K2Node_Self_0 206DD01948DB5054C00502935796BC9E,),PersistentGuid=00000000000000000000000000000000,bHidden=False,bNotConnectable=False,bDefaultValueIsReadOnly=False,bDefaultValueIsIgnored=False,bAdvancedView=False,bOrphanedPin=False,)
   CustomProperties Pin (PinId=B11F0D08450A5F29957215B5A9C1CB71,PinName="bIncludeFromChildActors",PinToolTip="Include from Child Actors
Boolean

Whether to include the components from child actors",PinType.PinCategory="bool",PinType.PinSubCategory="",PinType.PinSubCategoryObject=None,PinType.PinSubCategoryMemberReference=(),PinType.PinValueType=(),PinType.ContainerType=None,PinType.bIsReference=False,PinType.bIsConst=True,PinType.bIsWeakPointer=False,PinType.bIsUObjectWrapper=False,PinType.bSerializeAsSinglePrecisionFloat=False,DefaultValue="true",AutogeneratedDefaultValue="false",PersistentGuid=00000000000000000000000000000000,bHidden=False,bNotConnectable=False,bDefaultValueIsReadOnly=False,bDefaultValueIsIgnored=False,bAdvancedView=False,bOrphanedPin=False,)
End Object
Begin Object Class=/Script/BlueprintGraph.K2Node_VariableGet Name="K2Node_VariableGet_2" ExportPath="/Script/BlueprintGraph.K2Node_VariableGet'/Game/CharacterBP.CharacterBP:EventGraph.K2Node_VariableGet_2'"
   VariableReference=(MemberName="SceneCaptureComponent2D",bSelfContext=True)
   NodePosX=-144
   NodePosY=-144
   NodeGuid=C73DA14645D60EEA26E6999982C1C911
   CustomProperties Pin (PinId=B6D3084848ADCD11A0F678954B203751,PinName="SceneCaptureComponent2D",Direction="EGPD_Output",PinType.PinCategory="object",PinType.PinSubCategory="",PinType.PinSubCategoryObject="/Script/CoreUObject.Class'/Script/Engine.SceneCaptureComponent2D'",PinType.PinSubCategoryMemberReference=(),PinType.PinValueType=(),PinType.ContainerType=None,PinType.bIsReference=False,PinType.bIsConst=False,PinType.bIsWeakPointer=False,PinType.bIsUObjectWrapper=False,PinType.bSerializeAsSinglePrecisionFloat=False,LinkedTo=(K2Node_CallFunction_0 87E3D0114071A6FE13B2CABFA68DF9E7,),PersistentGuid=00000000000000000000000000000000,bHidden=False,bNotConnectable=False,bDefaultValueIsReadOnly=False,bDefaultValueIsIgnored=False,bAdvancedView=False,bOrphanedPin=False,)
   CustomProperties Pin (PinId=B302890A489CD4A645B34B81E0643E3F,PinName="self",PinFriendlyName=NSLOCTEXT("K2Node", "Target", "Target"),PinType.PinCategory="object",PinType.PinSubCategory="",PinType.PinSubCategoryObject="/Script/Engine.BlueprintGeneratedClass'/Game/CharacterBP.CharacterBP_C'",PinType.PinSubCategoryMemberReference=(),PinType.PinValueType=(),PinType.ContainerType=None,PinType.bIsReference=False,PinType.bIsConst=False,PinType.bIsWeakPointer=False,PinType.bIsUObjectWrapper=False,PinType.bSerializeAsSinglePrecisionFloat=False,PersistentGuid=00000000000000000000000000000000,bHidden=True,bNotConnectable=False,bDefaultValueIsReadOnly=False,bDefaultValueIsIgnored=False,bAdvancedView=False,bOrphanedPin=False,)
End Object
Begin Object Class=/Script/BlueprintGraph.K2Node_Self Name="K2Node_Self_0" ExportPath="/Script/BlueprintGraph.K2Node_Self'/Game/CharacterBP.CharacterBP:EventGraph.K2Node_Self_0'"
   NodePosX=-208
   NodePosY=160
   NodeGuid=51383A5F461E67DA040831A569212049
   CustomProperties Pin (PinId=206DD01948DB5054C00502935796BC9E,PinName="self",Direction="EGPD_Output",PinType.PinCategory="object",PinType.PinSubCategory="self",PinType.PinSubCategoryObject=None,PinType.PinSubCategoryMemberReference=(),PinType.PinValueType=(),PinType.ContainerType=None,PinType.bIsReference=False,PinType.bIsConst=False,PinType.bIsWeakPointer=False,PinType.bIsUObjectWrapper=False,PinType.bSerializeAsSinglePrecisionFloat=False,LinkedTo=(K2Node_CallFunction_0 2ADD996D4EEAA620918A22AEF45AEE71,),PersistentGuid=00000000000000000000000000000000,bHidden=False,bNotConnectable=False,bDefaultValueIsReadOnly=False,bDefaultValueIsIgnored=False,bAdvancedView=False,bOrphanedPin=False,)
End Object
Begin Object Class=/Script/BlueprintGraph.K2Node_CallFunction Name="K2Node_CallFunction_10" ExportPath="/Script/BlueprintGraph.K2Node_CallFunction'/Game/CharacterBP.CharacterBP:EventGraph.K2Node_CallFunction_10'"
   bIsPureFunc=True
   FunctionReference=(MemberParent="/Script/CoreUObject.Class'/Script/Engine.GameplayStatics'",MemberName="GetPlayerController")
   NodePosX=176
   NodePosY=240
   NodeGuid=3A2A4E0045AA45470631729AB3EC59AB
   CustomProperties Pin (PinId=F117EB0A4FD45EBD3601DDB6061ABE59,PinName="self",PinFriendlyName=NSLOCTEXT("K2Node", "Target", "Target"),PinToolTip="Target
Gameplay Statics Object Reference",PinType.PinCategory="object",PinType.PinSubCategory="",PinType.PinSubCategoryObject="/Script/CoreUObject.Class'/Script/Engine.GameplayStatics'",PinType.PinSubCategoryMemberReference=(),PinType.PinValueType=(),PinType.ContainerType=None,PinType.bIsReference=False,PinType.bIsConst=False,PinType.bIsWeakPointer=False,PinType.bIsUObjectWrapper=False,PinType.bSerializeAsSinglePrecisionFloat=False,DefaultObject="/Script/Engine.Default__GameplayStatics",PersistentGuid=00000000000000000000000000000000,bHidden=True,bNotConnectable=False,bDefaultValueIsReadOnly=False,bDefaultValueIsIgnored=False,bAdvancedView=False,bOrphanedPin=False,)
   CustomProperties Pin (PinId=8CDB63A04646D207AD130089E12AFCAA,PinName="WorldContextObject",PinToolTip="World Context Object
Object Reference",PinType.PinCategory="object",PinType.PinSubCategory="",PinType.PinSubCategoryObject="/Script/CoreUObject.Class'/Script/CoreUObject.Object'",PinType.PinSubCategoryMemberReference=(),PinType.PinValueType=(),PinType.ContainerType=None,PinType.bIsReference=False,PinType.bIsConst=True,PinType.bIsWeakPointer=False,PinType.bIsUObjectWrapper=False,PinType.bSerializeAsSinglePrecisionFloat=False,PersistentGuid=00000000000000000000000000000000,bHidden=True,bNotConnectable=False,bDefaultValueIsReadOnly=False,bDefaultValueIsIgnored=False,bAdvancedView=False,bOrphanedPin=False,)
   CustomProperties Pin (PinId=3662A1674A8D10633D499F9F05684A41,PinName="PlayerIndex",PinToolTip="Player Index
Integer

Index in the player controller list, starting first with local players and then available remote ones",PinType.PinCategory="int",PinType.PinSubCategory="",PinType.PinSubCategoryObject=None,PinType.PinSubCategoryMemberReference=(),PinType.PinValueType=(),PinType.ContainerType=None,PinType.bIsReference=False,PinType.bIsConst=False,PinType.bIsWeakPointer=False,PinType.bIsUObjectWrapper=False,PinType.bSerializeAsSinglePrecisionFloat=False,DefaultValue="0",AutogeneratedDefaultValue="0",PersistentGuid=00000000000000000000000000000000,bHidden=False,bNotConnectable=False,bDefaultValueIsReadOnly=False,bDefaultValueIsIgnored=False,bAdvancedView=False,bOrphanedPin=False,)
   CustomProperties Pin (PinId=C91D6ACE4EE3439E1866C9A04A8C217D,PinName="ReturnValue",PinToolTip="Return Value
Player Controller Object Reference",Direction="EGPD_Output",PinType.PinCategory="object",PinType.PinSubCategory="",PinType.PinSubCategoryObject="/Script/CoreUObject.Class'/Script/Engine.PlayerController'",PinType.PinSubCategoryMemberReference=(),PinType.PinValueType=(),PinType.ContainerType=None,PinType.bIsReference=False,PinType.bIsConst=False,PinType.bIsWeakPointer=False,PinType.bIsUObjectWrapper=False,PinType.bSerializeAsSinglePrecisionFloat=False,LinkedTo=(K2Node_CallFunction_12 D2DC0FF449ABEC29AC0CFBA7D7D00624,),PersistentGuid=00000000000000000000000000000000,bHidden=False,bNotConnectable=False,bDefaultValueIsReadOnly=False,bDefaultValueIsIgnored=False,bAdvancedView=False,bOrphanedPin=False,)
End Object
Begin Object Class=/Script/BlueprintGraph.K2Node_CallFunction Name="K2Node_CallFunction_12" ExportPath="/Script/BlueprintGraph.K2Node_CallFunction'/Game/CharacterBP.CharacterBP:EventGraph.K2Node_CallFunction_12'"
   bIsPureFunc=True
   bIsConstFunc=True
   FunctionReference=(MemberParent="/Script/CoreUObject.Class'/Script/Engine.PlayerController'",MemberName="GetHUD")
   NodePosX=512
   NodePosY=224
   NodeGuid=4F3420234B792BDC96CC7D8F9ABD0685
   CustomProperties Pin (PinId=D2DC0FF449ABEC29AC0CFBA7D7D00624,PinName="self",PinFriendlyName=NSLOCTEXT("K2Node", "Target", "Target"),PinToolTip="Target
Player Controller Object Reference",PinType.PinCategory="object",PinType.PinSubCategory="",PinType.PinSubCategoryObject="/Script/CoreUObject.Class'/Script/Engine.PlayerController'",PinType.PinSubCategoryMemberReference=(),PinType.PinValueType=(),PinType.ContainerType=None,PinType.bIsReference=False,PinType.bIsConst=False,PinType.bIsWeakPointer=False,PinType.bIsUObjectWrapper=False,PinType.bSerializeAsSinglePrecisionFloat=False,LinkedTo=(K2Node_CallFunction_10 C91D6ACE4EE3439E1866C9A04A8C217D,),PersistentGuid=00000000000000000000000000000000,bHidden=False,bNotConnectable=False,bDefaultValueIsReadOnly=False,bDefaultValueIsIgnored=False,bAdvancedView=False,bOrphanedPin=False,)
   CustomProperties Pin (PinId=6F33D0C3438E65764913DFA57CE7273C,PinName="ReturnValue",PinToolTip="Return Value
HUD Object Reference

Gets the HUD currently being used by this player controller",Direction="EGPD_Output",PinType.PinCategory="object",PinType.PinSubCategory="",PinType.PinSubCategoryObject="/Script/CoreUObject.Class'/Script/Engine.HUD'",PinType.PinSubCategoryMemberReference=(),PinType.PinValueType=(),PinType.ContainerType=None,PinType.bIsReference=False,PinType.bIsConst=False,PinType.bIsWeakPointer=False,PinType.bIsUObjectWrapper=False,PinType.bSerializeAsSinglePrecisionFloat=False,LinkedTo=(K2Node_DynamicCast_0 3C9251E64E92FB5B79E42283A62168A8,),PersistentGuid=00000000000000000000000000000000,bHidden=False,bNotConnectable=False,bDefaultValueIsReadOnly=False,bDefaultValueIsIgnored=False,bAdvancedView=False,bOrphanedPin=False,)
End Object
Begin Object Class=/Script/BlueprintGraph.K2Node_DynamicCast Name="K2Node_DynamicCast_0" ExportPath="/Script/BlueprintGraph.K2Node_DynamicCast'/Game/CharacterBP.CharacterBP:EventGraph.K2Node_DynamicCast_0'"
   TargetType="/Script/CoreUObject.Class'/Script/CohtmlPlugin.CohtmlGameHUD'"
   NodePosX=912
   NodePosY=-16
   ErrorType=3
   NodeGuid=6252AAF84923A9DC7EEE4EA2AD96AF54
   CustomProperties Pin (PinId=917AEA744E9924FE476F658EEB5D7CB4,PinName="execute",PinType.PinCategory="exec",PinType.PinSubCategory="",PinType.PinSubCategoryObject=None,PinType.PinSubCategoryMemberReference=(),PinType.PinValueType=(),PinType.ContainerType=None,PinType.bIsReference=False,PinType.bIsConst=False,PinType.bIsWeakPointer=False,PinType.bIsUObjectWrapper=False,PinType.bSerializeAsSinglePrecisionFloat=False,LinkedTo=(K2Node_CallFunction_0 C9627ED047925BE492C2ED8292875066,),PersistentGuid=00000000000000000000000000000000,bHidden=False,bNotConnectable=False,bDefaultValueIsReadOnly=False,bDefaultValueIsIgnored=False,bAdvancedView=False,bOrphanedPin=False,)
   CustomProperties Pin (PinId=E4C47558417AA95F71E529AA81C3F285,PinName="then",Direction="EGPD_Output",PinType.PinCategory="exec",PinType.PinSubCategory="",PinType.PinSubCategoryObject=None,PinType.PinSubCategoryMemberReference=(),PinType.PinValueType=(),PinType.ContainerType=None,PinType.bIsReference=False,PinType.bIsConst=False,PinType.bIsWeakPointer=False,PinType.bIsUObjectWrapper=False,PinType.bSerializeAsSinglePrecisionFloat=False,LinkedTo=(K2Node_AssignDelegate_1 D453DB184A8026BC0D3EE99AC0265352,),PersistentGuid=00000000000000000000000000000000,bHidden=False,bNotConnectable=False,bDefaultValueIsReadOnly=False,bDefaultValueIsIgnored=False,bAdvancedView=False,bOrphanedPin=False,)
   CustomProperties Pin (PinId=8E41CB7241DF0A09379ABA998E389A24,PinName="CastFailed",Direction="EGPD_Output",PinType.PinCategory="exec",PinType.PinSubCategory="",PinType.PinSubCategoryObject=None,PinType.PinSubCategoryMemberReference=(),PinType.PinValueType=(),PinType.ContainerType=None,PinType.bIsReference=False,PinType.bIsConst=False,PinType.bIsWeakPointer=False,PinType.bIsUObjectWrapper=False,PinType.bSerializeAsSinglePrecisionFloat=False,PersistentGuid=00000000000000000000000000000000,bHidden=False,bNotConnectable=False,bDefaultValueIsReadOnly=False,bDefaultValueIsIgnored=False,bAdvancedView=False,bOrphanedPin=False,)
   CustomProperties Pin (PinId=3C9251E64E92FB5B79E42283A62168A8,PinName="Object",PinType.PinCategory="object",PinType.PinSubCategory="",PinType.PinSubCategoryObject="/Script/CoreUObject.Class'/Script/CoreUObject.Object'",PinType.PinSubCategoryMemberReference=(),PinType.PinValueType=(),PinType.ContainerType=None,PinType.bIsReference=False,PinType.bIsConst=False,PinType.bIsWeakPointer=False,PinType.bIsUObjectWrapper=False,PinType.bSerializeAsSinglePrecisionFloat=False,LinkedTo=(K2Node_CallFunction_12 6F33D0C3438E65764913DFA57CE7273C,),PersistentGuid=00000000000000000000000000000000,bHidden=False,bNotConnectable=False,bDefaultValueIsReadOnly=False,bDefaultValueIsIgnored=False,bAdvancedView=False,bOrphanedPin=False,)
   CustomProperties Pin (PinId=C90E80264407C7300095CC960EDD63B7,PinName="AsGameface GameHUD",Direction="EGPD_Output",PinType.PinCategory="object",PinType.PinSubCategory="",PinType.PinSubCategoryObject="/Script/CoreUObject.Class'/Script/CohtmlPlugin.CohtmlGameHUD'",PinType.PinSubCategoryMemberReference=(),PinType.PinValueType=(),PinType.ContainerType=None,PinType.bIsReference=False,PinType.bIsConst=False,PinType.bIsWeakPointer=False,PinType.bIsUObjectWrapper=False,PinType.bSerializeAsSinglePrecisionFloat=False,LinkedTo=(K2Node_VariableGet_5 3B4A37D642DC775E657E2F91B2CCA7D1,),PersistentGuid=00000000000000000000000000000000,bHidden=False,bNotConnectable=False,bDefaultValueIsReadOnly=False,bDefaultValueIsIgnored=False,bAdvancedView=False,bOrphanedPin=False,)
   CustomProperties Pin (PinId=707244E24FB5E04A499B99A10654DDB5,PinName="bSuccess",Direction="EGPD_Output",PinType.PinCategory="bool",PinType.PinSubCategory="",PinType.PinSubCategoryObject=None,PinType.PinSubCategoryMemberReference=(),PinType.PinValueType=(),PinType.ContainerType=None,PinType.bIsReference=False,PinType.bIsConst=False,PinType.bIsWeakPointer=False,PinType.bIsUObjectWrapper=False,PinType.bSerializeAsSinglePrecisionFloat=False,PersistentGuid=00000000000000000000000000000000,bHidden=True,bNotConnectable=False,bDefaultValueIsReadOnly=False,bDefaultValueIsIgnored=False,bAdvancedView=False,bOrphanedPin=False,)
End Object
Begin Object Class=/Script/BlueprintGraph.K2Node_VariableGet Name="K2Node_VariableGet_5" ExportPath="/Script/BlueprintGraph.K2Node_VariableGet'/Game/CharacterBP.CharacterBP:EventGraph.K2Node_VariableGet_5'"
   VariableReference=(MemberParent="/Script/CoreUObject.Class'/Script/CohtmlPlugin.CohtmlGameHUD'",MemberName="CohtmlHUD")
   NodePosX=1248
   NodePosY=96
   NodeGuid=6511DE3C4AC02A274CA9EBB53699D72B
   CustomProperties Pin (PinId=8F7889484DA764528B2DB799D57983A9,PinName="CohtmlHUD",PinFriendlyName=NSLOCTEXT("", "BCEC64A0498EACFDBC19D5B65C299135", "Gameface HUD"),Direction="EGPD_Output",PinType.PinCategory="object",PinType.PinSubCategory="",PinType.PinSubCategoryObject="/Script/CoreUObject.Class'/Script/CohtmlPlugin.CohtmlHUD'",PinType.PinSubCategoryMemberReference=(),PinType.PinValueType=(),PinType.ContainerType=None,PinType.bIsReference=False,PinType.bIsConst=False,PinType.bIsWeakPointer=False,PinType.bIsUObjectWrapper=False,PinType.bSerializeAsSinglePrecisionFloat=False,LinkedTo=(K2Node_CallFunction_3 AA673F02470D337A1CD44F8054FBF608,K2Node_Knot_0 3AB654F2409BBBA3A58C6DAF141152D7,K2Node_Knot_1 7278BEB144096120A418C6B1BCE3B9EB,K2Node_AssignDelegate_1 98B5F5C945A226E535BED6BED0CFED92,K2Node_Knot_2 40D4048D4AB08B05A36E47B793441AD2,K2Node_CallFunction_4 AA673F02470D337A1CD44F8054FBF608,K2Node_CallFunction_5 A1CDE0AA42F31CBB1954DD94CCA22FFF,),PersistentGuid=00000000000000000000000000000000,bHidden=False,bNotConnectable=False,bDefaultValueIsReadOnly=False,bDefaultValueIsIgnored=False,bAdvancedView=False,bOrphanedPin=False,)
   CustomProperties Pin (PinId=3B4A37D642DC775E657E2F91B2CCA7D1,PinName="self",PinFriendlyName=NSLOCTEXT("K2Node", "Target", "Target"),PinType.PinCategory="object",PinType.PinSubCategory="",PinType.PinSubCategoryObject="/Script/CoreUObject.Class'/Script/CohtmlPlugin.CohtmlGameHUD'",PinType.PinSubCategoryMemberReference=(),PinType.PinValueType=(),PinType.ContainerType=None,PinType.bIsReference=False,PinType.bIsConst=False,PinType.bIsWeakPointer=False,PinType.bIsUObjectWrapper=False,PinType.bSerializeAsSinglePrecisionFloat=False,LinkedTo=(K2Node_DynamicCast_0 C90E80264407C7300095CC960EDD63B7,),PersistentGuid=00000000000000000000000000000000,bHidden=False,bNotConnectable=False,bDefaultValueIsReadOnly=False,bDefaultValueIsIgnored=False,bAdvancedView=False,bOrphanedPin=False,)
End Object
Begin Object Class=/Script/BlueprintGraph.K2Node_AssignDelegate Name="K2Node_AssignDelegate_1" ExportPath="/Script/BlueprintGraph.K2Node_AssignDelegate'/Game/CharacterBP.CharacterBP:EventGraph.K2Node_AssignDelegate_1'"
   DelegateReference=(MemberParent="/Script/CoreUObject.Class'/Script/CohtmlPlugin.CohtmlBaseComponent'",MemberName="ReadyForBindings")
   NodePosX=1712
   NodePosY=-16
   NodeGuid=02CEC1EE4CC8F7BE6652E580D808EBBA
   CustomProperties Pin (PinId=D453DB184A8026BC0D3EE99AC0265352,PinName="execute",PinType.PinCategory="exec",PinType.PinSubCategory="",PinType.PinSubCategoryObject=None,PinType.PinSubCategoryMemberReference=(),PinType.PinValueType=(),PinType.ContainerType=None,PinType.bIsReference=False,PinType.bIsConst=False,PinType.bIsWeakPointer=False,PinType.bIsUObjectWrapper=False,PinType.bSerializeAsSinglePrecisionFloat=False,LinkedTo=(K2Node_DynamicCast_0 E4C47558417AA95F71E529AA81C3F285,),PersistentGuid=00000000000000000000000000000000,bHidden=False,bNotConnectable=False,bDefaultValueIsReadOnly=False,bDefaultValueIsIgnored=False,bAdvancedView=False,bOrphanedPin=False,)
   CustomProperties Pin (PinId=DFC74ED14D01F43A2881C8BA92DB093E,PinName="then",Direction="EGPD_Output",PinType.PinCategory="exec",PinType.PinSubCategory="",PinType.PinSubCategoryObject=None,PinType.PinSubCategoryMemberReference=(),PinType.PinValueType=(),PinType.ContainerType=None,PinType.bIsReference=False,PinType.bIsConst=False,PinType.bIsWeakPointer=False,PinType.bIsUObjectWrapper=False,PinType.bSerializeAsSinglePrecisionFloat=False,PersistentGuid=00000000000000000000000000000000,bHidden=False,bNotConnectable=False,bDefaultValueIsReadOnly=False,bDefaultValueIsIgnored=False,bAdvancedView=False,bOrphanedPin=False,)
   CustomProperties Pin (PinId=98B5F5C945A226E535BED6BED0CFED92,PinName="self",PinFriendlyName=NSLOCTEXT("K2Node", "BaseMCDelegateSelfPinName", "Target"),PinType.PinCategory="object",PinType.PinSubCategory="",PinType.PinSubCategoryObject="/Script/CoreUObject.Class'/Script/CohtmlPlugin.CohtmlBaseComponent'",PinType.PinSubCategoryMemberReference=(),PinType.PinValueType=(),PinType.ContainerType=None,PinType.bIsReference=False,PinType.bIsConst=False,PinType.bIsWeakPointer=False,PinType.bIsUObjectWrapper=False,PinType.bSerializeAsSinglePrecisionFloat=False,LinkedTo=(K2Node_VariableGet_5 8F7889484DA764528B2DB799D57983A9,),PersistentGuid=00000000000000000000000000000000,bHidden=False,bNotConnectable=False,bDefaultValueIsReadOnly=False,bDefaultValueIsIgnored=False,bAdvancedView=False,bOrphanedPin=False,)
   CustomProperties Pin (PinId=CB93B7924C7F3EAEEE40F79D7951ADA0,PinName="Delegate",PinFriendlyName=NSLOCTEXT("K2Node", "PinFriendlyDelegatetName", "Event"),PinType.PinCategory="delegate",PinType.PinSubCategory="",PinType.PinSubCategoryObject=None,PinType.PinSubCategoryMemberReference=(MemberParent="/Script/CoreUObject.Package'/Script/CohtmlPlugin'",MemberName="CohtmlReadyForBindings__DelegateSignature"),PinType.PinValueType=(),PinType.ContainerType=None,PinType.bIsReference=True,PinType.bIsConst=True,PinType.bIsWeakPointer=False,PinType.bIsUObjectWrapper=False,PinType.bSerializeAsSinglePrecisionFloat=False,LinkedTo=(K2Node_CustomEvent_0 4F16979C4AB46052ED5FFA958978AA15,),PersistentGuid=00000000000000000000000000000000,bHidden=False,bNotConnectable=False,bDefaultValueIsReadOnly=False,bDefaultValueIsIgnored=False,bAdvancedView=False,bOrphanedPin=False,)
End Object
Next, register a binding event that is triggered by JavaScript. Let’s register an event called focusChest.
   Begin Object Class=/Script/BlueprintGraph.K2Node_DynamicCast Name="K2Node_DynamicCast_0" ExportPath="/Script/BlueprintGraph.K2Node_DynamicCast'/Game/CharacterBP.CharacterBP:EventGraph.K2Node_DynamicCast_0'"
   TargetType="/Script/CoreUObject.Class'/Script/CohtmlPlugin.CohtmlGameHUD'"
   NodePosX=912
   NodePosY=-16
   ErrorType=3
   NodeGuid=6252AAF84923A9DC7EEE4EA2AD96AF54
   CustomProperties Pin (PinId=917AEA744E9924FE476F658EEB5D7CB4,PinName="execute",PinType.PinCategory="exec",PinType.PinSubCategory="",PinType.PinSubCategoryObject=None,PinType.PinSubCategoryMemberReference=(),PinType.PinValueType=(),PinType.ContainerType=None,PinType.bIsReference=False,PinType.bIsConst=False,PinType.bIsWeakPointer=False,PinType.bIsUObjectWrapper=False,PinType.bSerializeAsSinglePrecisionFloat=False,LinkedTo=(K2Node_CallFunction_0 C9627ED047925BE492C2ED8292875066,),PersistentGuid=00000000000000000000000000000000,bHidden=False,bNotConnectable=False,bDefaultValueIsReadOnly=False,bDefaultValueIsIgnored=False,bAdvancedView=False,bOrphanedPin=False,)
   CustomProperties Pin (PinId=E4C47558417AA95F71E529AA81C3F285,PinName="then",Direction="EGPD_Output",PinType.PinCategory="exec",PinType.PinSubCategory="",PinType.PinSubCategoryObject=None,PinType.PinSubCategoryMemberReference=(),PinType.PinValueType=(),PinType.ContainerType=None,PinType.bIsReference=False,PinType.bIsConst=False,PinType.bIsWeakPointer=False,PinType.bIsUObjectWrapper=False,PinType.bSerializeAsSinglePrecisionFloat=False,LinkedTo=(K2Node_AssignDelegate_1 D453DB184A8026BC0D3EE99AC0265352,),PersistentGuid=00000000000000000000000000000000,bHidden=False,bNotConnectable=False,bDefaultValueIsReadOnly=False,bDefaultValueIsIgnored=False,bAdvancedView=False,bOrphanedPin=False,)
   CustomProperties Pin (PinId=8E41CB7241DF0A09379ABA998E389A24,PinName="CastFailed",Direction="EGPD_Output",PinType.PinCategory="exec",PinType.PinSubCategory="",PinType.PinSubCategoryObject=None,PinType.PinSubCategoryMemberReference=(),PinType.PinValueType=(),PinType.ContainerType=None,PinType.bIsReference=False,PinType.bIsConst=False,PinType.bIsWeakPointer=False,PinType.bIsUObjectWrapper=False,PinType.bSerializeAsSinglePrecisionFloat=False,PersistentGuid=00000000000000000000000000000000,bHidden=False,bNotConnectable=False,bDefaultValueIsReadOnly=False,bDefaultValueIsIgnored=False,bAdvancedView=False,bOrphanedPin=False,)
   CustomProperties Pin (PinId=3C9251E64E92FB5B79E42283A62168A8,PinName="Object",PinType.PinCategory="Object",PinType.PinSubCategory="",PinType.PinSubCategoryObject="/Script/CoreUObject.Class'/Script/CoreUObject.Object'",PinType.PinSubCategoryMemberReference=(),PinType.PinValueType=(),PinType.ContainerType=None,PinType.bIsReference=False,PinType.bIsConst=False,PinType.bIsWeakPointer=False,PinType.bIsUObjectWrapper=False,PinType.bSerializeAsSinglePrecisionFloat=False,LinkedTo=(K2Node_CallFunction_12 6F33D0C3438E65764913DFA57CE7273C,),PersistentGuid=00000000000000000000000000000000,bHidden=False,bNotConnectable=False,bDefaultValueIsReadOnly=False,bDefaultValueIsIgnored=False,bAdvancedView=False,bOrphanedPin=False,)
   CustomProperties Pin (PinId=C90E80264407C7300095CC960EDD63B7,PinName="AsGameface GameHUD",Direction="EGPD_Output",PinType.PinCategory="Object",PinType.PinSubCategory="",PinType.PinSubCategoryObject="/Script/CoreUObject.Class'/Script/CohtmlPlugin.CohtmlGameHUD'",PinType.PinSubCategoryMemberReference=(),PinType.PinValueType=(),PinType.ContainerType=None,PinType.bIsReference=False,PinType.bIsConst=False,PinType.bIsWeakPointer=False,PinType.bIsUObjectWrapper=False,PinType.bSerializeAsSinglePrecisionFloat=False,LinkedTo=(K2Node_VariableGet_5 3B4A37D642DC775E657E2F91B2CCA7D1,),PersistentGuid=00000000000000000000000000000000,bHidden=False,bNotConnectable=False,bDefaultValueIsReadOnly=False,bDefaultValueIsIgnored=False,bAdvancedView=False,bOrphanedPin=False,)
   CustomProperties Pin (PinId=707244E24FB5E04A499B99A10654DDB5,PinName="bSuccess",Direction="EGPD_Output",PinType.PinCategory="bool",PinType.PinSubCategory="",PinType.PinSubCategoryObject=None,PinType.PinSubCategoryMemberReference=(),PinType.PinValueType=(),PinType.ContainerType=None,PinType.bIsReference=False,PinType.bIsConst=False,PinType.bIsWeakPointer=False,PinType.bIsUObjectWrapper=False,PinType.bSerializeAsSinglePrecisionFloat=False,PersistentGuid=00000000000000000000000000000000,bHidden=True,bNotConnectable=False,bDefaultValueIsReadOnly=False,bDefaultValueIsIgnored=False,bAdvancedView=False,bOrphanedPin=False,)
End Object
Begin Object Class=/Script/BlueprintGraph.K2Node_CustomEvent Name="K2Node_CustomEvent_0" ExportPath="/Script/BlueprintGraph.K2Node_CustomEvent'/Game/CharacterBP.CharacterBP:EventGraph.K2Node_CustomEvent_0'"
   CustomFunctionName="ReadyForBindings_Event"
   NodePosX=1152
   NodePosY=240
   NodeGuid=FBEE447D402C2940EA04FD8D696C0EB4
   CustomProperties Pin (PinId=4F16979C4AB46052ED5FFA958978AA15,PinName="OutputDelegate",Direction="EGPD_Output",PinType.PinCategory="delegate",PinType.PinSubCategory="",PinType.PinSubCategoryObject=None,PinType.PinSubCategoryMemberReference=(MemberParent="/Script/Engine.BlueprintGeneratedClass'/Game/CharacterBP.CharacterBP_C'",MemberName="ReadyForBindings_Event",MemberGuid=FBEE447D402C2940EA04FD8D696C0EB4),PinType.PinValueType=(),PinType.ContainerType=None,PinType.bIsReference=False,PinType.bIsConst=False,PinType.bIsWeakPointer=False,PinType.bIsUObjectWrapper=False,PinType.bSerializeAsSinglePrecisionFloat=False,LinkedTo=(K2Node_AssignDelegate_1 CB93B7924C7F3EAEEE40F79D7951ADA0,),PersistentGuid=00000000000000000000000000000000,bHidden=False,bNotConnectable=False,bDefaultValueIsReadOnly=False,bDefaultValueIsIgnored=False,bAdvancedView=False,bOrphanedPin=False,)
   CustomProperties Pin (PinId=7D3E23F74351592A70CF4583D47293E9,PinName="then",Direction="EGPD_Output",PinType.PinCategory="exec",PinType.PinSubCategory="",PinType.PinSubCategoryObject=None,PinType.PinSubCategoryMemberReference=(),PinType.PinValueType=(),PinType.ContainerType=None,PinType.bIsReference=False,PinType.bIsConst=False,PinType.bIsWeakPointer=False,PinType.bIsUObjectWrapper=False,PinType.bSerializeAsSinglePrecisionFloat=False,LinkedTo=(K2Node_CallFunction_3 73D112C043A553883FA599A50A179592,),PersistentGuid=00000000000000000000000000000000,bHidden=False,bNotConnectable=False,bDefaultValueIsReadOnly=False,bDefaultValueIsIgnored=False,bAdvancedView=False,bOrphanedPin=False,)
End Object
Begin Object Class=/Script/BlueprintGraph.K2Node_CallFunction Name="K2Node_CallFunction_3" ExportPath="/Script/BlueprintGraph.K2Node_CallFunction'/Game/CharacterBP.CharacterBP:EventGraph.K2Node_CallFunction_3'"
   FunctionReference=(MemberParent="/Script/CoreUObject.Class'/Script/CohtmlPlugin.CohtmlBaseComponent'",MemberName="RegisterForEvent")
   NodePosX=1504
   NodePosY=240
   NodeGuid=DB41BF3043BE2622EF3FAA8EE928E834
   CustomProperties Pin (PinId=73D112C043A553883FA599A50A179592,PinName="execute",PinToolTip="
Exec",PinType.PinCategory="exec",PinType.PinSubCategory="",PinType.PinSubCategoryObject=None,PinType.PinSubCategoryMemberReference=(),PinType.PinValueType=(),PinType.ContainerType=None,PinType.bIsReference=False,PinType.bIsConst=False,PinType.bIsWeakPointer=False,PinType.bIsUObjectWrapper=False,PinType.bSerializeAsSinglePrecisionFloat=False,LinkedTo=(K2Node_CustomEvent_0 7D3E23F74351592A70CF4583D47293E9,),PersistentGuid=00000000000000000000000000000000,bHidden=False,bNotConnectable=False,bDefaultValueIsReadOnly=False,bDefaultValueIsIgnored=False,bAdvancedView=False,bOrphanedPin=False,)
   CustomProperties Pin (PinId=2594D8434A3E01AE3672CEBB306B3BB4,PinName="then",PinToolTip="
Exec",Direction="EGPD_Output",PinType.PinCategory="exec",PinType.PinSubCategory="",PinType.PinSubCategoryObject=None,PinType.PinSubCategoryMemberReference=(),PinType.PinValueType=(),PinType.ContainerType=None,PinType.bIsReference=False,PinType.bIsConst=False,PinType.bIsWeakPointer=False,PinType.bIsUObjectWrapper=False,PinType.bSerializeAsSinglePrecisionFloat=False,LinkedTo=(K2Node_CallFunction_6 73D112C043A553883FA599A50A179592,),PersistentGuid=00000000000000000000000000000000,bHidden=False,bNotConnectable=False,bDefaultValueIsReadOnly=False,bDefaultValueIsIgnored=False,bAdvancedView=False,bOrphanedPin=False,)
   CustomProperties Pin (PinId=AA673F02470D337A1CD44F8054FBF608,PinName="self",PinFriendlyName=NSLOCTEXT("K2Node", "Target", "Target"),PinToolTip="Target
Gameface Base Component Object Reference",PinType.PinCategory="object",PinType.PinSubCategory="",PinType.PinSubCategoryObject="/Script/CoreUObject.Class'/Script/CohtmlPlugin.CohtmlBaseComponent'",PinType.PinSubCategoryMemberReference=(),PinType.PinValueType=(),PinType.ContainerType=None,PinType.bIsReference=False,PinType.bIsConst=False,PinType.bIsWeakPointer=False,PinType.bIsUObjectWrapper=False,PinType.bSerializeAsSinglePrecisionFloat=False,LinkedTo=(K2Node_VariableGet_5 8F7889484DA764528B2DB799D57983A9,),PersistentGuid=00000000000000000000000000000000,bHidden=False,bNotConnectable=False,bDefaultValueIsReadOnly=False,bDefaultValueIsIgnored=False,bAdvancedView=False,bOrphanedPin=False,)
   CustomProperties Pin (PinId=3F65821C402C7D608CE5C3901FFD7CFA,PinName="JSEventName",PinFriendlyName=NSLOCTEXT("", "DA0ED98B4E0FB11C01AE319E09D31FFB", "JavaScript Event Name"),PinToolTip="Java Script Event Name
String",PinType.PinCategory="string",PinType.PinSubCategory="",PinType.PinSubCategoryObject=None,PinType.PinSubCategoryMemberReference=(),PinType.PinValueType=(),PinType.ContainerType=None,PinType.bIsReference=False,PinType.bIsConst=False,PinType.bIsWeakPointer=False,PinType.bIsUObjectWrapper=False,PinType.bSerializeAsSinglePrecisionFloat=False,DefaultValue="focusChest",PersistentGuid=00000000000000000000000000000000,bHidden=False,bNotConnectable=False,bDefaultValueIsReadOnly=False,bDefaultValueIsIgnored=False,bAdvancedView=False,bOrphanedPin=False,)
   CustomProperties Pin (PinId=93760E9C4A2EB4FC489ACEB012AAED6A,PinName="Delegate",PinFriendlyName=NSLOCTEXT("", "27317F7F4777F7CD6BA09AA81DE5FBE1", "Event"),PinToolTip="Event
Delegate",PinType.PinCategory="delegate",PinType.PinSubCategory="",PinType.PinSubCategoryObject=None,PinType.PinSubCategoryMemberReference=(MemberParent="/Script/CoreUObject.Package'/Script/CohtmlPlugin'",MemberName="CohtmlJSEventBPCallback__DelegateSignature"),PinType.PinValueType=(),PinType.ContainerType=None,PinType.bIsReference=False,PinType.bIsConst=False,PinType.bIsWeakPointer=False,PinType.bIsUObjectWrapper=False,PinType.bSerializeAsSinglePrecisionFloat=False,LinkedTo=(K2Node_CustomEvent_1 379011AD44FE616C93790EAD48EDD302,),PersistentGuid=00000000000000000000000000000000,bHidden=False,bNotConnectable=False,bDefaultValueIsReadOnly=False,bDefaultValueIsIgnored=False,bAdvancedView=False,bOrphanedPin=False,)
End Object
Begin Object Class=/Script/BlueprintGraph.K2Node_VariableGet Name="K2Node_VariableGet_5" ExportPath="/Script/BlueprintGraph.K2Node_VariableGet'/Game/CharacterBP.CharacterBP:EventGraph.K2Node_VariableGet_5'"
   VariableReference=(MemberParent="/Script/CoreUObject.Class'/Script/CohtmlPlugin.CohtmlGameHUD'",MemberName="CohtmlHUD")
   NodePosX=1248
   NodePosY=96
   NodeGuid=6511DE3C4AC02A274CA9EBB53699D72B
   CustomProperties Pin (PinId=8F7889484DA764528B2DB799D57983A9,PinName="CohtmlHUD",PinFriendlyName=NSLOCTEXT("", "BCEC64A0498EACFDBC19D5B65C299135", "Gameface HUD"),Direction="EGPD_Output",PinType.PinCategory="object",PinType.PinSubCategory="",PinType.PinSubCategoryObject="/Script/CoreUObject.Class'/Script/CohtmlPlugin.CohtmlHUD'",PinType.PinSubCategoryMemberReference=(),PinType.PinValueType=(),PinType.ContainerType=None,PinType.bIsReference=False,PinType.bIsConst=False,PinType.bIsWeakPointer=False,PinType.bIsUObjectWrapper=False,PinType.bSerializeAsSinglePrecisionFloat=False,LinkedTo=(K2Node_CallFunction_3 AA673F02470D337A1CD44F8054FBF608,K2Node_Knot_0 3AB654F2409BBBA3A58C6DAF141152D7,K2Node_Knot_1 7278BEB144096120A418C6B1BCE3B9EB,K2Node_AssignDelegate_1 98B5F5C945A226E535BED6BED0CFED92,K2Node_Knot_2 40D4048D4AB08B05A36E47B793441AD2,K2Node_CallFunction_4 AA673F02470D337A1CD44F8054FBF608,K2Node_CallFunction_5 A1CDE0AA42F31CBB1954DD94CCA22FFF,),PersistentGuid=00000000000000000000000000000000,bHidden=False,bNotConnectable=False,bDefaultValueIsReadOnly=False,bDefaultValueIsIgnored=False,bAdvancedView=False,bOrphanedPin=False,)
   CustomProperties Pin (PinId=3B4A37D642DC775E657E2F91B2CCA7D1,PinName="self",PinFriendlyName=NSLOCTEXT("K2Node", "Target", "Target"),PinType.PinCategory="object",PinType.PinSubCategory="",PinType.PinSubCategoryObject="/Script/CoreUObject.Class'/Script/CohtmlPlugin.CohtmlGameHUD'",PinType.PinSubCategoryMemberReference=(),PinType.PinValueType=(),PinType.ContainerType=None,PinType.bIsReference=False,PinType.bIsConst=False,PinType.bIsWeakPointer=False,PinType.bIsUObjectWrapper=False,PinType.bSerializeAsSinglePrecisionFloat=False,LinkedTo=(K2Node_DynamicCast_0 C90E80264407C7300095CC960EDD63B7,),PersistentGuid=00000000000000000000000000000000,bHidden=False,bNotConnectable=False,bDefaultValueIsReadOnly=False,bDefaultValueIsIgnored=False,bAdvancedView=False,bOrphanedPin=False,)
End Object
Begin Object Class=/Script/BlueprintGraph.K2Node_AssignDelegate Name="K2Node_AssignDelegate_1" ExportPath="/Script/BlueprintGraph.K2Node_AssignDelegate'/Game/CharacterBP.CharacterBP:EventGraph.K2Node_AssignDelegate_1'"
   DelegateReference=(MemberParent="/Script/CoreUObject.Class'/Script/CohtmlPlugin.CohtmlBaseComponent'",MemberName="ReadyForBindings")
   NodePosX=1712
   NodePosY=-16
   NodeGuid=02CEC1EE4CC8F7BE6652E580D808EBBA
   CustomProperties Pin (PinId=D453DB184A8026BC0D3EE99AC0265352,PinName="execute",PinType.PinCategory="exec",PinType.PinSubCategory="",PinType.PinSubCategoryObject=None,PinType.PinSubCategoryMemberReference=(),PinType.PinValueType=(),PinType.ContainerType=None,PinType.bIsReference=False,PinType.bIsConst=False,PinType.bIsWeakPointer=False,PinType.bIsUObjectWrapper=False,PinType.bSerializeAsSinglePrecisionFloat=False,LinkedTo=(K2Node_DynamicCast_0 E4C47558417AA95F71E529AA81C3F285,),PersistentGuid=00000000000000000000000000000000,bHidden=False,bNotConnectable=False,bDefaultValueIsReadOnly=False,bDefaultValueIsIgnored=False,bAdvancedView=False,bOrphanedPin=False,)
   CustomProperties Pin (PinId=DFC74ED14D01F43A2881C8BA92DB093E,PinName="then",Direction="EGPD_Output",PinType.PinCategory="exec",PinType.PinSubCategory="",PinType.PinSubCategoryObject=None,PinType.PinSubCategoryMemberReference=(),PinType.PinValueType=(),PinType.ContainerType=None,PinType.bIsReference=False,PinType.bIsConst=False,PinType.bIsWeakPointer=False,PinType.bIsUObjectWrapper=False,PinType.bSerializeAsSinglePrecisionFloat=False,PersistentGuid=00000000000000000000000000000000,bHidden=False,bNotConnectable=False,bDefaultValueIsReadOnly=False,bDefaultValueIsIgnored=False,bAdvancedView=False,bOrphanedPin=False,)
   CustomProperties Pin (PinId=98B5F5C945A226E535BED6BED0CFED92,PinName="self",PinFriendlyName=NSLOCTEXT("K2Node", "BaseMCDelegateSelfPinName", "Target"),PinType.PinCategory="object",PinType.PinSubCategory="",PinType.PinSubCategoryObject="/Script/CoreUObject.Class'/Script/CohtmlPlugin.CohtmlBaseComponent'",PinType.PinSubCategoryMemberReference=(),PinType.PinValueType=(),PinType.ContainerType=None,PinType.bIsReference=False,PinType.bIsConst=False,PinType.bIsWeakPointer=False,PinType.bIsUObjectWrapper=False,PinType.bSerializeAsSinglePrecisionFloat=False,LinkedTo=(K2Node_VariableGet_5 8F7889484DA764528B2DB799D57983A9,),PersistentGuid=00000000000000000000000000000000,bHidden=False,bNotConnectable=False,bDefaultValueIsReadOnly=False,bDefaultValueIsIgnored=False,bAdvancedView=False,bOrphanedPin=False,)
   CustomProperties Pin (PinId=CB93B7924C7F3EAEEE40F79D7951ADA0,PinName="Delegate",PinFriendlyName=NSLOCTEXT("K2Node", "PinFriendlyDelegatetName", "Event"),PinType.PinCategory="delegate",PinType.PinSubCategory="",PinType.PinSubCategoryObject=None,PinType.PinSubCategoryMemberReference=(MemberParent="/Script/CoreUObject.Package'/Script/CohtmlPlugin'",MemberName="CohtmlReadyForBindings__DelegateSignature"),PinType.PinValueType=(),PinType.ContainerType=None,PinType.bIsReference=True,PinType.bIsConst=True,PinType.bIsWeakPointer=False,PinType.bIsUObjectWrapper=False,PinType.bSerializeAsSinglePrecisionFloat=False,LinkedTo=(K2Node_CustomEvent_0 4F16979C4AB46052ED5FFA958978AA15,),PersistentGuid=00000000000000000000000000000000,bHidden=False,bNotConnectable=False,bDefaultValueIsReadOnly=False,bDefaultValueIsIgnored=False,bAdvancedView=False,bOrphanedPin=False,)
End Object
Now, we need to change the camera’s position. Use the Set Relative Location method for the SceneCaptureComponent2D to do this.
   Begin Object Class=/Script/BlueprintGraph.K2Node_CallFunction Name="K2Node_CallFunction_3" ExportPath="/Script/BlueprintGraph.K2Node_CallFunction'/Game/CharacterBP.CharacterBP:EventGraph.K2Node_CallFunction_3'"
   FunctionReference=(MemberParent="/Script/CoreUObject.Class'/Script/CohtmlPlugin.CohtmlBaseComponent'",MemberName="RegisterForEvent")
   NodePosX=256
   NodePosY=-256
   NodeGuid=DB41BF3043BE2622EF3FAA8EE928E834
   CustomProperties Pin (PinId=73D112C043A553883FA599A50A179592,PinName="execute",PinToolTip="
Exec",PinType.PinCategory="exec",PinType.PinSubCategory="",PinType.PinSubCategoryObject=None,PinType.PinSubCategoryMemberReference=(),PinType.PinValueType=(),PinType.ContainerType=None,PinType.bIsReference=False,PinType.bIsConst=False,PinType.bIsWeakPointer=False,PinType.bIsUObjectWrapper=False,PinType.bSerializeAsSinglePrecisionFloat=False,LinkedTo=(),PersistentGuid=00000000000000000000000000000000,bHidden=False,bNotConnectable=False,bDefaultValueIsReadOnly=False,bDefaultValueIsIgnored=False,bAdvancedView=False,bOrphanedPin=False,)
   CustomProperties Pin (PinId=2594D8434A3E01AE3672CEBB306B3BB4,PinName="then",PinToolTip="
Exec",Direction="EGPD_Output",PinType.PinCategory="exec",PinType.PinSubCategory="",PinType.PinSubCategoryObject=None,PinType.PinSubCategoryMemberReference=(),PinType.PinValueType=(),PinType.ContainerType=None,PinType.bIsReference=False,PinType.bIsConst=False,PinType.bIsWeakPointer=False,PinType.bIsUObjectWrapper=False,PinType.bSerializeAsSinglePrecisionFloat=False,LinkedTo=(),PersistentGuid=00000000000000000000000000000000,bHidden=False,bNotConnectable=False,bDefaultValueIsReadOnly=False,bDefaultValueIsIgnored=False,bAdvancedView=False,bOrphanedPin=False,)
   CustomProperties Pin (PinId=AA673F02470D337A1CD44F8054FBF608,PinName="self",PinFriendlyName=NSLOCTEXT("K2Node", "Target", "Target"),PinToolTip="Target
Gameface Base Component Object Reference",PinType.PinCategory="object",PinType.PinSubCategory="",PinType.PinSubCategoryObject="/Script/CoreUObject.Class'/Script/CohtmlPlugin.CohtmlBaseComponent'",PinType.PinSubCategoryMemberReference=(),PinType.PinValueType=(),PinType.ContainerType=None,PinType.bIsReference=False,PinType.bIsConst=False,PinType.bIsWeakPointer=False,PinType.bIsUObjectWrapper=False,PinType.bSerializeAsSinglePrecisionFloat=False,LinkedTo=(),PersistentGuid=00000000000000000000000000000000,bHidden=False,bNotConnectable=False,bDefaultValueIsReadOnly=False,bDefaultValueIsIgnored=False,bAdvancedView=False,bOrphanedPin=False,)
   CustomProperties Pin (PinId=3F65821C402C7D608CE5C3901FFD7CFA,PinName="JSEventName",PinFriendlyName=NSLOCTEXT("", "DA0ED98B4E0FB11C01AE319E09D31FFB", "JavaScript Event Name"),PinToolTip="Java Script Event Name
String",PinType.PinCategory="string",PinType.PinSubCategory="",PinType.PinSubCategoryObject=None,PinType.PinSubCategoryMemberReference=(),PinType.PinValueType=(),PinType.ContainerType=None,PinType.bIsReference=False,PinType.bIsConst=False,PinType.bIsWeakPointer=False,PinType.bIsUObjectWrapper=False,PinType.bSerializeAsSinglePrecisionFloat=False,DefaultValue="focusChest",PersistentGuid=00000000000000000000000000000000,bHidden=False,bNotConnectable=False,bDefaultValueIsReadOnly=False,bDefaultValueIsIgnored=False,bAdvancedView=False,bOrphanedPin=False,)
   CustomProperties Pin (PinId=93760E9C4A2EB4FC489ACEB012AAED6A,PinName="Delegate",PinFriendlyName=NSLOCTEXT("", "27317F7F4777F7CD6BA09AA81DE5FBE1", "Event"),PinToolTip="Event
Delegate",PinType.PinCategory="delegate",PinType.PinSubCategory="",PinType.PinSubCategoryObject=None,PinType.PinSubCategoryMemberReference=(MemberParent="/Script/CoreUObject.Package'/Script/CohtmlPlugin'",MemberName="CohtmlJSEventBPCallback__DelegateSignature"),PinType.PinValueType=(),PinType.ContainerType=None,PinType.bIsReference=False,PinType.bIsConst=False,PinType.bIsWeakPointer=False,PinType.bIsUObjectWrapper=False,PinType.bSerializeAsSinglePrecisionFloat=False,LinkedTo=(K2Node_CustomEvent_7 379011AD44FE616C93790EAD48EDD302),PersistentGuid=00000000000000000000000000000000,bHidden=False,bNotConnectable=False,bDefaultValueIsReadOnly=False,bDefaultValueIsIgnored=False,bAdvancedView=False,bOrphanedPin=False,)
End Object
Begin Object Class=/Script/BlueprintGraph.K2Node_CallFunction Name="K2Node_CallFunction_44" ExportPath="/Script/BlueprintGraph.K2Node_CallFunction'/Game/CharacterBP.CharacterBP:EventGraph.K2Node_CallFunction_44'"
   FunctionReference=(MemberParent="/Script/CoreUObject.Class'/Script/Engine.SceneComponent'",MemberName="K2_SetRelativeLocation")
   NodePosX=240
   NodePosY=48
   NodeGuid=CB0DA2B249230D9C371D4A9537085BAF
   CustomProperties Pin (PinId=258669B74CAA830BE806B2BAFCDD0E57,PinName="execute",PinToolTip="
Exec",PinType.PinCategory="exec",PinType.PinSubCategory="",PinType.PinSubCategoryObject=None,PinType.PinSubCategoryMemberReference=(),PinType.PinValueType=(),PinType.ContainerType=None,PinType.bIsReference=False,PinType.bIsConst=False,PinType.bIsWeakPointer=False,PinType.bIsUObjectWrapper=False,PinType.bSerializeAsSinglePrecisionFloat=False,LinkedTo=(K2Node_CustomEvent_7 0F97B6C54C3B7792AAE710B16B26D028),PersistentGuid=00000000000000000000000000000000,bHidden=False,bNotConnectable=False,bDefaultValueIsReadOnly=False,bDefaultValueIsIgnored=False,bAdvancedView=False,bOrphanedPin=False,)
   CustomProperties Pin (PinId=D3C417064DC1F6122F44109E9EBC1868,PinName="then",PinToolTip="
Exec",Direction="EGPD_Output",PinType.PinCategory="exec",PinType.PinSubCategory="",PinType.PinSubCategoryObject=None,PinType.PinSubCategoryMemberReference=(),PinType.PinValueType=(),PinType.ContainerType=None,PinType.bIsReference=False,PinType.bIsConst=False,PinType.bIsWeakPointer=False,PinType.bIsUObjectWrapper=False,PinType.bSerializeAsSinglePrecisionFloat=False,PersistentGuid=00000000000000000000000000000000,bHidden=False,bNotConnectable=False,bDefaultValueIsReadOnly=False,bDefaultValueIsIgnored=False,bAdvancedView=False,bOrphanedPin=False,)
   CustomProperties Pin (PinId=6E47B4604D1F2BEBC767C5A9B94EE170,PinName="self",PinFriendlyName=NSLOCTEXT("K2Node", "Target", "Target"),PinToolTip="Target
Scene Component Object Reference",PinType.PinCategory="object",PinType.PinSubCategory="",PinType.PinSubCategoryObject="/Script/CoreUObject.Class'/Script/Engine.SceneComponent'",PinType.PinSubCategoryMemberReference=(),PinType.PinValueType=(),PinType.ContainerType=None,PinType.bIsReference=False,PinType.bIsConst=False,PinType.bIsWeakPointer=False,PinType.bIsUObjectWrapper=False,PinType.bSerializeAsSinglePrecisionFloat=False,LinkedTo=(K2Node_VariableGet_15 34EFF39444E65B1F15F60F83750C192B),PersistentGuid=00000000000000000000000000000000,bHidden=False,bNotConnectable=False,bDefaultValueIsReadOnly=False,bDefaultValueIsIgnored=False,bAdvancedView=False,bOrphanedPin=False,)
   CustomProperties Pin (PinId=2D05CFDC4D2B8525BA4D65B2FC942798,PinName="NewLocation",PinToolTip="New Location
Vector

New location of the component relative to its parent.",PinType.PinCategory="struct",PinType.PinSubCategory="",PinType.PinSubCategoryObject="/Script/CoreUObject.ScriptStruct'/Script/CoreUObject.Vector'",PinType.PinSubCategoryMemberReference=(),PinType.PinValueType=(),PinType.ContainerType=None,PinType.bIsReference=False,PinType.bIsConst=False,PinType.bIsWeakPointer=False,PinType.bIsUObjectWrapper=False,PinType.bSerializeAsSinglePrecisionFloat=False,DefaultValue="0, 0, 0",AutogeneratedDefaultValue="0, 0, 0",PersistentGuid=00000000000000000000000000000000,bHidden=False,bNotConnectable=False,bDefaultValueIsReadOnly=False,bDefaultValueIsIgnored=False,bAdvancedView=False,bOrphanedPin=False,)
   CustomProperties Pin (PinId=BB3B67104D847DCD51C06F9754AB3C5D,PinName="bSweep",PinToolTip="Sweep
Boolean

Whether we sweep to the destination location, triggering overlaps along the way and stopping short of the target if blocked by something. Only the root component is swept and checked for blocking collision, child components move without sweeping. If collision is off, this has no effect.",PinType.PinCategory="bool",PinType.PinSubCategory="",PinType.PinSubCategoryObject=None,PinType.PinSubCategoryMemberReference=(),PinType.PinValueType=(),PinType.ContainerType=None,PinType.bIsReference=False,PinType.bIsConst=False,PinType.bIsWeakPointer=False,PinType.bIsUObjectWrapper=False,PinType.bSerializeAsSinglePrecisionFloat=False,DefaultValue="false",AutogeneratedDefaultValue="false",PersistentGuid=00000000000000000000000000000000,bHidden=False,bNotConnectable=False,bDefaultValueIsReadOnly=False,bDefaultValueIsIgnored=False,bAdvancedView=False,bOrphanedPin=False,)
   CustomProperties Pin (PinId=80989B5A45A4FD1A2D9235988C212C2B,PinName="SweepHitResult",PinToolTip="Sweep Hit Result
Hit Result Structure

Hit result from any impact if sweep is true.",Direction="EGPD_Output",PinType.PinCategory="struct",PinType.PinSubCategory="",PinType.PinSubCategoryObject="/Script/CoreUObject.ScriptStruct'/Script/Engine.HitResult'",PinType.PinSubCategoryMemberReference=(),PinType.PinValueType=(),PinType.ContainerType=None,PinType.bIsReference=False,PinType.bIsConst=False,PinType.bIsWeakPointer=False,PinType.bIsUObjectWrapper=False,PinType.bSerializeAsSinglePrecisionFloat=False,PersistentGuid=00000000000000000000000000000000,bHidden=False,bNotConnectable=False,bDefaultValueIsReadOnly=False,bDefaultValueIsIgnored=False,bAdvancedView=False,bOrphanedPin=False,)
   CustomProperties Pin (PinId=88BA22AA4E6CCE40E65F4F8450C8FE82,PinName="bTeleport",PinToolTip="Teleport
Boolean

Whether we teleport the physics state (if physics collision is enabled for this object). If true, physics velocity for this object is unchanged (so ragdoll parts are not affected by change in location). If false, physics velocity is updated based on the change in position (affecting ragdoll parts). If CCD is on and not teleporting, this will affect objects along the entire sweep volume.",PinType.PinCategory="bool",PinType.PinSubCategory="",PinType.PinSubCategoryObject=None,PinType.PinSubCategoryMemberReference=(),PinType.PinValueType=(),PinType.ContainerType=None,PinType.bIsReference=False,PinType.bIsConst=False,PinType.bIsWeakPointer=False,PinType.bIsUObjectWrapper=False,PinType.bSerializeAsSinglePrecisionFloat=False,DefaultValue="false",AutogeneratedDefaultValue="false",PersistentGuid=00000000000000000000000000000000,bHidden=False,bNotConnectable=False,bDefaultValueIsReadOnly=False,bDefaultValueIsIgnored=False,bAdvancedView=False,bOrphanedPin=False,)
End Object
Begin Object Class=/Script/BlueprintGraph.K2Node_VariableGet Name="K2Node_VariableGet_15" ExportPath="/Script/BlueprintGraph.K2Node_VariableGet'/Game/CharacterBP.CharacterBP:EventGraph.K2Node_VariableGet_15'"
   VariableReference=(MemberName="SceneCaptureComponent2D",bSelfContext=True)
   NodePosX=-96
   NodePosY=144
   bCommentBubbleVisible=True
   NodeGuid=B7F7D88746483BA9A4F7088244663B8C
   CustomProperties Pin (PinId=34EFF39444E65B1F15F60F83750C192B,PinName="SceneCaptureComponent2D",Direction="EGPD_Output",PinType.PinCategory="object",PinType.PinSubCategory="",PinType.PinSubCategoryObject="/Script/CoreUObject.Class'/Script/Engine.SceneCaptureComponent2D'",PinType.PinSubCategoryMemberReference=(),PinType.PinValueType=(),PinType.ContainerType=None,PinType.bIsReference=False,PinType.bIsConst=False,PinType.bIsWeakPointer=False,PinType.bIsUObjectWrapper=False,PinType.bSerializeAsSinglePrecisionFloat=False,LinkedTo=(K2Node_CallFunction_44 6E47B4604D1F2BEBC767C5A9B94EE170),PersistentGuid=00000000000000000000000000000000,bHidden=False,bNotConnectable=False,bDefaultValueIsReadOnly=False,bDefaultValueIsIgnored=False,bAdvancedView=False,bOrphanedPin=False,)
   CustomProperties Pin (PinId=9D78DA9D4930650D81491C89CAFA9A39,PinName="self",PinFriendlyName=NSLOCTEXT("K2Node", "Target", "Target"),PinType.PinCategory="object",PinType.PinSubCategory="",PinType.PinSubCategoryObject="/Script/Engine.BlueprintGeneratedClass'/Game/CharacterBP.CharacterBP_C'",PinType.PinSubCategoryMemberReference=(),PinType.PinValueType=(),PinType.ContainerType=None,PinType.bIsReference=False,PinType.bIsConst=False,PinType.bIsWeakPointer=False,PinType.bIsUObjectWrapper=False,PinType.bSerializeAsSinglePrecisionFloat=False,PersistentGuid=00000000000000000000000000000000,bHidden=True,bNotConnectable=False,bDefaultValueIsReadOnly=False,bDefaultValueIsIgnored=False,bAdvancedView=False,bOrphanedPin=False,)
End Object
Begin Object Class=/Script/BlueprintGraph.K2Node_CustomEvent Name="K2Node_CustomEvent_7" ExportPath="/Script/BlueprintGraph.K2Node_CustomEvent'/Game/CharacterBP.CharacterBP:EventGraph.K2Node_CustomEvent_7'"
   CustomFunctionName="focusChest"
   NodePosX=-448
   NodePosY=48
   NodeGuid=D8E0F4FE4E9729F952E3C38BC1B7A894
   CustomProperties Pin (PinId=379011AD44FE616C93790EAD48EDD302,PinName="OutputDelegate",Direction="EGPD_Output",PinType.PinCategory="delegate",PinType.PinSubCategory="",PinType.PinSubCategoryObject=None,PinType.PinSubCategoryMemberReference=(MemberParent="/Script/Engine.BlueprintGeneratedClass'/Game/CharacterBP.CharacterBP_C'",MemberName="focusChest",MemberGuid=D8E0F4FE4E9729F952E3C38BC1B7A894),PinType.PinValueType=(),PinType.ContainerType=None,PinType.bIsReference=False,PinType.bIsConst=False,PinType.bIsWeakPointer=False,PinType.bIsUObjectWrapper=False,PinType.bSerializeAsSinglePrecisionFloat=False,LinkedTo=(K2Node_CallFunction_3 93760E9C4A2EB4FC489ACEB012AAED6A),PersistentGuid=00000000000000000000000000000000,bHidden=False,bNotConnectable=False,bDefaultValueIsReadOnly=False,bDefaultValueIsIgnored=False,bAdvancedView=False,bOrphanedPin=False,)
   CustomProperties Pin (PinId=0F97B6C54C3B7792AAE710B16B26D028,PinName="then",Direction="EGPD_Output",PinType.PinCategory="exec",PinType.PinSubCategory="",PinType.PinSubCategoryObject=None,PinType.PinSubCategoryMemberReference=(),PinType.PinValueType=(),PinType.ContainerType=None,PinType.bIsReference=False,PinType.bIsConst=False,PinType.bIsWeakPointer=False,PinType.bIsUObjectWrapper=False,PinType.bSerializeAsSinglePrecisionFloat=False,LinkedTo=(K2Node_CallFunction_44 258669B74CAA830BE806B2BAFCDD0E57),PersistentGuid=00000000000000000000000000000000,bHidden=False,bNotConnectable=False,bDefaultValueIsReadOnly=False,bDefaultValueIsIgnored=False,bAdvancedView=False,bOrphanedPin=False,)
End Object
This will set the camera position to (0,0,0). However, a smooth transition from the current camera position to the new one is preferable.
To achieve this, define a method in CharacterBP called getCameraPosition that retrieves the current camera position, returning the x, y, and z coordinates.
   Begin Object Class=/Script/BlueprintGraph.K2Node_FunctionEntry Name="K2Node_FunctionEntry_0" ExportPath="/Script/BlueprintGraph.K2Node_FunctionEntry'/Game/CharacterBP.CharacterBP:getCameraPosition.K2Node_FunctionEntry_0'"
   ExtraFlags=201457664
   FunctionReference=(MemberName="getCameraPosition")
   bIsEditable=True
   NodeGuid=CDBF517D451734F44BDC57B5B6DBA4BF
   CustomProperties Pin (PinId=DD8C011A43756A11F901FE8CC3D22695,PinName="then",Direction="EGPD_Output",PinType.PinCategory="exec",PinType.PinSubCategory="",PinType.PinSubCategoryObject=None,PinType.PinSubCategoryMemberReference=(),PinType.PinValueType=(),PinType.ContainerType=None,PinType.bIsReference=False,PinType.bIsConst=False,PinType.bIsWeakPointer=False,PinType.bIsUObjectWrapper=False,PinType.bSerializeAsSinglePrecisionFloat=False,LinkedTo=(K2Node_FunctionResult_0 F5F2961A40A2432F3EB230A5C7B62A69,),PersistentGuid=00000000000000000000000000000000,bHidden=False,bNotConnectable=False,bDefaultValueIsReadOnly=False,bDefaultValueIsIgnored=False,bAdvancedView=False,bOrphanedPin=False,)
End Object
Begin Object Class=/Script/BlueprintGraph.K2Node_CallFunction Name="K2Node_CallFunction_23" ExportPath="/Script/BlueprintGraph.K2Node_CallFunction'/Game/CharacterBP.CharacterBP:getCameraPosition.K2Node_CallFunction_23'"
   bIsPureFunc=True
   bIsConstFunc=True
   FunctionReference=(MemberParent="/Script/CoreUObject.Class'/Script/Engine.SceneComponent'",MemberName="GetRelativeTransform")
   NodePosX=-272
   NodePosY=128
   NodeGuid=70A816A348310F8BEA4D8BA98C231089
   CustomProperties Pin (PinId=F5BEED2C4438776FED5AAF9C10FB2304,PinName="self",PinFriendlyName=NSLOCTEXT("K2Node", "Target", "Target"),PinType.PinCategory="object",PinType.PinSubCategory="",PinType.PinSubCategoryObject="/Script/CoreUObject.Class'/Script/Engine.SceneComponent'",PinType.PinSubCategoryMemberReference=(),PinType.PinValueType=(),PinType.ContainerType=None,PinType.bIsReference=False,PinType.bIsConst=False,PinType.bIsWeakPointer=False,PinType.bIsUObjectWrapper=False,PinType.bSerializeAsSinglePrecisionFloat=False,LinkedTo=(K2Node_VariableGet_4 34EFF39444E65B1F15F60F83750C192B,),PersistentGuid=00000000000000000000000000000000,bHidden=False,bNotConnectable=False,bDefaultValueIsReadOnly=False,bDefaultValueIsIgnored=False,bAdvancedView=False,bOrphanedPin=False,)
   CustomProperties Pin (PinId=42ED15C147CFE26D7BECB5A2C22C861C,PinName="ReturnValue",Direction="EGPD_Output",PinType.PinCategory="struct",PinType.PinSubCategory="",PinType.PinSubCategoryObject="/Script/CoreUObject.ScriptStruct'/Script/CoreUObject.Transform'",PinType.PinSubCategoryMemberReference=(),PinType.PinValueType=(),PinType.ContainerType=None,PinType.bIsReference=False,PinType.bIsConst=False,PinType.bIsWeakPointer=False,PinType.bIsUObjectWrapper=False,PinType.bSerializeAsSinglePrecisionFloat=False,LinkedTo=(K2Node_CallFunction_30 CFDED9F049C2FA1518030798D82021E2,),PersistentGuid=00000000000000000000000000000000,bHidden=False,bNotConnectable=False,bDefaultValueIsReadOnly=False,bDefaultValueIsIgnored=False,bAdvancedView=False,bOrphanedPin=False,)
End Object
Begin Object Class=/Script/BlueprintGraph.K2Node_CallFunction Name="K2Node_CallFunction_30" ExportPath="/Script/BlueprintGraph.K2Node_CallFunction'/Game/CharacterBP.CharacterBP:getCameraPosition.K2Node_CallFunction_30'"
   bIsPureFunc=True
   FunctionReference=(MemberParent="/Script/CoreUObject.Class'/Script/Engine.KismetMathLibrary'",MemberName="BreakTransform")
   NodePosY=96
   NodeGuid=BC5DA14544EF81E4FA68A7A5632093F8
   CustomProperties Pin (PinId=D6BED3384D75FCDD45379793D93C3397,PinName="self",PinFriendlyName=NSLOCTEXT("K2Node", "Target", "Target"),PinType.PinCategory="object",PinType.PinSubCategory="",PinType.PinSubCategoryObject="/Script/CoreUObject.Class'/Script/Engine.KismetMathLibrary'",PinType.PinSubCategoryMemberReference=(),PinType.PinValueType=(),PinType.ContainerType=None,PinType.bIsReference=False,PinType.bIsConst=False,PinType.bIsWeakPointer=False,PinType.bIsUObjectWrapper=False,PinType.bSerializeAsSinglePrecisionFloat=False,DefaultObject="/Script/Engine.Default__KismetMathLibrary",PersistentGuid=00000000000000000000000000000000,bHidden=True,bNotConnectable=False,bDefaultValueIsReadOnly=False,bDefaultValueIsIgnored=False,bAdvancedView=False,bOrphanedPin=False,)
   CustomProperties Pin (PinId=CFDED9F049C2FA1518030798D82021E2,PinName="InTransform",PinType.PinCategory="struct",PinType.PinSubCategory="",PinType.PinSubCategoryObject="/Script/CoreUObject.ScriptStruct'/Script/CoreUObject.Transform'",PinType.PinSubCategoryMemberReference=(),PinType.PinValueType=(),PinType.ContainerType=None,PinType.bIsReference=True,PinType.bIsConst=True,PinType.bIsWeakPointer=False,PinType.bIsUObjectWrapper=False,PinType.bSerializeAsSinglePrecisionFloat=False,LinkedTo=(K2Node_CallFunction_23 42ED15C147CFE26D7BECB5A2C22C861C,),PersistentGuid=00000000000000000000000000000000,bHidden=False,bNotConnectable=False,bDefaultValueIsReadOnly=False,bDefaultValueIsIgnored=True,bAdvancedView=False,bOrphanedPin=False,)
   CustomProperties Pin (PinId=CB22DB0543B8FFC2ED96F6B483F4F8F1,PinName="Location",Direction="EGPD_Output",PinType.PinCategory="struct",PinType.PinSubCategory="",PinType.PinSubCategoryObject="/Script/CoreUObject.ScriptStruct'/Script/CoreUObject.Vector'",PinType.PinSubCategoryMemberReference=(),PinType.PinValueType=(),PinType.ContainerType=None,PinType.bIsReference=False,PinType.bIsConst=False,PinType.bIsWeakPointer=False,PinType.bIsUObjectWrapper=False,PinType.bSerializeAsSinglePrecisionFloat=False,DefaultValue="0, 0, 0",AutogeneratedDefaultValue="0, 0, 0",LinkedTo=(K2Node_CallFunction_31 220D38C84D6DA1D501C860AF5537EBF3,),PersistentGuid=00000000000000000000000000000000,bHidden=False,bNotConnectable=False,bDefaultValueIsReadOnly=False,bDefaultValueIsIgnored=False,bAdvancedView=False,bOrphanedPin=False,)
   CustomProperties Pin (PinId=9579419F40990C552BDDF584BDF36C14,PinName="Rotation",Direction="EGPD_Output",PinType.PinCategory="struct",PinType.PinSubCategory="",PinType.PinSubCategoryObject="/Script/CoreUObject.ScriptStruct'/Script/CoreUObject.Rotator'",PinType.PinSubCategoryMemberReference=(),PinType.PinValueType=(),PinType.ContainerType=None,PinType.bIsReference=False,PinType.bIsConst=False,PinType.bIsWeakPointer=False,PinType.bIsUObjectWrapper=False,PinType.bSerializeAsSinglePrecisionFloat=False,DefaultValue="0, 0, 0",AutogeneratedDefaultValue="0, 0, 0",PersistentGuid=00000000000000000000000000000000,bHidden=False,bNotConnectable=False,bDefaultValueIsReadOnly=False,bDefaultValueIsIgnored=False,bAdvancedView=False,bOrphanedPin=False,)
   CustomProperties Pin (PinId=D1E6C2594AC9AA22060918A2C33D31AB,PinName="Scale",Direction="EGPD_Output",PinType.PinCategory="struct",PinType.PinSubCategory="",PinType.PinSubCategoryObject="/Script/CoreUObject.ScriptStruct'/Script/CoreUObject.Vector'",PinType.PinSubCategoryMemberReference=(),PinType.PinValueType=(),PinType.ContainerType=None,PinType.bIsReference=False,PinType.bIsConst=False,PinType.bIsWeakPointer=False,PinType.bIsUObjectWrapper=False,PinType.bSerializeAsSinglePrecisionFloat=False,DefaultValue="0, 0, 0",AutogeneratedDefaultValue="0, 0, 0",PersistentGuid=00000000000000000000000000000000,bHidden=False,bNotConnectable=False,bDefaultValueIsReadOnly=False,bDefaultValueIsIgnored=False,bAdvancedView=False,bOrphanedPin=False,)
End Object
Begin Object Class=/Script/BlueprintGraph.K2Node_CallFunction Name="K2Node_CallFunction_31" ExportPath="/Script/BlueprintGraph.K2Node_CallFunction'/Game/CharacterBP.CharacterBP:getCameraPosition.K2Node_CallFunction_31'"
   bIsPureFunc=True
   FunctionReference=(MemberParent="/Script/CoreUObject.Class'/Script/Engine.KismetMathLibrary'",MemberName="BreakVector")
   NodePosX=272
   NodePosY=96
   NodeGuid=D85134A8460ABF24BCAAA9BEDA53F7B4
   CustomProperties Pin (PinId=405427294C04F5E2079B6B9853D93A0A,PinName="self",PinFriendlyName=NSLOCTEXT("K2Node", "Target", "Target"),PinType.PinCategory="object",PinType.PinSubCategory="",PinType.PinSubCategoryObject="/Script/CoreUObject.Class'/Script/Engine.KismetMathLibrary'",PinType.PinSubCategoryMemberReference=(),PinType.PinValueType=(),PinType.ContainerType=None,PinType.bIsReference=False,PinType.bIsConst=False,PinType.bIsWeakPointer=False,PinType.bIsUObjectWrapper=False,PinType.bSerializeAsSinglePrecisionFloat=False,DefaultObject="/Script/Engine.Default__KismetMathLibrary",PersistentGuid=00000000000000000000000000000000,bHidden=True,bNotConnectable=False,bDefaultValueIsReadOnly=False,bDefaultValueIsIgnored=False,bAdvancedView=False,bOrphanedPin=False,)
   CustomProperties Pin (PinId=220D38C84D6DA1D501C860AF5537EBF3,PinName="InVec",PinType.PinCategory="struct",PinType.PinSubCategory="",PinType.PinSubCategoryObject="/Script/CoreUObject.ScriptStruct'/Script/CoreUObject.Vector'",PinType.PinSubCategoryMemberReference=(),PinType.PinValueType=(),PinType.ContainerType=None,PinType.bIsReference=False,PinType.bIsConst=False,PinType.bIsWeakPointer=False,PinType.bIsUObjectWrapper=False,PinType.bSerializeAsSinglePrecisionFloat=False,DefaultValue="0, 0, 0",AutogeneratedDefaultValue="0, 0, 0",LinkedTo=(K2Node_CallFunction_30 CB22DB0543B8FFC2ED96F6B483F4F8F1,),PersistentGuid=00000000000000000000000000000000,bHidden=False,bNotConnectable=False,bDefaultValueIsReadOnly=False,bDefaultValueIsIgnored=False,bAdvancedView=False,bOrphanedPin=False,)
   CustomProperties Pin (PinId=6434CAE54C43A342914FB8B42B002EF0,PinName="X",Direction="EGPD_Output",PinType.PinCategory="real",PinType.PinSubCategory="double",PinType.PinSubCategoryObject=None,PinType.PinSubCategoryMemberReference=(),PinType.PinValueType=(),PinType.ContainerType=None,PinType.bIsReference=False,PinType.bIsConst=False,PinType.bIsWeakPointer=False,PinType.bIsUObjectWrapper=False,PinType.bSerializeAsSinglePrecisionFloat=False,DefaultValue="0.0",AutogeneratedDefaultValue="0.0",LinkedTo=(K2Node_FunctionResult_0 CBEBFCB8485C2CB2F9CFF08BE7B964F4,),PersistentGuid=00000000000000000000000000000000,bHidden=False,bNotConnectable=False,bDefaultValueIsReadOnly=False,bDefaultValueIsIgnored=False,bAdvancedView=False,bOrphanedPin=False,)
   CustomProperties Pin (PinId=8C12D47C411FF567EFF452A7BF5FAEDA,PinName="Y",Direction="EGPD_Output",PinType.PinCategory="real",PinType.PinSubCategory="double",PinType.PinSubCategoryObject=None,PinType.PinSubCategoryMemberReference=(),PinType.PinValueType=(),PinType.ContainerType=None,PinType.bIsReference=False,PinType.bIsConst=False,PinType.bIsWeakPointer=False,PinType.bIsUObjectWrapper=False,PinType.bSerializeAsSinglePrecisionFloat=False,DefaultValue="0.0",AutogeneratedDefaultValue="0.0",LinkedTo=(K2Node_FunctionResult_0 8735A2A44E176C75E9C5AFB4FFE21062,),PersistentGuid=00000000000000000000000000000000,bHidden=False,bNotConnectable=False,bDefaultValueIsReadOnly=False,bDefaultValueIsIgnored=False,bAdvancedView=False,bOrphanedPin=False,)
   CustomProperties Pin (PinId=0370D29F495ECD64257BFBA932B57122,PinName="Z",Direction="EGPD_Output",PinType.PinCategory="real",PinType.PinSubCategory="double",PinType.PinSubCategoryObject=None,PinType.PinSubCategoryMemberReference=(),PinType.PinValueType=(),PinType.ContainerType=None,PinType.bIsReference=False,PinType.bIsConst=False,PinType.bIsWeakPointer=False,PinType.bIsUObjectWrapper=False,PinType.bSerializeAsSinglePrecisionFloat=False,DefaultValue="0.0",AutogeneratedDefaultValue="0.0",LinkedTo=(K2Node_FunctionResult_0 7647F36B4E4DB96B94BC58A7BC3BB3F2,),PersistentGuid=00000000000000000000000000000000,bHidden=False,bNotConnectable=False,bDefaultValueIsReadOnly=False,bDefaultValueIsIgnored=False,bAdvancedView=False,bOrphanedPin=False,)
End Object
Begin Object Class=/Script/BlueprintGraph.K2Node_VariableGet Name="K2Node_VariableGet_4" ExportPath="/Script/BlueprintGraph.K2Node_VariableGet'/Game/CharacterBP.CharacterBP:getCameraPosition.K2Node_VariableGet_4'"
   VariableReference=(MemberName="SceneCaptureComponent2D",bSelfContext=True)
   NodePosX=-544
   NodePosY=176
   NodeGuid=962560844FA72DBD9D02DDB764244D1C
   CustomProperties Pin (PinId=34EFF39444E65B1F15F60F83750C192B,PinName="SceneCaptureComponent2D",Direction="EGPD_Output",PinType.PinCategory="object",PinType.PinSubCategory="",PinType.PinSubCategoryObject="/Script/CoreUObject.Class'/Script/Engine.SceneCaptureComponent2D'",PinType.PinSubCategoryMemberReference=(),PinType.PinValueType=(),PinType.ContainerType=None,PinType.bIsReference=False,PinType.bIsConst=False,PinType.bIsWeakPointer=False,PinType.bIsUObjectWrapper=False,PinType.bSerializeAsSinglePrecisionFloat=False,LinkedTo=(K2Node_CallFunction_23 F5BEED2C4438776FED5AAF9C10FB2304,),PersistentGuid=00000000000000000000000000000000,bHidden=False,bNotConnectable=False,bDefaultValueIsReadOnly=False,bDefaultValueIsIgnored=False,bAdvancedView=False,bOrphanedPin=False,)
   CustomProperties Pin (PinId=9D78DA9D4930650D81491C89CAFA9A39,PinName="self",PinFriendlyName=NSLOCTEXT("K2Node", "Target", "Target"),PinType.PinCategory="object",PinType.PinSubCategory="",PinType.PinSubCategoryObject="/Script/Engine.BlueprintGeneratedClass'/Game/CharacterBP.CharacterBP_C'",PinType.PinSubCategoryMemberReference=(),PinType.PinValueType=(),PinType.ContainerType=None,PinType.bIsReference=False,PinType.bIsConst=False,PinType.bIsWeakPointer=False,PinType.bIsUObjectWrapper=False,PinType.bSerializeAsSinglePrecisionFloat=False,PersistentGuid=00000000000000000000000000000000,bHidden=True,bNotConnectable=False,bDefaultValueIsReadOnly=False,bDefaultValueIsIgnored=False,bAdvancedView=False,bOrphanedPin=False,)
End Object
Begin Object Class=/Script/BlueprintGraph.K2Node_FunctionResult Name="K2Node_FunctionResult_0" ExportPath="/Script/BlueprintGraph.K2Node_FunctionResult'/Game/CharacterBP.CharacterBP:getCameraPosition.K2Node_FunctionResult_0'"
   FunctionReference=(MemberName="getCameraPosition")
   bIsEditable=True
   NodePosX=496
   NodeGuid=8189BE8644BC6211F25034A99DE1D68B
   CustomProperties Pin (PinId=F5F2961A40A2432F3EB230A5C7B62A69,PinName="execute",PinType.PinCategory="exec",PinType.PinSubCategory="",PinType.PinSubCategoryObject=None,PinType.PinSubCategoryMemberReference=(),PinType.PinValueType=(),PinType.ContainerType=None,PinType.bIsReference=False,PinType.bIsConst=False,PinType.bIsWeakPointer=False,PinType.bIsUObjectWrapper=False,PinType.bSerializeAsSinglePrecisionFloat=False,LinkedTo=(K2Node_FunctionEntry_0 DD8C011A43756A11F901FE8CC3D22695,),PersistentGuid=00000000000000000000000000000000,bHidden=False,bNotConnectable=False,bDefaultValueIsReadOnly=False,bDefaultValueIsIgnored=False,bAdvancedView=False,bOrphanedPin=False,)
   CustomProperties Pin (PinId=CBEBFCB8485C2CB2F9CFF08BE7B964F4,PinName="X",PinType.PinCategory="real",PinType.PinSubCategory="double",PinType.PinSubCategoryObject=None,PinType.PinSubCategoryMemberReference=(),PinType.PinValueType=(),PinType.ContainerType=None,PinType.bIsReference=False,PinType.bIsConst=False,PinType.bIsWeakPointer=False,PinType.bIsUObjectWrapper=False,PinType.bSerializeAsSinglePrecisionFloat=False,DefaultValue="0.0",AutogeneratedDefaultValue="0.0",LinkedTo=(K2Node_CallFunction_31 6434CAE54C43A342914FB8B42B002EF0,),PersistentGuid=00000000000000000000000000000000,bHidden=False,bNotConnectable=False,bDefaultValueIsReadOnly=False,bDefaultValueIsIgnored=False,bAdvancedView=False,bOrphanedPin=False,)
   CustomProperties Pin (PinId=8735A2A44E176C75E9C5AFB4FFE21062,PinName="Y",PinType.PinCategory="real",PinType.PinSubCategory="double",PinType.PinSubCategoryObject=None,PinType.PinSubCategoryMemberReference=(),PinType.PinValueType=(),PinType.ContainerType=None,PinType.bIsReference=False,PinType.bIsConst=False,PinType.bIsWeakPointer=False,PinType.bIsUObjectWrapper=False,PinType.bSerializeAsSinglePrecisionFloat=False,DefaultValue="0.0",AutogeneratedDefaultValue="0.0",LinkedTo=(K2Node_CallFunction_31 8C12D47C411FF567EFF452A7BF5FAEDA,),PersistentGuid=00000000000000000000000000000000,bHidden=False,bNotConnectable=False,bDefaultValueIsReadOnly=False,bDefaultValueIsIgnored=False,bAdvancedView=False,bOrphanedPin=False,)
   CustomProperties Pin (PinId=7647F36B4E4DB96B94BC58A7BC3BB3F2,PinName="Z",PinType.PinCategory="real",PinType.PinSubCategory="double",PinType.PinSubCategoryObject=None,PinType.PinSubCategoryMemberReference=(),PinType.PinValueType=(),PinType.ContainerType=None,PinType.bIsReference=False,PinType.bIsConst=False,PinType.bIsWeakPointer=False,PinType.bIsUObjectWrapper=False,PinType.bSerializeAsSinglePrecisionFloat=False,DefaultValue="0.0",AutogeneratedDefaultValue="0.0",LinkedTo=(K2Node_CallFunction_31 0370D29F495ECD64257BFBA932B57122,),PersistentGuid=00000000000000000000000000000000,bHidden=False,bNotConnectable=False,bDefaultValueIsReadOnly=False,bDefaultValueIsIgnored=False,bAdvancedView=False,bOrphanedPin=False,)
   CustomProperties UserDefinedPin (PinName="X",PinType=(PinCategory="real",PinSubCategory="double"),DesiredPinDirection=EGPD_Input,PinDefaultValue="0.0")
   CustomProperties UserDefinedPin (PinName="Y",PinType=(PinCategory="real",PinSubCategory="double"),DesiredPinDirection=EGPD_Input,PinDefaultValue="0.0")
   CustomProperties UserDefinedPin (PinName="Z",PinType=(PinCategory="real",PinSubCategory="double"),DesiredPinDirection=EGPD_Input,PinDefaultValue="0.0")
End Object
Then, create a smooth transition between the old and new camera positions. Use a timeline to interpolate each camera axis value from the old to the new one.
   Begin Object Class=/Script/BlueprintGraph.K2Node_CustomEvent Name="K2Node_CustomEvent_1" ExportPath="/Script/BlueprintGraph.K2Node_CustomEvent'/Game/CharacterBP.CharacterBP:EventGraph.K2Node_CustomEvent_1'"
   CustomFunctionName="focusChest"
   NodePosX=128
   NodePosY=496
   NodeGuid=D8E0F4FE4E9729F952E3C38BC1B7A894
   CustomProperties Pin (PinId=379011AD44FE616C93790EAD48EDD302,PinName="OutputDelegate",Direction="EGPD_Output",PinType.PinCategory="delegate",PinType.PinSubCategory="",PinType.PinSubCategoryObject=None,PinType.PinSubCategoryMemberReference=(MemberParent="/Script/Engine.BlueprintGeneratedClass'/Game/CharacterBP.CharacterBP_C'",MemberName="focusChest",MemberGuid=D8E0F4FE4E9729F952E3C38BC1B7A894),PinType.PinValueType=(),PinType.ContainerType=None,PinType.bIsReference=False,PinType.bIsConst=False,PinType.bIsWeakPointer=False,PinType.bIsUObjectWrapper=False,PinType.bSerializeAsSinglePrecisionFloat=False,LinkedTo=(K2Node_CallFunction_3 93760E9C4A2EB4FC489ACEB012AAED6A,),PersistentGuid=00000000000000000000000000000000,bHidden=False,bNotConnectable=False,bDefaultValueIsReadOnly=False,bDefaultValueIsIgnored=False,bAdvancedView=False,bOrphanedPin=False,)
   CustomProperties Pin (PinId=0F97B6C54C3B7792AAE710B16B26D028,PinName="then",Direction="EGPD_Output",PinType.PinCategory="exec",PinType.PinSubCategory="",PinType.PinSubCategoryObject=None,PinType.PinSubCategoryMemberReference=(),PinType.PinValueType=(),PinType.ContainerType=None,PinType.bIsReference=False,PinType.bIsConst=False,PinType.bIsWeakPointer=False,PinType.bIsUObjectWrapper=False,PinType.bSerializeAsSinglePrecisionFloat=False,LinkedTo=(K2Node_CallFunction_48 497D2C674F6EFCD464C4369EF74F5FBD,),PersistentGuid=00000000000000000000000000000000,bHidden=False,bNotConnectable=False,bDefaultValueIsReadOnly=False,bDefaultValueIsIgnored=False,bAdvancedView=False,bOrphanedPin=False,)
End Object
Begin Object Class=/Script/BlueprintGraph.K2Node_VariableGet Name="K2Node_VariableGet_15" ExportPath="/Script/BlueprintGraph.K2Node_VariableGet'/Game/CharacterBP.CharacterBP:EventGraph.K2Node_VariableGet_15'"
   VariableReference=(MemberName="SceneCaptureComponent2D",bSelfContext=True)
   NodePosX=1488
   NodePosY=544
   NodeGuid=BC18A8A64B389EAFF6FDA594C6D66D76
   CustomProperties Pin (PinId=34EFF39444E65B1F15F60F83750C192B,PinName="SceneCaptureComponent2D",Direction="EGPD_Output",PinType.PinCategory="object",PinType.PinSubCategory="",PinType.PinSubCategoryObject="/Script/CoreUObject.Class'/Script/Engine.SceneCaptureComponent2D'",PinType.PinSubCategoryMemberReference=(),PinType.PinValueType=(),PinType.ContainerType=None,PinType.bIsReference=False,PinType.bIsConst=False,PinType.bIsWeakPointer=False,PinType.bIsUObjectWrapper=False,PinType.bSerializeAsSinglePrecisionFloat=False,LinkedTo=(K2Node_CallFunction_44 6E47B4604D1F2BEBC767C5A9B94EE170,),PersistentGuid=00000000000000000000000000000000,bHidden=False,bNotConnectable=False,bDefaultValueIsReadOnly=False,bDefaultValueIsIgnored=False,bAdvancedView=False,bOrphanedPin=False,)
   CustomProperties Pin (PinId=9D78DA9D4930650D81491C89CAFA9A39,PinName="self",PinFriendlyName=NSLOCTEXT("K2Node", "Target", "Target"),PinType.PinCategory="object",PinType.PinSubCategory="",PinType.PinSubCategoryObject="/Script/Engine.BlueprintGeneratedClass'/Game/CharacterBP.CharacterBP_C'",PinType.PinSubCategoryMemberReference=(),PinType.PinValueType=(),PinType.ContainerType=None,PinType.bIsReference=False,PinType.bIsConst=False,PinType.bIsWeakPointer=False,PinType.bIsUObjectWrapper=False,PinType.bSerializeAsSinglePrecisionFloat=False,PersistentGuid=00000000000000000000000000000000,bHidden=True,bNotConnectable=False,bDefaultValueIsReadOnly=False,bDefaultValueIsIgnored=False,bAdvancedView=False,bOrphanedPin=False,)
End Object
Begin Object Class=/Script/BlueprintGraph.K2Node_CallFunction Name="K2Node_CallFunction_44" ExportPath="/Script/BlueprintGraph.K2Node_CallFunction'/Game/CharacterBP.CharacterBP:EventGraph.K2Node_CallFunction_44'"
   FunctionReference=(MemberParent="/Script/CoreUObject.Class'/Script/Engine.SceneComponent'",MemberName="K2_SetRelativeLocation")
   NodePosX=1792
   NodePosY=448
   NodeGuid=6C78731643FC7AA115754CA1A74B085F
   CustomProperties Pin (PinId=258669B74CAA830BE806B2BAFCDD0E57,PinName="execute",PinToolTip="
Exec",PinType.PinCategory="exec",PinType.PinSubCategory="",PinType.PinSubCategoryObject=None,PinType.PinSubCategoryMemberReference=(),PinType.PinValueType=(),PinType.ContainerType=None,PinType.bIsReference=False,PinType.bIsConst=False,PinType.bIsWeakPointer=False,PinType.bIsUObjectWrapper=False,PinType.bSerializeAsSinglePrecisionFloat=False,LinkedTo=(K2Node_Timeline_6 61AAA0934A46D88F426A5BAB8B11C98D,),PersistentGuid=00000000000000000000000000000000,bHidden=False,bNotConnectable=False,bDefaultValueIsReadOnly=False,bDefaultValueIsIgnored=False,bAdvancedView=False,bOrphanedPin=False,)
   CustomProperties Pin (PinId=D3C417064DC1F6122F44109E9EBC1868,PinName="then",PinToolTip="
Exec",Direction="EGPD_Output",PinType.PinCategory="exec",PinType.PinSubCategory="",PinType.PinSubCategoryObject=None,PinType.PinSubCategoryMemberReference=(),PinType.PinValueType=(),PinType.ContainerType=None,PinType.bIsReference=False,PinType.bIsConst=False,PinType.bIsWeakPointer=False,PinType.bIsUObjectWrapper=False,PinType.bSerializeAsSinglePrecisionFloat=False,PersistentGuid=00000000000000000000000000000000,bHidden=False,bNotConnectable=False,bDefaultValueIsReadOnly=False,bDefaultValueIsIgnored=False,bAdvancedView=False,bOrphanedPin=False,)
   CustomProperties Pin (PinId=6E47B4604D1F2BEBC767C5A9B94EE170,PinName="self",PinFriendlyName=NSLOCTEXT("K2Node", "Target", "Target"),PinToolTip="Target
Scene Component Object Reference",PinType.PinCategory="object",PinType.PinSubCategory="",PinType.PinSubCategoryObject="/Script/CoreUObject.Class'/Script/Engine.SceneComponent'",PinType.PinSubCategoryMemberReference=(),PinType.PinValueType=(),PinType.ContainerType=None,PinType.bIsReference=False,PinType.bIsConst=False,PinType.bIsWeakPointer=False,PinType.bIsUObjectWrapper=False,PinType.bSerializeAsSinglePrecisionFloat=False,LinkedTo=(K2Node_VariableGet_15 34EFF39444E65B1F15F60F83750C192B,),PersistentGuid=00000000000000000000000000000000,bHidden=False,bNotConnectable=False,bDefaultValueIsReadOnly=False,bDefaultValueIsIgnored=False,bAdvancedView=False,bOrphanedPin=False,)
   CustomProperties Pin (PinId=2D05CFDC4D2B8525BA4D65B2FC942798,PinName="NewLocation",PinToolTip="New Location
Vector

New location of the component relative to its parent.",PinType.PinCategory="struct",PinType.PinSubCategory="",PinType.PinSubCategoryObject="/Script/CoreUObject.ScriptStruct'/Script/CoreUObject.Vector'",PinType.PinSubCategoryMemberReference=(),PinType.PinValueType=(),PinType.ContainerType=None,PinType.bIsReference=False,PinType.bIsConst=False,PinType.bIsWeakPointer=False,PinType.bIsUObjectWrapper=False,PinType.bSerializeAsSinglePrecisionFloat=False,DefaultValue="0, 0, 0",AutogeneratedDefaultValue="0, 0, 0",LinkedTo=(K2Node_CallFunction_46 4EA7224147536FE00B8890B3B622832F,),PersistentGuid=00000000000000000000000000000000,bHidden=False,bNotConnectable=False,bDefaultValueIsReadOnly=False,bDefaultValueIsIgnored=False,bAdvancedView=False,bOrphanedPin=False,)
   CustomProperties Pin (PinId=BB3B67104D847DCD51C06F9754AB3C5D,PinName="bSweep",PinToolTip="Sweep
Boolean

Whether we sweep to the destination location, triggering overlaps along the way and stopping short of the target if blocked by something. Only the root component is swept and checked for blocking collision, child components move without sweeping. If collision is off, this has no effect.",PinType.PinCategory="bool",PinType.PinSubCategory="",PinType.PinSubCategoryObject=None,PinType.PinSubCategoryMemberReference=(),PinType.PinValueType=(),PinType.ContainerType=None,PinType.bIsReference=False,PinType.bIsConst=False,PinType.bIsWeakPointer=False,PinType.bIsUObjectWrapper=False,PinType.bSerializeAsSinglePrecisionFloat=False,DefaultValue="false",AutogeneratedDefaultValue="false",PersistentGuid=00000000000000000000000000000000,bHidden=False,bNotConnectable=False,bDefaultValueIsReadOnly=False,bDefaultValueIsIgnored=False,bAdvancedView=False,bOrphanedPin=False,)
   CustomProperties Pin (PinId=80989B5A45A4FD1A2D9235988C212C2B,PinName="SweepHitResult",PinToolTip="Sweep Hit Result
Hit Result Structure

Hit result from any impact if sweep is true.",Direction="EGPD_Output",PinType.PinCategory="struct",PinType.PinSubCategory="",PinType.PinSubCategoryObject="/Script/CoreUObject.ScriptStruct'/Script/Engine.HitResult'",PinType.PinSubCategoryMemberReference=(),PinType.PinValueType=(),PinType.ContainerType=None,PinType.bIsReference=False,PinType.bIsConst=False,PinType.bIsWeakPointer=False,PinType.bIsUObjectWrapper=False,PinType.bSerializeAsSinglePrecisionFloat=False,PersistentGuid=00000000000000000000000000000000,bHidden=False,bNotConnectable=False,bDefaultValueIsReadOnly=False,bDefaultValueIsIgnored=False,bAdvancedView=False,bOrphanedPin=False,)
   CustomProperties Pin (PinId=88BA22AA4E6CCE40E65F4F8450C8FE82,PinName="bTeleport",PinToolTip="Teleport
Boolean

Whether we teleport the physics state (if physics collision is enabled for this object). If true, physics velocity for this object is unchanged (so ragdoll parts are not affected by change in location). If false, physics velocity is updated based on the change in position (affecting ragdoll parts). If CCD is on and not teleporting, this will affect objects along the entire sweep volume.",PinType.PinCategory="bool",PinType.PinSubCategory="",PinType.PinSubCategoryObject=None,PinType.PinSubCategoryMemberReference=(),PinType.PinValueType=(),PinType.ContainerType=None,PinType.bIsReference=False,PinType.bIsConst=False,PinType.bIsWeakPointer=False,PinType.bIsUObjectWrapper=False,PinType.bSerializeAsSinglePrecisionFloat=False,DefaultValue="false",AutogeneratedDefaultValue="false",PersistentGuid=00000000000000000000000000000000,bHidden=False,bNotConnectable=False,bDefaultValueIsReadOnly=False,bDefaultValueIsIgnored=False,bAdvancedView=False,bOrphanedPin=False,)
End Object
Begin Object Class=/Script/BlueprintGraph.K2Node_CallFunction Name="K2Node_CallFunction_45" ExportPath="/Script/BlueprintGraph.K2Node_CallFunction'/Game/CharacterBP.CharacterBP:EventGraph.K2Node_CallFunction_45'"
   bIsPureFunc=True
   FunctionReference=(MemberParent="/Script/CoreUObject.Class'/Script/Engine.KismetMathLibrary'",MemberName="Lerp")
   NodePosX=1200
   NodePosY=528
   NodeGuid=97326B8C4CB6E55C9030C2ABA29E1933
   CustomProperties Pin (PinId=5BDA421246A7735BE9B6E2AD17F29728,PinName="self",PinFriendlyName=NSLOCTEXT("K2Node", "Target", "Target"),PinToolTip="Target
Kismet Math Library Object Reference",PinType.PinCategory="object",PinType.PinSubCategory="",PinType.PinSubCategoryObject="/Script/CoreUObject.Class'/Script/Engine.KismetMathLibrary'",PinType.PinSubCategoryMemberReference=(),PinType.PinValueType=(),PinType.ContainerType=None,PinType.bIsReference=False,PinType.bIsConst=False,PinType.bIsWeakPointer=False,PinType.bIsUObjectWrapper=False,PinType.bSerializeAsSinglePrecisionFloat=False,DefaultObject="/Script/Engine.Default__KismetMathLibrary",PersistentGuid=00000000000000000000000000000000,bHidden=True,bNotConnectable=False,bDefaultValueIsReadOnly=False,bDefaultValueIsIgnored=False,bAdvancedView=False,bOrphanedPin=False,)
   CustomProperties Pin (PinId=B2CFE2C94684B68192F253B05849E7C6,PinName="A",PinToolTip="A
Float (double-precision)",PinType.PinCategory="real",PinType.PinSubCategory="double",PinType.PinSubCategoryObject=None,PinType.PinSubCategoryMemberReference=(),PinType.PinValueType=(),PinType.ContainerType=None,PinType.bIsReference=False,PinType.bIsConst=False,PinType.bIsWeakPointer=False,PinType.bIsUObjectWrapper=False,PinType.bSerializeAsSinglePrecisionFloat=False,DefaultValue="0.0",AutogeneratedDefaultValue="0.0",LinkedTo=(K2Node_CallFunction_48 7403A2D9401B34D9A4901896370B7485,),PersistentGuid=00000000000000000000000000000000,bHidden=False,bNotConnectable=False,bDefaultValueIsReadOnly=False,bDefaultValueIsIgnored=False,bAdvancedView=False,bOrphanedPin=False,)
   CustomProperties Pin (PinId=949AA94B496985E5DC646B9D5D43CD54,PinName="B",PinToolTip="B
Float (double-precision)",PinType.PinCategory="real",PinType.PinSubCategory="double",PinType.PinSubCategoryObject=None,PinType.PinSubCategoryMemberReference=(),PinType.PinValueType=(),PinType.ContainerType=None,PinType.bIsReference=False,PinType.bIsConst=False,PinType.bIsWeakPointer=False,PinType.bIsUObjectWrapper=False,PinType.bSerializeAsSinglePrecisionFloat=False,DefaultValue="130.000000",AutogeneratedDefaultValue="0.0",PersistentGuid=00000000000000000000000000000000,bHidden=False,bNotConnectable=False,bDefaultValueIsReadOnly=False,bDefaultValueIsIgnored=False,bAdvancedView=False,bOrphanedPin=False,)
   CustomProperties Pin (PinId=350EC28D4358A893D05E2B861CE9AD6F,PinName="Alpha",PinToolTip="Alpha
Float (double-precision)",PinType.PinCategory="real",PinType.PinSubCategory="double",PinType.PinSubCategoryObject=None,PinType.PinSubCategoryMemberReference=(),PinType.PinValueType=(),PinType.ContainerType=None,PinType.bIsReference=False,PinType.bIsConst=False,PinType.bIsWeakPointer=False,PinType.bIsUObjectWrapper=False,PinType.bSerializeAsSinglePrecisionFloat=False,DefaultValue="0.0",AutogeneratedDefaultValue="0.0",LinkedTo=(K2Node_Timeline_6 3D7FCC3341330E76CF2B1BBE30BEDC23,),PersistentGuid=00000000000000000000000000000000,bHidden=False,bNotConnectable=False,bDefaultValueIsReadOnly=False,bDefaultValueIsIgnored=False,bAdvancedView=False,bOrphanedPin=False,)
   CustomProperties Pin (PinId=3D1DCC6240151C93630A2AAB2DAB45DE,PinName="ReturnValue",PinToolTip="Return Value
Float (double-precision)

Linearly interpolates between A and B based on Alpha (100% of A when Alpha=0 and 100% of B when Alpha=1)",Direction="EGPD_Output",PinType.PinCategory="real",PinType.PinSubCategory="double",PinType.PinSubCategoryObject=None,PinType.PinSubCategoryMemberReference=(),PinType.PinValueType=(),PinType.ContainerType=None,PinType.bIsReference=False,PinType.bIsConst=False,PinType.bIsWeakPointer=False,PinType.bIsUObjectWrapper=False,PinType.bSerializeAsSinglePrecisionFloat=False,DefaultValue="0.0",AutogeneratedDefaultValue="0.0",LinkedTo=(K2Node_CallFunction_46 35CAFA6645A5B7A8FC79AB86767A0DC3,),PersistentGuid=00000000000000000000000000000000,bHidden=False,bNotConnectable=False,bDefaultValueIsReadOnly=False,bDefaultValueIsIgnored=False,bAdvancedView=False,bOrphanedPin=False,)
End Object
Begin Object Class=/Script/BlueprintGraph.K2Node_Timeline Name="K2Node_Timeline_6" ExportPath="/Script/BlueprintGraph.K2Node_Timeline'/Game/CharacterBP.CharacterBP:EventGraph.K2Node_Timeline_6'"
   TimelineName="Timeline_chest"
   TimelineGuid=9F416CD74443032C6F0D9DAE98ADD91B
   NodePosX=896
   NodePosY=480
   bCanRenameNode=True
   NodeGuid=32CDCDB7476A70221BCD5EA54582C400
   CustomProperties Pin (PinId=4865440743AB7E8980B95FAF0760FB3D,PinName="Play",PinType.PinCategory="exec",PinType.PinSubCategory="",PinType.PinSubCategoryObject=None,PinType.PinSubCategoryMemberReference=(),PinType.PinValueType=(),PinType.ContainerType=None,PinType.bIsReference=False,PinType.bIsConst=False,PinType.bIsWeakPointer=False,PinType.bIsUObjectWrapper=False,PinType.bSerializeAsSinglePrecisionFloat=False,PersistentGuid=00000000000000000000000000000000,bHidden=False,bNotConnectable=False,bDefaultValueIsReadOnly=False,bDefaultValueIsIgnored=False,bAdvancedView=False,bOrphanedPin=False,)
   CustomProperties Pin (PinId=D5FA5E0D47F969F39D9E92A50F53FA50,PinName="PlayFromStart",PinType.PinCategory="exec",PinType.PinSubCategory="",PinType.PinSubCategoryObject=None,PinType.PinSubCategoryMemberReference=(),PinType.PinValueType=(),PinType.ContainerType=None,PinType.bIsReference=False,PinType.bIsConst=False,PinType.bIsWeakPointer=False,PinType.bIsUObjectWrapper=False,PinType.bSerializeAsSinglePrecisionFloat=False,LinkedTo=(K2Node_CallFunction_48 32C856DD42C9FDCAA537FCB8E9F8D4F0,),PersistentGuid=00000000000000000000000000000000,bHidden=False,bNotConnectable=False,bDefaultValueIsReadOnly=False,bDefaultValueIsIgnored=False,bAdvancedView=False,bOrphanedPin=False,)
   CustomProperties Pin (PinId=347DB8AB43A73994EDFA4084AEB755B5,PinName="Stop",PinType.PinCategory="exec",PinType.PinSubCategory="",PinType.PinSubCategoryObject=None,PinType.PinSubCategoryMemberReference=(),PinType.PinValueType=(),PinType.ContainerType=None,PinType.bIsReference=False,PinType.bIsConst=False,PinType.bIsWeakPointer=False,PinType.bIsUObjectWrapper=False,PinType.bSerializeAsSinglePrecisionFloat=False,PersistentGuid=00000000000000000000000000000000,bHidden=False,bNotConnectable=False,bDefaultValueIsReadOnly=False,bDefaultValueIsIgnored=False,bAdvancedView=False,bOrphanedPin=False,)
   CustomProperties Pin (PinId=FCF951A047802ACF0EB69F87F2502B53,PinName="Reverse",PinType.PinCategory="exec",PinType.PinSubCategory="",PinType.PinSubCategoryObject=None,PinType.PinSubCategoryMemberReference=(),PinType.PinValueType=(),PinType.ContainerType=None,PinType.bIsReference=False,PinType.bIsConst=False,PinType.bIsWeakPointer=False,PinType.bIsUObjectWrapper=False,PinType.bSerializeAsSinglePrecisionFloat=False,PersistentGuid=00000000000000000000000000000000,bHidden=False,bNotConnectable=False,bDefaultValueIsReadOnly=False,bDefaultValueIsIgnored=False,bAdvancedView=False,bOrphanedPin=False,)
   CustomProperties Pin (PinId=24670FE14335ECB3771CED895504B15E,PinName="ReverseFromEnd",PinType.PinCategory="exec",PinType.PinSubCategory="",PinType.PinSubCategoryObject=None,PinType.PinSubCategoryMemberReference=(),PinType.PinValueType=(),PinType.ContainerType=None,PinType.bIsReference=False,PinType.bIsConst=False,PinType.bIsWeakPointer=False,PinType.bIsUObjectWrapper=False,PinType.bSerializeAsSinglePrecisionFloat=False,PersistentGuid=00000000000000000000000000000000,bHidden=False,bNotConnectable=False,bDefaultValueIsReadOnly=False,bDefaultValueIsIgnored=False,bAdvancedView=False,bOrphanedPin=False,)
   CustomProperties Pin (PinId=61AAA0934A46D88F426A5BAB8B11C98D,PinName="Update",Direction="EGPD_Output",PinType.PinCategory="exec",PinType.PinSubCategory="",PinType.PinSubCategoryObject=None,PinType.PinSubCategoryMemberReference=(),PinType.PinValueType=(),PinType.ContainerType=None,PinType.bIsReference=False,PinType.bIsConst=False,PinType.bIsWeakPointer=False,PinType.bIsUObjectWrapper=False,PinType.bSerializeAsSinglePrecisionFloat=False,LinkedTo=(K2Node_CallFunction_44 258669B74CAA830BE806B2BAFCDD0E57,),PersistentGuid=00000000000000000000000000000000,bHidden=False,bNotConnectable=False,bDefaultValueIsReadOnly=False,bDefaultValueIsIgnored=False,bAdvancedView=False,bOrphanedPin=False,)
   CustomProperties Pin (PinId=172F5AA441CCAED6970824B60892D61E,PinName="Finished",Direction="EGPD_Output",PinType.PinCategory="exec",PinType.PinSubCategory="",PinType.PinSubCategoryObject=None,PinType.PinSubCategoryMemberReference=(),PinType.PinValueType=(),PinType.ContainerType=None,PinType.bIsReference=False,PinType.bIsConst=False,PinType.bIsWeakPointer=False,PinType.bIsUObjectWrapper=False,PinType.bSerializeAsSinglePrecisionFloat=False,PersistentGuid=00000000000000000000000000000000,bHidden=False,bNotConnectable=False,bDefaultValueIsReadOnly=False,bDefaultValueIsIgnored=False,bAdvancedView=False,bOrphanedPin=False,)
   CustomProperties Pin (PinId=714DC24B4C83A52D3C1CCF8A4BD5CF45,PinName="SetNewTime",PinType.PinCategory="exec",PinType.PinSubCategory="",PinType.PinSubCategoryObject=None,PinType.PinSubCategoryMemberReference=(),PinType.PinValueType=(),PinType.ContainerType=None,PinType.bIsReference=False,PinType.bIsConst=False,PinType.bIsWeakPointer=False,PinType.bIsUObjectWrapper=False,PinType.bSerializeAsSinglePrecisionFloat=False,PersistentGuid=00000000000000000000000000000000,bHidden=False,bNotConnectable=False,bDefaultValueIsReadOnly=False,bDefaultValueIsIgnored=False,bAdvancedView=False,bOrphanedPin=False,)
   CustomProperties Pin (PinId=55F2D36743E5CA0A785D36BA19D8FAC5,PinName="NewTime",PinType.PinCategory="real",PinType.PinSubCategory="float",PinType.PinSubCategoryObject=None,PinType.PinSubCategoryMemberReference=(),PinType.PinValueType=(),PinType.ContainerType=None,PinType.bIsReference=False,PinType.bIsConst=False,PinType.bIsWeakPointer=False,PinType.bIsUObjectWrapper=False,PinType.bSerializeAsSinglePrecisionFloat=False,DefaultValue="0.0",AutogeneratedDefaultValue="0.0",PersistentGuid=00000000000000000000000000000000,bHidden=False,bNotConnectable=False,bDefaultValueIsReadOnly=False,bDefaultValueIsIgnored=False,bAdvancedView=False,bOrphanedPin=False,)
   CustomProperties Pin (PinId=8352FB0942F1B26CDE36F1A3E0194E94,PinName="Direction",Direction="EGPD_Output",PinType.PinCategory="byte",PinType.PinSubCategory="",PinType.PinSubCategoryObject="/Script/CoreUObject.Enum'/Script/Engine.ETimelineDirection'",PinType.PinSubCategoryMemberReference=(),PinType.PinValueType=(),PinType.ContainerType=None,PinType.bIsReference=False,PinType.bIsConst=False,PinType.bIsWeakPointer=False,PinType.bIsUObjectWrapper=False,PinType.bSerializeAsSinglePrecisionFloat=False,PersistentGuid=00000000000000000000000000000000,bHidden=False,bNotConnectable=False,bDefaultValueIsReadOnly=False,bDefaultValueIsIgnored=False,bAdvancedView=False,bOrphanedPin=False,)
   CustomProperties Pin (PinId=3D7FCC3341330E76CF2B1BBE30BEDC23,PinName="0-1",Direction="EGPD_Output",PinType.PinCategory="real",PinType.PinSubCategory="float",PinType.PinSubCategoryObject=None,PinType.PinSubCategoryMemberReference=(),PinType.PinValueType=(),PinType.ContainerType=None,PinType.bIsReference=False,PinType.bIsConst=False,PinType.bIsWeakPointer=False,PinType.bIsUObjectWrapper=False,PinType.bSerializeAsSinglePrecisionFloat=False,LinkedTo=(K2Node_CallFunction_45 350EC28D4358A893D05E2B861CE9AD6F,K2Node_CallFunction_47 350EC28D4358A893D05E2B861CE9AD6F,),PersistentGuid=00000000000000000000000000000000,bHidden=False,bNotConnectable=False,bDefaultValueIsReadOnly=False,bDefaultValueIsIgnored=False,bAdvancedView=False,bOrphanedPin=False,)
End Object
Begin Object Class=/Script/BlueprintGraph.K2Node_CallFunction Name="K2Node_CallFunction_46" ExportPath="/Script/BlueprintGraph.K2Node_CallFunction'/Game/CharacterBP.CharacterBP:EventGraph.K2Node_CallFunction_46'"
   bIsPureFunc=True
   FunctionReference=(MemberParent="/Script/CoreUObject.Class'/Script/Engine.KismetMathLibrary'",MemberName="MakeVector")
   NodePosX=1472
   NodePosY=608
   NodeGuid=8B929E4A43F39E6F1EF153BDE8EC0A57
   CustomProperties Pin (PinId=E5F0B96C4A5B059540565184D4DBF3B3,PinName="self",PinFriendlyName=NSLOCTEXT("K2Node", "Target", "Target"),PinToolTip="Target
Kismet Math Library Object Reference",PinType.PinCategory="object",PinType.PinSubCategory="",PinType.PinSubCategoryObject="/Script/CoreUObject.Class'/Script/Engine.KismetMathLibrary'",PinType.PinSubCategoryMemberReference=(),PinType.PinValueType=(),PinType.ContainerType=None,PinType.bIsReference=False,PinType.bIsConst=False,PinType.bIsWeakPointer=False,PinType.bIsUObjectWrapper=False,PinType.bSerializeAsSinglePrecisionFloat=False,DefaultObject="/Script/Engine.Default__KismetMathLibrary",PersistentGuid=00000000000000000000000000000000,bHidden=True,bNotConnectable=False,bDefaultValueIsReadOnly=False,bDefaultValueIsIgnored=False,bAdvancedView=False,bOrphanedPin=False,)
   CustomProperties Pin (PinId=35CAFA6645A5B7A8FC79AB86767A0DC3,PinName="X",PinToolTip="X
Float (double-precision)",PinType.PinCategory="real",PinType.PinSubCategory="double",PinType.PinSubCategoryObject=None,PinType.PinSubCategoryMemberReference=(),PinType.PinValueType=(),PinType.ContainerType=None,PinType.bIsReference=False,PinType.bIsConst=False,PinType.bIsWeakPointer=False,PinType.bIsUObjectWrapper=False,PinType.bSerializeAsSinglePrecisionFloat=False,DefaultValue="0.0",AutogeneratedDefaultValue="0.0",LinkedTo=(K2Node_CallFunction_45 3D1DCC6240151C93630A2AAB2DAB45DE,),PersistentGuid=00000000000000000000000000000000,bHidden=False,bNotConnectable=False,bDefaultValueIsReadOnly=False,bDefaultValueIsIgnored=False,bAdvancedView=False,bOrphanedPin=False,)
   CustomProperties Pin (PinId=51B02585428866C5252D249D1B20D68D,PinName="Y",PinToolTip="Y
Float (double-precision)",PinType.PinCategory="real",PinType.PinSubCategory="double",PinType.PinSubCategoryObject=None,PinType.PinSubCategoryMemberReference=(),PinType.PinValueType=(),PinType.ContainerType=None,PinType.bIsReference=False,PinType.bIsConst=False,PinType.bIsWeakPointer=False,PinType.bIsUObjectWrapper=False,PinType.bSerializeAsSinglePrecisionFloat=False,DefaultValue="0.628293",AutogeneratedDefaultValue="0.0",PersistentGuid=00000000000000000000000000000000,bHidden=False,bNotConnectable=False,bDefaultValueIsReadOnly=False,bDefaultValueIsIgnored=False,bAdvancedView=False,bOrphanedPin=False,)
   CustomProperties Pin (PinId=94FE6C5A466A3383867BD89DF5F49129,PinName="Z",PinToolTip="Z
Float (double-precision)",PinType.PinCategory="real",PinType.PinSubCategory="double",PinType.PinSubCategoryObject=None,PinType.PinSubCategoryMemberReference=(),PinType.PinValueType=(),PinType.ContainerType=None,PinType.bIsReference=False,PinType.bIsConst=False,PinType.bIsWeakPointer=False,PinType.bIsUObjectWrapper=False,PinType.bSerializeAsSinglePrecisionFloat=False,DefaultValue="0.0",AutogeneratedDefaultValue="0.0",LinkedTo=(K2Node_CallFunction_47 3D1DCC6240151C93630A2AAB2DAB45DE,),PersistentGuid=00000000000000000000000000000000,bHidden=False,bNotConnectable=False,bDefaultValueIsReadOnly=False,bDefaultValueIsIgnored=False,bAdvancedView=False,bOrphanedPin=False,)
   CustomProperties Pin (PinId=4EA7224147536FE00B8890B3B622832F,PinName="ReturnValue",PinToolTip="Return Value
Vector

Makes a vector {X, Y, Z}",Direction="EGPD_Output",PinType.PinCategory="struct",PinType.PinSubCategory="",PinType.PinSubCategoryObject="/Script/CoreUObject.ScriptStruct'/Script/CoreUObject.Vector'",PinType.PinSubCategoryMemberReference=(),PinType.PinValueType=(),PinType.ContainerType=None,PinType.bIsReference=False,PinType.bIsConst=False,PinType.bIsWeakPointer=False,PinType.bIsUObjectWrapper=False,PinType.bSerializeAsSinglePrecisionFloat=False,DefaultValue="0, 0, 0",AutogeneratedDefaultValue="0, 0, 0",LinkedTo=(K2Node_CallFunction_44 2D05CFDC4D2B8525BA4D65B2FC942798,),PersistentGuid=00000000000000000000000000000000,bHidden=False,bNotConnectable=False,bDefaultValueIsReadOnly=False,bDefaultValueIsIgnored=False,bAdvancedView=False,bOrphanedPin=False,)
End Object
Begin Object Class=/Script/BlueprintGraph.K2Node_CallFunction Name="K2Node_CallFunction_47" ExportPath="/Script/BlueprintGraph.K2Node_CallFunction'/Game/CharacterBP.CharacterBP:EventGraph.K2Node_CallFunction_47'"
   bIsPureFunc=True
   FunctionReference=(MemberParent="/Script/CoreUObject.Class'/Script/Engine.KismetMathLibrary'",MemberName="Lerp")
   NodePosX=1200
   NodePosY=688
   NodeGuid=4BC6EE5E4647A0D5B302A5B9E7DD3F8C
   CustomProperties Pin (PinId=5BDA421246A7735BE9B6E2AD17F29728,PinName="self",PinFriendlyName=NSLOCTEXT("K2Node", "Target", "Target"),PinToolTip="Target
Kismet Math Library Object Reference",PinType.PinCategory="object",PinType.PinSubCategory="",PinType.PinSubCategoryObject="/Script/CoreUObject.Class'/Script/Engine.KismetMathLibrary'",PinType.PinSubCategoryMemberReference=(),PinType.PinValueType=(),PinType.ContainerType=None,PinType.bIsReference=False,PinType.bIsConst=False,PinType.bIsWeakPointer=False,PinType.bIsUObjectWrapper=False,PinType.bSerializeAsSinglePrecisionFloat=False,DefaultObject="/Script/Engine.Default__KismetMathLibrary",PersistentGuid=00000000000000000000000000000000,bHidden=True,bNotConnectable=False,bDefaultValueIsReadOnly=False,bDefaultValueIsIgnored=False,bAdvancedView=False,bOrphanedPin=False,)
   CustomProperties Pin (PinId=B2CFE2C94684B68192F253B05849E7C6,PinName="A",PinToolTip="A
Float (double-precision)",PinType.PinCategory="real",PinType.PinSubCategory="double",PinType.PinSubCategoryObject=None,PinType.PinSubCategoryMemberReference=(),PinType.PinValueType=(),PinType.ContainerType=None,PinType.bIsReference=False,PinType.bIsConst=False,PinType.bIsWeakPointer=False,PinType.bIsUObjectWrapper=False,PinType.bSerializeAsSinglePrecisionFloat=False,DefaultValue="0.0",AutogeneratedDefaultValue="0.0",LinkedTo=(K2Node_CallFunction_48 CE18A2364B2C0FE93500E8AC4560E2B2,),PersistentGuid=00000000000000000000000000000000,bHidden=False,bNotConnectable=False,bDefaultValueIsReadOnly=False,bDefaultValueIsIgnored=False,bAdvancedView=False,bOrphanedPin=False,)
   CustomProperties Pin (PinId=949AA94B496985E5DC646B9D5D43CD54,PinName="B",PinToolTip="B
Float (double-precision)",PinType.PinCategory="real",PinType.PinSubCategory="double",PinType.PinSubCategoryObject=None,PinType.PinSubCategoryMemberReference=(),PinType.PinValueType=(),PinType.ContainerType=None,PinType.bIsReference=False,PinType.bIsConst=False,PinType.bIsWeakPointer=False,PinType.bIsUObjectWrapper=False,PinType.bSerializeAsSinglePrecisionFloat=False,DefaultValue="25.000000",AutogeneratedDefaultValue="0.0",PersistentGuid=00000000000000000000000000000000,bHidden=False,bNotConnectable=False,bDefaultValueIsReadOnly=False,bDefaultValueIsIgnored=False,bAdvancedView=False,bOrphanedPin=False,)
   CustomProperties Pin (PinId=350EC28D4358A893D05E2B861CE9AD6F,PinName="Alpha",PinToolTip="Alpha
Float (double-precision)",PinType.PinCategory="real",PinType.PinSubCategory="double",PinType.PinSubCategoryObject=None,PinType.PinSubCategoryMemberReference=(),PinType.PinValueType=(),PinType.ContainerType=None,PinType.bIsReference=False,PinType.bIsConst=False,PinType.bIsWeakPointer=False,PinType.bIsUObjectWrapper=False,PinType.bSerializeAsSinglePrecisionFloat=False,DefaultValue="0.0",AutogeneratedDefaultValue="0.0",LinkedTo=(K2Node_Timeline_6 3D7FCC3341330E76CF2B1BBE30BEDC23,),PersistentGuid=00000000000000000000000000000000,bHidden=False,bNotConnectable=False,bDefaultValueIsReadOnly=False,bDefaultValueIsIgnored=False,bAdvancedView=False,bOrphanedPin=False,)
   CustomProperties Pin (PinId=3D1DCC6240151C93630A2AAB2DAB45DE,PinName="ReturnValue",PinToolTip="Return Value
Float (double-precision)

Linearly interpolates between A and B based on Alpha (100% of A when Alpha=0 and 100% of B when Alpha=1)",Direction="EGPD_Output",PinType.PinCategory="real",PinType.PinSubCategory="double",PinType.PinSubCategoryObject=None,PinType.PinSubCategoryMemberReference=(),PinType.PinValueType=(),PinType.ContainerType=None,PinType.bIsReference=False,PinType.bIsConst=False,PinType.bIsWeakPointer=False,PinType.bIsUObjectWrapper=False,PinType.bSerializeAsSinglePrecisionFloat=False,DefaultValue="0.0",AutogeneratedDefaultValue="0.0",LinkedTo=(K2Node_CallFunction_46 94FE6C5A466A3383867BD89DF5F49129,),PersistentGuid=00000000000000000000000000000000,bHidden=False,bNotConnectable=False,bDefaultValueIsReadOnly=False,bDefaultValueIsIgnored=False,bAdvancedView=False,bOrphanedPin=False,)
End Object
Begin Object Class=/Script/BlueprintGraph.K2Node_CallFunction Name="K2Node_CallFunction_48" ExportPath="/Script/BlueprintGraph.K2Node_CallFunction'/Game/CharacterBP.CharacterBP:EventGraph.K2Node_CallFunction_48'"
   FunctionReference=(MemberName="getCameraPosition",MemberGuid=D43A7AD94273A628F99434A644C3E90E,bSelfContext=True)
   NodePosX=608
   NodePosY=496
   ErrorType=3
   NodeGuid=3FBDC3264C056765BFE24DB8E41EFE55
   CustomProperties Pin (PinId=497D2C674F6EFCD464C4369EF74F5FBD,PinName="execute",PinToolTip="
Exec",PinType.PinCategory="exec",PinType.PinSubCategory="",PinType.PinSubCategoryObject=None,PinType.PinSubCategoryMemberReference=(),PinType.PinValueType=(),PinType.ContainerType=None,PinType.bIsReference=False,PinType.bIsConst=False,PinType.bIsWeakPointer=False,PinType.bIsUObjectWrapper=False,PinType.bSerializeAsSinglePrecisionFloat=False,LinkedTo=(K2Node_CallFunction_17 E28762384CC22A0CF74DB28D25048126,K2Node_CustomEvent_1 0F97B6C54C3B7792AAE710B16B26D028,),PersistentGuid=00000000000000000000000000000000,bHidden=False,bNotConnectable=False,bDefaultValueIsReadOnly=False,bDefaultValueIsIgnored=False,bAdvancedView=False,bOrphanedPin=False,)
   CustomProperties Pin (PinId=32C856DD42C9FDCAA537FCB8E9F8D4F0,PinName="then",PinToolTip="
Exec",Direction="EGPD_Output",PinType.PinCategory="exec",PinType.PinSubCategory="",PinType.PinSubCategoryObject=None,PinType.PinSubCategoryMemberReference=(),PinType.PinValueType=(),PinType.ContainerType=None,PinType.bIsReference=False,PinType.bIsConst=False,PinType.bIsWeakPointer=False,PinType.bIsUObjectWrapper=False,PinType.bSerializeAsSinglePrecisionFloat=False,LinkedTo=(K2Node_Timeline_6 D5FA5E0D47F969F39D9E92A50F53FA50,),PersistentGuid=00000000000000000000000000000000,bHidden=False,bNotConnectable=False,bDefaultValueIsReadOnly=False,bDefaultValueIsIgnored=False,bAdvancedView=False,bOrphanedPin=False,)
   CustomProperties Pin (PinId=EB7F918D4E4854B62B920080CED27B38,PinName="self",PinFriendlyName=NSLOCTEXT("K2Node", "Target", "Target"),PinToolTip="Target
Self Object Reference",PinType.PinCategory="object",PinType.PinSubCategory="self",PinType.PinSubCategoryObject=None,PinType.PinSubCategoryMemberReference=(),PinType.PinValueType=(),PinType.ContainerType=None,PinType.bIsReference=False,PinType.bIsConst=False,PinType.bIsWeakPointer=False,PinType.bIsUObjectWrapper=False,PinType.bSerializeAsSinglePrecisionFloat=False,PersistentGuid=00000000000000000000000000000000,bHidden=False,bNotConnectable=False,bDefaultValueIsReadOnly=False,bDefaultValueIsIgnored=False,bAdvancedView=False,bOrphanedPin=False,)
   CustomProperties Pin (PinId=7403A2D9401B34D9A4901896370B7485,PinName="X",PinToolTip="X
Float (double-precision)",Direction="EGPD_Output",PinType.PinCategory="real",PinType.PinSubCategory="double",PinType.PinSubCategoryObject=None,PinType.PinSubCategoryMemberReference=(),PinType.PinValueType=(),PinType.ContainerType=None,PinType.bIsReference=False,PinType.bIsConst=False,PinType.bIsWeakPointer=False,PinType.bIsUObjectWrapper=False,PinType.bSerializeAsSinglePrecisionFloat=False,DefaultValue="0.0",AutogeneratedDefaultValue="0.0",LinkedTo=(K2Node_CallFunction_45 B2CFE2C94684B68192F253B05849E7C6,),PersistentGuid=00000000000000000000000000000000,bHidden=False,bNotConnectable=False,bDefaultValueIsReadOnly=False,bDefaultValueIsIgnored=False,bAdvancedView=False,bOrphanedPin=False,)
   CustomProperties Pin (PinId=89B7F1894DE3271069027EA646AED6D0,PinName="Y",PinToolTip="Y
Float (double-precision)",Direction="EGPD_Output",PinType.PinCategory="real",PinType.PinSubCategory="double",PinType.PinSubCategoryObject=None,PinType.PinSubCategoryMemberReference=(),PinType.PinValueType=(),PinType.ContainerType=None,PinType.bIsReference=False,PinType.bIsConst=False,PinType.bIsWeakPointer=False,PinType.bIsUObjectWrapper=False,PinType.bSerializeAsSinglePrecisionFloat=False,DefaultValue="0.0",AutogeneratedDefaultValue="0.0",PersistentGuid=00000000000000000000000000000000,bHidden=False,bNotConnectable=False,bDefaultValueIsReadOnly=False,bDefaultValueIsIgnored=False,bAdvancedView=False,bOrphanedPin=False,)
   CustomProperties Pin (PinId=CE18A2364B2C0FE93500E8AC4560E2B2,PinName="Z",PinToolTip="Z
Float (double-precision)",Direction="EGPD_Output",PinType.PinCategory="real",PinType.PinSubCategory="double",PinType.PinSubCategoryObject=None,PinType.PinSubCategoryMemberReference=(),PinType.PinValueType=(),PinType.ContainerType=None,PinType.bIsReference=False,PinType.bIsConst=False,PinType.bIsWeakPointer=False,PinType.bIsUObjectWrapper=False,PinType.bSerializeAsSinglePrecisionFloat=False,DefaultValue="0.0",AutogeneratedDefaultValue="0.0",LinkedTo=(K2Node_CallFunction_47 B2CFE2C94684B68192F253B05849E7C6,),PersistentGuid=00000000000000000000000000000000,bHidden=False,bNotConnectable=False,bDefaultValueIsReadOnly=False,bDefaultValueIsIgnored=False,bAdvancedView=False,bOrphanedPin=False,)
End Object
In this example, we interpolate the X and Z values of the current camera position to 130 for the X and 25 for the Z. You can adjust these values to suit your needs and achieve the best visual result.
Additionally, stop any timelines currently running for the camera. This prevents animation clashes when focusing on different parts of the character, such as the chest and legs simultaneously. Create a method to stop timelines for changing the camera position.
   Begin Object Class=/Script/BlueprintGraph.K2Node_FunctionEntry Name="K2Node_FunctionEntry_0" ExportPath="/Script/BlueprintGraph.K2Node_FunctionEntry'/Game/CharacterBP.CharacterBP:stopTimelines.K2Node_FunctionEntry_0'"
   ExtraFlags=201457664
   FunctionReference=(MemberName="stopTimelines")
   bIsEditable=True
   NodePosX=16
   NodePosY=32
   NodeGuid=5A19804443EB383AF06B16A12B892C50
   CustomProperties Pin (PinId=C5CBA5FA41EF12AF4A7E649EC451A9E4,PinName="then",Direction="EGPD_Output",PinType.PinCategory="exec",PinType.PinSubCategory="",PinType.PinSubCategoryObject=None,PinType.PinSubCategoryMemberReference=(),PinType.PinValueType=(),PinType.ContainerType=None,PinType.bIsReference=False,PinType.bIsConst=False,PinType.bIsWeakPointer=False,PinType.bIsUObjectWrapper=False,PinType.bSerializeAsSinglePrecisionFloat=False,LinkedTo=(K2Node_CallFunction_13 57E3133041010445F5D6359E4782FBEA,),PersistentGuid=00000000000000000000000000000000,bHidden=False,bNotConnectable=False,bDefaultValueIsReadOnly=False,bDefaultValueIsIgnored=False,bAdvancedView=False,bOrphanedPin=False,)
End Object
Begin Object Class=/Script/BlueprintGraph.K2Node_VariableGet Name="K2Node_VariableGet_6" ExportPath="/Script/BlueprintGraph.K2Node_VariableGet'/Game/CharacterBP.CharacterBP:stopTimelines.K2Node_VariableGet_6'"
   VariableReference=(MemberName="Timeline_face",bSelfContext=True)
   NodePosX=48
   NodePosY=176
   NodeGuid=A2A38CBF405069F46DF6A1A9A3C27A36
   CustomProperties Pin (PinId=5FB00FE840BCB29B191974ACFBB5C1D5,PinName="Timeline_face",Direction="EGPD_Output",PinType.PinCategory="object",PinType.PinSubCategory="",PinType.PinSubCategoryObject="/Script/CoreUObject.Class'/Script/Engine.TimelineComponent'",PinType.PinSubCategoryMemberReference=(),PinType.PinValueType=(),PinType.ContainerType=None,PinType.bIsReference=False,PinType.bIsConst=False,PinType.bIsWeakPointer=False,PinType.bIsUObjectWrapper=False,PinType.bSerializeAsSinglePrecisionFloat=False,LinkedTo=(K2Node_CallFunction_13 BB79E007465FDE8AF0F7B38B648EA1BC,),PersistentGuid=00000000000000000000000000000000,bHidden=False,bNotConnectable=False,bDefaultValueIsReadOnly=False,bDefaultValueIsIgnored=False,bAdvancedView=False,bOrphanedPin=False,)
   CustomProperties Pin (PinId=8AA026B44AA8198A5565E194BABC9E54,PinName="self",PinFriendlyName=NSLOCTEXT("K2Node", "Target", "Target"),PinType.PinCategory="object",PinType.PinSubCategory="",PinType.PinSubCategoryObject="/Script/Engine.BlueprintGeneratedClass'/Game/CharacterBP.CharacterBP_C'",PinType.PinSubCategoryMemberReference=(),PinType.PinValueType=(),PinType.ContainerType=None,PinType.bIsReference=False,PinType.bIsConst=False,PinType.bIsWeakPointer=False,PinType.bIsUObjectWrapper=False,PinType.bSerializeAsSinglePrecisionFloat=False,PersistentGuid=00000000000000000000000000000000,bHidden=True,bNotConnectable=False,bDefaultValueIsReadOnly=False,bDefaultValueIsIgnored=False,bAdvancedView=False,bOrphanedPin=False,)
End Object
Begin Object Class=/Script/BlueprintGraph.K2Node_CallFunction Name="K2Node_CallFunction_13" ExportPath="/Script/BlueprintGraph.K2Node_CallFunction'/Game/CharacterBP.CharacterBP:stopTimelines.K2Node_CallFunction_13'"
   FunctionReference=(MemberParent="/Script/CoreUObject.Class'/Script/Engine.TimelineComponent'",MemberName="Stop")
   NodePosX=272
   NodePosY=16
   NodeGuid=4DE101084F8636131432C0AF93DD18C7
   CustomProperties Pin (PinId=57E3133041010445F5D6359E4782FBEA,PinName="execute",PinToolTip="
Exec",PinType.PinCategory="exec",PinType.PinSubCategory="",PinType.PinSubCategoryObject=None,PinType.PinSubCategoryMemberReference=(),PinType.PinValueType=(),PinType.ContainerType=None,PinType.bIsReference=False,PinType.bIsConst=False,PinType.bIsWeakPointer=False,PinType.bIsUObjectWrapper=False,PinType.bSerializeAsSinglePrecisionFloat=False,LinkedTo=(K2Node_FunctionEntry_0 C5CBA5FA41EF12AF4A7E649EC451A9E4,),PersistentGuid=00000000000000000000000000000000,bHidden=False,bNotConnectable=False,bDefaultValueIsReadOnly=False,bDefaultValueIsIgnored=False,bAdvancedView=False,bOrphanedPin=False,)
   CustomProperties Pin (PinId=09DB41404A61063B329968988FB267AF,PinName="then",PinToolTip="
Exec",Direction="EGPD_Output",PinType.PinCategory="exec",PinType.PinSubCategory="",PinType.PinSubCategoryObject=None,PinType.PinSubCategoryMemberReference=(),PinType.PinValueType=(),PinType.ContainerType=None,PinType.bIsReference=False,PinType.bIsConst=False,PinType.bIsWeakPointer=False,PinType.bIsUObjectWrapper=False,PinType.bSerializeAsSinglePrecisionFloat=False,LinkedTo=(K2Node_CallFunction_15 9D74CA634F626946EB43B8941B84B71E,),PersistentGuid=00000000000000000000000000000000,bHidden=False,bNotConnectable=False,bDefaultValueIsReadOnly=False,bDefaultValueIsIgnored=False,bAdvancedView=False,bOrphanedPin=False,)
   CustomProperties Pin (PinId=BB79E007465FDE8AF0F7B38B648EA1BC,PinName="self",PinFriendlyName=NSLOCTEXT("K2Node", "Target", "Target"),PinToolTip="Target
Timeline Component Object Reference",PinType.PinCategory="object",PinType.PinSubCategory="",PinType.PinSubCategoryObject="/Script/CoreUObject.Class'/Script/Engine.TimelineComponent'",PinType.PinSubCategoryMemberReference=(),PinType.PinValueType=(),PinType.ContainerType=None,PinType.bIsReference=False,PinType.bIsConst=False,PinType.bIsWeakPointer=False,PinType.bIsUObjectWrapper=False,PinType.bSerializeAsSinglePrecisionFloat=False,LinkedTo=(K2Node_VariableGet_6 5FB00FE840BCB29B191974ACFBB5C1D5,),PersistentGuid=00000000000000000000000000000000,bHidden=False,bNotConnectable=False,bDefaultValueIsReadOnly=False,bDefaultValueIsIgnored=False,bAdvancedView=False,bOrphanedPin=False,)
End Object
Begin Object Class=/Script/BlueprintGraph.K2Node_VariableGet Name="K2Node_VariableGet_7" ExportPath="/Script/BlueprintGraph.K2Node_VariableGet'/Game/CharacterBP.CharacterBP:stopTimelines.K2Node_VariableGet_7'"
   VariableReference=(MemberName="Timeline_legs",bSelfContext=True)
   NodePosX=320
   NodePosY=192
   NodeGuid=47565AAE4C5666BE83CBDFB0A7D7B8EC
   CustomProperties Pin (PinId=512B49064112A3A6D5E03B8987C53BA9,PinName="Timeline_legs",Direction="EGPD_Output",PinType.PinCategory="object",PinType.PinSubCategory="",PinType.PinSubCategoryObject="/Script/CoreUObject.Class'/Script/Engine.TimelineComponent'",PinType.PinSubCategoryMemberReference=(),PinType.PinValueType=(),PinType.ContainerType=None,PinType.bIsReference=False,PinType.bIsConst=False,PinType.bIsWeakPointer=False,PinType.bIsUObjectWrapper=False,PinType.bSerializeAsSinglePrecisionFloat=False,LinkedTo=(K2Node_CallFunction_15 F8F52B1649C28C29BE750B9E454B41E8,),PersistentGuid=00000000000000000000000000000000,bHidden=False,bNotConnectable=False,bDefaultValueIsReadOnly=False,bDefaultValueIsIgnored=False,bAdvancedView=False,bOrphanedPin=False,)
   CustomProperties Pin (PinId=0A5A9E394226FCD124439085B89AB4B8,PinName="self",PinFriendlyName=NSLOCTEXT("K2Node", "Target", "Target"),PinType.PinCategory="object",PinType.PinSubCategory="",PinType.PinSubCategoryObject="/Script/Engine.BlueprintGeneratedClass'/Game/CharacterBP.CharacterBP_C'",PinType.PinSubCategoryMemberReference=(),PinType.PinValueType=(),PinType.ContainerType=None,PinType.bIsReference=False,PinType.bIsConst=False,PinType.bIsWeakPointer=False,PinType.bIsUObjectWrapper=False,PinType.bSerializeAsSinglePrecisionFloat=False,PersistentGuid=00000000000000000000000000000000,bHidden=True,bNotConnectable=False,bDefaultValueIsReadOnly=False,bDefaultValueIsIgnored=False,bAdvancedView=False,bOrphanedPin=False,)
End Object
Begin Object Class=/Script/BlueprintGraph.K2Node_CallFunction Name="K2Node_CallFunction_15" ExportPath="/Script/BlueprintGraph.K2Node_CallFunction'/Game/CharacterBP.CharacterBP:stopTimelines.K2Node_CallFunction_15'"
   FunctionReference=(MemberParent="/Script/CoreUObject.Class'/Script/Engine.TimelineComponent'",MemberName="Stop")
   NodePosX=560
   NodePosY=16
   NodeGuid=71E9ADB84596A7DEF1B0B09B3849CDC7
   CustomProperties Pin (PinId=9D74CA634F626946EB43B8941B84B71E,PinName="execute",PinType.PinCategory="exec",PinType.PinSubCategory="",PinType.PinSubCategoryObject=None,PinType.PinSubCategoryMemberReference=(),PinType.PinValueType=(),PinType.ContainerType=None,PinType.bIsReference=False,PinType.bIsConst=False,PinType.bIsWeakPointer=False,PinType.bIsUObjectWrapper=False,PinType.bSerializeAsSinglePrecisionFloat=False,LinkedTo=(K2Node_CallFunction_13 09DB41404A61063B329968988FB267AF,),PersistentGuid=00000000000000000000000000000000,bHidden=False,bNotConnectable=False,bDefaultValueIsReadOnly=False,bDefaultValueIsIgnored=False,bAdvancedView=False,bOrphanedPin=False,)
   CustomProperties Pin (PinId=8B92A7AE40DE830FB37F768E6A47FA27,PinName="then",Direction="EGPD_Output",PinType.PinCategory="exec",PinType.PinSubCategory="",PinType.PinSubCategoryObject=None,PinType.PinSubCategoryMemberReference=(),PinType.PinValueType=(),PinType.ContainerType=None,PinType.bIsReference=False,PinType.bIsConst=False,PinType.bIsWeakPointer=False,PinType.bIsUObjectWrapper=False,PinType.bSerializeAsSinglePrecisionFloat=False,LinkedTo=(K2Node_CallFunction_0 EBD2605F4FDF67910361B097D33D21E1,),PersistentGuid=00000000000000000000000000000000,bHidden=False,bNotConnectable=False,bDefaultValueIsReadOnly=False,bDefaultValueIsIgnored=False,bAdvancedView=False,bOrphanedPin=False,)
   CustomProperties Pin (PinId=F8F52B1649C28C29BE750B9E454B41E8,PinName="self",PinFriendlyName=NSLOCTEXT("K2Node", "Target", "Target"),PinType.PinCategory="object",PinType.PinSubCategory="",PinType.PinSubCategoryObject="/Script/CoreUObject.Class'/Script/Engine.TimelineComponent'",PinType.PinSubCategoryMemberReference=(),PinType.PinValueType=(),PinType.ContainerType=None,PinType.bIsReference=False,PinType.bIsConst=False,PinType.bIsWeakPointer=False,PinType.bIsUObjectWrapper=False,PinType.bSerializeAsSinglePrecisionFloat=False,LinkedTo=(K2Node_VariableGet_7 512B49064112A3A6D5E03B8987C53BA9,),PersistentGuid=00000000000000000000000000000000,bHidden=False,bNotConnectable=False,bDefaultValueIsReadOnly=False,bDefaultValueIsIgnored=False,bAdvancedView=False,bOrphanedPin=False,)
End Object
Begin Object Class=/Script/BlueprintGraph.K2Node_CallFunction Name="K2Node_CallFunction_0" ExportPath="/Script/BlueprintGraph.K2Node_CallFunction'/Game/CharacterBP.CharacterBP:stopTimelines.K2Node_CallFunction_0'"
   FunctionReference=(MemberParent="/Script/CoreUObject.Class'/Script/Engine.TimelineComponent'",MemberName="Stop")
   NodePosX=848
   NodePosY=16
   NodeGuid=55D9B5A240C67CE1D866259498611B30
   CustomProperties Pin (PinId=EBD2605F4FDF67910361B097D33D21E1,PinName="execute",PinType.PinCategory="exec",PinType.PinSubCategory="",PinType.PinSubCategoryObject=None,PinType.PinSubCategoryMemberReference=(),PinType.PinValueType=(),PinType.ContainerType=None,PinType.bIsReference=False,PinType.bIsConst=False,PinType.bIsWeakPointer=False,PinType.bIsUObjectWrapper=False,PinType.bSerializeAsSinglePrecisionFloat=False,LinkedTo=(K2Node_CallFunction_15 8B92A7AE40DE830FB37F768E6A47FA27,),PersistentGuid=00000000000000000000000000000000,bHidden=False,bNotConnectable=False,bDefaultValueIsReadOnly=False,bDefaultValueIsIgnored=False,bAdvancedView=False,bOrphanedPin=False,)
   CustomProperties Pin (PinId=6AD8C34A4C87195358802E989D950DFF,PinName="then",Direction="EGPD_Output",PinType.PinCategory="exec",PinType.PinSubCategory="",PinType.PinSubCategoryObject=None,PinType.PinSubCategoryMemberReference=(),PinType.PinValueType=(),PinType.ContainerType=None,PinType.bIsReference=False,PinType.bIsConst=False,PinType.bIsWeakPointer=False,PinType.bIsUObjectWrapper=False,PinType.bSerializeAsSinglePrecisionFloat=False,LinkedTo=(K2Node_CallFunction_1 79405A2647E20E35918E06B339830278,),PersistentGuid=00000000000000000000000000000000,bHidden=False,bNotConnectable=False,bDefaultValueIsReadOnly=False,bDefaultValueIsIgnored=False,bAdvancedView=False,bOrphanedPin=False,)
   CustomProperties Pin (PinId=F056205E4F77E8098893EE89F50C5F48,PinName="self",PinFriendlyName=NSLOCTEXT("K2Node", "Target", "Target"),PinType.PinCategory="object",PinType.PinSubCategory="",PinType.PinSubCategoryObject="/Script/CoreUObject.Class'/Script/Engine.TimelineComponent'",PinType.PinSubCategoryMemberReference=(),PinType.PinValueType=(),PinType.ContainerType=None,PinType.bIsReference=False,PinType.bIsConst=False,PinType.bIsWeakPointer=False,PinType.bIsUObjectWrapper=False,PinType.bSerializeAsSinglePrecisionFloat=False,LinkedTo=(K2Node_VariableGet_0 92BA3DBF4122A0A413AC69A1CDD8F4F5,),PersistentGuid=00000000000000000000000000000000,bHidden=False,bNotConnectable=False,bDefaultValueIsReadOnly=False,bDefaultValueIsIgnored=False,bAdvancedView=False,bOrphanedPin=False,)
End Object
Begin Object Class=/Script/BlueprintGraph.K2Node_VariableGet Name="K2Node_VariableGet_0" ExportPath="/Script/BlueprintGraph.K2Node_VariableGet'/Game/CharacterBP.CharacterBP:stopTimelines.K2Node_VariableGet_0'"
   VariableReference=(MemberName="Timeline_chest",bSelfContext=True)
   NodePosX=672
   NodePosY=224
   NodeGuid=191E87394C32EC0ACAC34FADD0884861
   CustomProperties Pin (PinId=92BA3DBF4122A0A413AC69A1CDD8F4F5,PinName="Timeline_chest",Direction="EGPD_Output",PinType.PinCategory="object",PinType.PinSubCategory="",PinType.PinSubCategoryObject="/Script/CoreUObject.Class'/Script/Engine.TimelineComponent'",PinType.PinSubCategoryMemberReference=(),PinType.PinValueType=(),PinType.ContainerType=None,PinType.bIsReference=False,PinType.bIsConst=False,PinType.bIsWeakPointer=False,PinType.bIsUObjectWrapper=False,PinType.bSerializeAsSinglePrecisionFloat=False,LinkedTo=(K2Node_CallFunction_0 F056205E4F77E8098893EE89F50C5F48,),PersistentGuid=00000000000000000000000000000000,bHidden=False,bNotConnectable=False,bDefaultValueIsReadOnly=False,bDefaultValueIsIgnored=False,bAdvancedView=False,bOrphanedPin=False,)
   CustomProperties Pin (PinId=F186CAA14C742D155E30B6A188217F42,PinName="self",PinFriendlyName=NSLOCTEXT("K2Node", "Target", "Target"),PinType.PinCategory="object",PinType.PinSubCategory="",PinType.PinSubCategoryObject="/Script/Engine.BlueprintGeneratedClass'/Game/CharacterBP.CharacterBP_C'",PinType.PinSubCategoryMemberReference=(),PinType.PinValueType=(),PinType.ContainerType=None,PinType.bIsReference=False,PinType.bIsConst=False,PinType.bIsWeakPointer=False,PinType.bIsUObjectWrapper=False,PinType.bSerializeAsSinglePrecisionFloat=False,PersistentGuid=00000000000000000000000000000000,bHidden=True,bNotConnectable=False,bDefaultValueIsReadOnly=False,bDefaultValueIsIgnored=False,bAdvancedView=False,bOrphanedPin=False,)
End Object
Begin Object Class=/Script/BlueprintGraph.K2Node_CallFunction Name="K2Node_CallFunction_1" ExportPath="/Script/BlueprintGraph.K2Node_CallFunction'/Game/CharacterBP.CharacterBP:stopTimelines.K2Node_CallFunction_1'"
   FunctionReference=(MemberParent="/Script/CoreUObject.Class'/Script/Engine.TimelineComponent'",MemberName="Stop")
   NodePosX=1168
   NodePosY=16
   NodeGuid=7086C5484FC233BAA0E035BC5926F368
   CustomProperties Pin (PinId=79405A2647E20E35918E06B339830278,PinName="execute",PinType.PinCategory="exec",PinType.PinSubCategory="",PinType.PinSubCategoryObject=None,PinType.PinSubCategoryMemberReference=(),PinType.PinValueType=(),PinType.ContainerType=None,PinType.bIsReference=False,PinType.bIsConst=False,PinType.bIsWeakPointer=False,PinType.bIsUObjectWrapper=False,PinType.bSerializeAsSinglePrecisionFloat=False,LinkedTo=(K2Node_CallFunction_0 6AD8C34A4C87195358802E989D950DFF,),PersistentGuid=00000000000000000000000000000000,bHidden=False,bNotConnectable=False,bDefaultValueIsReadOnly=False,bDefaultValueIsIgnored=False,bAdvancedView=False,bOrphanedPin=False,)
   CustomProperties Pin (PinId=323507674235CD3FBE73EE93968316F1,PinName="then",Direction="EGPD_Output",PinType.PinCategory="exec",PinType.PinSubCategory="",PinType.PinSubCategoryObject=None,PinType.PinSubCategoryMemberReference=(),PinType.PinValueType=(),PinType.ContainerType=None,PinType.bIsReference=False,PinType.bIsConst=False,PinType.bIsWeakPointer=False,PinType.bIsUObjectWrapper=False,PinType.bSerializeAsSinglePrecisionFloat=False,PersistentGuid=00000000000000000000000000000000,bHidden=False,bNotConnectable=False,bDefaultValueIsReadOnly=False,bDefaultValueIsIgnored=False,bAdvancedView=False,bOrphanedPin=False,)
   CustomProperties Pin (PinId=ED9FF1FB49A7C52843DCACA554B10091,PinName="self",PinFriendlyName=NSLOCTEXT("K2Node", "Target", "Target"),PinType.PinCategory="object",PinType.PinSubCategory="",PinType.PinSubCategoryObject="/Script/CoreUObject.Class'/Script/Engine.TimelineComponent'",PinType.PinSubCategoryMemberReference=(),PinType.PinValueType=(),PinType.ContainerType=None,PinType.bIsReference=False,PinType.bIsConst=False,PinType.bIsWeakPointer=False,PinType.bIsUObjectWrapper=False,PinType.bSerializeAsSinglePrecisionFloat=False,LinkedTo=(K2Node_VariableGet_1 3B695E6E4F180F9E905CE5A308484AE0,),PersistentGuid=00000000000000000000000000000000,bHidden=False,bNotConnectable=False,bDefaultValueIsReadOnly=False,bDefaultValueIsIgnored=False,bAdvancedView=False,bOrphanedPin=False,)
End Object
Begin Object Class=/Script/BlueprintGraph.K2Node_VariableGet Name="K2Node_VariableGet_1" ExportPath="/Script/BlueprintGraph.K2Node_VariableGet'/Game/CharacterBP.CharacterBP:stopTimelines.K2Node_VariableGet_1'"
   VariableReference=(MemberName="Timeline_initial",bSelfContext=True)
   NodePosX=976
   NodePosY=208
   NodeGuid=0F4B204E44C14C74C2FAD192D3232AAA
   CustomProperties Pin (PinId=3B695E6E4F180F9E905CE5A308484AE0,PinName="Timeline_initial",Direction="EGPD_Output",PinType.PinCategory="object",PinType.PinSubCategory="",PinType.PinSubCategoryObject="/Script/CoreUObject.Class'/Script/Engine.TimelineComponent'",PinType.PinSubCategoryMemberReference=(),PinType.PinValueType=(),PinType.ContainerType=None,PinType.bIsReference=False,PinType.bIsConst=False,PinType.bIsWeakPointer=False,PinType.bIsUObjectWrapper=False,PinType.bSerializeAsSinglePrecisionFloat=False,LinkedTo=(K2Node_CallFunction_1 ED9FF1FB49A7C52843DCACA554B10091,),PersistentGuid=00000000000000000000000000000000,bHidden=False,bNotConnectable=False,bDefaultValueIsReadOnly=False,bDefaultValueIsIgnored=False,bAdvancedView=False,bOrphanedPin=False,)
   CustomProperties Pin (PinId=105D9035487328C6DC3FC393C6C0CD2F,PinName="self",PinFriendlyName=NSLOCTEXT("K2Node", "Target", "Target"),PinType.PinCategory="object",PinType.PinSubCategory="",PinType.PinSubCategoryObject="/Script/Engine.BlueprintGeneratedClass'/Game/CharacterBP.CharacterBP_C'",PinType.PinSubCategoryMemberReference=(),PinType.PinValueType=(),PinType.ContainerType=None,PinType.bIsReference=False,PinType.bIsConst=False,PinType.bIsWeakPointer=False,PinType.bIsUObjectWrapper=False,PinType.bSerializeAsSinglePrecisionFloat=False,PersistentGuid=00000000000000000000000000000000,bHidden=True,bNotConnectable=False,bDefaultValueIsReadOnly=False,bDefaultValueIsIgnored=False,bAdvancedView=False,bOrphanedPin=False,)
End Object
Here, Timeline Face, Timeline Legs, Timeline Chest, and Timeline Initial are references to the timelines that need to be stopped.
Summarizing all these steps, the blueprint for CharacterBP will look like this:
   Begin Object Class=/Script/BlueprintGraph.K2Node_Event Name="K2Node_Event_0" ExportPath="/Script/BlueprintGraph.K2Node_Event'/Game/CharacterBP.CharacterBP:EventGraph.K2Node_Event_0'"
   EventReference=(MemberParent="/Script/CoreUObject.Class'/Script/Engine.Actor'",MemberName="ReceiveBeginPlay")
   bOverrideFunction=True
   NodePosX=-448
   NodePosY=-16
   bCommentBubblePinned=True
   NodeGuid=556FD8FC48149DCE0E18328C42CA57DC
   CustomProperties Pin (PinId=DE690A9F44A7126164E61FA2506D4B48,PinName="OutputDelegate",Direction="EGPD_Output",PinType.PinCategory="delegate",PinType.PinSubCategory="",PinType.PinSubCategoryObject=None,PinType.PinSubCategoryMemberReference=(MemberParent="/Script/CoreUObject.Class'/Script/Engine.Actor'",MemberName="ReceiveBeginPlay"),PinType.PinValueType=(),PinType.ContainerType=None,PinType.bIsReference=False,PinType.bIsConst=False,PinType.bIsWeakPointer=False,PinType.bIsUObjectWrapper=False,PinType.bSerializeAsSinglePrecisionFloat=False,PersistentGuid=00000000000000000000000000000000,bHidden=False,bNotConnectable=False,bDefaultValueIsReadOnly=False,bDefaultValueIsIgnored=False,bAdvancedView=False,bOrphanedPin=False,)
   CustomProperties Pin (PinId=1E50F67642D04E8252DD92936292CA6E,PinName="then",Direction="EGPD_Output",PinType.PinCategory="exec",PinType.PinSubCategory="",PinType.PinSubCategoryObject=None,PinType.PinSubCategoryMemberReference=(),PinType.PinValueType=(),PinType.ContainerType=None,PinType.bIsReference=False,PinType.bIsConst=False,PinType.bIsWeakPointer=False,PinType.bIsUObjectWrapper=False,PinType.bSerializeAsSinglePrecisionFloat=False,LinkedTo=(K2Node_CallFunction_0 AE5650D2417A8C50D560B4B28959837C,),PersistentGuid=00000000000000000000000000000000,bHidden=False,bNotConnectable=False,bDefaultValueIsReadOnly=False,bDefaultValueIsIgnored=False,bAdvancedView=False,bOrphanedPin=False,)
End Object
Begin Object Class=/Script/BlueprintGraph.K2Node_CallFunction Name="K2Node_CallFunction_0" ExportPath="/Script/BlueprintGraph.K2Node_CallFunction'/Game/CharacterBP.CharacterBP:EventGraph.K2Node_CallFunction_0'"
   FunctionReference=(MemberParent="/Script/CoreUObject.Class'/Script/Engine.SceneCaptureComponent'",MemberName="ShowOnlyActorComponents")
   NodePosX=224
   NodePosY=-32
   NodeGuid=9EC527424C222FBCA4C2D886E491B67F
   CustomProperties Pin (PinId=AE5650D2417A8C50D560B4B28959837C,PinName="execute",PinToolTip="
Exec",PinType.PinCategory="exec",PinType.PinSubCategory="",PinType.PinSubCategoryObject=None,PinType.PinSubCategoryMemberReference=(),PinType.PinValueType=(),PinType.ContainerType=None,PinType.bIsReference=False,PinType.bIsConst=False,PinType.bIsWeakPointer=False,PinType.bIsUObjectWrapper=False,PinType.bSerializeAsSinglePrecisionFloat=False,LinkedTo=(K2Node_Event_0 1E50F67642D04E8252DD92936292CA6E,),PersistentGuid=00000000000000000000000000000000,bHidden=False,bNotConnectable=False,bDefaultValueIsReadOnly=False,bDefaultValueIsIgnored=False,bAdvancedView=False,bOrphanedPin=False,)
   CustomProperties Pin (PinId=C9627ED047925BE492C2ED8292875066,PinName="then",PinToolTip="
Exec",Direction="EGPD_Output",PinType.PinCategory="exec",PinType.PinSubCategory="",PinType.PinSubCategoryObject=None,PinType.PinSubCategoryMemberReference=(),PinType.PinValueType=(),PinType.ContainerType=None,PinType.bIsReference=False,PinType.bIsConst=False,PinType.bIsWeakPointer=False,PinType.bIsUObjectWrapper=False,PinType.bSerializeAsSinglePrecisionFloat=False,LinkedTo=(K2Node_DynamicCast_0 917AEA744E9924FE476F658EEB5D7CB4,),PersistentGuid=00000000000000000000000000000000,bHidden=False,bNotConnectable=False,bDefaultValueIsReadOnly=False,bDefaultValueIsIgnored=False,bAdvancedView=False,bOrphanedPin=False,)
   CustomProperties Pin (PinId=87E3D0114071A6FE13B2CABFA68DF9E7,PinName="self",PinFriendlyName=NSLOCTEXT("K2Node", "Target", "Target"),PinToolTip="Target
Scene Capture Component Object Reference",PinType.PinCategory="object",PinType.PinSubCategory="",PinType.PinSubCategoryObject="/Script/CoreUObject.Class'/Script/Engine.SceneCaptureComponent'",PinType.PinSubCategoryMemberReference=(),PinType.PinValueType=(),PinType.ContainerType=None,PinType.bIsReference=False,PinType.bIsConst=False,PinType.bIsWeakPointer=False,PinType.bIsUObjectWrapper=False,PinType.bSerializeAsSinglePrecisionFloat=False,LinkedTo=(K2Node_VariableGet_2 B6D3084848ADCD11A0F678954B203751,),PersistentGuid=00000000000000000000000000000000,bHidden=False,bNotConnectable=False,bDefaultValueIsReadOnly=False,bDefaultValueIsIgnored=False,bAdvancedView=False,bOrphanedPin=False,)
   CustomProperties Pin (PinId=2ADD996D4EEAA620918A22AEF45AEE71,PinName="InActor",PinToolTip="In Actor
Actor Object Reference",PinType.PinCategory="object",PinType.PinSubCategory="",PinType.PinSubCategoryObject="/Script/CoreUObject.Class'/Script/Engine.Actor'",PinType.PinSubCategoryMemberReference=(),PinType.PinValueType=(),PinType.ContainerType=None,PinType.bIsReference=False,PinType.bIsConst=False,PinType.bIsWeakPointer=False,PinType.bIsUObjectWrapper=False,PinType.bSerializeAsSinglePrecisionFloat=False,LinkedTo=(K2Node_Self_0 206DD01948DB5054C00502935796BC9E,),PersistentGuid=00000000000000000000000000000000,bHidden=False,bNotConnectable=False,bDefaultValueIsReadOnly=False,bDefaultValueIsIgnored=False,bAdvancedView=False,bOrphanedPin=False,)
   CustomProperties Pin (PinId=B11F0D08450A5F29957215B5A9C1CB71,PinName="bIncludeFromChildActors",PinToolTip="Include from Child Actors
Boolean

Whether to include the components from child actors",PinType.PinCategory="bool",PinType.PinSubCategory="",PinType.PinSubCategoryObject=None,PinType.PinSubCategoryMemberReference=(),PinType.PinValueType=(),PinType.ContainerType=None,PinType.bIsReference=False,PinType.bIsConst=True,PinType.bIsWeakPointer=False,PinType.bIsUObjectWrapper=False,PinType.bSerializeAsSinglePrecisionFloat=False,DefaultValue="true",AutogeneratedDefaultValue="false",PersistentGuid=00000000000000000000000000000000,bHidden=False,bNotConnectable=False,bDefaultValueIsReadOnly=False,bDefaultValueIsIgnored=False,bAdvancedView=False,bOrphanedPin=False,)
End Object
Begin Object Class=/Script/BlueprintGraph.K2Node_VariableGet Name="K2Node_VariableGet_2" ExportPath="/Script/BlueprintGraph.K2Node_VariableGet'/Game/CharacterBP.CharacterBP:EventGraph.K2Node_VariableGet_2'"
   VariableReference=(MemberName="SceneCaptureComponent2D",bSelfContext=True)
   NodePosX=-144
   NodePosY=-144
   NodeGuid=C73DA14645D60EEA26E6999982C1C911
   CustomProperties Pin (PinId=B6D3084848ADCD11A0F678954B203751,PinName="SceneCaptureComponent2D",Direction="EGPD_Output",PinType.PinCategory="object",PinType.PinSubCategory="",PinType.PinSubCategoryObject="/Script/CoreUObject.Class'/Script/Engine.SceneCaptureComponent2D'",PinType.PinSubCategoryMemberReference=(),PinType.PinValueType=(),PinType.ContainerType=None,PinType.bIsReference=False,PinType.bIsConst=False,PinType.bIsWeakPointer=False,PinType.bIsUObjectWrapper=False,PinType.bSerializeAsSinglePrecisionFloat=False,LinkedTo=(K2Node_CallFunction_0 87E3D0114071A6FE13B2CABFA68DF9E7,),PersistentGuid=00000000000000000000000000000000,bHidden=False,bNotConnectable=False,bDefaultValueIsReadOnly=False,bDefaultValueIsIgnored=False,bAdvancedView=False,bOrphanedPin=False,)
   CustomProperties Pin (PinId=B302890A489CD4A645B34B81E0643E3F,PinName="self",PinFriendlyName=NSLOCTEXT("K2Node", "Target", "Target"),PinType.PinCategory="object",PinType.PinSubCategory="",PinType.PinSubCategoryObject="/Script/Engine.BlueprintGeneratedClass'/Game/CharacterBP.CharacterBP_C'",PinType.PinSubCategoryMemberReference=(),PinType.PinValueType=(),PinType.ContainerType=None,PinType.bIsReference=False,PinType.bIsConst=False,PinType.bIsWeakPointer=False,PinType.bIsUObjectWrapper=False,PinType.bSerializeAsSinglePrecisionFloat=False,PersistentGuid=00000000000000000000000000000000,bHidden=True,bNotConnectable=False,bDefaultValueIsReadOnly=False,bDefaultValueIsIgnored=False,bAdvancedView=False,bOrphanedPin=False,)
End Object
Begin Object Class=/Script/BlueprintGraph.K2Node_Self Name="K2Node_Self_0" ExportPath="/Script/BlueprintGraph.K2Node_Self'/Game/CharacterBP.CharacterBP:EventGraph.K2Node_Self_0'"
   NodePosX=-208
   NodePosY=160
   NodeGuid=51383A5F461E67DA040831A569212049
   CustomProperties Pin (PinId=206DD01948DB5054C00502935796BC9E,PinName="self",Direction="EGPD_Output",PinType.PinCategory="object",PinType.PinSubCategory="self",PinType.PinSubCategoryObject=None,PinType.PinSubCategoryMemberReference=(),PinType.PinValueType=(),PinType.ContainerType=None,PinType.bIsReference=False,PinType.bIsConst=False,PinType.bIsWeakPointer=False,PinType.bIsUObjectWrapper=False,PinType.bSerializeAsSinglePrecisionFloat=False,LinkedTo=(K2Node_CallFunction_0 2ADD996D4EEAA620918A22AEF45AEE71,),PersistentGuid=00000000000000000000000000000000,bHidden=False,bNotConnectable=False,bDefaultValueIsReadOnly=False,bDefaultValueIsIgnored=False,bAdvancedView=False,bOrphanedPin=False,)
End Object
Begin Object Class=/Script/BlueprintGraph.K2Node_CallFunction Name="K2Node_CallFunction_10" ExportPath="/Script/BlueprintGraph.K2Node_CallFunction'/Game/CharacterBP.CharacterBP:EventGraph.K2Node_CallFunction_10'"
   bIsPureFunc=True
   FunctionReference=(MemberParent="/Script/CoreUObject.Class'/Script/Engine.GameplayStatics'",MemberName="GetPlayerController")
   NodePosX=176
   NodePosY=240
   NodeGuid=3A2A4E0045AA45470631729AB3EC59AB
   CustomProperties Pin (PinId=F117EB0A4FD45EBD3601DDB6061ABE59,PinName="self",PinFriendlyName=NSLOCTEXT("K2Node", "Target", "Target"),PinToolTip="Target
Gameplay Statics Object Reference",PinType.PinCategory="object",PinType.PinSubCategory="",PinType.PinSubCategoryObject="/Script/CoreUObject.Class'/Script/Engine.GameplayStatics'",PinType.PinSubCategoryMemberReference=(),PinType.PinValueType=(),PinType.ContainerType=None,PinType.bIsReference=False,PinType.bIsConst=False,PinType.bIsWeakPointer=False,PinType.bIsUObjectWrapper=False,PinType.bSerializeAsSinglePrecisionFloat=False,DefaultObject="/Script/Engine.Default__GameplayStatics",PersistentGuid=00000000000000000000000000000000,bHidden=True,bNotConnectable=False,bDefaultValueIsReadOnly=False,bDefaultValueIsIgnored=False,bAdvancedView=False,bOrphanedPin=False,)
   CustomProperties Pin (PinId=8CDB63A04646D207AD130089E12AFCAA,PinName="WorldContextObject",PinToolTip="World Context Object
Object Reference",PinType.PinCategory="object",PinType.PinSubCategory="",PinType.PinSubCategoryObject="/Script/CoreUObject.Class'/Script/CoreUObject.Object'",PinType.PinSubCategoryMemberReference=(),PinType.PinValueType=(),PinType.ContainerType=None,PinType.bIsReference=False,PinType.bIsConst=True,PinType.bIsWeakPointer=False,PinType.bIsUObjectWrapper=False,PinType.bSerializeAsSinglePrecisionFloat=False,PersistentGuid=00000000000000000000000000000000,bHidden=True,bNotConnectable=False,bDefaultValueIsReadOnly=False,bDefaultValueIsIgnored=False,bAdvancedView=False,bOrphanedPin=False,)
   CustomProperties Pin (PinId=3662A1674A8D10633D499F9F05684A41,PinName="PlayerIndex",PinToolTip="Player Index
Integer

Index in the player controller list, starting first with local players and then available remote ones",PinType.PinCategory="int",PinType.PinSubCategory="",PinType.PinSubCategoryObject=None,PinType.PinSubCategoryMemberReference=(),PinType.PinValueType=(),PinType.ContainerType=None,PinType.bIsReference=False,PinType.bIsConst=False,PinType.bIsWeakPointer=False,PinType.bIsUObjectWrapper=False,PinType.bSerializeAsSinglePrecisionFloat=False,DefaultValue="0",AutogeneratedDefaultValue="0",PersistentGuid=00000000000000000000000000000000,bHidden=False,bNotConnectable=False,bDefaultValueIsReadOnly=False,bDefaultValueIsIgnored=False,bAdvancedView=False,bOrphanedPin=False,)
   CustomProperties Pin (PinId=C91D6ACE4EE3439E1866C9A04A8C217D,PinName="ReturnValue",PinToolTip="Return Value
Player Controller Object Reference",Direction="EGPD_Output",PinType.PinCategory="object",PinType.PinSubCategory="",PinType.PinSubCategoryObject="/Script/CoreUObject.Class'/Script/Engine.PlayerController'",PinType.PinSubCategoryMemberReference=(),PinType.PinValueType=(),PinType.ContainerType=None,PinType.bIsReference=False,PinType.bIsConst=False,PinType.bIsWeakPointer=False,PinType.bIsUObjectWrapper=False,PinType.bSerializeAsSinglePrecisionFloat=False,LinkedTo=(K2Node_CallFunction_12 D2DC0FF449ABEC29AC0CFBA7D7D00624,),PersistentGuid=00000000000000000000000000000000,bHidden=False,bNotConnectable=False,bDefaultValueIsReadOnly=False,bDefaultValueIsIgnored=False,bAdvancedView=False,bOrphanedPin=False,)
End Object
Begin Object Class=/Script/BlueprintGraph.K2Node_CallFunction Name="K2Node_CallFunction_12" ExportPath="/Script/BlueprintGraph.K2Node_CallFunction'/Game/CharacterBP.CharacterBP:EventGraph.K2Node_CallFunction_12'"
   bIsPureFunc=True
   bIsConstFunc=True
   FunctionReference=(MemberParent="/Script/CoreUObject.Class'/Script/Engine.PlayerController'",MemberName="GetHUD")
   NodePosX=512
   NodePosY=224
   NodeGuid=4F3420234B792BDC96CC7D8F9ABD0685
   CustomProperties Pin (PinId=D2DC0FF449ABEC29AC0CFBA7D7D00624,PinName="self",PinFriendlyName=NSLOCTEXT("K2Node", "Target", "Target"),PinToolTip="Target
Player Controller Object Reference",PinType.PinCategory="object",PinType.PinSubCategory="",PinType.PinSubCategoryObject="/Script/CoreUObject.Class'/Script/Engine.PlayerController'",PinType.PinSubCategoryMemberReference=(),PinType.PinValueType=(),PinType.ContainerType=None,PinType.bIsReference=False,PinType.bIsConst=False,PinType.bIsWeakPointer=False,PinType.bIsUObjectWrapper=False,PinType.bSerializeAsSinglePrecisionFloat=False,LinkedTo=(K2Node_CallFunction_10 C91D6ACE4EE3439E1866C9A04A8C217D,),PersistentGuid=00000000000000000000000000000000,bHidden=False,bNotConnectable=False,bDefaultValueIsReadOnly=False,bDefaultValueIsIgnored=False,bAdvancedView=False,bOrphanedPin=False,)
   CustomProperties Pin (PinId=6F33D0C3438E65764913DFA57CE7273C,PinName="ReturnValue",PinToolTip="Return Value
HUD Object Reference

Gets the HUD currently being used by this player controller",Direction="EGPD_Output",PinType.PinCategory="object",PinType.PinSubCategory="",PinType.PinSubCategoryObject="/Script/CoreUObject.Class'/Script/Engine.HUD'",PinType.PinSubCategoryMemberReference=(),PinType.PinValueType=(),PinType.ContainerType=None,PinType.bIsReference=False,PinType.bIsConst=False,PinType.bIsWeakPointer=False,PinType.bIsUObjectWrapper=False,PinType.bSerializeAsSinglePrecisionFloat=False,LinkedTo=(K2Node_DynamicCast_0 3C9251E64E92FB5B79E42283A62168A8,),PersistentGuid=00000000000000000000000000000000,bHidden=False,bNotConnectable=False,bDefaultValueIsReadOnly=False,bDefaultValueIsIgnored=False,bAdvancedView=False,bOrphanedPin=False,)
End Object
Begin Object Class=/Script/BlueprintGraph.K2Node_DynamicCast Name="K2Node_DynamicCast_0" ExportPath="/Script/BlueprintGraph.K2Node_DynamicCast'/Game/CharacterBP.CharacterBP:EventGraph.K2Node_DynamicCast_0'"
   TargetType="/Script/CoreUObject.Class'/Script/CohtmlPlugin.CohtmlGameHUD'"
   NodePosX=912
   NodePosY=-16
   ErrorType=3
   NodeGuid=6252AAF84923A9DC7EEE4EA2AD96AF54
   CustomProperties Pin (PinId=917AEA744E9924FE476F658EEB5D7CB4,PinName="execute",PinType.PinCategory="exec",PinType.PinSubCategory="",PinType.PinSubCategoryObject=None,PinType.PinSubCategoryMemberReference=(),PinType.PinValueType=(),PinType.ContainerType=None,PinType.bIsReference=False,PinType.bIsConst=False,PinType.bIsWeakPointer=False,PinType.bIsUObjectWrapper=False,PinType.bSerializeAsSinglePrecisionFloat=False,LinkedTo=(K2Node_CallFunction_0 C9627ED047925BE492C2ED8292875066,),PersistentGuid=00000000000000000000000000000000,bHidden=False,bNotConnectable=False,bDefaultValueIsReadOnly=False,bDefaultValueIsIgnored=False,bAdvancedView=False,bOrphanedPin=False,)
   CustomProperties Pin (PinId=E4C47558417AA95F71E529AA81C3F285,PinName="then",Direction="EGPD_Output",PinType.PinCategory="exec",PinType.PinSubCategory="",PinType.PinSubCategoryObject=None,PinType.PinSubCategoryMemberReference=(),PinType.PinValueType=(),PinType.ContainerType=None,PinType.bIsReference=False,PinType.bIsConst=False,PinType.bIsWeakPointer=False,PinType.bIsUObjectWrapper=False,PinType.bSerializeAsSinglePrecisionFloat=False,LinkedTo=(K2Node_AssignDelegate_1 D453DB184A8026BC0D3EE99AC0265352,),PersistentGuid=00000000000000000000000000000000,bHidden=False,bNotConnectable=False,bDefaultValueIsReadOnly=False,bDefaultValueIsIgnored=False,bAdvancedView=False,bOrphanedPin=False,)
   CustomProperties Pin (PinId=8E41CB7241DF0A09379ABA998E389A24,PinName="CastFailed",Direction="EGPD_Output",PinType.PinCategory="exec",PinType.PinSubCategory="",PinType.PinSubCategoryObject=None,PinType.PinSubCategoryMemberReference=(),PinType.PinValueType=(),PinType.ContainerType=None,PinType.bIsReference=False,PinType.bIsConst=False,PinType.bIsWeakPointer=False,PinType.bIsUObjectWrapper=False,PinType.bSerializeAsSinglePrecisionFloat=False,PersistentGuid=00000000000000000000000000000000,bHidden=False,bNotConnectable=False,bDefaultValueIsReadOnly=False,bDefaultValueIsIgnored=False,bAdvancedView=False,bOrphanedPin=False,)
   CustomProperties Pin (PinId=3C9251E64E92FB5B79E42283A62168A8,PinName="Object",PinType.PinCategory="Object",PinType.PinSubCategory="",PinType.PinSubCategoryObject="/Script/CoreUObject.Class'/Script/CoreUObject.Object'",PinType.PinSubCategoryMemberReference=(),PinType.PinValueType=(),PinType.ContainerType=None,PinType.bIsReference=False,PinType.bIsConst=False,PinType.bIsWeakPointer=False,PinType.bIsUObjectWrapper=False,PinType.bSerializeAsSinglePrecisionFloat=False,LinkedTo=(K2Node_CallFunction_12 6F33D0C3438E65764913DFA57CE7273C,),PersistentGuid=00000000000000000000000000000000,bHidden=False,bNotConnectable=False,bDefaultValueIsReadOnly=False,bDefaultValueIsIgnored=False,bAdvancedView=False,bOrphanedPin=False,)
   CustomProperties Pin (PinId=C90E80264407C7300095CC960EDD63B7,PinName="AsGameface GameHUD",Direction="EGPD_Output",PinType.PinCategory="Object",PinType.PinSubCategory="",PinType.PinSubCategoryObject="/Script/CoreUObject.Class'/Script/CohtmlPlugin.CohtmlGameHUD'",PinType.PinSubCategoryMemberReference=(),PinType.PinValueType=(),PinType.ContainerType=None,PinType.bIsReference=False,PinType.bIsConst=False,PinType.bIsWeakPointer=False,PinType.bIsUObjectWrapper=False,PinType.bSerializeAsSinglePrecisionFloat=False,LinkedTo=(K2Node_VariableGet_5 3B4A37D642DC775E657E2F91B2CCA7D1,),PersistentGuid=00000000000000000000000000000000,bHidden=False,bNotConnectable=False,bDefaultValueIsReadOnly=False,bDefaultValueIsIgnored=False,bAdvancedView=False,bOrphanedPin=False,)
   CustomProperties Pin (PinId=707244E24FB5E04A499B99A10654DDB5,PinName="bSuccess",Direction="EGPD_Output",PinType.PinCategory="bool",PinType.PinSubCategory="",PinType.PinSubCategoryObject=None,PinType.PinSubCategoryMemberReference=(),PinType.PinValueType=(),PinType.ContainerType=None,PinType.bIsReference=False,PinType.bIsConst=False,PinType.bIsWeakPointer=False,PinType.bIsUObjectWrapper=False,PinType.bSerializeAsSinglePrecisionFloat=False,PersistentGuid=00000000000000000000000000000000,bHidden=True,bNotConnectable=False,bDefaultValueIsReadOnly=False,bDefaultValueIsIgnored=False,bAdvancedView=False,bOrphanedPin=False,)
End Object
Begin Object Class=/Script/BlueprintGraph.K2Node_CustomEvent Name="K2Node_CustomEvent_0" ExportPath="/Script/BlueprintGraph.K2Node_CustomEvent'/Game/CharacterBP.CharacterBP:EventGraph.K2Node_CustomEvent_0'"
   CustomFunctionName="ReadyForBindings_Event"
   NodePosX=1152
   NodePosY=240
   NodeGuid=FBEE447D402C2940EA04FD8D696C0EB4
   CustomProperties Pin (PinId=4F16979C4AB46052ED5FFA958978AA15,PinName="OutputDelegate",Direction="EGPD_Output",PinType.PinCategory="delegate",PinType.PinSubCategory="",PinType.PinSubCategoryObject=None,PinType.PinSubCategoryMemberReference=(MemberParent="/Script/Engine.BlueprintGeneratedClass'/Game/CharacterBP.CharacterBP_C'",MemberName="ReadyForBindings_Event",MemberGuid=FBEE447D402C2940EA04FD8D696C0EB4),PinType.PinValueType=(),PinType.ContainerType=None,PinType.bIsReference=False,PinType.bIsConst=False,PinType.bIsWeakPointer=False,PinType.bIsUObjectWrapper=False,PinType.bSerializeAsSinglePrecisionFloat=False,LinkedTo=(K2Node_AssignDelegate_1 CB93B7924C7F3EAEEE40F79D7951ADA0,),PersistentGuid=00000000000000000000000000000000,bHidden=False,bNotConnectable=False,bDefaultValueIsReadOnly=False,bDefaultValueIsIgnored=False,bAdvancedView=False,bOrphanedPin=False,)
   CustomProperties Pin (PinId=7D3E23F74351592A70CF4583D47293E9,PinName="then",Direction="EGPD_Output",PinType.PinCategory="exec",PinType.PinSubCategory="",PinType.PinSubCategoryObject=None,PinType.PinSubCategoryMemberReference=(),PinType.PinValueType=(),PinType.ContainerType=None,PinType.bIsReference=False,PinType.bIsConst=False,PinType.bIsWeakPointer=False,PinType.bIsUObjectWrapper=False,PinType.bSerializeAsSinglePrecisionFloat=False,LinkedTo=(K2Node_CallFunction_3 73D112C043A553883FA599A50A179592,),PersistentGuid=00000000000000000000000000000000,bHidden=False,bNotConnectable=False,bDefaultValueIsReadOnly=False,bDefaultValueIsIgnored=False,bAdvancedView=False,bOrphanedPin=False,)
End Object
Begin Object Class=/Script/BlueprintGraph.K2Node_CallFunction Name="K2Node_CallFunction_3" ExportPath="/Script/BlueprintGraph.K2Node_CallFunction'/Game/CharacterBP.CharacterBP:EventGraph.K2Node_CallFunction_3'"
   FunctionReference=(MemberParent="/Script/CoreUObject.Class'/Script/CohtmlPlugin.CohtmlBaseComponent'",MemberName="RegisterForEvent")
   NodePosX=1504
   NodePosY=240
   NodeGuid=DB41BF3043BE2622EF3FAA8EE928E834
   CustomProperties Pin (PinId=73D112C043A553883FA599A50A179592,PinName="execute",PinToolTip="
Exec",PinType.PinCategory="exec",PinType.PinSubCategory="",PinType.PinSubCategoryObject=None,PinType.PinSubCategoryMemberReference=(),PinType.PinValueType=(),PinType.ContainerType=None,PinType.bIsReference=False,PinType.bIsConst=False,PinType.bIsWeakPointer=False,PinType.bIsUObjectWrapper=False,PinType.bSerializeAsSinglePrecisionFloat=False,LinkedTo=(K2Node_CustomEvent_0 7D3E23F74351592A70CF4583D47293E9,),PersistentGuid=00000000000000000000000000000000,bHidden=False,bNotConnectable=False,bDefaultValueIsReadOnly=False,bDefaultValueIsIgnored=False,bAdvancedView=False,bOrphanedPin=False,)
   CustomProperties Pin (PinId=2594D8434A3E01AE3672CEBB306B3BB4,PinName="then",PinToolTip="
Exec",Direction="EGPD_Output",PinType.PinCategory="exec",PinType.PinSubCategory="",PinType.PinSubCategoryObject=None,PinType.PinSubCategoryMemberReference=(),PinType.PinValueType=(),PinType.ContainerType=None,PinType.bIsReference=False,PinType.bIsConst=False,PinType.bIsWeakPointer=False,PinType.bIsUObjectWrapper=False,PinType.bSerializeAsSinglePrecisionFloat=False,LinkedTo=(K2Node_CallFunction_6 73D112C043A553883FA599A50A179592,),PersistentGuid=00000000000000000000000000000000,bHidden=False,bNotConnectable=False,bDefaultValueIsReadOnly=False,bDefaultValueIsIgnored=False,bAdvancedView=False,bOrphanedPin=False,)
   CustomProperties Pin (PinId=AA673F02470D337A1CD44F8054FBF608,PinName="self",PinFriendlyName=NSLOCTEXT("K2Node", "Target", "Target"),PinToolTip="Target
Gameface Base Component Object Reference",PinType.PinCategory="object",PinType.PinSubCategory="",PinType.PinSubCategoryObject="/Script/CoreUObject.Class'/Script/CohtmlPlugin.CohtmlBaseComponent'",PinType.PinSubCategoryMemberReference=(),PinType.PinValueType=(),PinType.ContainerType=None,PinType.bIsReference=False,PinType.bIsConst=False,PinType.bIsWeakPointer=False,PinType.bIsUObjectWrapper=False,PinType.bSerializeAsSinglePrecisionFloat=False,LinkedTo=(K2Node_VariableGet_5 8F7889484DA764528B2DB799D57983A9,),PersistentGuid=00000000000000000000000000000000,bHidden=False,bNotConnectable=False,bDefaultValueIsReadOnly=False,bDefaultValueIsIgnored=False,bAdvancedView=False,bOrphanedPin=False,)
   CustomProperties Pin (PinId=3F65821C402C7D608CE5C3901FFD7CFA,PinName="JSEventName",PinFriendlyName=NSLOCTEXT("", "DA0ED98B4E0FB11C01AE319E09D31FFB", "JavaScript Event Name"),PinToolTip="Java Script Event Name
String",PinType.PinCategory="string",PinType.PinSubCategory="",PinType.PinSubCategoryObject=None,PinType.PinSubCategoryMemberReference=(),PinType.PinValueType=(),PinType.ContainerType=None,PinType.bIsReference=False,PinType.bIsConst=False,PinType.bIsWeakPointer=False,PinType.bIsUObjectWrapper=False,PinType.bSerializeAsSinglePrecisionFloat=False,DefaultValue="focusChest",PersistentGuid=00000000000000000000000000000000,bHidden=False,bNotConnectable=False,bDefaultValueIsReadOnly=False,bDefaultValueIsIgnored=False,bAdvancedView=False,bOrphanedPin=False,)
   CustomProperties Pin (PinId=93760E9C4A2EB4FC489ACEB012AAED6A,PinName="Delegate",PinFriendlyName=NSLOCTEXT("", "27317F7F4777F7CD6BA09AA81DE5FBE1", "Event"),PinToolTip="Event
Delegate",PinType.PinCategory="Delegate",PinType.PinSubCategory="",PinType.PinSubCategoryObject=None,PinType.PinSubCategoryMemberReference=(MemberParent="/Script/CoreUObject.Package'/Script/CohtmlPlugin'",MemberName="CohtmlJSEventBPCallback__DelegateSignature"),PinType.PinValueType=(),PinType.ContainerType=None,PinType.bIsReference=False,PinType.bIsConst=False,PinType.bIsWeakPointer=False,PinType.bIsUObjectWrapper=False,PinType.bSerializeAsSinglePrecisionFloat=False,LinkedTo=(K2Node_CustomEvent_1 379011AD44FE616C93790EAD48EDD302,),PersistentGuid=00000000000000000000000000000000,bHidden=False,bNotConnectable=False,bDefaultValueIsReadOnly=False,bDefaultValueIsIgnored=False,bAdvancedView=False,bOrphanedPin=False,)
End Object
Begin Object Class=/Script/BlueprintGraph.K2Node_CustomEvent Name="K2Node_CustomEvent_1" ExportPath="/Script/BlueprintGraph.K2Node_CustomEvent'/Game/CharacterBP.CharacterBP:EventGraph.K2Node_CustomEvent_1'"
   CustomFunctionName="focusChest"
   NodePosX=128
   NodePosY=496
   NodeGuid=D8E0F4FE4E9729F952E3C38BC1B7A894
   CustomProperties Pin (PinId=379011AD44FE616C93790EAD48EDD302,PinName="OutputDelegate",Direction="EGPD_Output",PinType.PinCategory="delegate",PinType.PinSubCategory="",PinType.PinSubCategoryObject=None,PinType.PinSubCategoryMemberReference=(MemberParent="/Script/Engine.BlueprintGeneratedClass'/Game/CharacterBP.CharacterBP_C'",MemberName="focusChest",MemberGuid=D8E0F4FE4E9729F952E3C38BC1B7A894),PinType.PinValueType=(),PinType.ContainerType=None,PinType.bIsReference=False,PinType.bIsConst=False,PinType.bIsWeakPointer=False,PinType.bIsUObjectWrapper=False,PinType.bSerializeAsSinglePrecisionFloat=False,LinkedTo=(K2Node_CallFunction_3 93760E9C4A2EB4FC489ACEB012AAED6A,),PersistentGuid=00000000000000000000000000000000,bHidden=False,bNotConnectable=False,bDefaultValueIsReadOnly=False,bDefaultValueIsIgnored=False,bAdvancedView=False,bOrphanedPin=False,)
   CustomProperties Pin (PinId=0F97B6C54C3B7792AAE710B16B26D028,PinName="then",Direction="EGPD_Output",PinType.PinCategory="exec",PinType.PinSubCategory="",PinType.PinSubCategoryObject=None,PinType.PinSubCategoryMemberReference=(),PinType.PinValueType=(),PinType.ContainerType=None,PinType.bIsReference=False,PinType.bIsConst=False,PinType.bIsWeakPointer=False,PinType.bIsUObjectWrapper=False,PinType.bSerializeAsSinglePrecisionFloat=False,LinkedTo=(K2Node_CallFunction_48 497D2C674F6EFCD464C4369EF74F5FBD,),PersistentGuid=00000000000000000000000000000000,bHidden=False,bNotConnectable=False,bDefaultValueIsReadOnly=False,bDefaultValueIsIgnored=False,bAdvancedView=False,bOrphanedPin=False,)
End Object
Begin Object Class=/Script/BlueprintGraph.K2Node_VariableGet Name="K2Node_VariableGet_15" ExportPath="/Script/BlueprintGraph.K2Node_VariableGet'/Game/CharacterBP.CharacterBP:EventGraph.K2Node_VariableGet_15'"
   VariableReference=(MemberName="SceneCaptureComponent2D",bSelfContext=True)
   NodePosX=1488
   NodePosY=544
   NodeGuid=BC18A8A64B389EAFF6FDA594C6D66D76
   CustomProperties Pin (PinId=34EFF39444E65B1F15F60F83750C192B,PinName="SceneCaptureComponent2D",Direction="EGPD_Output",PinType.PinCategory="object",PinType.PinSubCategory="",PinType.PinSubCategoryObject="/Script/CoreUObject.Class'/Script/Engine.SceneCaptureComponent2D'",PinType.PinSubCategoryMemberReference=(),PinType.PinValueType=(),PinType.ContainerType=None,PinType.bIsReference=False,PinType.bIsConst=False,PinType.bIsWeakPointer=False,PinType.bIsUObjectWrapper=False,PinType.bSerializeAsSinglePrecisionFloat=False,LinkedTo=(K2Node_CallFunction_44 6E47B4604D1F2BEBC767C5A9B94EE170,),PersistentGuid=00000000000000000000000000000000,bHidden=False,bNotConnectable=False,bDefaultValueIsReadOnly=False,bDefaultValueIsIgnored=False,bAdvancedView=False,bOrphanedPin=False,)
   CustomProperties Pin (PinId=9D78DA9D4930650D81491C89CAFA9A39,PinName="self",PinFriendlyName=NSLOCTEXT("K2Node", "Target", "Target"),PinType.PinCategory="object",PinType.PinSubCategory="",PinType.PinSubCategoryObject="/Script/Engine.BlueprintGeneratedClass'/Game/CharacterBP.CharacterBP_C'",PinType.PinSubCategoryMemberReference=(),PinType.PinValueType=(),PinType.ContainerType=None,PinType.bIsReference=False,PinType.bIsConst=False,PinType.bIsWeakPointer=False,PinType.bIsUObjectWrapper=False,PinType.bSerializeAsSinglePrecisionFloat=False,PersistentGuid=00000000000000000000000000000000,bHidden=True,bNotConnectable=False,bDefaultValueIsReadOnly=False,bDefaultValueIsIgnored=False,bAdvancedView=False,bOrphanedPin=False,)
End Object
Begin Object Class=/Script/BlueprintGraph.K2Node_VariableGet Name="K2Node_VariableGet_5" ExportPath="/Script/BlueprintGraph.K2Node_VariableGet'/Game/CharacterBP.CharacterBP:EventGraph.K2Node_VariableGet_5'"
   VariableReference=(MemberParent="/Script/CoreUObject.Class'/Script/CohtmlPlugin.CohtmlGameHUD'",MemberName="CohtmlHUD")
   NodePosX=1248
   NodePosY=96
   NodeGuid=6511DE3C4AC02A274CA9EBB53699D72B
   CustomProperties Pin (PinId=8F7889484DA764528B2DB799D57983A9,PinName="CohtmlHUD",PinFriendlyName=NSLOCTEXT("", "BCEC64A0498EACFDBC19D5B65C299135", "Gameface HUD"),Direction="EGPD_Output",PinType.PinCategory="object",PinType.PinSubCategory="",PinType.PinSubCategoryObject="/Script/CoreUObject.Class'/Script/CohtmlPlugin.CohtmlHUD'",PinType.PinSubCategoryMemberReference=(),PinType.PinValueType=(),PinType.ContainerType=None,PinType.bIsReference=False,PinType.bIsConst=False,PinType.bIsWeakPointer=False,PinType.bIsUObjectWrapper=False,PinType.bSerializeAsSinglePrecisionFloat=False,LinkedTo=(K2Node_CallFunction_3 AA673F02470D337A1CD44F8054FBF608,K2Node_Knot_0 3AB654F2409BBBA3A58C6DAF141152D7,K2Node_Knot_1 7278BEB144096120A418C6B1BCE3B9EB,K2Node_AssignDelegate_1 98B5F5C945A226E535BED6BED0CFED92,K2Node_Knot_2 40D4048D4AB08B05A36E47B793441AD2,K2Node_CallFunction_4 AA673F02470D337A1CD44F8054FBF608,K2Node_CallFunction_5 A1CDE0AA42F31CBB1954DD94CCA22FFF,),PersistentGuid=00000000000000000000000000000000,bHidden=False,bNotConnectable=False,bDefaultValueIsReadOnly=False,bDefaultValueIsIgnored=False,bAdvancedView=False,bOrphanedPin=False,)
   CustomProperties Pin (PinId=3B4A37D642DC775E657E2F91B2CCA7D1,PinName="self",PinFriendlyName=NSLOCTEXT("K2Node", "Target", "Target"),PinType.PinCategory="object",PinType.PinSubCategory="",PinType.PinSubCategoryObject="/Script/CoreUObject.Class'/Script/CohtmlPlugin.CohtmlGameHUD'",PinType.PinSubCategoryMemberReference=(),PinType.PinValueType=(),PinType.ContainerType=None,PinType.bIsReference=False,PinType.bIsConst=False,PinType.bIsWeakPointer=False,PinType.bIsUObjectWrapper=False,PinType.bSerializeAsSinglePrecisionFloat=False,LinkedTo=(K2Node_DynamicCast_0 C90E80264407C7300095CC960EDD63B7,),PersistentGuid=00000000000000000000000000000000,bHidden=False,bNotConnectable=False,bDefaultValueIsReadOnly=False,bDefaultValueIsIgnored=False,bAdvancedView=False,bOrphanedPin=False,)
End Object
Begin Object Class=/Script/BlueprintGraph.K2Node_AssignDelegate Name="K2Node_AssignDelegate_1" ExportPath="/Script/BlueprintGraph.K2Node_AssignDelegate'/Game/CharacterBP.CharacterBP:EventGraph.K2Node_AssignDelegate_1'"
   DelegateReference=(MemberParent="/Script/CoreUObject.Class'/Script/CohtmlPlugin.CohtmlBaseComponent'",MemberName="ReadyForBindings")
   NodePosX=1712
   NodePosY=-16
   NodeGuid=02CEC1EE4CC8F7BE6652E580D808EBBA
   CustomProperties Pin (PinId=D453DB184A8026BC0D3EE99AC0265352,PinName="execute",PinType.PinCategory="exec",PinType.PinSubCategory="",PinType.PinSubCategoryObject=None,PinType.PinSubCategoryMemberReference=(),PinType.PinValueType=(),PinType.ContainerType=None,PinType.bIsReference=False,PinType.bIsConst=False,PinType.bIsWeakPointer=False,PinType.bIsUObjectWrapper=False,PinType.bSerializeAsSinglePrecisionFloat=False,LinkedTo=(K2Node_DynamicCast_0 E4C47558417AA95F71E529AA81C3F285,),PersistentGuid=00000000000000000000000000000000,bHidden=False,bNotConnectable=False,bDefaultValueIsReadOnly=False,bDefaultValueIsIgnored=False,bAdvancedView=False,bOrphanedPin=False,)
   CustomProperties Pin (PinId=DFC74ED14D01F43A2881C8BA92DB093E,PinName="then",Direction="EGPD_Output",PinType.PinCategory="exec",PinType.PinSubCategory="",PinType.PinSubCategoryObject=None,PinType.PinSubCategoryMemberReference=(),PinType.PinValueType=(),PinType.ContainerType=None,PinType.bIsReference=False,PinType.bIsConst=False,PinType.bIsWeakPointer=False,PinType.bIsUObjectWrapper=False,PinType.bSerializeAsSinglePrecisionFloat=False,PersistentGuid=00000000000000000000000000000000,bHidden=False,bNotConnectable=False,bDefaultValueIsReadOnly=False,bDefaultValueIsIgnored=False,bAdvancedView=False,bOrphanedPin=False,)
   CustomProperties Pin (PinId=98B5F5C945A226E535BED6BED0CFED92,PinName="self",PinFriendlyName=NSLOCTEXT("K2Node", "BaseMCDelegateSelfPinName", "Target"),PinType.PinCategory="object",PinType.PinSubCategory="",PinType.PinSubCategoryObject="/Script/CoreUObject.Class'/Script/CohtmlPlugin.CohtmlBaseComponent'",PinType.PinSubCategoryMemberReference=(),PinType.PinValueType=(),PinType.ContainerType=None,PinType.bIsReference=False,PinType.bIsConst=False,PinType.bIsWeakPointer=False,PinType.bIsUObjectWrapper=False,PinType.bSerializeAsSinglePrecisionFloat=False,LinkedTo=(K2Node_VariableGet_5 8F7889484DA764528B2DB799D57983A9,),PersistentGuid=00000000000000000000000000000000,bHidden=False,bNotConnectable=False,bDefaultValueIsReadOnly=False,bDefaultValueIsIgnored=False,bAdvancedView=False,bOrphanedPin=False,)
   CustomProperties Pin (PinId=CB93B7924C7F3EAEEE40F79D7951ADA0,PinName="Delegate",PinFriendlyName=NSLOCTEXT("K2Node", "PinFriendlyDelegatetName", "Event"),PinType.PinCategory="delegate",PinType.PinSubCategory="",PinType.PinSubCategoryObject=None,PinType.PinSubCategoryMemberReference=(MemberParent="/Script/CoreUObject.Package'/Script/CohtmlPlugin'",MemberName="CohtmlReadyForBindings__DelegateSignature"),PinType.PinValueType=(),PinType.ContainerType=None,PinType.bIsReference=True,PinType.bIsConst=True,PinType.bIsWeakPointer=False,PinType.bIsUObjectWrapper=False,PinType.bSerializeAsSinglePrecisionFloat=False,LinkedTo=(K2Node_CustomEvent_0 4F16979C4AB46052ED5FFA958978AA15,),PersistentGuid=00000000000000000000000000000000,bHidden=False,bNotConnectable=False,bDefaultValueIsReadOnly=False,bDefaultValueIsIgnored=False,bAdvancedView=False,bOrphanedPin=False,)
End Object
Begin Object Class=/Script/BlueprintGraph.K2Node_CallFunction Name="K2Node_CallFunction_44" ExportPath="/Script/BlueprintGraph.K2Node_CallFunction'/Game/CharacterBP.CharacterBP:EventGraph.K2Node_CallFunction_44'"
   FunctionReference=(MemberParent="/Script/CoreUObject.Class'/Script/Engine.SceneComponent'",MemberName="K2_SetRelativeLocation")
   NodePosX=1792
   NodePosY=448
   NodeGuid=6C78731643FC7AA115754CA1A74B085F
   CustomProperties Pin (PinId=258669B74CAA830BE806B2BAFCDD0E57,PinName="execute",PinToolTip="
Exec",PinType.PinCategory="exec",PinType.PinSubCategory="",PinType.PinSubCategoryObject=None,PinType.PinSubCategoryMemberReference=(),PinType.PinValueType=(),PinType.ContainerType=None,PinType.bIsReference=False,PinType.bIsConst=False,PinType.bIsWeakPointer=False,PinType.bIsUObjectWrapper=False,PinType.bSerializeAsSinglePrecisionFloat=False,LinkedTo=(K2Node_Timeline_6 61AAA0934A46D88F426A5BAB8B11C98D,),PersistentGuid=00000000000000000000000000000000,bHidden=False,bNotConnectable=False,bDefaultValueIsReadOnly=False,bDefaultValueIsIgnored=False,bAdvancedView=False,bOrphanedPin=False,)
   CustomProperties Pin (PinId=D3C417064DC1F6122F44109E9EBC1868,PinName="then",PinToolTip="
Exec",Direction="EGPD_Output",PinType.PinCategory="exec",PinType.PinSubCategory="",PinType.PinSubCategoryObject=None,PinType.PinSubCategoryMemberReference=(),PinType.PinValueType=(),PinType.ContainerType=None,PinType.bIsReference=False,PinType.bIsConst=False,PinType.bIsWeakPointer=False,PinType.bIsUObjectWrapper=False,PinType.bSerializeAsSinglePrecisionFloat=False,PersistentGuid=00000000000000000000000000000000,bHidden=False,bNotConnectable=False,bDefaultValueIsReadOnly=False,bDefaultValueIsIgnored=False,bAdvancedView=False,bOrphanedPin=False,)
   CustomProperties Pin (PinId=6E47B4604D1F2BEBC767C5A9B94EE170,PinName="self",PinFriendlyName=NSLOCTEXT("K2Node", "Target", "Target"),PinToolTip="Target
Scene Component Object Reference",PinType.PinCategory="object",PinType.PinSubCategory="",PinType.PinSubCategoryObject="/Script/CoreUObject.Class'/Script/Engine.SceneComponent'",PinType.PinSubCategoryMemberReference=(),PinType.PinValueType=(),PinType.ContainerType=None,PinType.bIsReference=False,PinType.bIsConst=False,PinType.bIsWeakPointer=False,PinType.bIsUObjectWrapper=False,PinType.bSerializeAsSinglePrecisionFloat=False,LinkedTo=(K2Node_VariableGet_15 34EFF39444E65B1F15F60F83750C192B,),PersistentGuid=00000000000000000000000000000000,bHidden=False,bNotConnectable=False,bDefaultValueIsReadOnly=False,bDefaultValueIsIgnored=False,bAdvancedView=False,bOrphanedPin=False,)
   CustomProperties Pin (PinId=2D05CFDC4D2B8525BA4D65B2FC942798,PinName="NewLocation",PinToolTip="New Location
Vector

New location of the component relative to its parent.",PinType.PinCategory="struct",PinType.PinSubCategory="",PinType.PinSubCategoryObject="/Script/CoreUObject.ScriptStruct'/Script/CoreUObject.Vector'",PinType.PinSubCategoryMemberReference=(),PinType.PinValueType=(),PinType.ContainerType=None,PinType.bIsReference=False,PinType.bIsConst=False,PinType.bIsWeakPointer=False,PinType.bIsUObjectWrapper=False,PinType.bSerializeAsSinglePrecisionFloat=False,DefaultValue="0, 0, 0",AutogeneratedDefaultValue="0, 0, 0",LinkedTo=(K2Node_CallFunction_46 4EA7224147536FE00B8890B3B622832F,),PersistentGuid=00000000000000000000000000000000,bHidden=False,bNotConnectable=False,bDefaultValueIsReadOnly=False,bDefaultValueIsIgnored=False,bAdvancedView=False,bOrphanedPin=False,)
   CustomProperties Pin (PinId=BB3B67104D847DCD51C06F9754AB3C5D,PinName="bSweep",PinToolTip="Sweep
Boolean

Whether we sweep to the destination location, triggering overlaps along the way and stopping short of the target if blocked by something. Only the root component is swept and checked for blocking collision, child components move without sweeping. If collision is off, this has no effect.",PinType.PinCategory="bool",PinType.PinSubCategory="",PinType.PinSubCategoryObject=None,PinType.PinSubCategoryMemberReference=(),PinType.PinValueType=(),PinType.ContainerType=None,PinType.bIsReference=False,PinType.bIsConst=False,PinType.bIsWeakPointer=False,PinType.bIsUObjectWrapper=False,PinType.bSerializeAsSinglePrecisionFloat=False,DefaultValue="false",AutogeneratedDefaultValue="false",PersistentGuid=00000000000000000000000000000000,bHidden=False,bNotConnectable=False,bDefaultValueIsReadOnly=False,bDefaultValueIsIgnored=False,bAdvancedView=False,bOrphanedPin=False,)
   CustomProperties Pin (PinId=80989B5A45A4FD1A2D9235988C212C2B,PinName="SweepHitResult",PinToolTip="Sweep Hit Result
Hit Result Structure

Hit result from any impact if sweep is true.",Direction="EGPD_Output",PinType.PinCategory="struct",PinType.PinSubCategory="",PinType.PinSubCategoryObject="/Script/CoreUObject.ScriptStruct'/Script/Engine.HitResult'",PinType.PinSubCategoryMemberReference=(),PinType.PinValueType=(),PinType.ContainerType=None,PinType.bIsReference=False,PinType.bIsConst=False,PinType.bIsWeakPointer=False,PinType.bIsUObjectWrapper=False,PinType.bSerializeAsSinglePrecisionFloat=False,PersistentGuid=00000000000000000000000000000000,bHidden=False,bNotConnectable=False,bDefaultValueIsReadOnly=False,bDefaultValueIsIgnored=False,bAdvancedView=False,bOrphanedPin=False,)
   CustomProperties Pin (PinId=88BA22AA4E6CCE40E65F4F8450C8FE82,PinName="bTeleport",PinToolTip="Teleport
Boolean

Whether we teleport the physics state (if physics collision is enabled for this object). If true, physics velocity for this object is unchanged (so ragdoll parts are not affected by change in location). If false, physics velocity is updated based on the change in position (affecting ragdoll parts). If CCD is on and not teleporting, this will affect objects along the entire sweep volume.",PinType.PinCategory="bool",PinType.PinSubCategory="",PinType.PinSubCategoryObject=None,PinType.PinSubCategoryMemberReference=(),PinType.PinValueType=(),PinType.ContainerType=None,PinType.bIsReference=False,PinType.bIsConst=False,PinType.bIsWeakPointer=False,PinType.bIsUObjectWrapper=False,PinType.bSerializeAsSinglePrecisionFloat=False,DefaultValue="false",AutogeneratedDefaultValue="false",PersistentGuid=00000000000000000000000000000000,bHidden=False,bNotConnectable=False,bDefaultValueIsReadOnly=False,bDefaultValueIsIgnored=False,bAdvancedView=False,bOrphanedPin=False,)
End Object
Begin Object Class=/Script/BlueprintGraph.K2Node_CallFunction Name="K2Node_CallFunction_45" ExportPath="/Script/BlueprintGraph.K2Node_CallFunction'/Game/CharacterBP.CharacterBP:EventGraph.K2Node_CallFunction_45'"
   bIsPureFunc=True
   FunctionReference=(MemberParent="/Script/CoreUObject.Class'/Script/Engine.KismetMathLibrary'",MemberName="Lerp")
   NodePosX=1200
   NodePosY=528
   NodeGuid=97326B8C4CB6E55C9030C2ABA29E1933
   CustomProperties Pin (PinId=5BDA421246A7735BE9B6E2AD17F29728,PinName="self",PinFriendlyName=NSLOCTEXT("K2Node", "Target", "Target"),PinToolTip="Target
Kismet Math Library Object Reference",PinType.PinCategory="object",PinType.PinSubCategory="",PinType.PinSubCategoryObject="/Script/CoreUObject.Class'/Script/Engine.KismetMathLibrary'",PinType.PinSubCategoryMemberReference=(),PinType.PinValueType=(),PinType.ContainerType=None,PinType.bIsReference=False,PinType.bIsConst=False,PinType.bIsWeakPointer=False,PinType.bIsUObjectWrapper=False,PinType.bSerializeAsSinglePrecisionFloat=False,DefaultObject="/Script/Engine.Default__KismetMathLibrary",PersistentGuid=00000000000000000000000000000000,bHidden=True,bNotConnectable=False,bDefaultValueIsReadOnly=False,bDefaultValueIsIgnored=False,bAdvancedView=False,bOrphanedPin=False,)
   CustomProperties Pin (PinId=B2CFE2C94684B68192F253B05849E7C6,PinName="A",PinToolTip="A
Float (double-precision)",PinType.PinCategory="real",PinType.PinSubCategory="double",PinType.PinSubCategoryObject=None,PinType.PinSubCategoryMemberReference=(),PinType.PinValueType=(),PinType.ContainerType=None,PinType.bIsReference=False,PinType.bIsConst=False,PinType.bIsWeakPointer=False,PinType.bIsUObjectWrapper=False,PinType.bSerializeAsSinglePrecisionFloat=False,DefaultValue="0.0",AutogeneratedDefaultValue="0.0",LinkedTo=(K2Node_CallFunction_48 7403A2D9401B34D9A4901896370B7485,),PersistentGuid=00000000000000000000000000000000,bHidden=False,bNotConnectable=False,bDefaultValueIsReadOnly=False,bDefaultValueIsIgnored=False,bAdvancedView=False,bOrphanedPin=False,)
   CustomProperties Pin (PinId=949AA94B496985E5DC646B9D5D43CD54,PinName="B",PinToolTip="B
Float (double-precision)",PinType.PinCategory="real",PinType.PinSubCategory="double",PinType.PinSubCategoryObject=None,PinType.PinSubCategoryMemberReference=(),PinType.PinValueType=(),PinType.ContainerType=None,PinType.bIsReference=False,PinType.bIsConst=False,PinType.bIsWeakPointer=False,PinType.bIsUObjectWrapper=False,PinType.bSerializeAsSinglePrecisionFloat=False,DefaultValue="130.000000",AutogeneratedDefaultValue="0.0",PersistentGuid=00000000000000000000000000000000,bHidden=False,bNotConnectable=False,bDefaultValueIsReadOnly=False,bDefaultValueIsIgnored=False,bAdvancedView=False,bOrphanedPin=False,)
   CustomProperties Pin (PinId=350EC28D4358A893D05E2B861CE9AD6F,PinName="Alpha",PinToolTip="Alpha
Float (double-precision)",PinType.PinCategory="real",PinType.PinSubCategory="double",PinType.PinSubCategoryObject=None,PinType.PinSubCategoryMemberReference=(),PinType.PinValueType=(),PinType.ContainerType=None,PinType.bIsReference=False,PinType.bIsConst=False,PinType.bIsWeakPointer=False,PinType.bIsUObjectWrapper=False,PinType.bSerializeAsSinglePrecisionFloat=False,DefaultValue="0.0",AutogeneratedDefaultValue="0.0",LinkedTo=(K2Node_Timeline_6 3D7FCC3341330E76CF2B1BBE30BEDC23,),PersistentGuid=00000000000000000000000000000000,bHidden=False,bNotConnectable=False,bDefaultValueIsReadOnly=False,bDefaultValueIsIgnored=False,bAdvancedView=False,bOrphanedPin=False,)
   CustomProperties Pin (PinId=3D1DCC6240151C93630A2AAB2DAB45DE,PinName="ReturnValue",PinToolTip="Return Value
Float (double-precision)

Linearly interpolates between A and B based on Alpha (100% of A when Alpha=0 and 100% of B when Alpha=1)",Direction="EGPD_Output",PinType.PinCategory="real",PinType.PinSubCategory="double",PinType.PinSubCategoryObject=None,PinType.PinSubCategoryMemberReference=(),PinType.PinValueType=(),PinType.ContainerType=None,PinType.bIsReference=False,PinType.bIsConst=False,PinType.bIsWeakPointer=False,PinType.bIsUObjectWrapper=False,PinType.bSerializeAsSinglePrecisionFloat=False,DefaultValue="0.0",AutogeneratedDefaultValue="0.0",LinkedTo=(K2Node_CallFunction_46 35CAFA6645A5B7A8FC79AB86767A0DC3,),PersistentGuid=00000000000000000000000000000000,bHidden=False,bNotConnectable=False,bDefaultValueIsReadOnly=False,bDefaultValueIsIgnored=False,bAdvancedView=False,bOrphanedPin=False,)
End Object
Begin Object Class=/Script/BlueprintGraph.K2Node_Timeline Name="K2Node_Timeline_6" ExportPath="/Script/BlueprintGraph.K2Node_Timeline'/Game/CharacterBP.CharacterBP:EventGraph.K2Node_Timeline_6'"
   TimelineName="Timeline_chest"
   TimelineGuid=9F416CD74443032C6F0D9DAE98ADD91B
   NodePosX=896
   NodePosY=480
   bCanRenameNode=True
   NodeGuid=32CDCDB7476A70221BCD5EA54582C400
   CustomProperties Pin (PinId=4865440743AB7E8980B95FAF0760FB3D,PinName="Play",PinType.PinCategory="exec",PinType.PinSubCategory="",PinType.PinSubCategoryObject=None,PinType.PinSubCategoryMemberReference=(),PinType.PinValueType=(),PinType.ContainerType=None,PinType.bIsReference=False,PinType.bIsConst=False,PinType.bIsWeakPointer=False,PinType.bIsUObjectWrapper=False,PinType.bSerializeAsSinglePrecisionFloat=False,PersistentGuid=00000000000000000000000000000000,bHidden=False,bNotConnectable=False,bDefaultValueIsReadOnly=False,bDefaultValueIsIgnored=False,bAdvancedView=False,bOrphanedPin=False,)
   CustomProperties Pin (PinId=D5FA5E0D47F969F39D9E92A50F53FA50,PinName="PlayFromStart",PinType.PinCategory="exec",PinType.PinSubCategory="",PinType.PinSubCategoryObject=None,PinType.PinSubCategoryMemberReference=(),PinType.PinValueType=(),PinType.ContainerType=None,PinType.bIsReference=False,PinType.bIsConst=False,PinType.bIsWeakPointer=False,PinType.bIsUObjectWrapper=False,PinType.bSerializeAsSinglePrecisionFloat=False,LinkedTo=(K2Node_CallFunction_48 32C856DD42C9FDCAA537FCB8E9F8D4F0,),PersistentGuid=00000000000000000000000000000000,bHidden=False,bNotConnectable=False,bDefaultValueIsReadOnly=False,bDefaultValueIsIgnored=False,bAdvancedView=False,bOrphanedPin=False,)
   CustomProperties Pin (PinId=347DB8AB43A73994EDFA4084AEB755B5,PinName="Stop",PinType.PinCategory="exec",PinType.PinSubCategory="",PinType.PinSubCategoryObject=None,PinType.PinSubCategoryMemberReference=(),PinType.PinValueType=(),PinType.ContainerType=None,PinType.bIsReference=False,PinType.bIsConst=False,PinType.bIsWeakPointer=False,PinType.bIsUObjectWrapper=False,PinType.bSerializeAsSinglePrecisionFloat=False,PersistentGuid=00000000000000000000000000000000,bHidden=False,bNotConnectable=False,bDefaultValueIsReadOnly=False,bDefaultValueIsIgnored=False,bAdvancedView=False,bOrphanedPin=False,)
   CustomProperties Pin (PinId=FCF951A047802ACF0EB69F87F2502B53,PinName="Reverse",PinType.PinCategory="exec",PinType.PinSubCategory="",PinType.PinSubCategoryObject=None,PinType.PinSubCategoryMemberReference=(),PinType.PinValueType=(),PinType.ContainerType=None,PinType.bIsReference=False,PinType.bIsConst=False,PinType.bIsWeakPointer=False,PinType.bIsUObjectWrapper=False,PinType.bSerializeAsSinglePrecisionFloat=False,PersistentGuid=00000000000000000000000000000000,bHidden=False,bNotConnectable=False,bDefaultValueIsReadOnly=False,bDefaultValueIsIgnored=False,bAdvancedView=False,bOrphanedPin=False,)
   CustomProperties Pin (PinId=24670FE14335ECB3771CED895504B15E,PinName="ReverseFromEnd",PinType.PinCategory="exec",PinType.PinSubCategory="",PinType.PinSubCategoryObject=None,PinType.PinSubCategoryMemberReference=(),PinType.PinValueType=(),PinType.ContainerType=None,PinType.bIsReference=False,PinType.bIsConst=False,PinType.bIsWeakPointer=False,PinType.bIsUObjectWrapper=False,PinType.bSerializeAsSinglePrecisionFloat=False,PersistentGuid=00000000000000000000000000000000,bHidden=False,bNotConnectable=False,bDefaultValueIsReadOnly=False,bDefaultValueIsIgnored=False,bAdvancedView=False,bOrphanedPin=False,)
   CustomProperties Pin (PinId=61AAA0934A46D88F426A5BAB8B11C98D,PinName="Update",Direction="EGPD_Output",PinType.PinCategory="exec",PinType.PinSubCategory="",PinType.PinSubCategoryObject=None,PinType.PinSubCategoryMemberReference=(),PinType.PinValueType=(),PinType.ContainerType=None,PinType.bIsReference=False,PinType.bIsConst=False,PinType.bIsWeakPointer=False,PinType.bIsUObjectWrapper=False,PinType.bSerializeAsSinglePrecisionFloat=False,LinkedTo=(K2Node_CallFunction_44 258669B74CAA830BE806B2BAFCDD0E57,),PersistentGuid=00000000000000000000000000000000,bHidden=False,bNotConnectable=False,bDefaultValueIsReadOnly=False,bDefaultValueIsIgnored=False,bAdvancedView=False,bOrphanedPin=False,)
   CustomProperties Pin (PinId=172F5AA441CCAED6970824B60892D61E,PinName="Finished",Direction="EGPD_Output",PinType.PinCategory="exec",PinType.PinSubCategory="",PinType.PinSubCategoryObject=None,PinType.PinSubCategoryMemberReference=(),PinType.PinValueType=(),PinType.ContainerType=None,PinType.bIsReference=False,PinType.bIsConst=False,PinType.bIsWeakPointer=False,PinType.bIsUObjectWrapper=False,PinType.bSerializeAsSinglePrecisionFloat=False,PersistentGuid=00000000000000000000000000000000,bHidden=False,bNotConnectable=False,bDefaultValueIsReadOnly=False,bDefaultValueIsIgnored=False,bAdvancedView=False,bOrphanedPin=False,)
   CustomProperties Pin (PinId=714DC24B4C83A52D3C1CCF8A4BD5CF45,PinName="SetNewTime",PinType.PinCategory="exec",PinType.PinSubCategory="",PinType.PinSubCategoryObject=None,PinType.PinSubCategoryMemberReference=(),PinType.PinValueType=(),PinType.ContainerType=None,PinType.bIsReference=False,PinType.bIsConst=False,PinType.bIsWeakPointer=False,PinType.bIsUObjectWrapper=False,PinType.bSerializeAsSinglePrecisionFloat=False,PersistentGuid=00000000000000000000000000000000,bHidden=False,bNotConnectable=False,bDefaultValueIsReadOnly=False,bDefaultValueIsIgnored=False,bAdvancedView=False,bOrphanedPin=False,)
   CustomProperties Pin (PinId=55F2D36743E5CA0A785D36BA19D8FAC5,PinName="NewTime",PinType.PinCategory="real",PinType.PinSubCategory="float",PinType.PinSubCategoryObject=None,PinType.PinSubCategoryMemberReference=(),PinType.PinValueType=(),PinType.ContainerType=None,PinType.bIsReference=False,PinType.bIsConst=False,PinType.bIsWeakPointer=False,PinType.bIsUObjectWrapper=False,PinType.bSerializeAsSinglePrecisionFloat=False,DefaultValue="0.0",AutogeneratedDefaultValue="0.0",PersistentGuid=00000000000000000000000000000000,bHidden=False,bNotConnectable=False,bDefaultValueIsReadOnly=False,bDefaultValueIsIgnored=False,bAdvancedView=False,bOrphanedPin=False,)
   CustomProperties Pin (PinId=8352FB0942F1B26CDE36F1A3E0194E94,PinName="Direction",Direction="EGPD_Output",PinType.PinCategory="byte",PinType.PinSubCategory="",PinType.PinSubCategoryObject="/Script/CoreUObject.Enum'/Script/Engine.ETimelineDirection'",PinType.PinSubCategoryMemberReference=(),PinType.PinValueType=(),PinType.ContainerType=None,PinType.bIsReference=False,PinType.bIsConst=False,PinType.bIsWeakPointer=False,PinType.bIsUObjectWrapper=False,PinType.bSerializeAsSinglePrecisionFloat=False,PersistentGuid=00000000000000000000000000000000,bHidden=False,bNotConnectable=False,bDefaultValueIsReadOnly=False,bDefaultValueIsIgnored=False,bAdvancedView=False,bOrphanedPin=False,)
   CustomProperties Pin (PinId=3D7FCC3341330E76CF2B1BBE30BEDC23,PinName="0-1",Direction="EGPD_Output",PinType.PinCategory="real",PinType.PinSubCategory="float",PinType.PinSubCategoryObject=None,PinType.PinSubCategoryMemberReference=(),PinType.PinValueType=(),PinType.ContainerType=None,PinType.bIsReference=False,PinType.bIsConst=False,PinType.bIsWeakPointer=False,PinType.bIsUObjectWrapper=False,PinType.bSerializeAsSinglePrecisionFloat=False,LinkedTo=(K2Node_CallFunction_45 350EC28D4358A893D05E2B861CE9AD6F,K2Node_CallFunction_47 350EC28D4358A893D05E2B861CE9AD6F,),PersistentGuid=00000000000000000000000000000000,bHidden=False,bNotConnectable=False,bDefaultValueIsReadOnly=False,bDefaultValueIsIgnored=False,bAdvancedView=False,bOrphanedPin=False,)
End Object
Begin Object Class=/Script/BlueprintGraph.K2Node_CallFunction Name="K2Node_CallFunction_46" ExportPath="/Script/BlueprintGraph.K2Node_CallFunction'/Game/CharacterBP.CharacterBP:EventGraph.K2Node_CallFunction_46'"
   bIsPureFunc=True
   FunctionReference=(MemberParent="/Script/CoreUObject.Class'/Script/Engine.KismetMathLibrary'",MemberName="MakeVector")
   NodePosX=1472
   NodePosY=608
   NodeGuid=8B929E4A43F39E6F1EF153BDE8EC0A57
   CustomProperties Pin (PinId=E5F0B96C4A5B059540565184D4DBF3B3,PinName="self",PinFriendlyName=NSLOCTEXT("K2Node", "Target", "Target"),PinToolTip="Target
Kismet Math Library Object Reference",PinType.PinCategory="object",PinType.PinSubCategory="",PinType.PinSubCategoryObject="/Script/CoreUObject.Class'/Script/Engine.KismetMathLibrary'",PinType.PinSubCategoryMemberReference=(),PinType.PinValueType=(),PinType.ContainerType=None,PinType.bIsReference=False,PinType.bIsConst=False,PinType.bIsWeakPointer=False,PinType.bIsUObjectWrapper=False,PinType.bSerializeAsSinglePrecisionFloat=False,DefaultObject="/Script/Engine.Default__KismetMathLibrary",PersistentGuid=00000000000000000000000000000000,bHidden=True,bNotConnectable=False,bDefaultValueIsReadOnly=False,bDefaultValueIsIgnored=False,bAdvancedView=False,bOrphanedPin=False,)
   CustomProperties Pin (PinId=35CAFA6645A5B7A8FC79AB86767A0DC3,PinName="X",PinToolTip="X
Float (double-precision)",PinType.PinCategory="real",PinType.PinSubCategory="double",PinType.PinSubCategoryObject=None,PinType.PinSubCategoryMemberReference=(),PinType.PinValueType=(),PinType.ContainerType=None,PinType.bIsReference=False,PinType.bIsConst=False,PinType.bIsWeakPointer=False,PinType.bIsUObjectWrapper=False,PinType.bSerializeAsSinglePrecisionFloat=False,DefaultValue="0.0",AutogeneratedDefaultValue="0.0",LinkedTo=(K2Node_CallFunction_45 3D1DCC6240151C93630A2AAB2DAB45DE,),PersistentGuid=00000000000000000000000000000000,bHidden=False,bNotConnectable=False,bDefaultValueIsReadOnly=False,bDefaultValueIsIgnored=False,bAdvancedView=False,bOrphanedPin=False,)
   CustomProperties Pin (PinId=51B02585428866C5252D249D1B20D68D,PinName="Y",PinToolTip="Y
Float (double-precision)",PinType.PinCategory="real",PinType.PinSubCategory="double",PinType.PinSubCategoryObject=None,PinType.PinSubCategoryMemberReference=(),PinType.PinValueType=(),PinType.ContainerType=None,PinType.bIsReference=False,PinType.bIsConst=False,PinType.bIsWeakPointer=False,PinType.bIsUObjectWrapper=False,PinType.bSerializeAsSinglePrecisionFloat=False,DefaultValue="0.628293",AutogeneratedDefaultValue="0.0",PersistentGuid=00000000000000000000000000000000,bHidden=False,bNotConnectable=False,bDefaultValueIsReadOnly=False,bDefaultValueIsIgnored=False,bAdvancedView=False,bOrphanedPin=False,)
   CustomProperties Pin (PinId=94FE6C5A466A3383867BD89DF5F49129,PinName="Z",PinToolTip="Z
Float (double-precision)",PinType.PinCategory="real",PinType.PinSubCategory="double",PinType.PinSubCategoryObject=None,PinType.PinSubCategoryMemberReference=(),PinType.PinValueType=(),PinType.ContainerType=None,PinType.bIsReference=False,PinType.bIsConst=False,PinType.bIsWeakPointer=False,PinType.bIsUObjectWrapper=False,PinType.bSerializeAsSinglePrecisionFloat=False,DefaultValue="0.0",AutogeneratedDefaultValue="0.0",LinkedTo=(K2Node_CallFunction_47 3D1DCC6240151C93630A2AAB2DAB45DE,),PersistentGuid=00000000000000000000000000000000,bHidden=False,bNotConnectable=False,bDefaultValueIsReadOnly=False,bDefaultValueIsIgnored=False,bAdvancedView=False,bOrphanedPin=False,)
   CustomProperties Pin (PinId=4EA7224147536FE00B8890B3B622832F,PinName="ReturnValue",PinToolTip="Return Value
Vector

Makes a vector {X, Y, Z}",Direction="EGPD_Output",PinType.PinCategory="struct",PinType.PinSubCategory="",PinType.PinSubCategoryObject="/Script/CoreUObject.ScriptStruct'/Script/CoreUObject.Vector'",PinType.PinSubCategoryMemberReference=(),PinType.PinValueType=(),PinType.ContainerType=None,PinType.bIsReference=False,PinType.bIsConst=False,PinType.bIsWeakPointer=False,PinType.bIsUObjectWrapper=False,PinType.bSerializeAsSinglePrecisionFloat=False,DefaultValue="0, 0, 0",AutogeneratedDefaultValue="0, 0, 0",LinkedTo=(K2Node_CallFunction_44 2D05CFDC4D2B8525BA4D65B2FC942798,),PersistentGuid=00000000000000000000000000000000,bHidden=False,bNotConnectable=False,bDefaultValueIsReadOnly=False,bDefaultValueIsIgnored=False,bAdvancedView=False,bOrphanedPin=False,)
End Object
Begin Object Class=/Script/BlueprintGraph.K2Node_CallFunction Name="K2Node_CallFunction_47" ExportPath="/Script/BlueprintGraph.K2Node_CallFunction'/Game/CharacterBP.CharacterBP:EventGraph.K2Node_CallFunction_47'"
   bIsPureFunc=True
   FunctionReference=(MemberParent="/Script/CoreUObject.Class'/Script/Engine.KismetMathLibrary'",MemberName="Lerp")
   NodePosX=1200
   NodePosY=688
   NodeGuid=4BC6EE5E4647A0D5B302A5B9E7DD3F8C
   CustomProperties Pin (PinId=5BDA421246A7735BE9B6E2AD17F29728,PinName="self",PinFriendlyName=NSLOCTEXT("K2Node", "Target", "Target"),PinToolTip="Target
Kismet Math Library Object Reference",PinType.PinCategory="object",PinType.PinSubCategory="",PinType.PinSubCategoryObject="/Script/CoreUObject.Class'/Script/Engine.KismetMathLibrary'",PinType.PinSubCategoryMemberReference=(),PinType.PinValueType=(),PinType.ContainerType=None,PinType.bIsReference=False,PinType.bIsConst=False,PinType.bIsWeakPointer=False,PinType.bIsUObjectWrapper=False,PinType.bSerializeAsSinglePrecisionFloat=False,DefaultObject="/Script/Engine.Default__KismetMathLibrary",PersistentGuid=00000000000000000000000000000000,bHidden=True,bNotConnectable=False,bDefaultValueIsReadOnly=False,bDefaultValueIsIgnored=False,bAdvancedView=False,bOrphanedPin=False,)
   CustomProperties Pin (PinId=B2CFE2C94684B68192F253B05849E7C6,PinName="A",PinToolTip="A
Float (double-precision)",PinType.PinCategory="real",PinType.PinSubCategory="double",PinType.PinSubCategoryObject=None,PinType.PinSubCategoryMemberReference=(),PinType.PinValueType=(),PinType.ContainerType=None,PinType.bIsReference=False,PinType.bIsConst=False,PinType.bIsWeakPointer=False,PinType.bIsUObjectWrapper=False,PinType.bSerializeAsSinglePrecisionFloat=False,DefaultValue="0.0",AutogeneratedDefaultValue="0.0",LinkedTo=(K2Node_CallFunction_48 CE18A2364B2C0FE93500E8AC4560E2B2,),PersistentGuid=00000000000000000000000000000000,bHidden=False,bNotConnectable=False,bDefaultValueIsReadOnly=False,bDefaultValueIsIgnored=False,bAdvancedView=False,bOrphanedPin=False,)
   CustomProperties Pin (PinId=949AA94B496985E5DC646B9D5D43CD54,PinName="B",PinToolTip="B
Float (double-precision)",PinType.PinCategory="real",PinType.PinSubCategory="double",PinType.PinSubCategoryObject=None,PinType.PinSubCategoryMemberReference=(),PinType.PinValueType=(),PinType.ContainerType=None,PinType.bIsReference=False,PinType.bIsConst=False,PinType.bIsWeakPointer=False,PinType.bIsUObjectWrapper=False,PinType.bSerializeAsSinglePrecisionFloat=False,DefaultValue="25.000000",AutogeneratedDefaultValue="0.0",PersistentGuid=00000000000000000000000000000000,bHidden=False,bNotConnectable=False,bDefaultValueIsReadOnly=False,bDefaultValueIsIgnored=False,bAdvancedView=False,bOrphanedPin=False,)
   CustomProperties Pin (PinId=350EC28D4358A893D05E2B861CE9AD6F,PinName="Alpha",PinToolTip="Alpha
Float (double-precision)",PinType.PinCategory="real",PinType.PinSubCategory="double",PinType.PinSubCategoryObject=None,PinType.PinSubCategoryMemberReference=(),PinType.PinValueType=(),PinType.ContainerType=None,PinType.bIsReference=False,PinType.bIsConst=False,PinType.bIsWeakPointer=False,PinType.bIsUObjectWrapper=False,PinType.bSerializeAsSinglePrecisionFloat=False,DefaultValue="0.0",AutogeneratedDefaultValue="0.0",LinkedTo=(K2Node_Timeline_6 3D7FCC3341330E76CF2B1BBE30BEDC23,),PersistentGuid=00000000000000000000000000000000,bHidden=False,bNotConnectable=False,bDefaultValueIsReadOnly=False,bDefaultValueIsIgnored=False,bAdvancedView=False,bOrphanedPin=False,)
   CustomProperties Pin (PinId=3D1DCC6240151C93630A2AAB2DAB45DE,PinName="ReturnValue",PinToolTip="Return Value
Float (double-precision)

Linearly interpolates between A and B based on Alpha (100% of A when Alpha=0 and 100% of B when Alpha=1)",Direction="EGPD_Output",PinType.PinCategory="real",PinType.PinSubCategory="double",PinType.PinSubCategoryObject=None,PinType.PinSubCategoryMemberReference=(),PinType.PinValueType=(),PinType.ContainerType=None,PinType.bIsReference=False,PinType.bIsConst=False,PinType.bIsWeakPointer=False,PinType.bIsUObjectWrapper=False,PinType.bSerializeAsSinglePrecisionFloat=False,DefaultValue="0.0",AutogeneratedDefaultValue="0.0",LinkedTo=(K2Node_CallFunction_46 94FE6C5A466A3383867BD89DF5F49129,),PersistentGuid=00000000000000000000000000000000,bHidden=False,bNotConnectable=False,bDefaultValueIsReadOnly=False,bDefaultValueIsIgnored=False,bAdvancedView=False,bOrphanedPin=False,)
End Object
Begin Object Class=/Script/BlueprintGraph.K2Node_CallFunction Name="K2Node_CallFunction_48" ExportPath="/Script/BlueprintGraph.K2Node_CallFunction'/Game/CharacterBP.CharacterBP:EventGraph.K2Node_CallFunction_48'"
   FunctionReference=(MemberName="getCameraPosition",MemberGuid=D43A7AD94273A628F99434A644C3E90E,bSelfContext=True)
   NodePosX=608
   NodePosY=496
   ErrorType=3
   NodeGuid=3FBDC3264C056765BFE24DB8E41EFE55
   CustomProperties Pin (PinId=497D2C674F6EFCD464C4369EF74F5FBD,PinName="execute",PinToolTip="
Exec",PinType.PinCategory="exec",PinType.PinSubCategory="",PinType.PinSubCategoryObject=None,PinType.PinSubCategoryMemberReference=(),PinType.PinValueType=(),PinType.ContainerType=None,PinType.bIsReference=False,PinType.bIsConst=False,PinType.bIsWeakPointer=False,PinType.bIsUObjectWrapper=False,PinType.bSerializeAsSinglePrecisionFloat=False,LinkedTo=(K2Node_CallFunction_17 E28762384CC22A0CF74DB28D25048126,K2Node_CustomEvent_1 0F97B6C54C3B7792AAE710B16B26D028,),PersistentGuid=00000000000000000000000000000000,bHidden=False,bNotConnectable=False,bDefaultValueIsReadOnly=False,bDefaultValueIsIgnored=False,bAdvancedView=False,bOrphanedPin=False,)
   CustomProperties Pin (PinId=32C856DD42C9FDCAA537FCB8E9F8D4F0,PinName="then",PinToolTip="
Exec",Direction="EGPD_Output",PinType.PinCategory="exec",PinType.PinSubCategory="",PinType.PinSubCategoryObject=None,PinType.PinSubCategoryMemberReference=(),PinType.PinValueType=(),PinType.ContainerType=None,PinType.bIsReference=False,PinType.bIsConst=False,PinType.bIsWeakPointer=False,PinType.bIsUObjectWrapper=False,PinType.bSerializeAsSinglePrecisionFloat=False,LinkedTo=(K2Node_Timeline_6 D5FA5E0D47F969F39D9E92A50F53FA50,),PersistentGuid=00000000000000000000000000000000,bHidden=False,bNotConnectable=False,bDefaultValueIsReadOnly=False,bDefaultValueIsIgnored=False,bAdvancedView=False,bOrphanedPin=False,)
   CustomProperties Pin (PinId=EB7F918D4E4854B62B920080CED27B38,PinName="self",PinFriendlyName=NSLOCTEXT("K2Node", "Target", "Target"),PinToolTip="Target
Self Object Reference",PinType.PinCategory="object",PinType.PinSubCategory="self",PinType.PinSubCategoryObject=None,PinType.PinSubCategoryMemberReference=(),PinType.PinValueType=(),PinType.ContainerType=None,PinType.bIsReference=False,PinType.bIsConst=False,PinType.bIsWeakPointer=False,PinType.bIsUObjectWrapper=False,PinType.bSerializeAsSinglePrecisionFloat=False,PersistentGuid=00000000000000000000000000000000,bHidden=False,bNotConnectable=False,bDefaultValueIsReadOnly=False,bDefaultValueIsIgnored=False,bAdvancedView=False,bOrphanedPin=False,)
   CustomProperties Pin (PinId=7403A2D9401B34D9A4901896370B7485,PinName="X",PinToolTip="X
Float (double-precision)",Direction="EGPD_Output",PinType.PinCategory="real",PinType.PinSubCategory="double",PinType.PinSubCategoryObject=None,PinType.PinSubCategoryMemberReference=(),PinType.PinValueType=(),PinType.ContainerType=None,PinType.bIsReference=False,PinType.bIsConst=False,PinType.bIsWeakPointer=False,PinType.bIsUObjectWrapper=False,PinType.bSerializeAsSinglePrecisionFloat=False,DefaultValue="0.0",AutogeneratedDefaultValue="0.0",LinkedTo=(K2Node_CallFunction_45 B2CFE2C94684B68192F253B05849E7C6,),PersistentGuid=00000000000000000000000000000000,bHidden=False,bNotConnectable=False,bDefaultValueIsReadOnly=False,bDefaultValueIsIgnored=False,bAdvancedView=False,bOrphanedPin=False,)
   CustomProperties Pin (PinId=89B7F1894DE3271069027EA646AED6D0,PinName="Y",PinToolTip="Y
Float (double-precision)",Direction="EGPD_Output",PinType.PinCategory="real",PinType.PinSubCategory="double",PinType.PinSubCategoryObject=None,PinType.PinSubCategoryMemberReference=(),PinType.PinValueType=(),PinType.ContainerType=None,PinType.bIsReference=False,PinType.bIsConst=False,PinType.bIsWeakPointer=False,PinType.bIsUObjectWrapper=False,PinType.bSerializeAsSinglePrecisionFloat=False,DefaultValue="0.0",AutogeneratedDefaultValue="0.0",PersistentGuid=00000000000000000000000000000000,bHidden=False,bNotConnectable=False,bDefaultValueIsReadOnly=False,bDefaultValueIsIgnored=False,bAdvancedView=False,bOrphanedPin=False,)
   CustomProperties Pin (PinId=CE18A2364B2C0FE93500E8AC4560E2B2,PinName="Z",PinToolTip="Z
Float (double-precision)",Direction="EGPD_Output",PinType.PinCategory="real",PinType.PinSubCategory="double",PinType.PinSubCategoryObject=None,PinType.PinSubCategoryMemberReference=(),PinType.PinValueType=(),PinType.ContainerType=None,PinType.bIsReference=False,PinType.bIsConst=False,PinType.bIsWeakPointer=False,PinType.bIsUObjectWrapper=False,PinType.bSerializeAsSinglePrecisionFloat=False,DefaultValue="0.0",AutogeneratedDefaultValue="0.0",LinkedTo=(K2Node_CallFunction_47 B2CFE2C94684B68192F253B05849E7C6,),PersistentGuid=00000000000000000000000000000000,bHidden=False,bNotConnectable=False,bDefaultValueIsReadOnly=False,bDefaultValueIsIgnored=False,bAdvancedView=False,bOrphanedPin=False,)
End Object
Begin Object Class=/Script/BlueprintGraph.K2Node_CallFunction Name="K2Node_CallFunction_17" ExportPath="/Script/BlueprintGraph.K2Node_CallFunction'/Game/CharacterBP.CharacterBP:EventGraph.K2Node_CallFunction_17'"
   FunctionReference=(MemberName="stopTimelines",MemberGuid=C5A561274273BEF6B7D762A67D7AC6D6,bSelfContext=True)
   NodePosX=336
   NodePosY=496
   NodeGuid=05387CD646D5A576BD4E6986EF064CF2
   CustomProperties Pin (PinId=ABE09E2A47D37615900BF79B53722FDF,PinName="execute",PinToolTip="
Exec",PinType.PinCategory="exec",PinType.PinSubCategory="",PinType.PinSubCategoryObject=None,PinType.PinSubCategoryMemberReference=(),PinType.PinValueType=(),PinType.ContainerType=None,PinType.bIsReference=False,PinType.bIsConst=False,PinType.bIsWeakPointer=False,PinType.bIsUObjectWrapper=False,PinType.bSerializeAsSinglePrecisionFloat=False,PersistentGuid=00000000000000000000000000000000,bHidden=False,bNotConnectable=False,bDefaultValueIsReadOnly=False,bDefaultValueIsIgnored=False,bAdvancedView=False,bOrphanedPin=False,)
   CustomProperties Pin (PinId=E28762384CC22A0CF74DB28D25048126,PinName="then",PinToolTip="
Exec",Direction="EGPD_Output",PinType.PinCategory="exec",PinType.PinSubCategory="",PinType.PinSubCategoryObject=None,PinType.PinSubCategoryMemberReference=(),PinType.PinValueType=(),PinType.ContainerType=None,PinType.bIsReference=False,PinType.bIsConst=False,PinType.bIsWeakPointer=False,PinType.bIsUObjectWrapper=False,PinType.bSerializeAsSinglePrecisionFloat=False,LinkedTo=(K2Node_CallFunction_48 497D2C674F6EFCD464C4369EF74F5FBD,),PersistentGuid=00000000000000000000000000000000,bHidden=False,bNotConnectable=False,bDefaultValueIsReadOnly=False,bDefaultValueIsIgnored=False,bAdvancedView=False,bOrphanedPin=False,)
   CustomProperties Pin (PinId=6E2FAEFC48B07DD15DBAD9A4E2821453,PinName="self",PinFriendlyName=NSLOCTEXT("K2Node", "Target", "Target"),PinToolTip="Target
Self Object Reference",PinType.PinCategory="object",PinType.PinSubCategory="self",PinType.PinSubCategoryObject=None,PinType.PinSubCategoryMemberReference=(),PinType.PinValueType=(),PinType.ContainerType=None,PinType.bIsReference=False,PinType.bIsConst=False,PinType.bIsWeakPointer=False,PinType.bIsUObjectWrapper=False,PinType.bSerializeAsSinglePrecisionFloat=False,PersistentGuid=00000000000000000000000000000000,bHidden=False,bNotConnectable=False,bDefaultValueIsReadOnly=False,bDefaultValueIsIgnored=False,bAdvancedView=False,bOrphanedPin=False,)
End Object
The blueprints for focusing on the face, legs, and initial camera position are:
   Begin Object Class=/Script/BlueprintGraph.K2Node_CallFunction Name="K2Node_CallFunction_6" ExportPath="/Script/BlueprintGraph.K2Node_CallFunction'/Game/CharacterBP.CharacterBP:EventGraph.K2Node_CallFunction_6'"
   FunctionReference=(MemberParent="/Script/CoreUObject.Class'/Script/CohtmlPlugin.CohtmlBaseComponent'",MemberName="RegisterForEvent")
   NodePosX=2624
   NodePosY=240
   NodeGuid=46944EA04370BF34CC1BBE964136D9A9
   CustomProperties Pin (PinId=73D112C043A553883FA599A50A179592,PinName="execute",PinToolTip="
Exec",PinType.PinCategory="exec",PinType.PinSubCategory="",PinType.PinSubCategoryObject=None,PinType.PinSubCategoryMemberReference=(),PinType.PinValueType=(),PinType.ContainerType=None,PinType.bIsReference=False,PinType.bIsConst=False,PinType.bIsWeakPointer=False,PinType.bIsUObjectWrapper=False,PinType.bSerializeAsSinglePrecisionFloat=False,LinkedTo=(K2Node_CallFunction_3 2594D8434A3E01AE3672CEBB306B3BB4,),PersistentGuid=00000000000000000000000000000000,bHidden=False,bNotConnectable=False,bDefaultValueIsReadOnly=False,bDefaultValueIsIgnored=False,bAdvancedView=False,bOrphanedPin=False,)
   CustomProperties Pin (PinId=2594D8434A3E01AE3672CEBB306B3BB4,PinName="then",PinToolTip="
Exec",Direction="EGPD_Output",PinType.PinCategory="exec",PinType.PinSubCategory="",PinType.PinSubCategoryObject=None,PinType.PinSubCategoryMemberReference=(),PinType.PinValueType=(),PinType.ContainerType=None,PinType.bIsReference=False,PinType.bIsConst=False,PinType.bIsWeakPointer=False,PinType.bIsUObjectWrapper=False,PinType.bSerializeAsSinglePrecisionFloat=False,LinkedTo=(K2Node_CallFunction_54 73D112C043A553883FA599A50A179592,),PersistentGuid=00000000000000000000000000000000,bHidden=False,bNotConnectable=False,bDefaultValueIsReadOnly=False,bDefaultValueIsIgnored=False,bAdvancedView=False,bOrphanedPin=False,)
   CustomProperties Pin (PinId=AA673F02470D337A1CD44F8054FBF608,PinName="self",PinFriendlyName=NSLOCTEXT("K2Node", "Target", "Target"),PinToolTip="Target
Gameface Base Component Object Reference",PinType.PinCategory="object",PinType.PinSubCategory="",PinType.PinSubCategoryObject="/Script/CoreUObject.Class'/Script/CohtmlPlugin.CohtmlBaseComponent'",PinType.PinSubCategoryMemberReference=(),PinType.PinValueType=(),PinType.ContainerType=None,PinType.bIsReference=False,PinType.bIsConst=False,PinType.bIsWeakPointer=False,PinType.bIsUObjectWrapper=False,PinType.bSerializeAsSinglePrecisionFloat=False,LinkedTo=(K2Node_Knot_1 43333471461693CD4955B49CD66C742A,),PersistentGuid=00000000000000000000000000000000,bHidden=False,bNotConnectable=False,bDefaultValueIsReadOnly=False,bDefaultValueIsIgnored=False,bAdvancedView=False,bOrphanedPin=False,)
   CustomProperties Pin (PinId=3F65821C402C7D608CE5C3901FFD7CFA,PinName="JSEventName",PinFriendlyName=NSLOCTEXT("", "140A42734E234E8FA5C87E831AA935D6", "JavaScript Event Name"),PinToolTip="Java Script Event Name
String",PinType.PinCategory="string",PinType.PinSubCategory="",PinType.PinSubCategoryObject=None,PinType.PinSubCategoryMemberReference=(),PinType.PinValueType=(),PinType.ContainerType=None,PinType.bIsReference=False,PinType.bIsConst=False,PinType.bIsWeakPointer=False,PinType.bIsUObjectWrapper=False,PinType.bSerializeAsSinglePrecisionFloat=False,DefaultValue="focusFace",PersistentGuid=00000000000000000000000000000000,bHidden=False,bNotConnectable=False,bDefaultValueIsReadOnly=False,bDefaultValueIsIgnored=False,bAdvancedView=False,bOrphanedPin=False,)
   CustomProperties Pin (PinId=93760E9C4A2EB4FC489ACEB012AAED6A,PinName="Delegate",PinFriendlyName=NSLOCTEXT("", "5A8F378B4201929C2972C5828114F9C1", "Event"),PinToolTip="Event
Delegate",PinType.PinCategory="delegate",PinType.PinSubCategory="",PinType.PinSubCategoryObject=None,PinType.PinSubCategoryMemberReference=(MemberParent="/Script/CoreUObject.Package'/Script/CohtmlPlugin'",MemberName="CohtmlJSEventBPCallback__DelegateSignature"),PinType.PinValueType=(),PinType.ContainerType=None,PinType.bIsReference=False,PinType.bIsConst=False,PinType.bIsWeakPointer=False,PinType.bIsUObjectWrapper=False,PinType.bSerializeAsSinglePrecisionFloat=False,LinkedTo=(K2Node_CustomEvent_6 379011AD44FE616C93790EAD48EDD302,),PersistentGuid=00000000000000000000000000000000,bHidden=False,bNotConnectable=False,bDefaultValueIsReadOnly=False,bDefaultValueIsIgnored=False,bAdvancedView=False,bOrphanedPin=False,)
End Object
Begin Object Class=/Script/BlueprintGraph.K2Node_CustomEvent Name="K2Node_CustomEvent_6" ExportPath="/Script/BlueprintGraph.K2Node_CustomEvent'/Game/CharacterBP.CharacterBP:EventGraph.K2Node_CustomEvent_6'"
   CustomFunctionName="FocusHead"
   NodePosX=2112
   NodePosY=496
   ErrorType=3
   NodeGuid=ECDC9ED64F9B540FC568C6B037737229
   CustomProperties Pin (PinId=379011AD44FE616C93790EAD48EDD302,PinName="OutputDelegate",Direction="EGPD_Output",PinType.PinCategory="delegate",PinType.PinSubCategory="",PinType.PinSubCategoryObject=None,PinType.PinSubCategoryMemberReference=(MemberParent="/Script/Engine.BlueprintGeneratedClass'/Game/CharacterBP.CharacterBP_C'",MemberName="FocusHead",MemberGuid=ECDC9ED64F9B540FC568C6B037737229),PinType.PinValueType=(),PinType.ContainerType=None,PinType.bIsReference=False,PinType.bIsConst=False,PinType.bIsWeakPointer=False,PinType.bIsUObjectWrapper=False,PinType.bSerializeAsSinglePrecisionFloat=False,LinkedTo=(K2Node_CallFunction_6 93760E9C4A2EB4FC489ACEB012AAED6A,),PersistentGuid=00000000000000000000000000000000,bHidden=False,bNotConnectable=False,bDefaultValueIsReadOnly=False,bDefaultValueIsIgnored=False,bAdvancedView=False,bOrphanedPin=False,)
   CustomProperties Pin (PinId=0F97B6C54C3B7792AAE710B16B26D028,PinName="then",Direction="EGPD_Output",PinType.PinCategory="exec",PinType.PinSubCategory="",PinType.PinSubCategoryObject=None,PinType.PinSubCategoryMemberReference=(),PinType.PinValueType=(),PinType.ContainerType=None,PinType.bIsReference=False,PinType.bIsConst=False,PinType.bIsWeakPointer=False,PinType.bIsUObjectWrapper=False,PinType.bSerializeAsSinglePrecisionFloat=False,LinkedTo=(K2Node_CallFunction_18 ABE09E2A47D37615900BF79B53722FDF,),PersistentGuid=00000000000000000000000000000000,bHidden=False,bNotConnectable=False,bDefaultValueIsReadOnly=False,bDefaultValueIsIgnored=False,bAdvancedView=False,bOrphanedPin=False,)
End Object
Begin Object Class=/Script/BlueprintGraph.K2Node_CallFunction Name="K2Node_CallFunction_54" ExportPath="/Script/BlueprintGraph.K2Node_CallFunction'/Game/CharacterBP.CharacterBP:EventGraph.K2Node_CallFunction_54'"
   FunctionReference=(MemberParent="/Script/CoreUObject.Class'/Script/CohtmlPlugin.CohtmlBaseComponent'",MemberName="RegisterForEvent")
   NodePosX=4384
   NodePosY=240
   NodeGuid=DBF8ECB149DB603BD91C72921B6E48CA
   CustomProperties Pin (PinId=73D112C043A553883FA599A50A179592,PinName="execute",PinToolTip="
Exec",PinType.PinCategory="exec",PinType.PinSubCategory="",PinType.PinSubCategoryObject=None,PinType.PinSubCategoryMemberReference=(),PinType.PinValueType=(),PinType.ContainerType=None,PinType.bIsReference=False,PinType.bIsConst=False,PinType.bIsWeakPointer=False,PinType.bIsUObjectWrapper=False,PinType.bSerializeAsSinglePrecisionFloat=False,LinkedTo=(K2Node_CallFunction_6 2594D8434A3E01AE3672CEBB306B3BB4,),PersistentGuid=00000000000000000000000000000000,bHidden=False,bNotConnectable=False,bDefaultValueIsReadOnly=False,bDefaultValueIsIgnored=False,bAdvancedView=False,bOrphanedPin=False,)
   CustomProperties Pin (PinId=2594D8434A3E01AE3672CEBB306B3BB4,PinName="then",PinToolTip="
Exec",Direction="EGPD_Output",PinType.PinCategory="exec",PinType.PinSubCategory="",PinType.PinSubCategoryObject=None,PinType.PinSubCategoryMemberReference=(),PinType.PinValueType=(),PinType.ContainerType=None,PinType.bIsReference=False,PinType.bIsConst=False,PinType.bIsWeakPointer=False,PinType.bIsUObjectWrapper=False,PinType.bSerializeAsSinglePrecisionFloat=False,LinkedTo=(K2Node_CallFunction_1 73D112C043A553883FA599A50A179592,),PersistentGuid=00000000000000000000000000000000,bHidden=False,bNotConnectable=False,bDefaultValueIsReadOnly=False,bDefaultValueIsIgnored=False,bAdvancedView=False,bOrphanedPin=False,)
   CustomProperties Pin (PinId=AA673F02470D337A1CD44F8054FBF608,PinName="self",PinFriendlyName=NSLOCTEXT("K2Node", "Target", "Target"),PinToolTip="Target
Gameface Base Component Object Reference",PinType.PinCategory="object",PinType.PinSubCategory="",PinType.PinSubCategoryObject="/Script/CoreUObject.Class'/Script/CohtmlPlugin.CohtmlBaseComponent'",PinType.PinSubCategoryMemberReference=(),PinType.PinValueType=(),PinType.ContainerType=None,PinType.bIsReference=False,PinType.bIsConst=False,PinType.bIsWeakPointer=False,PinType.bIsUObjectWrapper=False,PinType.bSerializeAsSinglePrecisionFloat=False,LinkedTo=(K2Node_Knot_0 A4DA0E9D471F5D5776F9CEB86195F29B,),PersistentGuid=00000000000000000000000000000000,bHidden=False,bNotConnectable=False,bDefaultValueIsReadOnly=False,bDefaultValueIsIgnored=False,bAdvancedView=False,bOrphanedPin=False,)
   CustomProperties Pin (PinId=3F65821C402C7D608CE5C3901FFD7CFA,PinName="JSEventName",PinFriendlyName=NSLOCTEXT("", "68C182B849CD3FA7C8958D9348DE5BDE", "JavaScript Event Name"),PinToolTip="Java Script Event Name
String",PinType.PinCategory="string",PinType.PinSubCategory="",PinType.PinSubCategoryObject=None,PinType.PinSubCategoryMemberReference=(),PinType.PinValueType=(),PinType.ContainerType=None,PinType.bIsReference=False,PinType.bIsConst=False,PinType.bIsWeakPointer=False,PinType.bIsUObjectWrapper=False,PinType.bSerializeAsSinglePrecisionFloat=False,DefaultValue="initialFocus",PersistentGuid=00000000000000000000000000000000,bHidden=False,bNotConnectable=False,bDefaultValueIsReadOnly=False,bDefaultValueIsIgnored=False,bAdvancedView=False,bOrphanedPin=False,)
   CustomProperties Pin (PinId=93760E9C4A2EB4FC489ACEB012AAED6A,PinName="Delegate",PinFriendlyName=NSLOCTEXT("", "28AF9E0F4882598F0357319C77FC89B0", "Event"),PinToolTip="Event
Delegate",PinType.PinCategory="delegate",PinType.PinSubCategory="",PinType.PinSubCategoryObject=None,PinType.PinSubCategoryMemberReference=(MemberParent="/Script/CoreUObject.Package'/Script/CohtmlPlugin'",MemberName="CohtmlJSEventBPCallback__DelegateSignature"),PinType.PinValueType=(),PinType.ContainerType=None,PinType.bIsReference=False,PinType.bIsConst=False,PinType.bIsWeakPointer=False,PinType.bIsUObjectWrapper=False,PinType.bSerializeAsSinglePrecisionFloat=False,LinkedTo=(K2Node_CustomEvent_8 379011AD44FE616C93790EAD48EDD302,),PersistentGuid=00000000000000000000000000000000,bHidden=False,bNotConnectable=False,bDefaultValueIsReadOnly=False,bDefaultValueIsIgnored=False,bAdvancedView=False,bOrphanedPin=False,)
End Object
Begin Object Class=/Script/BlueprintGraph.K2Node_CustomEvent Name="K2Node_CustomEvent_8" ExportPath="/Script/BlueprintGraph.K2Node_CustomEvent'/Game/CharacterBP.CharacterBP:EventGraph.K2Node_CustomEvent_8'"
   CustomFunctionName="InitialFocus"
   NodePosX=4048
   NodePosY=512
   ErrorType=3
   NodeGuid=ED9D5AEB4579D90706997790E6DE09C5
   CustomProperties Pin (PinId=379011AD44FE616C93790EAD48EDD302,PinName="OutputDelegate",Direction="EGPD_Output",PinType.PinCategory="delegate",PinType.PinSubCategory="",PinType.PinSubCategoryObject=None,PinType.PinSubCategoryMemberReference=(MemberParent="/Script/Engine.BlueprintGeneratedClass'/Game/CharacterBP.CharacterBP_C'",MemberName="InitialFocus",MemberGuid=ED9D5AEB4579D90706997790E6DE09C5),PinType.PinValueType=(),PinType.ContainerType=None,PinType.bIsReference=False,PinType.bIsConst=False,PinType.bIsWeakPointer=False,PinType.bIsUObjectWrapper=False,PinType.bSerializeAsSinglePrecisionFloat=False,LinkedTo=(K2Node_CallFunction_54 93760E9C4A2EB4FC489ACEB012AAED6A,),PersistentGuid=00000000000000000000000000000000,bHidden=False,bNotConnectable=False,bDefaultValueIsReadOnly=False,bDefaultValueIsIgnored=False,bAdvancedView=False,bOrphanedPin=False,)
   CustomProperties Pin (PinId=0F97B6C54C3B7792AAE710B16B26D028,PinName="then",Direction="EGPD_Output",PinType.PinCategory="exec",PinType.PinSubCategory="",PinType.PinSubCategoryObject=None,PinType.PinSubCategoryMemberReference=(),PinType.PinValueType=(),PinType.ContainerType=None,PinType.bIsReference=False,PinType.bIsConst=False,PinType.bIsWeakPointer=False,PinType.bIsUObjectWrapper=False,PinType.bSerializeAsSinglePrecisionFloat=False,LinkedTo=(K2Node_CallFunction_19 ABE09E2A47D37615900BF79B53722FDF,),PersistentGuid=00000000000000000000000000000000,bHidden=False,bNotConnectable=False,bDefaultValueIsReadOnly=False,bDefaultValueIsIgnored=False,bAdvancedView=False,bOrphanedPin=False,)
End Object
Begin Object Class=/Script/BlueprintGraph.K2Node_VariableGet Name="K2Node_VariableGet_16" ExportPath="/Script/BlueprintGraph.K2Node_VariableGet'/Game/CharacterBP.CharacterBP:EventGraph.K2Node_VariableGet_16'"
   VariableReference=(MemberName="SceneCaptureComponent2D",bSelfContext=True)
   NodePosX=3424
   NodePosY=560
   NodeGuid=BEAC753D4A46BE1BF29866A5E557A053
   CustomProperties Pin (PinId=34EFF39444E65B1F15F60F83750C192B,PinName="SceneCaptureComponent2D",Direction="EGPD_Output",PinType.PinCategory="object",PinType.PinSubCategory="",PinType.PinSubCategoryObject="/Script/CoreUObject.Class'/Script/Engine.SceneCaptureComponent2D'",PinType.PinSubCategoryMemberReference=(),PinType.PinValueType=(),PinType.ContainerType=None,PinType.bIsReference=False,PinType.bIsConst=False,PinType.bIsWeakPointer=False,PinType.bIsUObjectWrapper=False,PinType.bSerializeAsSinglePrecisionFloat=False,LinkedTo=(K2Node_CallFunction_49 6E47B4604D1F2BEBC767C5A9B94EE170,),PersistentGuid=00000000000000000000000000000000,bHidden=False,bNotConnectable=False,bDefaultValueIsReadOnly=False,bDefaultValueIsIgnored=False,bAdvancedView=False,bOrphanedPin=False,)
   CustomProperties Pin (PinId=9D78DA9D4930650D81491C89CAFA9A39,PinName="self",PinFriendlyName=NSLOCTEXT("K2Node", "Target", "Target"),PinType.PinCategory="object",PinType.PinSubCategory="",PinType.PinSubCategoryObject="/Script/Engine.BlueprintGeneratedClass'/Game/CharacterBP.CharacterBP_C'",PinType.PinSubCategoryMemberReference=(),PinType.PinValueType=(),PinType.ContainerType=None,PinType.bIsReference=False,PinType.bIsConst=False,PinType.bIsWeakPointer=False,PinType.bIsUObjectWrapper=False,PinType.bSerializeAsSinglePrecisionFloat=False,PersistentGuid=00000000000000000000000000000000,bHidden=True,bNotConnectable=False,bDefaultValueIsReadOnly=False,bDefaultValueIsIgnored=False,bAdvancedView=False,bOrphanedPin=False,)
End Object
Begin Object Class=/Script/BlueprintGraph.K2Node_CallFunction Name="K2Node_CallFunction_49" ExportPath="/Script/BlueprintGraph.K2Node_CallFunction'/Game/CharacterBP.CharacterBP:EventGraph.K2Node_CallFunction_49'"
   FunctionReference=(MemberParent="/Script/CoreUObject.Class'/Script/Engine.SceneComponent'",MemberName="K2_SetRelativeLocation")
   NodePosX=3728
   NodePosY=464
   NodeGuid=606E604C43C7C3B79250368D0AF03F15
   CustomProperties Pin (PinId=258669B74CAA830BE806B2BAFCDD0E57,PinName="execute",PinType.PinCategory="exec",PinType.PinSubCategory="",PinType.PinSubCategoryObject=None,PinType.PinSubCategoryMemberReference=(),PinType.PinValueType=(),PinType.ContainerType=None,PinType.bIsReference=False,PinType.bIsConst=False,PinType.bIsWeakPointer=False,PinType.bIsUObjectWrapper=False,PinType.bSerializeAsSinglePrecisionFloat=False,LinkedTo=(K2Node_Timeline_7 61AAA0934A46D88F426A5BAB8B11C98D,),PersistentGuid=00000000000000000000000000000000,bHidden=False,bNotConnectable=False,bDefaultValueIsReadOnly=False,bDefaultValueIsIgnored=False,bAdvancedView=False,bOrphanedPin=False,)
   CustomProperties Pin (PinId=D3C417064DC1F6122F44109E9EBC1868,PinName="then",Direction="EGPD_Output",PinType.PinCategory="exec",PinType.PinSubCategory="",PinType.PinSubCategoryObject=None,PinType.PinSubCategoryMemberReference=(),PinType.PinValueType=(),PinType.ContainerType=None,PinType.bIsReference=False,PinType.bIsConst=False,PinType.bIsWeakPointer=False,PinType.bIsUObjectWrapper=False,PinType.bSerializeAsSinglePrecisionFloat=False,PersistentGuid=00000000000000000000000000000000,bHidden=False,bNotConnectable=False,bDefaultValueIsReadOnly=False,bDefaultValueIsIgnored=False,bAdvancedView=False,bOrphanedPin=False,)
   CustomProperties Pin (PinId=6E47B4604D1F2BEBC767C5A9B94EE170,PinName="self",PinFriendlyName=NSLOCTEXT("K2Node", "Target", "Target"),PinType.PinCategory="object",PinType.PinSubCategory="",PinType.PinSubCategoryObject="/Script/CoreUObject.Class'/Script/Engine.SceneComponent'",PinType.PinSubCategoryMemberReference=(),PinType.PinValueType=(),PinType.ContainerType=None,PinType.bIsReference=False,PinType.bIsConst=False,PinType.bIsWeakPointer=False,PinType.bIsUObjectWrapper=False,PinType.bSerializeAsSinglePrecisionFloat=False,LinkedTo=(K2Node_VariableGet_16 34EFF39444E65B1F15F60F83750C192B,),PersistentGuid=00000000000000000000000000000000,bHidden=False,bNotConnectable=False,bDefaultValueIsReadOnly=False,bDefaultValueIsIgnored=False,bAdvancedView=False,bOrphanedPin=False,)
   CustomProperties Pin (PinId=2D05CFDC4D2B8525BA4D65B2FC942798,PinName="NewLocation",PinType.PinCategory="struct",PinType.PinSubCategory="",PinType.PinSubCategoryObject="/Script/CoreUObject.ScriptStruct'/Script/CoreUObject.Vector'",PinType.PinSubCategoryMemberReference=(),PinType.PinValueType=(),PinType.ContainerType=None,PinType.bIsReference=False,PinType.bIsConst=False,PinType.bIsWeakPointer=False,PinType.bIsUObjectWrapper=False,PinType.bSerializeAsSinglePrecisionFloat=False,DefaultValue="0, 0, 0",AutogeneratedDefaultValue="0, 0, 0",LinkedTo=(K2Node_CallFunction_51 4EA7224147536FE00B8890B3B622832F,),PersistentGuid=00000000000000000000000000000000,bHidden=False,bNotConnectable=False,bDefaultValueIsReadOnly=False,bDefaultValueIsIgnored=False,bAdvancedView=False,bOrphanedPin=False,)
   CustomProperties Pin (PinId=BB3B67104D847DCD51C06F9754AB3C5D,PinName="bSweep",PinType.PinCategory="bool",PinType.PinSubCategory="",PinType.PinSubCategoryObject=None,PinType.PinSubCategoryMemberReference=(),PinType.PinValueType=(),PinType.ContainerType=None,PinType.bIsReference=False,PinType.bIsConst=False,PinType.bIsWeakPointer=False,PinType.bIsUObjectWrapper=False,PinType.bSerializeAsSinglePrecisionFloat=False,DefaultValue="false",AutogeneratedDefaultValue="false",PersistentGuid=00000000000000000000000000000000,bHidden=False,bNotConnectable=False,bDefaultValueIsReadOnly=False,bDefaultValueIsIgnored=False,bAdvancedView=False,bOrphanedPin=False,)
   CustomProperties Pin (PinId=80989B5A45A4FD1A2D9235988C212C2B,PinName="SweepHitResult",Direction="EGPD_Output",PinType.PinCategory="struct",PinType.PinSubCategory="",PinType.PinSubCategoryObject="/Script/CoreUObject.ScriptStruct'/Script/Engine.HitResult'",PinType.PinSubCategoryMemberReference=(),PinType.PinValueType=(),PinType.ContainerType=None,PinType.bIsReference=False,PinType.bIsConst=False,PinType.bIsWeakPointer=False,PinType.bIsUObjectWrapper=False,PinType.bSerializeAsSinglePrecisionFloat=False,PersistentGuid=00000000000000000000000000000000,bHidden=False,bNotConnectable=False,bDefaultValueIsReadOnly=False,bDefaultValueIsIgnored=False,bAdvancedView=False,bOrphanedPin=False,)
   CustomProperties Pin (PinId=88BA22AA4E6CCE40E65F4F8450C8FE82,PinName="bTeleport",PinType.PinCategory="bool",PinType.PinSubCategory="",PinType.PinSubCategoryObject=None,PinType.PinSubCategoryMemberReference=(),PinType.PinValueType=(),PinType.ContainerType=None,PinType.bIsReference=False,PinType.bIsConst=False,PinType.bIsWeakPointer=False,PinType.bIsUObjectWrapper=False,PinType.bSerializeAsSinglePrecisionFloat=False,DefaultValue="false",AutogeneratedDefaultValue="false",PersistentGuid=00000000000000000000000000000000,bHidden=False,bNotConnectable=False,bDefaultValueIsReadOnly=False,bDefaultValueIsIgnored=False,bAdvancedView=False,bOrphanedPin=False,)
End Object
Begin Object Class=/Script/BlueprintGraph.K2Node_CallFunction Name="K2Node_CallFunction_50" ExportPath="/Script/BlueprintGraph.K2Node_CallFunction'/Game/CharacterBP.CharacterBP:EventGraph.K2Node_CallFunction_50'"
   bIsPureFunc=True
   FunctionReference=(MemberParent="/Script/CoreUObject.Class'/Script/Engine.KismetMathLibrary'",MemberName="Lerp")
   NodePosX=3136
   NodePosY=544
   NodeGuid=FFE75A9941F62CD18EF21C8CD672B234
   CustomProperties Pin (PinId=5BDA421246A7735BE9B6E2AD17F29728,PinName="self",PinFriendlyName=NSLOCTEXT("K2Node", "Target", "Target"),PinType.PinCategory="object",PinType.PinSubCategory="",PinType.PinSubCategoryObject="/Script/CoreUObject.Class'/Script/Engine.KismetMathLibrary'",PinType.PinSubCategoryMemberReference=(),PinType.PinValueType=(),PinType.ContainerType=None,PinType.bIsReference=False,PinType.bIsConst=False,PinType.bIsWeakPointer=False,PinType.bIsUObjectWrapper=False,PinType.bSerializeAsSinglePrecisionFloat=False,DefaultObject="/Script/Engine.Default__KismetMathLibrary",PersistentGuid=00000000000000000000000000000000,bHidden=True,bNotConnectable=False,bDefaultValueIsReadOnly=False,bDefaultValueIsIgnored=False,bAdvancedView=False,bOrphanedPin=False,)
   CustomProperties Pin (PinId=B2CFE2C94684B68192F253B05849E7C6,PinName="A",PinType.PinCategory="real",PinType.PinSubCategory="double",PinType.PinSubCategoryObject=None,PinType.PinSubCategoryMemberReference=(),PinType.PinValueType=(),PinType.ContainerType=None,PinType.bIsReference=False,PinType.bIsConst=False,PinType.bIsWeakPointer=False,PinType.bIsUObjectWrapper=False,PinType.bSerializeAsSinglePrecisionFloat=False,DefaultValue="0.0",AutogeneratedDefaultValue="0.0",LinkedTo=(K2Node_CallFunction_53 7403A2D9401B34D9A4901896370B7485,),PersistentGuid=00000000000000000000000000000000,bHidden=False,bNotConnectable=False,bDefaultValueIsReadOnly=False,bDefaultValueIsIgnored=False,bAdvancedView=False,bOrphanedPin=False,)
   CustomProperties Pin (PinId=949AA94B496985E5DC646B9D5D43CD54,PinName="B",PinType.PinCategory="real",PinType.PinSubCategory="double",PinType.PinSubCategoryObject=None,PinType.PinSubCategoryMemberReference=(),PinType.PinValueType=(),PinType.ContainerType=None,PinType.bIsReference=False,PinType.bIsConst=False,PinType.bIsWeakPointer=False,PinType.bIsUObjectWrapper=False,PinType.bSerializeAsSinglePrecisionFloat=False,DefaultValue="220.000000",AutogeneratedDefaultValue="0.0",PersistentGuid=00000000000000000000000000000000,bHidden=False,bNotConnectable=False,bDefaultValueIsReadOnly=False,bDefaultValueIsIgnored=False,bAdvancedView=False,bOrphanedPin=False,)
   CustomProperties Pin (PinId=350EC28D4358A893D05E2B861CE9AD6F,PinName="Alpha",PinType.PinCategory="real",PinType.PinSubCategory="double",PinType.PinSubCategoryObject=None,PinType.PinSubCategoryMemberReference=(),PinType.PinValueType=(),PinType.ContainerType=None,PinType.bIsReference=False,PinType.bIsConst=False,PinType.bIsWeakPointer=False,PinType.bIsUObjectWrapper=False,PinType.bSerializeAsSinglePrecisionFloat=False,DefaultValue="0.0",AutogeneratedDefaultValue="0.0",LinkedTo=(K2Node_Timeline_7 3D7FCC3341330E76CF2B1BBE30BEDC23,),PersistentGuid=00000000000000000000000000000000,bHidden=False,bNotConnectable=False,bDefaultValueIsReadOnly=False,bDefaultValueIsIgnored=False,bAdvancedView=False,bOrphanedPin=False,)
   CustomProperties Pin (PinId=3D1DCC6240151C93630A2AAB2DAB45DE,PinName="ReturnValue",Direction="EGPD_Output",PinType.PinCategory="real",PinType.PinSubCategory="double",PinType.PinSubCategoryObject=None,PinType.PinSubCategoryMemberReference=(),PinType.PinValueType=(),PinType.ContainerType=None,PinType.bIsReference=False,PinType.bIsConst=False,PinType.bIsWeakPointer=False,PinType.bIsUObjectWrapper=False,PinType.bSerializeAsSinglePrecisionFloat=False,DefaultValue="0.0",AutogeneratedDefaultValue="0.0",LinkedTo=(K2Node_CallFunction_51 35CAFA6645A5B7A8FC79AB86767A0DC3,),PersistentGuid=00000000000000000000000000000000,bHidden=False,bNotConnectable=False,bDefaultValueIsReadOnly=False,bDefaultValueIsIgnored=False,bAdvancedView=False,bOrphanedPin=False,)
End Object
Begin Object Class=/Script/BlueprintGraph.K2Node_Timeline Name="K2Node_Timeline_7" ExportPath="/Script/BlueprintGraph.K2Node_Timeline'/Game/CharacterBP.CharacterBP:EventGraph.K2Node_Timeline_7'"
   TimelineName="Timeline_face"
   TimelineGuid=E5C87CBD40BD0B6B1DFA3B9C42770E9D
   NodePosX=2832
   NodePosY=480
   bCanRenameNode=True
   NodeGuid=89970D1A427A85BC25C5BFA77A86BC1A
   CustomProperties Pin (PinId=4865440743AB7E8980B95FAF0760FB3D,PinName="Play",PinType.PinCategory="exec",PinType.PinSubCategory="",PinType.PinSubCategoryObject=None,PinType.PinSubCategoryMemberReference=(),PinType.PinValueType=(),PinType.ContainerType=None,PinType.bIsReference=False,PinType.bIsConst=False,PinType.bIsWeakPointer=False,PinType.bIsUObjectWrapper=False,PinType.bSerializeAsSinglePrecisionFloat=False,PersistentGuid=00000000000000000000000000000000,bHidden=False,bNotConnectable=False,bDefaultValueIsReadOnly=False,bDefaultValueIsIgnored=False,bAdvancedView=False,bOrphanedPin=False,)
   CustomProperties Pin (PinId=D5FA5E0D47F969F39D9E92A50F53FA50,PinName="PlayFromStart",PinType.PinCategory="exec",PinType.PinSubCategory="",PinType.PinSubCategoryObject=None,PinType.PinSubCategoryMemberReference=(),PinType.PinValueType=(),PinType.ContainerType=None,PinType.bIsReference=False,PinType.bIsConst=False,PinType.bIsWeakPointer=False,PinType.bIsUObjectWrapper=False,PinType.bSerializeAsSinglePrecisionFloat=False,LinkedTo=(K2Node_CallFunction_53 32C856DD42C9FDCAA537FCB8E9F8D4F0,),PersistentGuid=00000000000000000000000000000000,bHidden=False,bNotConnectable=False,bDefaultValueIsReadOnly=False,bDefaultValueIsIgnored=False,bAdvancedView=False,bOrphanedPin=False,)
   CustomProperties Pin (PinId=347DB8AB43A73994EDFA4084AEB755B5,PinName="Stop",PinType.PinCategory="exec",PinType.PinSubCategory="",PinType.PinSubCategoryObject=None,PinType.PinSubCategoryMemberReference=(),PinType.PinValueType=(),PinType.ContainerType=None,PinType.bIsReference=False,PinType.bIsConst=False,PinType.bIsWeakPointer=False,PinType.bIsUObjectWrapper=False,PinType.bSerializeAsSinglePrecisionFloat=False,PersistentGuid=00000000000000000000000000000000,bHidden=False,bNotConnectable=False,bDefaultValueIsReadOnly=False,bDefaultValueIsIgnored=False,bAdvancedView=False,bOrphanedPin=False,)
   CustomProperties Pin (PinId=FCF951A047802ACF0EB69F87F2502B53,PinName="Reverse",PinType.PinCategory="exec",PinType.PinSubCategory="",PinType.PinSubCategoryObject=None,PinType.PinSubCategoryMemberReference=(),PinType.PinValueType=(),PinType.ContainerType=None,PinType.bIsReference=False,PinType.bIsConst=False,PinType.bIsWeakPointer=False,PinType.bIsUObjectWrapper=False,PinType.bSerializeAsSinglePrecisionFloat=False,PersistentGuid=00000000000000000000000000000000,bHidden=False,bNotConnectable=False,bDefaultValueIsReadOnly=False,bDefaultValueIsIgnored=False,bAdvancedView=False,bOrphanedPin=False,)
   CustomProperties Pin (PinId=24670FE14335ECB3771CED895504B15E,PinName="ReverseFromEnd",PinType.PinCategory="exec",PinType.PinSubCategory="",PinType.PinSubCategoryObject=None,PinType.PinSubCategoryMemberReference=(),PinType.PinValueType=(),PinType.ContainerType=None,PinType.bIsReference=False,PinType.bIsConst=False,PinType.bIsWeakPointer=False,PinType.bIsUObjectWrapper=False,PinType.bSerializeAsSinglePrecisionFloat=False,PersistentGuid=00000000000000000000000000000000,bHidden=False,bNotConnectable=False,bDefaultValueIsReadOnly=False,bDefaultValueIsIgnored=False,bAdvancedView=False,bOrphanedPin=False,)
   CustomProperties Pin (PinId=61AAA0934A46D88F426A5BAB8B11C98D,PinName="Update",Direction="EGPD_Output",PinType.PinCategory="exec",PinType.PinSubCategory="",PinType.PinSubCategoryObject=None,PinType.PinSubCategoryMemberReference=(),PinType.PinValueType=(),PinType.ContainerType=None,PinType.bIsReference=False,PinType.bIsConst=False,PinType.bIsWeakPointer=False,PinType.bIsUObjectWrapper=False,PinType.bSerializeAsSinglePrecisionFloat=False,LinkedTo=(K2Node_CallFunction_49 258669B74CAA830BE806B2BAFCDD0E57,),PersistentGuid=00000000000000000000000000000000,bHidden=False,bNotConnectable=False,bDefaultValueIsReadOnly=False,bDefaultValueIsIgnored=False,bAdvancedView=False,bOrphanedPin=False,)
   CustomProperties Pin (PinId=172F5AA441CCAED6970824B60892D61E,PinName="Finished",Direction="EGPD_Output",PinType.PinCategory="exec",PinType.PinSubCategory="",PinType.PinSubCategoryObject=None,PinType.PinSubCategoryMemberReference=(),PinType.PinValueType=(),PinType.ContainerType=None,PinType.bIsReference=False,PinType.bIsConst=False,PinType.bIsWeakPointer=False,PinType.bIsUObjectWrapper=False,PinType.bSerializeAsSinglePrecisionFloat=False,PersistentGuid=00000000000000000000000000000000,bHidden=False,bNotConnectable=False,bDefaultValueIsReadOnly=False,bDefaultValueIsIgnored=False,bAdvancedView=False,bOrphanedPin=False,)
   CustomProperties Pin (PinId=714DC24B4C83A52D3C1CCF8A4BD5CF45,PinName="SetNewTime",PinType.PinCategory="exec",PinType.PinSubCategory="",PinType.PinSubCategoryObject=None,PinType.PinSubCategoryMemberReference=(),PinType.PinValueType=(),PinType.ContainerType=None,PinType.bIsReference=False,PinType.bIsConst=False,PinType.bIsWeakPointer=False,PinType.bIsUObjectWrapper=False,PinType.bSerializeAsSinglePrecisionFloat=False,PersistentGuid=00000000000000000000000000000000,bHidden=False,bNotConnectable=False,bDefaultValueIsReadOnly=False,bDefaultValueIsIgnored=False,bAdvancedView=False,bOrphanedPin=False,)
   CustomProperties Pin (PinId=55F2D36743E5CA0A785D36BA19D8FAC5,PinName="NewTime",PinType.PinCategory="real",PinType.PinSubCategory="float",PinType.PinSubCategoryObject=None,PinType.PinSubCategoryMemberReference=(),PinType.PinValueType=(),PinType.ContainerType=None,PinType.bIsReference=False,PinType.bIsConst=False,PinType.bIsWeakPointer=False,PinType.bIsUObjectWrapper=False,PinType.bSerializeAsSinglePrecisionFloat=False,DefaultValue="0.0",AutogeneratedDefaultValue="0.0",PersistentGuid=00000000000000000000000000000000,bHidden=False,bNotConnectable=False,bDefaultValueIsReadOnly=False,bDefaultValueIsIgnored=False,bAdvancedView=False,bOrphanedPin=False,)
   CustomProperties Pin (PinId=8352FB0942F1B26CDE36F1A3E0194E94,PinName="Direction",Direction="EGPD_Output",PinType.PinCategory="byte",PinType.PinSubCategory="",PinType.PinSubCategoryObject="/Script/CoreUObject.Enum'/Script/Engine.ETimelineDirection'",PinType.PinSubCategoryMemberReference=(),PinType.PinValueType=(),PinType.ContainerType=None,PinType.bIsReference=False,PinType.bIsConst=False,PinType.bIsWeakPointer=False,PinType.bIsUObjectWrapper=False,PinType.bSerializeAsSinglePrecisionFloat=False,PersistentGuid=00000000000000000000000000000000,bHidden=False,bNotConnectable=False,bDefaultValueIsReadOnly=False,bDefaultValueIsIgnored=False,bAdvancedView=False,bOrphanedPin=False,)
   CustomProperties Pin (PinId=3D7FCC3341330E76CF2B1BBE30BEDC23,PinName="0-1",Direction="EGPD_Output",PinType.PinCategory="real",PinType.PinSubCategory="float",PinType.PinSubCategoryObject=None,PinType.PinSubCategoryMemberReference=(),PinType.PinValueType=(),PinType.ContainerType=None,PinType.bIsReference=False,PinType.bIsConst=False,PinType.bIsWeakPointer=False,PinType.bIsUObjectWrapper=False,PinType.bSerializeAsSinglePrecisionFloat=False,LinkedTo=(K2Node_CallFunction_50 350EC28D4358A893D05E2B861CE9AD6F,K2Node_CallFunction_52 350EC28D4358A893D05E2B861CE9AD6F,),PersistentGuid=00000000000000000000000000000000,bHidden=False,bNotConnectable=False,bDefaultValueIsReadOnly=False,bDefaultValueIsIgnored=False,bAdvancedView=False,bOrphanedPin=False,)
End Object
Begin Object Class=/Script/BlueprintGraph.K2Node_CallFunction Name="K2Node_CallFunction_51" ExportPath="/Script/BlueprintGraph.K2Node_CallFunction'/Game/CharacterBP.CharacterBP:EventGraph.K2Node_CallFunction_51'"
   bIsPureFunc=True
   FunctionReference=(MemberParent="/Script/CoreUObject.Class'/Script/Engine.KismetMathLibrary'",MemberName="MakeVector")
   NodePosX=3408
   NodePosY=624
   NodeGuid=AE87785C4FFD198252B683A81CEAC857
   CustomProperties Pin (PinId=E5F0B96C4A5B059540565184D4DBF3B3,PinName="self",PinFriendlyName=NSLOCTEXT("K2Node", "Target", "Target"),PinToolTip="Target
Kismet Math Library Object Reference",PinType.PinCategory="object",PinType.PinSubCategory="",PinType.PinSubCategoryObject="/Script/CoreUObject.Class'/Script/Engine.KismetMathLibrary'",PinType.PinSubCategoryMemberReference=(),PinType.PinValueType=(),PinType.ContainerType=None,PinType.bIsReference=False,PinType.bIsConst=False,PinType.bIsWeakPointer=False,PinType.bIsUObjectWrapper=False,PinType.bSerializeAsSinglePrecisionFloat=False,DefaultObject="/Script/Engine.Default__KismetMathLibrary",PersistentGuid=00000000000000000000000000000000,bHidden=True,bNotConnectable=False,bDefaultValueIsReadOnly=False,bDefaultValueIsIgnored=False,bAdvancedView=False,bOrphanedPin=False,)
   CustomProperties Pin (PinId=35CAFA6645A5B7A8FC79AB86767A0DC3,PinName="X",PinToolTip="X
Float (double-precision)",PinType.PinCategory="real",PinType.PinSubCategory="double",PinType.PinSubCategoryObject=None,PinType.PinSubCategoryMemberReference=(),PinType.PinValueType=(),PinType.ContainerType=None,PinType.bIsReference=False,PinType.bIsConst=False,PinType.bIsWeakPointer=False,PinType.bIsUObjectWrapper=False,PinType.bSerializeAsSinglePrecisionFloat=False,DefaultValue="0.0",AutogeneratedDefaultValue="0.0",LinkedTo=(K2Node_CallFunction_50 3D1DCC6240151C93630A2AAB2DAB45DE,),PersistentGuid=00000000000000000000000000000000,bHidden=False,bNotConnectable=False,bDefaultValueIsReadOnly=False,bDefaultValueIsIgnored=False,bAdvancedView=False,bOrphanedPin=False,)
   CustomProperties Pin (PinId=51B02585428866C5252D249D1B20D68D,PinName="Y",PinToolTip="Y
Float (double-precision)",PinType.PinCategory="real",PinType.PinSubCategory="double",PinType.PinSubCategoryObject=None,PinType.PinSubCategoryMemberReference=(),PinType.PinValueType=(),PinType.ContainerType=None,PinType.bIsReference=False,PinType.bIsConst=False,PinType.bIsWeakPointer=False,PinType.bIsUObjectWrapper=False,PinType.bSerializeAsSinglePrecisionFloat=False,DefaultValue="0.628293",AutogeneratedDefaultValue="0.0",PersistentGuid=00000000000000000000000000000000,bHidden=False,bNotConnectable=False,bDefaultValueIsReadOnly=False,bDefaultValueIsIgnored=False,bAdvancedView=False,bOrphanedPin=False,)
   CustomProperties Pin (PinId=94FE6C5A466A3383867BD89DF5F49129,PinName="Z",PinToolTip="Z
Float (double-precision)",PinType.PinCategory="real",PinType.PinSubCategory="double",PinType.PinSubCategoryObject=None,PinType.PinSubCategoryMemberReference=(),PinType.PinValueType=(),PinType.ContainerType=None,PinType.bIsReference=False,PinType.bIsConst=False,PinType.bIsWeakPointer=False,PinType.bIsUObjectWrapper=False,PinType.bSerializeAsSinglePrecisionFloat=False,DefaultValue="0.0",AutogeneratedDefaultValue="0.0",LinkedTo=(K2Node_CallFunction_52 3D1DCC6240151C93630A2AAB2DAB45DE,),PersistentGuid=00000000000000000000000000000000,bHidden=False,bNotConnectable=False,bDefaultValueIsReadOnly=False,bDefaultValueIsIgnored=False,bAdvancedView=False,bOrphanedPin=False,)
   CustomProperties Pin (PinId=4EA7224147536FE00B8890B3B622832F,PinName="ReturnValue",PinToolTip="Return Value
Vector

Makes a vector {X, Y, Z}",Direction="EGPD_Output",PinType.PinCategory="struct",PinType.PinSubCategory="",PinType.PinSubCategoryObject="/Script/CoreUObject.ScriptStruct'/Script/CoreUObject.Vector'",PinType.PinSubCategoryMemberReference=(),PinType.PinValueType=(),PinType.ContainerType=None,PinType.bIsReference=False,PinType.bIsConst=False,PinType.bIsWeakPointer=False,PinType.bIsUObjectWrapper=False,PinType.bSerializeAsSinglePrecisionFloat=False,DefaultValue="0, 0, 0",AutogeneratedDefaultValue="0, 0, 0",LinkedTo=(K2Node_CallFunction_49 2D05CFDC4D2B8525BA4D65B2FC942798,),PersistentGuid=00000000000000000000000000000000,bHidden=False,bNotConnectable=False,bDefaultValueIsReadOnly=False,bDefaultValueIsIgnored=False,bAdvancedView=False,bOrphanedPin=False,)
End Object
Begin Object Class=/Script/BlueprintGraph.K2Node_CallFunction Name="K2Node_CallFunction_52" ExportPath="/Script/BlueprintGraph.K2Node_CallFunction'/Game/CharacterBP.CharacterBP:EventGraph.K2Node_CallFunction_52'"
   bIsPureFunc=True
   FunctionReference=(MemberParent="/Script/CoreUObject.Class'/Script/Engine.KismetMathLibrary'",MemberName="Lerp")
   NodePosX=3136
   NodePosY=704
   NodeGuid=5C0C7C6D4F1D462BAAE46E8C4233A115
   CustomProperties Pin (PinId=5BDA421246A7735BE9B6E2AD17F29728,PinName="self",PinFriendlyName=NSLOCTEXT("K2Node", "Target", "Target"),PinType.PinCategory="object",PinType.PinSubCategory="",PinType.PinSubCategoryObject="/Script/CoreUObject.Class'/Script/Engine.KismetMathLibrary'",PinType.PinSubCategoryMemberReference=(),PinType.PinValueType=(),PinType.ContainerType=None,PinType.bIsReference=False,PinType.bIsConst=False,PinType.bIsWeakPointer=False,PinType.bIsUObjectWrapper=False,PinType.bSerializeAsSinglePrecisionFloat=False,DefaultObject="/Script/Engine.Default__KismetMathLibrary",PersistentGuid=00000000000000000000000000000000,bHidden=True,bNotConnectable=False,bDefaultValueIsReadOnly=False,bDefaultValueIsIgnored=False,bAdvancedView=False,bOrphanedPin=False,)
   CustomProperties Pin (PinId=B2CFE2C94684B68192F253B05849E7C6,PinName="A",PinType.PinCategory="real",PinType.PinSubCategory="double",PinType.PinSubCategoryObject=None,PinType.PinSubCategoryMemberReference=(),PinType.PinValueType=(),PinType.ContainerType=None,PinType.bIsReference=False,PinType.bIsConst=False,PinType.bIsWeakPointer=False,PinType.bIsUObjectWrapper=False,PinType.bSerializeAsSinglePrecisionFloat=False,DefaultValue="0.0",AutogeneratedDefaultValue="0.0",LinkedTo=(K2Node_CallFunction_53 CE18A2364B2C0FE93500E8AC4560E2B2,),PersistentGuid=00000000000000000000000000000000,bHidden=False,bNotConnectable=False,bDefaultValueIsReadOnly=False,bDefaultValueIsIgnored=False,bAdvancedView=False,bOrphanedPin=False,)
   CustomProperties Pin (PinId=949AA94B496985E5DC646B9D5D43CD54,PinName="B",PinType.PinCategory="real",PinType.PinSubCategory="double",PinType.PinSubCategoryObject=None,PinType.PinSubCategoryMemberReference=(),PinType.PinValueType=(),PinType.ContainerType=None,PinType.bIsReference=False,PinType.bIsConst=False,PinType.bIsWeakPointer=False,PinType.bIsUObjectWrapper=False,PinType.bSerializeAsSinglePrecisionFloat=False,DefaultValue="55.000000",AutogeneratedDefaultValue="0.0",PersistentGuid=00000000000000000000000000000000,bHidden=False,bNotConnectable=False,bDefaultValueIsReadOnly=False,bDefaultValueIsIgnored=False,bAdvancedView=False,bOrphanedPin=False,)
   CustomProperties Pin (PinId=350EC28D4358A893D05E2B861CE9AD6F,PinName="Alpha",PinType.PinCategory="real",PinType.PinSubCategory="double",PinType.PinSubCategoryObject=None,PinType.PinSubCategoryMemberReference=(),PinType.PinValueType=(),PinType.ContainerType=None,PinType.bIsReference=False,PinType.bIsConst=False,PinType.bIsWeakPointer=False,PinType.bIsUObjectWrapper=False,PinType.bSerializeAsSinglePrecisionFloat=False,DefaultValue="0.0",AutogeneratedDefaultValue="0.0",LinkedTo=(K2Node_Timeline_7 3D7FCC3341330E76CF2B1BBE30BEDC23,),PersistentGuid=00000000000000000000000000000000,bHidden=False,bNotConnectable=False,bDefaultValueIsReadOnly=False,bDefaultValueIsIgnored=False,bAdvancedView=False,bOrphanedPin=False,)
   CustomProperties Pin (PinId=3D1DCC6240151C93630A2AAB2DAB45DE,PinName="ReturnValue",Direction="EGPD_Output",PinType.PinCategory="real",PinType.PinSubCategory="double",PinType.PinSubCategoryObject=None,PinType.PinSubCategoryMemberReference=(),PinType.PinValueType=(),PinType.ContainerType=None,PinType.bIsReference=False,PinType.bIsConst=False,PinType.bIsWeakPointer=False,PinType.bIsUObjectWrapper=False,PinType.bSerializeAsSinglePrecisionFloat=False,DefaultValue="0.0",AutogeneratedDefaultValue="0.0",LinkedTo=(K2Node_CallFunction_51 94FE6C5A466A3383867BD89DF5F49129,),PersistentGuid=00000000000000000000000000000000,bHidden=False,bNotConnectable=False,bDefaultValueIsReadOnly=False,bDefaultValueIsIgnored=False,bAdvancedView=False,bOrphanedPin=False,)
End Object
Begin Object Class=/Script/BlueprintGraph.K2Node_CallFunction Name="K2Node_CallFunction_53" ExportPath="/Script/BlueprintGraph.K2Node_CallFunction'/Game/CharacterBP.CharacterBP:EventGraph.K2Node_CallFunction_53'"
   FunctionReference=(MemberName="getCameraPosition",MemberGuid=D43A7AD94273A628F99434A644C3E90E,bSelfContext=True)
   NodePosX=2560
   NodePosY=496
   ErrorType=3
   NodeGuid=87081F404E1E161A5DA2B6850988736E
   CustomProperties Pin (PinId=497D2C674F6EFCD464C4369EF74F5FBD,PinName="execute",PinToolTip="
Exec",PinType.PinCategory="exec",PinType.PinSubCategory="",PinType.PinSubCategoryObject=None,PinType.PinSubCategoryMemberReference=(),PinType.PinValueType=(),PinType.ContainerType=None,PinType.bIsReference=False,PinType.bIsConst=False,PinType.bIsWeakPointer=False,PinType.bIsUObjectWrapper=False,PinType.bSerializeAsSinglePrecisionFloat=False,LinkedTo=(K2Node_CallFunction_18 E28762384CC22A0CF74DB28D25048126,),PersistentGuid=00000000000000000000000000000000,bHidden=False,bNotConnectable=False,bDefaultValueIsReadOnly=False,bDefaultValueIsIgnored=False,bAdvancedView=False,bOrphanedPin=False,)
   CustomProperties Pin (PinId=32C856DD42C9FDCAA537FCB8E9F8D4F0,PinName="then",PinToolTip="
Exec",Direction="EGPD_Output",PinType.PinCategory="exec",PinType.PinSubCategory="",PinType.PinSubCategoryObject=None,PinType.PinSubCategoryMemberReference=(),PinType.PinValueType=(),PinType.ContainerType=None,PinType.bIsReference=False,PinType.bIsConst=False,PinType.bIsWeakPointer=False,PinType.bIsUObjectWrapper=False,PinType.bSerializeAsSinglePrecisionFloat=False,LinkedTo=(K2Node_Timeline_7 D5FA5E0D47F969F39D9E92A50F53FA50,),PersistentGuid=00000000000000000000000000000000,bHidden=False,bNotConnectable=False,bDefaultValueIsReadOnly=False,bDefaultValueIsIgnored=False,bAdvancedView=False,bOrphanedPin=False,)
   CustomProperties Pin (PinId=EB7F918D4E4854B62B920080CED27B38,PinName="self",PinFriendlyName=NSLOCTEXT("K2Node", "Target", "Target"),PinToolTip="Target
Self Object Reference",PinType.PinCategory="object",PinType.PinSubCategory="self",PinType.PinSubCategoryObject=None,PinType.PinSubCategoryMemberReference=(),PinType.PinValueType=(),PinType.ContainerType=None,PinType.bIsReference=False,PinType.bIsConst=False,PinType.bIsWeakPointer=False,PinType.bIsUObjectWrapper=False,PinType.bSerializeAsSinglePrecisionFloat=False,PersistentGuid=00000000000000000000000000000000,bHidden=False,bNotConnectable=False,bDefaultValueIsReadOnly=False,bDefaultValueIsIgnored=False,bAdvancedView=False,bOrphanedPin=False,)
   CustomProperties Pin (PinId=7403A2D9401B34D9A4901896370B7485,PinName="X",PinToolTip="X
Float (double-precision)",Direction="EGPD_Output",PinType.PinCategory="real",PinType.PinSubCategory="double",PinType.PinSubCategoryObject=None,PinType.PinSubCategoryMemberReference=(),PinType.PinValueType=(),PinType.ContainerType=None,PinType.bIsReference=False,PinType.bIsConst=False,PinType.bIsWeakPointer=False,PinType.bIsUObjectWrapper=False,PinType.bSerializeAsSinglePrecisionFloat=False,DefaultValue="0.0",AutogeneratedDefaultValue="0.0",LinkedTo=(K2Node_CallFunction_50 B2CFE2C94684B68192F253B05849E7C6,),PersistentGuid=00000000000000000000000000000000,bHidden=False,bNotConnectable=False,bDefaultValueIsReadOnly=False,bDefaultValueIsIgnored=False,bAdvancedView=False,bOrphanedPin=False,)
   CustomProperties Pin (PinId=89B7F1894DE3271069027EA646AED6D0,PinName="Y",PinToolTip="Y
Float (double-precision)",Direction="EGPD_Output",PinType.PinCategory="real",PinType.PinSubCategory="double",PinType.PinSubCategoryObject=None,PinType.PinSubCategoryMemberReference=(),PinType.PinValueType=(),PinType.ContainerType=None,PinType.bIsReference=False,PinType.bIsConst=False,PinType.bIsWeakPointer=False,PinType.bIsUObjectWrapper=False,PinType.bSerializeAsSinglePrecisionFloat=False,DefaultValue="0.0",AutogeneratedDefaultValue="0.0",PersistentGuid=00000000000000000000000000000000,bHidden=False,bNotConnectable=False,bDefaultValueIsReadOnly=False,bDefaultValueIsIgnored=False,bAdvancedView=False,bOrphanedPin=False,)
   CustomProperties Pin (PinId=CE18A2364B2C0FE93500E8AC4560E2B2,PinName="Z",PinToolTip="Z
Float (double-precision)",Direction="EGPD_Output",PinType.PinCategory="real",PinType.PinSubCategory="double",PinType.PinSubCategoryObject=None,PinType.PinSubCategoryMemberReference=(),PinType.PinValueType=(),PinType.ContainerType=None,PinType.bIsReference=False,PinType.bIsConst=False,PinType.bIsWeakPointer=False,PinType.bIsUObjectWrapper=False,PinType.bSerializeAsSinglePrecisionFloat=False,DefaultValue="0.0",AutogeneratedDefaultValue="0.0",LinkedTo=(K2Node_CallFunction_52 B2CFE2C94684B68192F253B05849E7C6,),PersistentGuid=00000000000000000000000000000000,bHidden=False,bNotConnectable=False,bDefaultValueIsReadOnly=False,bDefaultValueIsIgnored=False,bAdvancedView=False,bOrphanedPin=False,)
End Object
Begin Object Class=/Script/BlueprintGraph.K2Node_VariableGet Name="K2Node_VariableGet_17" ExportPath="/Script/BlueprintGraph.K2Node_VariableGet'/Game/CharacterBP.CharacterBP:EventGraph.K2Node_VariableGet_17'"
   VariableReference=(MemberName="SceneCaptureComponent2D",bSelfContext=True)
   NodePosX=5376
   NodePosY=576
   NodeGuid=2AD468994C077294AAB1F2902754FE31
   CustomProperties Pin (PinId=34EFF39444E65B1F15F60F83750C192B,PinName="SceneCaptureComponent2D",Direction="EGPD_Output",PinType.PinCategory="object",PinType.PinSubCategory="",PinType.PinSubCategoryObject="/Script/CoreUObject.Class'/Script/Engine.SceneCaptureComponent2D'",PinType.PinSubCategoryMemberReference=(),PinType.PinValueType=(),PinType.ContainerType=None,PinType.bIsReference=False,PinType.bIsConst=False,PinType.bIsWeakPointer=False,PinType.bIsUObjectWrapper=False,PinType.bSerializeAsSinglePrecisionFloat=False,LinkedTo=(K2Node_CallFunction_55 6E47B4604D1F2BEBC767C5A9B94EE170,),PersistentGuid=00000000000000000000000000000000,bHidden=False,bNotConnectable=False,bDefaultValueIsReadOnly=False,bDefaultValueIsIgnored=False,bAdvancedView=False,bOrphanedPin=False,)
   CustomProperties Pin (PinId=9D78DA9D4930650D81491C89CAFA9A39,PinName="self",PinFriendlyName=NSLOCTEXT("K2Node", "Target", "Target"),PinType.PinCategory="object",PinType.PinSubCategory="",PinType.PinSubCategoryObject="/Script/Engine.BlueprintGeneratedClass'/Game/CharacterBP.CharacterBP_C'",PinType.PinSubCategoryMemberReference=(),PinType.PinValueType=(),PinType.ContainerType=None,PinType.bIsReference=False,PinType.bIsConst=False,PinType.bIsWeakPointer=False,PinType.bIsUObjectWrapper=False,PinType.bSerializeAsSinglePrecisionFloat=False,PersistentGuid=00000000000000000000000000000000,bHidden=True,bNotConnectable=False,bDefaultValueIsReadOnly=False,bDefaultValueIsIgnored=False,bAdvancedView=False,bOrphanedPin=False,)
End Object
Begin Object Class=/Script/BlueprintGraph.K2Node_CallFunction Name="K2Node_CallFunction_55" ExportPath="/Script/BlueprintGraph.K2Node_CallFunction'/Game/CharacterBP.CharacterBP:EventGraph.K2Node_CallFunction_55'"
   FunctionReference=(MemberParent="/Script/CoreUObject.Class'/Script/Engine.SceneComponent'",MemberName="K2_SetRelativeLocation")
   NodePosX=5680
   NodePosY=480
   NodeGuid=F980A3DD43519C54E51E6D87738E4356
   CustomProperties Pin (PinId=258669B74CAA830BE806B2BAFCDD0E57,PinName="execute",PinToolTip="
Exec",PinType.PinCategory="exec",PinType.PinSubCategory="",PinType.PinSubCategoryObject=None,PinType.PinSubCategoryMemberReference=(),PinType.PinValueType=(),PinType.ContainerType=None,PinType.bIsReference=False,PinType.bIsConst=False,PinType.bIsWeakPointer=False,PinType.bIsUObjectWrapper=False,PinType.bSerializeAsSinglePrecisionFloat=False,LinkedTo=(K2Node_Timeline_8 61AAA0934A46D88F426A5BAB8B11C98D,),PersistentGuid=00000000000000000000000000000000,bHidden=False,bNotConnectable=False,bDefaultValueIsReadOnly=False,bDefaultValueIsIgnored=False,bAdvancedView=False,bOrphanedPin=False,)
   CustomProperties Pin (PinId=D3C417064DC1F6122F44109E9EBC1868,PinName="then",PinToolTip="
Exec",Direction="EGPD_Output",PinType.PinCategory="exec",PinType.PinSubCategory="",PinType.PinSubCategoryObject=None,PinType.PinSubCategoryMemberReference=(),PinType.PinValueType=(),PinType.ContainerType=None,PinType.bIsReference=False,PinType.bIsConst=False,PinType.bIsWeakPointer=False,PinType.bIsUObjectWrapper=False,PinType.bSerializeAsSinglePrecisionFloat=False,PersistentGuid=00000000000000000000000000000000,bHidden=False,bNotConnectable=False,bDefaultValueIsReadOnly=False,bDefaultValueIsIgnored=False,bAdvancedView=False,bOrphanedPin=False,)
   CustomProperties Pin (PinId=6E47B4604D1F2BEBC767C5A9B94EE170,PinName="self",PinFriendlyName=NSLOCTEXT("K2Node", "Target", "Target"),PinToolTip="Target
Scene Component Object Reference",PinType.PinCategory="object",PinType.PinSubCategory="",PinType.PinSubCategoryObject="/Script/CoreUObject.Class'/Script/Engine.SceneComponent'",PinType.PinSubCategoryMemberReference=(),PinType.PinValueType=(),PinType.ContainerType=None,PinType.bIsReference=False,PinType.bIsConst=False,PinType.bIsWeakPointer=False,PinType.bIsUObjectWrapper=False,PinType.bSerializeAsSinglePrecisionFloat=False,LinkedTo=(K2Node_VariableGet_17 34EFF39444E65B1F15F60F83750C192B,),PersistentGuid=00000000000000000000000000000000,bHidden=False,bNotConnectable=False,bDefaultValueIsReadOnly=False,bDefaultValueIsIgnored=False,bAdvancedView=False,bOrphanedPin=False,)
   CustomProperties Pin (PinId=2D05CFDC4D2B8525BA4D65B2FC942798,PinName="NewLocation",PinToolTip="New Location
Vector

New location of the component relative to its parent.",PinType.PinCategory="struct",PinType.PinSubCategory="",PinType.PinSubCategoryObject="/Script/CoreUObject.ScriptStruct'/Script/CoreUObject.Vector'",PinType.PinSubCategoryMemberReference=(),PinType.PinValueType=(),PinType.ContainerType=None,PinType.bIsReference=False,PinType.bIsConst=False,PinType.bIsWeakPointer=False,PinType.bIsUObjectWrapper=False,PinType.bSerializeAsSinglePrecisionFloat=False,DefaultValue="0, 0, 0",AutogeneratedDefaultValue="0, 0, 0",LinkedTo=(K2Node_CallFunction_57 4EA7224147536FE00B8890B3B622832F,),PersistentGuid=00000000000000000000000000000000,bHidden=False,bNotConnectable=False,bDefaultValueIsReadOnly=False,bDefaultValueIsIgnored=False,bAdvancedView=False,bOrphanedPin=False,)
   CustomProperties Pin (PinId=BB3B67104D847DCD51C06F9754AB3C5D,PinName="bSweep",PinToolTip="Sweep
Boolean

Whether we sweep to the destination location, triggering overlaps along the way and stopping short of the target if blocked by something. Only the root component is swept and checked for blocking collision, child components move without sweeping. If collision is off, this has no effect.",PinType.PinCategory="bool",PinType.PinSubCategory="",PinType.PinSubCategoryObject=None,PinType.PinSubCategoryMemberReference=(),PinType.PinValueType=(),PinType.ContainerType=None,PinType.bIsReference=False,PinType.bIsConst=False,PinType.bIsWeakPointer=False,PinType.bIsUObjectWrapper=False,PinType.bSerializeAsSinglePrecisionFloat=False,DefaultValue="false",AutogeneratedDefaultValue="false",PersistentGuid=00000000000000000000000000000000,bHidden=False,bNotConnectable=False,bDefaultValueIsReadOnly=False,bDefaultValueIsIgnored=False,bAdvancedView=False,bOrphanedPin=False,)
   CustomProperties Pin (PinId=80989B5A45A4FD1A2D9235988C212C2B,PinName="SweepHitResult",PinToolTip="Sweep Hit Result
Hit Result Structure

Hit result from any impact if sweep is true.",Direction="EGPD_Output",PinType.PinCategory="struct",PinType.PinSubCategory="",PinType.PinSubCategoryObject="/Script/CoreUObject.ScriptStruct'/Script/Engine.HitResult'",PinType.PinSubCategoryMemberReference=(),PinType.PinValueType=(),PinType.ContainerType=None,PinType.bIsReference=False,PinType.bIsConst=False,PinType.bIsWeakPointer=False,PinType.bIsUObjectWrapper=False,PinType.bSerializeAsSinglePrecisionFloat=False,PersistentGuid=00000000000000000000000000000000,bHidden=False,bNotConnectable=False,bDefaultValueIsReadOnly=False,bDefaultValueIsIgnored=False,bAdvancedView=False,bOrphanedPin=False,)
   CustomProperties Pin (PinId=88BA22AA4E6CCE40E65F4F8450C8FE82,PinName="bTeleport",PinToolTip="Teleport
Boolean

Whether we teleport the physics state (if physics collision is enabled for this object). If true, physics velocity for this object is unchanged (so ragdoll parts are not affected by change in location). If false, physics velocity is updated based on the change in position (affecting ragdoll parts). If CCD is on and not teleporting, this will affect objects along the entire sweep volume.",PinType.PinCategory="bool",PinType.PinSubCategory="",PinType.PinSubCategoryObject=None,PinType.PinSubCategoryMemberReference=(),PinType.PinValueType=(),PinType.ContainerType=None,PinType.bIsReference=False,PinType.bIsConst=False,PinType.bIsWeakPointer=False,PinType.bIsUObjectWrapper=False,PinType.bSerializeAsSinglePrecisionFloat=False,DefaultValue="false",AutogeneratedDefaultValue="false",PersistentGuid=00000000000000000000000000000000,bHidden=False,bNotConnectable=False,bDefaultValueIsReadOnly=False,bDefaultValueIsIgnored=False,bAdvancedView=False,bOrphanedPin=False,)
End Object
Begin Object Class=/Script/BlueprintGraph.K2Node_CallFunction Name="K2Node_CallFunction_56" ExportPath="/Script/BlueprintGraph.K2Node_CallFunction'/Game/CharacterBP.CharacterBP:EventGraph.K2Node_CallFunction_56'"
   bIsPureFunc=True
   FunctionReference=(MemberParent="/Script/CoreUObject.Class'/Script/Engine.KismetMathLibrary'",MemberName="Lerp")
   NodePosX=5088
   NodePosY=560
   NodeGuid=5F58D99547CC62BCEDD70CBB706DD3DA
   CustomProperties Pin (PinId=5BDA421246A7735BE9B6E2AD17F29728,PinName="self",PinFriendlyName=NSLOCTEXT("K2Node", "Target", "Target"),PinToolTip="Target
Kismet Math Library Object Reference",PinType.PinCategory="object",PinType.PinSubCategory="",PinType.PinSubCategoryObject="/Script/CoreUObject.Class'/Script/Engine.KismetMathLibrary'",PinType.PinSubCategoryMemberReference=(),PinType.PinValueType=(),PinType.ContainerType=None,PinType.bIsReference=False,PinType.bIsConst=False,PinType.bIsWeakPointer=False,PinType.bIsUObjectWrapper=False,PinType.bSerializeAsSinglePrecisionFloat=False,DefaultObject="/Script/Engine.Default__KismetMathLibrary",PersistentGuid=00000000000000000000000000000000,bHidden=True,bNotConnectable=False,bDefaultValueIsReadOnly=False,bDefaultValueIsIgnored=False,bAdvancedView=False,bOrphanedPin=False,)
   CustomProperties Pin (PinId=B2CFE2C94684B68192F253B05849E7C6,PinName="A",PinToolTip="A
Float (double-precision)",PinType.PinCategory="real",PinType.PinSubCategory="double",PinType.PinSubCategoryObject=None,PinType.PinSubCategoryMemberReference=(),PinType.PinValueType=(),PinType.ContainerType=None,PinType.bIsReference=False,PinType.bIsConst=False,PinType.bIsWeakPointer=False,PinType.bIsUObjectWrapper=False,PinType.bSerializeAsSinglePrecisionFloat=False,DefaultValue="0.0",AutogeneratedDefaultValue="0.0",LinkedTo=(K2Node_CallFunction_59 7403A2D9401B34D9A4901896370B7485,),PersistentGuid=00000000000000000000000000000000,bHidden=False,bNotConnectable=False,bDefaultValueIsReadOnly=False,bDefaultValueIsIgnored=False,bAdvancedView=False,bOrphanedPin=False,)
   CustomProperties Pin (PinId=949AA94B496985E5DC646B9D5D43CD54,PinName="B",PinToolTip="B
Float (double-precision)",PinType.PinCategory="real",PinType.PinSubCategory="double",PinType.PinSubCategoryObject=None,PinType.PinSubCategoryMemberReference=(),PinType.PinValueType=(),PinType.ContainerType=None,PinType.bIsReference=False,PinType.bIsConst=False,PinType.bIsWeakPointer=False,PinType.bIsUObjectWrapper=False,PinType.bSerializeAsSinglePrecisionFloat=False,DefaultValue="-400.000000",AutogeneratedDefaultValue="0.0",PersistentGuid=00000000000000000000000000000000,bHidden=False,bNotConnectable=False,bDefaultValueIsReadOnly=False,bDefaultValueIsIgnored=False,bAdvancedView=False,bOrphanedPin=False,)
   CustomProperties Pin (PinId=350EC28D4358A893D05E2B861CE9AD6F,PinName="Alpha",PinToolTip="Alpha
Float (double-precision)",PinType.PinCategory="real",PinType.PinSubCategory="double",PinType.PinSubCategoryObject=None,PinType.PinSubCategoryMemberReference=(),PinType.PinValueType=(),PinType.ContainerType=None,PinType.bIsReference=False,PinType.bIsConst=False,PinType.bIsWeakPointer=False,PinType.bIsUObjectWrapper=False,PinType.bSerializeAsSinglePrecisionFloat=False,DefaultValue="0.0",AutogeneratedDefaultValue="0.0",LinkedTo=(K2Node_Timeline_8 3D7FCC3341330E76CF2B1BBE30BEDC23,),PersistentGuid=00000000000000000000000000000000,bHidden=False,bNotConnectable=False,bDefaultValueIsReadOnly=False,bDefaultValueIsIgnored=False,bAdvancedView=False,bOrphanedPin=False,)
   CustomProperties Pin (PinId=3D1DCC6240151C93630A2AAB2DAB45DE,PinName="ReturnValue",PinToolTip="Return Value
Float (double-precision)

Linearly interpolates between A and B based on Alpha (100% of A when Alpha=0 and 100% of B when Alpha=1)",Direction="EGPD_Output",PinType.PinCategory="real",PinType.PinSubCategory="double",PinType.PinSubCategoryObject=None,PinType.PinSubCategoryMemberReference=(),PinType.PinValueType=(),PinType.ContainerType=None,PinType.bIsReference=False,PinType.bIsConst=False,PinType.bIsWeakPointer=False,PinType.bIsUObjectWrapper=False,PinType.bSerializeAsSinglePrecisionFloat=False,DefaultValue="0.0",AutogeneratedDefaultValue="0.0",LinkedTo=(K2Node_CallFunction_57 35CAFA6645A5B7A8FC79AB86767A0DC3,),PersistentGuid=00000000000000000000000000000000,bHidden=False,bNotConnectable=False,bDefaultValueIsReadOnly=False,bDefaultValueIsIgnored=False,bAdvancedView=False,bOrphanedPin=False,)
End Object
Begin Object Class=/Script/BlueprintGraph.K2Node_Timeline Name="K2Node_Timeline_8" ExportPath="/Script/BlueprintGraph.K2Node_Timeline'/Game/CharacterBP.CharacterBP:EventGraph.K2Node_Timeline_8'"
   TimelineName="Timeline_initial"
   TimelineGuid=1E2EED4A41C2E43ACB3C8595C742A152
   NodePosX=4784
   NodePosY=496
   bCanRenameNode=True
   NodeGuid=FEE7F1BC471F5465D95EC08698BE45C4
   CustomProperties Pin (PinId=4865440743AB7E8980B95FAF0760FB3D,PinName="Play",PinType.PinCategory="exec",PinType.PinSubCategory="",PinType.PinSubCategoryObject=None,PinType.PinSubCategoryMemberReference=(),PinType.PinValueType=(),PinType.ContainerType=None,PinType.bIsReference=False,PinType.bIsConst=False,PinType.bIsWeakPointer=False,PinType.bIsUObjectWrapper=False,PinType.bSerializeAsSinglePrecisionFloat=False,PersistentGuid=00000000000000000000000000000000,bHidden=False,bNotConnectable=False,bDefaultValueIsReadOnly=False,bDefaultValueIsIgnored=False,bAdvancedView=False,bOrphanedPin=False,)
   CustomProperties Pin (PinId=D5FA5E0D47F969F39D9E92A50F53FA50,PinName="PlayFromStart",PinType.PinCategory="exec",PinType.PinSubCategory="",PinType.PinSubCategoryObject=None,PinType.PinSubCategoryMemberReference=(),PinType.PinValueType=(),PinType.ContainerType=None,PinType.bIsReference=False,PinType.bIsConst=False,PinType.bIsWeakPointer=False,PinType.bIsUObjectWrapper=False,PinType.bSerializeAsSinglePrecisionFloat=False,LinkedTo=(K2Node_CallFunction_59 32C856DD42C9FDCAA537FCB8E9F8D4F0,),PersistentGuid=00000000000000000000000000000000,bHidden=False,bNotConnectable=False,bDefaultValueIsReadOnly=False,bDefaultValueIsIgnored=False,bAdvancedView=False,bOrphanedPin=False,)
   CustomProperties Pin (PinId=347DB8AB43A73994EDFA4084AEB755B5,PinName="Stop",PinType.PinCategory="exec",PinType.PinSubCategory="",PinType.PinSubCategoryObject=None,PinType.PinSubCategoryMemberReference=(),PinType.PinValueType=(),PinType.ContainerType=None,PinType.bIsReference=False,PinType.bIsConst=False,PinType.bIsWeakPointer=False,PinType.bIsUObjectWrapper=False,PinType.bSerializeAsSinglePrecisionFloat=False,PersistentGuid=00000000000000000000000000000000,bHidden=False,bNotConnectable=False,bDefaultValueIsReadOnly=False,bDefaultValueIsIgnored=False,bAdvancedView=False,bOrphanedPin=False,)
   CustomProperties Pin (PinId=FCF951A047802ACF0EB69F87F2502B53,PinName="Reverse",PinType.PinCategory="exec",PinType.PinSubCategory="",PinType.PinSubCategoryObject=None,PinType.PinSubCategoryMemberReference=(),PinType.PinValueType=(),PinType.ContainerType=None,PinType.bIsReference=False,PinType.bIsConst=False,PinType.bIsWeakPointer=False,PinType.bIsUObjectWrapper=False,PinType.bSerializeAsSinglePrecisionFloat=False,PersistentGuid=00000000000000000000000000000000,bHidden=False,bNotConnectable=False,bDefaultValueIsReadOnly=False,bDefaultValueIsIgnored=False,bAdvancedView=False,bOrphanedPin=False,)
   CustomProperties Pin (PinId=24670FE14335ECB3771CED895504B15E,PinName="ReverseFromEnd",PinType.PinCategory="exec",PinType.PinSubCategory="",PinType.PinSubCategoryObject=None,PinType.PinSubCategoryMemberReference=(),PinType.PinValueType=(),PinType.ContainerType=None,PinType.bIsReference=False,PinType.bIsConst=False,PinType.bIsWeakPointer=False,PinType.bIsUObjectWrapper=False,PinType.bSerializeAsSinglePrecisionFloat=False,PersistentGuid=00000000000000000000000000000000,bHidden=False,bNotConnectable=False,bDefaultValueIsReadOnly=False,bDefaultValueIsIgnored=False,bAdvancedView=False,bOrphanedPin=False,)
   CustomProperties Pin (PinId=61AAA0934A46D88F426A5BAB8B11C98D,PinName="Update",Direction="EGPD_Output",PinType.PinCategory="exec",PinType.PinSubCategory="",PinType.PinSubCategoryObject=None,PinType.PinSubCategoryMemberReference=(),PinType.PinValueType=(),PinType.ContainerType=None,PinType.bIsReference=False,PinType.bIsConst=False,PinType.bIsWeakPointer=False,PinType.bIsUObjectWrapper=False,PinType.bSerializeAsSinglePrecisionFloat=False,LinkedTo=(K2Node_CallFunction_55 258669B74CAA830BE806B2BAFCDD0E57,),PersistentGuid=00000000000000000000000000000000,bHidden=False,bNotConnectable=False,bDefaultValueIsReadOnly=False,bDefaultValueIsIgnored=False,bAdvancedView=False,bOrphanedPin=False,)
   CustomProperties Pin (PinId=172F5AA441CCAED6970824B60892D61E,PinName="Finished",Direction="EGPD_Output",PinType.PinCategory="exec",PinType.PinSubCategory="",PinType.PinSubCategoryObject=None,PinType.PinSubCategoryMemberReference=(),PinType.PinValueType=(),PinType.ContainerType=None,PinType.bIsReference=False,PinType.bIsConst=False,PinType.bIsWeakPointer=False,PinType.bIsUObjectWrapper=False,PinType.bSerializeAsSinglePrecisionFloat=False,PersistentGuid=00000000000000000000000000000000,bHidden=False,bNotConnectable=False,bDefaultValueIsReadOnly=False,bDefaultValueIsIgnored=False,bAdvancedView=False,bOrphanedPin=False,)
   CustomProperties Pin (PinId=714DC24B4C83A52D3C1CCF8A4BD5CF45,PinName="SetNewTime",PinType.PinCategory="exec",PinType.PinSubCategory="",PinType.PinSubCategoryObject=None,PinType.PinSubCategoryMemberReference=(),PinType.PinValueType=(),PinType.ContainerType=None,PinType.bIsReference=False,PinType.bIsConst=False,PinType.bIsWeakPointer=False,PinType.bIsUObjectWrapper=False,PinType.bSerializeAsSinglePrecisionFloat=False,PersistentGuid=00000000000000000000000000000000,bHidden=False,bNotConnectable=False,bDefaultValueIsReadOnly=False,bDefaultValueIsIgnored=False,bAdvancedView=False,bOrphanedPin=False,)
   CustomProperties Pin (PinId=55F2D36743E5CA0A785D36BA19D8FAC5,PinName="NewTime",PinType.PinCategory="real",PinType.PinSubCategory="float",PinType.PinSubCategoryObject=None,PinType.PinSubCategoryMemberReference=(),PinType.PinValueType=(),PinType.ContainerType=None,PinType.bIsReference=False,PinType.bIsConst=False,PinType.bIsWeakPointer=False,PinType.bIsUObjectWrapper=False,PinType.bSerializeAsSinglePrecisionFloat=False,DefaultValue="0.0",AutogeneratedDefaultValue="0.0",PersistentGuid=00000000000000000000000000000000,bHidden=False,bNotConnectable=False,bDefaultValueIsReadOnly=False,bDefaultValueIsIgnored=False,bAdvancedView=False,bOrphanedPin=False,)
   CustomProperties Pin (PinId=8352FB0942F1B26CDE36F1A3E0194E94,PinName="Direction",Direction="EGPD_Output",PinType.PinCategory="byte",PinType.PinSubCategory="",PinType.PinSubCategoryObject="/Script/CoreUObject.Enum'/Script/Engine.ETimelineDirection'",PinType.PinSubCategoryMemberReference=(),PinType.PinValueType=(),PinType.ContainerType=None,PinType.bIsReference=False,PinType.bIsConst=False,PinType.bIsWeakPointer=False,PinType.bIsUObjectWrapper=False,PinType.bSerializeAsSinglePrecisionFloat=False,PersistentGuid=00000000000000000000000000000000,bHidden=False,bNotConnectable=False,bDefaultValueIsReadOnly=False,bDefaultValueIsIgnored=False,bAdvancedView=False,bOrphanedPin=False,)
   CustomProperties Pin (PinId=3D7FCC3341330E76CF2B1BBE30BEDC23,PinName="0-1",Direction="EGPD_Output",PinType.PinCategory="real",PinType.PinSubCategory="float",PinType.PinSubCategoryObject=None,PinType.PinSubCategoryMemberReference=(),PinType.PinValueType=(),PinType.ContainerType=None,PinType.bIsReference=False,PinType.bIsConst=False,PinType.bIsWeakPointer=False,PinType.bIsUObjectWrapper=False,PinType.bSerializeAsSinglePrecisionFloat=False,LinkedTo=(K2Node_CallFunction_56 350EC28D4358A893D05E2B861CE9AD6F,K2Node_CallFunction_58 350EC28D4358A893D05E2B861CE9AD6F,),PersistentGuid=00000000000000000000000000000000,bHidden=False,bNotConnectable=False,bDefaultValueIsReadOnly=False,bDefaultValueIsIgnored=False,bAdvancedView=False,bOrphanedPin=False,)
End Object
Begin Object Class=/Script/BlueprintGraph.K2Node_CallFunction Name="K2Node_CallFunction_57" ExportPath="/Script/BlueprintGraph.K2Node_CallFunction'/Game/CharacterBP.CharacterBP:EventGraph.K2Node_CallFunction_57'"
   bIsPureFunc=True
   FunctionReference=(MemberParent="/Script/CoreUObject.Class'/Script/Engine.KismetMathLibrary'",MemberName="MakeVector")
   NodePosX=5360
   NodePosY=640
   NodeGuid=79E09D1C4CEB043BFBA09481594514E3
   CustomProperties Pin (PinId=E5F0B96C4A5B059540565184D4DBF3B3,PinName="self",PinFriendlyName=NSLOCTEXT("K2Node", "Target", "Target"),PinToolTip="Target
Kismet Math Library Object Reference",PinType.PinCategory="object",PinType.PinSubCategory="",PinType.PinSubCategoryObject="/Script/CoreUObject.Class'/Script/Engine.KismetMathLibrary'",PinType.PinSubCategoryMemberReference=(),PinType.PinValueType=(),PinType.ContainerType=None,PinType.bIsReference=False,PinType.bIsConst=False,PinType.bIsWeakPointer=False,PinType.bIsUObjectWrapper=False,PinType.bSerializeAsSinglePrecisionFloat=False,DefaultObject="/Script/Engine.Default__KismetMathLibrary",PersistentGuid=00000000000000000000000000000000,bHidden=True,bNotConnectable=False,bDefaultValueIsReadOnly=False,bDefaultValueIsIgnored=False,bAdvancedView=False,bOrphanedPin=False,)
   CustomProperties Pin (PinId=35CAFA6645A5B7A8FC79AB86767A0DC3,PinName="X",PinToolTip="X
Float (double-precision)",PinType.PinCategory="real",PinType.PinSubCategory="double",PinType.PinSubCategoryObject=None,PinType.PinSubCategoryMemberReference=(),PinType.PinValueType=(),PinType.ContainerType=None,PinType.bIsReference=False,PinType.bIsConst=False,PinType.bIsWeakPointer=False,PinType.bIsUObjectWrapper=False,PinType.bSerializeAsSinglePrecisionFloat=False,DefaultValue="0.0",AutogeneratedDefaultValue="0.0",LinkedTo=(K2Node_CallFunction_56 3D1DCC6240151C93630A2AAB2DAB45DE,),PersistentGuid=00000000000000000000000000000000,bHidden=False,bNotConnectable=False,bDefaultValueIsReadOnly=False,bDefaultValueIsIgnored=False,bAdvancedView=False,bOrphanedPin=False,)
   CustomProperties Pin (PinId=51B02585428866C5252D249D1B20D68D,PinName="Y",PinToolTip="Y
Float (double-precision)",PinType.PinCategory="real",PinType.PinSubCategory="double",PinType.PinSubCategoryObject=None,PinType.PinSubCategoryMemberReference=(),PinType.PinValueType=(),PinType.ContainerType=None,PinType.bIsReference=False,PinType.bIsConst=False,PinType.bIsWeakPointer=False,PinType.bIsUObjectWrapper=False,PinType.bSerializeAsSinglePrecisionFloat=False,DefaultValue="0.628293",AutogeneratedDefaultValue="0.0",PersistentGuid=00000000000000000000000000000000,bHidden=False,bNotConnectable=False,bDefaultValueIsReadOnly=False,bDefaultValueIsIgnored=False,bAdvancedView=False,bOrphanedPin=False,)
   CustomProperties Pin (PinId=94FE6C5A466A3383867BD89DF5F49129,PinName="Z",PinToolTip="Z
Float (double-precision)",PinType.PinCategory="real",PinType.PinSubCategory="double",PinType.PinSubCategoryObject=None,PinType.PinSubCategoryMemberReference=(),PinType.PinValueType=(),PinType.ContainerType=None,PinType.bIsReference=False,PinType.bIsConst=False,PinType.bIsWeakPointer=False,PinType.bIsUObjectWrapper=False,PinType.bSerializeAsSinglePrecisionFloat=False,DefaultValue="0.0",AutogeneratedDefaultValue="0.0",LinkedTo=(K2Node_CallFunction_58 3D1DCC6240151C93630A2AAB2DAB45DE,),PersistentGuid=00000000000000000000000000000000,bHidden=False,bNotConnectable=False,bDefaultValueIsReadOnly=False,bDefaultValueIsIgnored=False,bAdvancedView=False,bOrphanedPin=False,)
   CustomProperties Pin (PinId=4EA7224147536FE00B8890B3B622832F,PinName="ReturnValue",PinToolTip="Return Value
Vector

Makes a vector {X, Y, Z}",Direction="EGPD_Output",PinType.PinCategory="struct",PinType.PinSubCategory="",PinType.PinSubCategoryObject="/Script/CoreUObject.ScriptStruct'/Script/CoreUObject.Vector'",PinType.PinSubCategoryMemberReference=(),PinType.PinValueType=(),PinType.ContainerType=None,PinType.bIsReference=False,PinType.bIsConst=False,PinType.bIsWeakPointer=False,PinType.bIsUObjectWrapper=False,PinType.bSerializeAsSinglePrecisionFloat=False,DefaultValue="0, 0, 0",AutogeneratedDefaultValue="0, 0, 0",LinkedTo=(K2Node_CallFunction_55 2D05CFDC4D2B8525BA4D65B2FC942798,),PersistentGuid=00000000000000000000000000000000,bHidden=False,bNotConnectable=False,bDefaultValueIsReadOnly=False,bDefaultValueIsIgnored=False,bAdvancedView=False,bOrphanedPin=False,)
End Object
Begin Object Class=/Script/BlueprintGraph.K2Node_CallFunction Name="K2Node_CallFunction_58" ExportPath="/Script/BlueprintGraph.K2Node_CallFunction'/Game/CharacterBP.CharacterBP:EventGraph.K2Node_CallFunction_58'"
   bIsPureFunc=True
   FunctionReference=(MemberParent="/Script/CoreUObject.Class'/Script/Engine.KismetMathLibrary'",MemberName="Lerp")
   NodePosX=5088
   NodePosY=720
   NodeGuid=402D8F26402F4A27315C25BB71CB95CA
   CustomProperties Pin (PinId=5BDA421246A7735BE9B6E2AD17F29728,PinName="self",PinFriendlyName=NSLOCTEXT("K2Node", "Target", "Target"),PinToolTip="Target
Kismet Math Library Object Reference",PinType.PinCategory="object",PinType.PinSubCategory="",PinType.PinSubCategoryObject="/Script/CoreUObject.Class'/Script/Engine.KismetMathLibrary'",PinType.PinSubCategoryMemberReference=(),PinType.PinValueType=(),PinType.ContainerType=None,PinType.bIsReference=False,PinType.bIsConst=False,PinType.bIsWeakPointer=False,PinType.bIsUObjectWrapper=False,PinType.bSerializeAsSinglePrecisionFloat=False,DefaultObject="/Script/Engine.Default__KismetMathLibrary",PersistentGuid=00000000000000000000000000000000,bHidden=True,bNotConnectable=False,bDefaultValueIsReadOnly=False,bDefaultValueIsIgnored=False,bAdvancedView=False,bOrphanedPin=False,)
   CustomProperties Pin (PinId=B2CFE2C94684B68192F253B05849E7C6,PinName="A",PinToolTip="A
Float (double-precision)",PinType.PinCategory="real",PinType.PinSubCategory="double",PinType.PinSubCategoryObject=None,PinType.PinSubCategoryMemberReference=(),PinType.PinValueType=(),PinType.ContainerType=None,PinType.bIsReference=False,PinType.bIsConst=False,PinType.bIsWeakPointer=False,PinType.bIsUObjectWrapper=False,PinType.bSerializeAsSinglePrecisionFloat=False,DefaultValue="0.0",AutogeneratedDefaultValue="0.0",LinkedTo=(K2Node_CallFunction_59 CE18A2364B2C0FE93500E8AC4560E2B2,),PersistentGuid=00000000000000000000000000000000,bHidden=False,bNotConnectable=False,bDefaultValueIsReadOnly=False,bDefaultValueIsIgnored=False,bAdvancedView=False,bOrphanedPin=False,)
   CustomProperties Pin (PinId=949AA94B496985E5DC646B9D5D43CD54,PinName="B",PinToolTip="B
Float (double-precision)",PinType.PinCategory="real",PinType.PinSubCategory="double",PinType.PinSubCategoryObject=None,PinType.PinSubCategoryMemberReference=(),PinType.PinValueType=(),PinType.ContainerType=None,PinType.bIsReference=False,PinType.bIsConst=False,PinType.bIsWeakPointer=False,PinType.bIsUObjectWrapper=False,PinType.bSerializeAsSinglePrecisionFloat=False,DefaultValue="-10.000000",AutogeneratedDefaultValue="0.0",PersistentGuid=00000000000000000000000000000000,bHidden=False,bNotConnectable=False,bDefaultValueIsReadOnly=False,bDefaultValueIsIgnored=False,bAdvancedView=False,bOrphanedPin=False,)
   CustomProperties Pin (PinId=350EC28D4358A893D05E2B861CE9AD6F,PinName="Alpha",PinToolTip="Alpha
Float (double-precision)",PinType.PinCategory="real",PinType.PinSubCategory="double",PinType.PinSubCategoryObject=None,PinType.PinSubCategoryMemberReference=(),PinType.PinValueType=(),PinType.ContainerType=None,PinType.bIsReference=False,PinType.bIsConst=False,PinType.bIsWeakPointer=False,PinType.bIsUObjectWrapper=False,PinType.bSerializeAsSinglePrecisionFloat=False,DefaultValue="0.0",AutogeneratedDefaultValue="0.0",LinkedTo=(K2Node_Timeline_8 3D7FCC3341330E76CF2B1BBE30BEDC23,),PersistentGuid=00000000000000000000000000000000,bHidden=False,bNotConnectable=False,bDefaultValueIsReadOnly=False,bDefaultValueIsIgnored=False,bAdvancedView=False,bOrphanedPin=False,)
   CustomProperties Pin (PinId=3D1DCC6240151C93630A2AAB2DAB45DE,PinName="ReturnValue",PinToolTip="Return Value
Float (double-precision)

Linearly interpolates between A and B based on Alpha (100% of A when Alpha=0 and 100% of B when Alpha=1)",Direction="EGPD_Output",PinType.PinCategory="real",PinType.PinSubCategory="double",PinType.PinSubCategoryObject=None,PinType.PinSubCategoryMemberReference=(),PinType.PinValueType=(),PinType.ContainerType=None,PinType.bIsReference=False,PinType.bIsConst=False,PinType.bIsWeakPointer=False,PinType.bIsUObjectWrapper=False,PinType.bSerializeAsSinglePrecisionFloat=False,DefaultValue="0.0",AutogeneratedDefaultValue="0.0",LinkedTo=(K2Node_CallFunction_57 94FE6C5A466A3383867BD89DF5F49129,),PersistentGuid=00000000000000000000000000000000,bHidden=False,bNotConnectable=False,bDefaultValueIsReadOnly=False,bDefaultValueIsIgnored=False,bAdvancedView=False,bOrphanedPin=False,)
End Object
Begin Object Class=/Script/BlueprintGraph.K2Node_CallFunction Name="K2Node_CallFunction_59" ExportPath="/Script/BlueprintGraph.K2Node_CallFunction'/Game/CharacterBP.CharacterBP:EventGraph.K2Node_CallFunction_59'"
   FunctionReference=(MemberName="getCameraPosition",MemberGuid=D43A7AD94273A628F99434A644C3E90E,bSelfContext=True)
   NodePosX=4512
   NodePosY=512
   ErrorType=3
   NodeGuid=1522B29F478FB0A6C62BDB919DD92C80
   CustomProperties Pin (PinId=497D2C674F6EFCD464C4369EF74F5FBD,PinName="execute",PinType.PinCategory="exec",PinType.PinSubCategory="",PinType.PinSubCategoryObject=None,PinType.PinSubCategoryMemberReference=(),PinType.PinValueType=(),PinType.ContainerType=None,PinType.bIsReference=False,PinType.bIsConst=False,PinType.bIsWeakPointer=False,PinType.bIsUObjectWrapper=False,PinType.bSerializeAsSinglePrecisionFloat=False,LinkedTo=(K2Node_CallFunction_19 E28762384CC22A0CF74DB28D25048126,),PersistentGuid=00000000000000000000000000000000,bHidden=False,bNotConnectable=False,bDefaultValueIsReadOnly=False,bDefaultValueIsIgnored=False,bAdvancedView=False,bOrphanedPin=False,)
   CustomProperties Pin (PinId=32C856DD42C9FDCAA537FCB8E9F8D4F0,PinName="then",Direction="EGPD_Output",PinType.PinCategory="exec",PinType.PinSubCategory="",PinType.PinSubCategoryObject=None,PinType.PinSubCategoryMemberReference=(),PinType.PinValueType=(),PinType.ContainerType=None,PinType.bIsReference=False,PinType.bIsConst=False,PinType.bIsWeakPointer=False,PinType.bIsUObjectWrapper=False,PinType.bSerializeAsSinglePrecisionFloat=False,LinkedTo=(K2Node_Timeline_8 D5FA5E0D47F969F39D9E92A50F53FA50,),PersistentGuid=00000000000000000000000000000000,bHidden=False,bNotConnectable=False,bDefaultValueIsReadOnly=False,bDefaultValueIsIgnored=False,bAdvancedView=False,bOrphanedPin=False,)
   CustomProperties Pin (PinId=EB7F918D4E4854B62B920080CED27B38,PinName="self",PinFriendlyName=NSLOCTEXT("K2Node", "Target", "Target"),PinType.PinCategory="object",PinType.PinSubCategory="self",PinType.PinSubCategoryObject=None,PinType.PinSubCategoryMemberReference=(),PinType.PinValueType=(),PinType.ContainerType=None,PinType.bIsReference=False,PinType.bIsConst=False,PinType.bIsWeakPointer=False,PinType.bIsUObjectWrapper=False,PinType.bSerializeAsSinglePrecisionFloat=False,PersistentGuid=00000000000000000000000000000000,bHidden=False,bNotConnectable=False,bDefaultValueIsReadOnly=False,bDefaultValueIsIgnored=False,bAdvancedView=False,bOrphanedPin=False,)
   CustomProperties Pin (PinId=7403A2D9401B34D9A4901896370B7485,PinName="X",Direction="EGPD_Output",PinType.PinCategory="real",PinType.PinSubCategory="double",PinType.PinSubCategoryObject=None,PinType.PinSubCategoryMemberReference=(),PinType.PinValueType=(),PinType.ContainerType=None,PinType.bIsReference=False,PinType.bIsConst=False,PinType.bIsWeakPointer=False,PinType.bIsUObjectWrapper=False,PinType.bSerializeAsSinglePrecisionFloat=False,DefaultValue="0.0",AutogeneratedDefaultValue="0.0",LinkedTo=(K2Node_CallFunction_56 B2CFE2C94684B68192F253B05849E7C6,),PersistentGuid=00000000000000000000000000000000,bHidden=False,bNotConnectable=False,bDefaultValueIsReadOnly=False,bDefaultValueIsIgnored=False,bAdvancedView=False,bOrphanedPin=False,)
   CustomProperties Pin (PinId=89B7F1894DE3271069027EA646AED6D0,PinName="Y",Direction="EGPD_Output",PinType.PinCategory="real",PinType.PinSubCategory="double",PinType.PinSubCategoryObject=None,PinType.PinSubCategoryMemberReference=(),PinType.PinValueType=(),PinType.ContainerType=None,PinType.bIsReference=False,PinType.bIsConst=False,PinType.bIsWeakPointer=False,PinType.bIsUObjectWrapper=False,PinType.bSerializeAsSinglePrecisionFloat=False,DefaultValue="0.0",AutogeneratedDefaultValue="0.0",PersistentGuid=00000000000000000000000000000000,bHidden=False,bNotConnectable=False,bDefaultValueIsReadOnly=False,bDefaultValueIsIgnored=False,bAdvancedView=False,bOrphanedPin=False,)
   CustomProperties Pin (PinId=CE18A2364B2C0FE93500E8AC4560E2B2,PinName="Z",Direction="EGPD_Output",PinType.PinCategory="real",PinType.PinSubCategory="double",PinType.PinSubCategoryObject=None,PinType.PinSubCategoryMemberReference=(),PinType.PinValueType=(),PinType.ContainerType=None,PinType.bIsReference=False,PinType.bIsConst=False,PinType.bIsWeakPointer=False,PinType.bIsUObjectWrapper=False,PinType.bSerializeAsSinglePrecisionFloat=False,DefaultValue="0.0",AutogeneratedDefaultValue="0.0",LinkedTo=(K2Node_CallFunction_58 B2CFE2C94684B68192F253B05849E7C6,),PersistentGuid=00000000000000000000000000000000,bHidden=False,bNotConnectable=False,bDefaultValueIsReadOnly=False,bDefaultValueIsIgnored=False,bAdvancedView=False,bOrphanedPin=False,)
End Object
Begin Object Class=/Script/BlueprintGraph.K2Node_CallFunction Name="K2Node_CallFunction_1" ExportPath="/Script/BlueprintGraph.K2Node_CallFunction'/Game/CharacterBP.CharacterBP:EventGraph.K2Node_CallFunction_1'"
   FunctionReference=(MemberParent="/Script/CoreUObject.Class'/Script/CohtmlPlugin.CohtmlBaseComponent'",MemberName="RegisterForEvent")
   NodePosX=6080
   NodePosY=240
   ErrorType=1
   NodeGuid=AD9EEA814F6D62AAC34360A93CF52691
   CustomProperties Pin (PinId=73D112C043A553883FA599A50A179592,PinName="execute",PinToolTip="
Exec",PinType.PinCategory="exec",PinType.PinSubCategory="",PinType.PinSubCategoryObject=None,PinType.PinSubCategoryMemberReference=(),PinType.PinValueType=(),PinType.ContainerType=None,PinType.bIsReference=False,PinType.bIsConst=False,PinType.bIsWeakPointer=False,PinType.bIsUObjectWrapper=False,PinType.bSerializeAsSinglePrecisionFloat=False,LinkedTo=(K2Node_CallFunction_54 2594D8434A3E01AE3672CEBB306B3BB4,),PersistentGuid=00000000000000000000000000000000,bHidden=False,bNotConnectable=False,bDefaultValueIsReadOnly=False,bDefaultValueIsIgnored=False,bAdvancedView=False,bOrphanedPin=False,)
   CustomProperties Pin (PinId=2594D8434A3E01AE3672CEBB306B3BB4,PinName="then",PinToolTip="
Exec",Direction="EGPD_Output",PinType.PinCategory="exec",PinType.PinSubCategory="",PinType.PinSubCategoryObject=None,PinType.PinSubCategoryMemberReference=(),PinType.PinValueType=(),PinType.ContainerType=None,PinType.bIsReference=False,PinType.bIsConst=False,PinType.bIsWeakPointer=False,PinType.bIsUObjectWrapper=False,PinType.bSerializeAsSinglePrecisionFloat=False,LinkedTo=(K2Node_CallFunction_4 73D112C043A553883FA599A50A179592,),PersistentGuid=00000000000000000000000000000000,bHidden=False,bNotConnectable=False,bDefaultValueIsReadOnly=False,bDefaultValueIsIgnored=False,bAdvancedView=False,bOrphanedPin=False,)
   CustomProperties Pin (PinId=AA673F02470D337A1CD44F8054FBF608,PinName="self",PinFriendlyName=NSLOCTEXT("K2Node", "Target", "Target"),PinToolTip="Target
Gameface Base Component Object Reference",PinType.PinCategory="object",PinType.PinSubCategory="",PinType.PinSubCategoryObject="/Script/CoreUObject.Class'/Script/CohtmlPlugin.CohtmlBaseComponent'",PinType.PinSubCategoryMemberReference=(),PinType.PinValueType=(),PinType.ContainerType=None,PinType.bIsReference=False,PinType.bIsConst=False,PinType.bIsWeakPointer=False,PinType.bIsUObjectWrapper=False,PinType.bSerializeAsSinglePrecisionFloat=False,LinkedTo=(K2Node_Knot_2 39879CB24D946A96CBCB0CA15AED7D7A,),PersistentGuid=00000000000000000000000000000000,bHidden=False,bNotConnectable=False,bDefaultValueIsReadOnly=False,bDefaultValueIsIgnored=False,bAdvancedView=False,bOrphanedPin=False,)
   CustomProperties Pin (PinId=3F65821C402C7D608CE5C3901FFD7CFA,PinName="JSEventName",PinFriendlyName=NSLOCTEXT("", "81B8FA0F4B7AFB890809978986FEFA24", "JavaScript Event Name"),PinToolTip="Java Script Event Name
String",PinType.PinCategory="string",PinType.PinSubCategory="",PinType.PinSubCategoryObject=None,PinType.PinSubCategoryMemberReference=(),PinType.PinValueType=(),PinType.ContainerType=None,PinType.bIsReference=False,PinType.bIsConst=False,PinType.bIsWeakPointer=False,PinType.bIsUObjectWrapper=False,PinType.bSerializeAsSinglePrecisionFloat=False,DefaultValue="focusLegs",PersistentGuid=00000000000000000000000000000000,bHidden=False,bNotConnectable=False,bDefaultValueIsReadOnly=False,bDefaultValueIsIgnored=False,bAdvancedView=False,bOrphanedPin=False,)
   CustomProperties Pin (PinId=93760E9C4A2EB4FC489ACEB012AAED6A,PinName="Delegate",PinFriendlyName=NSLOCTEXT("", "ADE3692B4820D20FBBC47C87C939D293", "Event"),PinToolTip="Event
Delegate",PinType.PinCategory="delegate",PinType.PinSubCategory="",PinType.PinSubCategoryObject=None,PinType.PinSubCategoryMemberReference=(MemberParent="/Script/CoreUObject.Package'/Script/CohtmlPlugin'",MemberName="CohtmlJSEventBPCallback__DelegateSignature"),PinType.PinValueType=(),PinType.ContainerType=None,PinType.bIsReference=False,PinType.bIsConst=False,PinType.bIsWeakPointer=False,PinType.bIsUObjectWrapper=False,PinType.bSerializeAsSinglePrecisionFloat=False,LinkedTo=(K2Node_CustomEvent_2 379011AD44FE616C93790EAD48EDD302,),PersistentGuid=00000000000000000000000000000000,bHidden=False,bNotConnectable=False,bDefaultValueIsReadOnly=False,bDefaultValueIsIgnored=False,bAdvancedView=False,bOrphanedPin=False,)
End Object
Begin Object Class=/Script/BlueprintGraph.K2Node_CustomEvent Name="K2Node_CustomEvent_2" ExportPath="/Script/BlueprintGraph.K2Node_CustomEvent'/Game/CharacterBP.CharacterBP:EventGraph.K2Node_CustomEvent_2'"
   CustomFunctionName="FocusLegs"
   NodePosX=6016
   NodePosY=512
   ErrorType=3
   NodeGuid=4636DB164934F9F41FFD41B30E10FC8C
   CustomProperties Pin (PinId=379011AD44FE616C93790EAD48EDD302,PinName="OutputDelegate",Direction="EGPD_Output",PinType.PinCategory="delegate",PinType.PinSubCategory="",PinType.PinSubCategoryObject=None,PinType.PinSubCategoryMemberReference=(MemberParent="/Script/Engine.BlueprintGeneratedClass'/Game/CharacterBP.CharacterBP_C'",MemberName="FocusLegs",MemberGuid=4636DB164934F9F41FFD41B30E10FC8C),PinType.PinValueType=(),PinType.ContainerType=None,PinType.bIsReference=False,PinType.bIsConst=False,PinType.bIsWeakPointer=False,PinType.bIsUObjectWrapper=False,PinType.bSerializeAsSinglePrecisionFloat=False,LinkedTo=(K2Node_CallFunction_1 93760E9C4A2EB4FC489ACEB012AAED6A,),PersistentGuid=00000000000000000000000000000000,bHidden=False,bNotConnectable=False,bDefaultValueIsReadOnly=False,bDefaultValueIsIgnored=False,bAdvancedView=False,bOrphanedPin=False,)
   CustomProperties Pin (PinId=0F97B6C54C3B7792AAE710B16B26D028,PinName="then",Direction="EGPD_Output",PinType.PinCategory="exec",PinType.PinSubCategory="",PinType.PinSubCategoryObject=None,PinType.PinSubCategoryMemberReference=(),PinType.PinValueType=(),PinType.ContainerType=None,PinType.bIsReference=False,PinType.bIsConst=False,PinType.bIsWeakPointer=False,PinType.bIsUObjectWrapper=False,PinType.bSerializeAsSinglePrecisionFloat=False,LinkedTo=(K2Node_CallFunction_16 ABE09E2A47D37615900BF79B53722FDF,),PersistentGuid=00000000000000000000000000000000,bHidden=False,bNotConnectable=False,bDefaultValueIsReadOnly=False,bDefaultValueIsIgnored=False,bAdvancedView=False,bOrphanedPin=False,)
End Object
Begin Object Class=/Script/BlueprintGraph.K2Node_VariableGet Name="K2Node_VariableGet_4" ExportPath="/Script/BlueprintGraph.K2Node_VariableGet'/Game/CharacterBP.CharacterBP:EventGraph.K2Node_VariableGet_4'"
   VariableReference=(MemberName="SceneCaptureComponent2D",bSelfContext=True)
   NodePosX=7344
   NodePosY=576
   NodeGuid=D61E712E47AFDBA97E05ED90698D12EE
   CustomProperties Pin (PinId=34EFF39444E65B1F15F60F83750C192B,PinName="SceneCaptureComponent2D",Direction="EGPD_Output",PinType.PinCategory="object",PinType.PinSubCategory="",PinType.PinSubCategoryObject="/Script/CoreUObject.Class'/Script/Engine.SceneCaptureComponent2D'",PinType.PinSubCategoryMemberReference=(),PinType.PinValueType=(),PinType.ContainerType=None,PinType.bIsReference=False,PinType.bIsConst=False,PinType.bIsWeakPointer=False,PinType.bIsUObjectWrapper=False,PinType.bSerializeAsSinglePrecisionFloat=False,LinkedTo=(K2Node_CallFunction_2 6E47B4604D1F2BEBC767C5A9B94EE170,),PersistentGuid=00000000000000000000000000000000,bHidden=False,bNotConnectable=False,bDefaultValueIsReadOnly=False,bDefaultValueIsIgnored=False,bAdvancedView=False,bOrphanedPin=False,)
   CustomProperties Pin (PinId=9D78DA9D4930650D81491C89CAFA9A39,PinName="self",PinFriendlyName=NSLOCTEXT("K2Node", "Target", "Target"),PinType.PinCategory="object",PinType.PinSubCategory="",PinType.PinSubCategoryObject="/Script/Engine.BlueprintGeneratedClass'/Game/CharacterBP.CharacterBP_C'",PinType.PinSubCategoryMemberReference=(),PinType.PinValueType=(),PinType.ContainerType=None,PinType.bIsReference=False,PinType.bIsConst=False,PinType.bIsWeakPointer=False,PinType.bIsUObjectWrapper=False,PinType.bSerializeAsSinglePrecisionFloat=False,PersistentGuid=00000000000000000000000000000000,bHidden=True,bNotConnectable=False,bDefaultValueIsReadOnly=False,bDefaultValueIsIgnored=False,bAdvancedView=False,bOrphanedPin=False,)
End Object
Begin Object Class=/Script/BlueprintGraph.K2Node_CallFunction Name="K2Node_CallFunction_2" ExportPath="/Script/BlueprintGraph.K2Node_CallFunction'/Game/CharacterBP.CharacterBP:EventGraph.K2Node_CallFunction_2'"
   FunctionReference=(MemberParent="/Script/CoreUObject.Class'/Script/Engine.SceneComponent'",MemberName="K2_SetRelativeLocation")
   NodePosX=7648
   NodePosY=480
   NodeGuid=E6E258C64C1D41171F1724ADEA041191
   CustomProperties Pin (PinId=258669B74CAA830BE806B2BAFCDD0E57,PinName="execute",PinToolTip="
Exec",PinType.PinCategory="exec",PinType.PinSubCategory="",PinType.PinSubCategoryObject=None,PinType.PinSubCategoryMemberReference=(),PinType.PinValueType=(),PinType.ContainerType=None,PinType.bIsReference=False,PinType.bIsConst=False,PinType.bIsWeakPointer=False,PinType.bIsUObjectWrapper=False,PinType.bSerializeAsSinglePrecisionFloat=False,LinkedTo=(K2Node_Timeline_5 61AAA0934A46D88F426A5BAB8B11C98D,),PersistentGuid=00000000000000000000000000000000,bHidden=False,bNotConnectable=False,bDefaultValueIsReadOnly=False,bDefaultValueIsIgnored=False,bAdvancedView=False,bOrphanedPin=False,)
   CustomProperties Pin (PinId=D3C417064DC1F6122F44109E9EBC1868,PinName="then",PinToolTip="
Exec",Direction="EGPD_Output",PinType.PinCategory="exec",PinType.PinSubCategory="",PinType.PinSubCategoryObject=None,PinType.PinSubCategoryMemberReference=(),PinType.PinValueType=(),PinType.ContainerType=None,PinType.bIsReference=False,PinType.bIsConst=False,PinType.bIsWeakPointer=False,PinType.bIsUObjectWrapper=False,PinType.bSerializeAsSinglePrecisionFloat=False,PersistentGuid=00000000000000000000000000000000,bHidden=False,bNotConnectable=False,bDefaultValueIsReadOnly=False,bDefaultValueIsIgnored=False,bAdvancedView=False,bOrphanedPin=False,)
   CustomProperties Pin (PinId=6E47B4604D1F2BEBC767C5A9B94EE170,PinName="self",PinFriendlyName=NSLOCTEXT("K2Node", "Target", "Target"),PinToolTip="Target
Scene Component Object Reference",PinType.PinCategory="object",PinType.PinSubCategory="",PinType.PinSubCategoryObject="/Script/CoreUObject.Class'/Script/Engine.SceneComponent'",PinType.PinSubCategoryMemberReference=(),PinType.PinValueType=(),PinType.ContainerType=None,PinType.bIsReference=False,PinType.bIsConst=False,PinType.bIsWeakPointer=False,PinType.bIsUObjectWrapper=False,PinType.bSerializeAsSinglePrecisionFloat=False,LinkedTo=(K2Node_VariableGet_4 34EFF39444E65B1F15F60F83750C192B,),PersistentGuid=00000000000000000000000000000000,bHidden=False,bNotConnectable=False,bDefaultValueIsReadOnly=False,bDefaultValueIsIgnored=False,bAdvancedView=False,bOrphanedPin=False,)
   CustomProperties Pin (PinId=2D05CFDC4D2B8525BA4D65B2FC942798,PinName="NewLocation",PinToolTip="New Location
Vector

New location of the component relative to its parent.",PinType.PinCategory="struct",PinType.PinSubCategory="",PinType.PinSubCategoryObject="/Script/CoreUObject.ScriptStruct'/Script/CoreUObject.Vector'",PinType.PinSubCategoryMemberReference=(),PinType.PinValueType=(),PinType.ContainerType=None,PinType.bIsReference=False,PinType.bIsConst=False,PinType.bIsWeakPointer=False,PinType.bIsUObjectWrapper=False,PinType.bSerializeAsSinglePrecisionFloat=False,DefaultValue="0, 0, 0",AutogeneratedDefaultValue="0, 0, 0",LinkedTo=(K2Node_CallFunction_22 4EA7224147536FE00B8890B3B622832F,),PersistentGuid=00000000000000000000000000000000,bHidden=False,bNotConnectable=False,bDefaultValueIsReadOnly=False,bDefaultValueIsIgnored=False,bAdvancedView=False,bOrphanedPin=False,)
   CustomProperties Pin (PinId=BB3B67104D847DCD51C06F9754AB3C5D,PinName="bSweep",PinToolTip="Sweep
Boolean

Whether we sweep to the destination location, triggering overlaps along the way and stopping short of the target if blocked by something. Only the root component is swept and checked for blocking collision, child components move without sweeping. If collision is off, this has no effect.",PinType.PinCategory="bool",PinType.PinSubCategory="",PinType.PinSubCategoryObject=None,PinType.PinSubCategoryMemberReference=(),PinType.PinValueType=(),PinType.ContainerType=None,PinType.bIsReference=False,PinType.bIsConst=False,PinType.bIsWeakPointer=False,PinType.bIsUObjectWrapper=False,PinType.bSerializeAsSinglePrecisionFloat=False,DefaultValue="false",AutogeneratedDefaultValue="false",PersistentGuid=00000000000000000000000000000000,bHidden=False,bNotConnectable=False,bDefaultValueIsReadOnly=False,bDefaultValueIsIgnored=False,bAdvancedView=False,bOrphanedPin=False,)
   CustomProperties Pin (PinId=80989B5A45A4FD1A2D9235988C212C2B,PinName="SweepHitResult",PinToolTip="Sweep Hit Result
Hit Result Structure

Hit result from any impact if sweep is true.",Direction="EGPD_Output",PinType.PinCategory="struct",PinType.PinSubCategory="",PinType.PinSubCategoryObject="/Script/CoreUObject.ScriptStruct'/Script/Engine.HitResult'",PinType.PinSubCategoryMemberReference=(),PinType.PinValueType=(),PinType.ContainerType=None,PinType.bIsReference=False,PinType.bIsConst=False,PinType.bIsWeakPointer=False,PinType.bIsUObjectWrapper=False,PinType.bSerializeAsSinglePrecisionFloat=False,PersistentGuid=00000000000000000000000000000000,bHidden=False,bNotConnectable=False,bDefaultValueIsReadOnly=False,bDefaultValueIsIgnored=False,bAdvancedView=False,bOrphanedPin=False,)
   CustomProperties Pin (PinId=88BA22AA4E6CCE40E65F4F8450C8FE82,PinName="bTeleport",PinToolTip="Teleport
Boolean

Whether we teleport the physics state (if physics collision is enabled for this object). If true, physics velocity for this object is unchanged (so ragdoll parts are not affected by change in location). If false, physics velocity is updated based on the change in position (affecting ragdoll parts). If CCD is on and not teleporting, this will affect objects along the entire sweep volume.",PinType.PinCategory="bool",PinType.PinSubCategory="",PinType.PinSubCategoryObject=None,PinType.PinSubCategoryMemberReference=(),PinType.PinValueType=(),PinType.ContainerType=None,PinType.bIsReference=False,PinType.bIsConst=False,PinType.bIsWeakPointer=False,PinType.bIsUObjectWrapper=False,PinType.bSerializeAsSinglePrecisionFloat=False,DefaultValue="false",AutogeneratedDefaultValue="false",PersistentGuid=00000000000000000000000000000000,bHidden=False,bNotConnectable=False,bDefaultValueIsReadOnly=False,bDefaultValueIsIgnored=False,bAdvancedView=False,bOrphanedPin=False,)
End Object
Begin Object Class=/Script/BlueprintGraph.K2Node_CallFunction Name="K2Node_CallFunction_32" ExportPath="/Script/BlueprintGraph.K2Node_CallFunction'/Game/CharacterBP.CharacterBP:EventGraph.K2Node_CallFunction_32'"
   bIsPureFunc=True
   FunctionReference=(MemberParent="/Script/CoreUObject.Class'/Script/Engine.KismetMathLibrary'",MemberName="Lerp")
   NodePosX=7056
   NodePosY=560
   NodeGuid=832167ED4316831FB99534B6BB641EB8
   CustomProperties Pin (PinId=5BDA421246A7735BE9B6E2AD17F29728,PinName="self",PinFriendlyName=NSLOCTEXT("K2Node", "Target", "Target"),PinType.PinCategory="object",PinType.PinSubCategory="",PinType.PinSubCategoryObject="/Script/CoreUObject.Class'/Script/Engine.KismetMathLibrary'",PinType.PinSubCategoryMemberReference=(),PinType.PinValueType=(),PinType.ContainerType=None,PinType.bIsReference=False,PinType.bIsConst=False,PinType.bIsWeakPointer=False,PinType.bIsUObjectWrapper=False,PinType.bSerializeAsSinglePrecisionFloat=False,DefaultObject="/Script/Engine.Default__KismetMathLibrary",PersistentGuid=00000000000000000000000000000000,bHidden=True,bNotConnectable=False,bDefaultValueIsReadOnly=False,bDefaultValueIsIgnored=False,bAdvancedView=False,bOrphanedPin=False,)
   CustomProperties Pin (PinId=B2CFE2C94684B68192F253B05849E7C6,PinName="A",PinType.PinCategory="real",PinType.PinSubCategory="double",PinType.PinSubCategoryObject=None,PinType.PinSubCategoryMemberReference=(),PinType.PinValueType=(),PinType.ContainerType=None,PinType.bIsReference=False,PinType.bIsConst=False,PinType.bIsWeakPointer=False,PinType.bIsUObjectWrapper=False,PinType.bSerializeAsSinglePrecisionFloat=False,DefaultValue="0.0",AutogeneratedDefaultValue="0.0",LinkedTo=(K2Node_CallFunction_33 7403A2D9401B34D9A4901896370B7485,),PersistentGuid=00000000000000000000000000000000,bHidden=False,bNotConnectable=False,bDefaultValueIsReadOnly=False,bDefaultValueIsIgnored=False,bAdvancedView=False,bOrphanedPin=False,)
   CustomProperties Pin (PinId=949AA94B496985E5DC646B9D5D43CD54,PinName="B",PinType.PinCategory="real",PinType.PinSubCategory="double",PinType.PinSubCategoryObject=None,PinType.PinSubCategoryMemberReference=(),PinType.PinValueType=(),PinType.ContainerType=None,PinType.bIsReference=False,PinType.bIsConst=False,PinType.bIsWeakPointer=False,PinType.bIsUObjectWrapper=False,PinType.bSerializeAsSinglePrecisionFloat=False,DefaultValue="-39.995065",AutogeneratedDefaultValue="0.0",PersistentGuid=00000000000000000000000000000000,bHidden=False,bNotConnectable=False,bDefaultValueIsReadOnly=False,bDefaultValueIsIgnored=False,bAdvancedView=False,bOrphanedPin=False,)
   CustomProperties Pin (PinId=350EC28D4358A893D05E2B861CE9AD6F,PinName="Alpha",PinType.PinCategory="real",PinType.PinSubCategory="double",PinType.PinSubCategoryObject=None,PinType.PinSubCategoryMemberReference=(),PinType.PinValueType=(),PinType.ContainerType=None,PinType.bIsReference=False,PinType.bIsConst=False,PinType.bIsWeakPointer=False,PinType.bIsUObjectWrapper=False,PinType.bSerializeAsSinglePrecisionFloat=False,DefaultValue="0.0",AutogeneratedDefaultValue="0.0",LinkedTo=(K2Node_Timeline_5 3D7FCC3341330E76CF2B1BBE30BEDC23,),PersistentGuid=00000000000000000000000000000000,bHidden=False,bNotConnectable=False,bDefaultValueIsReadOnly=False,bDefaultValueIsIgnored=False,bAdvancedView=False,bOrphanedPin=False,)
   CustomProperties Pin (PinId=3D1DCC6240151C93630A2AAB2DAB45DE,PinName="ReturnValue",Direction="EGPD_Output",PinType.PinCategory="real",PinType.PinSubCategory="double",PinType.PinSubCategoryObject=None,PinType.PinSubCategoryMemberReference=(),PinType.PinValueType=(),PinType.ContainerType=None,PinType.bIsReference=False,PinType.bIsConst=False,PinType.bIsWeakPointer=False,PinType.bIsUObjectWrapper=False,PinType.bSerializeAsSinglePrecisionFloat=False,DefaultValue="0.0",AutogeneratedDefaultValue="0.0",LinkedTo=(K2Node_CallFunction_22 35CAFA6645A5B7A8FC79AB86767A0DC3,),PersistentGuid=00000000000000000000000000000000,bHidden=False,bNotConnectable=False,bDefaultValueIsReadOnly=False,bDefaultValueIsIgnored=False,bAdvancedView=False,bOrphanedPin=False,)
End Object
Begin Object Class=/Script/BlueprintGraph.K2Node_Timeline Name="K2Node_Timeline_5" ExportPath="/Script/BlueprintGraph.K2Node_Timeline'/Game/CharacterBP.CharacterBP:EventGraph.K2Node_Timeline_5'"
   TimelineName="Timeline_legs"
   TimelineGuid=9FC332764A1EE5061ECBD3823A08012E
   NodePosX=6752
   NodePosY=496
   bCanRenameNode=True
   NodeGuid=3CE94F134B6C02EFFCE426AD7B995223
   CustomProperties Pin (PinId=4865440743AB7E8980B95FAF0760FB3D,PinName="Play",PinType.PinCategory="exec",PinType.PinSubCategory="",PinType.PinSubCategoryObject=None,PinType.PinSubCategoryMemberReference=(),PinType.PinValueType=(),PinType.ContainerType=None,PinType.bIsReference=False,PinType.bIsConst=False,PinType.bIsWeakPointer=False,PinType.bIsUObjectWrapper=False,PinType.bSerializeAsSinglePrecisionFloat=False,PersistentGuid=00000000000000000000000000000000,bHidden=False,bNotConnectable=False,bDefaultValueIsReadOnly=False,bDefaultValueIsIgnored=False,bAdvancedView=False,bOrphanedPin=False,)
   CustomProperties Pin (PinId=D5FA5E0D47F969F39D9E92A50F53FA50,PinName="PlayFromStart",PinType.PinCategory="exec",PinType.PinSubCategory="",PinType.PinSubCategoryObject=None,PinType.PinSubCategoryMemberReference=(),PinType.PinValueType=(),PinType.ContainerType=None,PinType.bIsReference=False,PinType.bIsConst=False,PinType.bIsWeakPointer=False,PinType.bIsUObjectWrapper=False,PinType.bSerializeAsSinglePrecisionFloat=False,LinkedTo=(K2Node_CallFunction_33 32C856DD42C9FDCAA537FCB8E9F8D4F0,),PersistentGuid=00000000000000000000000000000000,bHidden=False,bNotConnectable=False,bDefaultValueIsReadOnly=False,bDefaultValueIsIgnored=False,bAdvancedView=False,bOrphanedPin=False,)
   CustomProperties Pin (PinId=347DB8AB43A73994EDFA4084AEB755B5,PinName="Stop",PinType.PinCategory="exec",PinType.PinSubCategory="",PinType.PinSubCategoryObject=None,PinType.PinSubCategoryMemberReference=(),PinType.PinValueType=(),PinType.ContainerType=None,PinType.bIsReference=False,PinType.bIsConst=False,PinType.bIsWeakPointer=False,PinType.bIsUObjectWrapper=False,PinType.bSerializeAsSinglePrecisionFloat=False,PersistentGuid=00000000000000000000000000000000,bHidden=False,bNotConnectable=False,bDefaultValueIsReadOnly=False,bDefaultValueIsIgnored=False,bAdvancedView=False,bOrphanedPin=False,)
   CustomProperties Pin (PinId=FCF951A047802ACF0EB69F87F2502B53,PinName="Reverse",PinType.PinCategory="exec",PinType.PinSubCategory="",PinType.PinSubCategoryObject=None,PinType.PinSubCategoryMemberReference=(),PinType.PinValueType=(),PinType.ContainerType=None,PinType.bIsReference=False,PinType.bIsConst=False,PinType.bIsWeakPointer=False,PinType.bIsUObjectWrapper=False,PinType.bSerializeAsSinglePrecisionFloat=False,PersistentGuid=00000000000000000000000000000000,bHidden=False,bNotConnectable=False,bDefaultValueIsReadOnly=False,bDefaultValueIsIgnored=False,bAdvancedView=False,bOrphanedPin=False,)
   CustomProperties Pin (PinId=24670FE14335ECB3771CED895504B15E,PinName="ReverseFromEnd",PinType.PinCategory="exec",PinType.PinSubCategory="",PinType.PinSubCategoryObject=None,PinType.PinSubCategoryMemberReference=(),PinType.PinValueType=(),PinType.ContainerType=None,PinType.bIsReference=False,PinType.bIsConst=False,PinType.bIsWeakPointer=False,PinType.bIsUObjectWrapper=False,PinType.bSerializeAsSinglePrecisionFloat=False,PersistentGuid=00000000000000000000000000000000,bHidden=False,bNotConnectable=False,bDefaultValueIsReadOnly=False,bDefaultValueIsIgnored=False,bAdvancedView=False,bOrphanedPin=False,)
   CustomProperties Pin (PinId=61AAA0934A46D88F426A5BAB8B11C98D,PinName="Update",Direction="EGPD_Output",PinType.PinCategory="exec",PinType.PinSubCategory="",PinType.PinSubCategoryObject=None,PinType.PinSubCategoryMemberReference=(),PinType.PinValueType=(),PinType.ContainerType=None,PinType.bIsReference=False,PinType.bIsConst=False,PinType.bIsWeakPointer=False,PinType.bIsUObjectWrapper=False,PinType.bSerializeAsSinglePrecisionFloat=False,LinkedTo=(K2Node_CallFunction_2 258669B74CAA830BE806B2BAFCDD0E57,),PersistentGuid=00000000000000000000000000000000,bHidden=False,bNotConnectable=False,bDefaultValueIsReadOnly=False,bDefaultValueIsIgnored=False,bAdvancedView=False,bOrphanedPin=False,)
   CustomProperties Pin (PinId=172F5AA441CCAED6970824B60892D61E,PinName="Finished",Direction="EGPD_Output",PinType.PinCategory="exec",PinType.PinSubCategory="",PinType.PinSubCategoryObject=None,PinType.PinSubCategoryMemberReference=(),PinType.PinValueType=(),PinType.ContainerType=None,PinType.bIsReference=False,PinType.bIsConst=False,PinType.bIsWeakPointer=False,PinType.bIsUObjectWrapper=False,PinType.bSerializeAsSinglePrecisionFloat=False,PersistentGuid=00000000000000000000000000000000,bHidden=False,bNotConnectable=False,bDefaultValueIsReadOnly=False,bDefaultValueIsIgnored=False,bAdvancedView=False,bOrphanedPin=False,)
   CustomProperties Pin (PinId=714DC24B4C83A52D3C1CCF8A4BD5CF45,PinName="SetNewTime",PinType.PinCategory="exec",PinType.PinSubCategory="",PinType.PinSubCategoryObject=None,PinType.PinSubCategoryMemberReference=(),PinType.PinValueType=(),PinType.ContainerType=None,PinType.bIsReference=False,PinType.bIsConst=False,PinType.bIsWeakPointer=False,PinType.bIsUObjectWrapper=False,PinType.bSerializeAsSinglePrecisionFloat=False,PersistentGuid=00000000000000000000000000000000,bHidden=False,bNotConnectable=False,bDefaultValueIsReadOnly=False,bDefaultValueIsIgnored=False,bAdvancedView=False,bOrphanedPin=False,)
   CustomProperties Pin (PinId=55F2D36743E5CA0A785D36BA19D8FAC5,PinName="NewTime",PinType.PinCategory="real",PinType.PinSubCategory="float",PinType.PinSubCategoryObject=None,PinType.PinSubCategoryMemberReference=(),PinType.PinValueType=(),PinType.ContainerType=None,PinType.bIsReference=False,PinType.bIsConst=False,PinType.bIsWeakPointer=False,PinType.bIsUObjectWrapper=False,PinType.bSerializeAsSinglePrecisionFloat=False,DefaultValue="0.0",AutogeneratedDefaultValue="0.0",PersistentGuid=00000000000000000000000000000000,bHidden=False,bNotConnectable=False,bDefaultValueIsReadOnly=False,bDefaultValueIsIgnored=False,bAdvancedView=False,bOrphanedPin=False,)
   CustomProperties Pin (PinId=8352FB0942F1B26CDE36F1A3E0194E94,PinName="Direction",Direction="EGPD_Output",PinType.PinCategory="byte",PinType.PinSubCategory="",PinType.PinSubCategoryObject="/Script/CoreUObject.Enum'/Script/Engine.ETimelineDirection'",PinType.PinSubCategoryMemberReference=(),PinType.PinValueType=(),PinType.ContainerType=None,PinType.bIsReference=False,PinType.bIsConst=False,PinType.bIsWeakPointer=False,PinType.bIsUObjectWrapper=False,PinType.bSerializeAsSinglePrecisionFloat=False,PersistentGuid=00000000000000000000000000000000,bHidden=False,bNotConnectable=False,bDefaultValueIsReadOnly=False,bDefaultValueIsIgnored=False,bAdvancedView=False,bOrphanedPin=False,)
   CustomProperties Pin (PinId=3D7FCC3341330E76CF2B1BBE30BEDC23,PinName="0-1",Direction="EGPD_Output",PinType.PinCategory="real",PinType.PinSubCategory="float",PinType.PinSubCategoryObject=None,PinType.PinSubCategoryMemberReference=(),PinType.PinValueType=(),PinType.ContainerType=None,PinType.bIsReference=False,PinType.bIsConst=False,PinType.bIsWeakPointer=False,PinType.bIsUObjectWrapper=False,PinType.bSerializeAsSinglePrecisionFloat=False,LinkedTo=(K2Node_CallFunction_32 350EC28D4358A893D05E2B861CE9AD6F,K2Node_CallFunction_14 350EC28D4358A893D05E2B861CE9AD6F,),PersistentGuid=00000000000000000000000000000000,bHidden=False,bNotConnectable=False,bDefaultValueIsReadOnly=False,bDefaultValueIsIgnored=False,bAdvancedView=False,bOrphanedPin=False,)
End Object
Begin Object Class=/Script/BlueprintGraph.K2Node_CallFunction Name="K2Node_CallFunction_22" ExportPath="/Script/BlueprintGraph.K2Node_CallFunction'/Game/CharacterBP.CharacterBP:EventGraph.K2Node_CallFunction_22'"
   bIsPureFunc=True
   FunctionReference=(MemberParent="/Script/CoreUObject.Class'/Script/Engine.KismetMathLibrary'",MemberName="MakeVector")
   NodePosX=7328
   NodePosY=640
   NodeGuid=A52D7C6040BDC8BDACD7F9B8123106BD
   CustomProperties Pin (PinId=E5F0B96C4A5B059540565184D4DBF3B3,PinName="self",PinFriendlyName=NSLOCTEXT("K2Node", "Target", "Target"),PinType.PinCategory="object",PinType.PinSubCategory="",PinType.PinSubCategoryObject="/Script/CoreUObject.Class'/Script/Engine.KismetMathLibrary'",PinType.PinSubCategoryMemberReference=(),PinType.PinValueType=(),PinType.ContainerType=None,PinType.bIsReference=False,PinType.bIsConst=False,PinType.bIsWeakPointer=False,PinType.bIsUObjectWrapper=False,PinType.bSerializeAsSinglePrecisionFloat=False,DefaultObject="/Script/Engine.Default__KismetMathLibrary",PersistentGuid=00000000000000000000000000000000,bHidden=True,bNotConnectable=False,bDefaultValueIsReadOnly=False,bDefaultValueIsIgnored=False,bAdvancedView=False,bOrphanedPin=False,)
   CustomProperties Pin (PinId=35CAFA6645A5B7A8FC79AB86767A0DC3,PinName="X",PinType.PinCategory="real",PinType.PinSubCategory="double",PinType.PinSubCategoryObject=None,PinType.PinSubCategoryMemberReference=(),PinType.PinValueType=(),PinType.ContainerType=None,PinType.bIsReference=False,PinType.bIsConst=False,PinType.bIsWeakPointer=False,PinType.bIsUObjectWrapper=False,PinType.bSerializeAsSinglePrecisionFloat=False,DefaultValue="0.0",AutogeneratedDefaultValue="0.0",LinkedTo=(K2Node_CallFunction_32 3D1DCC6240151C93630A2AAB2DAB45DE,),PersistentGuid=00000000000000000000000000000000,bHidden=False,bNotConnectable=False,bDefaultValueIsReadOnly=False,bDefaultValueIsIgnored=False,bAdvancedView=False,bOrphanedPin=False,)
   CustomProperties Pin (PinId=51B02585428866C5252D249D1B20D68D,PinName="Y",PinType.PinCategory="real",PinType.PinSubCategory="double",PinType.PinSubCategoryObject=None,PinType.PinSubCategoryMemberReference=(),PinType.PinValueType=(),PinType.ContainerType=None,PinType.bIsReference=False,PinType.bIsConst=False,PinType.bIsWeakPointer=False,PinType.bIsUObjectWrapper=False,PinType.bSerializeAsSinglePrecisionFloat=False,DefaultValue="0.628293",AutogeneratedDefaultValue="0.0",PersistentGuid=00000000000000000000000000000000,bHidden=False,bNotConnectable=False,bDefaultValueIsReadOnly=False,bDefaultValueIsIgnored=False,bAdvancedView=False,bOrphanedPin=False,)
   CustomProperties Pin (PinId=94FE6C5A466A3383867BD89DF5F49129,PinName="Z",PinType.PinCategory="real",PinType.PinSubCategory="double",PinType.PinSubCategoryObject=None,PinType.PinSubCategoryMemberReference=(),PinType.PinValueType=(),PinType.ContainerType=None,PinType.bIsReference=False,PinType.bIsConst=False,PinType.bIsWeakPointer=False,PinType.bIsUObjectWrapper=False,PinType.bSerializeAsSinglePrecisionFloat=False,DefaultValue="0.0",AutogeneratedDefaultValue="0.0",LinkedTo=(K2Node_CallFunction_14 3D1DCC6240151C93630A2AAB2DAB45DE,),PersistentGuid=00000000000000000000000000000000,bHidden=False,bNotConnectable=False,bDefaultValueIsReadOnly=False,bDefaultValueIsIgnored=False,bAdvancedView=False,bOrphanedPin=False,)
   CustomProperties Pin (PinId=4EA7224147536FE00B8890B3B622832F,PinName="ReturnValue",Direction="EGPD_Output",PinType.PinCategory="struct",PinType.PinSubCategory="",PinType.PinSubCategoryObject="/Script/CoreUObject.ScriptStruct'/Script/CoreUObject.Vector'",PinType.PinSubCategoryMemberReference=(),PinType.PinValueType=(),PinType.ContainerType=None,PinType.bIsReference=False,PinType.bIsConst=False,PinType.bIsWeakPointer=False,PinType.bIsUObjectWrapper=False,PinType.bSerializeAsSinglePrecisionFloat=False,DefaultValue="0, 0, 0",AutogeneratedDefaultValue="0, 0, 0",LinkedTo=(K2Node_CallFunction_2 2D05CFDC4D2B8525BA4D65B2FC942798,),PersistentGuid=00000000000000000000000000000000,bHidden=False,bNotConnectable=False,bDefaultValueIsReadOnly=False,bDefaultValueIsIgnored=False,bAdvancedView=False,bOrphanedPin=False,)
End Object
Begin Object Class=/Script/BlueprintGraph.K2Node_CallFunction Name="K2Node_CallFunction_14" ExportPath="/Script/BlueprintGraph.K2Node_CallFunction'/Game/CharacterBP.CharacterBP:EventGraph.K2Node_CallFunction_14'"
   bIsPureFunc=True
   FunctionReference=(MemberParent="/Script/CoreUObject.Class'/Script/Engine.KismetMathLibrary'",MemberName="Lerp")
   NodePosX=7056
   NodePosY=720
   NodeGuid=344C18964B3391BFEEEAAAAEA1E9D122
   CustomProperties Pin (PinId=5BDA421246A7735BE9B6E2AD17F29728,PinName="self",PinFriendlyName=NSLOCTEXT("K2Node", "Target", "Target"),PinType.PinCategory="object",PinType.PinSubCategory="",PinType.PinSubCategoryObject="/Script/CoreUObject.Class'/Script/Engine.KismetMathLibrary'",PinType.PinSubCategoryMemberReference=(),PinType.PinValueType=(),PinType.ContainerType=None,PinType.bIsReference=False,PinType.bIsConst=False,PinType.bIsWeakPointer=False,PinType.bIsUObjectWrapper=False,PinType.bSerializeAsSinglePrecisionFloat=False,DefaultObject="/Script/Engine.Default__KismetMathLibrary",PersistentGuid=00000000000000000000000000000000,bHidden=True,bNotConnectable=False,bDefaultValueIsReadOnly=False,bDefaultValueIsIgnored=False,bAdvancedView=False,bOrphanedPin=False,)
   CustomProperties Pin (PinId=B2CFE2C94684B68192F253B05849E7C6,PinName="A",PinType.PinCategory="real",PinType.PinSubCategory="double",PinType.PinSubCategoryObject=None,PinType.PinSubCategoryMemberReference=(),PinType.PinValueType=(),PinType.ContainerType=None,PinType.bIsReference=False,PinType.bIsConst=False,PinType.bIsWeakPointer=False,PinType.bIsUObjectWrapper=False,PinType.bSerializeAsSinglePrecisionFloat=False,DefaultValue="0.0",AutogeneratedDefaultValue="0.0",LinkedTo=(K2Node_CallFunction_33 CE18A2364B2C0FE93500E8AC4560E2B2,),PersistentGuid=00000000000000000000000000000000,bHidden=False,bNotConnectable=False,bDefaultValueIsReadOnly=False,bDefaultValueIsIgnored=False,bAdvancedView=False,bOrphanedPin=False,)
   CustomProperties Pin (PinId=949AA94B496985E5DC646B9D5D43CD54,PinName="B",PinType.PinCategory="real",PinType.PinSubCategory="double",PinType.PinSubCategoryObject=None,PinType.PinSubCategoryMemberReference=(),PinType.PinValueType=(),PinType.ContainerType=None,PinType.bIsReference=False,PinType.bIsConst=False,PinType.bIsWeakPointer=False,PinType.bIsUObjectWrapper=False,PinType.bSerializeAsSinglePrecisionFloat=False,DefaultValue="-50.000000",AutogeneratedDefaultValue="0.0",PersistentGuid=00000000000000000000000000000000,bHidden=False,bNotConnectable=False,bDefaultValueIsReadOnly=False,bDefaultValueIsIgnored=False,bAdvancedView=False,bOrphanedPin=False,)
   CustomProperties Pin (PinId=350EC28D4358A893D05E2B861CE9AD6F,PinName="Alpha",PinType.PinCategory="real",PinType.PinSubCategory="double",PinType.PinSubCategoryObject=None,PinType.PinSubCategoryMemberReference=(),PinType.PinValueType=(),PinType.ContainerType=None,PinType.bIsReference=False,PinType.bIsConst=False,PinType.bIsWeakPointer=False,PinType.bIsUObjectWrapper=False,PinType.bSerializeAsSinglePrecisionFloat=False,DefaultValue="0.0",AutogeneratedDefaultValue="0.0",LinkedTo=(K2Node_Timeline_5 3D7FCC3341330E76CF2B1BBE30BEDC23,),PersistentGuid=00000000000000000000000000000000,bHidden=False,bNotConnectable=False,bDefaultValueIsReadOnly=False,bDefaultValueIsIgnored=False,bAdvancedView=False,bOrphanedPin=False,)
   CustomProperties Pin (PinId=3D1DCC6240151C93630A2AAB2DAB45DE,PinName="ReturnValue",Direction="EGPD_Output",PinType.PinCategory="real",PinType.PinSubCategory="double",PinType.PinSubCategoryObject=None,PinType.PinSubCategoryMemberReference=(),PinType.PinValueType=(),PinType.ContainerType=None,PinType.bIsReference=False,PinType.bIsConst=False,PinType.bIsWeakPointer=False,PinType.bIsUObjectWrapper=False,PinType.bSerializeAsSinglePrecisionFloat=False,DefaultValue="0.0",AutogeneratedDefaultValue="0.0",LinkedTo=(K2Node_CallFunction_22 94FE6C5A466A3383867BD89DF5F49129,),PersistentGuid=00000000000000000000000000000000,bHidden=False,bNotConnectable=False,bDefaultValueIsReadOnly=False,bDefaultValueIsIgnored=False,bAdvancedView=False,bOrphanedPin=False,)
End Object
Begin Object Class=/Script/BlueprintGraph.K2Node_CallFunction Name="K2Node_CallFunction_33" ExportPath="/Script/BlueprintGraph.K2Node_CallFunction'/Game/CharacterBP.CharacterBP:EventGraph.K2Node_CallFunction_33'"
   FunctionReference=(MemberName="getCameraPosition",MemberGuid=D43A7AD94273A628F99434A644C3E90E,bSelfContext=True)
   NodePosX=6464
   NodePosY=512
   ErrorType=3
   NodeGuid=D0B6FFB548F3623F84208F99CE76F6EF
   CustomProperties Pin (PinId=497D2C674F6EFCD464C4369EF74F5FBD,PinName="execute",PinType.PinCategory="exec",PinType.PinSubCategory="",PinType.PinSubCategoryObject=None,PinType.PinSubCategoryMemberReference=(),PinType.PinValueType=(),PinType.ContainerType=None,PinType.bIsReference=False,PinType.bIsConst=False,PinType.bIsWeakPointer=False,PinType.bIsUObjectWrapper=False,PinType.bSerializeAsSinglePrecisionFloat=False,LinkedTo=(K2Node_CallFunction_16 E28762384CC22A0CF74DB28D25048126,),PersistentGuid=00000000000000000000000000000000,bHidden=False,bNotConnectable=False,bDefaultValueIsReadOnly=False,bDefaultValueIsIgnored=False,bAdvancedView=False,bOrphanedPin=False,)
   CustomProperties Pin (PinId=32C856DD42C9FDCAA537FCB8E9F8D4F0,PinName="then",Direction="EGPD_Output",PinType.PinCategory="exec",PinType.PinSubCategory="",PinType.PinSubCategoryObject=None,PinType.PinSubCategoryMemberReference=(),PinType.PinValueType=(),PinType.ContainerType=None,PinType.bIsReference=False,PinType.bIsConst=False,PinType.bIsWeakPointer=False,PinType.bIsUObjectWrapper=False,PinType.bSerializeAsSinglePrecisionFloat=False,LinkedTo=(K2Node_Timeline_5 D5FA5E0D47F969F39D9E92A50F53FA50,),PersistentGuid=00000000000000000000000000000000,bHidden=False,bNotConnectable=False,bDefaultValueIsReadOnly=False,bDefaultValueIsIgnored=False,bAdvancedView=False,bOrphanedPin=False,)
   CustomProperties Pin (PinId=EB7F918D4E4854B62B920080CED27B38,PinName="self",PinFriendlyName=NSLOCTEXT("K2Node", "Target", "Target"),PinType.PinCategory="object",PinType.PinSubCategory="self",PinType.PinSubCategoryObject=None,PinType.PinSubCategoryMemberReference=(),PinType.PinValueType=(),PinType.ContainerType=None,PinType.bIsReference=False,PinType.bIsConst=False,PinType.bIsWeakPointer=False,PinType.bIsUObjectWrapper=False,PinType.bSerializeAsSinglePrecisionFloat=False,PersistentGuid=00000000000000000000000000000000,bHidden=False,bNotConnectable=False,bDefaultValueIsReadOnly=False,bDefaultValueIsIgnored=False,bAdvancedView=False,bOrphanedPin=False,)
   CustomProperties Pin (PinId=7403A2D9401B34D9A4901896370B7485,PinName="X",Direction="EGPD_Output",PinType.PinCategory="real",PinType.PinSubCategory="double",PinType.PinSubCategoryObject=None,PinType.PinSubCategoryMemberReference=(),PinType.PinValueType=(),PinType.ContainerType=None,PinType.bIsReference=False,PinType.bIsConst=False,PinType.bIsWeakPointer=False,PinType.bIsUObjectWrapper=False,PinType.bSerializeAsSinglePrecisionFloat=False,DefaultValue="0.0",AutogeneratedDefaultValue="0.0",LinkedTo=(K2Node_CallFunction_32 B2CFE2C94684B68192F253B05849E7C6,),PersistentGuid=00000000000000000000000000000000,bHidden=False,bNotConnectable=False,bDefaultValueIsReadOnly=False,bDefaultValueIsIgnored=False,bAdvancedView=False,bOrphanedPin=False,)
   CustomProperties Pin (PinId=89B7F1894DE3271069027EA646AED6D0,PinName="Y",Direction="EGPD_Output",PinType.PinCategory="real",PinType.PinSubCategory="double",PinType.PinSubCategoryObject=None,PinType.PinSubCategoryMemberReference=(),PinType.PinValueType=(),PinType.ContainerType=None,PinType.bIsReference=False,PinType.bIsConst=False,PinType.bIsWeakPointer=False,PinType.bIsUObjectWrapper=False,PinType.bSerializeAsSinglePrecisionFloat=False,DefaultValue="0.0",AutogeneratedDefaultValue="0.0",PersistentGuid=00000000000000000000000000000000,bHidden=False,bNotConnectable=False,bDefaultValueIsReadOnly=False,bDefaultValueIsIgnored=False,bAdvancedView=False,bOrphanedPin=False,)
   CustomProperties Pin (PinId=CE18A2364B2C0FE93500E8AC4560E2B2,PinName="Z",Direction="EGPD_Output",PinType.PinCategory="real",PinType.PinSubCategory="double",PinType.PinSubCategoryObject=None,PinType.PinSubCategoryMemberReference=(),PinType.PinValueType=(),PinType.ContainerType=None,PinType.bIsReference=False,PinType.bIsConst=False,PinType.bIsWeakPointer=False,PinType.bIsUObjectWrapper=False,PinType.bSerializeAsSinglePrecisionFloat=False,DefaultValue="0.0",AutogeneratedDefaultValue="0.0",LinkedTo=(K2Node_CallFunction_14 B2CFE2C94684B68192F253B05849E7C6,),PersistentGuid=00000000000000000000000000000000,bHidden=False,bNotConnectable=False,bDefaultValueIsReadOnly=False,bDefaultValueIsIgnored=False,bAdvancedView=False,bOrphanedPin=False,)
End Object
Begin Object Class=/Script/BlueprintGraph.K2Node_CallFunction Name="K2Node_CallFunction_18" ExportPath="/Script/BlueprintGraph.K2Node_CallFunction'/Game/CharacterBP.CharacterBP:EventGraph.K2Node_CallFunction_18'"
   FunctionReference=(MemberName="stopTimelines",MemberGuid=C5A561274273BEF6B7D762A67D7AC6D6,bSelfContext=True)
   NodePosX=2336
   NodePosY=496
   NodeGuid=4A65D00340146704ABC60DA3CA052013
   CustomProperties Pin (PinId=ABE09E2A47D37615900BF79B53722FDF,PinName="execute",PinType.PinCategory="exec",PinType.PinSubCategory="",PinType.PinSubCategoryObject=None,PinType.PinSubCategoryMemberReference=(),PinType.PinValueType=(),PinType.ContainerType=None,PinType.bIsReference=False,PinType.bIsConst=False,PinType.bIsWeakPointer=False,PinType.bIsUObjectWrapper=False,PinType.bSerializeAsSinglePrecisionFloat=False,LinkedTo=(K2Node_CustomEvent_6 0F97B6C54C3B7792AAE710B16B26D028,),PersistentGuid=00000000000000000000000000000000,bHidden=False,bNotConnectable=False,bDefaultValueIsReadOnly=False,bDefaultValueIsIgnored=False,bAdvancedView=False,bOrphanedPin=False,)
   CustomProperties Pin (PinId=E28762384CC22A0CF74DB28D25048126,PinName="then",Direction="EGPD_Output",PinType.PinCategory="exec",PinType.PinSubCategory="",PinType.PinSubCategoryObject=None,PinType.PinSubCategoryMemberReference=(),PinType.PinValueType=(),PinType.ContainerType=None,PinType.bIsReference=False,PinType.bIsConst=False,PinType.bIsWeakPointer=False,PinType.bIsUObjectWrapper=False,PinType.bSerializeAsSinglePrecisionFloat=False,LinkedTo=(K2Node_CallFunction_53 497D2C674F6EFCD464C4369EF74F5FBD,),PersistentGuid=00000000000000000000000000000000,bHidden=False,bNotConnectable=False,bDefaultValueIsReadOnly=False,bDefaultValueIsIgnored=False,bAdvancedView=False,bOrphanedPin=False,)
   CustomProperties Pin (PinId=6E2FAEFC48B07DD15DBAD9A4E2821453,PinName="self",PinFriendlyName=NSLOCTEXT("K2Node", "Target", "Target"),PinType.PinCategory="object",PinType.PinSubCategory="self",PinType.PinSubCategoryObject=None,PinType.PinSubCategoryMemberReference=(),PinType.PinValueType=(),PinType.ContainerType=None,PinType.bIsReference=False,PinType.bIsConst=False,PinType.bIsWeakPointer=False,PinType.bIsUObjectWrapper=False,PinType.bSerializeAsSinglePrecisionFloat=False,PersistentGuid=00000000000000000000000000000000,bHidden=False,bNotConnectable=False,bDefaultValueIsReadOnly=False,bDefaultValueIsIgnored=False,bAdvancedView=False,bOrphanedPin=False,)
End Object
Begin Object Class=/Script/BlueprintGraph.K2Node_CallFunction Name="K2Node_CallFunction_19" ExportPath="/Script/BlueprintGraph.K2Node_CallFunction'/Game/CharacterBP.CharacterBP:EventGraph.K2Node_CallFunction_19'"
   FunctionReference=(MemberName="stopTimelines",MemberGuid=C5A561274273BEF6B7D762A67D7AC6D6,bSelfContext=True)
   NodePosX=4240
   NodePosY=512
   NodeGuid=4E69D1CC44037A9090236CACE31322D9
   CustomProperties Pin (PinId=ABE09E2A47D37615900BF79B53722FDF,PinName="execute",PinType.PinCategory="exec",PinType.PinSubCategory="",PinType.PinSubCategoryObject=None,PinType.PinSubCategoryMemberReference=(),PinType.PinValueType=(),PinType.ContainerType=None,PinType.bIsReference=False,PinType.bIsConst=False,PinType.bIsWeakPointer=False,PinType.bIsUObjectWrapper=False,PinType.bSerializeAsSinglePrecisionFloat=False,LinkedTo=(K2Node_CustomEvent_8 0F97B6C54C3B7792AAE710B16B26D028,),PersistentGuid=00000000000000000000000000000000,bHidden=False,bNotConnectable=False,bDefaultValueIsReadOnly=False,bDefaultValueIsIgnored=False,bAdvancedView=False,bOrphanedPin=False,)
   CustomProperties Pin (PinId=E28762384CC22A0CF74DB28D25048126,PinName="then",Direction="EGPD_Output",PinType.PinCategory="exec",PinType.PinSubCategory="",PinType.PinSubCategoryObject=None,PinType.PinSubCategoryMemberReference=(),PinType.PinValueType=(),PinType.ContainerType=None,PinType.bIsReference=False,PinType.bIsConst=False,PinType.bIsWeakPointer=False,PinType.bIsUObjectWrapper=False,PinType.bSerializeAsSinglePrecisionFloat=False,LinkedTo=(K2Node_CallFunction_59 497D2C674F6EFCD464C4369EF74F5FBD,),PersistentGuid=00000000000000000000000000000000,bHidden=False,bNotConnectable=False,bDefaultValueIsReadOnly=False,bDefaultValueIsIgnored=False,bAdvancedView=False,bOrphanedPin=False,)
   CustomProperties Pin (PinId=6E2FAEFC48B07DD15DBAD9A4E2821453,PinName="self",PinFriendlyName=NSLOCTEXT("K2Node", "Target", "Target"),PinType.PinCategory="object",PinType.PinSubCategory="self",PinType.PinSubCategoryObject=None,PinType.PinSubCategoryMemberReference=(),PinType.PinValueType=(),PinType.ContainerType=None,PinType.bIsReference=False,PinType.bIsConst=False,PinType.bIsWeakPointer=False,PinType.bIsUObjectWrapper=False,PinType.bSerializeAsSinglePrecisionFloat=False,PersistentGuid=00000000000000000000000000000000,bHidden=False,bNotConnectable=False,bDefaultValueIsReadOnly=False,bDefaultValueIsIgnored=False,bAdvancedView=False,bOrphanedPin=False,)
End Object
Begin Object Class=/Script/BlueprintGraph.K2Node_CallFunction Name="K2Node_CallFunction_16" ExportPath="/Script/BlueprintGraph.K2Node_CallFunction'/Game/CharacterBP.CharacterBP:EventGraph.K2Node_CallFunction_16'"
   FunctionReference=(MemberName="stopTimelines",MemberGuid=C5A561274273BEF6B7D762A67D7AC6D6,bSelfContext=True)
   NodePosX=6208
   NodePosY=512
   NodeGuid=D17C65274FDC5880F2838E99FB799C74
   CustomProperties Pin (PinId=ABE09E2A47D37615900BF79B53722FDF,PinName="execute",PinType.PinCategory="exec",PinType.PinSubCategory="",PinType.PinSubCategoryObject=None,PinType.PinSubCategoryMemberReference=(),PinType.PinValueType=(),PinType.ContainerType=None,PinType.bIsReference=False,PinType.bIsConst=False,PinType.bIsWeakPointer=False,PinType.bIsUObjectWrapper=False,PinType.bSerializeAsSinglePrecisionFloat=False,LinkedTo=(K2Node_CustomEvent_2 0F97B6C54C3B7792AAE710B16B26D028,),PersistentGuid=00000000000000000000000000000000,bHidden=False,bNotConnectable=False,bDefaultValueIsReadOnly=False,bDefaultValueIsIgnored=False,bAdvancedView=False,bOrphanedPin=False,)
   CustomProperties Pin (PinId=E28762384CC22A0CF74DB28D25048126,PinName="then",Direction="EGPD_Output",PinType.PinCategory="exec",PinType.PinSubCategory="",PinType.PinSubCategoryObject=None,PinType.PinSubCategoryMemberReference=(),PinType.PinValueType=(),PinType.ContainerType=None,PinType.bIsReference=False,PinType.bIsConst=False,PinType.bIsWeakPointer=False,PinType.bIsUObjectWrapper=False,PinType.bSerializeAsSinglePrecisionFloat=False,LinkedTo=(K2Node_CallFunction_33 497D2C674F6EFCD464C4369EF74F5FBD,),PersistentGuid=00000000000000000000000000000000,bHidden=False,bNotConnectable=False,bDefaultValueIsReadOnly=False,bDefaultValueIsIgnored=False,bAdvancedView=False,bOrphanedPin=False,)
   CustomProperties Pin (PinId=6E2FAEFC48B07DD15DBAD9A4E2821453,PinName="self",PinFriendlyName=NSLOCTEXT("K2Node", "Target", "Target"),PinType.PinCategory="object",PinType.PinSubCategory="self",PinType.PinSubCategoryObject=None,PinType.PinSubCategoryMemberReference=(),PinType.PinValueType=(),PinType.ContainerType=None,PinType.bIsReference=False,PinType.bIsConst=False,PinType.bIsWeakPointer=False,PinType.bIsUObjectWrapper=False,PinType.bSerializeAsSinglePrecisionFloat=False,PersistentGuid=00000000000000000000000000000000,bHidden=False,bNotConnectable=False,bDefaultValueIsReadOnly=False,bDefaultValueIsIgnored=False,bAdvancedView=False,bOrphanedPin=False,)
End Object
After completing the engine setup, trigger these binding events from the frontend.
First, modify the menu’s data structure by adding a focusCallback property:
1const menus = [2 {3 title: 'Face',4 items: [...],5 focusCallback: () => engine.trigger("focusFace"),6 },7 ...8];After making these changes, call the focusCallback of the menu when it is selected:
1const selectMenu = (event, menuIndex) => {2   ...3   if (selectedMenu === menuIndex) {4      setSelectedMenu(-1);5     engine.trigger("initialFocus");6      return;7   }8
9   setSelectedMenu(menuIndex);10  menus[menuIndex].focusCallback();11}
Following these steps will result in this:
Rotating the character
In the tutorial about the 3D objects in the UI, we’ve set up a method for rotating our character.
We will enhance this rotation by adding functionality to rotate the character using both the mouse and the keyboard.
First, we need to listen for rotate left/right events in our backend. This is configured in the CharacterBP as follows:
   Begin Object Class=/Script/BlueprintGraph.K2Node_CallFunction Name="K2Node_CallFunction_4" ExportPath="/Script/BlueprintGraph.K2Node_CallFunction'/Game/CharacterBP.CharacterBP:EventGraph.K2Node_CallFunction_4'"
   FunctionReference=(MemberParent="/Script/CoreUObject.Class'/Script/CohtmlPlugin.CohtmlBaseComponent'",MemberName="RegisterForEvent")
   NodePosX=8704
   NodePosY=240
   ErrorType=1
   NodeGuid=DFFF2C5E4F0208B8A3DE96A6B80649D7
   CustomProperties Pin (PinId=73D112C043A553883FA599A50A179592,PinName="execute",PinToolTip="
Exec",PinType.PinCategory="exec",PinType.PinSubCategory="",PinType.PinSubCategoryObject=None,PinType.PinSubCategoryMemberReference=(),PinType.PinValueType=(),PinType.ContainerType=None,PinType.bIsReference=False,PinType.bIsConst=False,PinType.bIsWeakPointer=False,PinType.bIsUObjectWrapper=False,PinType.bSerializeAsSinglePrecisionFloat=False,LinkedTo=(K2Node_CallFunction_1 2594D8434A3E01AE3672CEBB306B3BB4,),PersistentGuid=00000000000000000000000000000000,bHidden=False,bNotConnectable=False,bDefaultValueIsReadOnly=False,bDefaultValueIsIgnored=False,bAdvancedView=False,bOrphanedPin=False,)
   CustomProperties Pin (PinId=2594D8434A3E01AE3672CEBB306B3BB4,PinName="then",PinToolTip="
Exec",Direction="EGPD_Output",PinType.PinCategory="exec",PinType.PinSubCategory="",PinType.PinSubCategoryObject=None,PinType.PinSubCategoryMemberReference=(),PinType.PinValueType=(),PinType.ContainerType=None,PinType.bIsReference=False,PinType.bIsConst=False,PinType.bIsWeakPointer=False,PinType.bIsUObjectWrapper=False,PinType.bSerializeAsSinglePrecisionFloat=False,LinkedTo=(K2Node_CallFunction_5 5A1C77664D51D1F9D1827D91568C4B25,),PersistentGuid=00000000000000000000000000000000,bHidden=False,bNotConnectable=False,bDefaultValueIsReadOnly=False,bDefaultValueIsIgnored=False,bAdvancedView=False,bOrphanedPin=False,)
   CustomProperties Pin (PinId=AA673F02470D337A1CD44F8054FBF608,PinName="self",PinFriendlyName=NSLOCTEXT("K2Node", "Target", "Target"),PinToolTip="Target
Gameface Base Component Object Reference",PinType.PinCategory="object",PinType.PinSubCategory="",PinType.PinSubCategoryObject="/Script/CoreUObject.Class'/Script/CohtmlPlugin.CohtmlBaseComponent'",PinType.PinSubCategoryMemberReference=(),PinType.PinValueType=(),PinType.ContainerType=None,PinType.bIsReference=False,PinType.bIsConst=False,PinType.bIsWeakPointer=False,PinType.bIsUObjectWrapper=False,PinType.bSerializeAsSinglePrecisionFloat=False,LinkedTo=(K2Node_VariableGet_5 8F7889484DA764528B2DB799D57983A9,),PersistentGuid=00000000000000000000000000000000,bHidden=False,bNotConnectable=False,bDefaultValueIsReadOnly=False,bDefaultValueIsIgnored=False,bAdvancedView=False,bOrphanedPin=False,)
   CustomProperties Pin (PinId=3F65821C402C7D608CE5C3901FFD7CFA,PinName="JSEventName",PinFriendlyName=NSLOCTEXT("", "CAD185EB47C68559B1C3C5B898424492", "JavaScript Event Name"),PinToolTip="Java Script Event Name
String",PinType.PinCategory="string",PinType.PinSubCategory="",PinType.PinSubCategoryObject=None,PinType.PinSubCategoryMemberReference=(),PinType.PinValueType=(),PinType.ContainerType=None,PinType.bIsReference=False,PinType.bIsConst=False,PinType.bIsWeakPointer=False,PinType.bIsUObjectWrapper=False,PinType.bSerializeAsSinglePrecisionFloat=False,DefaultValue="characterRotateLeft",PersistentGuid=00000000000000000000000000000000,bHidden=False,bNotConnectable=False,bDefaultValueIsReadOnly=False,bDefaultValueIsIgnored=False,bAdvancedView=False,bOrphanedPin=False,)
   CustomProperties Pin (PinId=93760E9C4A2EB4FC489ACEB012AAED6A,PinName="Delegate",PinFriendlyName=NSLOCTEXT("", "700F06F1479F7B903979038182D6E8CE", "Event"),PinToolTip="Event
Delegate",PinType.PinCategory="delegate",PinType.PinSubCategory="",PinType.PinSubCategoryObject=None,PinType.PinSubCategoryMemberReference=(MemberParent="/Script/CoreUObject.Package'/Script/CohtmlPlugin'",MemberName="CohtmlJSEventBPCallback__DelegateSignature"),PinType.PinValueType=(),PinType.ContainerType=None,PinType.bIsReference=False,PinType.bIsConst=False,PinType.bIsWeakPointer=False,PinType.bIsUObjectWrapper=False,PinType.bSerializeAsSinglePrecisionFloat=False,LinkedTo=(K2Node_CustomEvent_4 379011AD44FE616C93790EAD48EDD302,),PersistentGuid=00000000000000000000000000000000,bHidden=False,bNotConnectable=False,bDefaultValueIsReadOnly=False,bDefaultValueIsIgnored=False,bAdvancedView=False,bOrphanedPin=False,)
End Object
Begin Object Class=/Script/BlueprintGraph.K2Node_CallFunction Name="K2Node_CallFunction_5" ExportPath="/Script/BlueprintGraph.K2Node_CallFunction'/Game/CharacterBP.CharacterBP:EventGraph.K2Node_CallFunction_5'"
   FunctionReference=(MemberParent="/Script/CoreUObject.Class'/Script/CohtmlPlugin.CohtmlBaseComponent'",MemberName="RegisterForEvent")
   NodePosX=9168
   NodePosY=240
   ErrorType=1
   NodeGuid=625792324863D64BC491DB9FC801066D
   CustomProperties Pin (PinId=5A1C77664D51D1F9D1827D91568C4B25,PinName="execute",PinToolTip="
Exec",PinType.PinCategory="exec",PinType.PinSubCategory="",PinType.PinSubCategoryObject=None,PinType.PinSubCategoryMemberReference=(),PinType.PinValueType=(),PinType.ContainerType=None,PinType.bIsReference=False,PinType.bIsConst=False,PinType.bIsWeakPointer=False,PinType.bIsUObjectWrapper=False,PinType.bSerializeAsSinglePrecisionFloat=False,LinkedTo=(K2Node_CallFunction_4 2594D8434A3E01AE3672CEBB306B3BB4,),PersistentGuid=00000000000000000000000000000000,bHidden=False,bNotConnectable=False,bDefaultValueIsReadOnly=False,bDefaultValueIsIgnored=False,bAdvancedView=False,bOrphanedPin=False,)
   CustomProperties Pin (PinId=90E599A24A0F168CA6E1129156F5C284,PinName="then",PinToolTip="
Exec",Direction="EGPD_Output",PinType.PinCategory="exec",PinType.PinSubCategory="",PinType.PinSubCategoryObject=None,PinType.PinSubCategoryMemberReference=(),PinType.PinValueType=(),PinType.ContainerType=None,PinType.bIsReference=False,PinType.bIsConst=False,PinType.bIsWeakPointer=False,PinType.bIsUObjectWrapper=False,PinType.bSerializeAsSinglePrecisionFloat=False,PersistentGuid=00000000000000000000000000000000,bHidden=False,bNotConnectable=False,bDefaultValueIsReadOnly=False,bDefaultValueIsIgnored=False,bAdvancedView=False,bOrphanedPin=False,)
   CustomProperties Pin (PinId=A1CDE0AA42F31CBB1954DD94CCA22FFF,PinName="self",PinFriendlyName=NSLOCTEXT("K2Node", "Target", "Target"),PinToolTip="Target
Gameface Base Component Object Reference",PinType.PinCategory="object",PinType.PinSubCategory="",PinType.PinSubCategoryObject="/Script/CoreUObject.Class'/Script/CohtmlPlugin.CohtmlBaseComponent'",PinType.PinSubCategoryMemberReference=(),PinType.PinValueType=(),PinType.ContainerType=None,PinType.bIsReference=False,PinType.bIsConst=False,PinType.bIsWeakPointer=False,PinType.bIsUObjectWrapper=False,PinType.bSerializeAsSinglePrecisionFloat=False,LinkedTo=(K2Node_VariableGet_5 8F7889484DA764528B2DB799D57983A9,),PersistentGuid=00000000000000000000000000000000,bHidden=False,bNotConnectable=False,bDefaultValueIsReadOnly=False,bDefaultValueIsIgnored=False,bAdvancedView=False,bOrphanedPin=False,)
   CustomProperties Pin (PinId=A0123BC049D87E1A61A3ACACDCDDA245,PinName="JSEventName",PinFriendlyName=NSLOCTEXT("", "A4BF72D242944B56D8120188F755EAA3", "JavaScript Event Name"),PinToolTip="Java Script Event Name
String",PinType.PinCategory="string",PinType.PinSubCategory="",PinType.PinSubCategoryObject=None,PinType.PinSubCategoryMemberReference=(),PinType.PinValueType=(),PinType.ContainerType=None,PinType.bIsReference=False,PinType.bIsConst=False,PinType.bIsWeakPointer=False,PinType.bIsUObjectWrapper=False,PinType.bSerializeAsSinglePrecisionFloat=False,DefaultValue="characterRotateRight",PersistentGuid=00000000000000000000000000000000,bHidden=False,bNotConnectable=False,bDefaultValueIsReadOnly=False,bDefaultValueIsIgnored=False,bAdvancedView=False,bOrphanedPin=False,)
   CustomProperties Pin (PinId=734BD1D14037F912EA3F83B8480D2275,PinName="Delegate",PinFriendlyName=NSLOCTEXT("", "AE576BF24007384DABDF89B36DBD7F89", "Event"),PinToolTip="Event
Delegate",PinType.PinCategory="delegate",PinType.PinSubCategory="",PinType.PinSubCategoryObject=None,PinType.PinSubCategoryMemberReference=(MemberParent="/Script/CoreUObject.Package'/Script/CohtmlPlugin'",MemberName="CohtmlJSEventBPCallback__DelegateSignature"),PinType.PinValueType=(),PinType.ContainerType=None,PinType.bIsReference=False,PinType.bIsConst=False,PinType.bIsWeakPointer=False,PinType.bIsUObjectWrapper=False,PinType.bSerializeAsSinglePrecisionFloat=False,LinkedTo=(K2Node_CustomEvent_5 2966EBF94E5977A912FE88A3AC1A2CA7,),PersistentGuid=00000000000000000000000000000000,bHidden=False,bNotConnectable=False,bDefaultValueIsReadOnly=False,bDefaultValueIsIgnored=False,bAdvancedView=False,bOrphanedPin=False,)
End Object
Begin Object Class=/Script/BlueprintGraph.K2Node_CustomEvent Name="K2Node_CustomEvent_5" ExportPath="/Script/BlueprintGraph.K2Node_CustomEvent'/Game/CharacterBP.CharacterBP:EventGraph.K2Node_CustomEvent_5'"
   CustomFunctionName="rotateRight"
   NodePosX=9216
   NodePosY=608
   NodeGuid=7CDDD17C409DD55274C171941D531D94
   CustomProperties Pin (PinId=2966EBF94E5977A912FE88A3AC1A2CA7,PinName="OutputDelegate",Direction="EGPD_Output",PinType.PinCategory="delegate",PinType.PinSubCategory="",PinType.PinSubCategoryObject=None,PinType.PinSubCategoryMemberReference=(MemberParent="/Script/Engine.BlueprintGeneratedClass'/Game/CharacterBP.CharacterBP_C'",MemberName="rotateRight",MemberGuid=7CDDD17C409DD55274C171941D531D94),PinType.PinValueType=(),PinType.ContainerType=None,PinType.bIsReference=False,PinType.bIsConst=False,PinType.bIsWeakPointer=False,PinType.bIsUObjectWrapper=False,PinType.bSerializeAsSinglePrecisionFloat=False,LinkedTo=(K2Node_CallFunction_5 734BD1D14037F912EA3F83B8480D2275,),PersistentGuid=00000000000000000000000000000000,bHidden=False,bNotConnectable=False,bDefaultValueIsReadOnly=False,bDefaultValueIsIgnored=False,bAdvancedView=False,bOrphanedPin=False,)
   CustomProperties Pin (PinId=07B5826049EF5191D9DBCB9C9922BE3E,PinName="then",Direction="EGPD_Output",PinType.PinCategory="exec",PinType.PinSubCategory="",PinType.PinSubCategoryObject=None,PinType.PinSubCategoryMemberReference=(),PinType.PinValueType=(),PinType.ContainerType=None,PinType.bIsReference=False,PinType.bIsConst=False,PinType.bIsWeakPointer=False,PinType.bIsUObjectWrapper=False,PinType.bSerializeAsSinglePrecisionFloat=False,LinkedTo=(K2Node_CallFunction_9 186BCA544F636BB784EBA98D95ADB6ED,),PersistentGuid=00000000000000000000000000000000,bHidden=False,bNotConnectable=False,bDefaultValueIsReadOnly=False,bDefaultValueIsIgnored=False,bAdvancedView=False,bOrphanedPin=False,)
End Object
Begin Object Class=/Script/BlueprintGraph.K2Node_CallFunction Name="K2Node_CallFunction_9" ExportPath="/Script/BlueprintGraph.K2Node_CallFunction'/Game/CharacterBP.CharacterBP:EventGraph.K2Node_CallFunction_9'"
   FunctionReference=(MemberParent="/Script/CoreUObject.Class'/Script/Engine.SceneComponent'",MemberName="K2_SetWorldRotation")
   NodePosX=9696
   NodePosY=608
   AdvancedPinDisplay=Hidden
   NodeGuid=ABABAF404984AD552C05599F9E08351A
   CustomProperties Pin (PinId=186BCA544F636BB784EBA98D95ADB6ED,PinName="execute",PinToolTip="
Exec",PinType.PinCategory="exec",PinType.PinSubCategory="",PinType.PinSubCategoryObject=None,PinType.PinSubCategoryMemberReference=(),PinType.PinValueType=(),PinType.ContainerType=None,PinType.bIsReference=False,PinType.bIsConst=False,PinType.bIsWeakPointer=False,PinType.bIsUObjectWrapper=False,PinType.bSerializeAsSinglePrecisionFloat=False,LinkedTo=(K2Node_CustomEvent_5 07B5826049EF5191D9DBCB9C9922BE3E,),PersistentGuid=00000000000000000000000000000000,bHidden=False,bNotConnectable=False,bDefaultValueIsReadOnly=False,bDefaultValueIsIgnored=False,bAdvancedView=False,bOrphanedPin=False,)
   CustomProperties Pin (PinId=CF943D3E4AD1007BB1E76FB16AF6F1A2,PinName="then",PinToolTip="
Exec",Direction="EGPD_Output",PinType.PinCategory="exec",PinType.PinSubCategory="",PinType.PinSubCategoryObject=None,PinType.PinSubCategoryMemberReference=(),PinType.PinValueType=(),PinType.ContainerType=None,PinType.bIsReference=False,PinType.bIsConst=False,PinType.bIsWeakPointer=False,PinType.bIsUObjectWrapper=False,PinType.bSerializeAsSinglePrecisionFloat=False,LinkedTo=(K2Node_VariableSet_2 0FFDD34245E7370A765515985F872B42,),PersistentGuid=00000000000000000000000000000000,bHidden=False,bNotConnectable=False,bDefaultValueIsReadOnly=False,bDefaultValueIsIgnored=False,bAdvancedView=False,bOrphanedPin=False,)
   CustomProperties Pin (PinId=3F4B7D8847A4CC2CF82974AF2C5B0E78,PinName="self",PinFriendlyName=NSLOCTEXT("K2Node", "Target", "Target"),PinToolTip="Target
Scene Component Object Reference",PinType.PinCategory="object",PinType.PinSubCategory="",PinType.PinSubCategoryObject="/Script/CoreUObject.Class'/Script/Engine.SceneComponent'",PinType.PinSubCategoryMemberReference=(),PinType.PinValueType=(),PinType.ContainerType=None,PinType.bIsReference=False,PinType.bIsConst=False,PinType.bIsWeakPointer=False,PinType.bIsUObjectWrapper=False,PinType.bSerializeAsSinglePrecisionFloat=False,LinkedTo=(K2Node_VariableGet_0 E464856A4CA22455494CAA9F1ABBD8EB,),PersistentGuid=00000000000000000000000000000000,bHidden=False,bNotConnectable=False,bDefaultValueIsReadOnly=False,bDefaultValueIsIgnored=False,bAdvancedView=False,bOrphanedPin=False,)
   CustomProperties Pin (PinId=2FFDDC4E4E9325D1154E239D49BC7937,PinName="NewRotation",PinToolTip="New Rotation
Rotator

New rotation in world space for the component. *",PinType.PinCategory="struct",PinType.PinSubCategory="",PinType.PinSubCategoryObject="/Script/CoreUObject.ScriptStruct'/Script/CoreUObject.Rotator'",PinType.PinSubCategoryMemberReference=(),PinType.PinValueType=(),PinType.ContainerType=None,PinType.bIsReference=False,PinType.bIsConst=False,PinType.bIsWeakPointer=False,PinType.bIsUObjectWrapper=False,PinType.bSerializeAsSinglePrecisionFloat=False,DefaultValue="0, 0, 0",AutogeneratedDefaultValue="0, 0, 0",SubPins=(K2Node_CallFunction_9 40A2E2D94034CF22E29824BB075B4232,K2Node_CallFunction_9 01A9E8104BAAA118B1B079931B9E7C73,K2Node_CallFunction_9 5A777C014ECEDD50E28D0298553C7569,),PersistentGuid=00000000000000000000000000000000,bHidden=True,bNotConnectable=False,bDefaultValueIsReadOnly=False,bDefaultValueIsIgnored=False,bAdvancedView=False,bOrphanedPin=False,)
   CustomProperties Pin (PinId=40A2E2D94034CF22E29824BB075B4232,PinName="NewRotation_Roll",PinFriendlyName=LOCGEN_FORMAT_NAMED(NSLOCTEXT("KismetSchema", "SplitPinFriendlyNameFormat", "{PinDisplayName} {ProtoPinDisplayName}"), "PinDisplayName", NSLOCTEXT("", "47D0931140B8AE0B9B8DE2B9248E839E", "New Rotation"), "ProtoPinDisplayName", NSLOCTEXT("", "C89A5E2C43DB61F79D50C2B11859C52E", "X (Roll)")),PinToolTip="New Rotation X (Roll)
Float (single-precision)",PinType.PinCategory="real",PinType.PinSubCategory="float",PinType.PinSubCategoryObject=None,PinType.PinSubCategoryMemberReference=(),PinType.PinValueType=(),PinType.ContainerType=None,PinType.bIsReference=False,PinType.bIsConst=False,PinType.bIsWeakPointer=False,PinType.bIsUObjectWrapper=False,PinType.bSerializeAsSinglePrecisionFloat=False,DefaultValue="0.0",AutogeneratedDefaultValue="0.0",ParentPin=K2Node_CallFunction_9 2FFDDC4E4E9325D1154E239D49BC7937,PersistentGuid=00000000000000000000000000000000,bHidden=False,bNotConnectable=False,bDefaultValueIsReadOnly=False,bDefaultValueIsIgnored=False,bAdvancedView=False,bOrphanedPin=False,)
   CustomProperties Pin (PinId=01A9E8104BAAA118B1B079931B9E7C73,PinName="NewRotation_Pitch",PinFriendlyName=LOCGEN_FORMAT_NAMED(NSLOCTEXT("KismetSchema", "SplitPinFriendlyNameFormat", "{PinDisplayName} {ProtoPinDisplayName}"), "PinDisplayName", NSLOCTEXT("", "7F18E8F444CA38C2DD8E5794341923AD", "New Rotation"), "ProtoPinDisplayName", NSLOCTEXT("", "50EA5BD54E65E8027AD60F9D8F77633F", "Y (Pitch)")),PinToolTip="New Rotation Y (Pitch)
Float (single-precision)",PinType.PinCategory="real",PinType.PinSubCategory="float",PinType.PinSubCategoryObject=None,PinType.PinSubCategoryMemberReference=(),PinType.PinValueType=(),PinType.ContainerType=None,PinType.bIsReference=False,PinType.bIsConst=False,PinType.bIsWeakPointer=False,PinType.bIsUObjectWrapper=False,PinType.bSerializeAsSinglePrecisionFloat=False,DefaultValue="0.0",AutogeneratedDefaultValue="0.0",ParentPin=K2Node_CallFunction_9 2FFDDC4E4E9325D1154E239D49BC7937,PersistentGuid=00000000000000000000000000000000,bHidden=False,bNotConnectable=False,bDefaultValueIsReadOnly=False,bDefaultValueIsIgnored=False,bAdvancedView=False,bOrphanedPin=False,)
   CustomProperties Pin (PinId=5A777C014ECEDD50E28D0298553C7569,PinName="NewRotation_Yaw",PinFriendlyName=LOCGEN_FORMAT_NAMED(NSLOCTEXT("KismetSchema", "SplitPinFriendlyNameFormat", "{PinDisplayName} {ProtoPinDisplayName}"), "PinDisplayName", NSLOCTEXT("", "B6BF4F1E44ED5517C9FA12BCB9D8A275", "New Rotation"), "ProtoPinDisplayName", NSLOCTEXT("", "3289698641C001CD9B78C3ACF9D81234", "Z (Yaw)")),PinToolTip="New Rotation Z (Yaw)
Float (single-precision)",PinType.PinCategory="real",PinType.PinSubCategory="float",PinType.PinSubCategoryObject=None,PinType.PinSubCategoryMemberReference=(),PinType.PinValueType=(),PinType.ContainerType=None,PinType.bIsReference=False,PinType.bIsConst=False,PinType.bIsWeakPointer=False,PinType.bIsUObjectWrapper=False,PinType.bSerializeAsSinglePrecisionFloat=False,DefaultValue="0.0",AutogeneratedDefaultValue="0.0",LinkedTo=(K2Node_PromotableOperator_5 120E8C0040A91A1DF7E38BAD93A9A0BF,),ParentPin=K2Node_CallFunction_9 2FFDDC4E4E9325D1154E239D49BC7937,PersistentGuid=00000000000000000000000000000000,bHidden=False,bNotConnectable=False,bDefaultValueIsReadOnly=False,bDefaultValueIsIgnored=False,bAdvancedView=False,bOrphanedPin=False,)
   CustomProperties Pin (PinId=26BBA0FB403743D5436A37B5ADBBED9D,PinName="bSweep",PinToolTip="Sweep
Boolean

Whether we sweep to the destination (currently not supported for rotation). *",PinType.PinCategory="bool",PinType.PinSubCategory="",PinType.PinSubCategoryObject=None,PinType.PinSubCategoryMemberReference=(),PinType.PinValueType=(),PinType.ContainerType=None,PinType.bIsReference=False,PinType.bIsConst=False,PinType.bIsWeakPointer=False,PinType.bIsUObjectWrapper=False,PinType.bSerializeAsSinglePrecisionFloat=False,DefaultValue="false",AutogeneratedDefaultValue="false",PersistentGuid=00000000000000000000000000000000,bHidden=False,bNotConnectable=False,bDefaultValueIsReadOnly=False,bDefaultValueIsIgnored=False,bAdvancedView=True,bOrphanedPin=False,)
   CustomProperties Pin (PinId=4213851B44D1229289F9FDBB6629B9B0,PinName="SweepHitResult",PinToolTip="Sweep Hit Result
Hit Result Structure

Hit result from any impact if sweep is true. *",Direction="EGPD_Output",PinType.PinCategory="struct",PinType.PinSubCategory="",PinType.PinSubCategoryObject="/Script/CoreUObject.ScriptStruct'/Script/Engine.HitResult'",PinType.PinSubCategoryMemberReference=(),PinType.PinValueType=(),PinType.ContainerType=None,PinType.bIsReference=False,PinType.bIsConst=False,PinType.bIsWeakPointer=False,PinType.bIsUObjectWrapper=False,PinType.bSerializeAsSinglePrecisionFloat=False,PersistentGuid=00000000000000000000000000000000,bHidden=False,bNotConnectable=False,bDefaultValueIsReadOnly=False,bDefaultValueIsIgnored=False,bAdvancedView=True,bOrphanedPin=False,)
   CustomProperties Pin (PinId=3ACE721C47660ECFAF96E3BCAFA531ED,PinName="bTeleport",PinToolTip="Teleport
Boolean

Whether we teleport the physics state (if physics collision is enabled for this object). *                                                      If true, physics velocity for this object is unchanged (so ragdoll parts are not affected by change in location). *                                                      If false, physics velocity is updated based on the change in position (affecting ragdoll parts). *                                                      If CCD is on and not teleporting, this will affect objects along the entire sweep volume.",PinType.PinCategory="bool",PinType.PinSubCategory="",PinType.PinSubCategoryObject=None,PinType.PinSubCategoryMemberReference=(),PinType.PinValueType=(),PinType.ContainerType=None,PinType.bIsReference=False,PinType.bIsConst=False,PinType.bIsWeakPointer=False,PinType.bIsUObjectWrapper=False,PinType.bSerializeAsSinglePrecisionFloat=False,DefaultValue="false",AutogeneratedDefaultValue="false",PersistentGuid=00000000000000000000000000000000,bHidden=False,bNotConnectable=False,bDefaultValueIsReadOnly=False,bDefaultValueIsIgnored=False,bAdvancedView=True,bOrphanedPin=False,)
End Object
Begin Object Class=/Script/BlueprintGraph.K2Node_VariableGet Name="K2Node_VariableGet_9" ExportPath="/Script/BlueprintGraph.K2Node_VariableGet'/Game/CharacterBP.CharacterBP:EventGraph.K2Node_VariableGet_9'"
   VariableReference=(MemberName="angle",MemberGuid=774E6DFD4C300E85BE95D999D288064C,bSelfContext=True)
   NodePosX=9328
   NodePosY=752
   ErrorType=1
   NodeGuid=B3E7F06C4A9FF022E3B241817D141600
   CustomProperties Pin (PinId=E30D550749C1C92EEAB5F2BD887E8FB6,PinName="angle",Direction="EGPD_Output",PinType.PinCategory="real",PinType.PinSubCategory="double",PinType.PinSubCategoryObject=None,PinType.PinSubCategoryMemberReference=(),PinType.PinValueType=(),PinType.ContainerType=None,PinType.bIsReference=False,PinType.bIsConst=False,PinType.bIsWeakPointer=False,PinType.bIsUObjectWrapper=False,PinType.bSerializeAsSinglePrecisionFloat=False,DefaultValue="0.0",AutogeneratedDefaultValue="0.0",LinkedTo=(K2Node_PromotableOperator_5 42BF7E414671FA11348F388213CBAEEA,),PersistentGuid=00000000000000000000000000000000,bHidden=False,bNotConnectable=False,bDefaultValueIsReadOnly=False,bDefaultValueIsIgnored=False,bAdvancedView=False,bOrphanedPin=False,)
   CustomProperties Pin (PinId=F2997A2E4110FB596F92AFAED7B3D83A,PinName="self",PinFriendlyName=NSLOCTEXT("K2Node", "Target", "Target"),PinType.PinCategory="object",PinType.PinSubCategory="",PinType.PinSubCategoryObject="/Script/Engine.BlueprintGeneratedClass'/Game/CharacterBP.CharacterBP_C'",PinType.PinSubCategoryMemberReference=(),PinType.PinValueType=(),PinType.ContainerType=None,PinType.bIsReference=False,PinType.bIsConst=False,PinType.bIsWeakPointer=False,PinType.bIsUObjectWrapper=False,PinType.bSerializeAsSinglePrecisionFloat=False,PersistentGuid=00000000000000000000000000000000,bHidden=True,bNotConnectable=False,bDefaultValueIsReadOnly=False,bDefaultValueIsIgnored=False,bAdvancedView=False,bOrphanedPin=False,)
End Object
Begin Object Class=/Script/BlueprintGraph.K2Node_VariableSet Name="K2Node_VariableSet_3" ExportPath="/Script/BlueprintGraph.K2Node_VariableSet'/Game/CharacterBP.CharacterBP:EventGraph.K2Node_VariableSet_3'"
   VariableReference=(MemberName="angle",MemberGuid=774E6DFD4C300E85BE95D999D288064C,bSelfContext=True)
   NodePosX=9024
   NodePosY=832
   ErrorType=1
   NodeGuid=6B2A61C940375FEB089345935911EB4D
   CustomProperties Pin (PinId=0FFDD34245E7370A765515985F872B42,PinName="execute",PinType.PinCategory="exec",PinType.PinSubCategory="",PinType.PinSubCategoryObject=None,PinType.PinSubCategoryMemberReference=(),PinType.PinValueType=(),PinType.ContainerType=None,PinType.bIsReference=False,PinType.bIsConst=False,PinType.bIsWeakPointer=False,PinType.bIsUObjectWrapper=False,PinType.bSerializeAsSinglePrecisionFloat=False,LinkedTo=(K2Node_CallFunction_11 CF943D3E4AD1007BB1E76FB16AF6F1A2,),PersistentGuid=00000000000000000000000000000000,bHidden=False,bNotConnectable=False,bDefaultValueIsReadOnly=False,bDefaultValueIsIgnored=False,bAdvancedView=False,bOrphanedPin=False,)
   CustomProperties Pin (PinId=677D179D4C00A86165F9B88F14E40B76,PinName="then",Direction="EGPD_Output",PinType.PinCategory="exec",PinType.PinSubCategory="",PinType.PinSubCategoryObject=None,PinType.PinSubCategoryMemberReference=(),PinType.PinValueType=(),PinType.ContainerType=None,PinType.bIsReference=False,PinType.bIsConst=False,PinType.bIsWeakPointer=False,PinType.bIsUObjectWrapper=False,PinType.bSerializeAsSinglePrecisionFloat=False,PersistentGuid=00000000000000000000000000000000,bHidden=False,bNotConnectable=False,bDefaultValueIsReadOnly=False,bDefaultValueIsIgnored=False,bAdvancedView=False,bOrphanedPin=False,)
   CustomProperties Pin (PinId=5567215A4C3DB3C73212AC90B28E5B47,PinName="angle",PinType.PinCategory="real",PinType.PinSubCategory="double",PinType.PinSubCategoryObject=None,PinType.PinSubCategoryMemberReference=(),PinType.PinValueType=(),PinType.ContainerType=None,PinType.bIsReference=False,PinType.bIsConst=False,PinType.bIsWeakPointer=False,PinType.bIsUObjectWrapper=False,PinType.bSerializeAsSinglePrecisionFloat=False,DefaultValue="0.0",AutogeneratedDefaultValue="0.0",LinkedTo=(K2Node_PromotableOperator_0 914300654E95D50F57E6D3998725ED19,),PersistentGuid=00000000000000000000000000000000,bHidden=False,bNotConnectable=False,bDefaultValueIsReadOnly=False,bDefaultValueIsIgnored=False,bAdvancedView=False,bOrphanedPin=False,)
   CustomProperties Pin (PinId=6931B139420321ADB056F8A9018225E0,PinName="Output_Get",PinToolTip="Retrieves the value of the variable, can use instead of a separate Get node",Direction="EGPD_Output",PinType.PinCategory="real",PinType.PinSubCategory="double",PinType.PinSubCategoryObject=None,PinType.PinSubCategoryMemberReference=(),PinType.PinValueType=(),PinType.ContainerType=None,PinType.bIsReference=False,PinType.bIsConst=False,PinType.bIsWeakPointer=False,PinType.bIsUObjectWrapper=False,PinType.bSerializeAsSinglePrecisionFloat=False,DefaultValue="0.0",AutogeneratedDefaultValue="0.0",PersistentGuid=00000000000000000000000000000000,bHidden=False,bNotConnectable=False,bDefaultValueIsReadOnly=False,bDefaultValueIsIgnored=False,bAdvancedView=False,bOrphanedPin=False,)
   CustomProperties Pin (PinId=9989F71D44D4B400E4D4378F8DC8ABD5,PinName="self",PinFriendlyName=NSLOCTEXT("K2Node", "Target", "Target"),PinType.PinCategory="object",PinType.PinSubCategory="",PinType.PinSubCategoryObject="/Script/Engine.BlueprintGeneratedClass'/Game/CharacterBP.CharacterBP_C'",PinType.PinSubCategoryMemberReference=(),PinType.PinValueType=(),PinType.ContainerType=None,PinType.bIsReference=False,PinType.bIsConst=False,PinType.bIsWeakPointer=False,PinType.bIsUObjectWrapper=False,PinType.bSerializeAsSinglePrecisionFloat=False,PersistentGuid=00000000000000000000000000000000,bHidden=True,bNotConnectable=False,bDefaultValueIsReadOnly=False,bDefaultValueIsIgnored=False,bAdvancedView=False,bOrphanedPin=False,)
End Object
Begin Object Class=/Script/BlueprintGraph.K2Node_VariableSet Name="K2Node_VariableSet_2" ExportPath="/Script/BlueprintGraph.K2Node_VariableSet'/Game/CharacterBP.CharacterBP:EventGraph.K2Node_VariableSet_2'"
   VariableReference=(MemberName="angle",MemberGuid=774E6DFD4C300E85BE95D999D288064C,bSelfContext=True)
   NodePosX=10096
   NodePosY=640
   ErrorType=1
   NodeGuid=D60EEDA043038DB6D34BDAAB94B0A6BB
   CustomProperties Pin (PinId=0FFDD34245E7370A765515985F872B42,PinName="execute",PinType.PinCategory="exec",PinType.PinSubCategory="",PinType.PinSubCategoryObject=None,PinType.PinSubCategoryMemberReference=(),PinType.PinValueType=(),PinType.ContainerType=None,PinType.bIsReference=False,PinType.bIsConst=False,PinType.bIsWeakPointer=False,PinType.bIsUObjectWrapper=False,PinType.bSerializeAsSinglePrecisionFloat=False,LinkedTo=(K2Node_CallFunction_9 CF943D3E4AD1007BB1E76FB16AF6F1A2,),PersistentGuid=00000000000000000000000000000000,bHidden=False,bNotConnectable=False,bDefaultValueIsReadOnly=False,bDefaultValueIsIgnored=False,bAdvancedView=False,bOrphanedPin=False,)
   CustomProperties Pin (PinId=677D179D4C00A86165F9B88F14E40B76,PinName="then",Direction="EGPD_Output",PinType.PinCategory="exec",PinType.PinSubCategory="",PinType.PinSubCategoryObject=None,PinType.PinSubCategoryMemberReference=(),PinType.PinValueType=(),PinType.ContainerType=None,PinType.bIsReference=False,PinType.bIsConst=False,PinType.bIsWeakPointer=False,PinType.bIsUObjectWrapper=False,PinType.bSerializeAsSinglePrecisionFloat=False,PersistentGuid=00000000000000000000000000000000,bHidden=False,bNotConnectable=False,bDefaultValueIsReadOnly=False,bDefaultValueIsIgnored=False,bAdvancedView=False,bOrphanedPin=False,)
   CustomProperties Pin (PinId=5567215A4C3DB3C73212AC90B28E5B47,PinName="angle",PinType.PinCategory="real",PinType.PinSubCategory="double",PinType.PinSubCategoryObject=None,PinType.PinSubCategoryMemberReference=(),PinType.PinValueType=(),PinType.ContainerType=None,PinType.bIsReference=False,PinType.bIsConst=False,PinType.bIsWeakPointer=False,PinType.bIsUObjectWrapper=False,PinType.bSerializeAsSinglePrecisionFloat=False,DefaultValue="0.0",AutogeneratedDefaultValue="0.0",LinkedTo=(K2Node_PromotableOperator_5 120E8C0040A91A1DF7E38BAD93A9A0BF,),PersistentGuid=00000000000000000000000000000000,bHidden=False,bNotConnectable=False,bDefaultValueIsReadOnly=False,bDefaultValueIsIgnored=False,bAdvancedView=False,bOrphanedPin=False,)
   CustomProperties Pin (PinId=6931B139420321ADB056F8A9018225E0,PinName="Output_Get",PinToolTip="Retrieves the value of the variable, can use instead of a separate Get node",Direction="EGPD_Output",PinType.PinCategory="real",PinType.PinSubCategory="double",PinType.PinSubCategoryObject=None,PinType.PinSubCategoryMemberReference=(),PinType.PinValueType=(),PinType.ContainerType=None,PinType.bIsReference=False,PinType.bIsConst=False,PinType.bIsWeakPointer=False,PinType.bIsUObjectWrapper=False,PinType.bSerializeAsSinglePrecisionFloat=False,DefaultValue="0.0",AutogeneratedDefaultValue="0.0",PersistentGuid=00000000000000000000000000000000,bHidden=False,bNotConnectable=False,bDefaultValueIsReadOnly=False,bDefaultValueIsIgnored=False,bAdvancedView=False,bOrphanedPin=False,)
   CustomProperties Pin (PinId=8110CAFA4E3D2EBB9FC12C988B1258DA,PinName="self",PinFriendlyName=NSLOCTEXT("K2Node", "Target", "Target"),PinType.PinCategory="object",PinType.PinSubCategory="",PinType.PinSubCategoryObject="/Script/Engine.BlueprintGeneratedClass'/Game/CharacterBP.CharacterBP_C'",PinType.PinSubCategoryMemberReference=(),PinType.PinValueType=(),PinType.ContainerType=None,PinType.bIsReference=False,PinType.bIsConst=False,PinType.bIsWeakPointer=False,PinType.bIsUObjectWrapper=False,PinType.bSerializeAsSinglePrecisionFloat=False,PersistentGuid=00000000000000000000000000000000,bHidden=True,bNotConnectable=False,bDefaultValueIsReadOnly=False,bDefaultValueIsIgnored=False,bAdvancedView=False,bOrphanedPin=False,)
End Object
Begin Object Class=/Script/BlueprintGraph.K2Node_PromotableOperator Name="K2Node_PromotableOperator_5" ExportPath="/Script/BlueprintGraph.K2Node_PromotableOperator'/Game/CharacterBP.CharacterBP:EventGraph.K2Node_PromotableOperator_5'"
   bIsPureFunc=True
   FunctionReference=(MemberParent="/Script/CoreUObject.Class'/Script/Engine.KismetMathLibrary'",MemberName="Subtract_DoubleDouble")
   NodePosX=9488
   NodePosY=816
   NodeGuid=FCE509424DBA541DB4D35EB115DA49AB
   CustomProperties Pin (PinId=42BF7E414671FA11348F388213CBAEEA,PinName="A",PinType.PinCategory="real",PinType.PinSubCategory="double",PinType.PinSubCategoryObject=None,PinType.PinSubCategoryMemberReference=(),PinType.PinValueType=(),PinType.ContainerType=None,PinType.bIsReference=False,PinType.bIsConst=False,PinType.bIsWeakPointer=False,PinType.bIsUObjectWrapper=False,PinType.bSerializeAsSinglePrecisionFloat=False,LinkedTo=(K2Node_VariableGet_9 E30D550749C1C92EEAB5F2BD887E8FB6,),PersistentGuid=00000000000000000000000000000000,bHidden=False,bNotConnectable=False,bDefaultValueIsReadOnly=False,bDefaultValueIsIgnored=False,bAdvancedView=False,bOrphanedPin=False,)
   CustomProperties Pin (PinId=1DC4A38A4487BBF942A9ECAE568249E1,PinName="B",PinType.PinCategory="real",PinType.PinSubCategory="double",PinType.PinSubCategoryObject=None,PinType.PinSubCategoryMemberReference=(),PinType.PinValueType=(),PinType.ContainerType=None,PinType.bIsReference=False,PinType.bIsConst=False,PinType.bIsWeakPointer=False,PinType.bIsUObjectWrapper=False,PinType.bSerializeAsSinglePrecisionFloat=False,DefaultValue="10.000000",PersistentGuid=00000000000000000000000000000000,bHidden=False,bNotConnectable=False,bDefaultValueIsReadOnly=False,bDefaultValueIsIgnored=False,bAdvancedView=False,bOrphanedPin=False,)
   CustomProperties Pin (PinId=120E8C0040A91A1DF7E38BAD93A9A0BF,PinName="ReturnValue",Direction="EGPD_Output",PinType.PinCategory="real",PinType.PinSubCategory="double",PinType.PinSubCategoryObject=None,PinType.PinSubCategoryMemberReference=(),PinType.PinValueType=(),PinType.ContainerType=None,PinType.bIsReference=False,PinType.bIsConst=False,PinType.bIsWeakPointer=False,PinType.bIsUObjectWrapper=False,PinType.bSerializeAsSinglePrecisionFloat=False,LinkedTo=(K2Node_CallFunction_9 5A777C014ECEDD50E28D0298553C7569,K2Node_VariableSet_2 5567215A4C3DB3C73212AC90B28E5B47,),PersistentGuid=00000000000000000000000000000000,bHidden=False,bNotConnectable=False,bDefaultValueIsReadOnly=False,bDefaultValueIsIgnored=False,bAdvancedView=False,bOrphanedPin=False,)
End Object
Begin Object Class=/Script/BlueprintGraph.K2Node_VariableGet Name="K2Node_VariableGet_0" ExportPath="/Script/BlueprintGraph.K2Node_VariableGet'/Game/CharacterBP.CharacterBP:EventGraph.K2Node_VariableGet_0'"
   VariableReference=(MemberName="Arrow",bSelfContext=True)
   NodePosX=9504
   NodePosY=480
   NodeGuid=C27D62F243C69A333EA55B86319EC089
   CustomProperties Pin (PinId=E464856A4CA22455494CAA9F1ABBD8EB,PinName="Arrow",Direction="EGPD_Output",PinType.PinCategory="object",PinType.PinSubCategory="",PinType.PinSubCategoryObject="/Script/CoreUObject.Class'/Script/Engine.ArrowComponent'",PinType.PinSubCategoryMemberReference=(),PinType.PinValueType=(),PinType.ContainerType=None,PinType.bIsReference=False,PinType.bIsConst=False,PinType.bIsWeakPointer=False,PinType.bIsUObjectWrapper=False,PinType.bSerializeAsSinglePrecisionFloat=False,LinkedTo=(K2Node_CallFunction_9 3F4B7D8847A4CC2CF82974AF2C5B0E78,),PersistentGuid=00000000000000000000000000000000,bHidden=False,bNotConnectable=False,bDefaultValueIsReadOnly=False,bDefaultValueIsIgnored=False,bAdvancedView=False,bOrphanedPin=False,)
   CustomProperties Pin (PinId=C2DA06064721C3F2A0FDFCA8EB1BC5BD,PinName="self",PinFriendlyName=NSLOCTEXT("K2Node", "Target", "Target"),PinType.PinCategory="object",PinType.PinSubCategory="",PinType.PinSubCategoryObject="/Script/Engine.BlueprintGeneratedClass'/Game/CharacterBP.CharacterBP_C'",PinType.PinSubCategoryMemberReference=(),PinType.PinValueType=(),PinType.ContainerType=None,PinType.bIsReference=False,PinType.bIsConst=False,PinType.bIsWeakPointer=False,PinType.bIsUObjectWrapper=False,PinType.bSerializeAsSinglePrecisionFloat=False,PersistentGuid=00000000000000000000000000000000,bHidden=True,bNotConnectable=False,bDefaultValueIsReadOnly=False,bDefaultValueIsIgnored=False,bAdvancedView=False,bOrphanedPin=False,)
End Object
Begin Object Class=/Script/BlueprintGraph.K2Node_VariableGet Name="K2Node_VariableGet_3" ExportPath="/Script/BlueprintGraph.K2Node_VariableGet'/Game/CharacterBP.CharacterBP:EventGraph.K2Node_VariableGet_3'"
   VariableReference=(MemberName="Arrow",bSelfContext=True)
   NodePosX=8528
   NodePosY=688
   NodeGuid=42591E4A40405A5063B898B208D125D1
   CustomProperties Pin (PinId=5F240F3047AC421314E46F8DD8A4C8EF,PinName="Arrow",Direction="EGPD_Output",PinType.PinCategory="object",PinType.PinSubCategory="",PinType.PinSubCategoryObject="/Script/CoreUObject.Class'/Script/Engine.ArrowComponent'",PinType.PinSubCategoryMemberReference=(),PinType.PinValueType=(),PinType.ContainerType=None,PinType.bIsReference=False,PinType.bIsConst=False,PinType.bIsWeakPointer=False,PinType.bIsUObjectWrapper=False,PinType.bSerializeAsSinglePrecisionFloat=False,LinkedTo=(K2Node_CallFunction_11 3F4B7D8847A4CC2CF82974AF2C5B0E78,),PersistentGuid=00000000000000000000000000000000,bHidden=False,bNotConnectable=False,bDefaultValueIsReadOnly=False,bDefaultValueIsIgnored=False,bAdvancedView=False,bOrphanedPin=False,)
   CustomProperties Pin (PinId=A6CBA70E4DF9C7F3FC886B92BCBE2B73,PinName="self",PinFriendlyName=NSLOCTEXT("K2Node", "Target", "Target"),PinType.PinCategory="object",PinType.PinSubCategory="",PinType.PinSubCategoryObject="/Script/Engine.BlueprintGeneratedClass'/Game/CharacterBP.CharacterBP_C'",PinType.PinSubCategoryMemberReference=(),PinType.PinValueType=(),PinType.ContainerType=None,PinType.bIsReference=False,PinType.bIsConst=False,PinType.bIsWeakPointer=False,PinType.bIsUObjectWrapper=False,PinType.bSerializeAsSinglePrecisionFloat=False,PersistentGuid=00000000000000000000000000000000,bHidden=True,bNotConnectable=False,bDefaultValueIsReadOnly=False,bDefaultValueIsIgnored=False,bAdvancedView=False,bOrphanedPin=False,)
End Object
Begin Object Class=/Script/BlueprintGraph.K2Node_CustomEvent Name="K2Node_CustomEvent_4" ExportPath="/Script/BlueprintGraph.K2Node_CustomEvent'/Game/CharacterBP.CharacterBP:EventGraph.K2Node_CustomEvent_4'"
   CustomFunctionName="rotateLeft"
   NodePosX=8080
   NodePosY=784
   NodeGuid=FCF1000341AA0C788C030AAA64501946
   CustomProperties Pin (PinId=379011AD44FE616C93790EAD48EDD302,PinName="OutputDelegate",Direction="EGPD_Output",PinType.PinCategory="delegate",PinType.PinSubCategory="",PinType.PinSubCategoryObject=None,PinType.PinSubCategoryMemberReference=(MemberParent="/Script/Engine.BlueprintGeneratedClass'/Game/CharacterBP.CharacterBP_C'",MemberName="rotateLeft",MemberGuid=FCF1000341AA0C788C030AAA64501946),PinType.PinValueType=(),PinType.ContainerType=None,PinType.bIsReference=False,PinType.bIsConst=False,PinType.bIsWeakPointer=False,PinType.bIsUObjectWrapper=False,PinType.bSerializeAsSinglePrecisionFloat=False,LinkedTo=(K2Node_CallFunction_4 93760E9C4A2EB4FC489ACEB012AAED6A,),PersistentGuid=00000000000000000000000000000000,bHidden=False,bNotConnectable=False,bDefaultValueIsReadOnly=False,bDefaultValueIsIgnored=False,bAdvancedView=False,bOrphanedPin=False,)
   CustomProperties Pin (PinId=0F97B6C54C3B7792AAE710B16B26D028,PinName="then",Direction="EGPD_Output",PinType.PinCategory="exec",PinType.PinSubCategory="",PinType.PinSubCategoryObject=None,PinType.PinSubCategoryMemberReference=(),PinType.PinValueType=(),PinType.ContainerType=None,PinType.bIsReference=False,PinType.bIsConst=False,PinType.bIsWeakPointer=False,PinType.bIsUObjectWrapper=False,PinType.bSerializeAsSinglePrecisionFloat=False,LinkedTo=(K2Node_CallFunction_11 186BCA544F636BB784EBA98D95ADB6ED,),PersistentGuid=00000000000000000000000000000000,bHidden=False,bNotConnectable=False,bDefaultValueIsReadOnly=False,bDefaultValueIsIgnored=False,bAdvancedView=False,bOrphanedPin=False,)
End Object
Begin Object Class=/Script/BlueprintGraph.K2Node_VariableGet Name="K2Node_VariableGet_10" ExportPath="/Script/BlueprintGraph.K2Node_VariableGet'/Game/CharacterBP.CharacterBP:EventGraph.K2Node_VariableGet_10'"
   VariableReference=(MemberName="angle",MemberGuid=774E6DFD4C300E85BE95D999D288064C,bSelfContext=True)
   NodePosX=8240
   NodePosY=976
   ErrorType=1
   NodeGuid=4E4AE77642AF25AE8E400FA2AE1AB467
   CustomProperties Pin (PinId=E30D550749C1C92EEAB5F2BD887E8FB6,PinName="angle",Direction="EGPD_Output",PinType.PinCategory="real",PinType.PinSubCategory="double",PinType.PinSubCategoryObject=None,PinType.PinSubCategoryMemberReference=(),PinType.PinValueType=(),PinType.ContainerType=None,PinType.bIsReference=False,PinType.bIsConst=False,PinType.bIsWeakPointer=False,PinType.bIsUObjectWrapper=False,PinType.bSerializeAsSinglePrecisionFloat=False,DefaultValue="0.0",AutogeneratedDefaultValue="0.0",LinkedTo=(K2Node_PromotableOperator_0 7AF9682341969643F1BFB48757276B30,),PersistentGuid=00000000000000000000000000000000,bHidden=False,bNotConnectable=False,bDefaultValueIsReadOnly=False,bDefaultValueIsIgnored=False,bAdvancedView=False,bOrphanedPin=False,)
   CustomProperties Pin (PinId=C2581BBD42BD5C40CF8E68996ACB3B38,PinName="self",PinFriendlyName=NSLOCTEXT("K2Node", "Target", "Target"),PinType.PinCategory="object",PinType.PinSubCategory="",PinType.PinSubCategoryObject="/Script/Engine.BlueprintGeneratedClass'/Game/CharacterBP.CharacterBP_C'",PinType.PinSubCategoryMemberReference=(),PinType.PinValueType=(),PinType.ContainerType=None,PinType.bIsReference=False,PinType.bIsConst=False,PinType.bIsWeakPointer=False,PinType.bIsUObjectWrapper=False,PinType.bSerializeAsSinglePrecisionFloat=False,PersistentGuid=00000000000000000000000000000000,bHidden=True,bNotConnectable=False,bDefaultValueIsReadOnly=False,bDefaultValueIsIgnored=False,bAdvancedView=False,bOrphanedPin=False,)
End Object
Begin Object Class=/Script/BlueprintGraph.K2Node_PromotableOperator Name="K2Node_PromotableOperator_0" ExportPath="/Script/BlueprintGraph.K2Node_PromotableOperator'/Game/CharacterBP.CharacterBP:EventGraph.K2Node_PromotableOperator_0'"
   bIsPureFunc=True
   FunctionReference=(MemberParent="/Script/CoreUObject.Class'/Script/Engine.KismetMathLibrary'",MemberName="Add_DoubleDouble")
   NodePosX=8448
   NodePosY=1056
   NodeGuid=3E4E9F93408FE7D9A73DF9B5858341C8
   CustomProperties Pin (PinId=7AF9682341969643F1BFB48757276B30,PinName="A",PinType.PinCategory="real",PinType.PinSubCategory="double",PinType.PinSubCategoryObject=None,PinType.PinSubCategoryMemberReference=(),PinType.PinValueType=(),PinType.ContainerType=None,PinType.bIsReference=False,PinType.bIsConst=False,PinType.bIsWeakPointer=False,PinType.bIsUObjectWrapper=False,PinType.bSerializeAsSinglePrecisionFloat=False,LinkedTo=(K2Node_VariableGet_10 E30D550749C1C92EEAB5F2BD887E8FB6,),PersistentGuid=00000000000000000000000000000000,bHidden=False,bNotConnectable=False,bDefaultValueIsReadOnly=False,bDefaultValueIsIgnored=False,bAdvancedView=False,bOrphanedPin=False,)
   CustomProperties Pin (PinId=1D238FB34AF56BD71EC2E3A0ADD932F2,PinName="B",PinType.PinCategory="real",PinType.PinSubCategory="double",PinType.PinSubCategoryObject=None,PinType.PinSubCategoryMemberReference=(),PinType.PinValueType=(),PinType.ContainerType=None,PinType.bIsReference=False,PinType.bIsConst=False,PinType.bIsWeakPointer=False,PinType.bIsUObjectWrapper=False,PinType.bSerializeAsSinglePrecisionFloat=False,DefaultValue="10.000000",PersistentGuid=00000000000000000000000000000000,bHidden=False,bNotConnectable=False,bDefaultValueIsReadOnly=False,bDefaultValueIsIgnored=False,bAdvancedView=False,bOrphanedPin=False,)
   CustomProperties Pin (PinId=914300654E95D50F57E6D3998725ED19,PinName="ReturnValue",Direction="EGPD_Output",PinType.PinCategory="real",PinType.PinSubCategory="double",PinType.PinSubCategoryObject=None,PinType.PinSubCategoryMemberReference=(),PinType.PinValueType=(),PinType.ContainerType=None,PinType.bIsReference=False,PinType.bIsConst=False,PinType.bIsWeakPointer=False,PinType.bIsUObjectWrapper=False,PinType.bSerializeAsSinglePrecisionFloat=False,LinkedTo=(K2Node_CallFunction_11 5A777C014ECEDD50E28D0298553C7569,K2Node_VariableSet_3 5567215A4C3DB3C73212AC90B28E5B47,),PersistentGuid=00000000000000000000000000000000,bHidden=False,bNotConnectable=False,bDefaultValueIsReadOnly=False,bDefaultValueIsIgnored=False,bAdvancedView=False,bOrphanedPin=False,)
End Object
Begin Object Class=/Script/BlueprintGraph.K2Node_CallFunction Name="K2Node_CallFunction_11" ExportPath="/Script/BlueprintGraph.K2Node_CallFunction'/Game/CharacterBP.CharacterBP:EventGraph.K2Node_CallFunction_11'"
   FunctionReference=(MemberParent="/Script/CoreUObject.Class'/Script/Engine.SceneComponent'",MemberName="K2_SetWorldRotation")
   NodePosX=8688
   NodePosY=800
   AdvancedPinDisplay=Hidden
   NodeGuid=B420EFEA4F869A293A3FFAAB799D3A62
   CustomProperties Pin (PinId=186BCA544F636BB784EBA98D95ADB6ED,PinName="execute",PinType.PinCategory="exec",PinType.PinSubCategory="",PinType.PinSubCategoryObject=None,PinType.PinSubCategoryMemberReference=(),PinType.PinValueType=(),PinType.ContainerType=None,PinType.bIsReference=False,PinType.bIsConst=False,PinType.bIsWeakPointer=False,PinType.bIsUObjectWrapper=False,PinType.bSerializeAsSinglePrecisionFloat=False,LinkedTo=(K2Node_CustomEvent_4 0F97B6C54C3B7792AAE710B16B26D028,),PersistentGuid=00000000000000000000000000000000,bHidden=False,bNotConnectable=False,bDefaultValueIsReadOnly=False,bDefaultValueIsIgnored=False,bAdvancedView=False,bOrphanedPin=False,)
   CustomProperties Pin (PinId=CF943D3E4AD1007BB1E76FB16AF6F1A2,PinName="then",Direction="EGPD_Output",PinType.PinCategory="exec",PinType.PinSubCategory="",PinType.PinSubCategoryObject=None,PinType.PinSubCategoryMemberReference=(),PinType.PinValueType=(),PinType.ContainerType=None,PinType.bIsReference=False,PinType.bIsConst=False,PinType.bIsWeakPointer=False,PinType.bIsUObjectWrapper=False,PinType.bSerializeAsSinglePrecisionFloat=False,LinkedTo=(K2Node_VariableSet_3 0FFDD34245E7370A765515985F872B42,),PersistentGuid=00000000000000000000000000000000,bHidden=False,bNotConnectable=False,bDefaultValueIsReadOnly=False,bDefaultValueIsIgnored=False,bAdvancedView=False,bOrphanedPin=False,)
   CustomProperties Pin (PinId=3F4B7D8847A4CC2CF82974AF2C5B0E78,PinName="self",PinFriendlyName=NSLOCTEXT("K2Node", "Target", "Target"),PinType.PinCategory="object",PinType.PinSubCategory="",PinType.PinSubCategoryObject="/Script/CoreUObject.Class'/Script/Engine.SceneComponent'",PinType.PinSubCategoryMemberReference=(),PinType.PinValueType=(),PinType.ContainerType=None,PinType.bIsReference=False,PinType.bIsConst=False,PinType.bIsWeakPointer=False,PinType.bIsUObjectWrapper=False,PinType.bSerializeAsSinglePrecisionFloat=False,LinkedTo=(K2Node_VariableGet_3 5F240F3047AC421314E46F8DD8A4C8EF,),PersistentGuid=00000000000000000000000000000000,bHidden=False,bNotConnectable=False,bDefaultValueIsReadOnly=False,bDefaultValueIsIgnored=False,bAdvancedView=False,bOrphanedPin=False,)
   CustomProperties Pin (PinId=2FFDDC4E4E9325D1154E239D49BC7937,PinName="NewRotation",PinType.PinCategory="struct",PinType.PinSubCategory="",PinType.PinSubCategoryObject="/Script/CoreUObject.ScriptStruct'/Script/CoreUObject.Rotator'",PinType.PinSubCategoryMemberReference=(),PinType.PinValueType=(),PinType.ContainerType=None,PinType.bIsReference=False,PinType.bIsConst=False,PinType.bIsWeakPointer=False,PinType.bIsUObjectWrapper=False,PinType.bSerializeAsSinglePrecisionFloat=False,DefaultValue="0, 0, 0",AutogeneratedDefaultValue="0, 0, 0",SubPins=(K2Node_CallFunction_11 40A2E2D94034CF22E29824BB075B4232,K2Node_CallFunction_11 01A9E8104BAAA118B1B079931B9E7C73,K2Node_CallFunction_11 5A777C014ECEDD50E28D0298553C7569,),PersistentGuid=00000000000000000000000000000000,bHidden=True,bNotConnectable=False,bDefaultValueIsReadOnly=False,bDefaultValueIsIgnored=False,bAdvancedView=False,bOrphanedPin=False,)
   CustomProperties Pin (PinId=40A2E2D94034CF22E29824BB075B4232,PinName="NewRotation_Roll",PinFriendlyName=LOCGEN_FORMAT_NAMED(NSLOCTEXT("KismetSchema", "SplitPinFriendlyNameFormat", "{PinDisplayName} {ProtoPinDisplayName}"), "PinDisplayName", NSLOCTEXT("", "D0669FFE4D42174C69C1B89088591F61", "New Rotation"), "ProtoPinDisplayName", NSLOCTEXT("", "93F4973844298E67C87B45A48AE1FF6F", "X (Roll)")),PinType.PinCategory="real",PinType.PinSubCategory="float",PinType.PinSubCategoryObject=None,PinType.PinSubCategoryMemberReference=(),PinType.PinValueType=(),PinType.ContainerType=None,PinType.bIsReference=False,PinType.bIsConst=False,PinType.bIsWeakPointer=False,PinType.bIsUObjectWrapper=False,PinType.bSerializeAsSinglePrecisionFloat=False,DefaultValue="0.0",AutogeneratedDefaultValue="0.0",ParentPin=K2Node_CallFunction_11 2FFDDC4E4E9325D1154E239D49BC7937,PersistentGuid=00000000000000000000000000000000,bHidden=False,bNotConnectable=False,bDefaultValueIsReadOnly=False,bDefaultValueIsIgnored=False,bAdvancedView=False,bOrphanedPin=False,)
   CustomProperties Pin (PinId=01A9E8104BAAA118B1B079931B9E7C73,PinName="NewRotation_Pitch",PinFriendlyName=LOCGEN_FORMAT_NAMED(NSLOCTEXT("KismetSchema", "SplitPinFriendlyNameFormat", "{PinDisplayName} {ProtoPinDisplayName}"), "PinDisplayName", NSLOCTEXT("", "2E1B93134D96EF7A49AC91B9A11B1B65", "New Rotation"), "ProtoPinDisplayName", NSLOCTEXT("", "BBB417484A36236896D83595BB1C1DB7", "Y (Pitch)")),PinType.PinCategory="real",PinType.PinSubCategory="float",PinType.PinSubCategoryObject=None,PinType.PinSubCategoryMemberReference=(),PinType.PinValueType=(),PinType.ContainerType=None,PinType.bIsReference=False,PinType.bIsConst=False,PinType.bIsWeakPointer=False,PinType.bIsUObjectWrapper=False,PinType.bSerializeAsSinglePrecisionFloat=False,DefaultValue="0.0",AutogeneratedDefaultValue="0.0",ParentPin=K2Node_CallFunction_11 2FFDDC4E4E9325D1154E239D49BC7937,PersistentGuid=00000000000000000000000000000000,bHidden=False,bNotConnectable=False,bDefaultValueIsReadOnly=False,bDefaultValueIsIgnored=False,bAdvancedView=False,bOrphanedPin=False,)
   CustomProperties Pin (PinId=5A777C014ECEDD50E28D0298553C7569,PinName="NewRotation_Yaw",PinFriendlyName=LOCGEN_FORMAT_NAMED(NSLOCTEXT("KismetSchema", "SplitPinFriendlyNameFormat", "{PinDisplayName} {ProtoPinDisplayName}"), "PinDisplayName", NSLOCTEXT("", "F5706A9F4F82847A0DD9A389A7D06171", "New Rotation"), "ProtoPinDisplayName", NSLOCTEXT("", "E599448E4060840E8478DB8907922AD5", "Z (Yaw)")),PinType.PinCategory="real",PinType.PinSubCategory="float",PinType.PinSubCategoryObject=None,PinType.PinSubCategoryMemberReference=(),PinType.PinValueType=(),PinType.ContainerType=None,PinType.bIsReference=False,PinType.bIsConst=False,PinType.bIsWeakPointer=False,PinType.bIsUObjectWrapper=False,PinType.bSerializeAsSinglePrecisionFloat=False,DefaultValue="0.0",AutogeneratedDefaultValue="0.0",LinkedTo=(K2Node_PromotableOperator_0 914300654E95D50F57E6D3998725ED19,),ParentPin=K2Node_CallFunction_11 2FFDDC4E4E9325D1154E239D49BC7937,PersistentGuid=00000000000000000000000000000000,bHidden=False,bNotConnectable=False,bDefaultValueIsReadOnly=False,bDefaultValueIsIgnored=False,bAdvancedView=False,bOrphanedPin=False,)
   CustomProperties Pin (PinId=26BBA0FB403743D5436A37B5ADBBED9D,PinName="bSweep",PinType.PinCategory="bool",PinType.PinSubCategory="",PinType.PinSubCategoryObject=None,PinType.PinSubCategoryMemberReference=(),PinType.PinValueType=(),PinType.ContainerType=None,PinType.bIsReference=False,PinType.bIsConst=False,PinType.bIsWeakPointer=False,PinType.bIsUObjectWrapper=False,PinType.bSerializeAsSinglePrecisionFloat=False,DefaultValue="false",AutogeneratedDefaultValue="false",PersistentGuid=00000000000000000000000000000000,bHidden=False,bNotConnectable=False,bDefaultValueIsReadOnly=False,bDefaultValueIsIgnored=False,bAdvancedView=True,bOrphanedPin=False,)
   CustomProperties Pin (PinId=4213851B44D1229289F9FDBB6629B9B0,PinName="SweepHitResult",Direction="EGPD_Output",PinType.PinCategory="struct",PinType.PinSubCategory="",PinType.PinSubCategoryObject="/Script/CoreUObject.ScriptStruct'/Script/Engine.HitResult'",PinType.PinSubCategoryMemberReference=(),PinType.PinValueType=(),PinType.ContainerType=None,PinType.bIsReference=False,PinType.bIsConst=False,PinType.bIsWeakPointer=False,PinType.bIsUObjectWrapper=False,PinType.bSerializeAsSinglePrecisionFloat=False,PersistentGuid=00000000000000000000000000000000,bHidden=False,bNotConnectable=False,bDefaultValueIsReadOnly=False,bDefaultValueIsIgnored=False,bAdvancedView=True,bOrphanedPin=False,)
   CustomProperties Pin (PinId=3ACE721C47660ECFAF96E3BCAFA531ED,PinName="bTeleport",PinType.PinCategory="bool",PinType.PinSubCategory="",PinType.PinSubCategoryObject=None,PinType.PinSubCategoryMemberReference=(),PinType.PinValueType=(),PinType.ContainerType=None,PinType.bIsReference=False,PinType.bIsConst=False,PinType.bIsWeakPointer=False,PinType.bIsUObjectWrapper=False,PinType.bSerializeAsSinglePrecisionFloat=False,DefaultValue="false",AutogeneratedDefaultValue="false",PersistentGuid=00000000000000000000000000000000,bHidden=False,bNotConnectable=False,bDefaultValueIsReadOnly=False,bDefaultValueIsIgnored=False,bAdvancedView=True,bOrphanedPin=False,)
End Object
Once configured, you can trigger these events through keyboard actions or when the mouse is dragged left or right.
Rotate character with the keyboard
For keyboard rotation, refer to the setup in this tutorial.
Simply replace the backend-triggered events—such as engine.trigger("rotateCameraLeft"); with engine.trigger("characterRotateLeft"); and do the same for right rotation.
Rotate character with the mouse
To enable character rotation with the mouse, follow these steps:
- Add a mouse down event to the live view element.
- Add a mousemove event to the document that triggers
characterRotateLeftandcharacterRotateRightevents to the backend. - Finally, clear the events.
The handlers definitions for dragging starts, stops, and continues are the following:
1let isDragging = false;2let initialMouseX = 0;3
4const startDragging = (event) => {5   if (isDragging) return;6   isDragging = true;7   initialMouseX = event.clientX;8   document.addEventListener('mousemove', dragModel);9   document.addEventListener('mouseup', stopDragging);10}11
12const dragModel = (event) => {13   if (event.clientX < initialMouseX) {14      engine.trigger("characterRotateLeft");15      initialMouseX = event.clientX;16      return;17   }18
19   if (event.clientX > initialMouseX) {20      engine.trigger("characterRotateRight");21      initialMouseX = event.clientX;22   }23
24}25
26const stopDragging = (event) => {27   document.removeEventListener('mousemove', dragModel);28   document.removeEventListener('mouseup', stopDragging);29   isDragging = false;30}
To determine if the mouse is being dragged left or right, use the event.clientX property and compare it to the initial position.
Trigger the appropriate rotate event to the backend and update the initial position with the current one: initialMouseX = event.clientX;.
And finally to enable dragging on the live view element, add the event in the useEffect method:
1const model = useRef(null);2...3useEffect(() => {4 ...5 model.current.addEventListener('mousedown', startDragging);6 return () => {7 model.current && model.current.removeEventListener('mousedown', startDragging);8 ...9 };10}, []);