Creating screen for character selection
10/29/2024
Kaloyan Geshev
In the character selection screen, players are invited to choose their hero for the journey ahead. Each character comes with unique abilities, strengths, and playstyles, allowing players to find the perfect match for their strategy.
Overview
In this tutorial, we’ll use Unreal Engine v5.3 and blueprints to design a level where players can pick different characters. While it’s possible to implement this using live views as shown in previous tutorials, we’ll now explore a more dynamic and engaging character selection method. When the player cycles through characters, they will be displayed directly in the game, using different camera views to showcase each character.
For the UI we will use the Gameface’s native and UE data-binding features to bind game data to the UI.
Resources
- Character models: Paragon: Revenant .
- Environment assets: Paragon: Agora and Monolith Environment .
- Icon: Cracked alien skull icon .
- Font: Jacksonville .
Getting started - Unreal Engine
We’ll begin by setting up the project in Unreal Engine. Use the getting started guide from our documentation to install the Gameface plugin and integrate it into an existing project or use the sample project created by the installer.
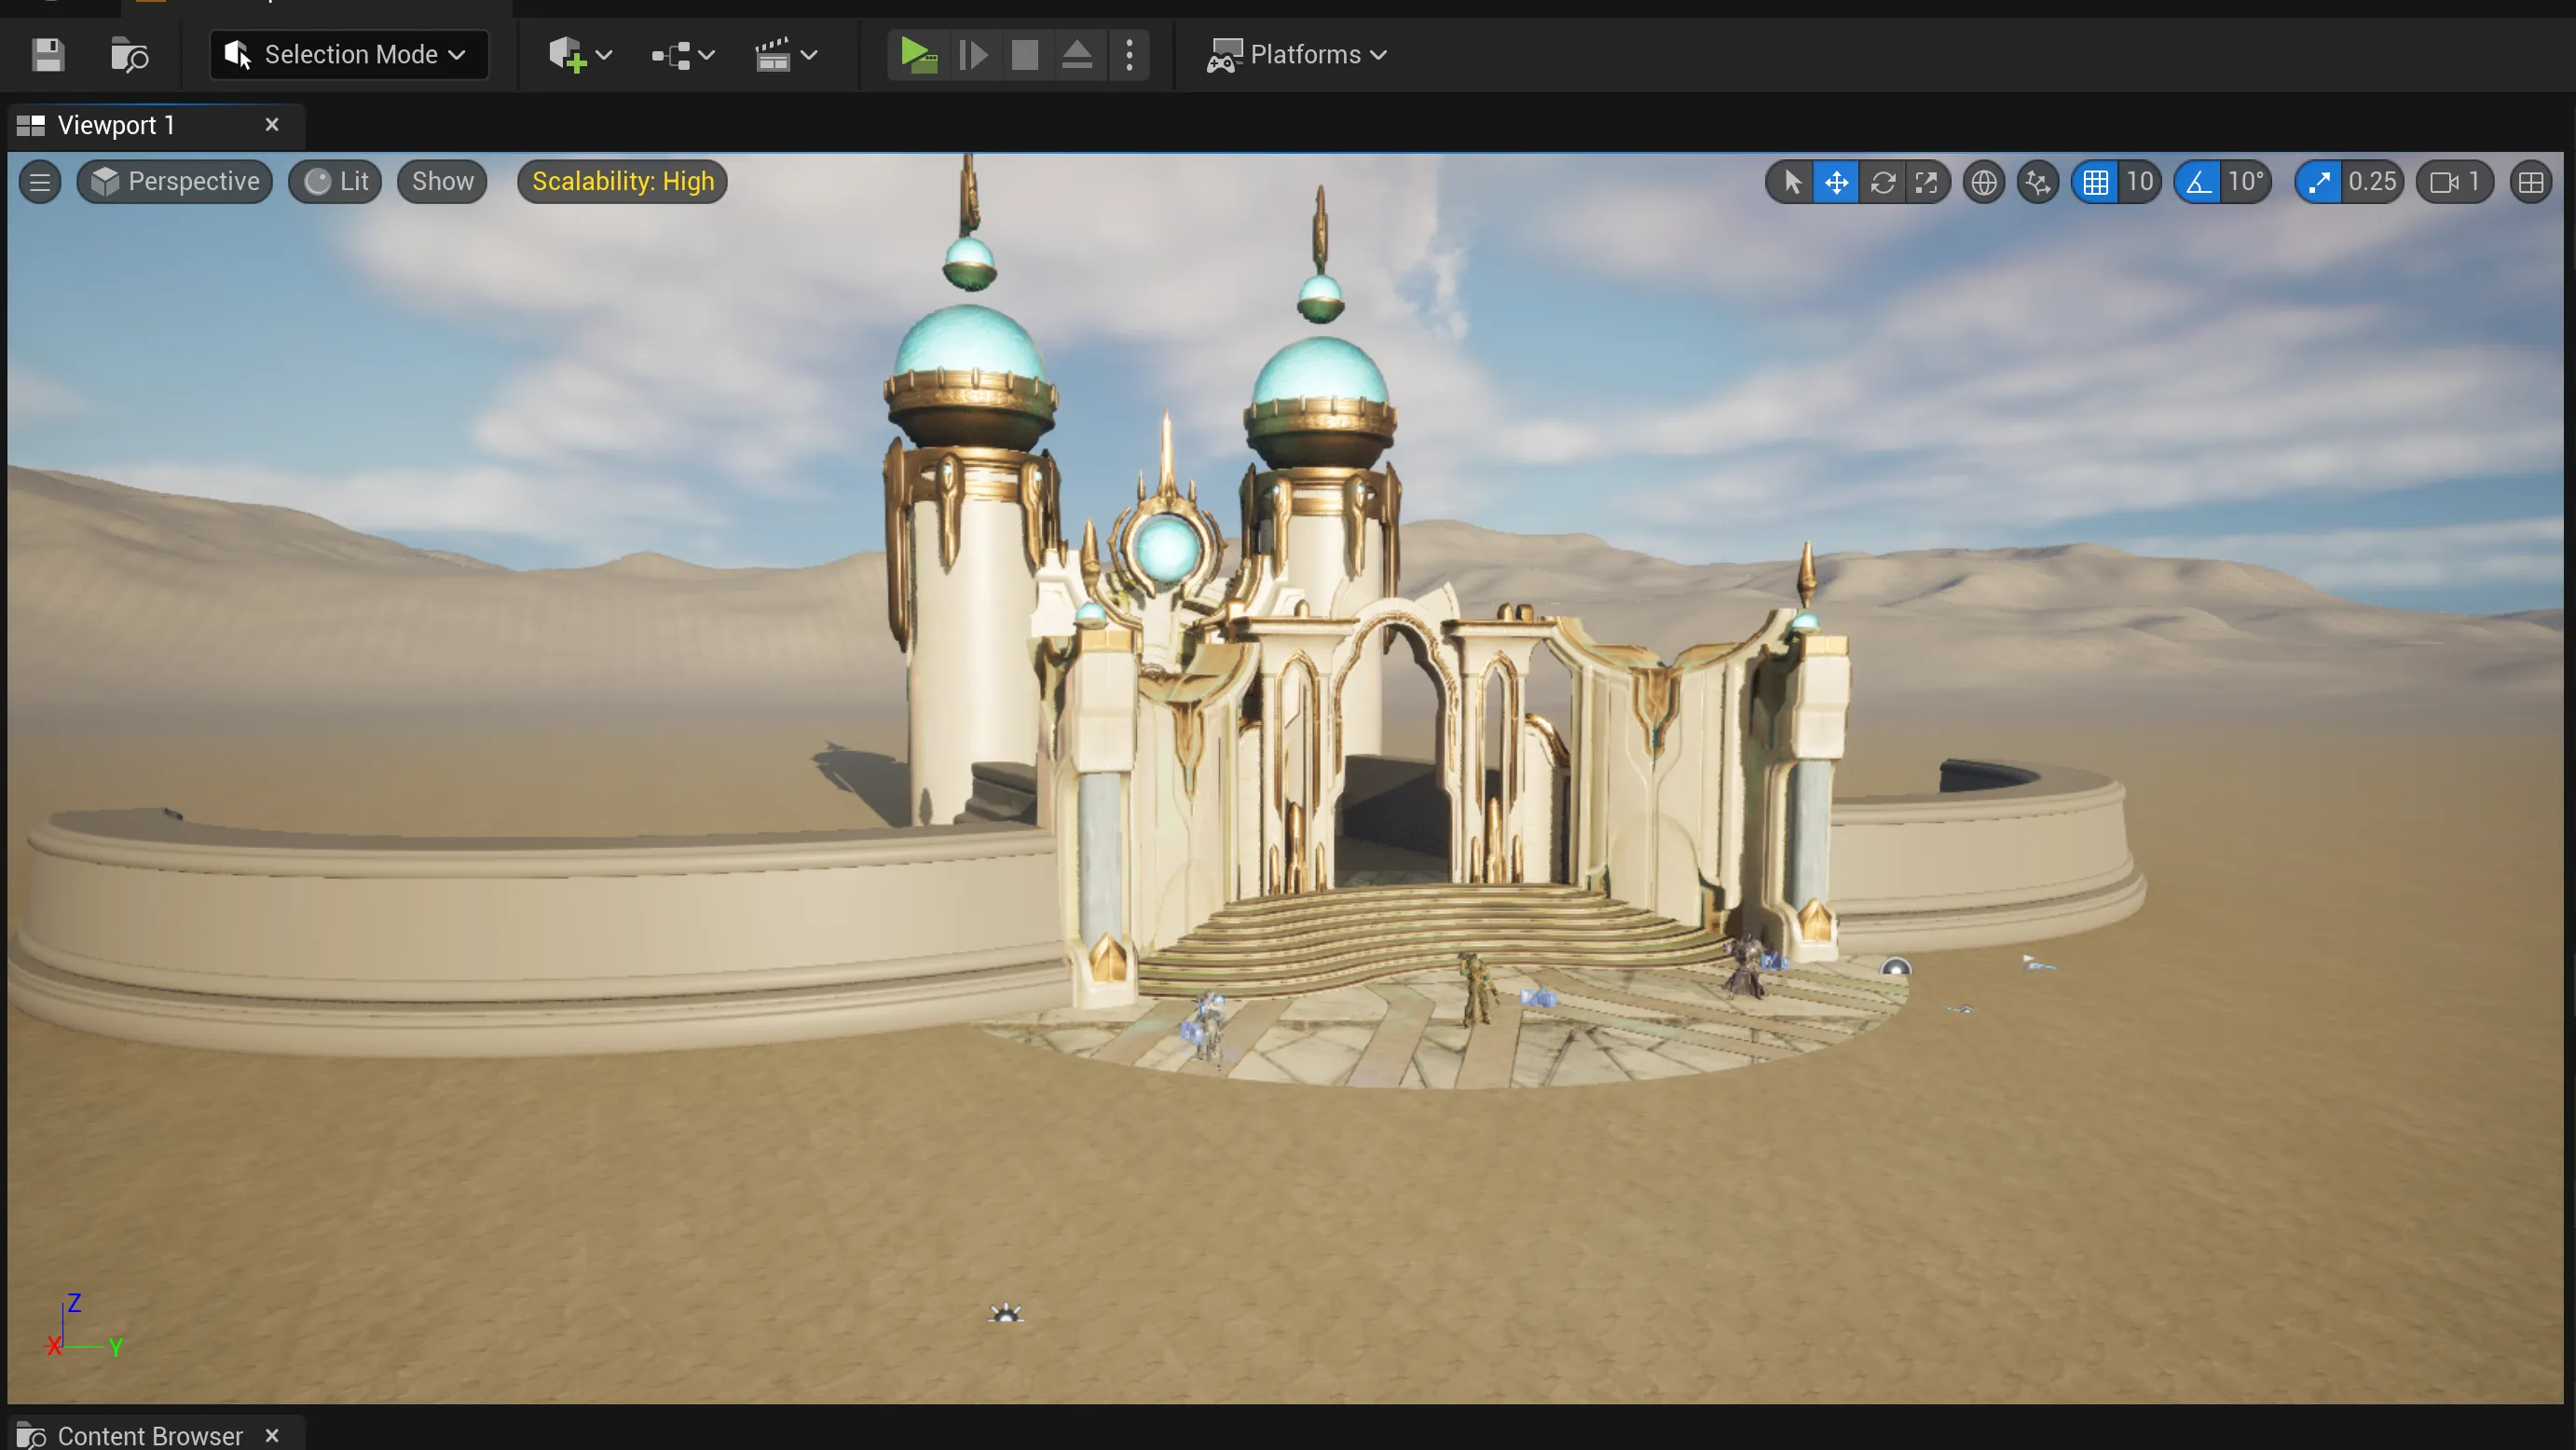
After setting things up, we’ll arrange and design the world in our level. You can use your creativity and the free assets linked in the Resources section to place them in your world.
For this tutorial, we arranged the assets in the following way:
Adding camera actors for each character
Once your game world is ready, we’ll begin building the character selection system. The first step is to create a camera actor for each character the player can choose from.
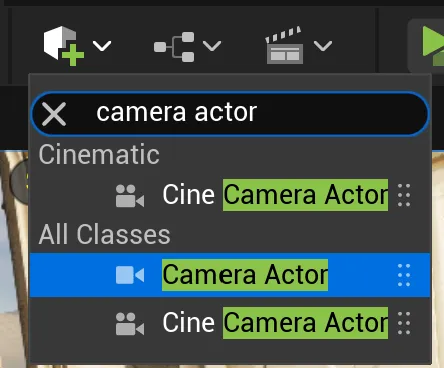
To create a camera actor, use the menu to create objects and search for Camera Actor.
After selecting the object, place it appropriately in the world. In our case, the character will be displayed on the right side of the screen, with their stats on the left. Make sure to position the cameras consistently across characters:
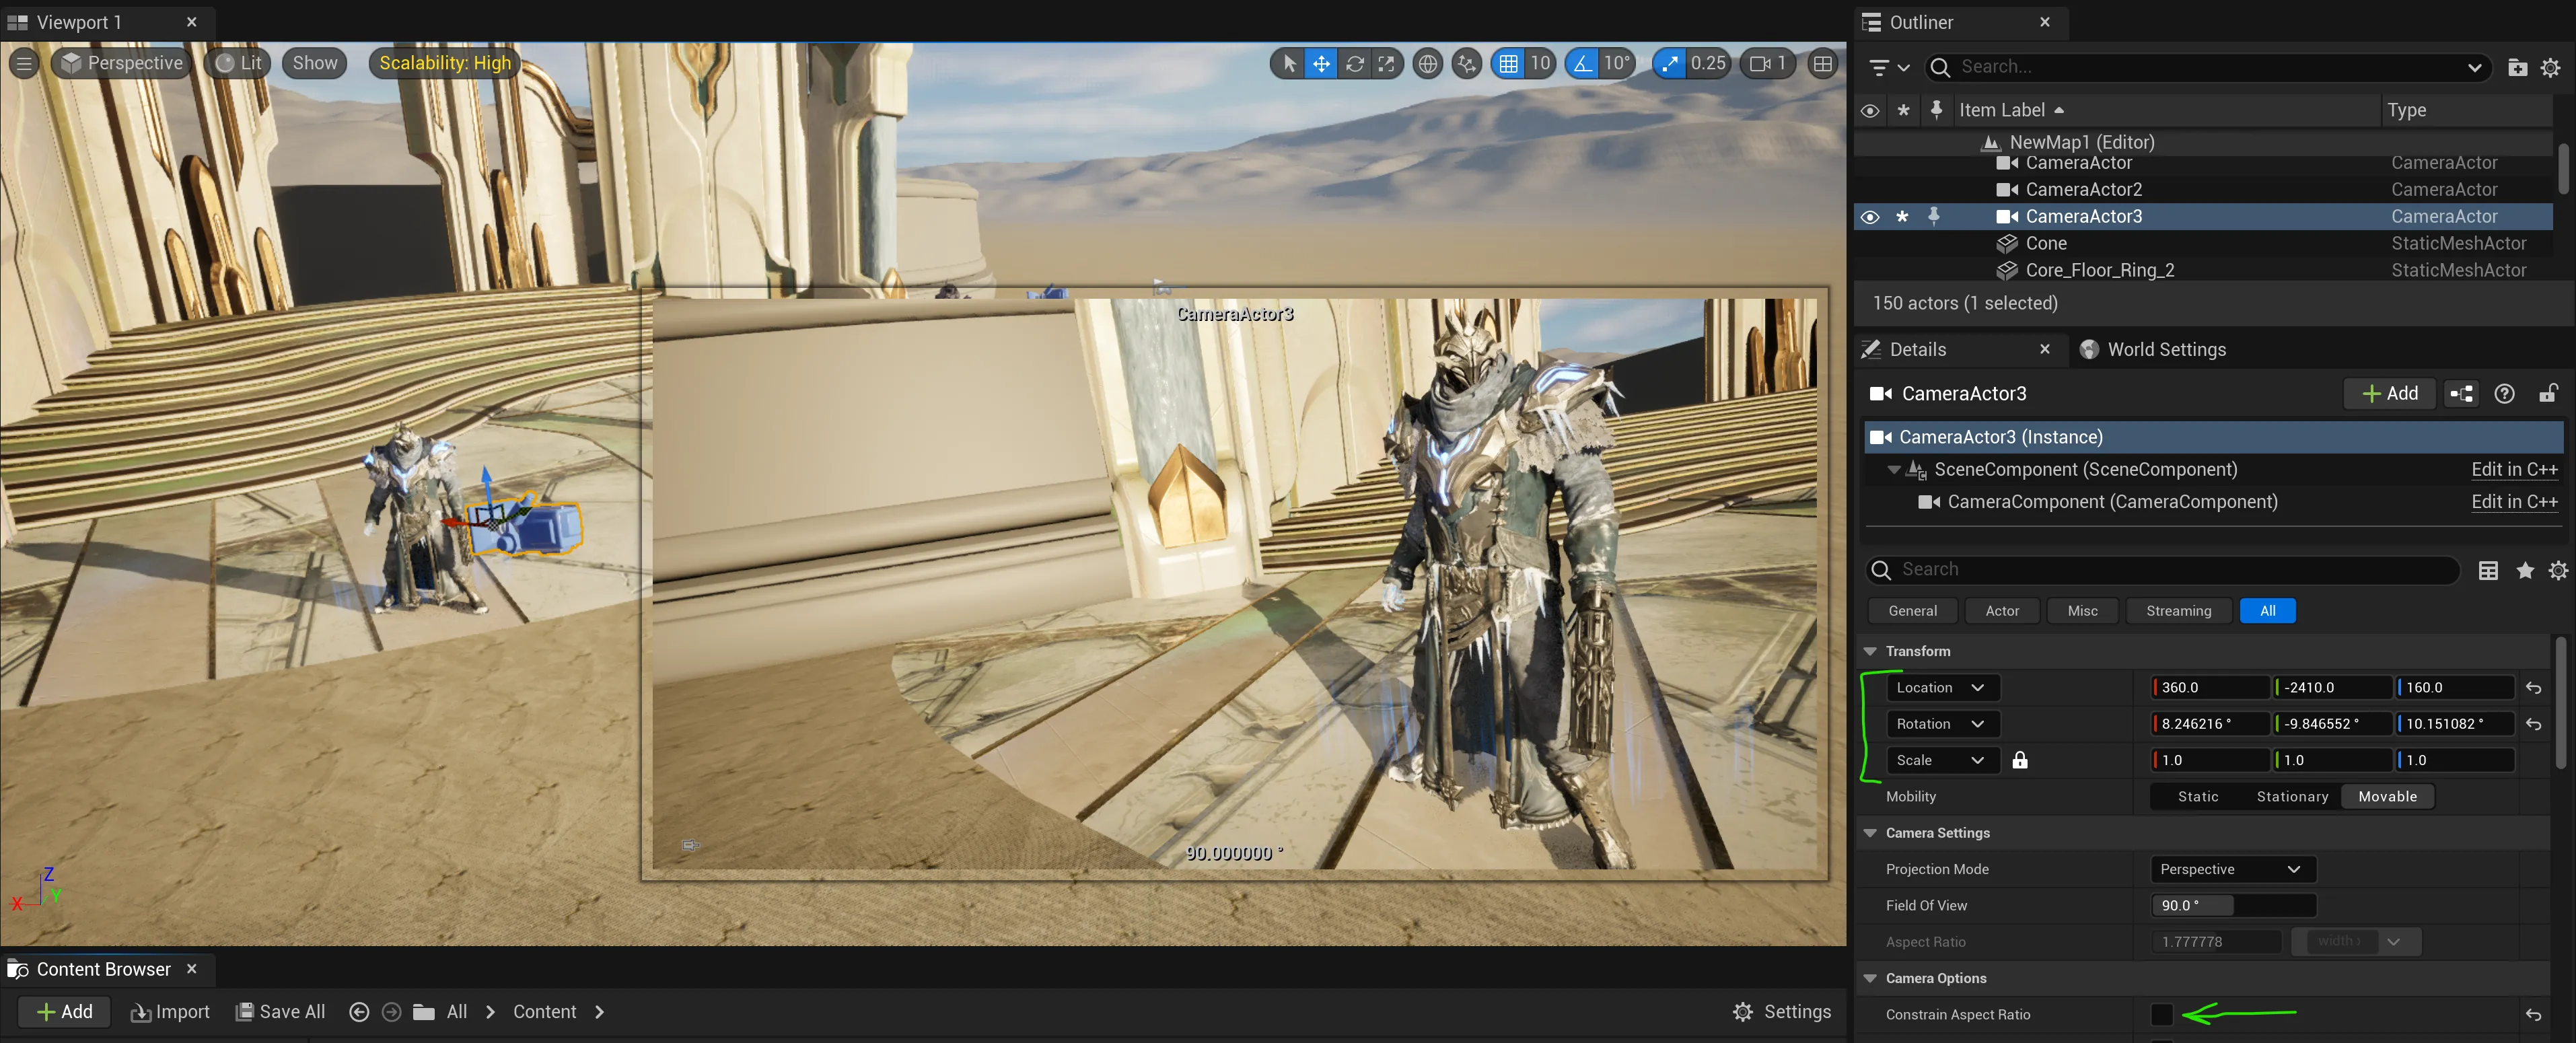
Note: Be sure to uncheck the Constrain Aspect Ratio setting to ensure the camera’s aspect ratio matches the screen.
Feel free to adjust the Location, Rotation, and Scale of the camera to achieve precise positioning.
Create a HUD class blueprint
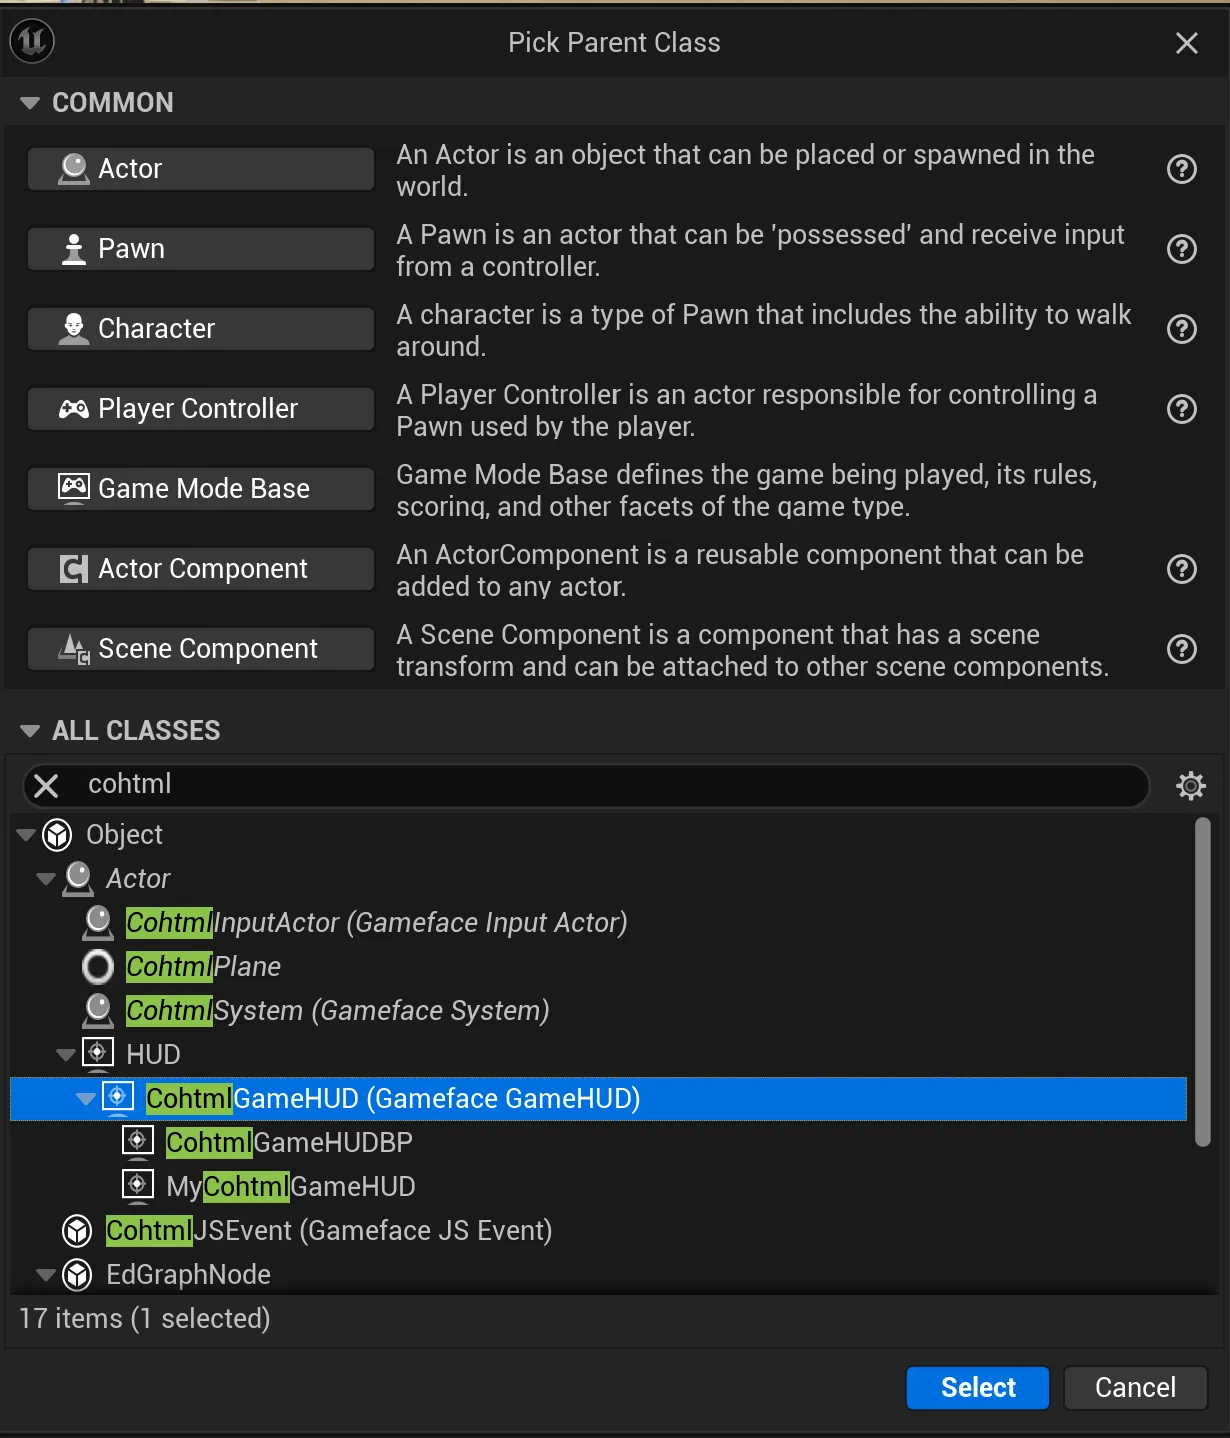
Now that the cameras are positioned, it’s time to implement the character selection logic. We’ll create a HUD class blueprint to handle the level’s logic. Start by creating the CohCharacterBP, inheriting from the CohtmlGameHUD class:
Setting up the view and the input
Create a Setup Input method in CohCharacterBP to enable user input for the UI:

   Begin Object Class=/Script/BlueprintGraph.K2Node_FunctionEntry Name="K2Node_FunctionEntry_1" ExportPath="/Script/BlueprintGraph.K2Node_FunctionEntry'/Game/CharacterSelection/CohCharacterBP.CohCharacterBP:Setup Input.K2Node_FunctionEntry_1'"
   ExtraFlags=201457664
   FunctionReference=(MemberName="Setup Input")
   bIsEditable=True
   NodePosX=-1216
   NodePosY=64
   NodeGuid=53FDA6FD48ECD782C5A7758B71F66A0E
   CustomProperties Pin (PinId=12E53CB74E967E1272213BBA4C288AC5,PinName="then",Direction="EGPD_Output",PinType.PinCategory="exec",PinType.PinSubCategory="",PinType.PinSubCategoryObject=None,PinType.PinSubCategoryMemberReference=(),PinType.PinValueType=(),PinType.ContainerType=None,PinType.bIsReference=False,PinType.bIsConst=False,PinType.bIsWeakPointer=False,PinType.bIsUObjectWrapper=False,PinType.bSerializeAsSinglePrecisionFloat=False,LinkedTo=(K2Node_CallFunction_179 B0C795774B68F365E7633D80F35515B5,),PersistentGuid=00000000000000000000000000000000,bHidden=False,bNotConnectable=False,bDefaultValueIsReadOnly=False,bDefaultValueIsIgnored=False,bAdvancedView=False,bOrphanedPin=False,)
End Object
Begin Object Class=/Script/BlueprintGraph.K2Node_FunctionResult Name="K2Node_FunctionResult_2" ExportPath="/Script/BlueprintGraph.K2Node_FunctionResult'/Game/CharacterSelection/CohCharacterBP.CohCharacterBP:Setup Input.K2Node_FunctionResult_2'"
   FunctionReference=(MemberName="Setup Input")
   bIsEditable=True
   NodePosX=1136
   NodePosY=48
   NodeGuid=BE47F780495BE7494E4B14A10DECD7D6
   CustomProperties Pin (PinId=7ABC1D3F4D5C21EB5B944CBE64C035DC,PinName="execute",PinType.PinCategory="exec",PinType.PinSubCategory="",PinType.PinSubCategoryObject=None,PinType.PinSubCategoryMemberReference=(),PinType.PinValueType=(),PinType.ContainerType=None,PinType.bIsReference=False,PinType.bIsConst=False,PinType.bIsWeakPointer=False,PinType.bIsUObjectWrapper=False,PinType.bSerializeAsSinglePrecisionFloat=False,LinkedTo=(K2Node_CallFunction_2289 F0C8E2934E3F6856E77CA49AFCA768A5,),PersistentGuid=00000000000000000000000000000000,bHidden=False,bNotConnectable=False,bDefaultValueIsReadOnly=False,bDefaultValueIsIgnored=False,bAdvancedView=False,bOrphanedPin=False,)
End Object
Begin Object Class=/Script/BlueprintGraph.K2Node_SpawnActorFromClass Name="K2Node_SpawnActorFromClass_1" ExportPath="/Script/BlueprintGraph.K2Node_SpawnActorFromClass'/Game/CharacterSelection/CohCharacterBP.CohCharacterBP:Setup Input.K2Node_SpawnActorFromClass_1'"
   NodePosX=-16
   NodePosY=48
   AdvancedPinDisplay=Shown
   NodeGuid=F228268244FEFB30F8E41A9CEBF78350
   CustomProperties Pin (PinId=3937017044422AD800BB9F95A03FA906,PinName="execute",PinType.PinCategory="exec",PinType.PinSubCategory="",PinType.PinSubCategoryObject=None,PinType.PinSubCategoryMemberReference=(),PinType.PinValueType=(),PinType.ContainerType=None,PinType.bIsReference=False,PinType.bIsConst=False,PinType.bIsWeakPointer=False,PinType.bIsUObjectWrapper=False,PinType.bSerializeAsSinglePrecisionFloat=False,LinkedTo=(K2Node_IfThenElse_0 A633E47B4BC635273ECB23A49C75B7CA,),PersistentGuid=00000000000000000000000000000000,bHidden=False,bNotConnectable=False,bDefaultValueIsReadOnly=False,bDefaultValueIsIgnored=False,bAdvancedView=False,bOrphanedPin=False,)
   CustomProperties Pin (PinId=F74539164921012AC12C8294AFAC24FD,PinName="then",Direction="EGPD_Output",PinType.PinCategory="exec",PinType.PinSubCategory="",PinType.PinSubCategoryObject=None,PinType.PinSubCategoryMemberReference=(),PinType.PinValueType=(),PinType.ContainerType=None,PinType.bIsReference=False,PinType.bIsConst=False,PinType.bIsWeakPointer=False,PinType.bIsUObjectWrapper=False,PinType.bSerializeAsSinglePrecisionFloat=False,LinkedTo=(K2Node_CallFunction_2288 B67A9C764A1DD3559ADE5E81091F1DE0,),PersistentGuid=00000000000000000000000000000000,bHidden=False,bNotConnectable=False,bDefaultValueIsReadOnly=False,bDefaultValueIsIgnored=False,bAdvancedView=False,bOrphanedPin=False,)
   CustomProperties Pin (PinId=C1BE9038465BAE3345C71CAC60A8DA5D,PinName="Class",PinType.PinCategory="class",PinType.PinSubCategory="",PinType.PinSubCategoryObject="/Script/CoreUObject.Class'/Script/Engine.Actor'",PinType.PinSubCategoryMemberReference=(),PinType.PinValueType=(),PinType.ContainerType=None,PinType.bIsReference=False,PinType.bIsConst=False,PinType.bIsWeakPointer=False,PinType.bIsUObjectWrapper=False,PinType.bSerializeAsSinglePrecisionFloat=False,DefaultObject="/Script/CohtmlPlugin.CohtmlInputActor",PersistentGuid=00000000000000000000000000000000,bHidden=False,bNotConnectable=False,bDefaultValueIsReadOnly=False,bDefaultValueIsIgnored=False,bAdvancedView=False,bOrphanedPin=False,)
   CustomProperties Pin (PinId=22C887FC43B0B1ABD9F78F9CD35C7424,PinName="ReturnValue",Direction="EGPD_Output",PinType.PinCategory="object",PinType.PinSubCategory="",PinType.PinSubCategoryObject="/Script/CoreUObject.Class'/Script/CohtmlPlugin.CohtmlInputActor'",PinType.PinSubCategoryMemberReference=(),PinType.PinValueType=(),PinType.ContainerType=None,PinType.bIsReference=False,PinType.bIsConst=False,PinType.bIsWeakPointer=False,PinType.bIsUObjectWrapper=False,PinType.bSerializeAsSinglePrecisionFloat=False,LinkedTo=(K2Node_CallFunction_2288 2C48E2AE4146EED83587E49B527BF508,K2Node_CallFunction_2289 C93791264A8B7A549EDCB7975D319127,),PersistentGuid=00000000000000000000000000000000,bHidden=False,bNotConnectable=False,bDefaultValueIsReadOnly=False,bDefaultValueIsIgnored=False,bAdvancedView=False,bOrphanedPin=False,)
   CustomProperties Pin (PinId=A617EF8A4E76762AE40281A35048E509,PinName="SpawnTransform",PinType.PinCategory="struct",PinType.PinSubCategory="",PinType.PinSubCategoryObject="/Script/CoreUObject.ScriptStruct'/Script/CoreUObject.Transform'",PinType.PinSubCategoryMemberReference=(),PinType.PinValueType=(),PinType.ContainerType=None,PinType.bIsReference=False,PinType.bIsConst=False,PinType.bIsWeakPointer=False,PinType.bIsUObjectWrapper=False,PinType.bSerializeAsSinglePrecisionFloat=False,LinkedTo=(K2Node_CallFunction_9557 F29D151141F2715498220291A5ABE9E4,),PersistentGuid=00000000000000000000000000000000,bHidden=False,bNotConnectable=False,bDefaultValueIsReadOnly=False,bDefaultValueIsIgnored=False,bAdvancedView=False,bOrphanedPin=False,)
   CustomProperties Pin (PinId=D4D1F6AE4B2E77C1AFAB5996002E9E58,PinName="CollisionHandlingOverride",PinType.PinCategory="byte",PinType.PinSubCategory="",PinType.PinSubCategoryObject="/Script/CoreUObject.Enum'/Script/Engine.ESpawnActorCollisionHandlingMethod'",PinType.PinSubCategoryMemberReference=(),PinType.PinValueType=(),PinType.ContainerType=None,PinType.bIsReference=False,PinType.bIsConst=False,PinType.bIsWeakPointer=False,PinType.bIsUObjectWrapper=False,PinType.bSerializeAsSinglePrecisionFloat=False,DefaultValue="AdjustIfPossibleButDontSpawnIfColliding",PersistentGuid=00000000000000000000000000000000,bHidden=False,bNotConnectable=False,bDefaultValueIsReadOnly=False,bDefaultValueIsIgnored=False,bAdvancedView=False,bOrphanedPin=False,)
   CustomProperties Pin (PinId=72F601E0403F9C88B77014B036C09779,PinName="TransformScaleMethod",PinType.PinCategory="byte",PinType.PinSubCategory="",PinType.PinSubCategoryObject="/Script/CoreUObject.Enum'/Script/Engine.ESpawnActorScaleMethod'",PinType.PinSubCategoryMemberReference=(),PinType.PinValueType=(),PinType.ContainerType=None,PinType.bIsReference=False,PinType.bIsConst=False,PinType.bIsWeakPointer=False,PinType.bIsUObjectWrapper=False,PinType.bSerializeAsSinglePrecisionFloat=False,DefaultValue="OverrideRootScale",PersistentGuid=00000000000000000000000000000000,bHidden=False,bNotConnectable=False,bDefaultValueIsReadOnly=False,bDefaultValueIsIgnored=False,bAdvancedView=True,bOrphanedPin=False,)
   CustomProperties Pin (PinId=49BBC6754F6007E3C718A8818CEEA804,PinName="Owner",PinType.PinCategory="object",PinType.PinSubCategory="",PinType.PinSubCategoryObject="/Script/CoreUObject.Class'/Script/Engine.Actor'",PinType.PinSubCategoryMemberReference=(),PinType.PinValueType=(),PinType.ContainerType=None,PinType.bIsReference=False,PinType.bIsConst=False,PinType.bIsWeakPointer=False,PinType.bIsUObjectWrapper=False,PinType.bSerializeAsSinglePrecisionFloat=False,PersistentGuid=00000000000000000000000000000000,bHidden=False,bNotConnectable=False,bDefaultValueIsReadOnly=False,bDefaultValueIsIgnored=False,bAdvancedView=True,bOrphanedPin=False,)
   CustomProperties Pin (PinId=A6CCD3914E3B1268879CC8882A6B5BD9,PinName="Instigator",PinToolTip="Instigator
Pawn Object Reference

Pawn responsible for damage and other gameplay events caused by this actor.",PinType.PinCategory="object",PinType.PinSubCategory="",PinType.PinSubCategoryObject="/Script/CoreUObject.Class'/Script/Engine.Pawn'",PinType.PinSubCategoryMemberReference=(),PinType.PinValueType=(),PinType.ContainerType=None,PinType.bIsReference=False,PinType.bIsConst=False,PinType.bIsWeakPointer=False,PinType.bIsUObjectWrapper=True,PinType.bSerializeAsSinglePrecisionFloat=False,AutogeneratedDefaultValue="None",PersistentGuid=00000000000000000000000000000000,bHidden=False,bNotConnectable=False,bDefaultValueIsReadOnly=False,bDefaultValueIsIgnored=False,bAdvancedView=False,bOrphanedPin=False,)
End Object
Begin Object Class=/Script/BlueprintGraph.K2Node_CallFunction Name="K2Node_CallFunction_9557" ExportPath="/Script/BlueprintGraph.K2Node_CallFunction'/Game/CharacterSelection/CohCharacterBP.CohCharacterBP:Setup Input.K2Node_CallFunction_9557'"
   bIsPureFunc=True
   FunctionReference=(MemberParent="/Script/CoreUObject.Class'/Script/Engine.KismetMathLibrary'",MemberName="MakeTransform")
   NodePosX=-384
   NodePosY=144
   NodeGuid=91E5DC33430760C5828917B8EBE822C4
   CustomProperties Pin (PinId=C57B14DE43DC3F29DC0AF0BB4BC91EFE,PinName="self",PinFriendlyName=NSLOCTEXT("K2Node", "Target", "Target"),PinToolTip="Target
Kismet Math Library Object Reference",PinType.PinCategory="object",PinType.PinSubCategory="",PinType.PinSubCategoryObject="/Script/CoreUObject.Class'/Script/Engine.KismetMathLibrary'",PinType.PinSubCategoryMemberReference=(),PinType.PinValueType=(),PinType.ContainerType=None,PinType.bIsReference=False,PinType.bIsConst=False,PinType.bIsWeakPointer=False,PinType.bIsUObjectWrapper=False,PinType.bSerializeAsSinglePrecisionFloat=False,DefaultObject="/Script/Engine.Default__KismetMathLibrary",PersistentGuid=00000000000000000000000000000000,bHidden=True,bNotConnectable=False,bDefaultValueIsReadOnly=False,bDefaultValueIsIgnored=False,bAdvancedView=False,bOrphanedPin=False,)
   CustomProperties Pin (PinId=6537860F4B472D6FFCAF8B8337A16F12,PinName="Location",PinToolTip="Location
Vector",PinType.PinCategory="struct",PinType.PinSubCategory="",PinType.PinSubCategoryObject="/Script/CoreUObject.ScriptStruct'/Script/CoreUObject.Vector'",PinType.PinSubCategoryMemberReference=(),PinType.PinValueType=(),PinType.ContainerType=None,PinType.bIsReference=False,PinType.bIsConst=False,PinType.bIsWeakPointer=False,PinType.bIsUObjectWrapper=False,PinType.bSerializeAsSinglePrecisionFloat=False,DefaultValue="0, 0, 0",AutogeneratedDefaultValue="0, 0, 0",PersistentGuid=00000000000000000000000000000000,bHidden=False,bNotConnectable=False,bDefaultValueIsReadOnly=False,bDefaultValueIsIgnored=False,bAdvancedView=False,bOrphanedPin=False,)
   CustomProperties Pin (PinId=6854467B4AB70F62E4AD83B405A2314E,PinName="Rotation",PinToolTip="Rotation
Rotator",PinType.PinCategory="struct",PinType.PinSubCategory="",PinType.PinSubCategoryObject="/Script/CoreUObject.ScriptStruct'/Script/CoreUObject.Rotator'",PinType.PinSubCategoryMemberReference=(),PinType.PinValueType=(),PinType.ContainerType=None,PinType.bIsReference=False,PinType.bIsConst=False,PinType.bIsWeakPointer=False,PinType.bIsUObjectWrapper=False,PinType.bSerializeAsSinglePrecisionFloat=False,DefaultValue="0, 0, 0",AutogeneratedDefaultValue="0, 0, 0",PersistentGuid=00000000000000000000000000000000,bHidden=False,bNotConnectable=False,bDefaultValueIsReadOnly=False,bDefaultValueIsIgnored=False,bAdvancedView=False,bOrphanedPin=False,)
   CustomProperties Pin (PinId=8DB416E74C75943E9F120FABF150D66C,PinName="Scale",PinToolTip="Scale
Vector",PinType.PinCategory="struct",PinType.PinSubCategory="",PinType.PinSubCategoryObject="/Script/CoreUObject.ScriptStruct'/Script/CoreUObject.Vector'",PinType.PinSubCategoryMemberReference=(),PinType.PinValueType=(),PinType.ContainerType=None,PinType.bIsReference=False,PinType.bIsConst=False,PinType.bIsWeakPointer=False,PinType.bIsUObjectWrapper=False,PinType.bSerializeAsSinglePrecisionFloat=False,DefaultValue="1.000000,1.000000,1.000000",AutogeneratedDefaultValue="1.000000,1.000000,1.000000",PersistentGuid=00000000000000000000000000000000,bHidden=False,bNotConnectable=False,bDefaultValueIsReadOnly=False,bDefaultValueIsIgnored=False,bAdvancedView=False,bOrphanedPin=False,)
   CustomProperties Pin (PinId=F29D151141F2715498220291A5ABE9E4,PinName="ReturnValue",PinToolTip="Return Value
Transform

Make a transform from location, rotation and scale",Direction="EGPD_Output",PinType.PinCategory="struct",PinType.PinSubCategory="",PinType.PinSubCategoryObject="/Script/CoreUObject.ScriptStruct'/Script/CoreUObject.Transform'",PinType.PinSubCategoryMemberReference=(),PinType.PinValueType=(),PinType.ContainerType=None,PinType.bIsReference=False,PinType.bIsConst=False,PinType.bIsWeakPointer=False,PinType.bIsUObjectWrapper=False,PinType.bSerializeAsSinglePrecisionFloat=False,LinkedTo=(K2Node_SpawnActorFromClass_1 A617EF8A4E76762AE40281A35048E509,),PersistentGuid=00000000000000000000000000000000,bHidden=False,bNotConnectable=False,bDefaultValueIsReadOnly=False,bDefaultValueIsIgnored=False,bAdvancedView=False,bOrphanedPin=False,)
End Object
Begin Object Class=/Script/BlueprintGraph.K2Node_CallFunction Name="K2Node_CallFunction_2288" ExportPath="/Script/BlueprintGraph.K2Node_CallFunction'/Game/CharacterSelection/CohCharacterBP.CohCharacterBP:Setup Input.K2Node_CallFunction_2288'"
   FunctionReference=(MemberParent="/Script/CoreUObject.Class'/Script/CohtmlPlugin.CohtmlInputActor'",MemberName="Initialize")
   NodePosX=464
   NodePosY=32
   NodeGuid=6EF1A5B04FDFD2C73311D5919A196B48
   CustomProperties Pin (PinId=B67A9C764A1DD3559ADE5E81091F1DE0,PinName="execute",PinType.PinCategory="exec",PinType.PinSubCategory="",PinType.PinSubCategoryObject=None,PinType.PinSubCategoryMemberReference=(),PinType.PinValueType=(),PinType.ContainerType=None,PinType.bIsReference=False,PinType.bIsConst=False,PinType.bIsWeakPointer=False,PinType.bIsUObjectWrapper=False,PinType.bSerializeAsSinglePrecisionFloat=False,LinkedTo=(K2Node_SpawnActorFromClass_1 F74539164921012AC12C8294AFAC24FD,),PersistentGuid=00000000000000000000000000000000,bHidden=False,bNotConnectable=False,bDefaultValueIsReadOnly=False,bDefaultValueIsIgnored=False,bAdvancedView=False,bOrphanedPin=False,)
   CustomProperties Pin (PinId=736186BB49056928D94484BCF108BBC5,PinName="then",Direction="EGPD_Output",PinType.PinCategory="exec",PinType.PinSubCategory="",PinType.PinSubCategoryObject=None,PinType.PinSubCategoryMemberReference=(),PinType.PinValueType=(),PinType.ContainerType=None,PinType.bIsReference=False,PinType.bIsConst=False,PinType.bIsWeakPointer=False,PinType.bIsUObjectWrapper=False,PinType.bSerializeAsSinglePrecisionFloat=False,LinkedTo=(K2Node_CallFunction_2289 B97CDC324E58A1E7524C52BF9E4768CA,),PersistentGuid=00000000000000000000000000000000,bHidden=False,bNotConnectable=False,bDefaultValueIsReadOnly=False,bDefaultValueIsIgnored=False,bAdvancedView=False,bOrphanedPin=False,)
   CustomProperties Pin (PinId=2C48E2AE4146EED83587E49B527BF508,PinName="self",PinFriendlyName=NSLOCTEXT("K2Node", "Target", "Target"),PinType.PinCategory="object",PinType.PinSubCategory="",PinType.PinSubCategoryObject="/Script/CoreUObject.Class'/Script/CohtmlPlugin.CohtmlInputActor'",PinType.PinSubCategoryMemberReference=(),PinType.PinValueType=(),PinType.ContainerType=None,PinType.bIsReference=False,PinType.bIsConst=False,PinType.bIsWeakPointer=False,PinType.bIsUObjectWrapper=False,PinType.bSerializeAsSinglePrecisionFloat=False,LinkedTo=(K2Node_SpawnActorFromClass_1 22C887FC43B0B1ABD9F78F9CD35C7424,),PersistentGuid=00000000000000000000000000000000,bHidden=False,bNotConnectable=False,bDefaultValueIsReadOnly=False,bDefaultValueIsIgnored=False,bAdvancedView=False,bOrphanedPin=False,)
   CustomProperties Pin (PinId=0411CFA24513047BB481CDB8BC5AB1BF,PinName="CollisionChannel",PinType.PinCategory="byte",PinType.PinSubCategory="",PinType.PinSubCategoryObject="/Script/CoreUObject.Enum'/Script/Engine.ECollisionChannel'",PinType.PinSubCategoryMemberReference=(),PinType.PinValueType=(),PinType.ContainerType=None,PinType.bIsReference=False,PinType.bIsConst=False,PinType.bIsWeakPointer=False,PinType.bIsUObjectWrapper=False,PinType.bSerializeAsSinglePrecisionFloat=False,DefaultValue="ECC_WorldDynamic",AutogeneratedDefaultValue="ECC_WorldDynamic",PersistentGuid=00000000000000000000000000000000,bHidden=False,bNotConnectable=False,bDefaultValueIsReadOnly=False,bDefaultValueIsIgnored=False,bAdvancedView=False,bOrphanedPin=False,)
   CustomProperties Pin (PinId=205BCF894E7642DDCAFC5EA9306217B5,PinName="AddressMode",PinType.PinCategory="byte",PinType.PinSubCategory="",PinType.PinSubCategoryObject="/Script/CoreUObject.Enum'/Script/Engine.TextureAddress'",PinType.PinSubCategoryMemberReference=(),PinType.PinValueType=(),PinType.ContainerType=None,PinType.bIsReference=False,PinType.bIsConst=False,PinType.bIsWeakPointer=False,PinType.bIsUObjectWrapper=False,PinType.bSerializeAsSinglePrecisionFloat=False,DefaultValue="TA_Wrap",AutogeneratedDefaultValue="TA_Wrap",PersistentGuid=00000000000000000000000000000000,bHidden=False,bNotConnectable=False,bDefaultValueIsReadOnly=False,bDefaultValueIsIgnored=False,bAdvancedView=False,bOrphanedPin=False,)
   CustomProperties Pin (PinId=3EBB8CEA46A9EAEDD4BF228007C1AD9B,PinName="RaycastQuality",PinType.PinCategory="byte",PinType.PinSubCategory="",PinType.PinSubCategoryObject="/Script/CoreUObject.Enum'/Script/CohtmlPlugin.ECohtmlInputWidgetRaycastQuality'",PinType.PinSubCategoryMemberReference=(),PinType.PinValueType=(),PinType.ContainerType=None,PinType.bIsReference=False,PinType.bIsConst=False,PinType.bIsWeakPointer=False,PinType.bIsUObjectWrapper=False,PinType.bSerializeAsSinglePrecisionFloat=False,DefaultValue="CohtmlRaycastQuality_Accurate",AutogeneratedDefaultValue="CohtmlRaycastQuality_Accurate",PersistentGuid=00000000000000000000000000000000,bHidden=False,bNotConnectable=False,bDefaultValueIsReadOnly=False,bDefaultValueIsIgnored=False,bAdvancedView=False,bOrphanedPin=False,)
   CustomProperties Pin (PinId=D02EF8014625FCEAF4274CA3BC408573,PinName="UVChannel",PinType.PinCategory="int",PinType.PinSubCategory="",PinType.PinSubCategoryObject=None,PinType.PinSubCategoryMemberReference=(),PinType.PinValueType=(),PinType.ContainerType=None,PinType.bIsReference=False,PinType.bIsConst=False,PinType.bIsWeakPointer=False,PinType.bIsUObjectWrapper=False,PinType.bSerializeAsSinglePrecisionFloat=False,DefaultValue="0",AutogeneratedDefaultValue="0",PersistentGuid=00000000000000000000000000000000,bHidden=False,bNotConnectable=False,bDefaultValueIsReadOnly=False,bDefaultValueIsIgnored=False,bAdvancedView=False,bOrphanedPin=False,)
End Object
Begin Object Class=/Script/BlueprintGraph.K2Node_CallFunction Name="K2Node_CallFunction_2289" ExportPath="/Script/BlueprintGraph.K2Node_CallFunction'/Game/CharacterSelection/CohCharacterBP.CohCharacterBP:Setup Input.K2Node_CallFunction_2289'"
   FunctionReference=(MemberParent="/Script/CoreUObject.Class'/Script/CohtmlPlugin.CohtmlInputActor'",MemberName="AlwaysAcceptMouseInput")
   NodePosX=752
   NodePosY=32
   NodeGuid=EF3897F045B1A45CF35EE1895BE804D9
   CustomProperties Pin (PinId=B97CDC324E58A1E7524C52BF9E4768CA,PinName="execute",PinType.PinCategory="exec",PinType.PinSubCategory="",PinType.PinSubCategoryObject=None,PinType.PinSubCategoryMemberReference=(),PinType.PinValueType=(),PinType.ContainerType=None,PinType.bIsReference=False,PinType.bIsConst=False,PinType.bIsWeakPointer=False,PinType.bIsUObjectWrapper=False,PinType.bSerializeAsSinglePrecisionFloat=False,LinkedTo=(K2Node_CallFunction_2288 736186BB49056928D94484BCF108BBC5,),PersistentGuid=00000000000000000000000000000000,bHidden=False,bNotConnectable=False,bDefaultValueIsReadOnly=False,bDefaultValueIsIgnored=False,bAdvancedView=False,bOrphanedPin=False,)
   CustomProperties Pin (PinId=F0C8E2934E3F6856E77CA49AFCA768A5,PinName="then",Direction="EGPD_Output",PinType.PinCategory="exec",PinType.PinSubCategory="",PinType.PinSubCategoryObject=None,PinType.PinSubCategoryMemberReference=(),PinType.PinValueType=(),PinType.ContainerType=None,PinType.bIsReference=False,PinType.bIsConst=False,PinType.bIsWeakPointer=False,PinType.bIsUObjectWrapper=False,PinType.bSerializeAsSinglePrecisionFloat=False,LinkedTo=(K2Node_FunctionResult_2 7ABC1D3F4D5C21EB5B944CBE64C035DC,),PersistentGuid=00000000000000000000000000000000,bHidden=False,bNotConnectable=False,bDefaultValueIsReadOnly=False,bDefaultValueIsIgnored=False,bAdvancedView=False,bOrphanedPin=False,)
   CustomProperties Pin (PinId=C93791264A8B7A549EDCB7975D319127,PinName="self",PinFriendlyName=NSLOCTEXT("K2Node", "Target", "Target"),PinType.PinCategory="object",PinType.PinSubCategory="",PinType.PinSubCategoryObject="/Script/CoreUObject.Class'/Script/CohtmlPlugin.CohtmlInputActor'",PinType.PinSubCategoryMemberReference=(),PinType.PinValueType=(),PinType.ContainerType=None,PinType.bIsReference=False,PinType.bIsConst=False,PinType.bIsWeakPointer=False,PinType.bIsUObjectWrapper=False,PinType.bSerializeAsSinglePrecisionFloat=False,LinkedTo=(K2Node_SpawnActorFromClass_1 22C887FC43B0B1ABD9F78F9CD35C7424,),PersistentGuid=00000000000000000000000000000000,bHidden=False,bNotConnectable=False,bDefaultValueIsReadOnly=False,bDefaultValueIsIgnored=False,bAdvancedView=False,bOrphanedPin=False,)
   CustomProperties Pin (PinId=282A095D4FFB249A757CE29C7CA2B5EB,PinName="bAccept",PinType.PinCategory="bool",PinType.PinSubCategory="",PinType.PinSubCategoryObject=None,PinType.PinSubCategoryMemberReference=(),PinType.PinValueType=(),PinType.ContainerType=None,PinType.bIsReference=False,PinType.bIsConst=False,PinType.bIsWeakPointer=False,PinType.bIsUObjectWrapper=False,PinType.bSerializeAsSinglePrecisionFloat=False,DefaultValue="true",AutogeneratedDefaultValue="false",PersistentGuid=00000000000000000000000000000000,bHidden=False,bNotConnectable=False,bDefaultValueIsReadOnly=False,bDefaultValueIsIgnored=False,bAdvancedView=False,bOrphanedPin=False,)
End Object
Begin Object Class=/Script/BlueprintGraph.K2Node_CallFunction Name="K2Node_CallFunction_179" ExportPath="/Script/BlueprintGraph.K2Node_CallFunction'/Game/CharacterSelection/CohCharacterBP.CohCharacterBP:Setup Input.K2Node_CallFunction_179'"
   FunctionReference=(MemberParent="/Script/CoreUObject.Class'/Script/Engine.GameplayStatics'",MemberName="GetAllActorsOfClass")
   NodePosX=-1024
   NodePosY=48
   NodeGuid=BA031752478D6BB437DE6FA5A83A2964
   CustomProperties Pin (PinId=B0C795774B68F365E7633D80F35515B5,PinName="execute",PinToolTip="
Exec",PinType.PinCategory="exec",PinType.PinSubCategory="",PinType.PinSubCategoryObject=None,PinType.PinSubCategoryMemberReference=(),PinType.PinValueType=(),PinType.ContainerType=None,PinType.bIsReference=False,PinType.bIsConst=False,PinType.bIsWeakPointer=False,PinType.bIsUObjectWrapper=False,PinType.bSerializeAsSinglePrecisionFloat=False,LinkedTo=(K2Node_FunctionEntry_1 12E53CB74E967E1272213BBA4C288AC5,),PersistentGuid=00000000000000000000000000000000,bHidden=False,bNotConnectable=False,bDefaultValueIsReadOnly=False,bDefaultValueIsIgnored=False,bAdvancedView=False,bOrphanedPin=False,)
   CustomProperties Pin (PinId=160A6BAB416446FF9CFC838762B58A92,PinName="then",PinToolTip="
Exec",Direction="EGPD_Output",PinType.PinCategory="exec",PinType.PinSubCategory="",PinType.PinSubCategoryObject=None,PinType.PinSubCategoryMemberReference=(),PinType.PinValueType=(),PinType.ContainerType=None,PinType.bIsReference=False,PinType.bIsConst=False,PinType.bIsWeakPointer=False,PinType.bIsUObjectWrapper=False,PinType.bSerializeAsSinglePrecisionFloat=False,LinkedTo=(K2Node_IfThenElse_0 B6DE4CB446216B44F9FB8ABD22161340,),PersistentGuid=00000000000000000000000000000000,bHidden=False,bNotConnectable=False,bDefaultValueIsReadOnly=False,bDefaultValueIsIgnored=False,bAdvancedView=False,bOrphanedPin=False,)
   CustomProperties Pin (PinId=7428CCCB4A27214A0626D9B4109E1758,PinName="self",PinFriendlyName=NSLOCTEXT("K2Node", "Target", "Target"),PinToolTip="Target
Gameplay Statics Object Reference",PinType.PinCategory="object",PinType.PinSubCategory="",PinType.PinSubCategoryObject="/Script/CoreUObject.Class'/Script/Engine.GameplayStatics'",PinType.PinSubCategoryMemberReference=(),PinType.PinValueType=(),PinType.ContainerType=None,PinType.bIsReference=False,PinType.bIsConst=False,PinType.bIsWeakPointer=False,PinType.bIsUObjectWrapper=False,PinType.bSerializeAsSinglePrecisionFloat=False,DefaultObject="/Script/Engine.Default__GameplayStatics",PersistentGuid=00000000000000000000000000000000,bHidden=True,bNotConnectable=False,bDefaultValueIsReadOnly=False,bDefaultValueIsIgnored=False,bAdvancedView=False,bOrphanedPin=False,)
   CustomProperties Pin (PinId=CA3E68C64D45B792C016C0B82E7F8819,PinName="WorldContextObject",PinToolTip="World Context Object
Object Reference",PinType.PinCategory="object",PinType.PinSubCategory="",PinType.PinSubCategoryObject="/Script/CoreUObject.Class'/Script/CoreUObject.Object'",PinType.PinSubCategoryMemberReference=(),PinType.PinValueType=(),PinType.ContainerType=None,PinType.bIsReference=False,PinType.bIsConst=True,PinType.bIsWeakPointer=False,PinType.bIsUObjectWrapper=False,PinType.bSerializeAsSinglePrecisionFloat=False,PersistentGuid=00000000000000000000000000000000,bHidden=True,bNotConnectable=False,bDefaultValueIsReadOnly=False,bDefaultValueIsIgnored=False,bAdvancedView=False,bOrphanedPin=False,)
   CustomProperties Pin (PinId=3F29531B4E958422FCA6E8B7D238358C,PinName="ActorClass",PinToolTip="Actor Class
Actor Class Reference

Class of Actor to find. Must be specified or result array will be empty.",PinType.PinCategory="class",PinType.PinSubCategory="",PinType.PinSubCategoryObject="/Script/CoreUObject.Class'/Script/Engine.Actor'",PinType.PinSubCategoryMemberReference=(),PinType.PinValueType=(),PinType.ContainerType=None,PinType.bIsReference=False,PinType.bIsConst=False,PinType.bIsWeakPointer=False,PinType.bIsUObjectWrapper=True,PinType.bSerializeAsSinglePrecisionFloat=False,DefaultObject="/Script/CohtmlPlugin.CohtmlInputActor",PersistentGuid=00000000000000000000000000000000,bHidden=False,bNotConnectable=False,bDefaultValueIsReadOnly=False,bDefaultValueIsIgnored=False,bAdvancedView=False,bOrphanedPin=False,)
   CustomProperties Pin (PinId=BDAE77F94AFF590233F6C2BDDC57B577,PinName="OutActors",PinToolTip="Out Actors
Array of Gameface Input Actor Object References

Output array of Actors of the specified class.",Direction="EGPD_Output",PinType.PinCategory="object",PinType.PinSubCategory="",PinType.PinSubCategoryObject="/Script/CoreUObject.Class'/Script/CohtmlPlugin.CohtmlInputActor'",PinType.PinSubCategoryMemberReference=(),PinType.PinValueType=(),PinType.ContainerType=Array,PinType.bIsReference=False,PinType.bIsConst=False,PinType.bIsWeakPointer=False,PinType.bIsUObjectWrapper=False,PinType.bSerializeAsSinglePrecisionFloat=False,LinkedTo=(K2Node_CallArrayFunction_1 0858BF55471E5CBD35113A91D0B2E5B3,),PersistentGuid=00000000000000000000000000000000,bHidden=False,bNotConnectable=False,bDefaultValueIsReadOnly=False,bDefaultValueIsIgnored=False,bAdvancedView=False,bOrphanedPin=False,)
End Object
Begin Object Class=/Script/BlueprintGraph.K2Node_CallArrayFunction Name="K2Node_CallArrayFunction_1" ExportPath="/Script/BlueprintGraph.K2Node_CallArrayFunction'/Game/CharacterSelection/CohCharacterBP.CohCharacterBP:Setup Input.K2Node_CallArrayFunction_1'"
   bIsPureFunc=True
   FunctionReference=(MemberParent="/Script/CoreUObject.Class'/Script/Engine.KismetArrayLibrary'",MemberName="Array_Length")
   NodePosX=-688
   NodePosY=80
   NodeGuid=36BC847645B01F99EF961DAB80A65E16
   CustomProperties Pin (PinId=8FEA8BBA45DBE4F0C046B89E2EC33BF5,PinName="self",PinFriendlyName=NSLOCTEXT("K2Node", "Target", "Target"),PinType.PinCategory="object",PinType.PinSubCategory="",PinType.PinSubCategoryObject="/Script/CoreUObject.Class'/Script/Engine.KismetArrayLibrary'",PinType.PinSubCategoryMemberReference=(),PinType.PinValueType=(),PinType.ContainerType=None,PinType.bIsReference=False,PinType.bIsConst=False,PinType.bIsWeakPointer=False,PinType.bIsUObjectWrapper=False,PinType.bSerializeAsSinglePrecisionFloat=False,DefaultObject="/Script/Engine.Default__KismetArrayLibrary",PersistentGuid=00000000000000000000000000000000,bHidden=True,bNotConnectable=False,bDefaultValueIsReadOnly=False,bDefaultValueIsIgnored=False,bAdvancedView=False,bOrphanedPin=False,)
   CustomProperties Pin (PinId=0858BF55471E5CBD35113A91D0B2E5B3,PinName="TargetArray",PinType.PinCategory="object",PinType.PinSubCategory="",PinType.PinSubCategoryObject="/Script/CoreUObject.Class'/Script/CohtmlPlugin.CohtmlInputActor'",PinType.PinSubCategoryMemberReference=(),PinType.PinValueType=(),PinType.ContainerType=Array,PinType.bIsReference=True,PinType.bIsConst=True,PinType.bIsWeakPointer=False,PinType.bIsUObjectWrapper=False,PinType.bSerializeAsSinglePrecisionFloat=False,LinkedTo=(K2Node_CallFunction_179 BDAE77F94AFF590233F6C2BDDC57B577,),PersistentGuid=00000000000000000000000000000000,bHidden=False,bNotConnectable=False,bDefaultValueIsReadOnly=False,bDefaultValueIsIgnored=True,bAdvancedView=False,bOrphanedPin=False,)
   CustomProperties Pin (PinId=04FE597E4A80DC2C3187049199DC96C6,PinName="ReturnValue",Direction="EGPD_Output",PinType.PinCategory="int",PinType.PinSubCategory="",PinType.PinSubCategoryObject=None,PinType.PinSubCategoryMemberReference=(),PinType.PinValueType=(),PinType.ContainerType=None,PinType.bIsReference=False,PinType.bIsConst=False,PinType.bIsWeakPointer=False,PinType.bIsUObjectWrapper=False,PinType.bSerializeAsSinglePrecisionFloat=False,DefaultValue="0",AutogeneratedDefaultValue="0",LinkedTo=(K2Node_CallFunction_180 FD5F5E68464482281D5EEA8BF028CAB6,),PersistentGuid=00000000000000000000000000000000,bHidden=False,bNotConnectable=False,bDefaultValueIsReadOnly=False,bDefaultValueIsIgnored=False,bAdvancedView=False,bOrphanedPin=False,)
End Object
Begin Object Class=/Script/BlueprintGraph.K2Node_CallFunction Name="K2Node_CallFunction_180" ExportPath="/Script/BlueprintGraph.K2Node_CallFunction'/Game/CharacterSelection/CohCharacterBP.CohCharacterBP:Setup Input.K2Node_CallFunction_180'"
   bIsPureFunc=True
   FunctionReference=(MemberParent="/Script/CoreUObject.Class'/Script/Engine.KismetMathLibrary'",MemberName="EqualEqual_IntInt")
   NodePosX=-496
   NodePosY=80
   NodeGuid=D4FE6C3A4D182E8E844EE385F8BEE994
   CustomProperties Pin (PinId=287FA4A047A5B2317EE5D4AB65206F99,PinName="self",PinFriendlyName=NSLOCTEXT("K2Node", "Target", "Target"),PinType.PinCategory="object",PinType.PinSubCategory="",PinType.PinSubCategoryObject="/Script/CoreUObject.Class'/Script/Engine.KismetMathLibrary'",PinType.PinSubCategoryMemberReference=(),PinType.PinValueType=(),PinType.ContainerType=None,PinType.bIsReference=False,PinType.bIsConst=False,PinType.bIsWeakPointer=False,PinType.bIsUObjectWrapper=False,PinType.bSerializeAsSinglePrecisionFloat=False,DefaultObject="/Script/Engine.Default__KismetMathLibrary",PersistentGuid=00000000000000000000000000000000,bHidden=True,bNotConnectable=False,bDefaultValueIsReadOnly=False,bDefaultValueIsIgnored=False,bAdvancedView=False,bOrphanedPin=False,)
   CustomProperties Pin (PinId=FD5F5E68464482281D5EEA8BF028CAB6,PinName="A",PinType.PinCategory="int",PinType.PinSubCategory="",PinType.PinSubCategoryObject=None,PinType.PinSubCategoryMemberReference=(),PinType.PinValueType=(),PinType.ContainerType=None,PinType.bIsReference=False,PinType.bIsConst=False,PinType.bIsWeakPointer=False,PinType.bIsUObjectWrapper=False,PinType.bSerializeAsSinglePrecisionFloat=False,DefaultValue="0",AutogeneratedDefaultValue="0",LinkedTo=(K2Node_CallArrayFunction_1 04FE597E4A80DC2C3187049199DC96C6,),PersistentGuid=00000000000000000000000000000000,bHidden=False,bNotConnectable=False,bDefaultValueIsReadOnly=False,bDefaultValueIsIgnored=False,bAdvancedView=False,bOrphanedPin=False,)
   CustomProperties Pin (PinId=264994F14305CCDB8CD59E956000B4F0,PinName="B",PinType.PinCategory="int",PinType.PinSubCategory="",PinType.PinSubCategoryObject=None,PinType.PinSubCategoryMemberReference=(),PinType.PinValueType=(),PinType.ContainerType=None,PinType.bIsReference=False,PinType.bIsConst=False,PinType.bIsWeakPointer=False,PinType.bIsUObjectWrapper=False,PinType.bSerializeAsSinglePrecisionFloat=False,DefaultValue="0",AutogeneratedDefaultValue="0",PersistentGuid=00000000000000000000000000000000,bHidden=False,bNotConnectable=False,bDefaultValueIsReadOnly=False,bDefaultValueIsIgnored=False,bAdvancedView=False,bOrphanedPin=False,)
   CustomProperties Pin (PinId=28F99B934B32A9C6F764B8BF9DF0FEAC,PinName="ReturnValue",Direction="EGPD_Output",PinType.PinCategory="bool",PinType.PinSubCategory="",PinType.PinSubCategoryObject=None,PinType.PinSubCategoryMemberReference=(),PinType.PinValueType=(),PinType.ContainerType=None,PinType.bIsReference=False,PinType.bIsConst=False,PinType.bIsWeakPointer=False,PinType.bIsUObjectWrapper=False,PinType.bSerializeAsSinglePrecisionFloat=False,DefaultValue="false",AutogeneratedDefaultValue="false",LinkedTo=(K2Node_IfThenElse_0 637C0BF04770D456FB3AA68D3ED04867,),PersistentGuid=00000000000000000000000000000000,bHidden=False,bNotConnectable=False,bDefaultValueIsReadOnly=False,bDefaultValueIsIgnored=False,bAdvancedView=False,bOrphanedPin=False,)
End Object
Begin Object Class=/Script/BlueprintGraph.K2Node_IfThenElse Name="K2Node_IfThenElse_0" ExportPath="/Script/BlueprintGraph.K2Node_IfThenElse'/Game/CharacterSelection/CohCharacterBP.CohCharacterBP:Setup Input.K2Node_IfThenElse_0'"
   NodePosX=-304
   NodePosY=-32
   NodeGuid=CB71639747A097631446FCADD0F21ACA
   CustomProperties Pin (PinId=B6DE4CB446216B44F9FB8ABD22161340,PinName="execute",PinType.PinCategory="exec",PinType.PinSubCategory="",PinType.PinSubCategoryObject=None,PinType.PinSubCategoryMemberReference=(),PinType.PinValueType=(),PinType.ContainerType=None,PinType.bIsReference=False,PinType.bIsConst=False,PinType.bIsWeakPointer=False,PinType.bIsUObjectWrapper=False,PinType.bSerializeAsSinglePrecisionFloat=False,LinkedTo=(K2Node_CallFunction_179 160A6BAB416446FF9CFC838762B58A92,),PersistentGuid=00000000000000000000000000000000,bHidden=False,bNotConnectable=False,bDefaultValueIsReadOnly=False,bDefaultValueIsIgnored=False,bAdvancedView=False,bOrphanedPin=False,)
   CustomProperties Pin (PinId=637C0BF04770D456FB3AA68D3ED04867,PinName="Condition",PinType.PinCategory="bool",PinType.PinSubCategory="",PinType.PinSubCategoryObject=None,PinType.PinSubCategoryMemberReference=(),PinType.PinValueType=(),PinType.ContainerType=None,PinType.bIsReference=False,PinType.bIsConst=False,PinType.bIsWeakPointer=False,PinType.bIsUObjectWrapper=False,PinType.bSerializeAsSinglePrecisionFloat=False,DefaultValue="true",AutogeneratedDefaultValue="true",LinkedTo=(K2Node_CallFunction_180 28F99B934B32A9C6F764B8BF9DF0FEAC,),PersistentGuid=00000000000000000000000000000000,bHidden=False,bNotConnectable=False,bDefaultValueIsReadOnly=False,bDefaultValueIsIgnored=False,bAdvancedView=False,bOrphanedPin=False,)
   CustomProperties Pin (PinId=A633E47B4BC635273ECB23A49C75B7CA,PinName="then",PinFriendlyName=NSLOCTEXT("K2Node", "true", "true"),Direction="EGPD_Output",PinType.PinCategory="exec",PinType.PinSubCategory="",PinType.PinSubCategoryObject=None,PinType.PinSubCategoryMemberReference=(),PinType.PinValueType=(),PinType.ContainerType=None,PinType.bIsReference=False,PinType.bIsConst=False,PinType.bIsWeakPointer=False,PinType.bIsUObjectWrapper=False,PinType.bSerializeAsSinglePrecisionFloat=False,LinkedTo=(K2Node_SpawnActorFromClass_1 3937017044422AD800BB9F95A03FA906,),PersistentGuid=00000000000000000000000000000000,bHidden=False,bNotConnectable=False,bDefaultValueIsReadOnly=False,bDefaultValueIsIgnored=False,bAdvancedView=False,bOrphanedPin=False,)
   CustomProperties Pin (PinId=DC2C70104E5FFB08588E49A25B183569,PinName="else",PinFriendlyName=NSLOCTEXT("K2Node", "false", "false"),Direction="EGPD_Output",PinType.PinCategory="exec",PinType.PinSubCategory="",PinType.PinSubCategoryObject=None,PinType.PinSubCategoryMemberReference=(),PinType.PinValueType=(),PinType.ContainerType=None,PinType.bIsReference=False,PinType.bIsConst=False,PinType.bIsWeakPointer=False,PinType.bIsUObjectWrapper=False,PinType.bSerializeAsSinglePrecisionFloat=False,PersistentGuid=00000000000000000000000000000000,bHidden=False,bNotConnectable=False,bDefaultValueIsReadOnly=False,bDefaultValueIsIgnored=False,bAdvancedView=False,bOrphanedPin=False,)
End Object
To initialize our HTML page for the UI, setup the view and set the input to the view in the CohCharacterBP blueprint.
   Begin Object Class=/Script/BlueprintGraph.K2Node_Event Name="K2Node_Event_0" ExportPath="/Script/BlueprintGraph.K2Node_Event'/Game/CharacterSelection/CohCharacterBP.CohCharacterBP:EventGraph.K2Node_Event_0'"
   EventReference=(MemberParent="/Script/CoreUObject.Class'/Script/Engine.Actor'",MemberName="ReceiveBeginPlay")
   bOverrideFunction=True
   NodePosX=-1328
   NodePosY=-208
   bCommentBubblePinned=True
   NodeGuid=AA4BFBA345770E8F5F124F943FD6A2C8
   CustomProperties Pin (PinId=2C0FDE5F475664EFB70A3C911CCD7C84,PinName="OutputDelegate",Direction="EGPD_Output",PinType.PinCategory="delegate",PinType.PinSubCategory="",PinType.PinSubCategoryObject=None,PinType.PinSubCategoryMemberReference=(MemberParent="/Script/CoreUObject.Class'/Script/Engine.Actor'",MemberName="ReceiveBeginPlay"),PinType.PinValueType=(),PinType.ContainerType=None,PinType.bIsReference=False,PinType.bIsConst=False,PinType.bIsWeakPointer=False,PinType.bIsUObjectWrapper=False,PinType.bSerializeAsSinglePrecisionFloat=False,PersistentGuid=00000000000000000000000000000000,bHidden=False,bNotConnectable=False,bDefaultValueIsReadOnly=False,bDefaultValueIsIgnored=False,bAdvancedView=False,bOrphanedPin=False,)
   CustomProperties Pin (PinId=2455A96F45A7C9E12B4E588DCC9A93CC,PinName="then",Direction="EGPD_Output",PinType.PinCategory="exec",PinType.PinSubCategory="",PinType.PinSubCategoryObject=None,PinType.PinSubCategoryMemberReference=(),PinType.PinValueType=(),PinType.ContainerType=None,PinType.bIsReference=False,PinType.bIsConst=False,PinType.bIsWeakPointer=False,PinType.bIsUObjectWrapper=False,PinType.bSerializeAsSinglePrecisionFloat=False,LinkedTo=(K2Node_CallFunction_5 C77F16CE4A9F02B6331B7BAEDB0D230A,),PersistentGuid=00000000000000000000000000000000,bHidden=False,bNotConnectable=False,bDefaultValueIsReadOnly=False,bDefaultValueIsIgnored=False,bAdvancedView=False,bOrphanedPin=False,)
End Object
Begin Object Class=/Script/BlueprintGraph.K2Node_CallFunction Name="K2Node_CallFunction_1" ExportPath="/Script/BlueprintGraph.K2Node_CallFunction'/Game/CharacterSelection/CohCharacterBP.CohCharacterBP:EventGraph.K2Node_CallFunction_1'"
   FunctionReference=(MemberName="Setup Input",MemberGuid=E28AB6F64DDFAA61819A6796767C7278,bSelfContext=True)
   NodePosX=-640
   NodePosY=-224
   NodeGuid=14BD67F74F6C557068E61F935616F254
   CustomProperties Pin (PinId=F18B0BF3447CC93D87DA1B9449B3027C,PinName="execute",PinToolTip="
Exec",PinType.PinCategory="exec",PinType.PinSubCategory="",PinType.PinSubCategoryObject=None,PinType.PinSubCategoryMemberReference=(),PinType.PinValueType=(),PinType.ContainerType=None,PinType.bIsReference=False,PinType.bIsConst=False,PinType.bIsWeakPointer=False,PinType.bIsUObjectWrapper=False,PinType.bSerializeAsSinglePrecisionFloat=False,LinkedTo=(K2Node_CallFunction_5 AE2E63844C3AD746CC9EE0B15A5F86B3,),PersistentGuid=00000000000000000000000000000000,bHidden=False,bNotConnectable=False,bDefaultValueIsReadOnly=False,bDefaultValueIsIgnored=False,bAdvancedView=False,bOrphanedPin=False,)
   CustomProperties Pin (PinId=8058C50046BCB64F9BE5388E2751A9D7,PinName="then",PinToolTip="
Exec",Direction="EGPD_Output",PinType.PinCategory="exec",PinType.PinSubCategory="",PinType.PinSubCategoryObject=None,PinType.PinSubCategoryMemberReference=(),PinType.PinValueType=(),PinType.ContainerType=None,PinType.bIsReference=False,PinType.bIsConst=False,PinType.bIsWeakPointer=False,PinType.bIsUObjectWrapper=False,PinType.bSerializeAsSinglePrecisionFloat=False,LinkedTo=(K2Node_CallFunction_4 42EC35D643324AA10F0A20964E95D6F9,),PersistentGuid=00000000000000000000000000000000,bHidden=False,bNotConnectable=False,bDefaultValueIsReadOnly=False,bDefaultValueIsIgnored=False,bAdvancedView=False,bOrphanedPin=False,)
   CustomProperties Pin (PinId=5D1E035F4CBDBCC8D9EB939E04758A3C,PinName="self",PinFriendlyName=NSLOCTEXT("K2Node", "Target", "Target"),PinToolTip="Target
Self Object Reference",PinType.PinCategory="object",PinType.PinSubCategory="self",PinType.PinSubCategoryObject=None,PinType.PinSubCategoryMemberReference=(),PinType.PinValueType=(),PinType.ContainerType=None,PinType.bIsReference=False,PinType.bIsConst=False,PinType.bIsWeakPointer=False,PinType.bIsUObjectWrapper=False,PinType.bSerializeAsSinglePrecisionFloat=False,PersistentGuid=00000000000000000000000000000000,bHidden=False,bNotConnectable=False,bDefaultValueIsReadOnly=False,bDefaultValueIsIgnored=False,bAdvancedView=False,bOrphanedPin=False,)
End Object
Begin Object Class=/Script/BlueprintGraph.K2Node_CallFunction Name="K2Node_CallFunction_5" ExportPath="/Script/BlueprintGraph.K2Node_CallFunction'/Game/CharacterSelection/CohCharacterBP.CohCharacterBP:EventGraph.K2Node_CallFunction_5'"
   FunctionReference=(MemberName="SetupView",bSelfContext=True)
   NodePosX=-1056
   NodePosY=-224
   NodeGuid=0D159CCF4818EE5C43C743A4B41D0110
   CustomProperties Pin (PinId=C77F16CE4A9F02B6331B7BAEDB0D230A,PinName="execute",PinToolTip="
Exec",PinType.PinCategory="exec",PinType.PinSubCategory="",PinType.PinSubCategoryObject=None,PinType.PinSubCategoryMemberReference=(),PinType.PinValueType=(),PinType.ContainerType=None,PinType.bIsReference=False,PinType.bIsConst=False,PinType.bIsWeakPointer=False,PinType.bIsUObjectWrapper=False,PinType.bSerializeAsSinglePrecisionFloat=False,LinkedTo=(K2Node_Event_0 2455A96F45A7C9E12B4E588DCC9A93CC,),PersistentGuid=00000000000000000000000000000000,bHidden=False,bNotConnectable=False,bDefaultValueIsReadOnly=False,bDefaultValueIsIgnored=False,bAdvancedView=False,bOrphanedPin=False,)
   CustomProperties Pin (PinId=AE2E63844C3AD746CC9EE0B15A5F86B3,PinName="then",PinToolTip="
Exec",Direction="EGPD_Output",PinType.PinCategory="exec",PinType.PinSubCategory="",PinType.PinSubCategoryObject=None,PinType.PinSubCategoryMemberReference=(),PinType.PinValueType=(),PinType.ContainerType=None,PinType.bIsReference=False,PinType.bIsConst=False,PinType.bIsWeakPointer=False,PinType.bIsUObjectWrapper=False,PinType.bSerializeAsSinglePrecisionFloat=False,LinkedTo=(K2Node_CallFunction_1 F18B0BF3447CC93D87DA1B9449B3027C,),PersistentGuid=00000000000000000000000000000000,bHidden=False,bNotConnectable=False,bDefaultValueIsReadOnly=False,bDefaultValueIsIgnored=False,bAdvancedView=False,bOrphanedPin=False,)
   CustomProperties Pin (PinId=3D0D0C004BB89C4E0EA77ABDD983927C,PinName="self",PinFriendlyName=NSLOCTEXT("K2Node", "Target", "Target"),PinToolTip="Target
Gameface Game HUD Object Reference",PinType.PinCategory="object",PinType.PinSubCategory="",PinType.PinSubCategoryObject="/Script/CoreUObject.Class'/Script/CohtmlPlugin.CohtmlGameHUD'",PinType.PinSubCategoryMemberReference=(),PinType.PinValueType=(),PinType.ContainerType=None,PinType.bIsReference=False,PinType.bIsConst=False,PinType.bIsWeakPointer=False,PinType.bIsUObjectWrapper=False,PinType.bSerializeAsSinglePrecisionFloat=False,PersistentGuid=00000000000000000000000000000000,bHidden=False,bNotConnectable=False,bDefaultValueIsReadOnly=False,bDefaultValueIsIgnored=False,bAdvancedView=False,bOrphanedPin=False,)
   CustomProperties Pin (PinId=C1E3F7E74AD9F592E81DA2B60C5B6095,PinName="PageUrl",PinToolTip="Page Url
String",PinType.PinCategory="string",PinType.PinSubCategory="",PinType.PinSubCategoryObject=None,PinType.PinSubCategoryMemberReference=(),PinType.PinValueType=(),PinType.ContainerType=None,PinType.bIsReference=False,PinType.bIsConst=False,PinType.bIsWeakPointer=False,PinType.bIsUObjectWrapper=False,PinType.bSerializeAsSinglePrecisionFloat=False,DefaultValue="coui://uiresources/index.html",PersistentGuid=00000000000000000000000000000000,bHidden=False,bNotConnectable=False,bDefaultValueIsReadOnly=False,bDefaultValueIsIgnored=False,bAdvancedView=False,bOrphanedPin=False,)
   CustomProperties Pin (PinId=CACD0FA544F4B66FD7CC93B317C35CB0,PinName="bEnableComplexCSSSupport",PinToolTip="Enable Complex CSSSupport
Boolean",PinType.PinCategory="bool",PinType.PinSubCategory="",PinType.PinSubCategoryObject=None,PinType.PinSubCategoryMemberReference=(),PinType.PinValueType=(),PinType.ContainerType=None,PinType.bIsReference=False,PinType.bIsConst=False,PinType.bIsWeakPointer=False,PinType.bIsUObjectWrapper=False,PinType.bSerializeAsSinglePrecisionFloat=False,DefaultValue="true",AutogeneratedDefaultValue="true",PersistentGuid=00000000000000000000000000000000,bHidden=False,bNotConnectable=False,bDefaultValueIsReadOnly=False,bDefaultValueIsIgnored=False,bAdvancedView=False,bOrphanedPin=False,)
   CustomProperties Pin (PinId=286B5E404BE0156C48DDECB5711A3494,PinName="bDelayedUpdate",PinToolTip="Delayed Update
Boolean",PinType.PinCategory="bool",PinType.PinSubCategory="",PinType.PinSubCategoryObject=None,PinType.PinSubCategoryMemberReference=(),PinType.PinValueType=(),PinType.ContainerType=None,PinType.bIsReference=False,PinType.bIsConst=False,PinType.bIsWeakPointer=False,PinType.bIsUObjectWrapper=False,PinType.bSerializeAsSinglePrecisionFloat=False,DefaultValue="false",AutogeneratedDefaultValue="false",PersistentGuid=00000000000000000000000000000000,bHidden=False,bNotConnectable=False,bDefaultValueIsReadOnly=False,bDefaultValueIsIgnored=False,bAdvancedView=False,bOrphanedPin=False,)
   CustomProperties Pin (PinId=673AA52E4183A7EA012D0B815978EFDA,PinName="bReceiveInput",PinToolTip="Receive Input
Boolean",PinType.PinCategory="bool",PinType.PinSubCategory="",PinType.PinSubCategoryObject=None,PinType.PinSubCategoryMemberReference=(),PinType.PinValueType=(),PinType.ContainerType=None,PinType.bIsReference=False,PinType.bIsConst=False,PinType.bIsWeakPointer=False,PinType.bIsUObjectWrapper=False,PinType.bSerializeAsSinglePrecisionFloat=False,DefaultValue="true",AutogeneratedDefaultValue="true",PersistentGuid=00000000000000000000000000000000,bHidden=False,bNotConnectable=False,bDefaultValueIsReadOnly=False,bDefaultValueIsIgnored=False,bAdvancedView=False,bOrphanedPin=False,)
   CustomProperties Pin (PinId=4EC3D3BB431EE840C5FDB6BB0301BF97,PinName="bExecuteCommandProcessingWithLayout",PinToolTip="Execute Command Processing with Layout
Boolean",PinType.PinCategory="bool",PinType.PinSubCategory="",PinType.PinSubCategoryObject=None,PinType.PinSubCategoryMemberReference=(),PinType.PinValueType=(),PinType.ContainerType=None,PinType.bIsReference=False,PinType.bIsConst=False,PinType.bIsWeakPointer=False,PinType.bIsUObjectWrapper=False,PinType.bSerializeAsSinglePrecisionFloat=False,DefaultValue="false",AutogeneratedDefaultValue="false",PersistentGuid=00000000000000000000000000000000,bHidden=False,bNotConnectable=False,bDefaultValueIsReadOnly=False,bDefaultValueIsIgnored=False,bAdvancedView=False,bOrphanedPin=False,)
   CustomProperties Pin (PinId=82CC317D468E1493DE68FE809E59FA4C,PinName="bUseSurfacePartitioning",PinToolTip="Use Surface Partitioning
Boolean",PinType.PinCategory="bool",PinType.PinSubCategory="",PinType.PinSubCategoryObject=None,PinType.PinSubCategoryMemberReference=(),PinType.PinValueType=(),PinType.ContainerType=None,PinType.bIsReference=False,PinType.bIsConst=False,PinType.bIsWeakPointer=False,PinType.bIsUObjectWrapper=False,PinType.bSerializeAsSinglePrecisionFloat=False,DefaultValue="false",AutogeneratedDefaultValue="false",PersistentGuid=00000000000000000000000000000000,bHidden=False,bNotConnectable=False,bDefaultValueIsReadOnly=False,bDefaultValueIsIgnored=False,bAdvancedView=False,bOrphanedPin=False,)
End Object
Change the HUD class
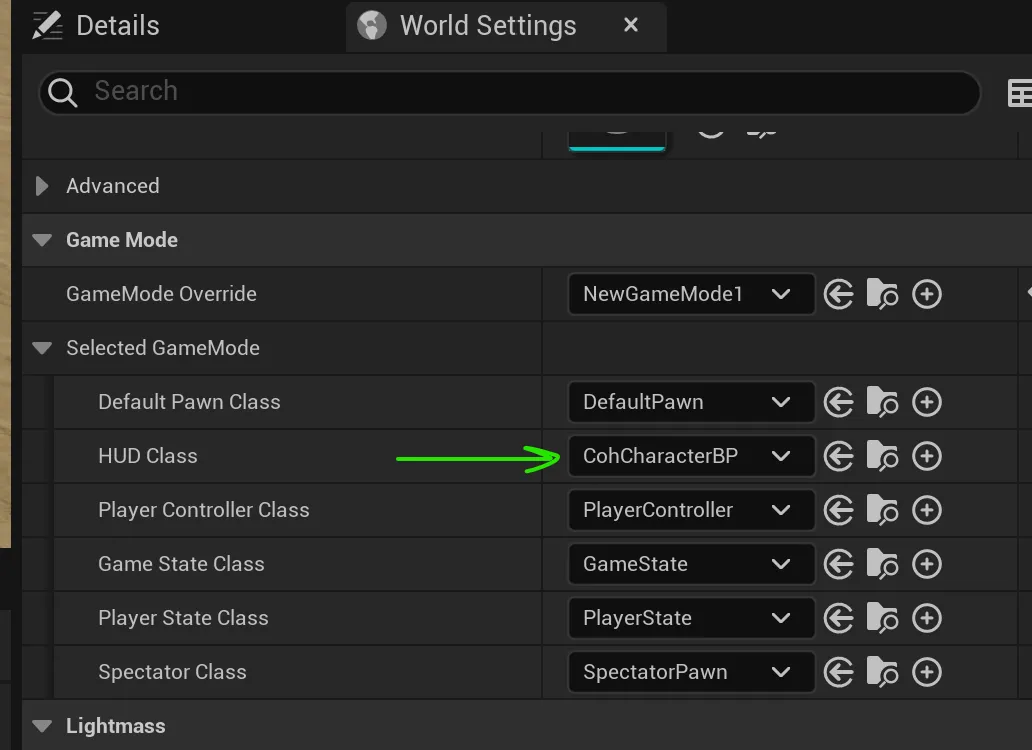
To display the game’s UI as defined in our HTML page, we need to set the game’s HUD class. This is done via the Game Mode in the World Settings.
Initializing the camera actors
With the view set, the next step is to implement the logic for switching cameras as the player selects different characters. Start by creating a Character cameras variable in CohCharacterBP, that is an array of Camera Actor types.
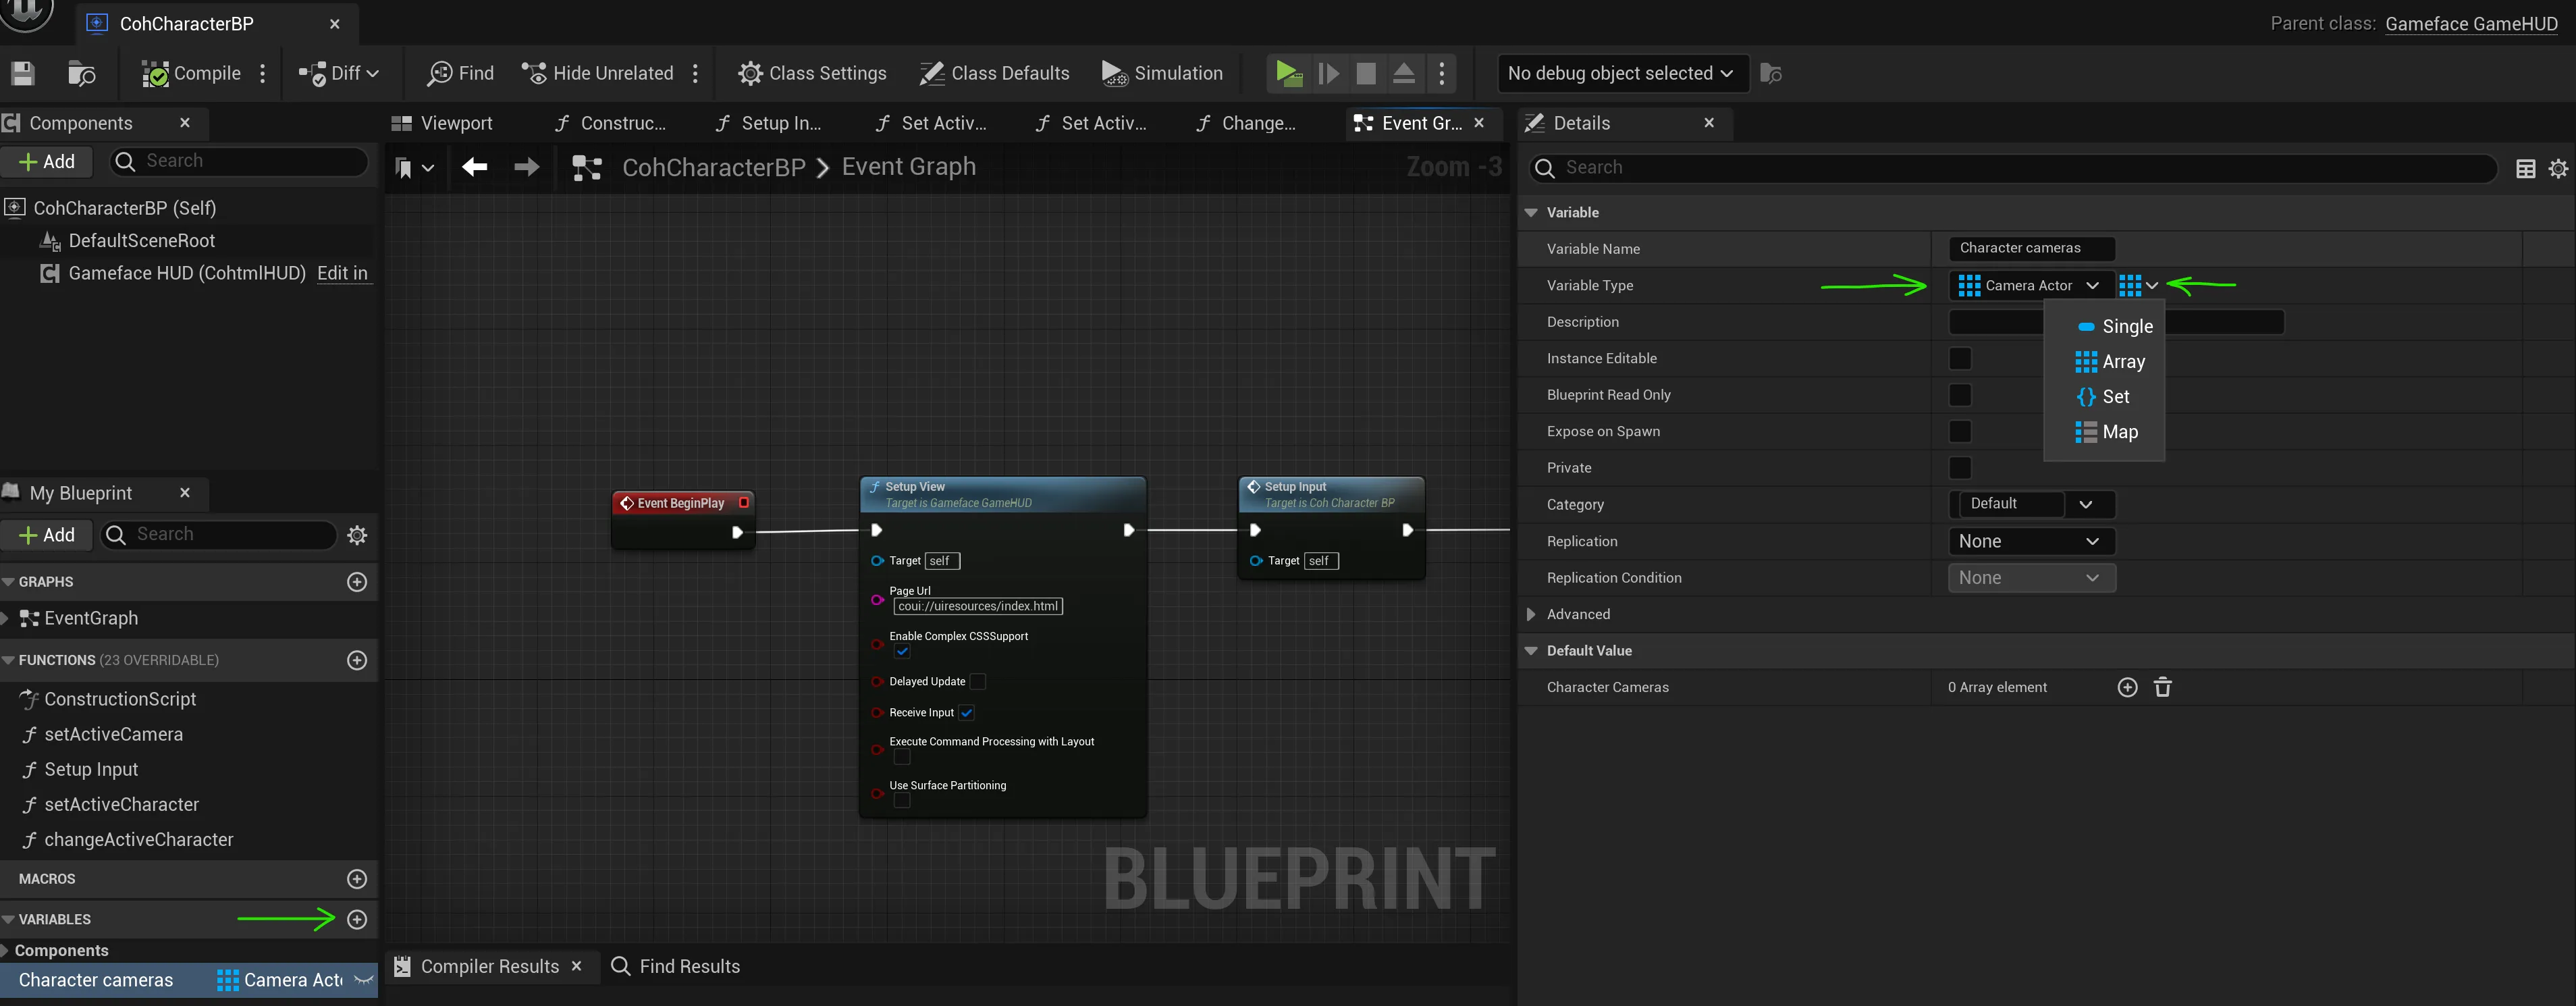
Next, populate this variable by using the Get All Actors Of Class method to retrieve all camera actors in the world and assign them to the Character cameras array.
   Begin Object Class=/Script/BlueprintGraph.K2Node_Event Name="K2Node_Event_0" ExportPath="/Script/BlueprintGraph.K2Node_Event'/Game/CharacterSelection/CohCharacterBP.CohCharacterBP:EventGraph.K2Node_Event_0'"
   EventReference=(MemberParent="/Script/CoreUObject.Class'/Script/Engine.Actor'",MemberName="ReceiveBeginPlay")
   bOverrideFunction=True
   NodePosX=-1328
   NodePosY=-208
   bCommentBubblePinned=True
   NodeGuid=AA4BFBA345770E8F5F124F943FD6A2C8
   CustomProperties Pin (PinId=2C0FDE5F475664EFB70A3C911CCD7C84,PinName="OutputDelegate",Direction="EGPD_Output",PinType.PinCategory="delegate",PinType.PinSubCategory="",PinType.PinSubCategoryObject=None,PinType.PinSubCategoryMemberReference=(MemberParent="/Script/CoreUObject.Class'/Script/Engine.Actor'",MemberName="ReceiveBeginPlay"),PinType.PinValueType=(),PinType.ContainerType=None,PinType.bIsReference=False,PinType.bIsConst=False,PinType.bIsWeakPointer=False,PinType.bIsUObjectWrapper=False,PinType.bSerializeAsSinglePrecisionFloat=False,PersistentGuid=00000000000000000000000000000000,bHidden=False,bNotConnectable=False,bDefaultValueIsReadOnly=False,bDefaultValueIsIgnored=False,bAdvancedView=False,bOrphanedPin=False,)
   CustomProperties Pin (PinId=2455A96F45A7C9E12B4E588DCC9A93CC,PinName="then",Direction="EGPD_Output",PinType.PinCategory="exec",PinType.PinSubCategory="",PinType.PinSubCategoryObject=None,PinType.PinSubCategoryMemberReference=(),PinType.PinValueType=(),PinType.ContainerType=None,PinType.bIsReference=False,PinType.bIsConst=False,PinType.bIsWeakPointer=False,PinType.bIsUObjectWrapper=False,PinType.bSerializeAsSinglePrecisionFloat=False,LinkedTo=(K2Node_CallFunction_5 C77F16CE4A9F02B6331B7BAEDB0D230A,),PersistentGuid=00000000000000000000000000000000,bHidden=False,bNotConnectable=False,bDefaultValueIsReadOnly=False,bDefaultValueIsIgnored=False,bAdvancedView=False,bOrphanedPin=False,)
End Object
Begin Object Class=/Script/BlueprintGraph.K2Node_VariableSet Name="K2Node_VariableSet_5" ExportPath="/Script/BlueprintGraph.K2Node_VariableSet'/Game/CharacterSelection/CohCharacterBP.CohCharacterBP:EventGraph.K2Node_VariableSet_5'"
   VariableReference=(MemberName="Character cameras",MemberGuid=BA6B8C2945790F525BAAEB82CA6723D0,bSelfContext=True)
   NodePosX=48
   NodePosY=-192
   ErrorType=1
   NodeGuid=D52BFFEF4F062C52A36BB19481AE2756
   CustomProperties Pin (PinId=9D059F0A423972C4C2257DAC152BB5DE,PinName="execute",PinType.PinCategory="exec",PinType.PinSubCategory="",PinType.PinSubCategoryObject=None,PinType.PinSubCategoryMemberReference=(),PinType.PinValueType=(),PinType.ContainerType=None,PinType.bIsReference=False,PinType.bIsConst=False,PinType.bIsWeakPointer=False,PinType.bIsUObjectWrapper=False,PinType.bSerializeAsSinglePrecisionFloat=False,LinkedTo=(K2Node_CallFunction_4 D48F987144FD993DD3A780A651A23FD4,),PersistentGuid=00000000000000000000000000000000,bHidden=False,bNotConnectable=False,bDefaultValueIsReadOnly=False,bDefaultValueIsIgnored=False,bAdvancedView=False,bOrphanedPin=False,)
   CustomProperties Pin (PinId=6AF7A93147AA13F25B69EC9CF5908562,PinName="then",Direction="EGPD_Output",PinType.PinCategory="exec",PinType.PinSubCategory="",PinType.PinSubCategoryObject=None,PinType.PinSubCategoryMemberReference=(),PinType.PinValueType=(),PinType.ContainerType=None,PinType.bIsReference=False,PinType.bIsConst=False,PinType.bIsWeakPointer=False,PinType.bIsUObjectWrapper=False,PinType.bSerializeAsSinglePrecisionFloat=False,LinkedTo=(K2Node_CallFunction_21 E71B463E4350C4896DC0CAA479186EE4,),PersistentGuid=00000000000000000000000000000000,bHidden=False,bNotConnectable=False,bDefaultValueIsReadOnly=False,bDefaultValueIsIgnored=False,bAdvancedView=False,bOrphanedPin=False,)
   CustomProperties Pin (PinId=EDEEDCE64AB4EE7A6193A3B43E2DA0A0,PinName="Character cameras",PinType.PinCategory="object",PinType.PinSubCategory="",PinType.PinSubCategoryObject="/Script/CoreUObject.Class'/Script/Engine.CameraActor'",PinType.PinSubCategoryMemberReference=(),PinType.PinValueType=(),PinType.ContainerType=Array,PinType.bIsReference=False,PinType.bIsConst=False,PinType.bIsWeakPointer=False,PinType.bIsUObjectWrapper=False,PinType.bSerializeAsSinglePrecisionFloat=False,LinkedTo=(K2Node_CallFunction_4 2043574F4A05ED4FEEBAE29430AD7B9E,),PersistentGuid=00000000000000000000000000000000,bHidden=False,bNotConnectable=False,bDefaultValueIsReadOnly=False,bDefaultValueIsIgnored=False,bAdvancedView=False,bOrphanedPin=False,)
   CustomProperties Pin (PinId=211FA3A843A3D8527AAB72B953C9982E,PinName="Output_Get",PinToolTip="Retrieves the value of the variable, can use instead of a separate Get node",Direction="EGPD_Output",PinType.PinCategory="object",PinType.PinSubCategory="",PinType.PinSubCategoryObject="/Script/CoreUObject.Class'/Script/Engine.CameraActor'",PinType.PinSubCategoryMemberReference=(),PinType.PinValueType=(),PinType.ContainerType=Array,PinType.bIsReference=False,PinType.bIsConst=False,PinType.bIsWeakPointer=False,PinType.bIsUObjectWrapper=False,PinType.bSerializeAsSinglePrecisionFloat=False,PersistentGuid=00000000000000000000000000000000,bHidden=False,bNotConnectable=False,bDefaultValueIsReadOnly=False,bDefaultValueIsIgnored=False,bAdvancedView=False,bOrphanedPin=False,)
   CustomProperties Pin (PinId=615FEC9B4F47EA744F323CB44CBA6DB6,PinName="self",PinFriendlyName=NSLOCTEXT("K2Node", "Target", "Target"),PinType.PinCategory="object",PinType.PinSubCategory="",PinType.PinSubCategoryObject="/Script/Engine.BlueprintGeneratedClass'/Game/CharacterSelection/CohCharacterBP.CohCharacterBP_C'",PinType.PinSubCategoryMemberReference=(),PinType.PinValueType=(),PinType.ContainerType=None,PinType.bIsReference=False,PinType.bIsConst=False,PinType.bIsWeakPointer=False,PinType.bIsUObjectWrapper=False,PinType.bSerializeAsSinglePrecisionFloat=False,PersistentGuid=00000000000000000000000000000000,bHidden=True,bNotConnectable=False,bDefaultValueIsReadOnly=False,bDefaultValueIsIgnored=False,bAdvancedView=False,bOrphanedPin=False,)
End Object
Begin Object Class=/Script/BlueprintGraph.K2Node_CallFunction Name="K2Node_CallFunction_1" ExportPath="/Script/BlueprintGraph.K2Node_CallFunction'/Game/CharacterSelection/CohCharacterBP.CohCharacterBP:EventGraph.K2Node_CallFunction_1'"
   FunctionReference=(MemberName="Setup Input",MemberGuid=E28AB6F64DDFAA61819A6796767C7278,bSelfContext=True)
   NodePosX=-640
   NodePosY=-224
   NodeGuid=14BD67F74F6C557068E61F935616F254
   CustomProperties Pin (PinId=F18B0BF3447CC93D87DA1B9449B3027C,PinName="execute",PinToolTip="
Exec",PinType.PinCategory="exec",PinType.PinSubCategory="",PinType.PinSubCategoryObject=None,PinType.PinSubCategoryMemberReference=(),PinType.PinValueType=(),PinType.ContainerType=None,PinType.bIsReference=False,PinType.bIsConst=False,PinType.bIsWeakPointer=False,PinType.bIsUObjectWrapper=False,PinType.bSerializeAsSinglePrecisionFloat=False,LinkedTo=(K2Node_CallFunction_5 AE2E63844C3AD746CC9EE0B15A5F86B3,),PersistentGuid=00000000000000000000000000000000,bHidden=False,bNotConnectable=False,bDefaultValueIsReadOnly=False,bDefaultValueIsIgnored=False,bAdvancedView=False,bOrphanedPin=False,)
   CustomProperties Pin (PinId=8058C50046BCB64F9BE5388E2751A9D7,PinName="then",PinToolTip="
Exec",Direction="EGPD_Output",PinType.PinCategory="exec",PinType.PinSubCategory="",PinType.PinSubCategoryObject=None,PinType.PinSubCategoryMemberReference=(),PinType.PinValueType=(),PinType.ContainerType=None,PinType.bIsReference=False,PinType.bIsConst=False,PinType.bIsWeakPointer=False,PinType.bIsUObjectWrapper=False,PinType.bSerializeAsSinglePrecisionFloat=False,LinkedTo=(K2Node_CallFunction_4 42EC35D643324AA10F0A20964E95D6F9,),PersistentGuid=00000000000000000000000000000000,bHidden=False,bNotConnectable=False,bDefaultValueIsReadOnly=False,bDefaultValueIsIgnored=False,bAdvancedView=False,bOrphanedPin=False,)
   CustomProperties Pin (PinId=5D1E035F4CBDBCC8D9EB939E04758A3C,PinName="self",PinFriendlyName=NSLOCTEXT("K2Node", "Target", "Target"),PinToolTip="Target
Self Object Reference",PinType.PinCategory="object",PinType.PinSubCategory="self",PinType.PinSubCategoryObject=None,PinType.PinSubCategoryMemberReference=(),PinType.PinValueType=(),PinType.ContainerType=None,PinType.bIsReference=False,PinType.bIsConst=False,PinType.bIsWeakPointer=False,PinType.bIsUObjectWrapper=False,PinType.bSerializeAsSinglePrecisionFloat=False,PersistentGuid=00000000000000000000000000000000,bHidden=False,bNotConnectable=False,bDefaultValueIsReadOnly=False,bDefaultValueIsIgnored=False,bAdvancedView=False,bOrphanedPin=False,)
End Object
Begin Object Class=/Script/BlueprintGraph.K2Node_CallFunction Name="K2Node_CallFunction_4" ExportPath="/Script/BlueprintGraph.K2Node_CallFunction'/Game/CharacterSelection/CohCharacterBP.CohCharacterBP:EventGraph.K2Node_CallFunction_4'"
   FunctionReference=(MemberParent="/Script/CoreUObject.Class'/Script/Engine.GameplayStatics'",MemberName="GetAllActorsOfClass")
   NodePosX=-320
   NodePosY=-208
   NodeGuid=C569A1774DB7FD54D2973BA68BA2D569
   CustomProperties Pin (PinId=42EC35D643324AA10F0A20964E95D6F9,PinName="execute",PinToolTip="
Exec",PinType.PinCategory="exec",PinType.PinSubCategory="",PinType.PinSubCategoryObject=None,PinType.PinSubCategoryMemberReference=(),PinType.PinValueType=(),PinType.ContainerType=None,PinType.bIsReference=False,PinType.bIsConst=False,PinType.bIsWeakPointer=False,PinType.bIsUObjectWrapper=False,PinType.bSerializeAsSinglePrecisionFloat=False,LinkedTo=(K2Node_CallFunction_1 8058C50046BCB64F9BE5388E2751A9D7,),PersistentGuid=00000000000000000000000000000000,bHidden=False,bNotConnectable=False,bDefaultValueIsReadOnly=False,bDefaultValueIsIgnored=False,bAdvancedView=False,bOrphanedPin=False,)
   CustomProperties Pin (PinId=D48F987144FD993DD3A780A651A23FD4,PinName="then",PinToolTip="
Exec",Direction="EGPD_Output",PinType.PinCategory="exec",PinType.PinSubCategory="",PinType.PinSubCategoryObject=None,PinType.PinSubCategoryMemberReference=(),PinType.PinValueType=(),PinType.ContainerType=None,PinType.bIsReference=False,PinType.bIsConst=False,PinType.bIsWeakPointer=False,PinType.bIsUObjectWrapper=False,PinType.bSerializeAsSinglePrecisionFloat=False,LinkedTo=(K2Node_VariableSet_5 9D059F0A423972C4C2257DAC152BB5DE,),PersistentGuid=00000000000000000000000000000000,bHidden=False,bNotConnectable=False,bDefaultValueIsReadOnly=False,bDefaultValueIsIgnored=False,bAdvancedView=False,bOrphanedPin=False,)
   CustomProperties Pin (PinId=E7B7655F43E57E172A3FC48AB481FB69,PinName="self",PinFriendlyName=NSLOCTEXT("K2Node", "Target", "Target"),PinToolTip="Target
Gameplay Statics Object Reference",PinType.PinCategory="object",PinType.PinSubCategory="",PinType.PinSubCategoryObject="/Script/CoreUObject.Class'/Script/Engine.GameplayStatics'",PinType.PinSubCategoryMemberReference=(),PinType.PinValueType=(),PinType.ContainerType=None,PinType.bIsReference=False,PinType.bIsConst=False,PinType.bIsWeakPointer=False,PinType.bIsUObjectWrapper=False,PinType.bSerializeAsSinglePrecisionFloat=False,DefaultObject="/Script/Engine.Default__GameplayStatics",PersistentGuid=00000000000000000000000000000000,bHidden=True,bNotConnectable=False,bDefaultValueIsReadOnly=False,bDefaultValueIsIgnored=False,bAdvancedView=False,bOrphanedPin=False,)
   CustomProperties Pin (PinId=743B6D51427794E8066D9AAE4D1A1F27,PinName="WorldContextObject",PinToolTip="World Context Object
Object Reference",PinType.PinCategory="object",PinType.PinSubCategory="",PinType.PinSubCategoryObject="/Script/CoreUObject.Class'/Script/CoreUObject.Object'",PinType.PinSubCategoryMemberReference=(),PinType.PinValueType=(),PinType.ContainerType=None,PinType.bIsReference=False,PinType.bIsConst=True,PinType.bIsWeakPointer=False,PinType.bIsUObjectWrapper=False,PinType.bSerializeAsSinglePrecisionFloat=False,PersistentGuid=00000000000000000000000000000000,bHidden=True,bNotConnectable=False,bDefaultValueIsReadOnly=False,bDefaultValueIsIgnored=False,bAdvancedView=False,bOrphanedPin=False,)
   CustomProperties Pin (PinId=F22259D44D983EE5141F7795B746C5ED,PinName="ActorClass",PinToolTip="Actor Class
Actor Class Reference

Class of Actor to find. Must be specified or result array will be empty.",PinType.PinCategory="class",PinType.PinSubCategory="",PinType.PinSubCategoryObject="/Script/CoreUObject.Class'/Script/Engine.Actor'",PinType.PinSubCategoryMemberReference=(),PinType.PinValueType=(),PinType.ContainerType=None,PinType.bIsReference=False,PinType.bIsConst=False,PinType.bIsWeakPointer=False,PinType.bIsUObjectWrapper=True,PinType.bSerializeAsSinglePrecisionFloat=False,DefaultObject="/Script/Engine.CameraActor",PersistentGuid=00000000000000000000000000000000,bHidden=False,bNotConnectable=False,bDefaultValueIsReadOnly=False,bDefaultValueIsIgnored=False,bAdvancedView=False,bOrphanedPin=False,)
   CustomProperties Pin (PinId=2043574F4A05ED4FEEBAE29430AD7B9E,PinName="OutActors",PinToolTip="Out Actors
Array of Camera Actor Object References

Output array of Actors of the specified class.",Direction="EGPD_Output",PinType.PinCategory="object",PinType.PinSubCategory="",PinType.PinSubCategoryObject="/Script/CoreUObject.Class'/Script/Engine.CameraActor'",PinType.PinSubCategoryMemberReference=(),PinType.PinValueType=(),PinType.ContainerType=Array,PinType.bIsReference=False,PinType.bIsConst=False,PinType.bIsWeakPointer=False,PinType.bIsUObjectWrapper=False,PinType.bSerializeAsSinglePrecisionFloat=False,LinkedTo=(K2Node_VariableSet_5 EDEEDCE64AB4EE7A6193A3B43E2DA0A0,),PersistentGuid=00000000000000000000000000000000,bHidden=False,bNotConnectable=False,bDefaultValueIsReadOnly=False,bDefaultValueIsIgnored=False,bAdvancedView=False,bOrphanedPin=False,)
End Object
Begin Object Class=/Script/BlueprintGraph.K2Node_CallFunction Name="K2Node_CallFunction_5" ExportPath="/Script/BlueprintGraph.K2Node_CallFunction'/Game/CharacterSelection/CohCharacterBP.CohCharacterBP:EventGraph.K2Node_CallFunction_5'"
   FunctionReference=(MemberName="SetupView",bSelfContext=True)
   NodePosX=-1056
   NodePosY=-224
   NodeGuid=0D159CCF4818EE5C43C743A4B41D0110
   CustomProperties Pin (PinId=C77F16CE4A9F02B6331B7BAEDB0D230A,PinName="execute",PinToolTip="
Exec",PinType.PinCategory="exec",PinType.PinSubCategory="",PinType.PinSubCategoryObject=None,PinType.PinSubCategoryMemberReference=(),PinType.PinValueType=(),PinType.ContainerType=None,PinType.bIsReference=False,PinType.bIsConst=False,PinType.bIsWeakPointer=False,PinType.bIsUObjectWrapper=False,PinType.bSerializeAsSinglePrecisionFloat=False,LinkedTo=(K2Node_Event_0 2455A96F45A7C9E12B4E588DCC9A93CC,),PersistentGuid=00000000000000000000000000000000,bHidden=False,bNotConnectable=False,bDefaultValueIsReadOnly=False,bDefaultValueIsIgnored=False,bAdvancedView=False,bOrphanedPin=False,)
   CustomProperties Pin (PinId=AE2E63844C3AD746CC9EE0B15A5F86B3,PinName="then",PinToolTip="
Exec",Direction="EGPD_Output",PinType.PinCategory="exec",PinType.PinSubCategory="",PinType.PinSubCategoryObject=None,PinType.PinSubCategoryMemberReference=(),PinType.PinValueType=(),PinType.ContainerType=None,PinType.bIsReference=False,PinType.bIsConst=False,PinType.bIsWeakPointer=False,PinType.bIsUObjectWrapper=False,PinType.bSerializeAsSinglePrecisionFloat=False,LinkedTo=(K2Node_CallFunction_1 F18B0BF3447CC93D87DA1B9449B3027C,),PersistentGuid=00000000000000000000000000000000,bHidden=False,bNotConnectable=False,bDefaultValueIsReadOnly=False,bDefaultValueIsIgnored=False,bAdvancedView=False,bOrphanedPin=False,)
   CustomProperties Pin (PinId=3D0D0C004BB89C4E0EA77ABDD983927C,PinName="self",PinFriendlyName=NSLOCTEXT("K2Node", "Target", "Target"),PinToolTip="Target
Gameface Game HUD Object Reference",PinType.PinCategory="object",PinType.PinSubCategory="",PinType.PinSubCategoryObject="/Script/CoreUObject.Class'/Script/CohtmlPlugin.CohtmlGameHUD'",PinType.PinSubCategoryMemberReference=(),PinType.PinValueType=(),PinType.ContainerType=None,PinType.bIsReference=False,PinType.bIsConst=False,PinType.bIsWeakPointer=False,PinType.bIsUObjectWrapper=False,PinType.bSerializeAsSinglePrecisionFloat=False,PersistentGuid=00000000000000000000000000000000,bHidden=False,bNotConnectable=False,bDefaultValueIsReadOnly=False,bDefaultValueIsIgnored=False,bAdvancedView=False,bOrphanedPin=False,)
   CustomProperties Pin (PinId=C1E3F7E74AD9F592E81DA2B60C5B6095,PinName="PageUrl",PinToolTip="Page Url
String",PinType.PinCategory="string",PinType.PinSubCategory="",PinType.PinSubCategoryObject=None,PinType.PinSubCategoryMemberReference=(),PinType.PinValueType=(),PinType.ContainerType=None,PinType.bIsReference=False,PinType.bIsConst=False,PinType.bIsWeakPointer=False,PinType.bIsUObjectWrapper=False,PinType.bSerializeAsSinglePrecisionFloat=False,DefaultValue="coui://uiresources/index.html",PersistentGuid=00000000000000000000000000000000,bHidden=False,bNotConnectable=False,bDefaultValueIsReadOnly=False,bDefaultValueIsIgnored=False,bAdvancedView=False,bOrphanedPin=False,)
   CustomProperties Pin (PinId=CACD0FA544F4B66FD7CC93B317C35CB0,PinName="bEnableComplexCSSSupport",PinToolTip="Enable Complex CSSSupport
Boolean",PinType.PinCategory="bool",PinType.PinSubCategory="",PinType.PinSubCategoryObject=None,PinType.PinSubCategoryMemberReference=(),PinType.PinValueType=(),PinType.ContainerType=None,PinType.bIsReference=False,PinType.bIsConst=False,PinType.bIsWeakPointer=False,PinType.bIsUObjectWrapper=False,PinType.bSerializeAsSinglePrecisionFloat=False,DefaultValue="true",AutogeneratedDefaultValue="true",PersistentGuid=00000000000000000000000000000000,bHidden=False,bNotConnectable=False,bDefaultValueIsReadOnly=False,bDefaultValueIsIgnored=False,bAdvancedView=False,bOrphanedPin=False,)
   CustomProperties Pin (PinId=286B5E404BE0156C48DDECB5711A3494,PinName="bDelayedUpdate",PinToolTip="Delayed Update
Boolean",PinType.PinCategory="bool",PinType.PinSubCategory="",PinType.PinSubCategoryObject=None,PinType.PinSubCategoryMemberReference=(),PinType.PinValueType=(),PinType.ContainerType=None,PinType.bIsReference=False,PinType.bIsConst=False,PinType.bIsWeakPointer=False,PinType.bIsUObjectWrapper=False,PinType.bSerializeAsSinglePrecisionFloat=False,DefaultValue="false",AutogeneratedDefaultValue="false",PersistentGuid=00000000000000000000000000000000,bHidden=False,bNotConnectable=False,bDefaultValueIsReadOnly=False,bDefaultValueIsIgnored=False,bAdvancedView=False,bOrphanedPin=False,)
   CustomProperties Pin (PinId=673AA52E4183A7EA012D0B815978EFDA,PinName="bReceiveInput",PinToolTip="Receive Input
Boolean",PinType.PinCategory="bool",PinType.PinSubCategory="",PinType.PinSubCategoryObject=None,PinType.PinSubCategoryMemberReference=(),PinType.PinValueType=(),PinType.ContainerType=None,PinType.bIsReference=False,PinType.bIsConst=False,PinType.bIsWeakPointer=False,PinType.bIsUObjectWrapper=False,PinType.bSerializeAsSinglePrecisionFloat=False,DefaultValue="true",AutogeneratedDefaultValue="true",PersistentGuid=00000000000000000000000000000000,bHidden=False,bNotConnectable=False,bDefaultValueIsReadOnly=False,bDefaultValueIsIgnored=False,bAdvancedView=False,bOrphanedPin=False,)
   CustomProperties Pin (PinId=4EC3D3BB431EE840C5FDB6BB0301BF97,PinName="bExecuteCommandProcessingWithLayout",PinToolTip="Execute Command Processing with Layout
Boolean",PinType.PinCategory="bool",PinType.PinSubCategory="",PinType.PinSubCategoryObject=None,PinType.PinSubCategoryMemberReference=(),PinType.PinValueType=(),PinType.ContainerType=None,PinType.bIsReference=False,PinType.bIsConst=False,PinType.bIsWeakPointer=False,PinType.bIsUObjectWrapper=False,PinType.bSerializeAsSinglePrecisionFloat=False,DefaultValue="false",AutogeneratedDefaultValue="false",PersistentGuid=00000000000000000000000000000000,bHidden=False,bNotConnectable=False,bDefaultValueIsReadOnly=False,bDefaultValueIsIgnored=False,bAdvancedView=False,bOrphanedPin=False,)
   CustomProperties Pin (PinId=82CC317D468E1493DE68FE809E59FA4C,PinName="bUseSurfacePartitioning",PinToolTip="Use Surface Partitioning
Boolean",PinType.PinCategory="bool",PinType.PinSubCategory="",PinType.PinSubCategoryObject=None,PinType.PinSubCategoryMemberReference=(),PinType.PinValueType=(),PinType.ContainerType=None,PinType.bIsReference=False,PinType.bIsConst=False,PinType.bIsWeakPointer=False,PinType.bIsUObjectWrapper=False,PinType.bSerializeAsSinglePrecisionFloat=False,DefaultValue="false",AutogeneratedDefaultValue="false",PersistentGuid=00000000000000000000000000000000,bHidden=False,bNotConnectable=False,bDefaultValueIsReadOnly=False,bDefaultValueIsIgnored=False,bAdvancedView=False,bOrphanedPin=False,)
End Object
Creating a method to change the active camera
To switch the camera, we’ll create a setActiveCamera method that will handle changing the active camera based on the player’s selection.
First, create a Current character variable, that will hold the index of the currently selected character. Set it to 0 by default to represent the index of the first character.
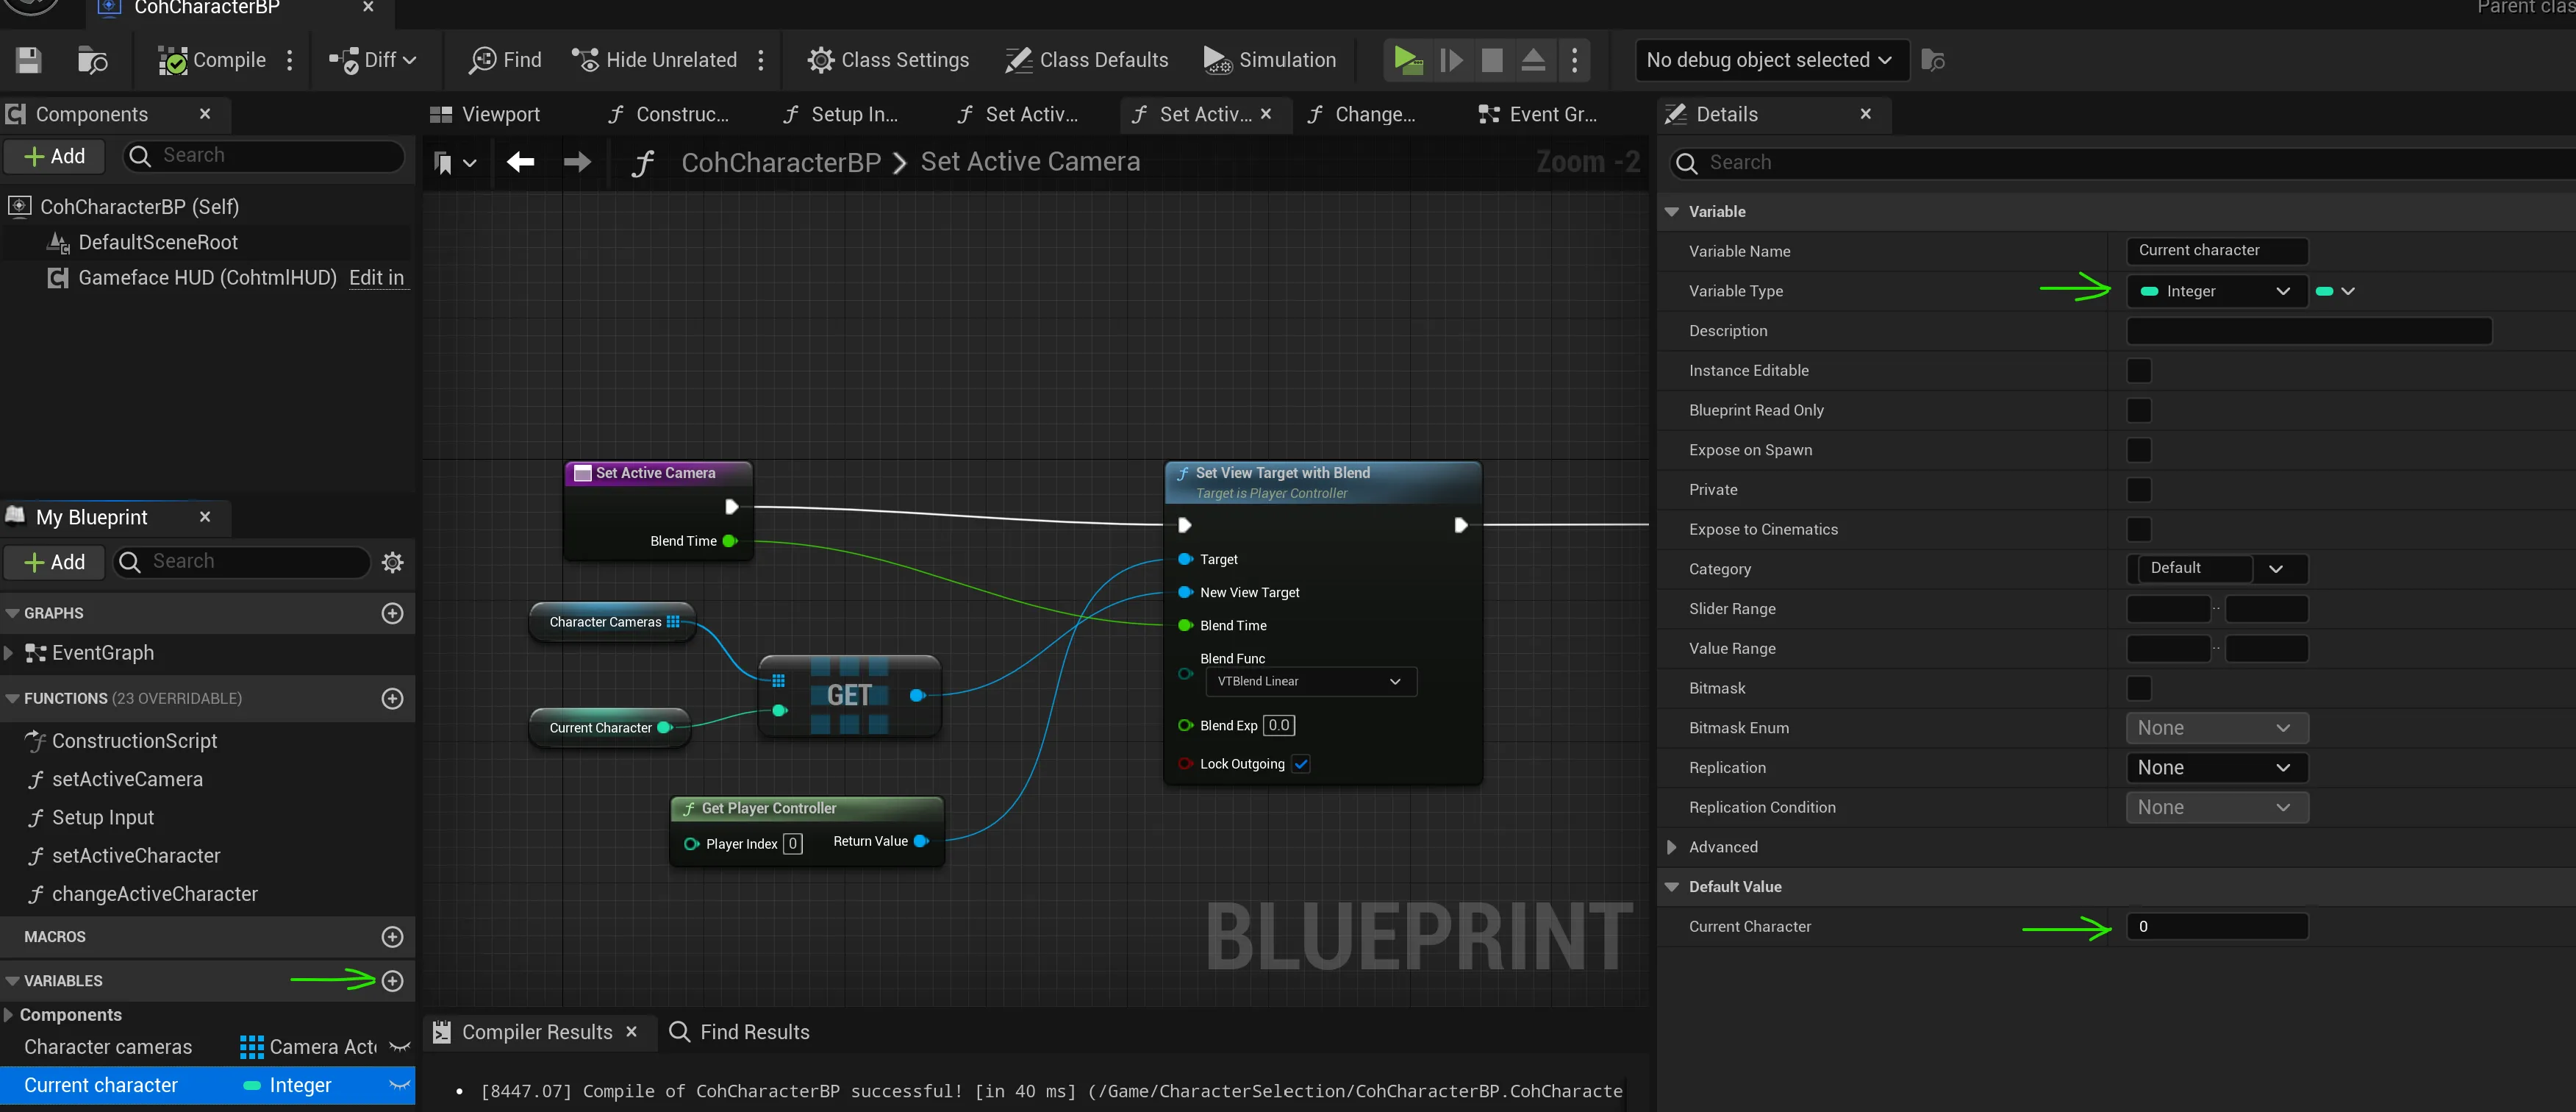
The setActiveCamera method will retrieve the camera of the currently selected character from the Character cameras array and switch the active camera using the Set View Target with Blend method. This method transitions between cameras over a set Blend Time, which we’ll set to 0.5 for a smooth 500ms transition.
   Begin Object Class=/Script/BlueprintGraph.K2Node_FunctionEntry Name="K2Node_FunctionEntry_1" ExportPath="/Script/BlueprintGraph.K2Node_FunctionEntry'/Game/CharacterSelection/CohCharacterBP.CohCharacterBP:setActiveCamera.K2Node_FunctionEntry_1'"
   ExtraFlags=201457664
   FunctionReference=(MemberName="setActiveCamera")
   bIsEditable=True
   NodeGuid=4E84FC3443AD48A6810FEA80949C7C4E
   CustomProperties Pin (PinId=907A362E4DD74E9ADE4A638CD80DFCC9,PinName="then",Direction="EGPD_Output",PinType.PinCategory="exec",PinType.PinSubCategory="",PinType.PinSubCategoryObject=None,PinType.PinSubCategoryMemberReference=(),PinType.PinValueType=(),PinType.ContainerType=None,PinType.bIsReference=False,PinType.bIsConst=False,PinType.bIsWeakPointer=False,PinType.bIsUObjectWrapper=False,PinType.bSerializeAsSinglePrecisionFloat=False,LinkedTo=(K2Node_CallFunction_4 FA3E0DDF4C0614977BFCBD9D085E101D,),PersistentGuid=00000000000000000000000000000000,bHidden=False,bNotConnectable=False,bDefaultValueIsReadOnly=False,bDefaultValueIsIgnored=False,bAdvancedView=False,bOrphanedPin=False,)
End Object
Begin Object Class=/Script/BlueprintGraph.K2Node_CallFunction Name="K2Node_CallFunction_8" ExportPath="/Script/BlueprintGraph.K2Node_CallFunction'/Game/CharacterSelection/CohCharacterBP.CohCharacterBP:setActiveCamera.K2Node_CallFunction_8'"
   bIsPureFunc=True
   FunctionReference=(MemberParent="/Script/CoreUObject.Class'/Script/Engine.GameplayStatics'",MemberName="GetPlayerController")
   NodePosX=96
   NodePosY=304
   NodeGuid=7536C52044CC8965CF6403AABBC0D66D
   CustomProperties Pin (PinId=E802FE794C078111B6E01E974DE9144F,PinName="self",PinFriendlyName=NSLOCTEXT("K2Node", "Target", "Target"),PinToolTip="Target
Gameplay Statics Object Reference",PinType.PinCategory="object",PinType.PinSubCategory="",PinType.PinSubCategoryObject="/Script/CoreUObject.Class'/Script/Engine.GameplayStatics'",PinType.PinSubCategoryMemberReference=(),PinType.PinValueType=(),PinType.ContainerType=None,PinType.bIsReference=False,PinType.bIsConst=False,PinType.bIsWeakPointer=False,PinType.bIsUObjectWrapper=False,PinType.bSerializeAsSinglePrecisionFloat=False,DefaultObject="/Script/Engine.Default__GameplayStatics",PersistentGuid=00000000000000000000000000000000,bHidden=True,bNotConnectable=False,bDefaultValueIsReadOnly=False,bDefaultValueIsIgnored=False,bAdvancedView=False,bOrphanedPin=False,)
   CustomProperties Pin (PinId=CD3C0AC94ECA4DBB821CCF90C0F11FE8,PinName="WorldContextObject",PinToolTip="World Context Object
Object Reference",PinType.PinCategory="object",PinType.PinSubCategory="",PinType.PinSubCategoryObject="/Script/CoreUObject.Class'/Script/CoreUObject.Object'",PinType.PinSubCategoryMemberReference=(),PinType.PinValueType=(),PinType.ContainerType=None,PinType.bIsReference=False,PinType.bIsConst=True,PinType.bIsWeakPointer=False,PinType.bIsUObjectWrapper=False,PinType.bSerializeAsSinglePrecisionFloat=False,PersistentGuid=00000000000000000000000000000000,bHidden=True,bNotConnectable=False,bDefaultValueIsReadOnly=False,bDefaultValueIsIgnored=False,bAdvancedView=False,bOrphanedPin=False,)
   CustomProperties Pin (PinId=DD09FE294A03B6F7EE09B2BCB4F5EA35,PinName="PlayerIndex",PinToolTip="Player Index
Integer

Index in the player controller list, starting first with local players and then available remote ones",PinType.PinCategory="int",PinType.PinSubCategory="",PinType.PinSubCategoryObject=None,PinType.PinSubCategoryMemberReference=(),PinType.PinValueType=(),PinType.ContainerType=None,PinType.bIsReference=False,PinType.bIsConst=False,PinType.bIsWeakPointer=False,PinType.bIsUObjectWrapper=False,PinType.bSerializeAsSinglePrecisionFloat=False,DefaultValue="0",AutogeneratedDefaultValue="0",PersistentGuid=00000000000000000000000000000000,bHidden=False,bNotConnectable=False,bDefaultValueIsReadOnly=False,bDefaultValueIsIgnored=False,bAdvancedView=False,bOrphanedPin=False,)
   CustomProperties Pin (PinId=E6315579413E636BBD0CC1A8D00EDA4B,PinName="ReturnValue",PinToolTip="Return Value
Player Controller Object Reference",Direction="EGPD_Output",PinType.PinCategory="object",PinType.PinSubCategory="",PinType.PinSubCategoryObject="/Script/CoreUObject.Class'/Script/Engine.PlayerController'",PinType.PinSubCategoryMemberReference=(),PinType.PinValueType=(),PinType.ContainerType=None,PinType.bIsReference=False,PinType.bIsConst=False,PinType.bIsWeakPointer=False,PinType.bIsUObjectWrapper=False,PinType.bSerializeAsSinglePrecisionFloat=False,LinkedTo=(K2Node_CallFunction_4 2CA944DD492C39986594F6B57C370A1F,),PersistentGuid=00000000000000000000000000000000,bHidden=False,bNotConnectable=False,bDefaultValueIsReadOnly=False,bDefaultValueIsIgnored=False,bAdvancedView=False,bOrphanedPin=False,)
End Object
Begin Object Class=/Script/BlueprintGraph.K2Node_CallFunction Name="K2Node_CallFunction_4" ExportPath="/Script/BlueprintGraph.K2Node_CallFunction'/Game/CharacterSelection/CohCharacterBP.CohCharacterBP:setActiveCamera.K2Node_CallFunction_4'"
   FunctionReference=(MemberParent="/Script/CoreUObject.Class'/Script/Engine.PlayerController'",MemberName="SetViewTargetWithBlend")
   NodePosX=544
   NodeGuid=CAAE5F6B4984EDF11497D39E2D613468
   CustomProperties Pin (PinId=FA3E0DDF4C0614977BFCBD9D085E101D,PinName="execute",PinToolTip="
Exec",PinType.PinCategory="exec",PinType.PinSubCategory="",PinType.PinSubCategoryObject=None,PinType.PinSubCategoryMemberReference=(),PinType.PinValueType=(),PinType.ContainerType=None,PinType.bIsReference=False,PinType.bIsConst=False,PinType.bIsWeakPointer=False,PinType.bIsUObjectWrapper=False,PinType.bSerializeAsSinglePrecisionFloat=False,LinkedTo=(K2Node_FunctionEntry_1 907A362E4DD74E9ADE4A638CD80DFCC9,),PersistentGuid=00000000000000000000000000000000,bHidden=False,bNotConnectable=False,bDefaultValueIsReadOnly=False,bDefaultValueIsIgnored=False,bAdvancedView=False,bOrphanedPin=False,)
   CustomProperties Pin (PinId=A0BD5C2B450494B9916D8CA73AC70E98,PinName="then",PinToolTip="
Exec",Direction="EGPD_Output",PinType.PinCategory="exec",PinType.PinSubCategory="",PinType.PinSubCategoryObject=None,PinType.PinSubCategoryMemberReference=(),PinType.PinValueType=(),PinType.ContainerType=None,PinType.bIsReference=False,PinType.bIsConst=False,PinType.bIsWeakPointer=False,PinType.bIsUObjectWrapper=False,PinType.bSerializeAsSinglePrecisionFloat=False,LinkedTo=(K2Node_FunctionResult_0 0EFAE818425676BA679641926502FDC8,),PersistentGuid=00000000000000000000000000000000,bHidden=False,bNotConnectable=False,bDefaultValueIsReadOnly=False,bDefaultValueIsIgnored=False,bAdvancedView=False,bOrphanedPin=False,)
   CustomProperties Pin (PinId=2CA944DD492C39986594F6B57C370A1F,PinName="self",PinFriendlyName=NSLOCTEXT("K2Node", "Target", "Target"),PinToolTip="Target
Player Controller Object Reference",PinType.PinCategory="object",PinType.PinSubCategory="",PinType.PinSubCategoryObject="/Script/CoreUObject.Class'/Script/Engine.PlayerController'",PinType.PinSubCategoryMemberReference=(),PinType.PinValueType=(),PinType.ContainerType=None,PinType.bIsReference=False,PinType.bIsConst=False,PinType.bIsWeakPointer=False,PinType.bIsUObjectWrapper=False,PinType.bSerializeAsSinglePrecisionFloat=False,LinkedTo=(K2Node_CallFunction_8 E6315579413E636BBD0CC1A8D00EDA4B,),PersistentGuid=00000000000000000000000000000000,bHidden=False,bNotConnectable=False,bDefaultValueIsReadOnly=False,bDefaultValueIsIgnored=False,bAdvancedView=False,bOrphanedPin=False,)
   CustomProperties Pin (PinId=CEBC31894B2E942E105256B2BB9A639E,PinName="NewViewTarget",PinToolTip="New View Target
Actor Object Reference

new actor to set as view target",PinType.PinCategory="object",PinType.PinSubCategory="",PinType.PinSubCategoryObject="/Script/CoreUObject.Class'/Script/Engine.Actor'",PinType.PinSubCategoryMemberReference=(),PinType.PinValueType=(),PinType.ContainerType=None,PinType.bIsReference=False,PinType.bIsConst=False,PinType.bIsWeakPointer=False,PinType.bIsUObjectWrapper=False,PinType.bSerializeAsSinglePrecisionFloat=False,LinkedTo=(K2Node_GetArrayItem_0 475AD50D4EF4C43F007180B2D5485065,),PersistentGuid=00000000000000000000000000000000,bHidden=False,bNotConnectable=False,bDefaultValueIsReadOnly=False,bDefaultValueIsIgnored=False,bAdvancedView=False,bOrphanedPin=False,)
   CustomProperties Pin (PinId=324B9DD44B9B445244E8DD90C0F72276,PinName="BlendTime",PinToolTip="Blend Time
Float (single-precision)

time taken to blend",PinType.PinCategory="real",PinType.PinSubCategory="float",PinType.PinSubCategoryObject=None,PinType.PinSubCategoryMemberReference=(),PinType.PinValueType=(),PinType.ContainerType=None,PinType.bIsReference=False,PinType.bIsConst=False,PinType.bIsWeakPointer=False,PinType.bIsUObjectWrapper=False,PinType.bSerializeAsSinglePrecisionFloat=False,DefaultValue="0.500000",AutogeneratedDefaultValue="0.000000",PersistentGuid=00000000000000000000000000000000,bHidden=False,bNotConnectable=False,bDefaultValueIsReadOnly=False,bDefaultValueIsIgnored=False,bAdvancedView=False,bOrphanedPin=False,)
   CustomProperties Pin (PinId=EDFB37B54320FEB3731EA48116AC058F,PinName="BlendFunc",PinToolTip="Blend Func
EViewTargetBlendFunction Enum

Cubic, Linear etc functions for blending",PinType.PinCategory="byte",PinType.PinSubCategory="",PinType.PinSubCategoryObject="/Script/CoreUObject.Enum'/Script/Engine.EViewTargetBlendFunction'",PinType.PinSubCategoryMemberReference=(),PinType.PinValueType=(),PinType.ContainerType=None,PinType.bIsReference=False,PinType.bIsConst=False,PinType.bIsWeakPointer=False,PinType.bIsUObjectWrapper=False,PinType.bSerializeAsSinglePrecisionFloat=False,DefaultValue="VTBlend_Linear",AutogeneratedDefaultValue="VTBlend_Linear",PersistentGuid=00000000000000000000000000000000,bHidden=False,bNotConnectable=False,bDefaultValueIsReadOnly=False,bDefaultValueIsIgnored=False,bAdvancedView=False,bOrphanedPin=False,)
   CustomProperties Pin (PinId=DA7BCD1D48D62E1A7E0B0C882D69CEAE,PinName="BlendExp",PinToolTip="Blend Exp
Float (single-precision)

Exponent, used by certain blend functions to control the shape of the curve.",PinType.PinCategory="real",PinType.PinSubCategory="float",PinType.PinSubCategoryObject=None,PinType.PinSubCategoryMemberReference=(),PinType.PinValueType=(),PinType.ContainerType=None,PinType.bIsReference=False,PinType.bIsConst=False,PinType.bIsWeakPointer=False,PinType.bIsUObjectWrapper=False,PinType.bSerializeAsSinglePrecisionFloat=False,DefaultValue="0.000000",AutogeneratedDefaultValue="0.000000",PersistentGuid=00000000000000000000000000000000,bHidden=False,bNotConnectable=False,bDefaultValueIsReadOnly=False,bDefaultValueIsIgnored=False,bAdvancedView=False,bOrphanedPin=False,)
   CustomProperties Pin (PinId=83485CFD4CDEBE13E9B88D82D31BEE63,PinName="bLockOutgoing",PinToolTip="Lock Outgoing
Boolean

If true, lock outgoing viewtarget to last frame's camera position for the remainder of the blend.",PinType.PinCategory="bool",PinType.PinSubCategory="",PinType.PinSubCategoryObject=None,PinType.PinSubCategoryMemberReference=(),PinType.PinValueType=(),PinType.ContainerType=None,PinType.bIsReference=False,PinType.bIsConst=False,PinType.bIsWeakPointer=False,PinType.bIsUObjectWrapper=False,PinType.bSerializeAsSinglePrecisionFloat=False,DefaultValue="true",AutogeneratedDefaultValue="false",PersistentGuid=00000000000000000000000000000000,bHidden=False,bNotConnectable=False,bDefaultValueIsReadOnly=False,bDefaultValueIsIgnored=False,bAdvancedView=False,bOrphanedPin=False,)
End Object
Begin Object Class=/Script/BlueprintGraph.K2Node_VariableGet Name="K2Node_VariableGet_2" ExportPath="/Script/BlueprintGraph.K2Node_VariableGet'/Game/CharacterSelection/CohCharacterBP.CohCharacterBP:setActiveCamera.K2Node_VariableGet_2'"
   VariableReference=(MemberName="Character cameras",MemberGuid=BA6B8C2945790F525BAAEB82CA6723D0,bSelfContext=True)
   NodePosX=-32
   NodePosY=128
   NodeGuid=C41030D2448BA32ADE660FA629FD24EF
   CustomProperties Pin (PinId=736D382A43FC00A61E83F3862EBE1AA5,PinName="Character cameras",Direction="EGPD_Output",PinType.PinCategory="object",PinType.PinSubCategory="",PinType.PinSubCategoryObject="/Script/CoreUObject.Class'/Script/Engine.CameraActor'",PinType.PinSubCategoryMemberReference=(),PinType.PinValueType=(),PinType.ContainerType=Array,PinType.bIsReference=False,PinType.bIsConst=False,PinType.bIsWeakPointer=False,PinType.bIsUObjectWrapper=False,PinType.bSerializeAsSinglePrecisionFloat=False,LinkedTo=(K2Node_GetArrayItem_0 FC7ABD3C43E5E15146194793AA844809,),PersistentGuid=00000000000000000000000000000000,bHidden=False,bNotConnectable=False,bDefaultValueIsReadOnly=False,bDefaultValueIsIgnored=False,bAdvancedView=False,bOrphanedPin=False,)
   CustomProperties Pin (PinId=9F252A4D45787E7DFE9BED90B96C0773,PinName="self",PinFriendlyName=NSLOCTEXT("K2Node", "Target", "Target"),PinType.PinCategory="object",PinType.PinSubCategory="",PinType.PinSubCategoryObject="/Script/Engine.BlueprintGeneratedClass'/Game/CharacterSelection/CohCharacterBP.CohCharacterBP_C'",PinType.PinSubCategoryMemberReference=(),PinType.PinValueType=(),PinType.ContainerType=None,PinType.bIsReference=False,PinType.bIsConst=False,PinType.bIsWeakPointer=False,PinType.bIsUObjectWrapper=False,PinType.bSerializeAsSinglePrecisionFloat=False,PersistentGuid=00000000000000000000000000000000,bHidden=True,bNotConnectable=False,bDefaultValueIsReadOnly=False,bDefaultValueIsIgnored=False,bAdvancedView=False,bOrphanedPin=False,)
End Object
Begin Object Class=/Script/BlueprintGraph.K2Node_GetArrayItem Name="K2Node_GetArrayItem_0" ExportPath="/Script/BlueprintGraph.K2Node_GetArrayItem'/Game/CharacterSelection/CohCharacterBP.CohCharacterBP:setActiveCamera.K2Node_GetArrayItem_0'"
   bReturnByRefDesired=False
   NodePosX=176
   NodePosY=176
   NodeGuid=CC6F78204EC3B106C20511A46D5AABDF
   CustomProperties Pin (PinId=FC7ABD3C43E5E15146194793AA844809,PinName="Array",PinType.PinCategory="object",PinType.PinSubCategory="",PinType.PinSubCategoryObject="/Script/CoreUObject.Class'/Script/Engine.CameraActor'",PinType.PinSubCategoryMemberReference=(),PinType.PinValueType=(),PinType.ContainerType=Array,PinType.bIsReference=False,PinType.bIsConst=False,PinType.bIsWeakPointer=False,PinType.bIsUObjectWrapper=False,PinType.bSerializeAsSinglePrecisionFloat=False,LinkedTo=(K2Node_VariableGet_2 736D382A43FC00A61E83F3862EBE1AA5,),PersistentGuid=00000000000000000000000000000000,bHidden=False,bNotConnectable=False,bDefaultValueIsReadOnly=False,bDefaultValueIsIgnored=False,bAdvancedView=False,bOrphanedPin=False,)
   CustomProperties Pin (PinId=AD7E25654D36066273413784CF262CEE,PinName="Dimension 1",PinType.PinCategory="int",PinType.PinSubCategory="",PinType.PinSubCategoryObject=None,PinType.PinSubCategoryMemberReference=(),PinType.PinValueType=(),PinType.ContainerType=None,PinType.bIsReference=False,PinType.bIsConst=False,PinType.bIsWeakPointer=False,PinType.bIsUObjectWrapper=False,PinType.bSerializeAsSinglePrecisionFloat=False,DefaultValue="0",AutogeneratedDefaultValue="0",LinkedTo=(K2Node_VariableGet_4 A66E1685486221DDFA819784F06158E4,),PersistentGuid=00000000000000000000000000000000,bHidden=False,bNotConnectable=False,bDefaultValueIsReadOnly=False,bDefaultValueIsIgnored=False,bAdvancedView=False,bOrphanedPin=False,)
   CustomProperties Pin (PinId=475AD50D4EF4C43F007180B2D5485065,PinName="Output",Direction="EGPD_Output",PinType.PinCategory="object",PinType.PinSubCategory="",PinType.PinSubCategoryObject="/Script/CoreUObject.Class'/Script/Engine.CameraActor'",PinType.PinSubCategoryMemberReference=(),PinType.PinValueType=(),PinType.ContainerType=None,PinType.bIsReference=False,PinType.bIsConst=False,PinType.bIsWeakPointer=False,PinType.bIsUObjectWrapper=False,PinType.bSerializeAsSinglePrecisionFloat=False,LinkedTo=(K2Node_CallFunction_4 CEBC31894B2E942E105256B2BB9A639E,),PersistentGuid=00000000000000000000000000000000,bHidden=False,bNotConnectable=False,bDefaultValueIsReadOnly=False,bDefaultValueIsIgnored=False,bAdvancedView=False,bOrphanedPin=False,)
End Object
Begin Object Class=/Script/BlueprintGraph.K2Node_VariableGet Name="K2Node_VariableGet_4" ExportPath="/Script/BlueprintGraph.K2Node_VariableGet'/Game/CharacterSelection/CohCharacterBP.CohCharacterBP:setActiveCamera.K2Node_VariableGet_4'"
   VariableReference=(MemberName="Current character",MemberGuid=437F78C54D4E7B31937A989B5D56CB25,bSelfContext=True)
   NodePosX=-32
   NodePosY=224
   NodeGuid=C35F2D1D402B22FC427ECDAA30F67C95
   CustomProperties Pin (PinId=A66E1685486221DDFA819784F06158E4,PinName="Current character",Direction="EGPD_Output",PinType.PinCategory="int",PinType.PinSubCategory="",PinType.PinSubCategoryObject=None,PinType.PinSubCategoryMemberReference=(),PinType.PinValueType=(),PinType.ContainerType=None,PinType.bIsReference=False,PinType.bIsConst=False,PinType.bIsWeakPointer=False,PinType.bIsUObjectWrapper=False,PinType.bSerializeAsSinglePrecisionFloat=False,DefaultValue="0",AutogeneratedDefaultValue="0",LinkedTo=(K2Node_GetArrayItem_0 AD7E25654D36066273413784CF262CEE,),PersistentGuid=00000000000000000000000000000000,bHidden=False,bNotConnectable=False,bDefaultValueIsReadOnly=False,bDefaultValueIsIgnored=False,bAdvancedView=False,bOrphanedPin=False,)
   CustomProperties Pin (PinId=0C2BF0A74025D620DAD31C88541084E9,PinName="self",PinFriendlyName=NSLOCTEXT("K2Node", "Target", "Target"),PinType.PinCategory="object",PinType.PinSubCategory="",PinType.PinSubCategoryObject="/Script/Engine.BlueprintGeneratedClass'/Game/CharacterSelection/CohCharacterBP.CohCharacterBP_C'",PinType.PinSubCategoryMemberReference=(),PinType.PinValueType=(),PinType.ContainerType=None,PinType.bIsReference=False,PinType.bIsConst=False,PinType.bIsWeakPointer=False,PinType.bIsUObjectWrapper=False,PinType.bSerializeAsSinglePrecisionFloat=False,PersistentGuid=00000000000000000000000000000000,bHidden=True,bNotConnectable=False,bDefaultValueIsReadOnly=False,bDefaultValueIsIgnored=False,bAdvancedView=False,bOrphanedPin=False,)
End Object
Begin Object Class=/Script/BlueprintGraph.K2Node_FunctionResult Name="K2Node_FunctionResult_0" ExportPath="/Script/BlueprintGraph.K2Node_FunctionResult'/Game/CharacterSelection/CohCharacterBP.CohCharacterBP:setActiveCamera.K2Node_FunctionResult_0'"
   FunctionReference=(MemberName="setActiveCamera")
   bIsEditable=True
   NodePosX=992
   NodePosY=16
   NodeGuid=FF32E3D74B660345072CE6A93D7886C1
   CustomProperties Pin (PinId=0EFAE818425676BA679641926502FDC8,PinName="execute",PinType.PinCategory="exec",PinType.PinSubCategory="",PinType.PinSubCategoryObject=None,PinType.PinSubCategoryMemberReference=(),PinType.PinValueType=(),PinType.ContainerType=None,PinType.bIsReference=False,PinType.bIsConst=False,PinType.bIsWeakPointer=False,PinType.bIsUObjectWrapper=False,PinType.bSerializeAsSinglePrecisionFloat=False,LinkedTo=(K2Node_CallFunction_4 A0BD5C2B450494B9916D8CA73AC70E98,),PersistentGuid=00000000000000000000000000000000,bHidden=False,bNotConnectable=False,bDefaultValueIsReadOnly=False,bDefaultValueIsIgnored=False,bAdvancedView=False,bOrphanedPin=False,)
End Object
Ensure that the Lock Outgoing option is checked for the Set View Target With Blend method.
Once the setActiveCamera method is created, call it in the Event Graph to switch to the first character’s camera when initializing the Character cameras.
   Begin Object Class=/Script/BlueprintGraph.K2Node_Event Name="K2Node_Event_0" ExportPath="/Script/BlueprintGraph.K2Node_Event'/Game/CharacterSelection/CohCharacterBP.CohCharacterBP:EventGraph.K2Node_Event_0'"
   EventReference=(MemberParent="/Script/CoreUObject.Class'/Script/Engine.Actor'",MemberName="ReceiveBeginPlay")
   bOverrideFunction=True
   NodePosX=-1328
   NodePosY=-208
   bCommentBubblePinned=True
   NodeGuid=AA4BFBA345770E8F5F124F943FD6A2C8
   CustomProperties Pin (PinId=2C0FDE5F475664EFB70A3C911CCD7C84,PinName="OutputDelegate",Direction="EGPD_Output",PinType.PinCategory="delegate",PinType.PinSubCategory="",PinType.PinSubCategoryObject=None,PinType.PinSubCategoryMemberReference=(MemberParent="/Script/CoreUObject.Class'/Script/Engine.Actor'",MemberName="ReceiveBeginPlay"),PinType.PinValueType=(),PinType.ContainerType=None,PinType.bIsReference=False,PinType.bIsConst=False,PinType.bIsWeakPointer=False,PinType.bIsUObjectWrapper=False,PinType.bSerializeAsSinglePrecisionFloat=False,PersistentGuid=00000000000000000000000000000000,bHidden=False,bNotConnectable=False,bDefaultValueIsReadOnly=False,bDefaultValueIsIgnored=False,bAdvancedView=False,bOrphanedPin=False,)
   CustomProperties Pin (PinId=2455A96F45A7C9E12B4E588DCC9A93CC,PinName="then",Direction="EGPD_Output",PinType.PinCategory="exec",PinType.PinSubCategory="",PinType.PinSubCategoryObject=None,PinType.PinSubCategoryMemberReference=(),PinType.PinValueType=(),PinType.ContainerType=None,PinType.bIsReference=False,PinType.bIsConst=False,PinType.bIsWeakPointer=False,PinType.bIsUObjectWrapper=False,PinType.bSerializeAsSinglePrecisionFloat=False,LinkedTo=(K2Node_CallFunction_5 C77F16CE4A9F02B6331B7BAEDB0D230A,),PersistentGuid=00000000000000000000000000000000,bHidden=False,bNotConnectable=False,bDefaultValueIsReadOnly=False,bDefaultValueIsIgnored=False,bAdvancedView=False,bOrphanedPin=False,)
End Object
Begin Object Class=/Script/BlueprintGraph.K2Node_VariableSet Name="K2Node_VariableSet_5" ExportPath="/Script/BlueprintGraph.K2Node_VariableSet'/Game/CharacterSelection/CohCharacterBP.CohCharacterBP:EventGraph.K2Node_VariableSet_5'"
   VariableReference=(MemberName="Character cameras",MemberGuid=BA6B8C2945790F525BAAEB82CA6723D0,bSelfContext=True)
   NodePosX=48
   NodePosY=-192
   ErrorType=1
   NodeGuid=D52BFFEF4F062C52A36BB19481AE2756
   CustomProperties Pin (PinId=9D059F0A423972C4C2257DAC152BB5DE,PinName="execute",PinType.PinCategory="exec",PinType.PinSubCategory="",PinType.PinSubCategoryObject=None,PinType.PinSubCategoryMemberReference=(),PinType.PinValueType=(),PinType.ContainerType=None,PinType.bIsReference=False,PinType.bIsConst=False,PinType.bIsWeakPointer=False,PinType.bIsUObjectWrapper=False,PinType.bSerializeAsSinglePrecisionFloat=False,LinkedTo=(K2Node_CallFunction_4 D48F987144FD993DD3A780A651A23FD4,),PersistentGuid=00000000000000000000000000000000,bHidden=False,bNotConnectable=False,bDefaultValueIsReadOnly=False,bDefaultValueIsIgnored=False,bAdvancedView=False,bOrphanedPin=False,)
   CustomProperties Pin (PinId=6AF7A93147AA13F25B69EC9CF5908562,PinName="then",Direction="EGPD_Output",PinType.PinCategory="exec",PinType.PinSubCategory="",PinType.PinSubCategoryObject=None,PinType.PinSubCategoryMemberReference=(),PinType.PinValueType=(),PinType.ContainerType=None,PinType.bIsReference=False,PinType.bIsConst=False,PinType.bIsWeakPointer=False,PinType.bIsUObjectWrapper=False,PinType.bSerializeAsSinglePrecisionFloat=False,LinkedTo=(K2Node_CallFunction_21 E71B463E4350C4896DC0CAA479186EE4,),PersistentGuid=00000000000000000000000000000000,bHidden=False,bNotConnectable=False,bDefaultValueIsReadOnly=False,bDefaultValueIsIgnored=False,bAdvancedView=False,bOrphanedPin=False,)
   CustomProperties Pin (PinId=EDEEDCE64AB4EE7A6193A3B43E2DA0A0,PinName="Character cameras",PinType.PinCategory="object",PinType.PinSubCategory="",PinType.PinSubCategoryObject="/Script/CoreUObject.Class'/Script/Engine.CameraActor'",PinType.PinSubCategoryMemberReference=(),PinType.PinValueType=(),PinType.ContainerType=Array,PinType.bIsReference=False,PinType.bIsConst=False,PinType.bIsWeakPointer=False,PinType.bIsUObjectWrapper=False,PinType.bSerializeAsSinglePrecisionFloat=False,LinkedTo=(K2Node_CallFunction_4 2043574F4A05ED4FEEBAE29430AD7B9E,),PersistentGuid=00000000000000000000000000000000,bHidden=False,bNotConnectable=False,bDefaultValueIsReadOnly=False,bDefaultValueIsIgnored=False,bAdvancedView=False,bOrphanedPin=False,)
   CustomProperties Pin (PinId=211FA3A843A3D8527AAB72B953C9982E,PinName="Output_Get",PinToolTip="Retrieves the value of the variable, can use instead of a separate Get node",Direction="EGPD_Output",PinType.PinCategory="object",PinType.PinSubCategory="",PinType.PinSubCategoryObject="/Script/CoreUObject.Class'/Script/Engine.CameraActor'",PinType.PinSubCategoryMemberReference=(),PinType.PinValueType=(),PinType.ContainerType=Array,PinType.bIsReference=False,PinType.bIsConst=False,PinType.bIsWeakPointer=False,PinType.bIsUObjectWrapper=False,PinType.bSerializeAsSinglePrecisionFloat=False,PersistentGuid=00000000000000000000000000000000,bHidden=False,bNotConnectable=False,bDefaultValueIsReadOnly=False,bDefaultValueIsIgnored=False,bAdvancedView=False,bOrphanedPin=False,)
   CustomProperties Pin (PinId=615FEC9B4F47EA744F323CB44CBA6DB6,PinName="self",PinFriendlyName=NSLOCTEXT("K2Node", "Target", "Target"),PinType.PinCategory="object",PinType.PinSubCategory="",PinType.PinSubCategoryObject="/Script/Engine.BlueprintGeneratedClass'/Game/CharacterSelection/CohCharacterBP.CohCharacterBP_C'",PinType.PinSubCategoryMemberReference=(),PinType.PinValueType=(),PinType.ContainerType=None,PinType.bIsReference=False,PinType.bIsConst=False,PinType.bIsWeakPointer=False,PinType.bIsUObjectWrapper=False,PinType.bSerializeAsSinglePrecisionFloat=False,PersistentGuid=00000000000000000000000000000000,bHidden=True,bNotConnectable=False,bDefaultValueIsReadOnly=False,bDefaultValueIsIgnored=False,bAdvancedView=False,bOrphanedPin=False,)
End Object
Begin Object Class=/Script/BlueprintGraph.K2Node_CallFunction Name="K2Node_CallFunction_21" ExportPath="/Script/BlueprintGraph.K2Node_CallFunction'/Game/CharacterSelection/CohCharacterBP.CohCharacterBP:EventGraph.K2Node_CallFunction_21'"
   FunctionReference=(MemberName="setActiveCamera",MemberGuid=2AD9851E47B5E56FEE67D1B0B837C204,bSelfContext=True)
   NodePosX=336
   NodePosY=-224
   NodeGuid=3A459AA04DB9E8C578930B850C2AA45C
   CustomProperties Pin (PinId=E71B463E4350C4896DC0CAA479186EE4,PinName="execute",PinType.PinCategory="exec",PinType.PinSubCategory="",PinType.PinSubCategoryObject=None,PinType.PinSubCategoryMemberReference=(),PinType.PinValueType=(),PinType.ContainerType=None,PinType.bIsReference=False,PinType.bIsConst=False,PinType.bIsWeakPointer=False,PinType.bIsUObjectWrapper=False,PinType.bSerializeAsSinglePrecisionFloat=False,LinkedTo=(K2Node_VariableSet_5 6AF7A93147AA13F25B69EC9CF5908562,),PersistentGuid=00000000000000000000000000000000,bHidden=False,bNotConnectable=False,bDefaultValueIsReadOnly=False,bDefaultValueIsIgnored=False,bAdvancedView=False,bOrphanedPin=False,)
   CustomProperties Pin (PinId=EE258B5943BCE8C716109BBF4228F705,PinName="then",Direction="EGPD_Output",PinType.PinCategory="exec",PinType.PinSubCategory="",PinType.PinSubCategoryObject=None,PinType.PinSubCategoryMemberReference=(),PinType.PinValueType=(),PinType.ContainerType=None,PinType.bIsReference=False,PinType.bIsConst=False,PinType.bIsWeakPointer=False,PinType.bIsUObjectWrapper=False,PinType.bSerializeAsSinglePrecisionFloat=False,LinkedTo=(K2Node_AssignDelegate_1 D453DB184A8026BC0D3EE99AC0265352,),PersistentGuid=00000000000000000000000000000000,bHidden=False,bNotConnectable=False,bDefaultValueIsReadOnly=False,bDefaultValueIsIgnored=False,bAdvancedView=False,bOrphanedPin=False,)
   CustomProperties Pin (PinId=6C71A2BD43ABCFD067D49AAB3F388F4A,PinName="self",PinFriendlyName=NSLOCTEXT("K2Node", "Target", "Target"),PinType.PinCategory="object",PinType.PinSubCategory="self",PinType.PinSubCategoryObject=None,PinType.PinSubCategoryMemberReference=(),PinType.PinValueType=(),PinType.ContainerType=None,PinType.bIsReference=False,PinType.bIsConst=False,PinType.bIsWeakPointer=False,PinType.bIsUObjectWrapper=False,PinType.bSerializeAsSinglePrecisionFloat=False,PersistentGuid=00000000000000000000000000000000,bHidden=False,bNotConnectable=False,bDefaultValueIsReadOnly=False,bDefaultValueIsIgnored=False,bAdvancedView=False,bOrphanedPin=False,)
End Object
Begin Object Class=/Script/BlueprintGraph.K2Node_CallFunction Name="K2Node_CallFunction_1" ExportPath="/Script/BlueprintGraph.K2Node_CallFunction'/Game/CharacterSelection/CohCharacterBP.CohCharacterBP:EventGraph.K2Node_CallFunction_1'"
   FunctionReference=(MemberName="Setup Input",MemberGuid=E28AB6F64DDFAA61819A6796767C7278,bSelfContext=True)
   NodePosX=-640
   NodePosY=-224
   NodeGuid=14BD67F74F6C557068E61F935616F254
   CustomProperties Pin (PinId=F18B0BF3447CC93D87DA1B9449B3027C,PinName="execute",PinToolTip="
Exec",PinType.PinCategory="exec",PinType.PinSubCategory="",PinType.PinSubCategoryObject=None,PinType.PinSubCategoryMemberReference=(),PinType.PinValueType=(),PinType.ContainerType=None,PinType.bIsReference=False,PinType.bIsConst=False,PinType.bIsWeakPointer=False,PinType.bIsUObjectWrapper=False,PinType.bSerializeAsSinglePrecisionFloat=False,LinkedTo=(K2Node_CallFunction_5 AE2E63844C3AD746CC9EE0B15A5F86B3,),PersistentGuid=00000000000000000000000000000000,bHidden=False,bNotConnectable=False,bDefaultValueIsReadOnly=False,bDefaultValueIsIgnored=False,bAdvancedView=False,bOrphanedPin=False,)
   CustomProperties Pin (PinId=8058C50046BCB64F9BE5388E2751A9D7,PinName="then",PinToolTip="
Exec",Direction="EGPD_Output",PinType.PinCategory="exec",PinType.PinSubCategory="",PinType.PinSubCategoryObject=None,PinType.PinSubCategoryMemberReference=(),PinType.PinValueType=(),PinType.ContainerType=None,PinType.bIsReference=False,PinType.bIsConst=False,PinType.bIsWeakPointer=False,PinType.bIsUObjectWrapper=False,PinType.bSerializeAsSinglePrecisionFloat=False,LinkedTo=(K2Node_CallFunction_4 42EC35D643324AA10F0A20964E95D6F9,),PersistentGuid=00000000000000000000000000000000,bHidden=False,bNotConnectable=False,bDefaultValueIsReadOnly=False,bDefaultValueIsIgnored=False,bAdvancedView=False,bOrphanedPin=False,)
   CustomProperties Pin (PinId=5D1E035F4CBDBCC8D9EB939E04758A3C,PinName="self",PinFriendlyName=NSLOCTEXT("K2Node", "Target", "Target"),PinToolTip="Target
Self Object Reference",PinType.PinCategory="object",PinType.PinSubCategory="self",PinType.PinSubCategoryObject=None,PinType.PinSubCategoryMemberReference=(),PinType.PinValueType=(),PinType.ContainerType=None,PinType.bIsReference=False,PinType.bIsConst=False,PinType.bIsWeakPointer=False,PinType.bIsUObjectWrapper=False,PinType.bSerializeAsSinglePrecisionFloat=False,PersistentGuid=00000000000000000000000000000000,bHidden=False,bNotConnectable=False,bDefaultValueIsReadOnly=False,bDefaultValueIsIgnored=False,bAdvancedView=False,bOrphanedPin=False,)
End Object
Begin Object Class=/Script/BlueprintGraph.K2Node_CallFunction Name="K2Node_CallFunction_4" ExportPath="/Script/BlueprintGraph.K2Node_CallFunction'/Game/CharacterSelection/CohCharacterBP.CohCharacterBP:EventGraph.K2Node_CallFunction_4'"
   FunctionReference=(MemberParent="/Script/CoreUObject.Class'/Script/Engine.GameplayStatics'",MemberName="GetAllActorsOfClass")
   NodePosX=-320
   NodePosY=-208
   NodeGuid=C569A1774DB7FD54D2973BA68BA2D569
   CustomProperties Pin (PinId=42EC35D643324AA10F0A20964E95D6F9,PinName="execute",PinToolTip="
Exec",PinType.PinCategory="exec",PinType.PinSubCategory="",PinType.PinSubCategoryObject=None,PinType.PinSubCategoryMemberReference=(),PinType.PinValueType=(),PinType.ContainerType=None,PinType.bIsReference=False,PinType.bIsConst=False,PinType.bIsWeakPointer=False,PinType.bIsUObjectWrapper=False,PinType.bSerializeAsSinglePrecisionFloat=False,LinkedTo=(K2Node_CallFunction_1 8058C50046BCB64F9BE5388E2751A9D7,),PersistentGuid=00000000000000000000000000000000,bHidden=False,bNotConnectable=False,bDefaultValueIsReadOnly=False,bDefaultValueIsIgnored=False,bAdvancedView=False,bOrphanedPin=False,)
   CustomProperties Pin (PinId=D48F987144FD993DD3A780A651A23FD4,PinName="then",PinToolTip="
Exec",Direction="EGPD_Output",PinType.PinCategory="exec",PinType.PinSubCategory="",PinType.PinSubCategoryObject=None,PinType.PinSubCategoryMemberReference=(),PinType.PinValueType=(),PinType.ContainerType=None,PinType.bIsReference=False,PinType.bIsConst=False,PinType.bIsWeakPointer=False,PinType.bIsUObjectWrapper=False,PinType.bSerializeAsSinglePrecisionFloat=False,LinkedTo=(K2Node_VariableSet_5 9D059F0A423972C4C2257DAC152BB5DE,),PersistentGuid=00000000000000000000000000000000,bHidden=False,bNotConnectable=False,bDefaultValueIsReadOnly=False,bDefaultValueIsIgnored=False,bAdvancedView=False,bOrphanedPin=False,)
   CustomProperties Pin (PinId=E7B7655F43E57E172A3FC48AB481FB69,PinName="self",PinFriendlyName=NSLOCTEXT("K2Node", "Target", "Target"),PinToolTip="Target
Gameplay Statics Object Reference",PinType.PinCategory="object",PinType.PinSubCategory="",PinType.PinSubCategoryObject="/Script/CoreUObject.Class'/Script/Engine.GameplayStatics'",PinType.PinSubCategoryMemberReference=(),PinType.PinValueType=(),PinType.ContainerType=None,PinType.bIsReference=False,PinType.bIsConst=False,PinType.bIsWeakPointer=False,PinType.bIsUObjectWrapper=False,PinType.bSerializeAsSinglePrecisionFloat=False,DefaultObject="/Script/Engine.Default__GameplayStatics",PersistentGuid=00000000000000000000000000000000,bHidden=True,bNotConnectable=False,bDefaultValueIsReadOnly=False,bDefaultValueIsIgnored=False,bAdvancedView=False,bOrphanedPin=False,)
   CustomProperties Pin (PinId=743B6D51427794E8066D9AAE4D1A1F27,PinName="WorldContextObject",PinToolTip="World Context Object
Object Reference",PinType.PinCategory="object",PinType.PinSubCategory="",PinType.PinSubCategoryObject="/Script/CoreUObject.Class'/Script/CoreUObject.Object'",PinType.PinSubCategoryMemberReference=(),PinType.PinValueType=(),PinType.ContainerType=None,PinType.bIsReference=False,PinType.bIsConst=True,PinType.bIsWeakPointer=False,PinType.bIsUObjectWrapper=False,PinType.bSerializeAsSinglePrecisionFloat=False,PersistentGuid=00000000000000000000000000000000,bHidden=True,bNotConnectable=False,bDefaultValueIsReadOnly=False,bDefaultValueIsIgnored=False,bAdvancedView=False,bOrphanedPin=False,)
   CustomProperties Pin (PinId=F22259D44D983EE5141F7795B746C5ED,PinName="ActorClass",PinToolTip="Actor Class
Actor Class Reference

Class of Actor to find. Must be specified or result array will be empty.",PinType.PinCategory="class",PinType.PinSubCategory="",PinType.PinSubCategoryObject="/Script/CoreUObject.Class'/Script/Engine.Actor'",PinType.PinSubCategoryMemberReference=(),PinType.PinValueType=(),PinType.ContainerType=None,PinType.bIsReference=False,PinType.bIsConst=False,PinType.bIsWeakPointer=False,PinType.bIsUObjectWrapper=True,PinType.bSerializeAsSinglePrecisionFloat=False,DefaultObject="/Script/Engine.CameraActor",PersistentGuid=00000000000000000000000000000000,bHidden=False,bNotConnectable=False,bDefaultValueIsReadOnly=False,bDefaultValueIsIgnored=False,bAdvancedView=False,bOrphanedPin=False,)
   CustomProperties Pin (PinId=2043574F4A05ED4FEEBAE29430AD7B9E,PinName="OutActors",PinToolTip="Out Actors
Array of Camera Actor Object References

Output array of Actors of the specified class.",Direction="EGPD_Output",PinType.PinCategory="object",PinType.PinSubCategory="",PinType.PinSubCategoryObject="/Script/CoreUObject.Class'/Script/Engine.CameraActor'",PinType.PinSubCategoryMemberReference=(),PinType.PinValueType=(),PinType.ContainerType=Array,PinType.bIsReference=False,PinType.bIsConst=False,PinType.bIsWeakPointer=False,PinType.bIsUObjectWrapper=False,PinType.bSerializeAsSinglePrecisionFloat=False,LinkedTo=(K2Node_VariableSet_5 EDEEDCE64AB4EE7A6193A3B43E2DA0A0,),PersistentGuid=00000000000000000000000000000000,bHidden=False,bNotConnectable=False,bDefaultValueIsReadOnly=False,bDefaultValueIsIgnored=False,bAdvancedView=False,bOrphanedPin=False,)
End Object
Begin Object Class=/Script/BlueprintGraph.K2Node_CallFunction Name="K2Node_CallFunction_5" ExportPath="/Script/BlueprintGraph.K2Node_CallFunction'/Game/CharacterSelection/CohCharacterBP.CohCharacterBP:EventGraph.K2Node_CallFunction_5'"
   FunctionReference=(MemberName="SetupView",bSelfContext=True)
   NodePosX=-1056
   NodePosY=-224
   NodeGuid=0D159CCF4818EE5C43C743A4B41D0110
   CustomProperties Pin (PinId=C77F16CE4A9F02B6331B7BAEDB0D230A,PinName="execute",PinToolTip="
Exec",PinType.PinCategory="exec",PinType.PinSubCategory="",PinType.PinSubCategoryObject=None,PinType.PinSubCategoryMemberReference=(),PinType.PinValueType=(),PinType.ContainerType=None,PinType.bIsReference=False,PinType.bIsConst=False,PinType.bIsWeakPointer=False,PinType.bIsUObjectWrapper=False,PinType.bSerializeAsSinglePrecisionFloat=False,LinkedTo=(K2Node_Event_0 2455A96F45A7C9E12B4E588DCC9A93CC,),PersistentGuid=00000000000000000000000000000000,bHidden=False,bNotConnectable=False,bDefaultValueIsReadOnly=False,bDefaultValueIsIgnored=False,bAdvancedView=False,bOrphanedPin=False,)
   CustomProperties Pin (PinId=AE2E63844C3AD746CC9EE0B15A5F86B3,PinName="then",PinToolTip="
Exec",Direction="EGPD_Output",PinType.PinCategory="exec",PinType.PinSubCategory="",PinType.PinSubCategoryObject=None,PinType.PinSubCategoryMemberReference=(),PinType.PinValueType=(),PinType.ContainerType=None,PinType.bIsReference=False,PinType.bIsConst=False,PinType.bIsWeakPointer=False,PinType.bIsUObjectWrapper=False,PinType.bSerializeAsSinglePrecisionFloat=False,LinkedTo=(K2Node_CallFunction_1 F18B0BF3447CC93D87DA1B9449B3027C,),PersistentGuid=00000000000000000000000000000000,bHidden=False,bNotConnectable=False,bDefaultValueIsReadOnly=False,bDefaultValueIsIgnored=False,bAdvancedView=False,bOrphanedPin=False,)
   CustomProperties Pin (PinId=3D0D0C004BB89C4E0EA77ABDD983927C,PinName="self",PinFriendlyName=NSLOCTEXT("K2Node", "Target", "Target"),PinToolTip="Target
Gameface Game HUD Object Reference",PinType.PinCategory="object",PinType.PinSubCategory="",PinType.PinSubCategoryObject="/Script/CoreUObject.Class'/Script/CohtmlPlugin.CohtmlGameHUD'",PinType.PinSubCategoryMemberReference=(),PinType.PinValueType=(),PinType.ContainerType=None,PinType.bIsReference=False,PinType.bIsConst=False,PinType.bIsWeakPointer=False,PinType.bIsUObjectWrapper=False,PinType.bSerializeAsSinglePrecisionFloat=False,PersistentGuid=00000000000000000000000000000000,bHidden=False,bNotConnectable=False,bDefaultValueIsReadOnly=False,bDefaultValueIsIgnored=False,bAdvancedView=False,bOrphanedPin=False,)
   CustomProperties Pin (PinId=C1E3F7E74AD9F592E81DA2B60C5B6095,PinName="PageUrl",PinToolTip="Page Url
String",PinType.PinCategory="string",PinType.PinSubCategory="",PinType.PinSubCategoryObject=None,PinType.PinSubCategoryMemberReference=(),PinType.PinValueType=(),PinType.ContainerType=None,PinType.bIsReference=False,PinType.bIsConst=False,PinType.bIsWeakPointer=False,PinType.bIsUObjectWrapper=False,PinType.bSerializeAsSinglePrecisionFloat=False,DefaultValue="coui://uiresources/index.html",PersistentGuid=00000000000000000000000000000000,bHidden=False,bNotConnectable=False,bDefaultValueIsReadOnly=False,bDefaultValueIsIgnored=False,bAdvancedView=False,bOrphanedPin=False,)
   CustomProperties Pin (PinId=CACD0FA544F4B66FD7CC93B317C35CB0,PinName="bEnableComplexCSSSupport",PinToolTip="Enable Complex CSSSupport
Boolean",PinType.PinCategory="bool",PinType.PinSubCategory="",PinType.PinSubCategoryObject=None,PinType.PinSubCategoryMemberReference=(),PinType.PinValueType=(),PinType.ContainerType=None,PinType.bIsReference=False,PinType.bIsConst=False,PinType.bIsWeakPointer=False,PinType.bIsUObjectWrapper=False,PinType.bSerializeAsSinglePrecisionFloat=False,DefaultValue="true",AutogeneratedDefaultValue="true",PersistentGuid=00000000000000000000000000000000,bHidden=False,bNotConnectable=False,bDefaultValueIsReadOnly=False,bDefaultValueIsIgnored=False,bAdvancedView=False,bOrphanedPin=False,)
   CustomProperties Pin (PinId=286B5E404BE0156C48DDECB5711A3494,PinName="bDelayedUpdate",PinToolTip="Delayed Update
Boolean",PinType.PinCategory="bool",PinType.PinSubCategory="",PinType.PinSubCategoryObject=None,PinType.PinSubCategoryMemberReference=(),PinType.PinValueType=(),PinType.ContainerType=None,PinType.bIsReference=False,PinType.bIsConst=False,PinType.bIsWeakPointer=False,PinType.bIsUObjectWrapper=False,PinType.bSerializeAsSinglePrecisionFloat=False,DefaultValue="false",AutogeneratedDefaultValue="false",PersistentGuid=00000000000000000000000000000000,bHidden=False,bNotConnectable=False,bDefaultValueIsReadOnly=False,bDefaultValueIsIgnored=False,bAdvancedView=False,bOrphanedPin=False,)
   CustomProperties Pin (PinId=673AA52E4183A7EA012D0B815978EFDA,PinName="bReceiveInput",PinToolTip="Receive Input
Boolean",PinType.PinCategory="bool",PinType.PinSubCategory="",PinType.PinSubCategoryObject=None,PinType.PinSubCategoryMemberReference=(),PinType.PinValueType=(),PinType.ContainerType=None,PinType.bIsReference=False,PinType.bIsConst=False,PinType.bIsWeakPointer=False,PinType.bIsUObjectWrapper=False,PinType.bSerializeAsSinglePrecisionFloat=False,DefaultValue="true",AutogeneratedDefaultValue="true",PersistentGuid=00000000000000000000000000000000,bHidden=False,bNotConnectable=False,bDefaultValueIsReadOnly=False,bDefaultValueIsIgnored=False,bAdvancedView=False,bOrphanedPin=False,)
   CustomProperties Pin (PinId=4EC3D3BB431EE840C5FDB6BB0301BF97,PinName="bExecuteCommandProcessingWithLayout",PinToolTip="Execute Command Processing with Layout
Boolean",PinType.PinCategory="bool",PinType.PinSubCategory="",PinType.PinSubCategoryObject=None,PinType.PinSubCategoryMemberReference=(),PinType.PinValueType=(),PinType.ContainerType=None,PinType.bIsReference=False,PinType.bIsConst=False,PinType.bIsWeakPointer=False,PinType.bIsUObjectWrapper=False,PinType.bSerializeAsSinglePrecisionFloat=False,DefaultValue="false",AutogeneratedDefaultValue="false",PersistentGuid=00000000000000000000000000000000,bHidden=False,bNotConnectable=False,bDefaultValueIsReadOnly=False,bDefaultValueIsIgnored=False,bAdvancedView=False,bOrphanedPin=False,)
   CustomProperties Pin (PinId=82CC317D468E1493DE68FE809E59FA4C,PinName="bUseSurfacePartitioning",PinToolTip="Use Surface Partitioning
Boolean",PinType.PinCategory="bool",PinType.PinSubCategory="",PinType.PinSubCategoryObject=None,PinType.PinSubCategoryMemberReference=(),PinType.PinValueType=(),PinType.ContainerType=None,PinType.bIsReference=False,PinType.bIsConst=False,PinType.bIsWeakPointer=False,PinType.bIsUObjectWrapper=False,PinType.bSerializeAsSinglePrecisionFloat=False,DefaultValue="false",AutogeneratedDefaultValue="false",PersistentGuid=00000000000000000000000000000000,bHidden=False,bNotConnectable=False,bDefaultValueIsReadOnly=False,bDefaultValueIsIgnored=False,bAdvancedView=False,bOrphanedPin=False,)
End Object
Implementing character switching
To switch between characters, we’ll create a changeActiveCharacter method, which will accept a boolean input - direction, indicating whether the player is cycling forward (true) or backward (false) through the character list.
The method will update the Current character index accordingly. When moving forward, we’ll check if the index exceeds the length of the Character cameras array, and if so, reset it to 0 (first character). Similarly, when moving backward, if the index is less than 0, we reset it to the index of last character in the array.
Finally, call the setActiveCamera method to change the camera to the next or previous character.
Begin Object Class=/Script/BlueprintGraph.K2Node_FunctionEntry Name="K2Node_FunctionEntry_0" ExportPath="/Script/BlueprintGraph.K2Node_FunctionEntry'/Game/CharacterSelection/CohCharacterBP.CohCharacterBP:changeActiveCharacter.K2Node_FunctionEntry_0'"
   ExtraFlags=201457664
   FunctionReference=(MemberName="changeActiveCharacter")
   bIsEditable=True
   NodePosX=-976
   NodePosY=32
   NodeGuid=0F607B2B41FCA48CD97DA2808ED8B135
   CustomProperties Pin (PinId=866F4EB34E0094C875DB858F50619467,PinName="then",Direction="EGPD_Output",PinType.PinCategory="exec",PinType.PinSubCategory="",PinType.PinSubCategoryObject=None,PinType.PinSubCategoryMemberReference=(),PinType.PinValueType=(),PinType.ContainerType=None,PinType.bIsReference=False,PinType.bIsConst=False,PinType.bIsWeakPointer=False,PinType.bIsUObjectWrapper=False,PinType.bSerializeAsSinglePrecisionFloat=False,LinkedTo=(K2Node_IfThenElse_0 D723DB8E477797FACA660AB03F29D6EA,),PersistentGuid=00000000000000000000000000000000,bHidden=False,bNotConnectable=False,bDefaultValueIsReadOnly=False,bDefaultValueIsIgnored=False,bAdvancedView=False,bOrphanedPin=False,)
   CustomProperties Pin (PinId=C43C6D7B46A7F88229EA14AA54C23756,PinName="direction",Direction="EGPD_Output",PinType.PinCategory="bool",PinType.PinSubCategory="",PinType.PinSubCategoryObject=None,PinType.PinSubCategoryMemberReference=(),PinType.PinValueType=(TerminalCategory="int"),PinType.ContainerType=None,PinType.bIsReference=False,PinType.bIsConst=False,PinType.bIsWeakPointer=False,PinType.bIsUObjectWrapper=False,PinType.bSerializeAsSinglePrecisionFloat=False,DefaultValue="true",AutogeneratedDefaultValue="true",LinkedTo=(K2Node_IfThenElse_0 DEC7C20F473E9C9927AC06A3A1890C7D,),PersistentGuid=00000000000000000000000000000000,bHidden=False,bNotConnectable=False,bDefaultValueIsReadOnly=False,bDefaultValueIsIgnored=False,bAdvancedView=False,bOrphanedPin=False,)
   CustomProperties UserDefinedPin (PinName="direction",PinType=(PinCategory="bool",PinValueType=(TerminalCategory="int")),DesiredPinDirection=EGPD_Output,PinDefaultValue="true")
End Object
Begin Object Class=/Script/BlueprintGraph.K2Node_VariableSet Name="K2Node_VariableSet_3" ExportPath="/Script/BlueprintGraph.K2Node_VariableSet'/Game/CharacterSelection/CohCharacterBP.CohCharacterBP:changeActiveCharacter.K2Node_VariableSet_3'"
   VariableReference=(MemberName="Current character",MemberGuid=437F78C54D4E7B31937A989B5D56CB25,bSelfContext=True)
   NodePosX=416
   NodePosY=48
   ErrorType=1
   NodeGuid=84ED192C46645302AD4F7C91027693CA
   CustomProperties Pin (PinId=8DA5A71A400F4A521FFF93B06E7AAED5,PinName="execute",PinType.PinCategory="exec",PinType.PinSubCategory="",PinType.PinSubCategoryObject=None,PinType.PinSubCategoryMemberReference=(),PinType.PinValueType=(),PinType.ContainerType=None,PinType.bIsReference=False,PinType.bIsConst=False,PinType.bIsWeakPointer=False,PinType.bIsUObjectWrapper=False,PinType.bSerializeAsSinglePrecisionFloat=False,LinkedTo=(K2Node_IfThenElse_2 7D1B0FC24F15A60D9A95EF9325E9358E,),PersistentGuid=00000000000000000000000000000000,bHidden=False,bNotConnectable=False,bDefaultValueIsReadOnly=False,bDefaultValueIsIgnored=False,bAdvancedView=False,bOrphanedPin=False,)
   CustomProperties Pin (PinId=70715F8745549821FC419787D95693D9,PinName="then",Direction="EGPD_Output",PinType.PinCategory="exec",PinType.PinSubCategory="",PinType.PinSubCategoryObject=None,PinType.PinSubCategoryMemberReference=(),PinType.PinValueType=(),PinType.ContainerType=None,PinType.bIsReference=False,PinType.bIsConst=False,PinType.bIsWeakPointer=False,PinType.bIsUObjectWrapper=False,PinType.bSerializeAsSinglePrecisionFloat=False,LinkedTo=(K2Node_CallFunction_22 77FF95C945E0EB19D6B4AC9D66B5405F,),PersistentGuid=00000000000000000000000000000000,bHidden=False,bNotConnectable=False,bDefaultValueIsReadOnly=False,bDefaultValueIsIgnored=False,bAdvancedView=False,bOrphanedPin=False,)
   CustomProperties Pin (PinId=C2996CF742DE9F384CEF43BCC4FD163A,PinName="Current character",PinType.PinCategory="int",PinType.PinSubCategory="",PinType.PinSubCategoryObject=None,PinType.PinSubCategoryMemberReference=(),PinType.PinValueType=(),PinType.ContainerType=None,PinType.bIsReference=False,PinType.bIsConst=False,PinType.bIsWeakPointer=False,PinType.bIsUObjectWrapper=False,PinType.bSerializeAsSinglePrecisionFloat=False,DefaultValue="0",AutogeneratedDefaultValue="0",LinkedTo=(K2Node_PromotableOperator_0 1F2B46A24DBA7B45A4EC0C866D9885C5,),PersistentGuid=00000000000000000000000000000000,bHidden=False,bNotConnectable=False,bDefaultValueIsReadOnly=False,bDefaultValueIsIgnored=False,bAdvancedView=False,bOrphanedPin=False,)
   CustomProperties Pin (PinId=CAA3B27E484216ADE10207B672F808EA,PinName="Output_Get",PinToolTip="Retrieves the value of the variable, can use instead of a separate Get node",Direction="EGPD_Output",PinType.PinCategory="int",PinType.PinSubCategory="",PinType.PinSubCategoryObject=None,PinType.PinSubCategoryMemberReference=(),PinType.PinValueType=(),PinType.ContainerType=None,PinType.bIsReference=False,PinType.bIsConst=False,PinType.bIsWeakPointer=False,PinType.bIsUObjectWrapper=False,PinType.bSerializeAsSinglePrecisionFloat=False,DefaultValue="0",AutogeneratedDefaultValue="0",PersistentGuid=00000000000000000000000000000000,bHidden=False,bNotConnectable=False,bDefaultValueIsReadOnly=False,bDefaultValueIsIgnored=False,bAdvancedView=False,bOrphanedPin=False,)
   CustomProperties Pin (PinId=7A4EC2F249FE8D075F9ED8839124CC00,PinName="self",PinFriendlyName=NSLOCTEXT("K2Node", "Target", "Target"),PinType.PinCategory="object",PinType.PinSubCategory="",PinType.PinSubCategoryObject="/Script/Engine.BlueprintGeneratedClass'/Game/CharacterSelection/CohCharacterBP.CohCharacterBP_C'",PinType.PinSubCategoryMemberReference=(),PinType.PinValueType=(),PinType.ContainerType=None,PinType.bIsReference=False,PinType.bIsConst=False,PinType.bIsWeakPointer=False,PinType.bIsUObjectWrapper=False,PinType.bSerializeAsSinglePrecisionFloat=False,PersistentGuid=00000000000000000000000000000000,bHidden=True,bNotConnectable=False,bDefaultValueIsReadOnly=False,bDefaultValueIsIgnored=False,bAdvancedView=False,bOrphanedPin=False,)
End Object
Begin Object Class=/Script/BlueprintGraph.K2Node_PromotableOperator Name="K2Node_PromotableOperator_0" ExportPath="/Script/BlueprintGraph.K2Node_PromotableOperator'/Game/CharacterSelection/CohCharacterBP.CohCharacterBP:changeActiveCharacter.K2Node_PromotableOperator_0'"
   bIsPureFunc=True
   FunctionReference=(MemberParent="/Script/CoreUObject.Class'/Script/Engine.KismetMathLibrary'",MemberName="Add_IntInt")
   NodePosX=240
   NodePosY=-80
   NodeGuid=8005778F4F4BFC953FFDFAA52A815054
   CustomProperties Pin (PinId=9168C568419EA1DE55ACF3AF249882D4,PinName="A",PinToolTip="A
Integer",PinType.PinCategory="int",PinType.PinSubCategory="",PinType.PinSubCategoryObject=None,PinType.PinSubCategoryMemberReference=(),PinType.PinValueType=(),PinType.ContainerType=None,PinType.bIsReference=False,PinType.bIsConst=False,PinType.bIsWeakPointer=False,PinType.bIsUObjectWrapper=False,PinType.bSerializeAsSinglePrecisionFloat=False,LinkedTo=(K2Node_VariableGet_10 5C3F7071401834FBA049BEB273220AFC,),PersistentGuid=00000000000000000000000000000000,bHidden=False,bNotConnectable=False,bDefaultValueIsReadOnly=False,bDefaultValueIsIgnored=False,bAdvancedView=False,bOrphanedPin=False,)
   CustomProperties Pin (PinId=D30A58D04CB9405AF6AC5C921CA0B11A,PinName="B",PinToolTip="B
Integer",PinType.PinCategory="int",PinType.PinSubCategory="",PinType.PinSubCategoryObject=None,PinType.PinSubCategoryMemberReference=(),PinType.PinValueType=(),PinType.ContainerType=None,PinType.bIsReference=False,PinType.bIsConst=False,PinType.bIsWeakPointer=False,PinType.bIsUObjectWrapper=False,PinType.bSerializeAsSinglePrecisionFloat=False,DefaultValue="1",PersistentGuid=00000000000000000000000000000000,bHidden=False,bNotConnectable=False,bDefaultValueIsReadOnly=False,bDefaultValueIsIgnored=False,bAdvancedView=False,bOrphanedPin=False,)
   CustomProperties Pin (PinId=1F2B46A24DBA7B45A4EC0C866D9885C5,PinName="ReturnValue",PinToolTip="Return Value
Integer

Addition (A + B)",Direction="EGPD_Output",PinType.PinCategory="int",PinType.PinSubCategory="",PinType.PinSubCategoryObject=None,PinType.PinSubCategoryMemberReference=(),PinType.PinValueType=(),PinType.ContainerType=None,PinType.bIsReference=False,PinType.bIsConst=False,PinType.bIsWeakPointer=False,PinType.bIsUObjectWrapper=False,PinType.bSerializeAsSinglePrecisionFloat=False,LinkedTo=(K2Node_VariableSet_3 C2996CF742DE9F384CEF43BCC4FD163A,),PersistentGuid=00000000000000000000000000000000,bHidden=False,bNotConnectable=False,bDefaultValueIsReadOnly=False,bDefaultValueIsIgnored=False,bAdvancedView=False,bOrphanedPin=False,)
End Object
Begin Object Class=/Script/BlueprintGraph.K2Node_IfThenElse Name="K2Node_IfThenElse_2" ExportPath="/Script/BlueprintGraph.K2Node_IfThenElse'/Game/CharacterSelection/CohCharacterBP.CohCharacterBP:changeActiveCharacter.K2Node_IfThenElse_2'"
   NodePosX=112
   NodePosY=32
   NodeGuid=5804A4214FE60509B8C11A87D6D438A3
   CustomProperties Pin (PinId=2BD39A1349AE1E72B9AE0BA2CF09D645,PinName="execute",PinType.PinCategory="exec",PinType.PinSubCategory="",PinType.PinSubCategoryObject=None,PinType.PinSubCategoryMemberReference=(),PinType.PinValueType=(),PinType.ContainerType=None,PinType.bIsReference=False,PinType.bIsConst=False,PinType.bIsWeakPointer=False,PinType.bIsUObjectWrapper=False,PinType.bSerializeAsSinglePrecisionFloat=False,LinkedTo=(K2Node_IfThenElse_0 CFA333304DC309D2B9966C921546677C,),PersistentGuid=00000000000000000000000000000000,bHidden=False,bNotConnectable=False,bDefaultValueIsReadOnly=False,bDefaultValueIsIgnored=False,bAdvancedView=False,bOrphanedPin=False,)
   CustomProperties Pin (PinId=8F6BCF4840252679BFB86DA67250DAC4,PinName="Condition",PinType.PinCategory="bool",PinType.PinSubCategory="",PinType.PinSubCategoryObject=None,PinType.PinSubCategoryMemberReference=(),PinType.PinValueType=(),PinType.ContainerType=None,PinType.bIsReference=False,PinType.bIsConst=False,PinType.bIsWeakPointer=False,PinType.bIsUObjectWrapper=False,PinType.bSerializeAsSinglePrecisionFloat=False,DefaultValue="true",AutogeneratedDefaultValue="true",LinkedTo=(K2Node_PromotableOperator_4 5F59A061496B969848ED54A4E99958AA,),PersistentGuid=00000000000000000000000000000000,bHidden=False,bNotConnectable=False,bDefaultValueIsReadOnly=False,bDefaultValueIsIgnored=False,bAdvancedView=False,bOrphanedPin=False,)
   CustomProperties Pin (PinId=7D1B0FC24F15A60D9A95EF9325E9358E,PinName="then",PinFriendlyName=NSLOCTEXT("K2Node", "true", "true"),Direction="EGPD_Output",PinType.PinCategory="exec",PinType.PinSubCategory="",PinType.PinSubCategoryObject=None,PinType.PinSubCategoryMemberReference=(),PinType.PinValueType=(),PinType.ContainerType=None,PinType.bIsReference=False,PinType.bIsConst=False,PinType.bIsWeakPointer=False,PinType.bIsUObjectWrapper=False,PinType.bSerializeAsSinglePrecisionFloat=False,LinkedTo=(K2Node_VariableSet_3 8DA5A71A400F4A521FFF93B06E7AAED5,),PersistentGuid=00000000000000000000000000000000,bHidden=False,bNotConnectable=False,bDefaultValueIsReadOnly=False,bDefaultValueIsIgnored=False,bAdvancedView=False,bOrphanedPin=False,)
   CustomProperties Pin (PinId=49119A5E4B22241E0881EB89D5FB6E22,PinName="else",PinFriendlyName=NSLOCTEXT("K2Node", "false", "false"),Direction="EGPD_Output",PinType.PinCategory="exec",PinType.PinSubCategory="",PinType.PinSubCategoryObject=None,PinType.PinSubCategoryMemberReference=(),PinType.PinValueType=(),PinType.ContainerType=None,PinType.bIsReference=False,PinType.bIsConst=False,PinType.bIsWeakPointer=False,PinType.bIsUObjectWrapper=False,PinType.bSerializeAsSinglePrecisionFloat=False,LinkedTo=(K2Node_VariableSet_4 132D606B4E8272EA12F77AA6B400D941,),PersistentGuid=00000000000000000000000000000000,bHidden=False,bNotConnectable=False,bDefaultValueIsReadOnly=False,bDefaultValueIsIgnored=False,bAdvancedView=False,bOrphanedPin=False,)
End Object
Begin Object Class=/Script/BlueprintGraph.K2Node_VariableSet Name="K2Node_VariableSet_4" ExportPath="/Script/BlueprintGraph.K2Node_VariableSet'/Game/CharacterSelection/CohCharacterBP.CohCharacterBP:changeActiveCharacter.K2Node_VariableSet_4'"
   VariableReference=(MemberName="Current character",MemberGuid=437F78C54D4E7B31937A989B5D56CB25,bSelfContext=True)
   NodePosX=416
   NodePosY=144
   ErrorType=1
   NodeGuid=B32A0D2C44DDF9FB80085D823C5EDDFF
   CustomProperties Pin (PinId=132D606B4E8272EA12F77AA6B400D941,PinName="execute",PinType.PinCategory="exec",PinType.PinSubCategory="",PinType.PinSubCategoryObject=None,PinType.PinSubCategoryMemberReference=(),PinType.PinValueType=(),PinType.ContainerType=None,PinType.bIsReference=False,PinType.bIsConst=False,PinType.bIsWeakPointer=False,PinType.bIsUObjectWrapper=False,PinType.bSerializeAsSinglePrecisionFloat=False,LinkedTo=(K2Node_IfThenElse_2 49119A5E4B22241E0881EB89D5FB6E22,),PersistentGuid=00000000000000000000000000000000,bHidden=False,bNotConnectable=False,bDefaultValueIsReadOnly=False,bDefaultValueIsIgnored=False,bAdvancedView=False,bOrphanedPin=False,)
   CustomProperties Pin (PinId=31A7526D4F4FB70B5854328EDE4AB375,PinName="then",Direction="EGPD_Output",PinType.PinCategory="exec",PinType.PinSubCategory="",PinType.PinSubCategoryObject=None,PinType.PinSubCategoryMemberReference=(),PinType.PinValueType=(),PinType.ContainerType=None,PinType.bIsReference=False,PinType.bIsConst=False,PinType.bIsWeakPointer=False,PinType.bIsUObjectWrapper=False,PinType.bSerializeAsSinglePrecisionFloat=False,LinkedTo=(K2Node_CallFunction_22 77FF95C945E0EB19D6B4AC9D66B5405F,),PersistentGuid=00000000000000000000000000000000,bHidden=False,bNotConnectable=False,bDefaultValueIsReadOnly=False,bDefaultValueIsIgnored=False,bAdvancedView=False,bOrphanedPin=False,)
   CustomProperties Pin (PinId=1210C0F34FF82B94EE2C9591126CC218,PinName="Current character",PinType.PinCategory="int",PinType.PinSubCategory="",PinType.PinSubCategoryObject=None,PinType.PinSubCategoryMemberReference=(),PinType.PinValueType=(),PinType.ContainerType=None,PinType.bIsReference=False,PinType.bIsConst=False,PinType.bIsWeakPointer=False,PinType.bIsUObjectWrapper=False,PinType.bSerializeAsSinglePrecisionFloat=False,DefaultValue="0",AutogeneratedDefaultValue="0",PersistentGuid=00000000000000000000000000000000,bHidden=False,bNotConnectable=False,bDefaultValueIsReadOnly=False,bDefaultValueIsIgnored=False,bAdvancedView=False,bOrphanedPin=False,)
   CustomProperties Pin (PinId=119FDD44442B4D9ACEAF319BE973A708,PinName="Output_Get",PinToolTip="Retrieves the value of the variable, can use instead of a separate Get node",Direction="EGPD_Output",PinType.PinCategory="int",PinType.PinSubCategory="",PinType.PinSubCategoryObject=None,PinType.PinSubCategoryMemberReference=(),PinType.PinValueType=(),PinType.ContainerType=None,PinType.bIsReference=False,PinType.bIsConst=False,PinType.bIsWeakPointer=False,PinType.bIsUObjectWrapper=False,PinType.bSerializeAsSinglePrecisionFloat=False,DefaultValue="0",AutogeneratedDefaultValue="0",PersistentGuid=00000000000000000000000000000000,bHidden=False,bNotConnectable=False,bDefaultValueIsReadOnly=False,bDefaultValueIsIgnored=False,bAdvancedView=False,bOrphanedPin=False,)
   CustomProperties Pin (PinId=698F34F8491512003A0C79A921FAEA5B,PinName="self",PinFriendlyName=NSLOCTEXT("K2Node", "Target", "Target"),PinType.PinCategory="object",PinType.PinSubCategory="",PinType.PinSubCategoryObject="/Script/Engine.BlueprintGeneratedClass'/Game/CharacterSelection/CohCharacterBP.CohCharacterBP_C'",PinType.PinSubCategoryMemberReference=(),PinType.PinValueType=(),PinType.ContainerType=None,PinType.bIsReference=False,PinType.bIsConst=False,PinType.bIsWeakPointer=False,PinType.bIsUObjectWrapper=False,PinType.bSerializeAsSinglePrecisionFloat=False,PersistentGuid=00000000000000000000000000000000,bHidden=True,bNotConnectable=False,bDefaultValueIsReadOnly=False,bDefaultValueIsIgnored=False,bAdvancedView=False,bOrphanedPin=False,)
End Object
Begin Object Class=/Script/BlueprintGraph.K2Node_VariableGet Name="K2Node_VariableGet_10" ExportPath="/Script/BlueprintGraph.K2Node_VariableGet'/Game/CharacterSelection/CohCharacterBP.CohCharacterBP:changeActiveCharacter.K2Node_VariableGet_10'"
   VariableReference=(MemberName="Current character",MemberGuid=437F78C54D4E7B31937A989B5D56CB25,bSelfContext=True)
   NodePosX=-288
   NodePosY=-80
   bCommentBubbleVisible=True
   ErrorType=1
   NodeGuid=227AC12B45D5BE0BDD39DA8670C7BDDB
   CustomProperties Pin (PinId=5C3F7071401834FBA049BEB273220AFC,PinName="Current character",Direction="EGPD_Output",PinType.PinCategory="int",PinType.PinSubCategory="",PinType.PinSubCategoryObject=None,PinType.PinSubCategoryMemberReference=(),PinType.PinValueType=(),PinType.ContainerType=None,PinType.bIsReference=False,PinType.bIsConst=False,PinType.bIsWeakPointer=False,PinType.bIsUObjectWrapper=False,PinType.bSerializeAsSinglePrecisionFloat=False,DefaultValue="0",AutogeneratedDefaultValue="0",LinkedTo=(K2Node_PromotableOperator_4 6311D25E4809354E8F27C49117BB9FB4,K2Node_PromotableOperator_0 9168C568419EA1DE55ACF3AF249882D4,),PersistentGuid=00000000000000000000000000000000,bHidden=False,bNotConnectable=False,bDefaultValueIsReadOnly=False,bDefaultValueIsIgnored=False,bAdvancedView=False,bOrphanedPin=False,)
   CustomProperties Pin (PinId=CD52FBB34CD2CE74E7ABF7B21A5AAD4C,PinName="self",PinFriendlyName=NSLOCTEXT("K2Node", "Target", "Target"),PinType.PinCategory="object",PinType.PinSubCategory="",PinType.PinSubCategoryObject="/Script/Engine.BlueprintGeneratedClass'/Game/CharacterSelection/CohCharacterBP.CohCharacterBP_C'",PinType.PinSubCategoryMemberReference=(),PinType.PinValueType=(),PinType.ContainerType=None,PinType.bIsReference=False,PinType.bIsConst=False,PinType.bIsWeakPointer=False,PinType.bIsUObjectWrapper=False,PinType.bSerializeAsSinglePrecisionFloat=False,PersistentGuid=00000000000000000000000000000000,bHidden=True,bNotConnectable=False,bDefaultValueIsReadOnly=False,bDefaultValueIsIgnored=False,bAdvancedView=False,bOrphanedPin=False,)
End Object
Begin Object Class=/Script/BlueprintGraph.K2Node_PromotableOperator Name="K2Node_PromotableOperator_4" ExportPath="/Script/BlueprintGraph.K2Node_PromotableOperator'/Game/CharacterSelection/CohCharacterBP.CohCharacterBP:changeActiveCharacter.K2Node_PromotableOperator_4'"
   bIsPureFunc=True
   FunctionReference=(MemberParent="/Script/CoreUObject.Class'/Script/Engine.KismetMathLibrary'",MemberName="Less_IntInt")
   NodePosX=-80
   NodePosY=128
   NodeGuid=9BCF3F7B4F035C627C2AA3B54D9F1C7D
   CustomProperties Pin (PinId=6311D25E4809354E8F27C49117BB9FB4,PinName="A",PinToolTip="A
Integer",PinType.PinCategory="int",PinType.PinSubCategory="",PinType.PinSubCategoryObject=None,PinType.PinSubCategoryMemberReference=(),PinType.PinValueType=(),PinType.ContainerType=None,PinType.bIsReference=False,PinType.bIsConst=False,PinType.bIsWeakPointer=False,PinType.bIsUObjectWrapper=False,PinType.bSerializeAsSinglePrecisionFloat=False,LinkedTo=(K2Node_VariableGet_10 5C3F7071401834FBA049BEB273220AFC,),PersistentGuid=00000000000000000000000000000000,bHidden=False,bNotConnectable=False,bDefaultValueIsReadOnly=False,bDefaultValueIsIgnored=False,bAdvancedView=False,bOrphanedPin=False,)
   CustomProperties Pin (PinId=E3DEF2514BFC84F3B4A3AC988D80916E,PinName="B",PinToolTip="B
Integer",PinType.PinCategory="int",PinType.PinSubCategory="",PinType.PinSubCategoryObject=None,PinType.PinSubCategoryMemberReference=(),PinType.PinValueType=(),PinType.ContainerType=None,PinType.bIsReference=False,PinType.bIsConst=False,PinType.bIsWeakPointer=False,PinType.bIsUObjectWrapper=False,PinType.bSerializeAsSinglePrecisionFloat=False,LinkedTo=(K2Node_Knot_2 371458CE4E1CEBD898BCBCBF862F5719,),PersistentGuid=00000000000000000000000000000000,bHidden=False,bNotConnectable=False,bDefaultValueIsReadOnly=False,bDefaultValueIsIgnored=False,bAdvancedView=False,bOrphanedPin=False,)
   CustomProperties Pin (PinId=5F59A061496B969848ED54A4E99958AA,PinName="ReturnValue",PinToolTip="Return Value
Boolean

Returns true if A is less than B (A < B)",Direction="EGPD_Output",PinType.PinCategory="bool",PinType.PinSubCategory="",PinType.PinSubCategoryObject=None,PinType.PinSubCategoryMemberReference=(),PinType.PinValueType=(),PinType.ContainerType=None,PinType.bIsReference=False,PinType.bIsConst=False,PinType.bIsWeakPointer=False,PinType.bIsUObjectWrapper=False,PinType.bSerializeAsSinglePrecisionFloat=False,LinkedTo=(K2Node_IfThenElse_2 8F6BCF4840252679BFB86DA67250DAC4,),PersistentGuid=00000000000000000000000000000000,bHidden=False,bNotConnectable=False,bDefaultValueIsReadOnly=False,bDefaultValueIsIgnored=False,bAdvancedView=False,bOrphanedPin=False,)
   CustomProperties Pin (PinId=B889869548F0225562DB06B8E53CE49F,PinName="ErrorTolerance",PinToolTip="Error Tolerance
",PinType.PinCategory="",PinType.PinSubCategory="",PinType.PinSubCategoryObject=None,PinType.PinSubCategoryMemberReference=(),PinType.PinValueType=(),PinType.ContainerType=None,PinType.bIsReference=False,PinType.bIsConst=False,PinType.bIsWeakPointer=False,PinType.bIsUObjectWrapper=False,PinType.bSerializeAsSinglePrecisionFloat=False,PersistentGuid=00000000000000000000000000000000,bHidden=True,bNotConnectable=False,bDefaultValueIsReadOnly=False,bDefaultValueIsIgnored=False,bAdvancedView=False,bOrphanedPin=False,)
End Object
Begin Object Class=/Script/BlueprintGraph.K2Node_CallFunction Name="K2Node_CallFunction_22" ExportPath="/Script/BlueprintGraph.K2Node_CallFunction'/Game/CharacterSelection/CohCharacterBP.CohCharacterBP:changeActiveCharacter.K2Node_CallFunction_22'"
   FunctionReference=(MemberName="setActiveCamera",MemberGuid=2AD9851E47B5E56FEE67D1B0B837C204,bSelfContext=True)
   NodePosX=816
   NodePosY=240
   NodeGuid=087DAD05475255E59838CB97441D8E12
   CustomProperties Pin (PinId=77FF95C945E0EB19D6B4AC9D66B5405F,PinName="execute",PinToolTip="
Exec",PinType.PinCategory="exec",PinType.PinSubCategory="",PinType.PinSubCategoryObject=None,PinType.PinSubCategoryMemberReference=(),PinType.PinValueType=(),PinType.ContainerType=None,PinType.bIsReference=False,PinType.bIsConst=False,PinType.bIsWeakPointer=False,PinType.bIsUObjectWrapper=False,PinType.bSerializeAsSinglePrecisionFloat=False,LinkedTo=(K2Node_VariableSet_3 70715F8745549821FC419787D95693D9,K2Node_VariableSet_4 31A7526D4F4FB70B5854328EDE4AB375,K2Node_VariableSet_1 70715F8745549821FC419787D95693D9,K2Node_VariableSet_2 31A7526D4F4FB70B5854328EDE4AB375,),PersistentGuid=00000000000000000000000000000000,bHidden=False,bNotConnectable=False,bDefaultValueIsReadOnly=False,bDefaultValueIsIgnored=False,bAdvancedView=False,bOrphanedPin=False,)
   CustomProperties Pin (PinId=C76381B647F4248340D42CBDBE453D51,PinName="then",PinToolTip="
Exec",Direction="EGPD_Output",PinType.PinCategory="exec",PinType.PinSubCategory="",PinType.PinSubCategoryObject=None,PinType.PinSubCategoryMemberReference=(),PinType.PinValueType=(),PinType.ContainerType=None,PinType.bIsReference=False,PinType.bIsConst=False,PinType.bIsWeakPointer=False,PinType.bIsUObjectWrapper=False,PinType.bSerializeAsSinglePrecisionFloat=False,LinkedTo=(K2Node_CallFunction_9 7E0D21F14DCDED923438A5BD119644FA,),PersistentGuid=00000000000000000000000000000000,bHidden=False,bNotConnectable=False,bDefaultValueIsReadOnly=False,bDefaultValueIsIgnored=False,bAdvancedView=False,bOrphanedPin=False,)
   CustomProperties Pin (PinId=2707C9E54219E8513DFF259F4011D966,PinName="self",PinFriendlyName=NSLOCTEXT("K2Node", "Target", "Target"),PinToolTip="Target
Self Object Reference",PinType.PinCategory="object",PinType.PinSubCategory="self",PinType.PinSubCategoryObject=None,PinType.PinSubCategoryMemberReference=(),PinType.PinValueType=(),PinType.ContainerType=None,PinType.bIsReference=False,PinType.bIsConst=False,PinType.bIsWeakPointer=False,PinType.bIsUObjectWrapper=False,PinType.bSerializeAsSinglePrecisionFloat=False,PersistentGuid=00000000000000000000000000000000,bHidden=False,bNotConnectable=False,bDefaultValueIsReadOnly=False,bDefaultValueIsIgnored=False,bAdvancedView=False,bOrphanedPin=False,)
End Object
Begin Object Class=/Script/BlueprintGraph.K2Node_IfThenElse Name="K2Node_IfThenElse_0" ExportPath="/Script/BlueprintGraph.K2Node_IfThenElse'/Game/CharacterSelection/CohCharacterBP.CohCharacterBP:changeActiveCharacter.K2Node_IfThenElse_0'"
   NodePosX=-672
   NodePosY=32
   NodeGuid=EFE3D04144A8742126FE59BBD2A7F25F
   CustomProperties Pin (PinId=D723DB8E477797FACA660AB03F29D6EA,PinName="execute",PinType.PinCategory="exec",PinType.PinSubCategory="",PinType.PinSubCategoryObject=None,PinType.PinSubCategoryMemberReference=(),PinType.PinValueType=(),PinType.ContainerType=None,PinType.bIsReference=False,PinType.bIsConst=False,PinType.bIsWeakPointer=False,PinType.bIsUObjectWrapper=False,PinType.bSerializeAsSinglePrecisionFloat=False,LinkedTo=(K2Node_FunctionEntry_0 866F4EB34E0094C875DB858F50619467,),PersistentGuid=00000000000000000000000000000000,bHidden=False,bNotConnectable=False,bDefaultValueIsReadOnly=False,bDefaultValueIsIgnored=False,bAdvancedView=False,bOrphanedPin=False,)
   CustomProperties Pin (PinId=DEC7C20F473E9C9927AC06A3A1890C7D,PinName="Condition",PinType.PinCategory="bool",PinType.PinSubCategory="",PinType.PinSubCategoryObject=None,PinType.PinSubCategoryMemberReference=(),PinType.PinValueType=(),PinType.ContainerType=None,PinType.bIsReference=False,PinType.bIsConst=False,PinType.bIsWeakPointer=False,PinType.bIsUObjectWrapper=False,PinType.bSerializeAsSinglePrecisionFloat=False,DefaultValue="true",AutogeneratedDefaultValue="true",LinkedTo=(K2Node_FunctionEntry_0 C43C6D7B46A7F88229EA14AA54C23756,),PersistentGuid=00000000000000000000000000000000,bHidden=False,bNotConnectable=False,bDefaultValueIsReadOnly=False,bDefaultValueIsIgnored=False,bAdvancedView=False,bOrphanedPin=False,)
   CustomProperties Pin (PinId=CFA333304DC309D2B9966C921546677C,PinName="then",PinFriendlyName=NSLOCTEXT("K2Node", "true", "true"),Direction="EGPD_Output",PinType.PinCategory="exec",PinType.PinSubCategory="",PinType.PinSubCategoryObject=None,PinType.PinSubCategoryMemberReference=(),PinType.PinValueType=(),PinType.ContainerType=None,PinType.bIsReference=False,PinType.bIsConst=False,PinType.bIsWeakPointer=False,PinType.bIsUObjectWrapper=False,PinType.bSerializeAsSinglePrecisionFloat=False,LinkedTo=(K2Node_IfThenElse_2 2BD39A1349AE1E72B9AE0BA2CF09D645,),PersistentGuid=00000000000000000000000000000000,bHidden=False,bNotConnectable=False,bDefaultValueIsReadOnly=False,bDefaultValueIsIgnored=False,bAdvancedView=False,bOrphanedPin=False,)
   CustomProperties Pin (PinId=EC3F09C84D8797DC93262EBE29230F12,PinName="else",PinFriendlyName=NSLOCTEXT("K2Node", "false", "false"),Direction="EGPD_Output",PinType.PinCategory="exec",PinType.PinSubCategory="",PinType.PinSubCategoryObject=None,PinType.PinSubCategoryMemberReference=(),PinType.PinValueType=(),PinType.ContainerType=None,PinType.bIsReference=False,PinType.bIsConst=False,PinType.bIsWeakPointer=False,PinType.bIsUObjectWrapper=False,PinType.bSerializeAsSinglePrecisionFloat=False,LinkedTo=(K2Node_Knot_1 04580BC64AB9152DE801B395B04A1CFE,),PersistentGuid=00000000000000000000000000000000,bHidden=False,bNotConnectable=False,bDefaultValueIsReadOnly=False,bDefaultValueIsIgnored=False,bAdvancedView=False,bOrphanedPin=False,)
End Object
Begin Object Class=/Script/BlueprintGraph.K2Node_VariableGet Name="K2Node_VariableGet_12" ExportPath="/Script/BlueprintGraph.K2Node_VariableGet'/Game/CharacterSelection/CohCharacterBP.CohCharacterBP:changeActiveCharacter.K2Node_VariableGet_12'"
   VariableReference=(MemberName="Current character",MemberGuid=437F78C54D4E7B31937A989B5D56CB25,bSelfContext=True)
   NodePosX=-400
   NodePosY=400
   bCommentBubbleVisible=True
   ErrorType=1
   NodeGuid=390EF8D34B9ECF21A75769AD72275AD1
   CustomProperties Pin (PinId=5C3F7071401834FBA049BEB273220AFC,PinName="Current character",Direction="EGPD_Output",PinType.PinCategory="int",PinType.PinSubCategory="",PinType.PinSubCategoryObject=None,PinType.PinSubCategoryMemberReference=(),PinType.PinValueType=(),PinType.ContainerType=None,PinType.bIsReference=False,PinType.bIsConst=False,PinType.bIsWeakPointer=False,PinType.bIsUObjectWrapper=False,PinType.bSerializeAsSinglePrecisionFloat=False,DefaultValue="0",AutogeneratedDefaultValue="0",LinkedTo=(K2Node_PromotableOperator_12 945A0C7449ED90184D69A3A73D2BC271,K2Node_PromotableOperator_11 57C23F0E415ADD8EB8DE309B789F0D51,),PersistentGuid=00000000000000000000000000000000,bHidden=False,bNotConnectable=False,bDefaultValueIsReadOnly=False,bDefaultValueIsIgnored=False,bAdvancedView=False,bOrphanedPin=False,)
   CustomProperties Pin (PinId=EC803DC648E3156418083E8A88F9FDEF,PinName="self",PinFriendlyName=NSLOCTEXT("K2Node", "Target", "Target"),PinType.PinCategory="object",PinType.PinSubCategory="",PinType.PinSubCategoryObject="/Script/Engine.BlueprintGeneratedClass'/Game/CharacterSelection/CohCharacterBP.CohCharacterBP_C'",PinType.PinSubCategoryMemberReference=(),PinType.PinValueType=(),PinType.ContainerType=None,PinType.bIsReference=False,PinType.bIsConst=False,PinType.bIsWeakPointer=False,PinType.bIsUObjectWrapper=False,PinType.bSerializeAsSinglePrecisionFloat=False,PersistentGuid=00000000000000000000000000000000,bHidden=True,bNotConnectable=False,bDefaultValueIsReadOnly=False,bDefaultValueIsIgnored=False,bAdvancedView=False,bOrphanedPin=False,)
End Object
Begin Object Class=/Script/BlueprintGraph.K2Node_IfThenElse Name="K2Node_IfThenElse_1" ExportPath="/Script/BlueprintGraph.K2Node_IfThenElse'/Game/CharacterSelection/CohCharacterBP.CohCharacterBP:changeActiveCharacter.K2Node_IfThenElse_1'"
   NodePosX=-32
   NodePosY=272
   NodeGuid=F84456B14815849CCCDBEDA4804906E7
   CustomProperties Pin (PinId=2BD39A1349AE1E72B9AE0BA2CF09D645,PinName="execute",PinType.PinCategory="exec",PinType.PinSubCategory="",PinType.PinSubCategoryObject=None,PinType.PinSubCategoryMemberReference=(),PinType.PinValueType=(),PinType.ContainerType=None,PinType.bIsReference=False,PinType.bIsConst=False,PinType.bIsWeakPointer=False,PinType.bIsUObjectWrapper=False,PinType.bSerializeAsSinglePrecisionFloat=False,LinkedTo=(K2Node_Knot_1 75AFA3654F6A6B32AD48A987E8383998,),PersistentGuid=00000000000000000000000000000000,bHidden=False,bNotConnectable=False,bDefaultValueIsReadOnly=False,bDefaultValueIsIgnored=False,bAdvancedView=False,bOrphanedPin=False,)
   CustomProperties Pin (PinId=8F6BCF4840252679BFB86DA67250DAC4,PinName="Condition",PinType.PinCategory="bool",PinType.PinSubCategory="",PinType.PinSubCategoryObject=None,PinType.PinSubCategoryMemberReference=(),PinType.PinValueType=(),PinType.ContainerType=None,PinType.bIsReference=False,PinType.bIsConst=False,PinType.bIsWeakPointer=False,PinType.bIsUObjectWrapper=False,PinType.bSerializeAsSinglePrecisionFloat=False,DefaultValue="true",AutogeneratedDefaultValue="true",LinkedTo=(K2Node_PromotableOperator_12 5C6D9DC943C4ED1997A766B724F99B69,),PersistentGuid=00000000000000000000000000000000,bHidden=False,bNotConnectable=False,bDefaultValueIsReadOnly=False,bDefaultValueIsIgnored=False,bAdvancedView=False,bOrphanedPin=False,)
   CustomProperties Pin (PinId=7D1B0FC24F15A60D9A95EF9325E9358E,PinName="then",PinFriendlyName=NSLOCTEXT("K2Node", "true", "true"),Direction="EGPD_Output",PinType.PinCategory="exec",PinType.PinSubCategory="",PinType.PinSubCategoryObject=None,PinType.PinSubCategoryMemberReference=(),PinType.PinValueType=(),PinType.ContainerType=None,PinType.bIsReference=False,PinType.bIsConst=False,PinType.bIsWeakPointer=False,PinType.bIsUObjectWrapper=False,PinType.bSerializeAsSinglePrecisionFloat=False,LinkedTo=(K2Node_VariableSet_1 8DA5A71A400F4A521FFF93B06E7AAED5,),PersistentGuid=00000000000000000000000000000000,bHidden=False,bNotConnectable=False,bDefaultValueIsReadOnly=False,bDefaultValueIsIgnored=False,bAdvancedView=False,bOrphanedPin=False,)
   CustomProperties Pin (PinId=49119A5E4B22241E0881EB89D5FB6E22,PinName="else",PinFriendlyName=NSLOCTEXT("K2Node", "false", "false"),Direction="EGPD_Output",PinType.PinCategory="exec",PinType.PinSubCategory="",PinType.PinSubCategoryObject=None,PinType.PinSubCategoryMemberReference=(),PinType.PinValueType=(),PinType.ContainerType=None,PinType.bIsReference=False,PinType.bIsConst=False,PinType.bIsWeakPointer=False,PinType.bIsUObjectWrapper=False,PinType.bSerializeAsSinglePrecisionFloat=False,LinkedTo=(K2Node_Knot_0 CF70438D4EB5D0197AE8719A89B87129,),PersistentGuid=00000000000000000000000000000000,bHidden=False,bNotConnectable=False,bDefaultValueIsReadOnly=False,bDefaultValueIsIgnored=False,bAdvancedView=False,bOrphanedPin=False,)
End Object
Begin Object Class=/Script/BlueprintGraph.K2Node_VariableSet Name="K2Node_VariableSet_1" ExportPath="/Script/BlueprintGraph.K2Node_VariableSet'/Game/CharacterSelection/CohCharacterBP.CohCharacterBP:changeActiveCharacter.K2Node_VariableSet_1'"
   VariableReference=(MemberName="Current character",MemberGuid=437F78C54D4E7B31937A989B5D56CB25,bSelfContext=True)
   NodePosX=416
   NodePosY=288
   ErrorType=1
   NodeGuid=5424FF064C6958E5746F5F9B8FBD92D0
   CustomProperties Pin (PinId=8DA5A71A400F4A521FFF93B06E7AAED5,PinName="execute",PinType.PinCategory="exec",PinType.PinSubCategory="",PinType.PinSubCategoryObject=None,PinType.PinSubCategoryMemberReference=(),PinType.PinValueType=(),PinType.ContainerType=None,PinType.bIsReference=False,PinType.bIsConst=False,PinType.bIsWeakPointer=False,PinType.bIsUObjectWrapper=False,PinType.bSerializeAsSinglePrecisionFloat=False,LinkedTo=(K2Node_IfThenElse_1 7D1B0FC24F15A60D9A95EF9325E9358E,),PersistentGuid=00000000000000000000000000000000,bHidden=False,bNotConnectable=False,bDefaultValueIsReadOnly=False,bDefaultValueIsIgnored=False,bAdvancedView=False,bOrphanedPin=False,)
   CustomProperties Pin (PinId=70715F8745549821FC419787D95693D9,PinName="then",Direction="EGPD_Output",PinType.PinCategory="exec",PinType.PinSubCategory="",PinType.PinSubCategoryObject=None,PinType.PinSubCategoryMemberReference=(),PinType.PinValueType=(),PinType.ContainerType=None,PinType.bIsReference=False,PinType.bIsConst=False,PinType.bIsWeakPointer=False,PinType.bIsUObjectWrapper=False,PinType.bSerializeAsSinglePrecisionFloat=False,LinkedTo=(K2Node_CallFunction_22 77FF95C945E0EB19D6B4AC9D66B5405F,),PersistentGuid=00000000000000000000000000000000,bHidden=False,bNotConnectable=False,bDefaultValueIsReadOnly=False,bDefaultValueIsIgnored=False,bAdvancedView=False,bOrphanedPin=False,)
   CustomProperties Pin (PinId=C2996CF742DE9F384CEF43BCC4FD163A,PinName="Current character",PinType.PinCategory="int",PinType.PinSubCategory="",PinType.PinSubCategoryObject=None,PinType.PinSubCategoryMemberReference=(),PinType.PinValueType=(),PinType.ContainerType=None,PinType.bIsReference=False,PinType.bIsConst=False,PinType.bIsWeakPointer=False,PinType.bIsUObjectWrapper=False,PinType.bSerializeAsSinglePrecisionFloat=False,DefaultValue="0",AutogeneratedDefaultValue="0",LinkedTo=(K2Node_PromotableOperator_11 24BC2743448279E4913794B8FA309ACD,),PersistentGuid=00000000000000000000000000000000,bHidden=False,bNotConnectable=False,bDefaultValueIsReadOnly=False,bDefaultValueIsIgnored=False,bAdvancedView=False,bOrphanedPin=False,)
   CustomProperties Pin (PinId=CAA3B27E484216ADE10207B672F808EA,PinName="Output_Get",PinToolTip="Retrieves the value of the variable, can use instead of a separate Get node",Direction="EGPD_Output",PinType.PinCategory="int",PinType.PinSubCategory="",PinType.PinSubCategoryObject=None,PinType.PinSubCategoryMemberReference=(),PinType.PinValueType=(),PinType.ContainerType=None,PinType.bIsReference=False,PinType.bIsConst=False,PinType.bIsWeakPointer=False,PinType.bIsUObjectWrapper=False,PinType.bSerializeAsSinglePrecisionFloat=False,DefaultValue="0",AutogeneratedDefaultValue="0",PersistentGuid=00000000000000000000000000000000,bHidden=False,bNotConnectable=False,bDefaultValueIsReadOnly=False,bDefaultValueIsIgnored=False,bAdvancedView=False,bOrphanedPin=False,)
   CustomProperties Pin (PinId=C5B52CCB4F3D520B27F30BAA69E1EAAD,PinName="self",PinFriendlyName=NSLOCTEXT("K2Node", "Target", "Target"),PinType.PinCategory="object",PinType.PinSubCategory="",PinType.PinSubCategoryObject="/Script/Engine.BlueprintGeneratedClass'/Game/CharacterSelection/CohCharacterBP.CohCharacterBP_C'",PinType.PinSubCategoryMemberReference=(),PinType.PinValueType=(),PinType.ContainerType=None,PinType.bIsReference=False,PinType.bIsConst=False,PinType.bIsWeakPointer=False,PinType.bIsUObjectWrapper=False,PinType.bSerializeAsSinglePrecisionFloat=False,PersistentGuid=00000000000000000000000000000000,bHidden=True,bNotConnectable=False,bDefaultValueIsReadOnly=False,bDefaultValueIsIgnored=False,bAdvancedView=False,bOrphanedPin=False,)
End Object
Begin Object Class=/Script/BlueprintGraph.K2Node_VariableSet Name="K2Node_VariableSet_2" ExportPath="/Script/BlueprintGraph.K2Node_VariableSet'/Game/CharacterSelection/CohCharacterBP.CohCharacterBP:changeActiveCharacter.K2Node_VariableSet_2'"
   VariableReference=(MemberName="Current character",MemberGuid=437F78C54D4E7B31937A989B5D56CB25,bSelfContext=True)
   NodePosX=416
   NodePosY=496
   ErrorType=1
   NodeGuid=02B3EE78428C64F06AF58EB599460F5C
   CustomProperties Pin (PinId=132D606B4E8272EA12F77AA6B400D941,PinName="execute",PinType.PinCategory="exec",PinType.PinSubCategory="",PinType.PinSubCategoryObject=None,PinType.PinSubCategoryMemberReference=(),PinType.PinValueType=(),PinType.ContainerType=None,PinType.bIsReference=False,PinType.bIsConst=False,PinType.bIsWeakPointer=False,PinType.bIsUObjectWrapper=False,PinType.bSerializeAsSinglePrecisionFloat=False,LinkedTo=(K2Node_Knot_0 B83B0FC4401941C5FA82F58C01799E6C,),PersistentGuid=00000000000000000000000000000000,bHidden=False,bNotConnectable=False,bDefaultValueIsReadOnly=False,bDefaultValueIsIgnored=False,bAdvancedView=False,bOrphanedPin=False,)
   CustomProperties Pin (PinId=31A7526D4F4FB70B5854328EDE4AB375,PinName="then",Direction="EGPD_Output",PinType.PinCategory="exec",PinType.PinSubCategory="",PinType.PinSubCategoryObject=None,PinType.PinSubCategoryMemberReference=(),PinType.PinValueType=(),PinType.ContainerType=None,PinType.bIsReference=False,PinType.bIsConst=False,PinType.bIsWeakPointer=False,PinType.bIsUObjectWrapper=False,PinType.bSerializeAsSinglePrecisionFloat=False,LinkedTo=(K2Node_CallFunction_22 77FF95C945E0EB19D6B4AC9D66B5405F,),PersistentGuid=00000000000000000000000000000000,bHidden=False,bNotConnectable=False,bDefaultValueIsReadOnly=False,bDefaultValueIsIgnored=False,bAdvancedView=False,bOrphanedPin=False,)
   CustomProperties Pin (PinId=1210C0F34FF82B94EE2C9591126CC218,PinName="Current character",PinType.PinCategory="int",PinType.PinSubCategory="",PinType.PinSubCategoryObject=None,PinType.PinSubCategoryMemberReference=(),PinType.PinValueType=(),PinType.ContainerType=None,PinType.bIsReference=False,PinType.bIsConst=False,PinType.bIsWeakPointer=False,PinType.bIsUObjectWrapper=False,PinType.bSerializeAsSinglePrecisionFloat=False,DefaultValue="0",AutogeneratedDefaultValue="0",LinkedTo=(K2Node_Knot_3 C10B1B4C466D9122A122E88C23266AB3,),PersistentGuid=00000000000000000000000000000000,bHidden=False,bNotConnectable=False,bDefaultValueIsReadOnly=False,bDefaultValueIsIgnored=False,bAdvancedView=False,bOrphanedPin=False,)
   CustomProperties Pin (PinId=119FDD44442B4D9ACEAF319BE973A708,PinName="Output_Get",PinToolTip="Retrieves the value of the variable, can use instead of a separate Get node",Direction="EGPD_Output",PinType.PinCategory="int",PinType.PinSubCategory="",PinType.PinSubCategoryObject=None,PinType.PinSubCategoryMemberReference=(),PinType.PinValueType=(),PinType.ContainerType=None,PinType.bIsReference=False,PinType.bIsConst=False,PinType.bIsWeakPointer=False,PinType.bIsUObjectWrapper=False,PinType.bSerializeAsSinglePrecisionFloat=False,DefaultValue="0",AutogeneratedDefaultValue="0",PersistentGuid=00000000000000000000000000000000,bHidden=False,bNotConnectable=False,bDefaultValueIsReadOnly=False,bDefaultValueIsIgnored=False,bAdvancedView=False,bOrphanedPin=False,)
   CustomProperties Pin (PinId=DC336F204C126647773EF7ACB01AD16D,PinName="self",PinFriendlyName=NSLOCTEXT("K2Node", "Target", "Target"),PinType.PinCategory="object",PinType.PinSubCategory="",PinType.PinSubCategoryObject="/Script/Engine.BlueprintGeneratedClass'/Game/CharacterSelection/CohCharacterBP.CohCharacterBP_C'",PinType.PinSubCategoryMemberReference=(),PinType.PinValueType=(),PinType.ContainerType=None,PinType.bIsReference=False,PinType.bIsConst=False,PinType.bIsWeakPointer=False,PinType.bIsUObjectWrapper=False,PinType.bSerializeAsSinglePrecisionFloat=False,PersistentGuid=00000000000000000000000000000000,bHidden=True,bNotConnectable=False,bDefaultValueIsReadOnly=False,bDefaultValueIsIgnored=False,bAdvancedView=False,bOrphanedPin=False,)
End Object
Begin Object Class=/Script/BlueprintGraph.K2Node_PromotableOperator Name="K2Node_PromotableOperator_11" ExportPath="/Script/BlueprintGraph.K2Node_PromotableOperator'/Game/CharacterSelection/CohCharacterBP.CohCharacterBP:changeActiveCharacter.K2Node_PromotableOperator_11'"
   bIsPureFunc=True
   FunctionReference=(MemberParent="/Script/CoreUObject.Class'/Script/Engine.KismetMathLibrary'",MemberName="Subtract_IntInt")
   NodePosX=240
   NodePosY=400
   NodeGuid=52946B504CB68A1A3D91478CB5DD50E2
   CustomProperties Pin (PinId=57C23F0E415ADD8EB8DE309B789F0D51,PinName="A",PinToolTip="A
Integer",PinType.PinCategory="int",PinType.PinSubCategory="",PinType.PinSubCategoryObject=None,PinType.PinSubCategoryMemberReference=(),PinType.PinValueType=(),PinType.ContainerType=None,PinType.bIsReference=False,PinType.bIsConst=False,PinType.bIsWeakPointer=False,PinType.bIsUObjectWrapper=False,PinType.bSerializeAsSinglePrecisionFloat=False,LinkedTo=(K2Node_VariableGet_12 5C3F7071401834FBA049BEB273220AFC,),PersistentGuid=00000000000000000000000000000000,bHidden=False,bNotConnectable=False,bDefaultValueIsReadOnly=False,bDefaultValueIsIgnored=False,bAdvancedView=False,bOrphanedPin=False,)
   CustomProperties Pin (PinId=D7905EAD406C9A7E8CE497B1B4303FB0,PinName="B",PinToolTip="B
Integer",PinType.PinCategory="int",PinType.PinSubCategory="",PinType.PinSubCategoryObject=None,PinType.PinSubCategoryMemberReference=(),PinType.PinValueType=(),PinType.ContainerType=None,PinType.bIsReference=False,PinType.bIsConst=False,PinType.bIsWeakPointer=False,PinType.bIsUObjectWrapper=False,PinType.bSerializeAsSinglePrecisionFloat=False,DefaultValue="1",PersistentGuid=00000000000000000000000000000000,bHidden=False,bNotConnectable=False,bDefaultValueIsReadOnly=False,bDefaultValueIsIgnored=False,bAdvancedView=False,bOrphanedPin=False,)
   CustomProperties Pin (PinId=24BC2743448279E4913794B8FA309ACD,PinName="ReturnValue",PinToolTip="Return Value
Integer

Subtraction (A - B)",Direction="EGPD_Output",PinType.PinCategory="int",PinType.PinSubCategory="",PinType.PinSubCategoryObject=None,PinType.PinSubCategoryMemberReference=(),PinType.PinValueType=(),PinType.ContainerType=None,PinType.bIsReference=False,PinType.bIsConst=False,PinType.bIsWeakPointer=False,PinType.bIsUObjectWrapper=False,PinType.bSerializeAsSinglePrecisionFloat=False,LinkedTo=(K2Node_VariableSet_1 C2996CF742DE9F384CEF43BCC4FD163A,),PersistentGuid=00000000000000000000000000000000,bHidden=False,bNotConnectable=False,bDefaultValueIsReadOnly=False,bDefaultValueIsIgnored=False,bAdvancedView=False,bOrphanedPin=False,)
End Object
Begin Object Class=/Script/BlueprintGraph.K2Node_PromotableOperator Name="K2Node_PromotableOperator_12" ExportPath="/Script/BlueprintGraph.K2Node_PromotableOperator'/Game/CharacterSelection/CohCharacterBP.CohCharacterBP:changeActiveCharacter.K2Node_PromotableOperator_12'"
   bIsPureFunc=True
   FunctionReference=(MemberParent="/Script/CoreUObject.Class'/Script/Engine.KismetMathLibrary'",MemberName="Greater_IntInt")
   NodePosX=-208
   NodePosY=320
   NodeGuid=7B355714436E5A5D36D7A1869BB03B15
   CustomProperties Pin (PinId=945A0C7449ED90184D69A3A73D2BC271,PinName="A",PinToolTip="A
Integer",PinType.PinCategory="int",PinType.PinSubCategory="",PinType.PinSubCategoryObject=None,PinType.PinSubCategoryMemberReference=(),PinType.PinValueType=(),PinType.ContainerType=None,PinType.bIsReference=False,PinType.bIsConst=False,PinType.bIsWeakPointer=False,PinType.bIsUObjectWrapper=False,PinType.bSerializeAsSinglePrecisionFloat=False,LinkedTo=(K2Node_VariableGet_12 5C3F7071401834FBA049BEB273220AFC,),PersistentGuid=00000000000000000000000000000000,bHidden=False,bNotConnectable=False,bDefaultValueIsReadOnly=False,bDefaultValueIsIgnored=False,bAdvancedView=False,bOrphanedPin=False,)
   CustomProperties Pin (PinId=A35C089F461BA374EC65DDBFCB274F26,PinName="B",PinToolTip="B
Integer",PinType.PinCategory="int",PinType.PinSubCategory="",PinType.PinSubCategoryObject=None,PinType.PinSubCategoryMemberReference=(),PinType.PinValueType=(),PinType.ContainerType=None,PinType.bIsReference=False,PinType.bIsConst=False,PinType.bIsWeakPointer=False,PinType.bIsUObjectWrapper=False,PinType.bSerializeAsSinglePrecisionFloat=False,PersistentGuid=00000000000000000000000000000000,bHidden=False,bNotConnectable=False,bDefaultValueIsReadOnly=False,bDefaultValueIsIgnored=False,bAdvancedView=False,bOrphanedPin=False,)
   CustomProperties Pin (PinId=5C6D9DC943C4ED1997A766B724F99B69,PinName="ReturnValue",PinToolTip="Return Value
Boolean

Returns true if A is greater than B (A > B)",Direction="EGPD_Output",PinType.PinCategory="bool",PinType.PinSubCategory="",PinType.PinSubCategoryObject=None,PinType.PinSubCategoryMemberReference=(),PinType.PinValueType=(),PinType.ContainerType=None,PinType.bIsReference=False,PinType.bIsConst=False,PinType.bIsWeakPointer=False,PinType.bIsUObjectWrapper=False,PinType.bSerializeAsSinglePrecisionFloat=False,LinkedTo=(K2Node_IfThenElse_1 8F6BCF4840252679BFB86DA67250DAC4,),PersistentGuid=00000000000000000000000000000000,bHidden=False,bNotConnectable=False,bDefaultValueIsReadOnly=False,bDefaultValueIsIgnored=False,bAdvancedView=False,bOrphanedPin=False,)
   CustomProperties Pin (PinId=1B4A060C4EFACC35D2AD86BCFAB56011,PinName="ErrorTolerance",PinToolTip="Error Tolerance
",PinType.PinCategory="",PinType.PinSubCategory="",PinType.PinSubCategoryObject=None,PinType.PinSubCategoryMemberReference=(),PinType.PinValueType=(),PinType.ContainerType=None,PinType.bIsReference=False,PinType.bIsConst=False,PinType.bIsWeakPointer=False,PinType.bIsUObjectWrapper=False,PinType.bSerializeAsSinglePrecisionFloat=False,PersistentGuid=00000000000000000000000000000000,bHidden=True,bNotConnectable=False,bDefaultValueIsReadOnly=False,bDefaultValueIsIgnored=False,bAdvancedView=False,bOrphanedPin=False,)
End Object
Begin Object Class=/Script/BlueprintGraph.K2Node_Knot Name="K2Node_Knot_0" ExportPath="/Script/BlueprintGraph.K2Node_Knot'/Game/CharacterSelection/CohCharacterBP.CohCharacterBP:changeActiveCharacter.K2Node_Knot_0'"
   NodePosX=192
   NodePosY=512
   NodeGuid=7EBD018641120BC05A5B318DB9DE1222
   CustomProperties Pin (PinId=CF70438D4EB5D0197AE8719A89B87129,PinName="InputPin",PinType.PinCategory="exec",PinType.PinSubCategory="",PinType.PinSubCategoryObject=None,PinType.PinSubCategoryMemberReference=(),PinType.PinValueType=(),PinType.ContainerType=None,PinType.bIsReference=False,PinType.bIsConst=False,PinType.bIsWeakPointer=False,PinType.bIsUObjectWrapper=False,PinType.bSerializeAsSinglePrecisionFloat=False,LinkedTo=(K2Node_IfThenElse_1 49119A5E4B22241E0881EB89D5FB6E22,),PersistentGuid=00000000000000000000000000000000,bHidden=False,bNotConnectable=False,bDefaultValueIsReadOnly=False,bDefaultValueIsIgnored=True,bAdvancedView=False,bOrphanedPin=False,)
   CustomProperties Pin (PinId=B83B0FC4401941C5FA82F58C01799E6C,PinName="OutputPin",Direction="EGPD_Output",PinType.PinCategory="exec",PinType.PinSubCategory="",PinType.PinSubCategoryObject=None,PinType.PinSubCategoryMemberReference=(),PinType.PinValueType=(),PinType.ContainerType=None,PinType.bIsReference=False,PinType.bIsConst=False,PinType.bIsWeakPointer=False,PinType.bIsUObjectWrapper=False,PinType.bSerializeAsSinglePrecisionFloat=False,LinkedTo=(K2Node_VariableSet_2 132D606B4E8272EA12F77AA6B400D941,),PersistentGuid=00000000000000000000000000000000,bHidden=False,bNotConnectable=False,bDefaultValueIsReadOnly=False,bDefaultValueIsIgnored=False,bAdvancedView=False,bOrphanedPin=False,)
End Object
Begin Object Class=/Script/BlueprintGraph.K2Node_Knot Name="K2Node_Knot_1" ExportPath="/Script/BlueprintGraph.K2Node_Knot'/Game/CharacterSelection/CohCharacterBP.CohCharacterBP:changeActiveCharacter.K2Node_Knot_1'"
   NodePosX=-384
   NodePosY=304
   NodeGuid=395455AC433907DC1509FE8988A66B76
   CustomProperties Pin (PinId=04580BC64AB9152DE801B395B04A1CFE,PinName="InputPin",PinType.PinCategory="exec",PinType.PinSubCategory="",PinType.PinSubCategoryObject=None,PinType.PinSubCategoryMemberReference=(),PinType.PinValueType=(),PinType.ContainerType=None,PinType.bIsReference=False,PinType.bIsConst=False,PinType.bIsWeakPointer=False,PinType.bIsUObjectWrapper=False,PinType.bSerializeAsSinglePrecisionFloat=False,LinkedTo=(K2Node_IfThenElse_0 EC3F09C84D8797DC93262EBE29230F12,),PersistentGuid=00000000000000000000000000000000,bHidden=False,bNotConnectable=False,bDefaultValueIsReadOnly=False,bDefaultValueIsIgnored=True,bAdvancedView=False,bOrphanedPin=False,)
   CustomProperties Pin (PinId=75AFA3654F6A6B32AD48A987E8383998,PinName="OutputPin",Direction="EGPD_Output",PinType.PinCategory="exec",PinType.PinSubCategory="",PinType.PinSubCategoryObject=None,PinType.PinSubCategoryMemberReference=(),PinType.PinValueType=(),PinType.ContainerType=None,PinType.bIsReference=False,PinType.bIsConst=False,PinType.bIsWeakPointer=False,PinType.bIsUObjectWrapper=False,PinType.bSerializeAsSinglePrecisionFloat=False,LinkedTo=(K2Node_IfThenElse_1 2BD39A1349AE1E72B9AE0BA2CF09D645,),PersistentGuid=00000000000000000000000000000000,bHidden=False,bNotConnectable=False,bDefaultValueIsReadOnly=False,bDefaultValueIsIgnored=False,bAdvancedView=False,bOrphanedPin=False,)
End Object
Begin Object Class=/Script/BlueprintGraph.K2Node_VariableGet Name="K2Node_VariableGet_8" ExportPath="/Script/BlueprintGraph.K2Node_VariableGet'/Game/CharacterSelection/CohCharacterBP.CohCharacterBP:changeActiveCharacter.K2Node_VariableGet_8'"
   VariableReference=(MemberName="Character cameras",MemberGuid=BA6B8C2945790F525BAAEB82CA6723D0,bSelfContext=True)
   NodePosX=-1104
   NodePosY=320
   ErrorType=1
   NodeGuid=C3E7365942CA963B433415888AD0D2BB
   CustomProperties Pin (PinId=9D5FADAF44EB647B878DF59C6BEBD992,PinName="Character cameras",Direction="EGPD_Output",PinType.PinCategory="object",PinType.PinSubCategory="",PinType.PinSubCategoryObject="/Script/CoreUObject.Class'/Script/Engine.CameraActor'",PinType.PinSubCategoryMemberReference=(),PinType.PinValueType=(),PinType.ContainerType=Array,PinType.bIsReference=False,PinType.bIsConst=False,PinType.bIsWeakPointer=False,PinType.bIsUObjectWrapper=False,PinType.bSerializeAsSinglePrecisionFloat=False,LinkedTo=(K2Node_CallArrayFunction_0 4AE933FA43055667DFE578AF6197E34C,),PersistentGuid=00000000000000000000000000000000,bHidden=False,bNotConnectable=False,bDefaultValueIsReadOnly=False,bDefaultValueIsIgnored=False,bAdvancedView=False,bOrphanedPin=False,)
   CustomProperties Pin (PinId=FA792AC74D11398DEED7309463283732,PinName="self",PinFriendlyName=NSLOCTEXT("K2Node", "Target", "Target"),PinType.PinCategory="object",PinType.PinSubCategory="",PinType.PinSubCategoryObject="/Script/Engine.BlueprintGeneratedClass'/Game/CharacterSelection/CohCharacterBP.CohCharacterBP_C'",PinType.PinSubCategoryMemberReference=(),PinType.PinValueType=(),PinType.ContainerType=None,PinType.bIsReference=False,PinType.bIsConst=False,PinType.bIsWeakPointer=False,PinType.bIsUObjectWrapper=False,PinType.bSerializeAsSinglePrecisionFloat=False,PersistentGuid=00000000000000000000000000000000,bHidden=True,bNotConnectable=False,bDefaultValueIsReadOnly=False,bDefaultValueIsIgnored=False,bAdvancedView=False,bOrphanedPin=False,)
End Object
Begin Object Class=/Script/BlueprintGraph.K2Node_CallArrayFunction Name="K2Node_CallArrayFunction_0" ExportPath="/Script/BlueprintGraph.K2Node_CallArrayFunction'/Game/CharacterSelection/CohCharacterBP.CohCharacterBP:changeActiveCharacter.K2Node_CallArrayFunction_0'"
   bIsPureFunc=True
   FunctionReference=(MemberParent="/Script/CoreUObject.Class'/Script/Engine.KismetArrayLibrary'",MemberName="Array_Length")
   NodePosX=-912
   NodePosY=304
   NodeGuid=4F2C187E44CFDF050469E8ABC67B05E6
   CustomProperties Pin (PinId=EE9281BA40701B070D3AB9969B2469E2,PinName="self",PinFriendlyName=NSLOCTEXT("K2Node", "Target", "Target"),PinToolTip="Target
Kismet Array Library Object Reference",PinType.PinCategory="object",PinType.PinSubCategory="",PinType.PinSubCategoryObject="/Script/CoreUObject.Class'/Script/Engine.KismetArrayLibrary'",PinType.PinSubCategoryMemberReference=(),PinType.PinValueType=(),PinType.ContainerType=None,PinType.bIsReference=False,PinType.bIsConst=False,PinType.bIsWeakPointer=False,PinType.bIsUObjectWrapper=False,PinType.bSerializeAsSinglePrecisionFloat=False,DefaultObject="/Script/Engine.Default__KismetArrayLibrary",PersistentGuid=00000000000000000000000000000000,bHidden=True,bNotConnectable=False,bDefaultValueIsReadOnly=False,bDefaultValueIsIgnored=False,bAdvancedView=False,bOrphanedPin=False,)
   CustomProperties Pin (PinId=4AE933FA43055667DFE578AF6197E34C,PinName="TargetArray",PinToolTip="Target Array
Array of Camera Actor Object References

The array to get the length of *",PinType.PinCategory="object",PinType.PinSubCategory="",PinType.PinSubCategoryObject="/Script/CoreUObject.Class'/Script/Engine.CameraActor'",PinType.PinSubCategoryMemberReference=(),PinType.PinValueType=(),PinType.ContainerType=Array,PinType.bIsReference=True,PinType.bIsConst=True,PinType.bIsWeakPointer=False,PinType.bIsUObjectWrapper=False,PinType.bSerializeAsSinglePrecisionFloat=False,LinkedTo=(K2Node_VariableGet_8 9D5FADAF44EB647B878DF59C6BEBD992,),PersistentGuid=00000000000000000000000000000000,bHidden=False,bNotConnectable=False,bDefaultValueIsReadOnly=False,bDefaultValueIsIgnored=True,bAdvancedView=False,bOrphanedPin=False,)
   CustomProperties Pin (PinId=8F28912B48A6D6E8F0B40CB55BA03EC7,PinName="ReturnValue",PinToolTip="Return Value
Integer

The length of the array",Direction="EGPD_Output",PinType.PinCategory="int",PinType.PinSubCategory="",PinType.PinSubCategoryObject=None,PinType.PinSubCategoryMemberReference=(),PinType.PinValueType=(),PinType.ContainerType=None,PinType.bIsReference=False,PinType.bIsConst=False,PinType.bIsWeakPointer=False,PinType.bIsUObjectWrapper=False,PinType.bSerializeAsSinglePrecisionFloat=False,DefaultValue="0",AutogeneratedDefaultValue="0",LinkedTo=(K2Node_PromotableOperator_3 40BC860E40046D6B62EF09AECC771F56,),PersistentGuid=00000000000000000000000000000000,bHidden=False,bNotConnectable=False,bDefaultValueIsReadOnly=False,bDefaultValueIsIgnored=False,bAdvancedView=False,bOrphanedPin=False,)
End Object
Begin Object Class=/Script/BlueprintGraph.K2Node_PromotableOperator Name="K2Node_PromotableOperator_3" ExportPath="/Script/BlueprintGraph.K2Node_PromotableOperator'/Game/CharacterSelection/CohCharacterBP.CohCharacterBP:changeActiveCharacter.K2Node_PromotableOperator_3'"
   bIsPureFunc=True
   FunctionReference=(MemberParent="/Script/CoreUObject.Class'/Script/Engine.KismetMathLibrary'",MemberName="Subtract_IntInt")
   NodePosX=-656
   NodePosY=320
   NodeGuid=B0B5511B425E21668894F3A7BC0FAA14
   CustomProperties Pin (PinId=40BC860E40046D6B62EF09AECC771F56,PinName="A",PinToolTip="A
Integer",PinType.PinCategory="int",PinType.PinSubCategory="",PinType.PinSubCategoryObject=None,PinType.PinSubCategoryMemberReference=(),PinType.PinValueType=(),PinType.ContainerType=None,PinType.bIsReference=False,PinType.bIsConst=False,PinType.bIsWeakPointer=False,PinType.bIsUObjectWrapper=False,PinType.bSerializeAsSinglePrecisionFloat=False,LinkedTo=(K2Node_CallArrayFunction_0 8F28912B48A6D6E8F0B40CB55BA03EC7,),PersistentGuid=00000000000000000000000000000000,bHidden=False,bNotConnectable=False,bDefaultValueIsReadOnly=False,bDefaultValueIsIgnored=False,bAdvancedView=False,bOrphanedPin=False,)
   CustomProperties Pin (PinId=DBC89A9B49D94641C01094B81FC7A7A3,PinName="B",PinToolTip="B
Integer",PinType.PinCategory="int",PinType.PinSubCategory="",PinType.PinSubCategoryObject=None,PinType.PinSubCategoryMemberReference=(),PinType.PinValueType=(),PinType.ContainerType=None,PinType.bIsReference=False,PinType.bIsConst=False,PinType.bIsWeakPointer=False,PinType.bIsUObjectWrapper=False,PinType.bSerializeAsSinglePrecisionFloat=False,DefaultValue="1",PersistentGuid=00000000000000000000000000000000,bHidden=False,bNotConnectable=False,bDefaultValueIsReadOnly=False,bDefaultValueIsIgnored=False,bAdvancedView=False,bOrphanedPin=False,)
   CustomProperties Pin (PinId=985B62C44AFABD83E539FDB2AC47F6AF,PinName="ReturnValue",PinToolTip="Return Value
Integer

Subtraction (A - B)",Direction="EGPD_Output",PinType.PinCategory="int",PinType.PinSubCategory="",PinType.PinSubCategoryObject=None,PinType.PinSubCategoryMemberReference=(),PinType.PinValueType=(),PinType.ContainerType=None,PinType.bIsReference=False,PinType.bIsConst=False,PinType.bIsWeakPointer=False,PinType.bIsUObjectWrapper=False,PinType.bSerializeAsSinglePrecisionFloat=False,LinkedTo=(K2Node_Knot_2 539C78154006668C2CEF2491A42CFC0A,K2Node_Knot_3 B88AD40A479975A5CD4A29B3B70B9FFF,),PersistentGuid=00000000000000000000000000000000,bHidden=False,bNotConnectable=False,bDefaultValueIsReadOnly=False,bDefaultValueIsIgnored=False,bAdvancedView=False,bOrphanedPin=False,)
End Object
Begin Object Class=/Script/BlueprintGraph.K2Node_Knot Name="K2Node_Knot_2" ExportPath="/Script/BlueprintGraph.K2Node_Knot'/Game/CharacterSelection/CohCharacterBP.CohCharacterBP:changeActiveCharacter.K2Node_Knot_2'"
   NodePosX=-368
   NodePosY=160
   NodeGuid=959E0FB74B571A492A2322AE7213D5E7
   CustomProperties Pin (PinId=539C78154006668C2CEF2491A42CFC0A,PinName="InputPin",PinType.PinCategory="int",PinType.PinSubCategory="",PinType.PinSubCategoryObject=None,PinType.PinSubCategoryMemberReference=(),PinType.PinValueType=(),PinType.ContainerType=None,PinType.bIsReference=False,PinType.bIsConst=False,PinType.bIsWeakPointer=False,PinType.bIsUObjectWrapper=False,PinType.bSerializeAsSinglePrecisionFloat=False,LinkedTo=(K2Node_PromotableOperator_3 985B62C44AFABD83E539FDB2AC47F6AF,),PersistentGuid=00000000000000000000000000000000,bHidden=False,bNotConnectable=False,bDefaultValueIsReadOnly=False,bDefaultValueIsIgnored=True,bAdvancedView=False,bOrphanedPin=False,)
   CustomProperties Pin (PinId=371458CE4E1CEBD898BCBCBF862F5719,PinName="OutputPin",Direction="EGPD_Output",PinType.PinCategory="int",PinType.PinSubCategory="",PinType.PinSubCategoryObject=None,PinType.PinSubCategoryMemberReference=(),PinType.PinValueType=(),PinType.ContainerType=None,PinType.bIsReference=False,PinType.bIsConst=False,PinType.bIsWeakPointer=False,PinType.bIsUObjectWrapper=False,PinType.bSerializeAsSinglePrecisionFloat=False,LinkedTo=(K2Node_PromotableOperator_4 E3DEF2514BFC84F3B4A3AC988D80916E,),PersistentGuid=00000000000000000000000000000000,bHidden=False,bNotConnectable=False,bDefaultValueIsReadOnly=False,bDefaultValueIsIgnored=False,bAdvancedView=False,bOrphanedPin=False,)
End Object
Begin Object Class=/Script/BlueprintGraph.K2Node_Knot Name="K2Node_Knot_3" ExportPath="/Script/BlueprintGraph.K2Node_Knot'/Game/CharacterSelection/CohCharacterBP.CohCharacterBP:changeActiveCharacter.K2Node_Knot_3'"
   NodePosX=-384
   NodePosY=544
   NodeGuid=DC800E72469DBBAF6AE7F390EFA28AE2
   CustomProperties Pin (PinId=B88AD40A479975A5CD4A29B3B70B9FFF,PinName="InputPin",PinType.PinCategory="int",PinType.PinSubCategory="",PinType.PinSubCategoryObject=None,PinType.PinSubCategoryMemberReference=(),PinType.PinValueType=(),PinType.ContainerType=None,PinType.bIsReference=False,PinType.bIsConst=False,PinType.bIsWeakPointer=False,PinType.bIsUObjectWrapper=False,PinType.bSerializeAsSinglePrecisionFloat=False,LinkedTo=(K2Node_PromotableOperator_3 985B62C44AFABD83E539FDB2AC47F6AF,),PersistentGuid=00000000000000000000000000000000,bHidden=False,bNotConnectable=False,bDefaultValueIsReadOnly=False,bDefaultValueIsIgnored=True,bAdvancedView=False,bOrphanedPin=False,)
   CustomProperties Pin (PinId=C10B1B4C466D9122A122E88C23266AB3,PinName="OutputPin",Direction="EGPD_Output",PinType.PinCategory="int",PinType.PinSubCategory="",PinType.PinSubCategoryObject=None,PinType.PinSubCategoryMemberReference=(),PinType.PinValueType=(),PinType.ContainerType=None,PinType.bIsReference=False,PinType.bIsConst=False,PinType.bIsWeakPointer=False,PinType.bIsUObjectWrapper=False,PinType.bSerializeAsSinglePrecisionFloat=False,LinkedTo=(K2Node_VariableSet_2 1210C0F34FF82B94EE2C9591126CC218,),PersistentGuid=00000000000000000000000000000000,bHidden=False,bNotConnectable=False,bDefaultValueIsReadOnly=False,bDefaultValueIsIgnored=False,bAdvancedView=False,bOrphanedPin=False,)
End Object
Begin Object Class=/Script/UnrealEd.EdGraphNode_Comment Name="EdGraphNode_Comment_1" ExportPath="/Script/UnrealEd.EdGraphNode_Comment'/Game/CharacterSelection/CohCharacterBP.CohCharacterBP:changeActiveCharacter.EdGraphNode_Comment_1'"
   CommentColor=(R=1.000000,G=1.000000,B=1.000000,A=0.162000)
   bCommentBubbleVisible_InDetailsPanel=False
   MoveMode=NoGroupMovement
   NodePosX=-448
   NodePosY=240
   NodeWidth=1136
   NodeHeight=368
   bCommentBubblePinned=False
   bCommentBubbleVisible=False
   NodeComment="Change to previous character"
   NodeGuid=17C96903454A4D3B2ED68184761EEED7
End Object
Begin Object Class=/Script/UnrealEd.EdGraphNode_Comment Name="EdGraphNode_Comment_0" ExportPath="/Script/UnrealEd.EdGraphNode_Comment'/Game/CharacterSelection/CohCharacterBP.CohCharacterBP:changeActiveCharacter.EdGraphNode_Comment_0'"
   CommentColor=(R=1.000000,G=1.000000,B=1.000000,A=0.162000)
   bCommentBubbleVisible_InDetailsPanel=False
   MoveMode=NoGroupMovement
   NodePosX=-448
   NodePosY=-128
   NodeWidth=1136
   NodeHeight=368
   bCommentBubblePinned=False
   bCommentBubbleVisible=False
   NodeComment="Change to next character"
   NodeGuid=D61B6D59483357489A27C9B7ED6581F2
End Object
Register events for changing the active character
We will set up two events to handle character selection: one for switching to the next character and another for the previous character. These events will be named nextCharacter and prevCharacter, and they’ll be triggered from the UI we’ll implement later.
To add these events in our CohCharacterBP, we need to wait for Gameface to be ready for bindings using the Bind Events Ready for Bindings method. After that, we can register the two events using the Register for Event method, which accepts the Java Script Event Name where we’ll specify our event names.
For both events, we will call the previously created Change Active Character method, adjusting the Direction property to true or false based on whether we’re moving to the previous or next character.
   Begin Object Class=/Script/BlueprintGraph.K2Node_Event Name="K2Node_Event_0" ExportPath="/Script/BlueprintGraph.K2Node_Event'/Game/CharacterSelection/CohCharacterBP.CohCharacterBP:EventGraph.K2Node_Event_0'"
   EventReference=(MemberParent="/Script/CoreUObject.Class'/Script/Engine.Actor'",MemberName="ReceiveBeginPlay")
   bOverrideFunction=True
   NodePosX=-1552
   NodePosY=-240
   bCommentBubblePinned=True
   NodeGuid=AA4BFBA345770E8F5F124F943FD6A2C8
   CustomProperties Pin (PinId=2C0FDE5F475664EFB70A3C911CCD7C84,PinName="OutputDelegate",Direction="EGPD_Output",PinType.PinCategory="delegate",PinType.PinSubCategory="",PinType.PinSubCategoryObject=None,PinType.PinSubCategoryMemberReference=(MemberParent="/Script/CoreUObject.Class'/Script/Engine.Actor'",MemberName="ReceiveBeginPlay"),PinType.PinValueType=(),PinType.ContainerType=None,PinType.bIsReference=False,PinType.bIsConst=False,PinType.bIsWeakPointer=False,PinType.bIsUObjectWrapper=False,PinType.bSerializeAsSinglePrecisionFloat=False,PersistentGuid=00000000000000000000000000000000,bHidden=False,bNotConnectable=False,bDefaultValueIsReadOnly=False,bDefaultValueIsIgnored=False,bAdvancedView=False,bOrphanedPin=False,)
   CustomProperties Pin (PinId=2455A96F45A7C9E12B4E588DCC9A93CC,PinName="then",Direction="EGPD_Output",PinType.PinCategory="exec",PinType.PinSubCategory="",PinType.PinSubCategoryObject=None,PinType.PinSubCategoryMemberReference=(),PinType.PinValueType=(),PinType.ContainerType=None,PinType.bIsReference=False,PinType.bIsConst=False,PinType.bIsWeakPointer=False,PinType.bIsUObjectWrapper=False,PinType.bSerializeAsSinglePrecisionFloat=False,LinkedTo=(K2Node_CallFunction_5 C77F16CE4A9F02B6331B7BAEDB0D230A),PersistentGuid=00000000000000000000000000000000,bHidden=False,bNotConnectable=False,bDefaultValueIsReadOnly=False,bDefaultValueIsIgnored=False,bAdvancedView=False,bOrphanedPin=False,)
End Object
Begin Object Class=/Script/BlueprintGraph.K2Node_CustomEvent Name="K2Node_CustomEvent_0" ExportPath="/Script/BlueprintGraph.K2Node_CustomEvent'/Game/CharacterSelection/CohCharacterBP.CohCharacterBP:EventGraph.K2Node_CustomEvent_0'"
   CustomFunctionName="ReadyForBindings_Event"
   NodePosX=112
   NodePosY=-16
   NodeGuid=34091CBA45BDE4AD5BCDED936668318E
   CustomProperties Pin (PinId=4F16979C4AB46052ED5FFA958978AA15,PinName="OutputDelegate",Direction="EGPD_Output",PinType.PinCategory="delegate",PinType.PinSubCategory="",PinType.PinSubCategoryObject=None,PinType.PinSubCategoryMemberReference=(MemberParent="/Script/Engine.BlueprintGeneratedClass'/Game/CharacterSelection/CohCharacterBP.CohCharacterBP_C'",MemberName="ReadyForBindings_Event",MemberGuid=34091CBA45BDE4AD5BCDED936668318E),PinType.PinValueType=(),PinType.ContainerType=None,PinType.bIsReference=False,PinType.bIsConst=False,PinType.bIsWeakPointer=False,PinType.bIsUObjectWrapper=False,PinType.bSerializeAsSinglePrecisionFloat=False,LinkedTo=(K2Node_AssignDelegate_1 CB93B7924C7F3EAEEE40F79D7951ADA0),PersistentGuid=00000000000000000000000000000000,bHidden=False,bNotConnectable=False,bDefaultValueIsReadOnly=False,bDefaultValueIsIgnored=False,bAdvancedView=False,bOrphanedPin=False,)
   CustomProperties Pin (PinId=7D3E23F74351592A70CF4583D47293E9,PinName="then",Direction="EGPD_Output",PinType.PinCategory="exec",PinType.PinSubCategory="",PinType.PinSubCategoryObject=None,PinType.PinSubCategoryMemberReference=(),PinType.PinValueType=(),PinType.ContainerType=None,PinType.bIsReference=False,PinType.bIsConst=False,PinType.bIsWeakPointer=False,PinType.bIsUObjectWrapper=False,PinType.bSerializeAsSinglePrecisionFloat=False,LinkedTo=(K2Node_CallFunction_0 73D112C043A553883FA599A50A179592),PersistentGuid=00000000000000000000000000000000,bHidden=False,bNotConnectable=False,bDefaultValueIsReadOnly=False,bDefaultValueIsIgnored=False,bAdvancedView=False,bOrphanedPin=False,)
End Object
Begin Object Class=/Script/BlueprintGraph.K2Node_CallFunction Name="K2Node_CallFunction_0" ExportPath="/Script/BlueprintGraph.K2Node_CallFunction'/Game/CharacterSelection/CohCharacterBP.CohCharacterBP:EventGraph.K2Node_CallFunction_0'"
   FunctionReference=(MemberParent="/Script/CoreUObject.Class'/Script/CohtmlPlugin.CohtmlBaseComponent'",MemberName="RegisterForEvent")
   NodePosX=480
   NodePosY=-16
   NodeGuid=C62B7FBF427B69DD5163DF89CA2F414D
   CustomProperties Pin (PinId=73D112C043A553883FA599A50A179592,PinName="execute",PinToolTip="
Exec",PinType.PinCategory="exec",PinType.PinSubCategory="",PinType.PinSubCategoryObject=None,PinType.PinSubCategoryMemberReference=(),PinType.PinValueType=(),PinType.ContainerType=None,PinType.bIsReference=False,PinType.bIsConst=False,PinType.bIsWeakPointer=False,PinType.bIsUObjectWrapper=False,PinType.bSerializeAsSinglePrecisionFloat=False,LinkedTo=(K2Node_CustomEvent_0 7D3E23F74351592A70CF4583D47293E9),PersistentGuid=00000000000000000000000000000000,bHidden=False,bNotConnectable=False,bDefaultValueIsReadOnly=False,bDefaultValueIsIgnored=False,bAdvancedView=False,bOrphanedPin=False,)
   CustomProperties Pin (PinId=2594D8434A3E01AE3672CEBB306B3BB4,PinName="then",PinToolTip="
Exec",Direction="EGPD_Output",PinType.PinCategory="exec",PinType.PinSubCategory="",PinType.PinSubCategoryObject=None,PinType.PinSubCategoryMemberReference=(),PinType.PinValueType=(),PinType.ContainerType=None,PinType.bIsReference=False,PinType.bIsConst=False,PinType.bIsWeakPointer=False,PinType.bIsUObjectWrapper=False,PinType.bSerializeAsSinglePrecisionFloat=False,LinkedTo=(K2Node_CallFunction_6 73D112C043A553883FA599A50A179592),PersistentGuid=00000000000000000000000000000000,bHidden=False,bNotConnectable=False,bDefaultValueIsReadOnly=False,bDefaultValueIsIgnored=False,bAdvancedView=False,bOrphanedPin=False,)
   CustomProperties Pin (PinId=AA673F02470D337A1CD44F8054FBF608,PinName="self",PinFriendlyName=NSLOCTEXT("K2Node", "Target", "Target"),PinToolTip="Target
Gameface Base Component Object Reference",PinType.PinCategory="object",PinType.PinSubCategory="",PinType.PinSubCategoryObject="/Script/CoreUObject.Class'/Script/CohtmlPlugin.CohtmlBaseComponent'",PinType.PinSubCategoryMemberReference=(),PinType.PinValueType=(),PinType.ContainerType=None,PinType.bIsReference=False,PinType.bIsConst=False,PinType.bIsWeakPointer=False,PinType.bIsUObjectWrapper=False,PinType.bSerializeAsSinglePrecisionFloat=False,LinkedTo=(K2Node_VariableGet_9 4D9148BE4E0A6AC5B65986BAC710B4EE),PersistentGuid=00000000000000000000000000000000,bHidden=False,bNotConnectable=False,bDefaultValueIsReadOnly=False,bDefaultValueIsIgnored=False,bAdvancedView=False,bOrphanedPin=False,)
   CustomProperties Pin (PinId=3F65821C402C7D608CE5C3901FFD7CFA,PinName="JSEventName",PinFriendlyName=NSLOCTEXT("", "49F3F7954033E4A55A7BBFBA329549F4", "JavaScript Event Name"),PinToolTip="Java Script Event Name
String",PinType.PinCategory="string",PinType.PinSubCategory="",PinType.PinSubCategoryObject=None,PinType.PinSubCategoryMemberReference=(),PinType.PinValueType=(),PinType.ContainerType=None,PinType.bIsReference=False,PinType.bIsConst=False,PinType.bIsWeakPointer=False,PinType.bIsUObjectWrapper=False,PinType.bSerializeAsSinglePrecisionFloat=False,DefaultValue="nextCharacter",PersistentGuid=00000000000000000000000000000000,bHidden=False,bNotConnectable=False,bDefaultValueIsReadOnly=False,bDefaultValueIsIgnored=False,bAdvancedView=False,bOrphanedPin=False,)
   CustomProperties Pin (PinId=93760E9C4A2EB4FC489ACEB012AAED6A,PinName="Delegate",PinFriendlyName=NSLOCTEXT("", "71127FCB4836FB9B0FD82586BAD00F29", "Event"),PinToolTip="Event
Delegate",PinType.PinCategory="delegate",PinType.PinSubCategory="",PinType.PinSubCategoryObject=None,PinType.PinSubCategoryMemberReference=(MemberParent="/Script/CoreUObject.Package'/Script/CohtmlPlugin'",MemberName="CohtmlJSEventBPCallback__DelegateSignature"),PinType.PinValueType=(),PinType.ContainerType=None,PinType.bIsReference=False,PinType.bIsConst=False,PinType.bIsWeakPointer=False,PinType.bIsUObjectWrapper=False,PinType.bSerializeAsSinglePrecisionFloat=False,LinkedTo=(K2Node_CustomEvent_2 54C3AA7C41B38DB460AB7DA7A7DD82C9),PersistentGuid=00000000000000000000000000000000,bHidden=False,bNotConnectable=False,bDefaultValueIsReadOnly=False,bDefaultValueIsIgnored=False,bAdvancedView=False,bOrphanedPin=False,)
End Object
Begin Object Class=/Script/BlueprintGraph.K2Node_AssignDelegate Name="K2Node_Bind_Event_to_Ready_for_Bindings" ExportPath="/Script/BlueprintGraph.K2Node_AssignDelegate'/Game/CharacterSelection/CohCharacterBP.CohCharacterBP:EventGraph.K2Node_AssignDelegate_1'"
   DelegateReference=(MemberParent="/Script/CoreUObject.Class'/Script/CohtmlPlugin.CohtmlBaseComponent'",MemberName="ReadyForBindings")
   NodePosX=512
   NodePosY=-240
   NodeGuid=C0D008FB4B1056E0115310BA250A0421
   CustomProperties Pin (PinId=D453DB184A8026BC0D3EE99AC0265352,PinName="execute",PinType.PinCategory="exec",PinType.PinSubCategory="",PinType.PinSubCategoryObject=None,PinType.PinSubCategoryMemberReference=(),PinType.PinValueType=(),PinType.ContainerType=None,PinType.bIsReference=False,PinType.bIsConst=False,PinType.bIsWeakPointer=False,PinType.bIsUObjectWrapper=False,PinType.bSerializeAsSinglePrecisionFloat=False,LinkedTo=(K2Node_CallFunction_21 EE258B5943BCE8C716109BBF4228F705),PersistentGuid=00000000000000000000000000000000,bHidden=False,bNotConnectable=False,bDefaultValueIsReadOnly=False,bDefaultValueIsIgnored=False,bAdvancedView=False,bOrphanedPin=False,)
   CustomProperties Pin (PinId=DFC74ED14D01F43A2881C8BA92DB093E,PinName="then",Direction="EGPD_Output",PinType.PinCategory="exec",PinType.PinSubCategory="",PinType.PinSubCategoryObject=None,PinType.PinSubCategoryMemberReference=(),PinType.PinValueType=(),PinType.ContainerType=None,PinType.bIsReference=False,PinType.bIsConst=False,PinType.bIsWeakPointer=False,PinType.bIsUObjectWrapper=False,PinType.bSerializeAsSinglePrecisionFloat=False,PersistentGuid=00000000000000000000000000000000,bHidden=False,bNotConnectable=False,bDefaultValueIsReadOnly=False,bDefaultValueIsIgnored=False,bAdvancedView=False,bOrphanedPin=False,)
   CustomProperties Pin (PinId=98B5F5C945A226E535BED6BED0CFED92,PinName="self",PinFriendlyName=NSLOCTEXT("K2Node", "BaseMCDelegateSelfPinName", "Target"),PinType.PinCategory="object",PinType.PinSubCategory="",PinType.PinSubCategoryObject="/Script/CoreUObject.Class'/Script/CohtmlPlugin.CohtmlBaseComponent'",PinType.PinSubCategoryMemberReference=(),PinType.PinValueType=(),PinType.ContainerType=None,PinType.bIsReference=False,PinType.bIsConst=False,PinType.bIsWeakPointer=False,PinType.bIsUObjectWrapper=False,PinType.bSerializeAsSinglePrecisionFloat=False,LinkedTo=(K2Node_VariableGet_9 4D9148BE4E0A6AC5B65986BAC710B4EE),PersistentGuid=00000000000000000000000000000000,bHidden=False,bNotConnectable=False,bDefaultValueIsReadOnly=False,bDefaultValueIsIgnored=False,bAdvancedView=False,bOrphanedPin=False,)
   CustomProperties Pin (PinId=CB93B7924C7F3EAEEE40F79D7951ADA0,PinName="Delegate",PinFriendlyName=NSLOCTEXT("K2Node", "PinFriendlyDelegatetName", "Event"),PinType.PinCategory="Delegate",PinType.PinSubCategory="",PinType.PinSubCategoryObject=None,PinType.PinSubCategoryMemberReference=(MemberParent="/Script/CoreUObject.Package'/Script/CohtmlPlugin'",MemberName="CohtmlReadyForBindings__DelegateSignature"),PinType.PinValueType=(),PinType.ContainerType=None,PinType.bIsReference=True,PinType.bIsConst=True,PinType.bIsWeakPointer=False,PinType.bIsUObjectWrapper=False,PinType.bSerializeAsSinglePrecisionFloat=False,LinkedTo=(),PersistentGuid=00000000000000000000000000000000,bHidden=False,bNotConnectable=False,bDefaultValueIsReadOnly=False,bDefaultValueIsIgnored=False,bAdvancedView=False,bOrphanedPin=False,)
End Object
Begin Object Class=/Script/BlueprintGraph.K2Node_CallFunction Name="K2Node_CallFunction_6" ExportPath="/Script/BlueprintGraph.K2Node_CallFunction'/Game/CharacterSelection/CohCharacterBP.CohCharacterBP:EventGraph.K2Node_CallFunction_6'"
   FunctionReference=(MemberParent="/Script/CoreUObject.Class'/Script/CohtmlPlugin.CohtmlBaseComponent'",MemberName="RegisterForEvent")
   NodePosX=880
   NodePosY=-16
   ErrorType=1
   NodeGuid=7ADA30FF4078FEB2C93FAB834976A860
   CustomProperties Pin (PinId=73D112C043A553883FA599A50A179592,PinName="execute",PinToolTip="
Exec",PinType.PinCategory="exec",PinType.PinSubCategory="",PinType.PinSubCategoryObject=None,PinType.PinSubCategoryMemberReference=(),PinType.PinValueType=(),PinType.ContainerType=None,PinType.bIsReference=False,PinType.bIsConst=False,PinType.bIsWeakPointer=False,PinType.bIsUObjectWrapper=False,PinType.bSerializeAsSinglePrecisionFloat=False,LinkedTo=(K2Node_CallFunction_0 2594D8434A3E01AE3672CEBB306B3BB4),PersistentGuid=00000000000000000000000000000000,bHidden=False,bNotConnectable=False,bDefaultValueIsReadOnly=False,bDefaultValueIsIgnored=False,bAdvancedView=False,bOrphanedPin=False,)
   CustomProperties Pin (PinId=2594D8434A3E01AE3672CEBB306B3BB4,PinName="then",PinToolTip="
Exec",Direction="EGPD_Output",PinType.PinCategory="exec",PinType.PinSubCategory="",PinType.PinSubCategoryObject=None,PinType.PinSubCategoryMemberReference=(),PinType.PinValueType=(),PinType.ContainerType=None,PinType.bIsReference=False,PinType.bIsConst=False,PinType.bIsWeakPointer=False,PinType.bIsUObjectWrapper=False,PinType.bSerializeAsSinglePrecisionFloat=False,LinkedTo=(),PersistentGuid=00000000000000000000000000000000,bHidden=False,bNotConnectable=False,bDefaultValueIsReadOnly=False,bDefaultValueIsIgnored=False,bAdvancedView=False,bOrphanedPin=False,)
   CustomProperties Pin (PinId=AA673F02470D337A1CD44F8054FBF608,PinName="self",PinFriendlyName=NSLOCTEXT("K2Node", "Target", "Target"),PinToolTip="Target
Gameface Base Component Object Reference",PinType.PinCategory="object",PinType.PinSubCategory="",PinType.PinSubCategoryObject="/Script/CoreUObject.Class'/Script/CohtmlPlugin.CohtmlBaseComponent'",PinType.PinSubCategoryMemberReference=(),PinType.PinValueType=(),PinType.ContainerType=None,PinType.bIsReference=False,PinType.bIsConst=False,PinType.bIsWeakPointer=False,PinType.bIsUObjectWrapper=False,PinType.bSerializeAsSinglePrecisionFloat=False,LinkedTo=(K2Node_Knot_5 C083585B4ADA7F3A211F0B95DEE97F61),PersistentGuid=00000000000000000000000000000000,bHidden=False,bNotConnectable=False,bDefaultValueIsReadOnly=False,bDefaultValueIsIgnored=False,bAdvancedView=False,bOrphanedPin=False,)
   CustomProperties Pin (PinId=3F65821C402C7D608CE5C3901FFD7CFA,PinName="JSEventName",PinFriendlyName=NSLOCTEXT("", "4F0108A1494A8B22E897CEAF24C3A5E5", "JavaScript Event Name"),PinToolTip="Java Script Event Name
String",PinType.PinCategory="string",PinType.PinSubCategory="",PinType.PinSubCategoryObject=None,PinType.PinSubCategoryMemberReference=(),PinType.PinValueType=(),PinType.ContainerType=None,PinType.bIsReference=False,PinType.bIsConst=False,PinType.bIsWeakPointer=False,PinType.bIsUObjectWrapper=False,PinType.bSerializeAsSinglePrecisionFloat=False,DefaultValue="prevCharacter",PersistentGuid=00000000000000000000000000000000,bHidden=False,bNotConnectable=False,bDefaultValueIsReadOnly=False,bDefaultValueIsIgnored=False,bAdvancedView=False,bOrphanedPin=False,)
   CustomProperties Pin (PinId=93760E9C4A2EB4FC489ACEB012AAED6A,PinName="Delegate",PinFriendlyName=NSLOCTEXT("", "0E751C0D40BD89493C78AF8DF00D0B1A", "Event"),PinToolTip="Event
Delegate",PinType.PinCategory="delegate",PinType.PinSubCategory="",PinType.PinSubCategoryObject=None,PinType.PinSubCategoryMemberReference=(MemberParent="/Script/CoreUObject.Package'/Script/CohtmlPlugin'",MemberName="CohtmlJSEventBPCallback__DelegateSignature"),PinType.PinValueType=(),PinType.ContainerType=None,PinType.bIsReference=False,PinType.bIsConst=False,PinType.bIsWeakPointer=False,PinType.bIsUObjectWrapper=False,PinType.bSerializeAsSinglePrecisionFloat=False,LinkedTo=(K2Node_CustomEvent_3 034529EA43946A78C8869196F1EFC07A),PersistentGuid=00000000000000000000000000000000,bHidden=False,bNotConnectable=False,bDefaultValueIsReadOnly=False,bDefaultValueIsIgnored=False,bAdvancedView=False,bOrphanedPin=False,)
End Object
Begin Object Class=/Script/BlueprintGraph.K2Node_CustomEvent Name="K2Node_CustomEvent_2" ExportPath="/Script/BlueprintGraph.K2Node_CustomEvent'/Game/CharacterSelection/CohCharacterBP.CohCharacterBP:EventGraph.K2Node_CustomEvent_2'"
   CustomFunctionName="nextCharacter"
   NodePosX=-144
   NodePosY=272
   ErrorType=1
   NodeGuid=9C4AEA324E2617AEAF15E89B05D2709E
   CustomProperties Pin (PinId=54C3AA7C41B38DB460AB7DA7A7DD82C9,PinName="OutputDelegate",Direction="EGPD_Output",PinType.PinCategory="delegate",PinType.PinSubCategory="",PinType.PinSubCategoryObject=None,PinType.PinSubCategoryMemberReference=(MemberParent="/Script/Engine.BlueprintGeneratedClass'/Game/CharacterSelection/CohCharacterBP.CohCharacterBP_C'",MemberName="nextCharacter",MemberGuid=9C4AEA324E2617AEAF15E89B05D2709E),PinType.PinValueType=(),PinType.ContainerType=None,PinType.bIsReference=False,PinType.bIsConst=False,PinType.bIsWeakPointer=False,PinType.bIsUObjectWrapper=False,PinType.bSerializeAsSinglePrecisionFloat=False,LinkedTo=(K2Node_CallFunction_0 93760E9C4A2EB4FC489ACEB012AAED6A),PersistentGuid=00000000000000000000000000000000,bHidden=False,bNotConnectable=False,bDefaultValueIsReadOnly=False,bDefaultValueIsIgnored=False,bAdvancedView=False,bOrphanedPin=False,)
   CustomProperties Pin (PinId=B1217FF44E2AD317D952A7AA29F05E25,PinName="then",Direction="EGPD_Output",PinType.PinCategory="exec",PinType.PinSubCategory="",PinType.PinSubCategoryObject=None,PinType.PinSubCategoryMemberReference=(),PinType.PinValueType=(),PinType.ContainerType=None,PinType.bIsReference=False,PinType.bIsConst=False,PinType.bIsWeakPointer=False,PinType.bIsUObjectWrapper=False,PinType.bSerializeAsSinglePrecisionFloat=False,LinkedTo=(K2Node_CallFunction_12 1943ACA14B4C104CDA6A8DBC4930A6B1),PersistentGuid=00000000000000000000000000000000,bHidden=False,bNotConnectable=False,bDefaultValueIsReadOnly=False,bDefaultValueIsIgnored=False,bAdvancedView=False,bOrphanedPin=False,)
End Object
Begin Object Class=/Script/BlueprintGraph.K2Node_CustomEvent Name="K2Node_CustomEvent_3" ExportPath="/Script/BlueprintGraph.K2Node_CustomEvent'/Game/CharacterSelection/CohCharacterBP.CohCharacterBP:EventGraph.K2Node_CustomEvent_3'"
   CustomFunctionName="prevCharacter"
   NodePosX=400
   NodePosY=288
   NodeGuid=900D92DF473E1D0E251168A3FB87960B
   CustomProperties Pin (PinId=034529EA43946A78C8869196F1EFC07A,PinName="OutputDelegate",Direction="EGPD_Output",PinType.PinCategory="delegate",PinType.PinSubCategory="",PinType.PinSubCategoryObject=None,PinType.PinSubCategoryMemberReference=(MemberParent="/Script/Engine.BlueprintGeneratedClass'/Game/CharacterSelection/CohCharacterBP.CohCharacterBP_C'",MemberName="prevCharacter",MemberGuid=900D92DF473E1D0E251168A3FB87960B),PinType.PinValueType=(),PinType.ContainerType=None,PinType.bIsReference=False,PinType.bIsConst=False,PinType.bIsWeakPointer=False,PinType.bIsUObjectWrapper=False,PinType.bSerializeAsSinglePrecisionFloat=False,LinkedTo=(K2Node_CallFunction_6 93760E9C4A2EB4FC489ACEB012AAED6A),PersistentGuid=00000000000000000000000000000000,bHidden=False,bNotConnectable=False,bDefaultValueIsReadOnly=False,bDefaultValueIsIgnored=False,bAdvancedView=False,bOrphanedPin=False,)
   CustomProperties Pin (PinId=8D2CA6BC472D24C1CAE8BEB94DEC6B8C,PinName="then",Direction="EGPD_Output",PinType.PinCategory="exec",PinType.PinSubCategory="",PinType.PinSubCategoryObject=None,PinType.PinSubCategoryMemberReference=(),PinType.PinValueType=(),PinType.ContainerType=None,PinType.bIsReference=False,PinType.bIsConst=False,PinType.bIsWeakPointer=False,PinType.bIsUObjectWrapper=False,PinType.bSerializeAsSinglePrecisionFloat=False,LinkedTo=(K2Node_CallFunction_11 1943ACA14B4C104CDA6A8DBC4930A6B1),PersistentGuid=00000000000000000000000000000000,bHidden=False,bNotConnectable=False,bDefaultValueIsReadOnly=False,bDefaultValueIsIgnored=False,bAdvancedView=False,bOrphanedPin=False,)
End Object
Begin Object Class=/Script/BlueprintGraph.K2Node_VariableSet Name="K2Node_VariableSet_5" ExportPath="/Script/BlueprintGraph.K2Node_VariableSet'/Game/CharacterSelection/CohCharacterBP.CohCharacterBP:EventGraph.K2Node_VariableSet_5'"
   VariableReference=(MemberName="Character cameras",MemberGuid=BA6B8C2945790F525BAAEB82CA6723D0,bSelfContext=True)
   NodePosX=-176
   NodePosY=-224
   ErrorType=1
   NodeGuid=D52BFFEF4F062C52A36BB19481AE2756
   CustomProperties Pin (PinId=9D059F0A423972C4C2257DAC152BB5DE,PinName="execute",PinType.PinCategory="exec",PinType.PinSubCategory="",PinType.PinSubCategoryObject=None,PinType.PinSubCategoryMemberReference=(),PinType.PinValueType=(),PinType.ContainerType=None,PinType.bIsReference=False,PinType.bIsConst=False,PinType.bIsWeakPointer=False,PinType.bIsUObjectWrapper=False,PinType.bSerializeAsSinglePrecisionFloat=False,LinkedTo=(K2Node_CallFunction_4 D48F987144FD993DD3A780A651A23FD4),PersistentGuid=00000000000000000000000000000000,bHidden=False,bNotConnectable=False,bDefaultValueIsReadOnly=False,bDefaultValueIsIgnored=False,bAdvancedView=False,bOrphanedPin=False,)
   CustomProperties Pin (PinId=6AF7A93147AA13F25B69EC9CF5908562,PinName="then",Direction="EGPD_Output",PinType.PinCategory="exec",PinType.PinSubCategory="",PinType.PinSubCategoryObject=None,PinType.PinSubCategoryMemberReference=(),PinType.PinValueType=(),PinType.ContainerType=None,PinType.bIsReference=False,PinType.bIsConst=False,PinType.bIsWeakPointer=False,PinType.bIsUObjectWrapper=False,PinType.bSerializeAsSinglePrecisionFloat=False,LinkedTo=(K2Node_CallFunction_21 E71B463E4350C4896DC0CAA479186EE4),PersistentGuid=00000000000000000000000000000000,bHidden=False,bNotConnectable=False,bDefaultValueIsReadOnly=False,bDefaultValueIsIgnored=False,bAdvancedView=False,bOrphanedPin=False,)
   CustomProperties Pin (PinId=EDEEDCE64AB4EE7A6193A3B43E2DA0A0,PinName="Character cameras",PinType.PinCategory="object",PinType.PinSubCategory="",PinType.PinSubCategoryObject="/Script/CoreUObject.Class'/Script/Engine.CameraActor'",PinType.PinSubCategoryMemberReference=(),PinType.PinValueType=(),PinType.ContainerType=Array,PinType.bIsReference=False,PinType.bIsConst=False,PinType.bIsWeakPointer=False,PinType.bIsUObjectWrapper=False,PinType.bSerializeAsSinglePrecisionFloat=False,LinkedTo=(K2Node_CallFunction_4 2043574F4A05ED4FEEBAE29430AD7B9E),PersistentGuid=00000000000000000000000000000000,bHidden=False,bNotConnectable=False,bDefaultValueIsReadOnly=False,bDefaultValueIsIgnored=False,bAdvancedView=False,bOrphanedPin=False,)
   CustomProperties Pin (PinId=211FA3A843A3D8527AAB72B953C9982E,PinName="Output_Get",PinToolTip="Retrieves the value of the variable, can use instead of a separate Get node",Direction="EGPD_Output",PinType.PinCategory="object",PinType.PinSubCategory="",PinType.PinSubCategoryObject="/Script/CoreUObject.Class'/Script/Engine.CameraActor'",PinType.PinSubCategoryMemberReference=(),PinType.PinValueType=(),PinType.ContainerType=Array,PinType.bIsReference=False,PinType.bIsConst=False,PinType.bIsWeakPointer=False,PinType.bIsUObjectWrapper=False,PinType.bSerializeAsSinglePrecisionFloat=False,PersistentGuid=00000000000000000000000000000000,bHidden=False,bNotConnectable=False,bDefaultValueIsReadOnly=False,bDefaultValueIsIgnored=False,bAdvancedView=False,bOrphanedPin=False,)
   CustomProperties Pin (PinId=615FEC9B4F47EA744F323CB44CBA6DB6,PinName="self",PinFriendlyName=NSLOCTEXT("K2Node", "Target", "Target"),PinType.PinCategory="object",PinType.PinSubCategory="",PinType.PinSubCategoryObject="/Script/Engine.BlueprintGeneratedClass'/Game/CharacterSelection/CohCharacterBP.CohCharacterBP_C'",PinType.PinSubCategoryMemberReference=(),PinType.PinValueType=(),PinType.ContainerType=None,PinType.bIsReference=False,PinType.bIsConst=False,PinType.bIsWeakPointer=False,PinType.bIsUObjectWrapper=False,PinType.bSerializeAsSinglePrecisionFloat=False,PersistentGuid=00000000000000000000000000000000,bHidden=True,bNotConnectable=False,bDefaultValueIsReadOnly=False,bDefaultValueIsIgnored=False,bAdvancedView=False,bOrphanedPin=False,)
End Object
Begin Object Class=/Script/BlueprintGraph.K2Node_CallFunction Name="K2Node_CallFunction_21" ExportPath="/Script/BlueprintGraph.K2Node_CallFunction'/Game/CharacterSelection/CohCharacterBP.CohCharacterBP:EventGraph.K2Node_CallFunction_21'"
   FunctionReference=(MemberName="setActiveCamera",MemberGuid=2AD9851E47B5E56FEE67D1B0B837C204,bSelfContext=True)
   NodePosX=112
   NodePosY=-256
   NodeGuid=3A459AA04DB9E8C578930B850C2AA45C
   CustomProperties Pin (PinId=E71B463E4350C4896DC0CAA479186EE4,PinName="execute",PinType.PinCategory="exec",PinType.PinSubCategory="",PinType.PinSubCategoryObject=None,PinType.PinSubCategoryMemberReference=(),PinType.PinValueType=(),PinType.ContainerType=None,PinType.bIsReference=False,PinType.bIsConst=False,PinType.bIsWeakPointer=False,PinType.bIsUObjectWrapper=False,PinType.bSerializeAsSinglePrecisionFloat=False,LinkedTo=(K2Node_VariableSet_5 6AF7A93147AA13F25B69EC9CF5908562),PersistentGuid=00000000000000000000000000000000,bHidden=False,bNotConnectable=False,bDefaultValueIsReadOnly=False,bDefaultValueIsIgnored=False,bAdvancedView=False,bOrphanedPin=False,)
   CustomProperties Pin (PinId=EE258B5943BCE8C716109BBF4228F705,PinName="then",Direction="EGPD_Output",PinType.PinCategory="exec",PinType.PinSubCategory="",PinType.PinSubCategoryObject=None,PinType.PinSubCategoryMemberReference=(),PinType.PinValueType=(),PinType.ContainerType=None,PinType.bIsReference=False,PinType.bIsConst=False,PinType.bIsWeakPointer=False,PinType.bIsUObjectWrapper=False,PinType.bSerializeAsSinglePrecisionFloat=False,LinkedTo=(K2Node_AssignDelegate_1 D453DB184A8026BC0D3EE99AC0265352),PersistentGuid=00000000000000000000000000000000,bHidden=False,bNotConnectable=False,bDefaultValueIsReadOnly=False,bDefaultValueIsIgnored=False,bAdvancedView=False,bOrphanedPin=False,)
   CustomProperties Pin (PinId=6C71A2BD43ABCFD067D49AAB3F388F4A,PinName="self",PinFriendlyName=NSLOCTEXT("K2Node", "Target", "Target"),PinType.PinCategory="object",PinType.PinSubCategory="self",PinType.PinSubCategoryObject=None,PinType.PinSubCategoryMemberReference=(),PinType.PinValueType=(),PinType.ContainerType=None,PinType.bIsReference=False,PinType.bIsConst=False,PinType.bIsWeakPointer=False,PinType.bIsUObjectWrapper=False,PinType.bSerializeAsSinglePrecisionFloat=False,PersistentGuid=00000000000000000000000000000000,bHidden=False,bNotConnectable=False,bDefaultValueIsReadOnly=False,bDefaultValueIsIgnored=False,bAdvancedView=False,bOrphanedPin=False,)
End Object
Begin Object Class=/Script/BlueprintGraph.K2Node_CallFunction Name="K2Node_CallFunction_1" ExportPath="/Script/BlueprintGraph.K2Node_CallFunction'/Game/CharacterSelection/CohCharacterBP.CohCharacterBP:EventGraph.K2Node_CallFunction_1'"
   FunctionReference=(MemberName="Setup Input",MemberGuid=E28AB6F64DDFAA61819A6796767C7278,bSelfContext=True)
   NodePosX=-864
   NodePosY=-256
   NodeGuid=14BD67F74F6C557068E61F935616F254
   CustomProperties Pin (PinId=F18B0BF3447CC93D87DA1B9449B3027C,PinName="execute",PinToolTip="
Exec",PinType.PinCategory="exec",PinType.PinSubCategory="",PinType.PinSubCategoryObject=None,PinType.PinSubCategoryMemberReference=(),PinType.PinValueType=(),PinType.ContainerType=None,PinType.bIsReference=False,PinType.bIsConst=False,PinType.bIsWeakPointer=False,PinType.bIsUObjectWrapper=False,PinType.bSerializeAsSinglePrecisionFloat=False,LinkedTo=(K2Node_CallFunction_5 AE2E63844C3AD746CC9EE0B15A5F86B3),PersistentGuid=00000000000000000000000000000000,bHidden=False,bNotConnectable=False,bDefaultValueIsReadOnly=False,bDefaultValueIsIgnored=False,bAdvancedView=False,bOrphanedPin=False,)
   CustomProperties Pin (PinId=8058C50046BCB64F9BE5388E2751A9D7,PinName="then",PinToolTip="
Exec",Direction="EGPD_Output",PinType.PinCategory="exec",PinType.PinSubCategory="",PinType.PinSubCategoryObject=None,PinType.PinSubCategoryMemberReference=(),PinType.PinValueType=(),PinType.ContainerType=None,PinType.bIsReference=False,PinType.bIsConst=False,PinType.bIsWeakPointer=False,PinType.bIsUObjectWrapper=False,PinType.bSerializeAsSinglePrecisionFloat=False,LinkedTo=(K2Node_CallFunction_4 42EC35D643324AA10F0A20964E95D6F9),PersistentGuid=00000000000000000000000000000000,bHidden=False,bNotConnectable=False,bDefaultValueIsReadOnly=False,bDefaultValueIsIgnored=False,bAdvancedView=False,bOrphanedPin=False,)
   CustomProperties Pin (PinId=5D1E035F4CBDBCC8D9EB939E04758A3C,PinName="self",PinFriendlyName=NSLOCTEXT("K2Node", "Target", "Target"),PinToolTip="Target
Self Object Reference",PinType.PinCategory="object",PinType.PinSubCategory="self",PinType.PinSubCategoryObject=None,PinType.PinSubCategoryMemberReference=(),PinType.PinValueType=(),PinType.ContainerType=None,PinType.bIsReference=False,PinType.bIsConst=False,PinType.bIsWeakPointer=False,PinType.bIsUObjectWrapper=False,PinType.bSerializeAsSinglePrecisionFloat=False,PersistentGuid=00000000000000000000000000000000,bHidden=False,bNotConnectable=False,bDefaultValueIsReadOnly=False,bDefaultValueIsIgnored=False,bAdvancedView=False,bOrphanedPin=False,)
End Object
Begin Object Class=/Script/BlueprintGraph.K2Node_CallFunction Name="K2Node_CallFunction_4" ExportPath="/Script/BlueprintGraph.K2Node_CallFunction'/Game/CharacterSelection/CohCharacterBP.CohCharacterBP:EventGraph.K2Node_CallFunction_4'"
   FunctionReference=(MemberParent="/Script/CoreUObject.Class'/Script/Engine.GameplayStatics'",MemberName="GetAllActorsOfClass")
   NodePosX=-544
   NodePosY=-240
   NodeGuid=C569A1774DB7FD54D2973BA68BA2D569
   CustomProperties Pin (PinId=42EC35D643324AA10F0A20964E95D6F9,PinName="execute",PinToolTip="
Exec",PinType.PinCategory="exec",PinType.PinSubCategory="",PinType.PinSubCategoryObject=None,PinType.PinSubCategoryMemberReference=(),PinType.PinValueType=(),PinType.ContainerType=None,PinType.bIsReference=False,PinType.bIsConst=False,PinType.bIsWeakPointer=False,PinType.bIsUObjectWrapper=False,PinType.bSerializeAsSinglePrecisionFloat=False,LinkedTo=(K2Node_CallFunction_1 8058C50046BCB64F9BE5388E2751A9D7),PersistentGuid=00000000000000000000000000000000,bHidden=False,bNotConnectable=False,bDefaultValueIsReadOnly=False,bDefaultValueIsIgnored=False,bAdvancedView=False,bOrphanedPin=False,)
   CustomProperties Pin (PinId=D48F987144FD993DD3A780A651A23FD4,PinName="then",PinToolTip="
Exec",Direction="EGPD_Output",PinType.PinCategory="exec",PinType.PinSubCategory="",PinType.PinSubCategoryObject=None,PinType.PinSubCategoryMemberReference=(),PinType.PinValueType=(),PinType.ContainerType=None,PinType.bIsReference=False,PinType.bIsConst=False,PinType.bIsWeakPointer=False,PinType.bIsUObjectWrapper=False,PinType.bSerializeAsSinglePrecisionFloat=False,LinkedTo=(K2Node_VariableSet_5 9D059F0A423972C4C2257DAC152BB5DE),PersistentGuid=00000000000000000000000000000000,bHidden=False,bNotConnectable=False,bDefaultValueIsReadOnly=False,bDefaultValueIsIgnored=False,bAdvancedView=False,bOrphanedPin=False,)
   CustomProperties Pin (PinId=E7B7655F43E57E172A3FC48AB481FB69,PinName="self",PinFriendlyName=NSLOCTEXT("K2Node", "Target", "Target"),PinToolTip="Target
Gameplay Statics Object Reference",PinType.PinCategory="object",PinType.PinSubCategory="",PinType.PinSubCategoryObject="/Script/CoreUObject.Class'/Script/Engine.GameplayStatics'",PinType.PinSubCategoryMemberReference=(),PinType.PinValueType=(),PinType.ContainerType=None,PinType.bIsReference=False,PinType.bIsConst=False,PinType.bIsWeakPointer=False,PinType.bIsUObjectWrapper=False,PinType.bSerializeAsSinglePrecisionFloat=False,DefaultObject="/Script/Engine.Default__GameplayStatics",PersistentGuid=00000000000000000000000000000000,bHidden=True,bNotConnectable=False,bDefaultValueIsReadOnly=False,bDefaultValueIsIgnored=False,bAdvancedView=False,bOrphanedPin=False,)
   CustomProperties Pin (PinId=743B6D51427794E8066D9AAE4D1A1F27,PinName="WorldContextObject",PinToolTip="World Context Object
Object Reference",PinType.PinCategory="object",PinType.PinSubCategory="",PinType.PinSubCategoryObject="/Script/CoreUObject.Class'/Script/CoreUObject.Object'",PinType.PinSubCategoryMemberReference=(),PinType.PinValueType=(),PinType.ContainerType=None,PinType.bIsReference=False,PinType.bIsConst=True,PinType.bIsWeakPointer=False,PinType.bIsUObjectWrapper=False,PinType.bSerializeAsSinglePrecisionFloat=False,PersistentGuid=00000000000000000000000000000000,bHidden=True,bNotConnectable=False,bDefaultValueIsReadOnly=False,bDefaultValueIsIgnored=False,bAdvancedView=False,bOrphanedPin=False,)
   CustomProperties Pin (PinId=F22259D44D983EE5141F7795B746C5ED,PinName="ActorClass",PinToolTip="Actor Class
Actor Class Reference

Class of Actor to find. Must be specified or result array will be empty.",PinType.PinCategory="class",PinType.PinSubCategory="",PinType.PinSubCategoryObject="/Script/CoreUObject.Class'/Script/Engine.Actor'",PinType.PinSubCategoryMemberReference=(),PinType.PinValueType=(),PinType.ContainerType=None,PinType.bIsReference=False,PinType.bIsConst=False,PinType.bIsWeakPointer=False,PinType.bIsUObjectWrapper=True,PinType.bSerializeAsSinglePrecisionFloat=False,DefaultObject="/Script/Engine.CameraActor",PersistentGuid=00000000000000000000000000000000,bHidden=False,bNotConnectable=False,bDefaultValueIsReadOnly=False,bDefaultValueIsIgnored=False,bAdvancedView=False,bOrphanedPin=False,)
   CustomProperties Pin (PinId=2043574F4A05ED4FEEBAE29430AD7B9E,PinName="OutActors",PinToolTip="Out Actors
Array of Camera Actor Object References

Output array of Actors of the specified class.",Direction="EGPD_Output",PinType.PinCategory="object",PinType.PinSubCategory="",PinType.PinSubCategoryObject="/Script/CoreUObject.Class'/Script/Engine.CameraActor'",PinType.PinSubCategoryMemberReference=(),PinType.PinValueType=(),PinType.ContainerType=Array,PinType.bIsReference=False,PinType.bIsConst=False,PinType.bIsWeakPointer=False,PinType.bIsUObjectWrapper=False,PinType.bSerializeAsSinglePrecisionFloat=False,LinkedTo=(K2Node_VariableSet_5 EDEEDCE64AB4EE7A6193A3B43E2DA0A0),PersistentGuid=00000000000000000000000000000000,bHidden=False,bNotConnectable=False,bDefaultValueIsReadOnly=False,bDefaultValueIsIgnored=False,bAdvancedView=False,bOrphanedPin=False,)
End Object
Begin Object Class=/Script/BlueprintGraph.K2Node_CallFunction Name="K2Node_CallFunction_5" ExportPath="/Script/BlueprintGraph.K2Node_CallFunction'/Game/CharacterSelection/CohCharacterBP.CohCharacterBP:EventGraph.K2Node_CallFunction_5'"
   FunctionReference=(MemberName="SetupView",bSelfContext=True)
   NodePosX=-1280
   NodePosY=-256
   NodeGuid=0D159CCF4818EE5C43C743A4B41D0110
   CustomProperties Pin (PinId=C77F16CE4A9F02B6331B7BAEDB0D230A,PinName="execute",PinToolTip="
Exec",PinType.PinCategory="exec",PinType.PinSubCategory="",PinType.PinSubCategoryObject=None,PinType.PinSubCategoryMemberReference=(),PinType.PinValueType=(),PinType.ContainerType=None,PinType.bIsReference=False,PinType.bIsConst=False,PinType.bIsWeakPointer=False,PinType.bIsUObjectWrapper=False,PinType.bSerializeAsSinglePrecisionFloat=False,LinkedTo=(K2Node_Event_0 2455A96F45A7C9E12B4E588DCC9A93CC),PersistentGuid=00000000000000000000000000000000,bHidden=False,bNotConnectable=False,bDefaultValueIsReadOnly=False,bDefaultValueIsIgnored=False,bAdvancedView=False,bOrphanedPin=False,)
   CustomProperties Pin (PinId=AE2E63844C3AD746CC9EE0B15A5F86B3,PinName="then",PinToolTip="
Exec",Direction="EGPD_Output",PinType.PinCategory="exec",PinType.PinSubCategory="",PinType.PinSubCategoryObject=None,PinType.PinSubCategoryMemberReference=(),PinType.PinValueType=(),PinType.ContainerType=None,PinType.bIsReference=False,PinType.bIsConst=False,PinType.bIsWeakPointer=False,PinType.bIsUObjectWrapper=False,PinType.bSerializeAsSinglePrecisionFloat=False,LinkedTo=(K2Node_CallFunction_1 F18B0BF3447CC93D87DA1B9449B3027C),PersistentGuid=00000000000000000000000000000000,bHidden=False,bNotConnectable=False,bDefaultValueIsReadOnly=False,bDefaultValueIsIgnored=False,bAdvancedView=False,bOrphanedPin=False,)
   CustomProperties Pin (PinId=3D0D0C004BB89C4E0EA77ABDD983927C,PinName="self",PinFriendlyName=NSLOCTEXT("K2Node", "Target", "Target"),PinToolTip="Target
Gameface Game HUD Object Reference",PinType.PinCategory="object",PinType.PinSubCategory="",PinType.PinSubCategoryObject="/Script/CoreUObject.Class'/Script/CohtmlPlugin.CohtmlGameHUD'",PinType.PinSubCategoryMemberReference=(),PinType.PinValueType=(),PinType.ContainerType=None,PinType.bIsReference=False,PinType.bIsConst=False,PinType.bIsWeakPointer=False,PinType.bIsUObjectWrapper=False,PinType.bSerializeAsSinglePrecisionFloat=False,PersistentGuid=00000000000000000000000000000000,bHidden=False,bNotConnectable=False,bDefaultValueIsReadOnly=False,bDefaultValueIsIgnored=False,bAdvancedView=False,bOrphanedPin=False,)
   CustomProperties Pin (PinId=C1E3F7E74AD9F592E81DA2B60C5B6095,PinName="PageUrl",PinToolTip="Page Url
String",PinType.PinCategory="string",PinType.PinSubCategory="",PinType.PinSubCategoryObject=None,PinType.PinSubCategoryMemberReference=(),PinType.PinValueType=(),PinType.ContainerType=None,PinType.bIsReference=False,PinType.bIsConst=False,PinType.bIsWeakPointer=False,PinType.bIsUObjectWrapper=False,PinType.bSerializeAsSinglePrecisionFloat=False,DefaultValue="coui://uiresources/index.html",PersistentGuid=00000000000000000000000000000000,bHidden=False,bNotConnectable=False,bDefaultValueIsReadOnly=False,bDefaultValueIsIgnored=False,bAdvancedView=False,bOrphanedPin=False,)
   CustomProperties Pin (PinId=CACD0FA544F4B66FD7CC93B317C35CB0,PinName="bEnableComplexCSSSupport",PinToolTip="Enable Complex CSSSupport
Boolean",PinType.PinCategory="bool",PinType.PinSubCategory="",PinType.PinSubCategoryObject=None,PinType.PinSubCategoryMemberReference=(),PinType.PinValueType=(),PinType.ContainerType=None,PinType.bIsReference=False,PinType.bIsConst=False,PinType.bIsWeakPointer=False,PinType.bIsUObjectWrapper=False,PinType.bSerializeAsSinglePrecisionFloat=False,DefaultValue="true",AutogeneratedDefaultValue="true",PersistentGuid=00000000000000000000000000000000,bHidden=False,bNotConnectable=False,bDefaultValueIsReadOnly=False,bDefaultValueIsIgnored=False,bAdvancedView=False,bOrphanedPin=False,)
   CustomProperties Pin (PinId=286B5E404BE0156C48DDECB5711A3494,PinName="bDelayedUpdate",PinToolTip="Delayed Update
Boolean",PinType.PinCategory="bool",PinType.PinSubCategory="",PinType.PinSubCategoryObject=None,PinType.PinSubCategoryMemberReference=(),PinType.PinValueType=(),PinType.ContainerType=None,PinType.bIsReference=False,PinType.bIsConst=False,PinType.bIsWeakPointer=False,PinType.bIsUObjectWrapper=False,PinType.bSerializeAsSinglePrecisionFloat=False,DefaultValue="false",AutogeneratedDefaultValue="false",PersistentGuid=00000000000000000000000000000000,bHidden=False,bNotConnectable=False,bDefaultValueIsReadOnly=False,bDefaultValueIsIgnored=False,bAdvancedView=False,bOrphanedPin=False,)
   CustomProperties Pin (PinId=673AA52E4183A7EA012D0B815978EFDA,PinName="bReceiveInput",PinToolTip="Receive Input
Boolean",PinType.PinCategory="bool",PinType.PinSubCategory="",PinType.PinSubCategoryObject=None,PinType.PinSubCategoryMemberReference=(),PinType.PinValueType=(),PinType.ContainerType=None,PinType.bIsReference=False,PinType.bIsConst=False,PinType.bIsWeakPointer=False,PinType.bIsUObjectWrapper=False,PinType.bSerializeAsSinglePrecisionFloat=False,DefaultValue="true",AutogeneratedDefaultValue="true",PersistentGuid=00000000000000000000000000000000,bHidden=False,bNotConnectable=False,bDefaultValueIsReadOnly=False,bDefaultValueIsIgnored=False,bAdvancedView=False,bOrphanedPin=False,)
   CustomProperties Pin (PinId=4EC3D3BB431EE840C5FDB6BB0301BF97,PinName="bExecuteCommandProcessingWithLayout",PinToolTip="Execute Command Processing with Layout
Boolean",PinType.PinCategory="bool",PinType.PinSubCategory="",PinType.PinSubCategoryObject=None,PinType.PinSubCategoryMemberReference=(),PinType.PinValueType=(),PinType.ContainerType=None,PinType.bIsReference=False,PinType.bIsConst=False,PinType.bIsWeakPointer=False,PinType.bIsUObjectWrapper=False,PinType.bSerializeAsSinglePrecisionFloat=False,DefaultValue="false",AutogeneratedDefaultValue="false",PersistentGuid=00000000000000000000000000000000,bHidden=False,bNotConnectable=False,bDefaultValueIsReadOnly=False,bDefaultValueIsIgnored=False,bAdvancedView=False,bOrphanedPin=False,)
   CustomProperties Pin (PinId=82CC317D468E1493DE68FE809E59FA4C,PinName="bUseSurfacePartitioning",PinToolTip="Use Surface Partitioning
Boolean",PinType.PinCategory="bool",PinType.PinSubCategory="",PinType.PinSubCategoryObject=None,PinType.PinSubCategoryMemberReference=(),PinType.PinValueType=(),PinType.ContainerType=None,PinType.bIsReference=False,PinType.bIsConst=False,PinType.bIsWeakPointer=False,PinType.bIsUObjectWrapper=False,PinType.bSerializeAsSinglePrecisionFloat=False,DefaultValue="false",AutogeneratedDefaultValue="false",PersistentGuid=00000000000000000000000000000000,bHidden=False,bNotConnectable=False,bDefaultValueIsReadOnly=False,bDefaultValueIsIgnored=False,bAdvancedView=False,bOrphanedPin=False,)
End Object
Begin Object Class=/Script/BlueprintGraph.K2Node_VariableGet Name="K2Node_VariableGet_9" ExportPath="/Script/BlueprintGraph.K2Node_VariableGet'/Game/CharacterSelection/CohCharacterBP.CohCharacterBP:EventGraph.K2Node_VariableGet_9'"
   VariableReference=(MemberName="CohtmlHUD",bSelfContext=True)
   NodePosX=144
   NodePosY=112
   NodeGuid=78DF4FD743F5298EECB98C842DBEEA5E
   CustomProperties Pin (PinId=4D9148BE4E0A6AC5B65986BAC710B4EE,PinName="CohtmlHUD",PinFriendlyName=NSLOCTEXT("", "9648E1194A49EF2CF1D6ECB653991C17", "Gameface HUD"),Direction="EGPD_Output",PinType.PinCategory="object",PinType.PinSubCategory="",PinType.PinSubCategoryObject="/Script/CoreUObject.Class'/Script/CohtmlPlugin.CohtmlHUD'",PinType.PinSubCategoryMemberReference=(),PinType.PinValueType=(),PinType.ContainerType=None,PinType.bIsReference=False,PinType.bIsConst=False,PinType.bIsWeakPointer=False,PinType.bIsUObjectWrapper=False,PinType.bSerializeAsSinglePrecisionFloat=False,LinkedTo=(K2Node_CallFunction_0 AA673F02470D337A1CD44F8054FBF608,K2Node_AssignDelegate_1 98B5F5C945A226E535BED6BED0CFED92,K2Node_Knot_4 3077BFD24A294FA165A364A1B253A3C6),PersistentGuid=00000000000000000000000000000000,bHidden=False,bNotConnectable=False,bDefaultValueIsReadOnly=False,bDefaultValueIsIgnored=False,bAdvancedView=False,bOrphanedPin=False,)
   CustomProperties Pin (PinId=214B2F1B4D5BC7002EF7DC831E730F95,PinName="self",PinFriendlyName=NSLOCTEXT("K2Node", "Target", "Target"),PinType.PinCategory="object",PinType.PinSubCategory="",PinType.PinSubCategoryObject="/Script/CoreUObject.Class'/Script/CohtmlPlugin.CohtmlGameHUD'",PinType.PinSubCategoryMemberReference=(),PinType.PinValueType=(),PinType.ContainerType=None,PinType.bIsReference=False,PinType.bIsConst=False,PinType.bIsWeakPointer=False,PinType.bIsUObjectWrapper=False,PinType.bSerializeAsSinglePrecisionFloat=False,PersistentGuid=00000000000000000000000000000000,bHidden=True,bNotConnectable=False,bDefaultValueIsReadOnly=False,bDefaultValueIsIgnored=False,bAdvancedView=False,bOrphanedPin=False,)
End Object
Begin Object Class=/Script/BlueprintGraph.K2Node_CallFunction Name="K2Node_CallFunction_12" ExportPath="/Script/BlueprintGraph.K2Node_CallFunction'/Game/CharacterSelection/CohCharacterBP.CohCharacterBP:EventGraph.K2Node_CallFunction_12'"
   FunctionReference=(MemberName="changeActiveCharacter",MemberGuid=26127B434DF38FDED193F5A9A19B2D0A,bSelfContext=True)
   NodePosX=80
   NodePosY=272
   NodeGuid=60CBD7DB42691C70A5650D9500C96352
   CustomProperties Pin (PinId=1943ACA14B4C104CDA6A8DBC4930A6B1,PinName="execute",PinToolTip="
Exec",PinType.PinCategory="exec",PinType.PinSubCategory="",PinType.PinSubCategoryObject=None,PinType.PinSubCategoryMemberReference=(),PinType.PinValueType=(),PinType.ContainerType=None,PinType.bIsReference=False,PinType.bIsConst=False,PinType.bIsWeakPointer=False,PinType.bIsUObjectWrapper=False,PinType.bSerializeAsSinglePrecisionFloat=False,LinkedTo=(K2Node_CustomEvent_2 B1217FF44E2AD317D952A7AA29F05E25),PersistentGuid=00000000000000000000000000000000,bHidden=False,bNotConnectable=False,bDefaultValueIsReadOnly=False,bDefaultValueIsIgnored=False,bAdvancedView=False,bOrphanedPin=False,)
   CustomProperties Pin (PinId=1D1DC147485EB9A8613793BB5C843ED5,PinName="then",PinToolTip="
Exec",Direction="EGPD_Output",PinType.PinCategory="exec",PinType.PinSubCategory="",PinType.PinSubCategoryObject=None,PinType.PinSubCategoryMemberReference=(),PinType.PinValueType=(),PinType.ContainerType=None,PinType.bIsReference=False,PinType.bIsConst=False,PinType.bIsWeakPointer=False,PinType.bIsUObjectWrapper=False,PinType.bSerializeAsSinglePrecisionFloat=False,PersistentGuid=00000000000000000000000000000000,bHidden=False,bNotConnectable=False,bDefaultValueIsReadOnly=False,bDefaultValueIsIgnored=False,bAdvancedView=False,bOrphanedPin=False,)
   CustomProperties Pin (PinId=61D5967B46B988E1124E1D96E413B1A0,PinName="self",PinFriendlyName=NSLOCTEXT("K2Node", "Target", "Target"),PinToolTip="Target
Self Object Reference",PinType.PinCategory="object",PinType.PinSubCategory="self",PinType.PinSubCategoryObject=None,PinType.PinSubCategoryMemberReference=(),PinType.PinValueType=(),PinType.ContainerType=None,PinType.bIsReference=False,PinType.bIsConst=False,PinType.bIsWeakPointer=False,PinType.bIsUObjectWrapper=False,PinType.bSerializeAsSinglePrecisionFloat=False,PersistentGuid=00000000000000000000000000000000,bHidden=False,bNotConnectable=False,bDefaultValueIsReadOnly=False,bDefaultValueIsIgnored=False,bAdvancedView=False,bOrphanedPin=False,)
   CustomProperties Pin (PinId=D726964942E5C62F09BBEDAF7A925679,PinName="direction",PinToolTip="Direction
Boolean",PinType.PinCategory="bool",PinType.PinSubCategory="",PinType.PinSubCategoryObject=None,PinType.PinSubCategoryMemberReference=(),PinType.PinValueType=(),PinType.ContainerType=None,PinType.bIsReference=False,PinType.bIsConst=False,PinType.bIsWeakPointer=False,PinType.bIsUObjectWrapper=False,PinType.bSerializeAsSinglePrecisionFloat=False,DefaultValue="true",AutogeneratedDefaultValue="true",PersistentGuid=00000000000000000000000000000000,bHidden=False,bNotConnectable=False,bDefaultValueIsReadOnly=False,bDefaultValueIsIgnored=False,bAdvancedView=False,bOrphanedPin=False,)
End Object
Begin Object Class=/Script/BlueprintGraph.K2Node_CallFunction Name="K2Node_CallFunction_11" ExportPath="/Script/BlueprintGraph.K2Node_CallFunction'/Game/CharacterSelection/CohCharacterBP.CohCharacterBP:EventGraph.K2Node_CallFunction_11'"
   FunctionReference=(MemberName="changeActiveCharacter",MemberGuid=26127B434DF38FDED193F5A9A19B2D0A,bSelfContext=True)
   NodePosX=608
   NodePosY=288
   NodeGuid=360CF181462154A8872AE19D9AB94E50
   CustomProperties Pin (PinId=1943ACA14B4C104CDA6A8DBC4930A6B1,PinName="execute",PinToolTip="
Exec",PinType.PinCategory="exec",PinType.PinSubCategory="",PinType.PinSubCategoryObject=None,PinType.PinSubCategoryMemberReference=(),PinType.PinValueType=(),PinType.ContainerType=None,PinType.bIsReference=False,PinType.bIsConst=False,PinType.bIsWeakPointer=False,PinType.bIsUObjectWrapper=False,PinType.bSerializeAsSinglePrecisionFloat=False,LinkedTo=(K2Node_CustomEvent_3 8D2CA6BC472D24C1CAE8BEB94DEC6B8C),PersistentGuid=00000000000000000000000000000000,bHidden=False,bNotConnectable=False,bDefaultValueIsReadOnly=False,bDefaultValueIsIgnored=False,bAdvancedView=False,bOrphanedPin=False,)
   CustomProperties Pin (PinId=1D1DC147485EB9A8613793BB5C843ED5,PinName="then",PinToolTip="
Exec",Direction="EGPD_Output",PinType.PinCategory="exec",PinType.PinSubCategory="",PinType.PinSubCategoryObject=None,PinType.PinSubCategoryMemberReference=(),PinType.PinValueType=(),PinType.ContainerType=None,PinType.bIsReference=False,PinType.bIsConst=False,PinType.bIsWeakPointer=False,PinType.bIsUObjectWrapper=False,PinType.bSerializeAsSinglePrecisionFloat=False,PersistentGuid=00000000000000000000000000000000,bHidden=False,bNotConnectable=False,bDefaultValueIsReadOnly=False,bDefaultValueIsIgnored=False,bAdvancedView=False,bOrphanedPin=False,)
   CustomProperties Pin (PinId=61D5967B46B988E1124E1D96E413B1A0,PinName="self",PinFriendlyName=NSLOCTEXT("K2Node", "Target", "Target"),PinToolTip="Target
Self Object Reference",PinType.PinCategory="object",PinType.PinSubCategory="self",PinType.PinSubCategoryObject=None,PinType.PinSubCategoryMemberReference=(),PinType.PinValueType=(),PinType.ContainerType=None,PinType.bIsReference=False,PinType.bIsConst=False,PinType.bIsWeakPointer=False,PinType.bIsUObjectWrapper=False,PinType.bSerializeAsSinglePrecisionFloat=False,PersistentGuid=00000000000000000000000000000000,bHidden=False,bNotConnectable=False,bDefaultValueIsReadOnly=False,bDefaultValueIsIgnored=False,bAdvancedView=False,bOrphanedPin=False,)
   CustomProperties Pin (PinId=D726964942E5C62F09BBEDAF7A925679,PinName="direction",PinToolTip="Direction
Boolean",PinType.PinCategory="bool",PinType.PinSubCategory="",PinType.PinSubCategoryObject=None,PinType.PinSubCategoryMemberReference=(),PinType.PinValueType=(),PinType.ContainerType=None,PinType.bIsReference=False,PinType.bIsConst=False,PinType.bIsWeakPointer=False,PinType.bIsUObjectWrapper=False,PinType.bSerializeAsSinglePrecisionFloat=False,DefaultValue="false",AutogeneratedDefaultValue="true",PersistentGuid=00000000000000000000000000000000,bHidden=False,bNotConnectable=False,bDefaultValueIsReadOnly=False,bDefaultValueIsIgnored=False,bAdvancedView=False,bOrphanedPin=False,)
End Object
Begin Object Class=/Script/BlueprintGraph.K2Node_Knot Name="K2Node_Knot_4" ExportPath="/Script/BlueprintGraph.K2Node_Knot'/Game/CharacterSelection/CohCharacterBP.CohCharacterBP:EventGraph.K2Node_Knot_4'"
   NodePosX=416
   NodePosY=192
   NodeGuid=E0430B70458928F5A0BD2F90FCF5B115
   CustomProperties Pin (PinId=3077BFD24A294FA165A364A1B253A3C6,PinName="InputPin",PinType.PinCategory="object",PinType.PinSubCategory="",PinType.PinSubCategoryObject="/Script/CoreUObject.Class'/Script/CohtmlPlugin.CohtmlHUD'",PinType.PinSubCategoryMemberReference=(),PinType.PinValueType=(),PinType.ContainerType=None,PinType.bIsReference=False,PinType.bIsConst=False,PinType.bIsWeakPointer=False,PinType.bIsUObjectWrapper=False,PinType.bSerializeAsSinglePrecisionFloat=False,LinkedTo=(K2Node_VariableGet_9 4D9148BE4E0A6AC5B65986BAC710B4EE),PersistentGuid=00000000000000000000000000000000,bHidden=False,bNotConnectable=False,bDefaultValueIsReadOnly=False,bDefaultValueIsIgnored=True,bAdvancedView=False,bOrphanedPin=False,)
   CustomProperties Pin (PinId=CD6EA85E447639BF2477039B45D01BF7,PinName="OutputPin",Direction="EGPD_Output",PinType.PinCategory="object",PinType.PinSubCategory="",PinType.PinSubCategoryObject="/Script/CoreUObject.Class'/Script/CohtmlPlugin.CohtmlHUD'",PinType.PinSubCategoryMemberReference=(),PinType.PinValueType=(),PinType.ContainerType=None,PinType.bIsReference=False,PinType.bIsConst=False,PinType.bIsWeakPointer=False,PinType.bIsUObjectWrapper=False,PinType.bSerializeAsSinglePrecisionFloat=False,LinkedTo=(K2Node_Knot_5 359CFB1C40A1617C48C28185CFB32D6F),PersistentGuid=00000000000000000000000000000000,bHidden=False,bNotConnectable=False,bDefaultValueIsReadOnly=False,bDefaultValueIsIgnored=False,bAdvancedView=False,bOrphanedPin=False,)
End Object
Begin Object Class=/Script/BlueprintGraph.K2Node_Knot Name="K2Node_Knot_5" ExportPath="/Script/BlueprintGraph.K2Node_Knot'/Game/CharacterSelection/CohCharacterBP.CohCharacterBP:EventGraph.K2Node_Knot_5'"
   NodePosX=736
   NodePosY=192
   NodeGuid=6766A88B4A19015689076BAADCBDD861
   CustomProperties Pin (PinId=359CFB1C40A1617C48C28185CFB32D6F,PinName="InputPin",PinType.PinCategory="object",PinType.PinSubCategory="",PinType.PinSubCategoryObject="/Script/CoreUObject.Class'/Script/CohtmlPlugin.CohtmlHUD'",PinType.PinSubCategoryMemberReference=(),PinType.PinValueType=(),PinType.ContainerType=None,PinType.bIsReference=False,PinType.bIsConst=False,PinType.bIsWeakPointer=False,PinType.bIsUObjectWrapper=False,PinType.bSerializeAsSinglePrecisionFloat=False,LinkedTo=(K2Node_Knot_4 CD6EA85E447639BF2477039B45D01BF7),PersistentGuid=00000000000000000000000000000000,bHidden=False,bNotConnectable=False,bDefaultValueIsReadOnly=False,bDefaultValueIsIgnored=True,bAdvancedView=False,bOrphanedPin=False,)
   CustomProperties Pin (PinId=C083585B4ADA7F3A211F0B95DEE97F61,PinName="OutputPin",Direction="EGPD_Output",PinType.PinCategory="object",PinType.PinSubCategory="",PinType.PinSubCategoryObject="/Script/CoreUObject.Class'/Script/CohtmlPlugin.CohtmlHUD'",PinType.PinSubCategoryMemberReference=(),PinType.PinValueType=(),PinType.ContainerType=None,PinType.bIsReference=False,PinType.bIsConst=False,PinType.bIsWeakPointer=False,PinType.bIsUObjectWrapper=False,PinType.bSerializeAsSinglePrecisionFloat=False,LinkedTo=(K2Node_CallFunction_6 AA673F02470D337A1CD44F8054FBF608),PersistentGuid=00000000000000000000000000000000,bHidden=False,bNotConnectable=False,bDefaultValueIsReadOnly=False,bDefaultValueIsIgnored=False,bAdvancedView=False,bOrphanedPin=False,)
End Object
Create the data bind model
Now that we’ve set up the logic for changing the active character and registered the events, it’s time to add a data model for the game’s characters. This model will be linked with the UI so that when a character is changed, the UI updates automatically.
Each character in our game will have a name and stats. The stats will be an array of objects, with each object containing a stat name and its value.
First, we’ll create a structure defining the stat object, named Stat.
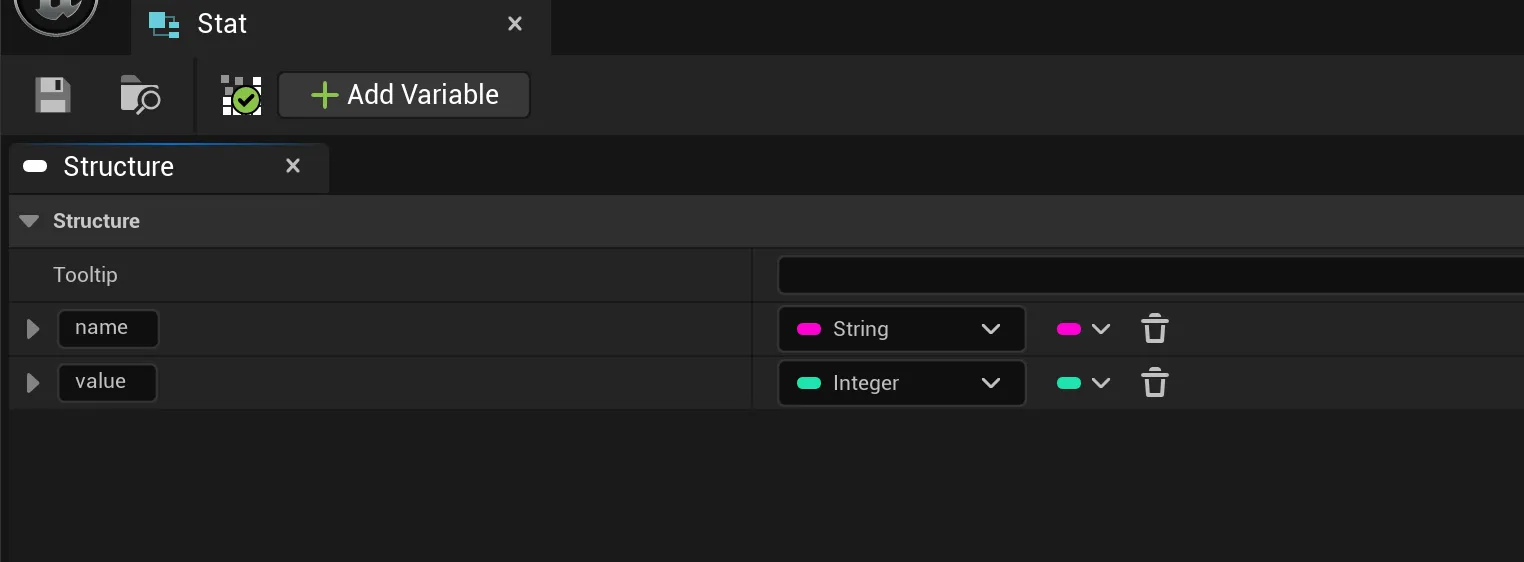
Each stat will include a name as a string and its current value as an integer.
Next, we’ll create a Character Model structure to store the character’s name and stats. The name will be a string, and the stats will be an array of Stat objects.
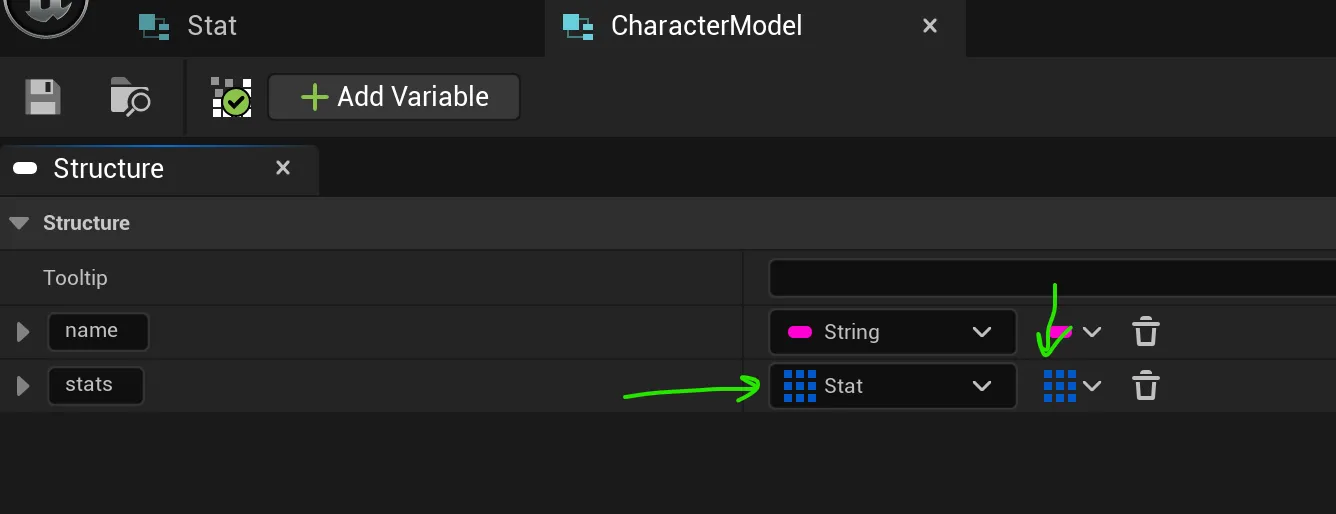
Now, in the event graph of our CohCharacterBP, we’ll create a variable called Characters, which will be an array of Character Model items. We’ll set a default value for this array with three items, as we have three characters in our case. Each character will have a name and the following stat categories: health, strength, defense, attackPower, magicPower, and stamina. For each stat the values should range from 0 to 100.
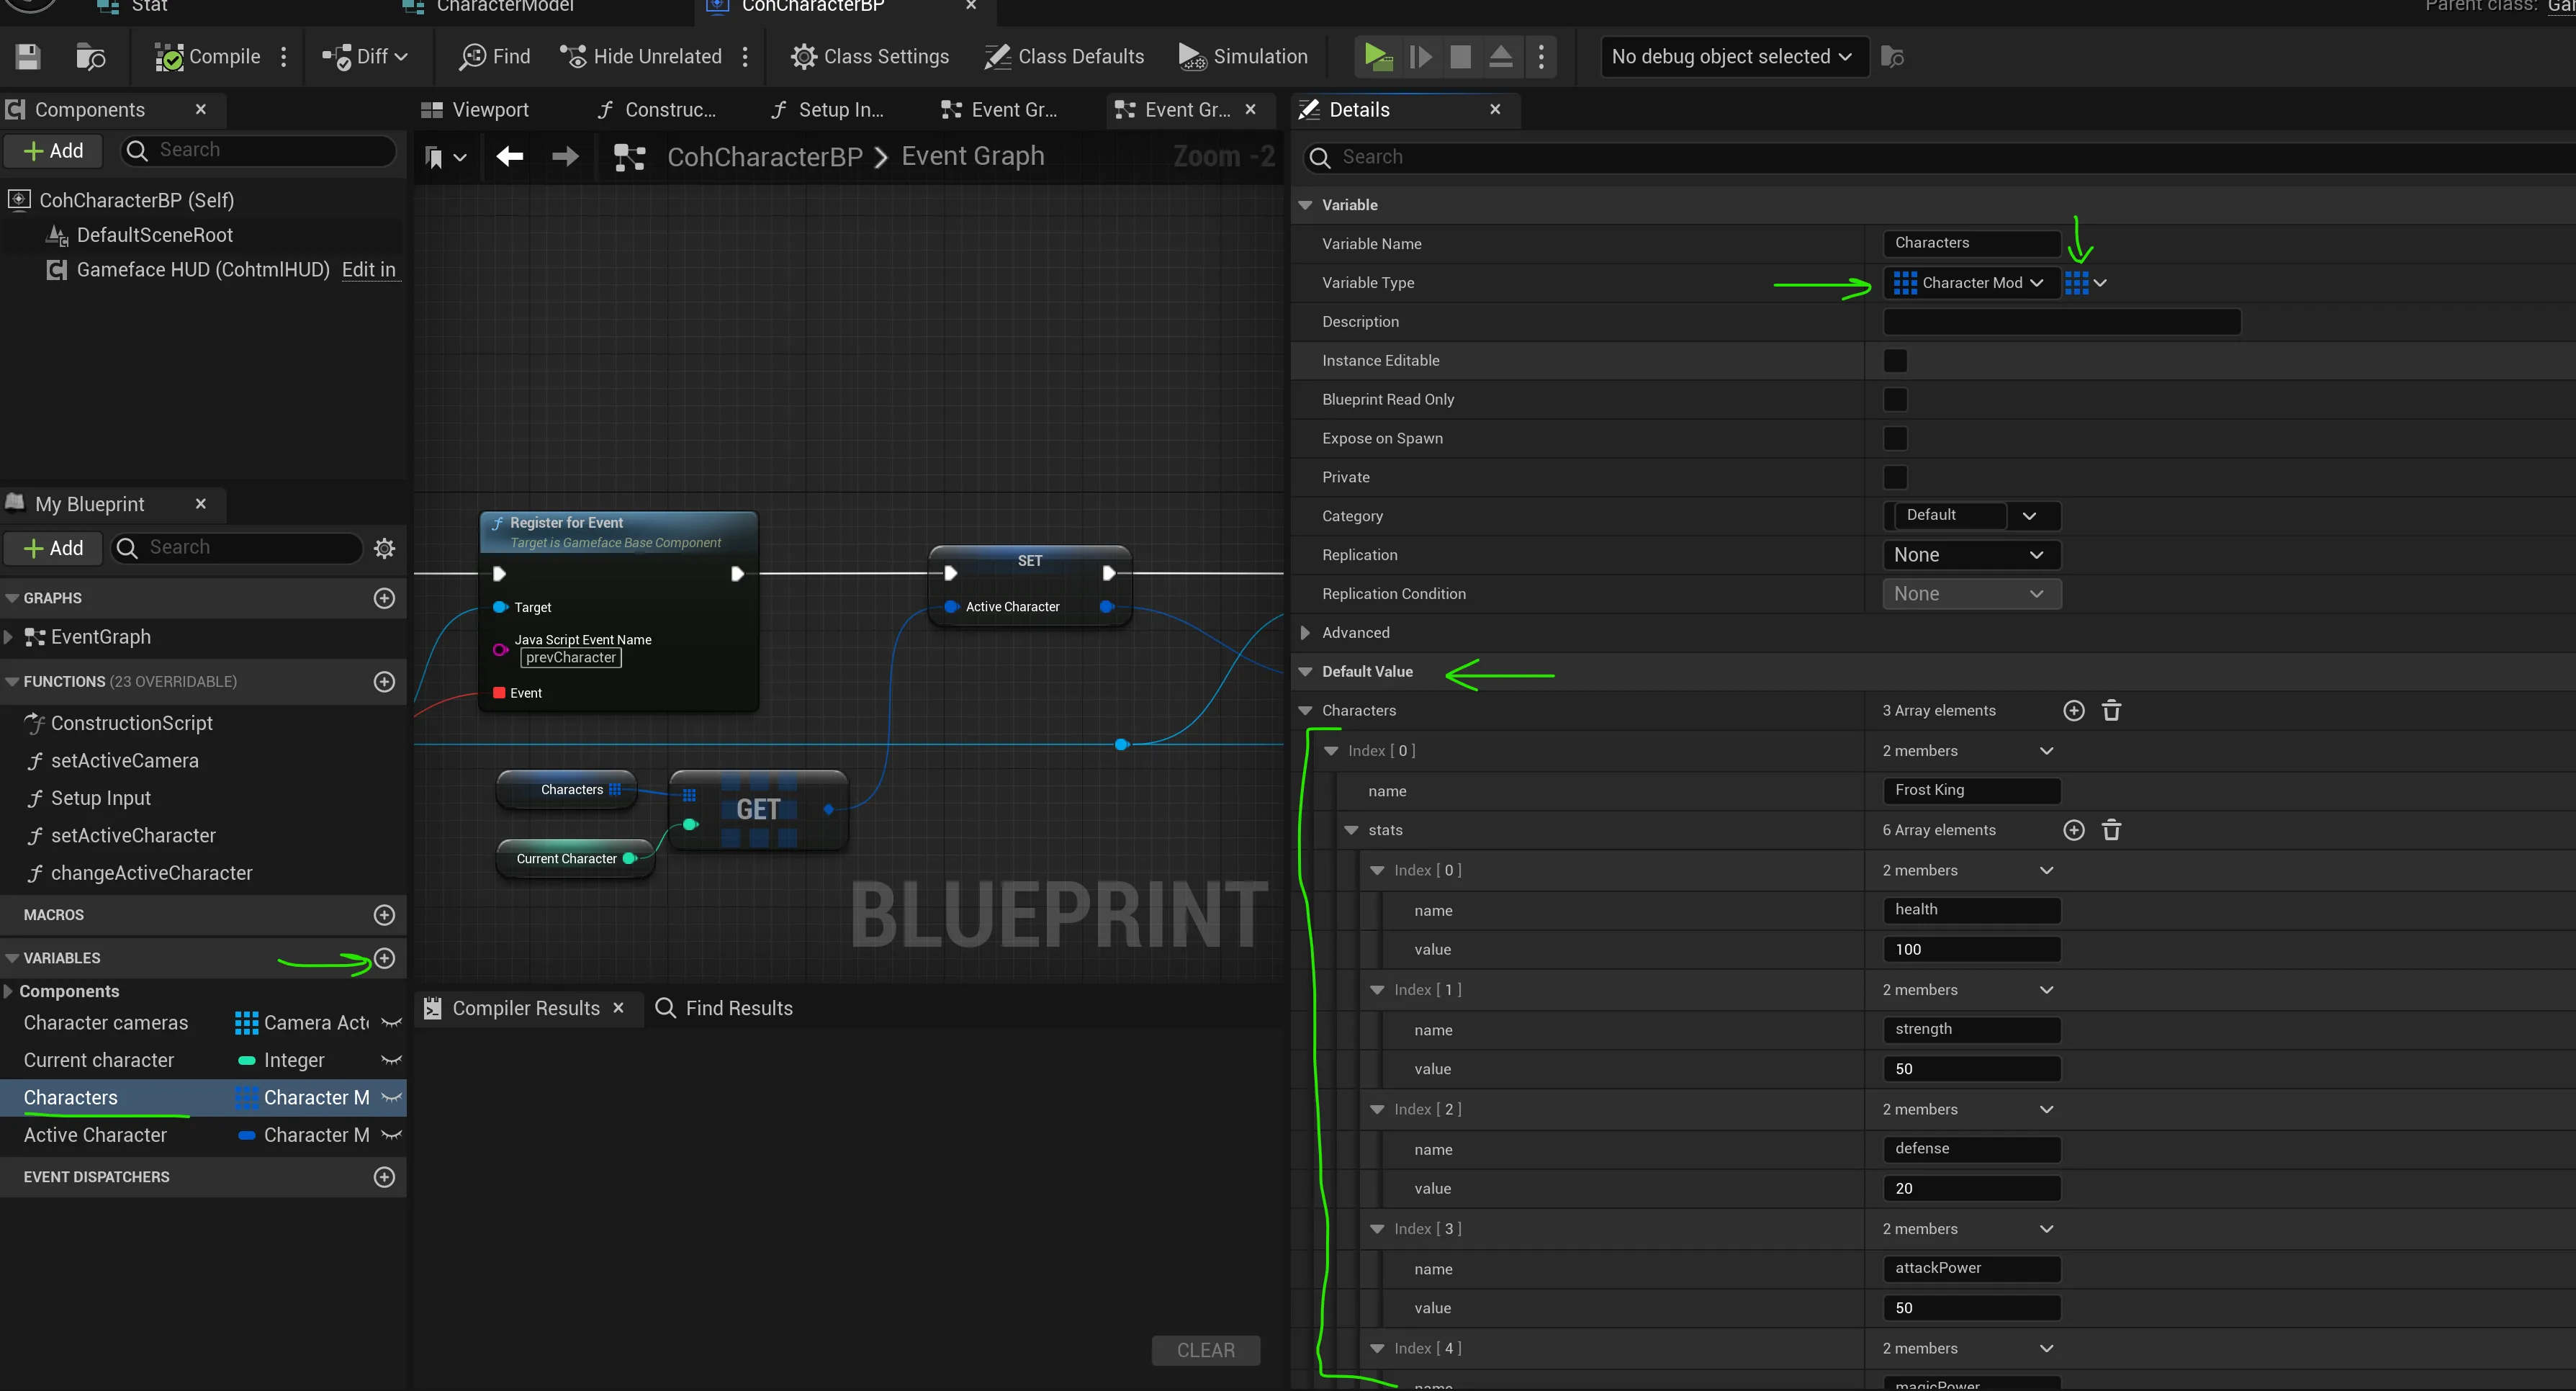
Once the Characters variable is defined, we’ll create an Active Character variable of type Character Model to store the name and stats of the currently active character. This variable will be bound to the UI.
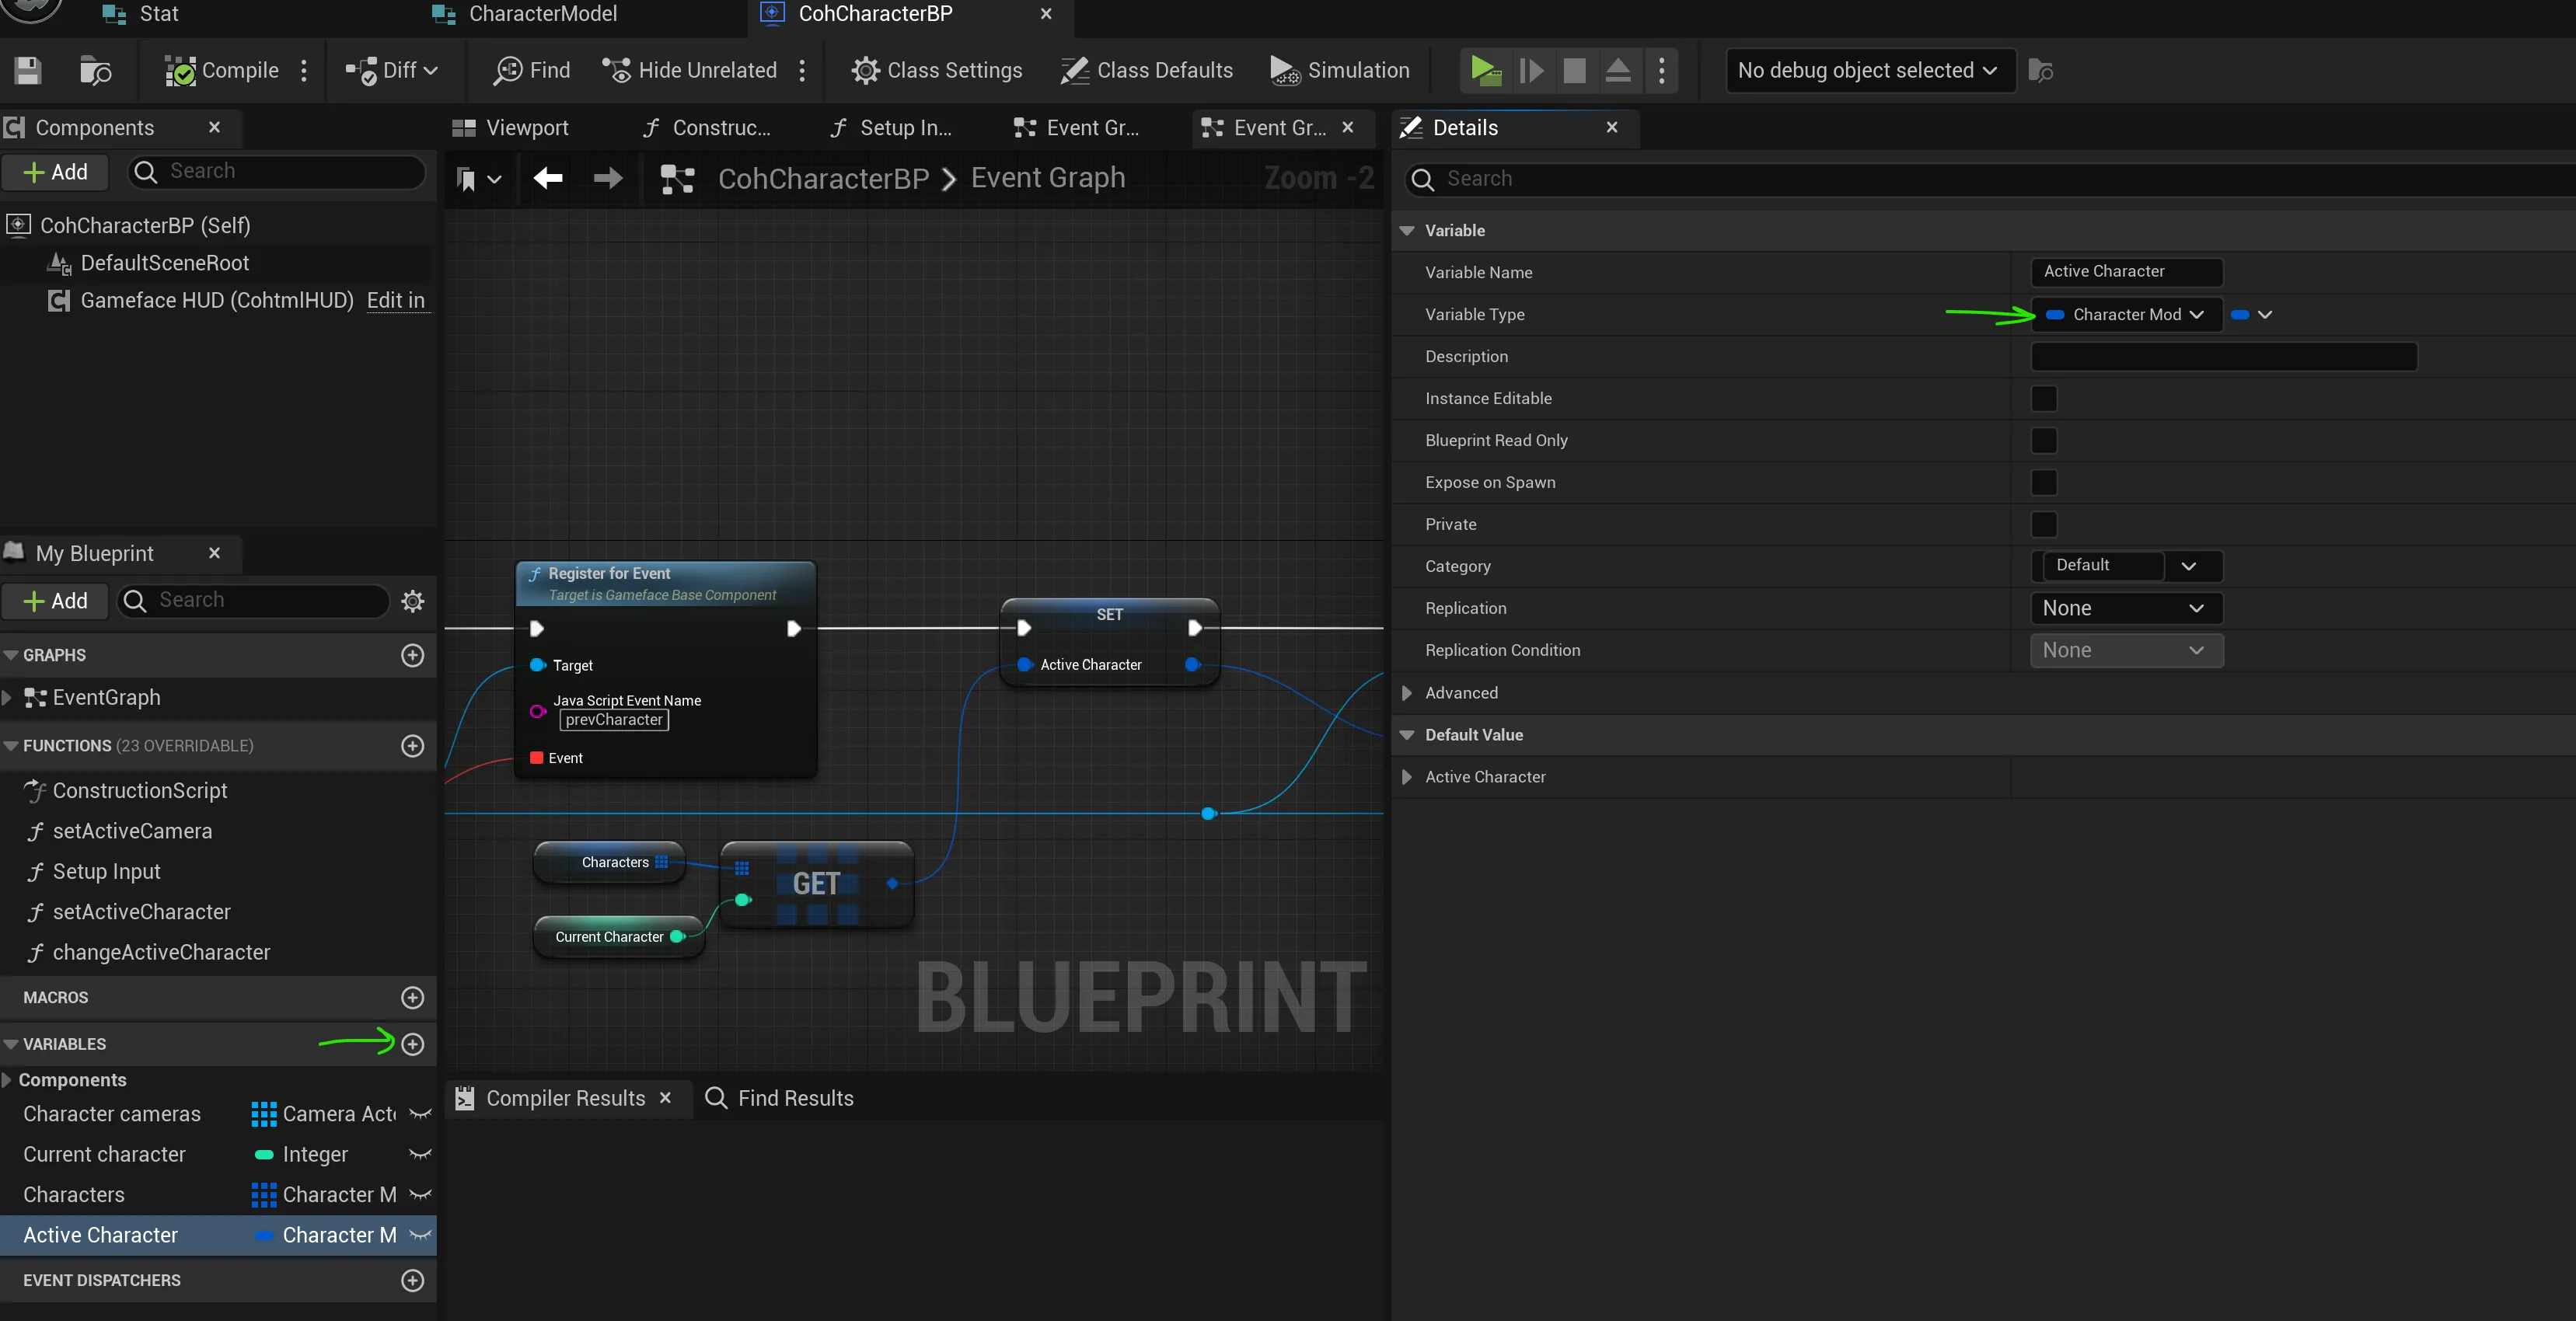
Now that we’ve set up the Active Character, we can bind it to the UI. After registering the two events in our blueprint, we’ll populate it with the current character data, retrieved from the Characters array using the Current Character index.
Finally, we’ll create a data model from the Active Character structure using the Create Data Model From Struct method and synchronize the models with the Synchronize Models method. We’ll name this model Character, which allows us to access it from the frontend.
Begin Object Class=/Script/BlueprintGraph.K2Node_CustomEvent Name="K2Node_CustomEvent_0" ExportPath="/Script/BlueprintGraph.K2Node_CustomEvent'/Game/CharacterSelection/CohCharacterBP.CohCharacterBP:EventGraph.K2Node_CustomEvent_0'"
   CustomFunctionName="ReadyForBindings_Event"
   NodePosX=336
   NodePosY=16
   NodeGuid=34091CBA45BDE4AD5BCDED936668318E
   CustomProperties Pin (PinId=4F16979C4AB46052ED5FFA958978AA15,PinName="OutputDelegate",Direction="EGPD_Output",PinType.PinCategory="delegate",PinType.PinSubCategory="",PinType.PinSubCategoryObject=None,PinType.PinSubCategoryMemberReference=(MemberParent="/Script/Engine.BlueprintGeneratedClass'/Game/CharacterSelection/CohCharacterBP.CohCharacterBP_C'",MemberName="ReadyForBindings_Event",MemberGuid=34091CBA45BDE4AD5BCDED936668318E),PinType.PinValueType=(),PinType.ContainerType=None,PinType.bIsReference=False,PinType.bIsConst=False,PinType.bIsWeakPointer=False,PinType.bIsUObjectWrapper=False,PinType.bSerializeAsSinglePrecisionFloat=False,LinkedTo=(K2Node_AssignDelegate_1 CB93B7924C7F3EAEEE40F79D7951ADA0,),PersistentGuid=00000000000000000000000000000000,bHidden=False,bNotConnectable=False,bDefaultValueIsReadOnly=False,bDefaultValueIsIgnored=False,bAdvancedView=False,bOrphanedPin=False,)
   CustomProperties Pin (PinId=7D3E23F74351592A70CF4583D47293E9,PinName="then",Direction="EGPD_Output",PinType.PinCategory="exec",PinType.PinSubCategory="",PinType.PinSubCategoryObject=None,PinType.PinSubCategoryMemberReference=(),PinType.PinValueType=(),PinType.ContainerType=None,PinType.bIsReference=False,PinType.bIsConst=False,PinType.bIsWeakPointer=False,PinType.bIsUObjectWrapper=False,PinType.bSerializeAsSinglePrecisionFloat=False,LinkedTo=(K2Node_CallFunction_0 73D112C043A553883FA599A50A179592,),PersistentGuid=00000000000000000000000000000000,bHidden=False,bNotConnectable=False,bDefaultValueIsReadOnly=False,bDefaultValueIsIgnored=False,bAdvancedView=False,bOrphanedPin=False,)
End Object
Begin Object Class=/Script/BlueprintGraph.K2Node_CallFunction Name="K2Node_CallFunction_0" ExportPath="/Script/BlueprintGraph.K2Node_CallFunction'/Game/CharacterSelection/CohCharacterBP.CohCharacterBP:EventGraph.K2Node_CallFunction_0'"
   FunctionReference=(MemberParent="/Script/CoreUObject.Class'/Script/CohtmlPlugin.CohtmlBaseComponent'",MemberName="RegisterForEvent")
   NodePosX=704
   NodePosY=16
   NodeGuid=C62B7FBF427B69DD5163DF89CA2F414D
   CustomProperties Pin (PinId=73D112C043A553883FA599A50A179592,PinName="execute",PinToolTip="
Exec",PinType.PinCategory="exec",PinType.PinSubCategory="",PinType.PinSubCategoryObject=None,PinType.PinSubCategoryMemberReference=(),PinType.PinValueType=(),PinType.ContainerType=None,PinType.bIsReference=False,PinType.bIsConst=False,PinType.bIsWeakPointer=False,PinType.bIsUObjectWrapper=False,PinType.bSerializeAsSinglePrecisionFloat=False,LinkedTo=(K2Node_CustomEvent_0 7D3E23F74351592A70CF4583D47293E9,),PersistentGuid=00000000000000000000000000000000,bHidden=False,bNotConnectable=False,bDefaultValueIsReadOnly=False,bDefaultValueIsIgnored=False,bAdvancedView=False,bOrphanedPin=False,)
   CustomProperties Pin (PinId=2594D8434A3E01AE3672CEBB306B3BB4,PinName="then",PinToolTip="
Exec",Direction="EGPD_Output",PinType.PinCategory="exec",PinType.PinSubCategory="",PinType.PinSubCategoryObject=None,PinType.PinSubCategoryMemberReference=(),PinType.PinValueType=(),PinType.ContainerType=None,PinType.bIsReference=False,PinType.bIsConst=False,PinType.bIsWeakPointer=False,PinType.bIsUObjectWrapper=False,PinType.bSerializeAsSinglePrecisionFloat=False,LinkedTo=(K2Node_CallFunction_6 73D112C043A553883FA599A50A179592,),PersistentGuid=00000000000000000000000000000000,bHidden=False,bNotConnectable=False,bDefaultValueIsReadOnly=False,bDefaultValueIsIgnored=False,bAdvancedView=False,bOrphanedPin=False,)
   CustomProperties Pin (PinId=AA673F02470D337A1CD44F8054FBF608,PinName="self",PinFriendlyName=NSLOCTEXT("K2Node", "Target", "Target"),PinToolTip="Target
Gameface Base Component Object Reference",PinType.PinCategory="object",PinType.PinSubCategory="",PinType.PinSubCategoryObject="/Script/CoreUObject.Class'/Script/CohtmlPlugin.CohtmlBaseComponent'",PinType.PinSubCategoryMemberReference=(),PinType.PinValueType=(),PinType.ContainerType=None,PinType.bIsReference=False,PinType.bIsConst=False,PinType.bIsWeakPointer=False,PinType.bIsUObjectWrapper=False,PinType.bSerializeAsSinglePrecisionFloat=False,LinkedTo=(K2Node_VariableGet_9 4D9148BE4E0A6AC5B65986BAC710B4EE,),PersistentGuid=00000000000000000000000000000000,bHidden=False,bNotConnectable=False,bDefaultValueIsReadOnly=False,bDefaultValueIsIgnored=False,bAdvancedView=False,bOrphanedPin=False,)
   CustomProperties Pin (PinId=3F65821C402C7D608CE5C3901FFD7CFA,PinName="JSEventName",PinFriendlyName=NSLOCTEXT("", "49F3F7954033E4A55A7BBFBA329549F4", "JavaScript Event Name"),PinToolTip="Java Script Event Name
String",PinType.PinCategory="string",PinType.PinSubCategory="",PinType.PinSubCategoryObject=None,PinType.PinSubCategoryMemberReference=(),PinType.PinValueType=(),PinType.ContainerType=None,PinType.bIsReference=False,PinType.bIsConst=False,PinType.bIsWeakPointer=False,PinType.bIsUObjectWrapper=False,PinType.bSerializeAsSinglePrecisionFloat=False,DefaultValue="nextCharacter",PersistentGuid=00000000000000000000000000000000,bHidden=False,bNotConnectable=False,bDefaultValueIsReadOnly=False,bDefaultValueIsIgnored=False,bAdvancedView=False,bOrphanedPin=False,)
   CustomProperties Pin (PinId=93760E9C4A2EB4FC489ACEB012AAED6A,PinName="Delegate",PinFriendlyName=NSLOCTEXT("", "71127FCB4836FB9B0FD82586BAD00F29", "Event"),PinToolTip="Event
Delegate",PinType.PinCategory="Delegate",PinType.PinSubCategory="",PinType.PinSubCategoryObject=None,PinType.PinSubCategoryMemberReference=(MemberParent="/Script/CoreUObject.Package'/Script/CohtmlPlugin'",MemberName="CohtmlJSEventBPCallback__DelegateSignature"),PinType.PinValueType=(),PinType.ContainerType=None,PinType.bIsReference=False,PinType.bIsConst=False,PinType.bIsWeakPointer=False,PinType.bIsUObjectWrapper=False,PinType.bSerializeAsSinglePrecisionFloat=False,LinkedTo=(K2Node_Knot_12 209C27204711869473E687AEB84AFD36,),PersistentGuid=00000000000000000000000000000000,bHidden=False,bNotConnectable=False,bDefaultValueIsReadOnly=False,bDefaultValueIsIgnored=False,bAdvancedView=False,bOrphanedPin=False,)
End Object
Begin Object Class=/Script/BlueprintGraph.K2Node_CallFunction Name="K2Node_CallFunction_6" ExportPath="/Script/BlueprintGraph.K2Node_CallFunction'/Game/CharacterSelection/CohCharacterBP.CohCharacterBP:EventGraph.K2Node_CallFunction_6'"
   FunctionReference=(MemberParent="/Script/CoreUObject.Class'/Script/CohtmlPlugin.CohtmlBaseComponent'",MemberName="RegisterForEvent")
   NodePosX=1104
   NodePosY=16
   ErrorType=1
   NodeGuid=7ADA30FF4078FEB2C93FAB834976A860
   CustomProperties Pin (PinId=73D112C043A553883FA599A50A179592,PinName="execute",PinToolTip="
Exec",PinType.PinCategory="exec",PinType.PinSubCategory="",PinType.PinSubCategoryObject=None,PinType.PinSubCategoryMemberReference=(),PinType.PinValueType=(),PinType.ContainerType=None,PinType.bIsReference=False,PinType.bIsConst=False,PinType.bIsWeakPointer=False,PinType.bIsUObjectWrapper=False,PinType.bSerializeAsSinglePrecisionFloat=False,LinkedTo=(K2Node_CallFunction_0 2594D8434A3E01AE3672CEBB306B3BB4,),PersistentGuid=00000000000000000000000000000000,bHidden=False,bNotConnectable=False,bDefaultValueIsReadOnly=False,bDefaultValueIsIgnored=False,bAdvancedView=False,bOrphanedPin=False,)
   CustomProperties Pin (PinId=2594D8434A3E01AE3672CEBB306B3BB4,PinName="then",PinToolTip="
Exec",Direction="EGPD_Output",PinType.PinCategory="exec",PinType.PinSubCategory="",PinType.PinSubCategoryObject=None,PinType.PinSubCategoryMemberReference=(),PinType.PinValueType=(),PinType.ContainerType=None,PinType.bIsReference=False,PinType.bIsConst=False,PinType.bIsWeakPointer=False,PinType.bIsUObjectWrapper=False,PinType.bSerializeAsSinglePrecisionFloat=False,LinkedTo=(K2Node_VariableSet_0 4EF79C9A4F51B479EFF833924180E783,),PersistentGuid=00000000000000000000000000000000,bHidden=False,bNotConnectable=False,bDefaultValueIsReadOnly=False,bDefaultValueIsIgnored=False,bAdvancedView=False,bOrphanedPin=False,)
   CustomProperties Pin (PinId=AA673F02470D337A1CD44F8054FBF608,PinName="self",PinFriendlyName=NSLOCTEXT("K2Node", "Target", "Target"),PinToolTip="Target
Gameface Base Component Object Reference",PinType.PinCategory="object",PinType.PinSubCategory="",PinType.PinSubCategoryObject="/Script/CoreUObject.Class'/Script/CohtmlPlugin.CohtmlBaseComponent'",PinType.PinSubCategoryMemberReference=(),PinType.PinValueType=(),PinType.ContainerType=None,PinType.bIsReference=False,PinType.bIsConst=False,PinType.bIsWeakPointer=False,PinType.bIsUObjectWrapper=False,PinType.bSerializeAsSinglePrecisionFloat=False,LinkedTo=(K2Node_Knot_5 C083585B4ADA7F3A211F0B95DEE97F61,),PersistentGuid=00000000000000000000000000000000,bHidden=False,bNotConnectable=False,bDefaultValueIsReadOnly=False,bDefaultValueIsIgnored=False,bAdvancedView=False,bOrphanedPin=False,)
   CustomProperties Pin (PinId=3F65821C402C7D608CE5C3901FFD7CFA,PinName="JSEventName",PinFriendlyName=NSLOCTEXT("", "4F0108A1494A8B22E897CEAF24C3A5E5", "JavaScript Event Name"),PinToolTip="Java Script Event Name
String",PinType.PinCategory="string",PinType.PinSubCategory="",PinType.PinSubCategoryObject=None,PinType.PinSubCategoryMemberReference=(),PinType.PinValueType=(),PinType.ContainerType=None,PinType.bIsReference=False,PinType.bIsConst=False,PinType.bIsWeakPointer=False,PinType.bIsUObjectWrapper=False,PinType.bSerializeAsSinglePrecisionFloat=False,DefaultValue="prevCharacter",PersistentGuid=00000000000000000000000000000000,bHidden=False,bNotConnectable=False,bDefaultValueIsReadOnly=False,bDefaultValueIsIgnored=False,bAdvancedView=False,bOrphanedPin=False,)
   CustomProperties Pin (PinId=93760E9C4A2EB4FC489ACEB012AAED6A,PinName="Delegate",PinFriendlyName=NSLOCTEXT("", "0E751C0D40BD89493C78AF8DF00D0B1A", "Event"),PinToolTip="Event
Delegate",PinType.PinCategory="Delegate",PinType.PinSubCategory="",PinType.PinSubCategoryObject=None,PinType.PinSubCategoryMemberReference=(MemberParent="/Script/CoreUObject.Package'/Script/CohtmlPlugin'",MemberName="CohtmlJSEventBPCallback__DelegateSignature"),PinType.PinValueType=(),PinType.ContainerType=None,PinType.bIsReference=False,PinType.bIsConst=False,PinType.bIsWeakPointer=False,PinType.bIsUObjectWrapper=False,PinType.bSerializeAsSinglePrecisionFloat=False,LinkedTo=(K2Node_Knot_11 ADF72E2D49679C1FCB5959BFFA233F13,),PersistentGuid=00000000000000000000000000000000,bHidden=False,bNotConnectable=False,bDefaultValueIsReadOnly=False,bDefaultValueIsIgnored=False,bAdvancedView=False,bOrphanedPin=False,)
End Object
Begin Object Class=/Script/BlueprintGraph.K2Node_CallFunction Name="K2Node_CallFunction_7" ExportPath="/Script/BlueprintGraph.K2Node_CallFunction'/Game/CharacterSelection/CohCharacterBP.CohCharacterBP:EventGraph.K2Node_CallFunction_7'"
   FunctionReference=(MemberParent="/Script/CoreUObject.Class'/Script/CohtmlPlugin.CohtmlBaseComponent'",MemberName="CreateDataModelFromStruct")
   NodePosX=1872
   NodePosY=16
   ErrorType=1
   NodeGuid=3F9F9940455D5BFE3B34589E8C55AC18
   CustomProperties Pin (PinId=6F14200C46B4197A08CB259B5DDD9929,PinName="execute",PinToolTip="
Exec",PinType.PinCategory="exec",PinType.PinSubCategory="",PinType.PinSubCategoryObject=None,PinType.PinSubCategoryMemberReference=(),PinType.PinValueType=(),PinType.ContainerType=None,PinType.bIsReference=False,PinType.bIsConst=False,PinType.bIsWeakPointer=False,PinType.bIsUObjectWrapper=False,PinType.bSerializeAsSinglePrecisionFloat=False,LinkedTo=(K2Node_VariableSet_0 81655EBF49E0BBFF98F532A276A6597D,),PersistentGuid=00000000000000000000000000000000,bHidden=False,bNotConnectable=False,bDefaultValueIsReadOnly=False,bDefaultValueIsIgnored=False,bAdvancedView=False,bOrphanedPin=False,)
   CustomProperties Pin (PinId=301C6E4D4C030D71DAD613B8C2631CC1,PinName="then",PinToolTip="
Exec",Direction="EGPD_Output",PinType.PinCategory="exec",PinType.PinSubCategory="",PinType.PinSubCategoryObject=None,PinType.PinSubCategoryMemberReference=(),PinType.PinValueType=(),PinType.ContainerType=None,PinType.bIsReference=False,PinType.bIsConst=False,PinType.bIsWeakPointer=False,PinType.bIsUObjectWrapper=False,PinType.bSerializeAsSinglePrecisionFloat=False,LinkedTo=(K2Node_CallFunction_10 36E3BCD44B3A870DED7686810E71C442,),PersistentGuid=00000000000000000000000000000000,bHidden=False,bNotConnectable=False,bDefaultValueIsReadOnly=False,bDefaultValueIsIgnored=False,bAdvancedView=False,bOrphanedPin=False,)
   CustomProperties Pin (PinId=4CBBA66E45B816D3C27873AD64686AC9,PinName="self",PinFriendlyName=NSLOCTEXT("K2Node", "Target", "Target"),PinToolTip="Target
Gameface Base Component Object Reference",PinType.PinCategory="object",PinType.PinSubCategory="",PinType.PinSubCategoryObject="/Script/CoreUObject.Class'/Script/CohtmlPlugin.CohtmlBaseComponent'",PinType.PinSubCategoryMemberReference=(),PinType.PinValueType=(),PinType.ContainerType=None,PinType.bIsReference=False,PinType.bIsConst=False,PinType.bIsWeakPointer=False,PinType.bIsUObjectWrapper=False,PinType.bSerializeAsSinglePrecisionFloat=False,LinkedTo=(K2Node_Knot_3 C32D66D9444C273800F10CB0837F0631,),PersistentGuid=00000000000000000000000000000000,bHidden=False,bNotConnectable=False,bDefaultValueIsReadOnly=False,bDefaultValueIsIgnored=False,bAdvancedView=False,bOrphanedPin=False,)
   CustomProperties Pin (PinId=A832DB184A994847646945B4C54B0E46,PinName="Name",PinToolTip="Name
String",PinType.PinCategory="string",PinType.PinSubCategory="",PinType.PinSubCategoryObject=None,PinType.PinSubCategoryMemberReference=(),PinType.PinValueType=(),PinType.ContainerType=None,PinType.bIsReference=False,PinType.bIsConst=False,PinType.bIsWeakPointer=False,PinType.bIsUObjectWrapper=False,PinType.bSerializeAsSinglePrecisionFloat=False,DefaultValue="Character",PersistentGuid=00000000000000000000000000000000,bHidden=False,bNotConnectable=False,bDefaultValueIsReadOnly=False,bDefaultValueIsIgnored=False,bAdvancedView=False,bOrphanedPin=False,)
   CustomProperties Pin (PinId=E305DAA5496F374254398A8EA31AF175,PinName="Struct",PinToolTip="Struct
Character Model Structure",PinType.PinCategory="Struct",PinType.PinSubCategory="",PinType.PinSubCategoryObject="/Script/Engine.UserDefinedStruct'/Game/CharacterSelection/CharacterModel.CharacterModel'",PinType.PinSubCategoryMemberReference=(),PinType.PinValueType=(),PinType.ContainerType=None,PinType.bIsReference=False,PinType.bIsConst=False,PinType.bIsWeakPointer=False,PinType.bIsUObjectWrapper=False,PinType.bSerializeAsSinglePrecisionFloat=False,LinkedTo=(K2Node_VariableSet_0 6521C3954EA313B7997F23B8C44CD04E,),PersistentGuid=00000000000000000000000000000000,bHidden=False,bNotConnectable=False,bDefaultValueIsReadOnly=False,bDefaultValueIsIgnored=False,bAdvancedView=False,bOrphanedPin=False,)
End Object
Begin Object Class=/Script/BlueprintGraph.K2Node_CallFunction Name="K2Node_CallFunction_10" ExportPath="/Script/BlueprintGraph.K2Node_CallFunction'/Game/CharacterSelection/CohCharacterBP.CohCharacterBP:EventGraph.K2Node_CallFunction_10'"
   bIsConstFunc=True
   FunctionReference=(MemberParent="/Script/CoreUObject.Class'/Script/CohtmlPlugin.CohtmlBaseComponent'",MemberName="SynchronizeModels")
   NodePosX=2256
   NodePosY=16
   NodeGuid=DF79F3164846CEFE73246F80217ED3F7
   CustomProperties Pin (PinId=36E3BCD44B3A870DED7686810E71C442,PinName="execute",PinToolTip="
Exec",PinType.PinCategory="exec",PinType.PinSubCategory="",PinType.PinSubCategoryObject=None,PinType.PinSubCategoryMemberReference=(),PinType.PinValueType=(),PinType.ContainerType=None,PinType.bIsReference=False,PinType.bIsConst=False,PinType.bIsWeakPointer=False,PinType.bIsUObjectWrapper=False,PinType.bSerializeAsSinglePrecisionFloat=False,LinkedTo=(K2Node_CallFunction_7 301C6E4D4C030D71DAD613B8C2631CC1,),PersistentGuid=00000000000000000000000000000000,bHidden=False,bNotConnectable=False,bDefaultValueIsReadOnly=False,bDefaultValueIsIgnored=False,bAdvancedView=False,bOrphanedPin=False,)
   CustomProperties Pin (PinId=1DDAA7F04B86ECA557D741A05883F17B,PinName="then",PinToolTip="
Exec",Direction="EGPD_Output",PinType.PinCategory="exec",PinType.PinSubCategory="",PinType.PinSubCategoryObject=None,PinType.PinSubCategoryMemberReference=(),PinType.PinValueType=(),PinType.ContainerType=None,PinType.bIsReference=False,PinType.bIsConst=False,PinType.bIsWeakPointer=False,PinType.bIsUObjectWrapper=False,PinType.bSerializeAsSinglePrecisionFloat=False,PersistentGuid=00000000000000000000000000000000,bHidden=False,bNotConnectable=False,bDefaultValueIsReadOnly=False,bDefaultValueIsIgnored=False,bAdvancedView=False,bOrphanedPin=False,)
   CustomProperties Pin (PinId=688CC935493CFE1889C9CC8D9576B510,PinName="self",PinFriendlyName=NSLOCTEXT("K2Node", "Target", "Target"),PinToolTip="Target
Gameface Base Component Object Reference",PinType.PinCategory="object",PinType.PinSubCategory="",PinType.PinSubCategoryObject="/Script/CoreUObject.Class'/Script/CohtmlPlugin.CohtmlBaseComponent'",PinType.PinSubCategoryMemberReference=(),PinType.PinValueType=(),PinType.ContainerType=None,PinType.bIsReference=False,PinType.bIsConst=False,PinType.bIsWeakPointer=False,PinType.bIsUObjectWrapper=False,PinType.bSerializeAsSinglePrecisionFloat=False,LinkedTo=(K2Node_Knot_0 237467D6491C53FE72E79896643D4155,),PersistentGuid=00000000000000000000000000000000,bHidden=False,bNotConnectable=False,bDefaultValueIsReadOnly=False,bDefaultValueIsIgnored=False,bAdvancedView=False,bOrphanedPin=False,)
End Object
Begin Object Class=/Script/BlueprintGraph.K2Node_VariableSet Name="K2Node_VariableSet_0" ExportPath="/Script/BlueprintGraph.K2Node_VariableSet'/Game/CharacterSelection/CohCharacterBP.CohCharacterBP:EventGraph.K2Node_VariableSet_0'"
   VariableReference=(MemberName="Active Character",MemberGuid=3FACD134407CB045DE002FB7F2995548,bSelfContext=True)
   NodePosX=1520
   NodePosY=48
   NodeGuid=BACBF0764D93B412142C8C8C1074DD03
   CustomProperties Pin (PinId=4EF79C9A4F51B479EFF833924180E783,PinName="execute",PinType.PinCategory="exec",PinType.PinSubCategory="",PinType.PinSubCategoryObject=None,PinType.PinSubCategoryMemberReference=(),PinType.PinValueType=(),PinType.ContainerType=None,PinType.bIsReference=False,PinType.bIsConst=False,PinType.bIsWeakPointer=False,PinType.bIsUObjectWrapper=False,PinType.bSerializeAsSinglePrecisionFloat=False,LinkedTo=(K2Node_CallFunction_6 2594D8434A3E01AE3672CEBB306B3BB4,),PersistentGuid=00000000000000000000000000000000,bHidden=False,bNotConnectable=False,bDefaultValueIsReadOnly=False,bDefaultValueIsIgnored=False,bAdvancedView=False,bOrphanedPin=False,)
   CustomProperties Pin (PinId=81655EBF49E0BBFF98F532A276A6597D,PinName="then",Direction="EGPD_Output",PinType.PinCategory="exec",PinType.PinSubCategory="",PinType.PinSubCategoryObject=None,PinType.PinSubCategoryMemberReference=(),PinType.PinValueType=(),PinType.ContainerType=None,PinType.bIsReference=False,PinType.bIsConst=False,PinType.bIsWeakPointer=False,PinType.bIsUObjectWrapper=False,PinType.bSerializeAsSinglePrecisionFloat=False,LinkedTo=(K2Node_CallFunction_7 6F14200C46B4197A08CB259B5DDD9929,),PersistentGuid=00000000000000000000000000000000,bHidden=False,bNotConnectable=False,bDefaultValueIsReadOnly=False,bDefaultValueIsIgnored=False,bAdvancedView=False,bOrphanedPin=False,)
   CustomProperties Pin (PinId=97B5641A4E6DEC2942997C8969547992,PinName="Active Character",PinType.PinCategory="struct",PinType.PinSubCategory="",PinType.PinSubCategoryObject="/Script/Engine.UserDefinedStruct'/Game/CharacterSelection/CharacterModel.CharacterModel'",PinType.PinSubCategoryMemberReference=(),PinType.PinValueType=(),PinType.ContainerType=None,PinType.bIsReference=False,PinType.bIsConst=False,PinType.bIsWeakPointer=False,PinType.bIsUObjectWrapper=False,PinType.bSerializeAsSinglePrecisionFloat=False,LinkedTo=(K2Node_GetArrayItem_0 469A6500465F1D6303E7029671298847,),PersistentGuid=00000000000000000000000000000000,bHidden=False,bNotConnectable=False,bDefaultValueIsReadOnly=False,bDefaultValueIsIgnored=False,bAdvancedView=False,bOrphanedPin=False,)
   CustomProperties Pin (PinId=6521C3954EA313B7997F23B8C44CD04E,PinName="Output_Get",PinToolTip="Retrieves the value of the variable, can use instead of a separate Get node",Direction="EGPD_Output",PinType.PinCategory="struct",PinType.PinSubCategory="",PinType.PinSubCategoryObject="/Script/Engine.UserDefinedStruct'/Game/CharacterSelection/CharacterModel.CharacterModel'",PinType.PinSubCategoryMemberReference=(),PinType.PinValueType=(),PinType.ContainerType=None,PinType.bIsReference=False,PinType.bIsConst=False,PinType.bIsWeakPointer=False,PinType.bIsUObjectWrapper=False,PinType.bSerializeAsSinglePrecisionFloat=False,LinkedTo=(K2Node_CallFunction_7 E305DAA5496F374254398A8EA31AF175,),PersistentGuid=00000000000000000000000000000000,bHidden=False,bNotConnectable=False,bDefaultValueIsReadOnly=False,bDefaultValueIsIgnored=False,bAdvancedView=False,bOrphanedPin=False,)
   CustomProperties Pin (PinId=24827DF14BA6D8ED56D59290171F8EDB,PinName="self",PinFriendlyName=NSLOCTEXT("K2Node", "Target", "Target"),PinType.PinCategory="object",PinType.PinSubCategory="",PinType.PinSubCategoryObject="/Script/Engine.BlueprintGeneratedClass'/Game/CharacterSelection/CohCharacterBP.CohCharacterBP_C'",PinType.PinSubCategoryMemberReference=(),PinType.PinValueType=(),PinType.ContainerType=None,PinType.bIsReference=False,PinType.bIsConst=False,PinType.bIsWeakPointer=False,PinType.bIsUObjectWrapper=False,PinType.bSerializeAsSinglePrecisionFloat=False,PersistentGuid=00000000000000000000000000000000,bHidden=True,bNotConnectable=False,bDefaultValueIsReadOnly=False,bDefaultValueIsIgnored=False,bAdvancedView=False,bOrphanedPin=False,)
End Object
Begin Object Class=/Script/BlueprintGraph.K2Node_VariableGet Name="K2Node_VariableGet_9" ExportPath="/Script/BlueprintGraph.K2Node_VariableGet'/Game/CharacterSelection/CohCharacterBP.CohCharacterBP:EventGraph.K2Node_VariableGet_9'"
   VariableReference=(MemberName="CohtmlHUD",bSelfContext=True)
   NodePosX=368
   NodePosY=144
   NodeGuid=78DF4FD743F5298EECB98C842DBEEA5E
   CustomProperties Pin (PinId=4D9148BE4E0A6AC5B65986BAC710B4EE,PinName="CohtmlHUD",PinFriendlyName=NSLOCTEXT("", "9648E1194A49EF2CF1D6ECB653991C17", "Gameface HUD"),Direction="EGPD_Output",PinType.PinCategory="object",PinType.PinSubCategory="",PinType.PinSubCategoryObject="/Script/CoreUObject.Class'/Script/CohtmlPlugin.CohtmlHUD'",PinType.PinSubCategoryMemberReference=(),PinType.PinValueType=(),PinType.ContainerType=None,PinType.bIsReference=False,PinType.bIsConst=False,PinType.bIsWeakPointer=False,PinType.bIsUObjectWrapper=False,PinType.bSerializeAsSinglePrecisionFloat=False,LinkedTo=(K2Node_CallFunction_0 AA673F02470D337A1CD44F8054FBF608,K2Node_AssignDelegate_1 98B5F5C945A226E535BED6BED0CFED92,K2Node_Knot_4 3077BFD24A294FA165A364A1B253A3C6,),PersistentGuid=00000000000000000000000000000000,bHidden=False,bNotConnectable=False,bDefaultValueIsReadOnly=False,bDefaultValueIsIgnored=False,bAdvancedView=False,bOrphanedPin=False,)
   CustomProperties Pin (PinId=214B2F1B4D5BC7002EF7DC831E730F95,PinName="self",PinFriendlyName=NSLOCTEXT("K2Node", "Target", "Target"),PinType.PinCategory="object",PinType.PinSubCategory="",PinType.PinSubCategoryObject="/Script/CoreUObject.Class'/Script/CohtmlPlugin.CohtmlGameHUD'",PinType.PinSubCategoryMemberReference=(),PinType.PinValueType=(),PinType.ContainerType=None,PinType.bIsReference=False,PinType.bIsConst=False,PinType.bIsWeakPointer=False,PinType.bIsUObjectWrapper=False,PinType.bSerializeAsSinglePrecisionFloat=False,PersistentGuid=00000000000000000000000000000000,bHidden=True,bNotConnectable=False,bDefaultValueIsReadOnly=False,bDefaultValueIsIgnored=False,bAdvancedView=False,bOrphanedPin=False,)
End Object
Begin Object Class=/Script/BlueprintGraph.K2Node_VariableGet Name="K2Node_VariableGet_4" ExportPath="/Script/BlueprintGraph.K2Node_VariableGet'/Game/CharacterSelection/CohCharacterBP.CohCharacterBP:EventGraph.K2Node_VariableGet_4'"
   VariableReference=(MemberName="Current character",MemberGuid=437F78C54D4E7B31937A989B5D56CB25,bSelfContext=True)
   NodePosX=1120
   NodePosY=320
   NodeGuid=07822D2B412FBDE901BF7F81E4C6B0C4
   CustomProperties Pin (PinId=A66E1685486221DDFA819784F06158E4,PinName="Current character",Direction="EGPD_Output",PinType.PinCategory="int",PinType.PinSubCategory="",PinType.PinSubCategoryObject=None,PinType.PinSubCategoryMemberReference=(),PinType.PinValueType=(),PinType.ContainerType=None,PinType.bIsReference=False,PinType.bIsConst=False,PinType.bIsWeakPointer=False,PinType.bIsUObjectWrapper=False,PinType.bSerializeAsSinglePrecisionFloat=False,DefaultValue="0",AutogeneratedDefaultValue="0",LinkedTo=(K2Node_GetArrayItem_0 38A19A5B45B4B95560F3D898A11CB796,),PersistentGuid=00000000000000000000000000000000,bHidden=False,bNotConnectable=False,bDefaultValueIsReadOnly=False,bDefaultValueIsIgnored=False,bAdvancedView=False,bOrphanedPin=False,)
   CustomProperties Pin (PinId=621EB2DC4376D2BA1823F3AAB2E8AF44,PinName="self",PinFriendlyName=NSLOCTEXT("K2Node", "Target", "Target"),PinType.PinCategory="object",PinType.PinSubCategory="",PinType.PinSubCategoryObject="/Script/Engine.BlueprintGeneratedClass'/Game/CharacterSelection/CohCharacterBP.CohCharacterBP_C'",PinType.PinSubCategoryMemberReference=(),PinType.PinValueType=(),PinType.ContainerType=None,PinType.bIsReference=False,PinType.bIsConst=False,PinType.bIsWeakPointer=False,PinType.bIsUObjectWrapper=False,PinType.bSerializeAsSinglePrecisionFloat=False,PersistentGuid=00000000000000000000000000000000,bHidden=True,bNotConnectable=False,bDefaultValueIsReadOnly=False,bDefaultValueIsIgnored=False,bAdvancedView=False,bOrphanedPin=False,)
End Object
Begin Object Class=/Script/BlueprintGraph.K2Node_VariableGet Name="K2Node_VariableGet_0" ExportPath="/Script/BlueprintGraph.K2Node_VariableGet'/Game/CharacterSelection/CohCharacterBP.CohCharacterBP:EventGraph.K2Node_VariableGet_0'"
   VariableReference=(MemberName="Characters",MemberGuid=D7F44CCB4FD6A077AB083F9D98BDC790,bSelfContext=True)
   NodePosX=1120
   NodePosY=256
   NodeGuid=1B9C8A7140477B2648D52D8197E1CBD5
   CustomProperties Pin (PinId=A2E047F94F6A2114DD0433AD24B50387,PinName="Characters",Direction="EGPD_Output",PinType.PinCategory="struct",PinType.PinSubCategory="",PinType.PinSubCategoryObject="/Script/Engine.UserDefinedStruct'/Game/CharacterSelection/CharacterModel.CharacterModel'",PinType.PinSubCategoryMemberReference=(),PinType.PinValueType=(),PinType.ContainerType=Array,PinType.bIsReference=False,PinType.bIsConst=False,PinType.bIsWeakPointer=False,PinType.bIsUObjectWrapper=False,PinType.bSerializeAsSinglePrecisionFloat=False,LinkedTo=(K2Node_GetArrayItem_0 EFB4115E4163A6B7E8DDEA808D39E995,),PersistentGuid=00000000000000000000000000000000,bHidden=False,bNotConnectable=False,bDefaultValueIsReadOnly=False,bDefaultValueIsIgnored=False,bAdvancedView=False,bOrphanedPin=False,)
   CustomProperties Pin (PinId=9349E8D7491C505D7C70BB8525DB1AA9,PinName="self",PinFriendlyName=NSLOCTEXT("K2Node", "Target", "Target"),PinType.PinCategory="object",PinType.PinSubCategory="",PinType.PinSubCategoryObject="/Script/Engine.BlueprintGeneratedClass'/Game/CharacterSelection/CohCharacterBP.CohCharacterBP_C'",PinType.PinSubCategoryMemberReference=(),PinType.PinValueType=(),PinType.ContainerType=None,PinType.bIsReference=False,PinType.bIsConst=False,PinType.bIsWeakPointer=False,PinType.bIsUObjectWrapper=False,PinType.bSerializeAsSinglePrecisionFloat=False,PersistentGuid=00000000000000000000000000000000,bHidden=True,bNotConnectable=False,bDefaultValueIsReadOnly=False,bDefaultValueIsIgnored=False,bAdvancedView=False,bOrphanedPin=False,)
End Object
Begin Object Class=/Script/BlueprintGraph.K2Node_GetArrayItem Name="K2Node_GetArrayItem_0" ExportPath="/Script/BlueprintGraph.K2Node_GetArrayItem'/Game/CharacterSelection/CohCharacterBP.CohCharacterBP:EventGraph.K2Node_GetArrayItem_0'"
   NodePosX=1280
   NodePosY=256
   NodeGuid=DA790574496031B3D1335194EA68F07F
   CustomProperties Pin (PinId=EFB4115E4163A6B7E8DDEA808D39E995,PinName="Array",PinType.PinCategory="struct",PinType.PinSubCategory="",PinType.PinSubCategoryObject="/Script/Engine.UserDefinedStruct'/Game/CharacterSelection/CharacterModel.CharacterModel'",PinType.PinSubCategoryMemberReference=(),PinType.PinValueType=(),PinType.ContainerType=Array,PinType.bIsReference=False,PinType.bIsConst=False,PinType.bIsWeakPointer=False,PinType.bIsUObjectWrapper=False,PinType.bSerializeAsSinglePrecisionFloat=False,LinkedTo=(K2Node_VariableGet_0 A2E047F94F6A2114DD0433AD24B50387,),PersistentGuid=00000000000000000000000000000000,bHidden=False,bNotConnectable=False,bDefaultValueIsReadOnly=False,bDefaultValueIsIgnored=False,bAdvancedView=False,bOrphanedPin=False,)
   CustomProperties Pin (PinId=38A19A5B45B4B95560F3D898A11CB796,PinName="Dimension 1",PinType.PinCategory="int",PinType.PinSubCategory="",PinType.PinSubCategoryObject=None,PinType.PinSubCategoryMemberReference=(),PinType.PinValueType=(),PinType.ContainerType=None,PinType.bIsReference=False,PinType.bIsConst=False,PinType.bIsWeakPointer=False,PinType.bIsUObjectWrapper=False,PinType.bSerializeAsSinglePrecisionFloat=False,DefaultValue="0",AutogeneratedDefaultValue="0",LinkedTo=(K2Node_VariableGet_4 A66E1685486221DDFA819784F06158E4,),PersistentGuid=00000000000000000000000000000000,bHidden=False,bNotConnectable=False,bDefaultValueIsReadOnly=False,bDefaultValueIsIgnored=False,bAdvancedView=False,bOrphanedPin=False,)
   CustomProperties Pin (PinId=469A6500465F1D6303E7029671298847,PinName="Output",Direction="EGPD_Output",PinType.PinCategory="struct",PinType.PinSubCategory="",PinType.PinSubCategoryObject="/Script/Engine.UserDefinedStruct'/Game/CharacterSelection/CharacterModel.CharacterModel'",PinType.PinSubCategoryMemberReference=(),PinType.PinValueType=(),PinType.ContainerType=None,PinType.bIsReference=True,PinType.bIsConst=False,PinType.bIsWeakPointer=False,PinType.bIsUObjectWrapper=False,PinType.bSerializeAsSinglePrecisionFloat=False,LinkedTo=(K2Node_VariableSet_0 97B5641A4E6DEC2942997C8969547992,),PersistentGuid=00000000000000000000000000000000,bHidden=False,bNotConnectable=False,bDefaultValueIsReadOnly=False,bDefaultValueIsIgnored=False,bAdvancedView=False,bOrphanedPin=False,)
End Object
Begin Object Class=/Script/BlueprintGraph.K2Node_Knot Name="K2Node_Knot_4" ExportPath="/Script/BlueprintGraph.K2Node_Knot'/Game/CharacterSelection/CohCharacterBP.CohCharacterBP:EventGraph.K2Node_Knot_4'"
   NodePosX=640
   NodePosY=224
   NodeGuid=E0430B70458928F5A0BD2F90FCF5B115
   CustomProperties Pin (PinId=3077BFD24A294FA165A364A1B253A3C6,PinName="InputPin",PinType.PinCategory="object",PinType.PinSubCategory="",PinType.PinSubCategoryObject="/Script/CoreUObject.Class'/Script/CohtmlPlugin.CohtmlHUD'",PinType.PinSubCategoryMemberReference=(),PinType.PinValueType=(),PinType.ContainerType=None,PinType.bIsReference=False,PinType.bIsConst=False,PinType.bIsWeakPointer=False,PinType.bIsUObjectWrapper=False,PinType.bSerializeAsSinglePrecisionFloat=False,LinkedTo=(K2Node_VariableGet_9 4D9148BE4E0A6AC5B65986BAC710B4EE,),PersistentGuid=00000000000000000000000000000000,bHidden=False,bNotConnectable=False,bDefaultValueIsReadOnly=False,bDefaultValueIsIgnored=True,bAdvancedView=False,bOrphanedPin=False,)
   CustomProperties Pin (PinId=CD6EA85E447639BF2477039B45D01BF7,PinName="OutputPin",Direction="EGPD_Output",PinType.PinCategory="object",PinType.PinSubCategory="",PinType.PinSubCategoryObject="/Script/CoreUObject.Class'/Script/CohtmlPlugin.CohtmlHUD'",PinType.PinSubCategoryMemberReference=(),PinType.PinValueType=(),PinType.ContainerType=None,PinType.bIsReference=False,PinType.bIsConst=False,PinType.bIsWeakPointer=False,PinType.bIsUObjectWrapper=False,PinType.bSerializeAsSinglePrecisionFloat=False,LinkedTo=(K2Node_Knot_5 359CFB1C40A1617C48C28185CFB32D6F,),PersistentGuid=00000000000000000000000000000000,bHidden=False,bNotConnectable=False,bDefaultValueIsReadOnly=False,bDefaultValueIsIgnored=False,bAdvancedView=False,bOrphanedPin=False,)
End Object
Begin Object Class=/Script/BlueprintGraph.K2Node_Knot Name="K2Node_Knot_5" ExportPath="/Script/BlueprintGraph.K2Node_Knot'/Game/CharacterSelection/CohCharacterBP.CohCharacterBP:EventGraph.K2Node_Knot_5'"
   NodePosX=960
   NodePosY=224
   NodeGuid=6766A88B4A19015689076BAADCBDD861
   CustomProperties Pin (PinId=359CFB1C40A1617C48C28185CFB32D6F,PinName="InputPin",PinType.PinCategory="object",PinType.PinSubCategory="",PinType.PinSubCategoryObject="/Script/CoreUObject.Class'/Script/CohtmlPlugin.CohtmlHUD'",PinType.PinSubCategoryMemberReference=(),PinType.PinValueType=(),PinType.ContainerType=None,PinType.bIsReference=False,PinType.bIsConst=False,PinType.bIsWeakPointer=False,PinType.bIsUObjectWrapper=False,PinType.bSerializeAsSinglePrecisionFloat=False,LinkedTo=(K2Node_Knot_4 CD6EA85E447639BF2477039B45D01BF7,),PersistentGuid=00000000000000000000000000000000,bHidden=False,bNotConnectable=False,bDefaultValueIsReadOnly=False,bDefaultValueIsIgnored=True,bAdvancedView=False,bOrphanedPin=False,)
   CustomProperties Pin (PinId=C083585B4ADA7F3A211F0B95DEE97F61,PinName="OutputPin",Direction="EGPD_Output",PinType.PinCategory="object",PinType.PinSubCategory="",PinType.PinSubCategoryObject="/Script/CoreUObject.Class'/Script/CohtmlPlugin.CohtmlHUD'",PinType.PinSubCategoryMemberReference=(),PinType.PinValueType=(),PinType.ContainerType=None,PinType.bIsReference=False,PinType.bIsConst=False,PinType.bIsWeakPointer=False,PinType.bIsUObjectWrapper=False,PinType.bSerializeAsSinglePrecisionFloat=False,LinkedTo=(K2Node_Knot_3 1CE3D0F145C665DD7B926B9F14781ECA,K2Node_CallFunction_6 AA673F02470D337A1CD44F8054FBF608,),PersistentGuid=00000000000000000000000000000000,bHidden=False,bNotConnectable=False,bDefaultValueIsReadOnly=False,bDefaultValueIsIgnored=False,bAdvancedView=False,bOrphanedPin=False,)
End Object
Begin Object Class=/Script/BlueprintGraph.K2Node_Knot Name="K2Node_Knot_3" ExportPath="/Script/BlueprintGraph.K2Node_Knot'/Game/CharacterSelection/CohCharacterBP.CohCharacterBP:EventGraph.K2Node_Knot_3'"
   NodePosX=1680
   NodePosY=224
   NodeGuid=51DAACCC4A0AE7AC23C42AB2523D4B2B
   CustomProperties Pin (PinId=1CE3D0F145C665DD7B926B9F14781ECA,PinName="InputPin",PinType.PinCategory="object",PinType.PinSubCategory="",PinType.PinSubCategoryObject="/Script/CoreUObject.Class'/Script/CohtmlPlugin.CohtmlHUD'",PinType.PinSubCategoryMemberReference=(),PinType.PinValueType=(),PinType.ContainerType=None,PinType.bIsReference=False,PinType.bIsConst=False,PinType.bIsWeakPointer=False,PinType.bIsUObjectWrapper=False,PinType.bSerializeAsSinglePrecisionFloat=False,LinkedTo=(K2Node_Knot_5 C083585B4ADA7F3A211F0B95DEE97F61,),PersistentGuid=00000000000000000000000000000000,bHidden=False,bNotConnectable=False,bDefaultValueIsReadOnly=False,bDefaultValueIsIgnored=True,bAdvancedView=False,bOrphanedPin=False,)
   CustomProperties Pin (PinId=C32D66D9444C273800F10CB0837F0631,PinName="OutputPin",Direction="EGPD_Output",PinType.PinCategory="object",PinType.PinSubCategory="",PinType.PinSubCategoryObject="/Script/CoreUObject.Class'/Script/CohtmlPlugin.CohtmlHUD'",PinType.PinSubCategoryMemberReference=(),PinType.PinValueType=(),PinType.ContainerType=None,PinType.bIsReference=False,PinType.bIsConst=False,PinType.bIsWeakPointer=False,PinType.bIsUObjectWrapper=False,PinType.bSerializeAsSinglePrecisionFloat=False,LinkedTo=(K2Node_Knot_0 C60AE652465844352E7CA6B94EE63B33,K2Node_CallFunction_7 4CBBA66E45B816D3C27873AD64686AC9,),PersistentGuid=00000000000000000000000000000000,bHidden=False,bNotConnectable=False,bDefaultValueIsReadOnly=False,bDefaultValueIsIgnored=False,bAdvancedView=False,bOrphanedPin=False,)
End Object
Begin Object Class=/Script/BlueprintGraph.K2Node_Knot Name="K2Node_Knot_0" ExportPath="/Script/BlueprintGraph.K2Node_Knot'/Game/CharacterSelection/CohCharacterBP.CohCharacterBP:EventGraph.K2Node_Knot_0'"
   NodePosX=2128
   NodePosY=224
   NodeGuid=CB62C4B2425766B359FDA8A610A2DB77
   CustomProperties Pin (PinId=C60AE652465844352E7CA6B94EE63B33,PinName="InputPin",PinType.PinCategory="object",PinType.PinSubCategory="",PinType.PinSubCategoryObject="/Script/CoreUObject.Class'/Script/CohtmlPlugin.CohtmlHUD'",PinType.PinSubCategoryMemberReference=(),PinType.PinValueType=(),PinType.ContainerType=None,PinType.bIsReference=False,PinType.bIsConst=False,PinType.bIsWeakPointer=False,PinType.bIsUObjectWrapper=False,PinType.bSerializeAsSinglePrecisionFloat=False,LinkedTo=(K2Node_Knot_3 C32D66D9444C273800F10CB0837F0631,),PersistentGuid=00000000000000000000000000000000,bHidden=False,bNotConnectable=False,bDefaultValueIsReadOnly=False,bDefaultValueIsIgnored=True,bAdvancedView=False,bOrphanedPin=False,)
   CustomProperties Pin (PinId=237467D6491C53FE72E79896643D4155,PinName="OutputPin",Direction="EGPD_Output",PinType.PinCategory="object",PinType.PinSubCategory="",PinType.PinSubCategoryObject="/Script/CoreUObject.Class'/Script/CohtmlPlugin.CohtmlHUD'",PinType.PinSubCategoryMemberReference=(),PinType.PinValueType=(),PinType.ContainerType=None,PinType.bIsReference=False,PinType.bIsConst=False,PinType.bIsWeakPointer=False,PinType.bIsUObjectWrapper=False,PinType.bSerializeAsSinglePrecisionFloat=False,LinkedTo=(K2Node_CallFunction_10 688CC935493CFE1889C9CC8D9576B510,),PersistentGuid=00000000000000000000000000000000,bHidden=False,bNotConnectable=False,bDefaultValueIsReadOnly=False,bDefaultValueIsIgnored=False,bAdvancedView=False,bOrphanedPin=False,)
End Object
Setting the active character data
The final step in the CohCharacterBP implementation is to update the model for the active character, ensuring the UI receives the correct data when the player changes characters.
To do this, we’ll create a new method called Set Active Character, which will retrieve the current character data from the Characters array, set it to the Active Character, and then update the model using the Update Whole Data Model from Struct method. After the model has been updated we need to synchronize the UI with the model via the Synchronize Models method.
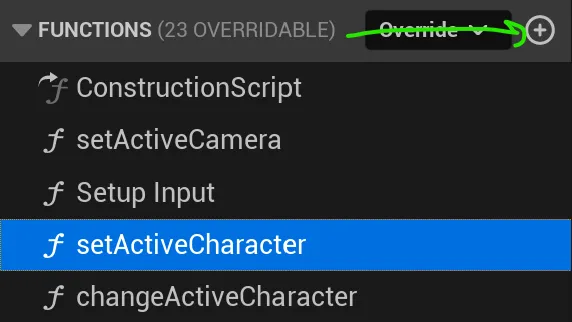
Begin Object Class=/Script/BlueprintGraph.K2Node_FunctionEntry Name="K2Node_FunctionEntry_1" ExportPath="/Script/BlueprintGraph.K2Node_FunctionEntry'/Game/CharacterSelection/CohCharacterBP.CohCharacterBP:setActiveCharacter.K2Node_FunctionEntry_1'"
   ExtraFlags=201457664
   FunctionReference=(MemberName="setActiveCharacter")
   bIsEditable=True
   NodePosX=-256
   NodePosY=16
   NodeGuid=6E7B4AF0430689A1C6D0C4AED0643604
   CustomProperties Pin (PinId=6574B17340E4C698FF3BF398804A92FA,PinName="then",Direction="EGPD_Output",PinType.PinCategory="exec",PinType.PinSubCategory="",PinType.PinSubCategoryObject=None,PinType.PinSubCategoryMemberReference=(),PinType.PinValueType=(),PinType.ContainerType=None,PinType.bIsReference=False,PinType.bIsConst=False,PinType.bIsWeakPointer=False,PinType.bIsUObjectWrapper=False,PinType.bSerializeAsSinglePrecisionFloat=False,LinkedTo=(K2Node_VariableSet_0 4EF79C9A4F51B479EFF833924180E783,),PersistentGuid=00000000000000000000000000000000,bHidden=False,bNotConnectable=False,bDefaultValueIsReadOnly=False,bDefaultValueIsIgnored=False,bAdvancedView=False,bOrphanedPin=False,)
End Object
Begin Object Class=/Script/BlueprintGraph.K2Node_CallFunction Name="K2Node_CallFunction_0" ExportPath="/Script/BlueprintGraph.K2Node_CallFunction'/Game/CharacterSelection/CohCharacterBP.CohCharacterBP:setActiveCharacter.K2Node_CallFunction_0'"
   bIsConstFunc=True
   FunctionReference=(MemberParent="/Script/CoreUObject.Class'/Script/CohtmlPlugin.CohtmlBaseComponent'",MemberName="UpdateWholeDataModelFromStruct")
   NodePosX=288
   NodePosY=16
   ErrorType=1
   NodeGuid=B96279464459765E822A1B8F5C305E6E
   CustomProperties Pin (PinId=004225AE4C5711234F6B089300E10B10,PinName="execute",PinToolTip="
Exec",PinType.PinCategory="exec",PinType.PinSubCategory="",PinType.PinSubCategoryObject=None,PinType.PinSubCategoryMemberReference=(),PinType.PinValueType=(),PinType.ContainerType=None,PinType.bIsReference=False,PinType.bIsConst=False,PinType.bIsWeakPointer=False,PinType.bIsUObjectWrapper=False,PinType.bSerializeAsSinglePrecisionFloat=False,LinkedTo=(K2Node_VariableSet_0 81655EBF49E0BBFF98F532A276A6597D,),PersistentGuid=00000000000000000000000000000000,bHidden=False,bNotConnectable=False,bDefaultValueIsReadOnly=False,bDefaultValueIsIgnored=False,bAdvancedView=False,bOrphanedPin=False,)
   CustomProperties Pin (PinId=16C0E2604E8108DC58703DB8D336E69E,PinName="then",PinToolTip="
Exec",Direction="EGPD_Output",PinType.PinCategory="exec",PinType.PinSubCategory="",PinType.PinSubCategoryObject=None,PinType.PinSubCategoryMemberReference=(),PinType.PinValueType=(),PinType.ContainerType=None,PinType.bIsReference=False,PinType.bIsConst=False,PinType.bIsWeakPointer=False,PinType.bIsUObjectWrapper=False,PinType.bSerializeAsSinglePrecisionFloat=False,LinkedTo=(K2Node_CallFunction_1 468A26284AF54AE2B66911B7AB269629,),PersistentGuid=00000000000000000000000000000000,bHidden=False,bNotConnectable=False,bDefaultValueIsReadOnly=False,bDefaultValueIsIgnored=False,bAdvancedView=False,bOrphanedPin=False,)
   CustomProperties Pin (PinId=109568A74461B2F45EA46E87D27F7A53,PinName="self",PinFriendlyName=NSLOCTEXT("K2Node", "Target", "Target"),PinToolTip="Target
Gameface Base Component Object Reference",PinType.PinCategory="object",PinType.PinSubCategory="",PinType.PinSubCategoryObject="/Script/CoreUObject.Class'/Script/CohtmlPlugin.CohtmlBaseComponent'",PinType.PinSubCategoryMemberReference=(),PinType.PinValueType=(),PinType.ContainerType=None,PinType.bIsReference=False,PinType.bIsConst=False,PinType.bIsWeakPointer=False,PinType.bIsUObjectWrapper=False,PinType.bSerializeAsSinglePrecisionFloat=False,LinkedTo=(K2Node_VariableGet_1 A2CFDF654C5083CF072259B6405613C2,),PersistentGuid=00000000000000000000000000000000,bHidden=False,bNotConnectable=False,bDefaultValueIsReadOnly=False,bDefaultValueIsIgnored=False,bAdvancedView=False,bOrphanedPin=False,)
   CustomProperties Pin (PinId=42AAF60B41923068D54958A2A2530CFA,PinName="Struct",PinToolTip="Struct
Character Model Structure",PinType.PinCategory="struct",PinType.PinSubCategory="",PinType.PinSubCategoryObject="/Script/Engine.UserDefinedStruct'/Game/CharacterSelection/CharacterModel.CharacterModel'",PinType.PinSubCategoryMemberReference=(),PinType.PinValueType=(),PinType.ContainerType=None,PinType.bIsReference=False,PinType.bIsConst=False,PinType.bIsWeakPointer=False,PinType.bIsUObjectWrapper=False,PinType.bSerializeAsSinglePrecisionFloat=False,LinkedTo=(K2Node_VariableSet_0 6521C3954EA313B7997F23B8C44CD04E,),PersistentGuid=00000000000000000000000000000000,bHidden=False,bNotConnectable=False,bDefaultValueIsReadOnly=False,bDefaultValueIsIgnored=False,bAdvancedView=False,bOrphanedPin=False,)
End Object
Begin Object Class=/Script/BlueprintGraph.K2Node_VariableGet Name="K2Node_VariableGet_1" ExportPath="/Script/BlueprintGraph.K2Node_VariableGet'/Game/CharacterSelection/CohCharacterBP.CohCharacterBP:setActiveCharacter.K2Node_VariableGet_1'"
   VariableReference=(MemberName="CohtmlHUD",bSelfContext=True)
   NodePosX=80
   NodePosY=176
   NodeGuid=4283F12E487ED9D319D0B0ADF27FD2F3
   CustomProperties Pin (PinId=A2CFDF654C5083CF072259B6405613C2,PinName="CohtmlHUD",PinFriendlyName=NSLOCTEXT("", "3C15D39A46FD5EBEACA66194E453D95B", "Gameface HUD"),Direction="EGPD_Output",PinType.PinCategory="object",PinType.PinSubCategory="",PinType.PinSubCategoryObject="/Script/CoreUObject.Class'/Script/CohtmlPlugin.CohtmlHUD'",PinType.PinSubCategoryMemberReference=(),PinType.PinValueType=(),PinType.ContainerType=None,PinType.bIsReference=False,PinType.bIsConst=False,PinType.bIsWeakPointer=False,PinType.bIsUObjectWrapper=False,PinType.bSerializeAsSinglePrecisionFloat=False,LinkedTo=(K2Node_CallFunction_0 109568A74461B2F45EA46E87D27F7A53,K2Node_Knot_0 A5F8DD894A922BC32E3B96B6BBE55C4E,),PersistentGuid=00000000000000000000000000000000,bHidden=False,bNotConnectable=False,bDefaultValueIsReadOnly=False,bDefaultValueIsIgnored=False,bAdvancedView=False,bOrphanedPin=False,)
   CustomProperties Pin (PinId=8AF746A34F8751F0503801B9E7584D06,PinName="self",PinFriendlyName=NSLOCTEXT("K2Node", "Target", "Target"),PinType.PinCategory="object",PinType.PinSubCategory="",PinType.PinSubCategoryObject="/Script/CoreUObject.Class'/Script/CohtmlPlugin.CohtmlGameHUD'",PinType.PinSubCategoryMemberReference=(),PinType.PinValueType=(),PinType.ContainerType=None,PinType.bIsReference=False,PinType.bIsConst=False,PinType.bIsWeakPointer=False,PinType.bIsUObjectWrapper=False,PinType.bSerializeAsSinglePrecisionFloat=False,PersistentGuid=00000000000000000000000000000000,bHidden=True,bNotConnectable=False,bDefaultValueIsReadOnly=False,bDefaultValueIsIgnored=False,bAdvancedView=False,bOrphanedPin=False,)
End Object
Begin Object Class=/Script/BlueprintGraph.K2Node_VariableGet Name="K2Node_VariableGet_4" ExportPath="/Script/BlueprintGraph.K2Node_VariableGet'/Game/CharacterSelection/CohCharacterBP.CohCharacterBP:setActiveCharacter.K2Node_VariableGet_4'"
   VariableReference=(MemberName="Current character",MemberGuid=437F78C54D4E7B31937A989B5D56CB25,bSelfContext=True)
   NodePosX=-384
   NodePosY=192
   NodeGuid=1CB469B6421C244440F7E391AC63C671
   CustomProperties Pin (PinId=A66E1685486221DDFA819784F06158E4,PinName="Current character",Direction="EGPD_Output",PinType.PinCategory="int",PinType.PinSubCategory="",PinType.PinSubCategoryObject=None,PinType.PinSubCategoryMemberReference=(),PinType.PinValueType=(),PinType.ContainerType=None,PinType.bIsReference=False,PinType.bIsConst=False,PinType.bIsWeakPointer=False,PinType.bIsUObjectWrapper=False,PinType.bSerializeAsSinglePrecisionFloat=False,DefaultValue="0",AutogeneratedDefaultValue="0",LinkedTo=(K2Node_GetArrayItem_0 38A19A5B45B4B95560F3D898A11CB796,),PersistentGuid=00000000000000000000000000000000,bHidden=False,bNotConnectable=False,bDefaultValueIsReadOnly=False,bDefaultValueIsIgnored=False,bAdvancedView=False,bOrphanedPin=False,)
   CustomProperties Pin (PinId=621EB2DC4376D2BA1823F3AAB2E8AF44,PinName="self",PinFriendlyName=NSLOCTEXT("K2Node", "Target", "Target"),PinType.PinCategory="object",PinType.PinSubCategory="",PinType.PinSubCategoryObject="/Script/Engine.BlueprintGeneratedClass'/Game/CharacterSelection/CohCharacterBP.CohCharacterBP_C'",PinType.PinSubCategoryMemberReference=(),PinType.PinValueType=(),PinType.ContainerType=None,PinType.bIsReference=False,PinType.bIsConst=False,PinType.bIsWeakPointer=False,PinType.bIsUObjectWrapper=False,PinType.bSerializeAsSinglePrecisionFloat=False,PersistentGuid=00000000000000000000000000000000,bHidden=True,bNotConnectable=False,bDefaultValueIsReadOnly=False,bDefaultValueIsIgnored=False,bAdvancedView=False,bOrphanedPin=False,)
End Object
Begin Object Class=/Script/BlueprintGraph.K2Node_CallFunction Name="K2Node_CallFunction_1" ExportPath="/Script/BlueprintGraph.K2Node_CallFunction'/Game/CharacterSelection/CohCharacterBP.CohCharacterBP:setActiveCharacter.K2Node_CallFunction_1'"
   bIsConstFunc=True
   FunctionReference=(MemberParent="/Script/CoreUObject.Class'/Script/CohtmlPlugin.CohtmlBaseComponent'",MemberName="SynchronizeModels")
   NodePosX=656
   NodePosY=16
   ErrorType=1
   NodeGuid=68761E5F4C62F3190A92DDBAD2064024
   CustomProperties Pin (PinId=468A26284AF54AE2B66911B7AB269629,PinName="execute",PinToolTip="
Exec",PinType.PinCategory="exec",PinType.PinSubCategory="",PinType.PinSubCategoryObject=None,PinType.PinSubCategoryMemberReference=(),PinType.PinValueType=(),PinType.ContainerType=None,PinType.bIsReference=False,PinType.bIsConst=False,PinType.bIsWeakPointer=False,PinType.bIsUObjectWrapper=False,PinType.bSerializeAsSinglePrecisionFloat=False,LinkedTo=(K2Node_CallFunction_0 16C0E2604E8108DC58703DB8D336E69E,),PersistentGuid=00000000000000000000000000000000,bHidden=False,bNotConnectable=False,bDefaultValueIsReadOnly=False,bDefaultValueIsIgnored=False,bAdvancedView=False,bOrphanedPin=False,)
   CustomProperties Pin (PinId=0E16DAEC46FCA03501C86D9466B60EA6,PinName="then",PinToolTip="
Exec",Direction="EGPD_Output",PinType.PinCategory="exec",PinType.PinSubCategory="",PinType.PinSubCategoryObject=None,PinType.PinSubCategoryMemberReference=(),PinType.PinValueType=(),PinType.ContainerType=None,PinType.bIsReference=False,PinType.bIsConst=False,PinType.bIsWeakPointer=False,PinType.bIsUObjectWrapper=False,PinType.bSerializeAsSinglePrecisionFloat=False,PersistentGuid=00000000000000000000000000000000,bHidden=False,bNotConnectable=False,bDefaultValueIsReadOnly=False,bDefaultValueIsIgnored=False,bAdvancedView=False,bOrphanedPin=False,)
   CustomProperties Pin (PinId=7F093B064000211432FD87A8C370937E,PinName="self",PinFriendlyName=NSLOCTEXT("K2Node", "Target", "Target"),PinToolTip="Target
Gameface Base Component Object Reference",PinType.PinCategory="object",PinType.PinSubCategory="",PinType.PinSubCategoryObject="/Script/CoreUObject.Class'/Script/CohtmlPlugin.CohtmlBaseComponent'",PinType.PinSubCategoryMemberReference=(),PinType.PinValueType=(),PinType.ContainerType=None,PinType.bIsReference=False,PinType.bIsConst=False,PinType.bIsWeakPointer=False,PinType.bIsUObjectWrapper=False,PinType.bSerializeAsSinglePrecisionFloat=False,LinkedTo=(K2Node_Knot_0 D336A4484F3F4FB49354868A58D82E6A,),PersistentGuid=00000000000000000000000000000000,bHidden=False,bNotConnectable=False,bDefaultValueIsReadOnly=False,bDefaultValueIsIgnored=False,bAdvancedView=False,bOrphanedPin=False,)
End Object
Begin Object Class=/Script/BlueprintGraph.K2Node_VariableGet Name="K2Node_VariableGet_0" ExportPath="/Script/BlueprintGraph.K2Node_VariableGet'/Game/CharacterSelection/CohCharacterBP.CohCharacterBP:setActiveCharacter.K2Node_VariableGet_0'"
   VariableReference=(MemberName="Characters",MemberGuid=D7F44CCB4FD6A077AB083F9D98BDC790,bSelfContext=True)
   NodePosX=-368
   NodePosY=128
   NodeGuid=784E5C124803B6612850C6AA6092DA1D
   CustomProperties Pin (PinId=A2E047F94F6A2114DD0433AD24B50387,PinName="Characters",Direction="EGPD_Output",PinType.PinCategory="struct",PinType.PinSubCategory="",PinType.PinSubCategoryObject="/Script/Engine.UserDefinedStruct'/Game/CharacterSelection/CharacterModel.CharacterModel'",PinType.PinSubCategoryMemberReference=(),PinType.PinValueType=(),PinType.ContainerType=Array,PinType.bIsReference=False,PinType.bIsConst=False,PinType.bIsWeakPointer=False,PinType.bIsUObjectWrapper=False,PinType.bSerializeAsSinglePrecisionFloat=False,LinkedTo=(K2Node_GetArrayItem_0 EFB4115E4163A6B7E8DDEA808D39E995,),PersistentGuid=00000000000000000000000000000000,bHidden=False,bNotConnectable=False,bDefaultValueIsReadOnly=False,bDefaultValueIsIgnored=False,bAdvancedView=False,bOrphanedPin=False,)
   CustomProperties Pin (PinId=9349E8D7491C505D7C70BB8525DB1AA9,PinName="self",PinFriendlyName=NSLOCTEXT("K2Node", "Target", "Target"),PinType.PinCategory="object",PinType.PinSubCategory="",PinType.PinSubCategoryObject="/Script/Engine.BlueprintGeneratedClass'/Game/CharacterSelection/CohCharacterBP.CohCharacterBP_C'",PinType.PinSubCategoryMemberReference=(),PinType.PinValueType=(),PinType.ContainerType=None,PinType.bIsReference=False,PinType.bIsConst=False,PinType.bIsWeakPointer=False,PinType.bIsUObjectWrapper=False,PinType.bSerializeAsSinglePrecisionFloat=False,PersistentGuid=00000000000000000000000000000000,bHidden=True,bNotConnectable=False,bDefaultValueIsReadOnly=False,bDefaultValueIsIgnored=False,bAdvancedView=False,bOrphanedPin=False,)
End Object
Begin Object Class=/Script/BlueprintGraph.K2Node_GetArrayItem Name="K2Node_GetArrayItem_0" ExportPath="/Script/BlueprintGraph.K2Node_GetArrayItem'/Game/CharacterSelection/CohCharacterBP.CohCharacterBP:setActiveCharacter.K2Node_GetArrayItem_0'"
   NodePosX=-192
   NodePosY=128
   NodeGuid=8AB936BF48009975AD48EFB110DA636D
   CustomProperties Pin (PinId=EFB4115E4163A6B7E8DDEA808D39E995,PinName="Array",PinType.PinCategory="struct",PinType.PinSubCategory="",PinType.PinSubCategoryObject="/Script/Engine.UserDefinedStruct'/Game/CharacterSelection/CharacterModel.CharacterModel'",PinType.PinSubCategoryMemberReference=(),PinType.PinValueType=(),PinType.ContainerType=Array,PinType.bIsReference=False,PinType.bIsConst=False,PinType.bIsWeakPointer=False,PinType.bIsUObjectWrapper=False,PinType.bSerializeAsSinglePrecisionFloat=False,LinkedTo=(K2Node_VariableGet_0 A2E047F94F6A2114DD0433AD24B50387,),PersistentGuid=00000000000000000000000000000000,bHidden=False,bNotConnectable=False,bDefaultValueIsReadOnly=False,bDefaultValueIsIgnored=False,bAdvancedView=False,bOrphanedPin=False,)
   CustomProperties Pin (PinId=38A19A5B45B4B95560F3D898A11CB796,PinName="Dimension 1",PinType.PinCategory="int",PinType.PinSubCategory="",PinType.PinSubCategoryObject=None,PinType.PinSubCategoryMemberReference=(),PinType.PinValueType=(),PinType.ContainerType=None,PinType.bIsReference=False,PinType.bIsConst=False,PinType.bIsWeakPointer=False,PinType.bIsUObjectWrapper=False,PinType.bSerializeAsSinglePrecisionFloat=False,DefaultValue="0",AutogeneratedDefaultValue="0",LinkedTo=(K2Node_VariableGet_4 A66E1685486221DDFA819784F06158E4,),PersistentGuid=00000000000000000000000000000000,bHidden=False,bNotConnectable=False,bDefaultValueIsReadOnly=False,bDefaultValueIsIgnored=False,bAdvancedView=False,bOrphanedPin=False,)
   CustomProperties Pin (PinId=469A6500465F1D6303E7029671298847,PinName="Output",Direction="EGPD_Output",PinType.PinCategory="struct",PinType.PinSubCategory="",PinType.PinSubCategoryObject="/Script/Engine.UserDefinedStruct'/Game/CharacterSelection/CharacterModel.CharacterModel'",PinType.PinSubCategoryMemberReference=(),PinType.PinValueType=(),PinType.ContainerType=None,PinType.bIsReference=True,PinType.bIsConst=False,PinType.bIsWeakPointer=False,PinType.bIsUObjectWrapper=False,PinType.bSerializeAsSinglePrecisionFloat=False,LinkedTo=(K2Node_VariableSet_0 97B5641A4E6DEC2942997C8969547992,),PersistentGuid=00000000000000000000000000000000,bHidden=False,bNotConnectable=False,bDefaultValueIsReadOnly=False,bDefaultValueIsIgnored=False,bAdvancedView=False,bOrphanedPin=False,)
End Object
Begin Object Class=/Script/BlueprintGraph.K2Node_VariableSet Name="K2Node_VariableSet_0" ExportPath="/Script/BlueprintGraph.K2Node_VariableSet'/Game/CharacterSelection/CohCharacterBP.CohCharacterBP:setActiveCharacter.K2Node_VariableSet_0'"
   VariableReference=(MemberName="Active Character",MemberGuid=3FACD134407CB045DE002FB7F2995548,bSelfContext=True)
   NodePosX=16
   NodePosY=32
   NodeGuid=12F68BA043A9FB76398D76A6EDE34932
   CustomProperties Pin (PinId=4EF79C9A4F51B479EFF833924180E783,PinName="execute",PinType.PinCategory="exec",PinType.PinSubCategory="",PinType.PinSubCategoryObject=None,PinType.PinSubCategoryMemberReference=(),PinType.PinValueType=(),PinType.ContainerType=None,PinType.bIsReference=False,PinType.bIsConst=False,PinType.bIsWeakPointer=False,PinType.bIsUObjectWrapper=False,PinType.bSerializeAsSinglePrecisionFloat=False,LinkedTo=(K2Node_FunctionEntry_1 6574B17340E4C698FF3BF398804A92FA,),PersistentGuid=00000000000000000000000000000000,bHidden=False,bNotConnectable=False,bDefaultValueIsReadOnly=False,bDefaultValueIsIgnored=False,bAdvancedView=False,bOrphanedPin=False,)
   CustomProperties Pin (PinId=81655EBF49E0BBFF98F532A276A6597D,PinName="then",Direction="EGPD_Output",PinType.PinCategory="exec",PinType.PinSubCategory="",PinType.PinSubCategoryObject=None,PinType.PinSubCategoryMemberReference=(),PinType.PinValueType=(),PinType.ContainerType=None,PinType.bIsReference=False,PinType.bIsConst=False,PinType.bIsWeakPointer=False,PinType.bIsUObjectWrapper=False,PinType.bSerializeAsSinglePrecisionFloat=False,LinkedTo=(K2Node_CallFunction_0 004225AE4C5711234F6B089300E10B10,),PersistentGuid=00000000000000000000000000000000,bHidden=False,bNotConnectable=False,bDefaultValueIsReadOnly=False,bDefaultValueIsIgnored=False,bAdvancedView=False,bOrphanedPin=False,)
   CustomProperties Pin (PinId=97B5641A4E6DEC2942997C8969547992,PinName="Active Character",PinType.PinCategory="struct",PinType.PinSubCategory="",PinType.PinSubCategoryObject="/Script/Engine.UserDefinedStruct'/Game/CharacterSelection/CharacterModel.CharacterModel'",PinType.PinSubCategoryMemberReference=(),PinType.PinValueType=(),PinType.ContainerType=None,PinType.bIsReference=False,PinType.bIsConst=False,PinType.bIsWeakPointer=False,PinType.bIsUObjectWrapper=False,PinType.bSerializeAsSinglePrecisionFloat=False,LinkedTo=(K2Node_GetArrayItem_0 469A6500465F1D6303E7029671298847,),PersistentGuid=00000000000000000000000000000000,bHidden=False,bNotConnectable=False,bDefaultValueIsReadOnly=False,bDefaultValueIsIgnored=False,bAdvancedView=False,bOrphanedPin=False,)
   CustomProperties Pin (PinId=24827DF14BA6D8ED56D59290171F8EDB,PinName="self",PinFriendlyName=NSLOCTEXT("K2Node", "Target", "Target"),PinType.PinCategory="object",PinType.PinSubCategory="",PinType.PinSubCategoryObject="/Script/Engine.BlueprintGeneratedClass'/Game/CharacterSelection/CohCharacterBP.CohCharacterBP_C'",PinType.PinSubCategoryMemberReference=(),PinType.PinValueType=(),PinType.ContainerType=None,PinType.bIsReference=False,PinType.bIsConst=False,PinType.bIsWeakPointer=False,PinType.bIsUObjectWrapper=False,PinType.bSerializeAsSinglePrecisionFloat=False,PersistentGuid=00000000000000000000000000000000,bHidden=True,bNotConnectable=False,bDefaultValueIsReadOnly=False,bDefaultValueIsIgnored=False,bAdvancedView=False,bOrphanedPin=False,)
   CustomProperties Pin (PinId=6521C3954EA313B7997F23B8C44CD04E,PinName="Output_Get",PinToolTip="Retrieves the value of the variable, can use instead of a separate Get node",Direction="EGPD_Output",PinType.PinCategory="struct",PinType.PinSubCategory="",PinType.PinSubCategoryObject="/Script/Engine.UserDefinedStruct'/Game/CharacterSelection/CharacterModel.CharacterModel'",PinType.PinSubCategoryMemberReference=(),PinType.PinValueType=(),PinType.ContainerType=None,PinType.bIsReference=False,PinType.bIsConst=False,PinType.bIsWeakPointer=False,PinType.bIsUObjectWrapper=False,PinType.bSerializeAsSinglePrecisionFloat=False,LinkedTo=(K2Node_CallFunction_0 42AAF60B41923068D54958A2A2530CFA,),PersistentGuid=00000000000000000000000000000000,bHidden=False,bNotConnectable=False,bDefaultValueIsReadOnly=False,bDefaultValueIsIgnored=False,bAdvancedView=False,bOrphanedPin=False,)
End Object
Begin Object Class=/Script/BlueprintGraph.K2Node_Knot Name="K2Node_Knot_0" ExportPath="/Script/BlueprintGraph.K2Node_Knot'/Game/CharacterSelection/CohCharacterBP.CohCharacterBP:setActiveCharacter.K2Node_Knot_0'"
   NodePosX=592
   NodePosY=176
   NodeGuid=9042061E45DE7541AA3E1093ABE9BAEE
   CustomProperties Pin (PinId=A5F8DD894A922BC32E3B96B6BBE55C4E,PinName="InputPin",PinType.PinCategory="object",PinType.PinSubCategory="",PinType.PinSubCategoryObject="/Script/CoreUObject.Class'/Script/CohtmlPlugin.CohtmlHUD'",PinType.PinSubCategoryMemberReference=(),PinType.PinValueType=(),PinType.ContainerType=None,PinType.bIsReference=False,PinType.bIsConst=False,PinType.bIsWeakPointer=False,PinType.bIsUObjectWrapper=False,PinType.bSerializeAsSinglePrecisionFloat=False,LinkedTo=(K2Node_VariableGet_1 A2CFDF654C5083CF072259B6405613C2,),PersistentGuid=00000000000000000000000000000000,bHidden=False,bNotConnectable=False,bDefaultValueIsReadOnly=False,bDefaultValueIsIgnored=True,bAdvancedView=False,bOrphanedPin=False,)
   CustomProperties Pin (PinId=D336A4484F3F4FB49354868A58D82E6A,PinName="OutputPin",Direction="EGPD_Output",PinType.PinCategory="object",PinType.PinSubCategory="",PinType.PinSubCategoryObject="/Script/CoreUObject.Class'/Script/CohtmlPlugin.CohtmlHUD'",PinType.PinSubCategoryMemberReference=(),PinType.PinValueType=(),PinType.ContainerType=None,PinType.bIsReference=False,PinType.bIsConst=False,PinType.bIsWeakPointer=False,PinType.bIsUObjectWrapper=False,PinType.bSerializeAsSinglePrecisionFloat=False,LinkedTo=(K2Node_CallFunction_1 7F093B064000211432FD87A8C370937E,),PersistentGuid=00000000000000000000000000000000,bHidden=False,bNotConnectable=False,bDefaultValueIsReadOnly=False,bDefaultValueIsIgnored=False,bAdvancedView=False,bOrphanedPin=False,)
End Object
After creating this method, we can call it whenever the user changes the active character, ensuring that the character model is updated after the active camera is changed in the Change Active Character method created earlier.
   Begin Object Class=/Script/BlueprintGraph.K2Node_FunctionEntry Name="K2Node_FunctionEntry_0" ExportPath="/Script/BlueprintGraph.K2Node_FunctionEntry'/Game/CharacterSelection/CohCharacterBP.CohCharacterBP:changeActiveCharacter.K2Node_FunctionEntry_0'"
   ExtraFlags=201457664
   FunctionReference=(MemberName="changeActiveCharacter")
   bIsEditable=True
   NodePosX=-976
   NodePosY=32
   NodeGuid=0F607B2B41FCA48CD97DA2808ED8B135
   CustomProperties Pin (PinId=866F4EB34E0094C875DB858F50619467,PinName="then",Direction="EGPD_Output",PinType.PinCategory="exec",PinType.PinSubCategory="",PinType.PinSubCategoryObject=None,PinType.PinSubCategoryMemberReference=(),PinType.PinValueType=(),PinType.ContainerType=None,PinType.bIsReference=False,PinType.bIsConst=False,PinType.bIsWeakPointer=False,PinType.bIsUObjectWrapper=False,PinType.bSerializeAsSinglePrecisionFloat=False,LinkedTo=(K2Node_IfThenElse_0 D723DB8E477797FACA660AB03F29D6EA,),PersistentGuid=00000000000000000000000000000000,bHidden=False,bNotConnectable=False,bDefaultValueIsReadOnly=False,bDefaultValueIsIgnored=False,bAdvancedView=False,bOrphanedPin=False,)
   CustomProperties Pin (PinId=C43C6D7B46A7F88229EA14AA54C23756,PinName="direction",Direction="EGPD_Output",PinType.PinCategory="bool",PinType.PinSubCategory="",PinType.PinSubCategoryObject=None,PinType.PinSubCategoryMemberReference=(),PinType.PinValueType=(TerminalCategory="int"),PinType.ContainerType=None,PinType.bIsReference=False,PinType.bIsConst=False,PinType.bIsWeakPointer=False,PinType.bIsUObjectWrapper=False,PinType.bSerializeAsSinglePrecisionFloat=False,DefaultValue="true",AutogeneratedDefaultValue="true",LinkedTo=(K2Node_IfThenElse_0 DEC7C20F473E9C9927AC06A3A1890C7D,),PersistentGuid=00000000000000000000000000000000,bHidden=False,bNotConnectable=False,bDefaultValueIsReadOnly=False,bDefaultValueIsIgnored=False,bAdvancedView=False,bOrphanedPin=False,)
   CustomProperties UserDefinedPin (PinName="direction",PinType=(PinCategory="bool",PinValueType=(TerminalCategory="int")),DesiredPinDirection=EGPD_Output,PinDefaultValue="true")
End Object
Begin Object Class=/Script/BlueprintGraph.K2Node_VariableSet Name="K2Node_VariableSet_3" ExportPath="/Script/BlueprintGraph.K2Node_VariableSet'/Game/CharacterSelection/CohCharacterBP.CohCharacterBP:changeActiveCharacter.K2Node_VariableSet_3'"
   VariableReference=(MemberName="Current character",MemberGuid=437F78C54D4E7B31937A989B5D56CB25,bSelfContext=True)
   NodePosX=416
   NodePosY=48
   ErrorType=1
   NodeGuid=84ED192C46645302AD4F7C91027693CA
   CustomProperties Pin (PinId=8DA5A71A400F4A521FFF93B06E7AAED5,PinName="execute",PinType.PinCategory="exec",PinType.PinSubCategory="",PinType.PinSubCategoryObject=None,PinType.PinSubCategoryMemberReference=(),PinType.PinValueType=(),PinType.ContainerType=None,PinType.bIsReference=False,PinType.bIsConst=False,PinType.bIsWeakPointer=False,PinType.bIsUObjectWrapper=False,PinType.bSerializeAsSinglePrecisionFloat=False,LinkedTo=(K2Node_IfThenElse_2 7D1B0FC24F15A60D9A95EF9325E9358E,),PersistentGuid=00000000000000000000000000000000,bHidden=False,bNotConnectable=False,bDefaultValueIsReadOnly=False,bDefaultValueIsIgnored=False,bAdvancedView=False,bOrphanedPin=False,)
   CustomProperties Pin (PinId=70715F8745549821FC419787D95693D9,PinName="then",Direction="EGPD_Output",PinType.PinCategory="exec",PinType.PinSubCategory="",PinType.PinSubCategoryObject=None,PinType.PinSubCategoryMemberReference=(),PinType.PinValueType=(),PinType.ContainerType=None,PinType.bIsReference=False,PinType.bIsConst=False,PinType.bIsWeakPointer=False,PinType.bIsUObjectWrapper=False,PinType.bSerializeAsSinglePrecisionFloat=False,LinkedTo=(K2Node_CallFunction_22 77FF95C945E0EB19D6B4AC9D66B5405F,),PersistentGuid=00000000000000000000000000000000,bHidden=False,bNotConnectable=False,bDefaultValueIsReadOnly=False,bDefaultValueIsIgnored=False,bAdvancedView=False,bOrphanedPin=False,)
   CustomProperties Pin (PinId=C2996CF742DE9F384CEF43BCC4FD163A,PinName="Current character",PinType.PinCategory="int",PinType.PinSubCategory="",PinType.PinSubCategoryObject=None,PinType.PinSubCategoryMemberReference=(),PinType.PinValueType=(),PinType.ContainerType=None,PinType.bIsReference=False,PinType.bIsConst=False,PinType.bIsWeakPointer=False,PinType.bIsUObjectWrapper=False,PinType.bSerializeAsSinglePrecisionFloat=False,DefaultValue="0",AutogeneratedDefaultValue="0",LinkedTo=(K2Node_PromotableOperator_0 1F2B46A24DBA7B45A4EC0C866D9885C5,),PersistentGuid=00000000000000000000000000000000,bHidden=False,bNotConnectable=False,bDefaultValueIsReadOnly=False,bDefaultValueIsIgnored=False,bAdvancedView=False,bOrphanedPin=False,)
   CustomProperties Pin (PinId=CAA3B27E484216ADE10207B672F808EA,PinName="Output_Get",PinToolTip="Retrieves the value of the variable, can use instead of a separate Get node",Direction="EGPD_Output",PinType.PinCategory="int",PinType.PinSubCategory="",PinType.PinSubCategoryObject=None,PinType.PinSubCategoryMemberReference=(),PinType.PinValueType=(),PinType.ContainerType=None,PinType.bIsReference=False,PinType.bIsConst=False,PinType.bIsWeakPointer=False,PinType.bIsUObjectWrapper=False,PinType.bSerializeAsSinglePrecisionFloat=False,DefaultValue="0",AutogeneratedDefaultValue="0",PersistentGuid=00000000000000000000000000000000,bHidden=False,bNotConnectable=False,bDefaultValueIsReadOnly=False,bDefaultValueIsIgnored=False,bAdvancedView=False,bOrphanedPin=False,)
   CustomProperties Pin (PinId=7A4EC2F249FE8D075F9ED8839124CC00,PinName="self",PinFriendlyName=NSLOCTEXT("K2Node", "Target", "Target"),PinType.PinCategory="object",PinType.PinSubCategory="",PinType.PinSubCategoryObject="/Script/Engine.BlueprintGeneratedClass'/Game/CharacterSelection/CohCharacterBP.CohCharacterBP_C'",PinType.PinSubCategoryMemberReference=(),PinType.PinValueType=(),PinType.ContainerType=None,PinType.bIsReference=False,PinType.bIsConst=False,PinType.bIsWeakPointer=False,PinType.bIsUObjectWrapper=False,PinType.bSerializeAsSinglePrecisionFloat=False,PersistentGuid=00000000000000000000000000000000,bHidden=True,bNotConnectable=False,bDefaultValueIsReadOnly=False,bDefaultValueIsIgnored=False,bAdvancedView=False,bOrphanedPin=False,)
End Object
Begin Object Class=/Script/BlueprintGraph.K2Node_PromotableOperator Name="K2Node_PromotableOperator_0" ExportPath="/Script/BlueprintGraph.K2Node_PromotableOperator'/Game/CharacterSelection/CohCharacterBP.CohCharacterBP:changeActiveCharacter.K2Node_PromotableOperator_0'"
   bIsPureFunc=True
   FunctionReference=(MemberParent="/Script/CoreUObject.Class'/Script/Engine.KismetMathLibrary'",MemberName="Add_IntInt")
   NodePosX=240
   NodePosY=-80
   NodeGuid=8005778F4F4BFC953FFDFAA52A815054
   CustomProperties Pin (PinId=9168C568419EA1DE55ACF3AF249882D4,PinName="A",PinToolTip="A
Integer",PinType.PinCategory="int",PinType.PinSubCategory="",PinType.PinSubCategoryObject=None,PinType.PinSubCategoryMemberReference=(),PinType.PinValueType=(),PinType.ContainerType=None,PinType.bIsReference=False,PinType.bIsConst=False,PinType.bIsWeakPointer=False,PinType.bIsUObjectWrapper=False,PinType.bSerializeAsSinglePrecisionFloat=False,LinkedTo=(K2Node_VariableGet_10 5C3F7071401834FBA049BEB273220AFC,),PersistentGuid=00000000000000000000000000000000,bHidden=False,bNotConnectable=False,bDefaultValueIsReadOnly=False,bDefaultValueIsIgnored=False,bAdvancedView=False,bOrphanedPin=False,)
   CustomProperties Pin (PinId=D30A58D04CB9405AF6AC5C921CA0B11A,PinName="B",PinToolTip="B
Integer",PinType.PinCategory="int",PinType.PinSubCategory="",PinType.PinSubCategoryObject=None,PinType.PinSubCategoryMemberReference=(),PinType.PinValueType=(),PinType.ContainerType=None,PinType.bIsReference=False,PinType.bIsConst=False,PinType.bIsWeakPointer=False,PinType.bIsUObjectWrapper=False,PinType.bSerializeAsSinglePrecisionFloat=False,DefaultValue="1",PersistentGuid=00000000000000000000000000000000,bHidden=False,bNotConnectable=False,bDefaultValueIsReadOnly=False,bDefaultValueIsIgnored=False,bAdvancedView=False,bOrphanedPin=False,)
   CustomProperties Pin (PinId=1F2B46A24DBA7B45A4EC0C866D9885C5,PinName="ReturnValue",PinToolTip="Return Value
Integer

Addition (A + B)",Direction="EGPD_Output",PinType.PinCategory="int",PinType.PinSubCategory="",PinType.PinSubCategoryObject=None,PinType.PinSubCategoryMemberReference=(),PinType.PinValueType=(),PinType.ContainerType=None,PinType.bIsReference=False,PinType.bIsConst=False,PinType.bIsWeakPointer=False,PinType.bIsUObjectWrapper=False,PinType.bSerializeAsSinglePrecisionFloat=False,LinkedTo=(K2Node_VariableSet_3 C2996CF742DE9F384CEF43BCC4FD163A,),PersistentGuid=00000000000000000000000000000000,bHidden=False,bNotConnectable=False,bDefaultValueIsReadOnly=False,bDefaultValueIsIgnored=False,bAdvancedView=False,bOrphanedPin=False,)
End Object
Begin Object Class=/Script/BlueprintGraph.K2Node_IfThenElse Name="K2Node_IfThenElse_2" ExportPath="/Script/BlueprintGraph.K2Node_IfThenElse'/Game/CharacterSelection/CohCharacterBP.CohCharacterBP:changeActiveCharacter.K2Node_IfThenElse_2'"
   NodePosX=112
   NodePosY=32
   NodeGuid=5804A4214FE60509B8C11A87D6D438A3
   CustomProperties Pin (PinId=2BD39A1349AE1E72B9AE0BA2CF09D645,PinName="execute",PinType.PinCategory="exec",PinType.PinSubCategory="",PinType.PinSubCategoryObject=None,PinType.PinSubCategoryMemberReference=(),PinType.PinValueType=(),PinType.ContainerType=None,PinType.bIsReference=False,PinType.bIsConst=False,PinType.bIsWeakPointer=False,PinType.bIsUObjectWrapper=False,PinType.bSerializeAsSinglePrecisionFloat=False,LinkedTo=(K2Node_IfThenElse_0 CFA333304DC309D2B9966C921546677C,),PersistentGuid=00000000000000000000000000000000,bHidden=False,bNotConnectable=False,bDefaultValueIsReadOnly=False,bDefaultValueIsIgnored=False,bAdvancedView=False,bOrphanedPin=False,)
   CustomProperties Pin (PinId=8F6BCF4840252679BFB86DA67250DAC4,PinName="Condition",PinType.PinCategory="bool",PinType.PinSubCategory="",PinType.PinSubCategoryObject=None,PinType.PinSubCategoryMemberReference=(),PinType.PinValueType=(),PinType.ContainerType=None,PinType.bIsReference=False,PinType.bIsConst=False,PinType.bIsWeakPointer=False,PinType.bIsUObjectWrapper=False,PinType.bSerializeAsSinglePrecisionFloat=False,DefaultValue="true",AutogeneratedDefaultValue="true",LinkedTo=(K2Node_PromotableOperator_4 5F59A061496B969848ED54A4E99958AA,),PersistentGuid=00000000000000000000000000000000,bHidden=False,bNotConnectable=False,bDefaultValueIsReadOnly=False,bDefaultValueIsIgnored=False,bAdvancedView=False,bOrphanedPin=False,)
   CustomProperties Pin (PinId=7D1B0FC24F15A60D9A95EF9325E9358E,PinName="then",PinFriendlyName=NSLOCTEXT("K2Node", "true", "true"),Direction="EGPD_Output",PinType.PinCategory="exec",PinType.PinSubCategory="",PinType.PinSubCategoryObject=None,PinType.PinSubCategoryMemberReference=(),PinType.PinValueType=(),PinType.ContainerType=None,PinType.bIsReference=False,PinType.bIsConst=False,PinType.bIsWeakPointer=False,PinType.bIsUObjectWrapper=False,PinType.bSerializeAsSinglePrecisionFloat=False,LinkedTo=(K2Node_VariableSet_3 8DA5A71A400F4A521FFF93B06E7AAED5,),PersistentGuid=00000000000000000000000000000000,bHidden=False,bNotConnectable=False,bDefaultValueIsReadOnly=False,bDefaultValueIsIgnored=False,bAdvancedView=False,bOrphanedPin=False,)
   CustomProperties Pin (PinId=49119A5E4B22241E0881EB89D5FB6E22,PinName="else",PinFriendlyName=NSLOCTEXT("K2Node", "false", "false"),Direction="EGPD_Output",PinType.PinCategory="exec",PinType.PinSubCategory="",PinType.PinSubCategoryObject=None,PinType.PinSubCategoryMemberReference=(),PinType.PinValueType=(),PinType.ContainerType=None,PinType.bIsReference=False,PinType.bIsConst=False,PinType.bIsWeakPointer=False,PinType.bIsUObjectWrapper=False,PinType.bSerializeAsSinglePrecisionFloat=False,LinkedTo=(K2Node_VariableSet_4 132D606B4E8272EA12F77AA6B400D941,),PersistentGuid=00000000000000000000000000000000,bHidden=False,bNotConnectable=False,bDefaultValueIsReadOnly=False,bDefaultValueIsIgnored=False,bAdvancedView=False,bOrphanedPin=False,)
End Object
Begin Object Class=/Script/BlueprintGraph.K2Node_VariableSet Name="K2Node_VariableSet_4" ExportPath="/Script/BlueprintGraph.K2Node_VariableSet'/Game/CharacterSelection/CohCharacterBP.CohCharacterBP:changeActiveCharacter.K2Node_VariableSet_4'"
   VariableReference=(MemberName="Current character",MemberGuid=437F78C54D4E7B31937A989B5D56CB25,bSelfContext=True)
   NodePosX=416
   NodePosY=144
   ErrorType=1
   NodeGuid=B32A0D2C44DDF9FB80085D823C5EDDFF
   CustomProperties Pin (PinId=132D606B4E8272EA12F77AA6B400D941,PinName="execute",PinType.PinCategory="exec",PinType.PinSubCategory="",PinType.PinSubCategoryObject=None,PinType.PinSubCategoryMemberReference=(),PinType.PinValueType=(),PinType.ContainerType=None,PinType.bIsReference=False,PinType.bIsConst=False,PinType.bIsWeakPointer=False,PinType.bIsUObjectWrapper=False,PinType.bSerializeAsSinglePrecisionFloat=False,LinkedTo=(K2Node_IfThenElse_2 49119A5E4B22241E0881EB89D5FB6E22,),PersistentGuid=00000000000000000000000000000000,bHidden=False,bNotConnectable=False,bDefaultValueIsReadOnly=False,bDefaultValueIsIgnored=False,bAdvancedView=False,bOrphanedPin=False,)
   CustomProperties Pin (PinId=31A7526D4F4FB70B5854328EDE4AB375,PinName="then",Direction="EGPD_Output",PinType.PinCategory="exec",PinType.PinSubCategory="",PinType.PinSubCategoryObject=None,PinType.PinSubCategoryMemberReference=(),PinType.PinValueType=(),PinType.ContainerType=None,PinType.bIsReference=False,PinType.bIsConst=False,PinType.bIsWeakPointer=False,PinType.bIsUObjectWrapper=False,PinType.bSerializeAsSinglePrecisionFloat=False,LinkedTo=(K2Node_CallFunction_22 77FF95C945E0EB19D6B4AC9D66B5405F,),PersistentGuid=00000000000000000000000000000000,bHidden=False,bNotConnectable=False,bDefaultValueIsReadOnly=False,bDefaultValueIsIgnored=False,bAdvancedView=False,bOrphanedPin=False,)
   CustomProperties Pin (PinId=1210C0F34FF82B94EE2C9591126CC218,PinName="Current character",PinType.PinCategory="int",PinType.PinSubCategory="",PinType.PinSubCategoryObject=None,PinType.PinSubCategoryMemberReference=(),PinType.PinValueType=(),PinType.ContainerType=None,PinType.bIsReference=False,PinType.bIsConst=False,PinType.bIsWeakPointer=False,PinType.bIsUObjectWrapper=False,PinType.bSerializeAsSinglePrecisionFloat=False,DefaultValue="0",AutogeneratedDefaultValue="0",PersistentGuid=00000000000000000000000000000000,bHidden=False,bNotConnectable=False,bDefaultValueIsReadOnly=False,bDefaultValueIsIgnored=False,bAdvancedView=False,bOrphanedPin=False,)
   CustomProperties Pin (PinId=119FDD44442B4D9ACEAF319BE973A708,PinName="Output_Get",PinToolTip="Retrieves the value of the variable, can use instead of a separate Get node",Direction="EGPD_Output",PinType.PinCategory="int",PinType.PinSubCategory="",PinType.PinSubCategoryObject=None,PinType.PinSubCategoryMemberReference=(),PinType.PinValueType=(),PinType.ContainerType=None,PinType.bIsReference=False,PinType.bIsConst=False,PinType.bIsWeakPointer=False,PinType.bIsUObjectWrapper=False,PinType.bSerializeAsSinglePrecisionFloat=False,DefaultValue="0",AutogeneratedDefaultValue="0",PersistentGuid=00000000000000000000000000000000,bHidden=False,bNotConnectable=False,bDefaultValueIsReadOnly=False,bDefaultValueIsIgnored=False,bAdvancedView=False,bOrphanedPin=False,)
   CustomProperties Pin (PinId=698F34F8491512003A0C79A921FAEA5B,PinName="self",PinFriendlyName=NSLOCTEXT("K2Node", "Target", "Target"),PinType.PinCategory="object",PinType.PinSubCategory="",PinType.PinSubCategoryObject="/Script/Engine.BlueprintGeneratedClass'/Game/CharacterSelection/CohCharacterBP.CohCharacterBP_C'",PinType.PinSubCategoryMemberReference=(),PinType.PinValueType=(),PinType.ContainerType=None,PinType.bIsReference=False,PinType.bIsConst=False,PinType.bIsWeakPointer=False,PinType.bIsUObjectWrapper=False,PinType.bSerializeAsSinglePrecisionFloat=False,PersistentGuid=00000000000000000000000000000000,bHidden=True,bNotConnectable=False,bDefaultValueIsReadOnly=False,bDefaultValueIsIgnored=False,bAdvancedView=False,bOrphanedPin=False,)
End Object
Begin Object Class=/Script/BlueprintGraph.K2Node_VariableGet Name="K2Node_VariableGet_10" ExportPath="/Script/BlueprintGraph.K2Node_VariableGet'/Game/CharacterSelection/CohCharacterBP.CohCharacterBP:changeActiveCharacter.K2Node_VariableGet_10'"
   VariableReference=(MemberName="Current character",MemberGuid=437F78C54D4E7B31937A989B5D56CB25,bSelfContext=True)
   NodePosX=-288
   NodePosY=-80
   bCommentBubbleVisible=True
   ErrorType=1
   NodeGuid=227AC12B45D5BE0BDD39DA8670C7BDDB
   CustomProperties Pin (PinId=5C3F7071401834FBA049BEB273220AFC,PinName="Current character",Direction="EGPD_Output",PinType.PinCategory="int",PinType.PinSubCategory="",PinType.PinSubCategoryObject=None,PinType.PinSubCategoryMemberReference=(),PinType.PinValueType=(),PinType.ContainerType=None,PinType.bIsReference=False,PinType.bIsConst=False,PinType.bIsWeakPointer=False,PinType.bIsUObjectWrapper=False,PinType.bSerializeAsSinglePrecisionFloat=False,DefaultValue="0",AutogeneratedDefaultValue="0",LinkedTo=(K2Node_PromotableOperator_4 6311D25E4809354E8F27C49117BB9FB4,K2Node_PromotableOperator_0 9168C568419EA1DE55ACF3AF249882D4,),PersistentGuid=00000000000000000000000000000000,bHidden=False,bNotConnectable=False,bDefaultValueIsReadOnly=False,bDefaultValueIsIgnored=False,bAdvancedView=False,bOrphanedPin=False,)
   CustomProperties Pin (PinId=CD52FBB34CD2CE74E7ABF7B21A5AAD4C,PinName="self",PinFriendlyName=NSLOCTEXT("K2Node", "Target", "Target"),PinType.PinCategory="object",PinType.PinSubCategory="",PinType.PinSubCategoryObject="/Script/Engine.BlueprintGeneratedClass'/Game/CharacterSelection/CohCharacterBP.CohCharacterBP_C'",PinType.PinSubCategoryMemberReference=(),PinType.PinValueType=(),PinType.ContainerType=None,PinType.bIsReference=False,PinType.bIsConst=False,PinType.bIsWeakPointer=False,PinType.bIsUObjectWrapper=False,PinType.bSerializeAsSinglePrecisionFloat=False,PersistentGuid=00000000000000000000000000000000,bHidden=True,bNotConnectable=False,bDefaultValueIsReadOnly=False,bDefaultValueIsIgnored=False,bAdvancedView=False,bOrphanedPin=False,)
End Object
Begin Object Class=/Script/BlueprintGraph.K2Node_PromotableOperator Name="K2Node_PromotableOperator_4" ExportPath="/Script/BlueprintGraph.K2Node_PromotableOperator'/Game/CharacterSelection/CohCharacterBP.CohCharacterBP:changeActiveCharacter.K2Node_PromotableOperator_4'"
   bIsPureFunc=True
   FunctionReference=(MemberParent="/Script/CoreUObject.Class'/Script/Engine.KismetMathLibrary'",MemberName="Less_IntInt")
   NodePosX=-80
   NodePosY=128
   NodeGuid=9BCF3F7B4F035C627C2AA3B54D9F1C7D
   CustomProperties Pin (PinId=6311D25E4809354E8F27C49117BB9FB4,PinName="A",PinToolTip="A
Integer",PinType.PinCategory="int",PinType.PinSubCategory="",PinType.PinSubCategoryObject=None,PinType.PinSubCategoryMemberReference=(),PinType.PinValueType=(),PinType.ContainerType=None,PinType.bIsReference=False,PinType.bIsConst=False,PinType.bIsWeakPointer=False,PinType.bIsUObjectWrapper=False,PinType.bSerializeAsSinglePrecisionFloat=False,LinkedTo=(K2Node_VariableGet_10 5C3F7071401834FBA049BEB273220AFC,),PersistentGuid=00000000000000000000000000000000,bHidden=False,bNotConnectable=False,bDefaultValueIsReadOnly=False,bDefaultValueIsIgnored=False,bAdvancedView=False,bOrphanedPin=False,)
   CustomProperties Pin (PinId=E3DEF2514BFC84F3B4A3AC988D80916E,PinName="B",PinToolTip="B
Integer",PinType.PinCategory="int",PinType.PinSubCategory="",PinType.PinSubCategoryObject=None,PinType.PinSubCategoryMemberReference=(),PinType.PinValueType=(),PinType.ContainerType=None,PinType.bIsReference=False,PinType.bIsConst=False,PinType.bIsWeakPointer=False,PinType.bIsUObjectWrapper=False,PinType.bSerializeAsSinglePrecisionFloat=False,LinkedTo=(K2Node_Knot_2 371458CE4E1CEBD898BCBCBF862F5719,),PersistentGuid=00000000000000000000000000000000,bHidden=False,bNotConnectable=False,bDefaultValueIsReadOnly=False,bDefaultValueIsIgnored=False,bAdvancedView=False,bOrphanedPin=False,)
   CustomProperties Pin (PinId=5F59A061496B969848ED54A4E99958AA,PinName="ReturnValue",PinToolTip="Return Value
Boolean

Returns true if A is less than B (A < B)",Direction="EGPD_Output",PinType.PinCategory="bool",PinType.PinSubCategory="",PinType.PinSubCategoryObject=None,PinType.PinSubCategoryMemberReference=(),PinType.PinValueType=(),PinType.ContainerType=None,PinType.bIsReference=False,PinType.bIsConst=False,PinType.bIsWeakPointer=False,PinType.bIsUObjectWrapper=False,PinType.bSerializeAsSinglePrecisionFloat=False,LinkedTo=(K2Node_IfThenElse_2 8F6BCF4840252679BFB86DA67250DAC4,),PersistentGuid=00000000000000000000000000000000,bHidden=False,bNotConnectable=False,bDefaultValueIsReadOnly=False,bDefaultValueIsIgnored=False,bAdvancedView=False,bOrphanedPin=False,)
   CustomProperties Pin (PinId=B889869548F0225562DB06B8E53CE49F,PinName="ErrorTolerance",PinToolTip="Error Tolerance
",PinType.PinCategory="",PinType.PinSubCategory="",PinType.PinSubCategoryObject=None,PinType.PinSubCategoryMemberReference=(),PinType.PinValueType=(),PinType.ContainerType=None,PinType.bIsReference=False,PinType.bIsConst=False,PinType.bIsWeakPointer=False,PinType.bIsUObjectWrapper=False,PinType.bSerializeAsSinglePrecisionFloat=False,PersistentGuid=00000000000000000000000000000000,bHidden=True,bNotConnectable=False,bDefaultValueIsReadOnly=False,bDefaultValueIsIgnored=False,bAdvancedView=False,bOrphanedPin=False,)
End Object
Begin Object Class=/Script/BlueprintGraph.K2Node_CallFunction Name="K2Node_CallFunction_22" ExportPath="/Script/BlueprintGraph.K2Node_CallFunction'/Game/CharacterSelection/CohCharacterBP.CohCharacterBP:changeActiveCharacter.K2Node_CallFunction_22'"
   FunctionReference=(MemberName="setActiveCamera",MemberGuid=2AD9851E47B5E56FEE67D1B0B837C204,bSelfContext=True)
   NodePosX=816
   NodePosY=240
   NodeGuid=087DAD05475255E59838CB97441D8E12
   CustomProperties Pin (PinId=77FF95C945E0EB19D6B4AC9D66B5405F,PinName="execute",PinToolTip="
Exec",PinType.PinCategory="exec",PinType.PinSubCategory="",PinType.PinSubCategoryObject=None,PinType.PinSubCategoryMemberReference=(),PinType.PinValueType=(),PinType.ContainerType=None,PinType.bIsReference=False,PinType.bIsConst=False,PinType.bIsWeakPointer=False,PinType.bIsUObjectWrapper=False,PinType.bSerializeAsSinglePrecisionFloat=False,LinkedTo=(K2Node_VariableSet_3 70715F8745549821FC419787D95693D9,K2Node_VariableSet_4 31A7526D4F4FB70B5854328EDE4AB375,K2Node_VariableSet_1 70715F8745549821FC419787D95693D9,K2Node_VariableSet_2 31A7526D4F4FB70B5854328EDE4AB375,),PersistentGuid=00000000000000000000000000000000,bHidden=False,bNotConnectable=False,bDefaultValueIsReadOnly=False,bDefaultValueIsIgnored=False,bAdvancedView=False,bOrphanedPin=False,)
   CustomProperties Pin (PinId=C76381B647F4248340D42CBDBE453D51,PinName="then",PinToolTip="
Exec",Direction="EGPD_Output",PinType.PinCategory="exec",PinType.PinSubCategory="",PinType.PinSubCategoryObject=None,PinType.PinSubCategoryMemberReference=(),PinType.PinValueType=(),PinType.ContainerType=None,PinType.bIsReference=False,PinType.bIsConst=False,PinType.bIsWeakPointer=False,PinType.bIsUObjectWrapper=False,PinType.bSerializeAsSinglePrecisionFloat=False,LinkedTo=(K2Node_CallFunction_9 7E0D21F14DCDED923438A5BD119644FA,),PersistentGuid=00000000000000000000000000000000,bHidden=False,bNotConnectable=False,bDefaultValueIsReadOnly=False,bDefaultValueIsIgnored=False,bAdvancedView=False,bOrphanedPin=False,)
   CustomProperties Pin (PinId=2707C9E54219E8513DFF259F4011D966,PinName="self",PinFriendlyName=NSLOCTEXT("K2Node", "Target", "Target"),PinToolTip="Target
Self Object Reference",PinType.PinCategory="object",PinType.PinSubCategory="self",PinType.PinSubCategoryObject=None,PinType.PinSubCategoryMemberReference=(),PinType.PinValueType=(),PinType.ContainerType=None,PinType.bIsReference=False,PinType.bIsConst=False,PinType.bIsWeakPointer=False,PinType.bIsUObjectWrapper=False,PinType.bSerializeAsSinglePrecisionFloat=False,PersistentGuid=00000000000000000000000000000000,bHidden=False,bNotConnectable=False,bDefaultValueIsReadOnly=False,bDefaultValueIsIgnored=False,bAdvancedView=False,bOrphanedPin=False,)
End Object
Begin Object Class=/Script/BlueprintGraph.K2Node_CallFunction Name="K2Node_CallFunction_9" ExportPath="/Script/BlueprintGraph.K2Node_CallFunction'/Game/CharacterSelection/CohCharacterBP.CohCharacterBP:changeActiveCharacter.K2Node_CallFunction_9'"
   FunctionReference=(MemberName="setActiveCharacter",MemberGuid=C67C922D4D6EF97F5A916AB8C7C288FF,bSelfContext=True)
   NodePosX=1088
   NodePosY=240
   NodeGuid=09E84E0A4F94FE0D8C7DCE810B735EE8
   CustomProperties Pin (PinId=7E0D21F14DCDED923438A5BD119644FA,PinName="execute",PinToolTip="
Exec",PinType.PinCategory="exec",PinType.PinSubCategory="",PinType.PinSubCategoryObject=None,PinType.PinSubCategoryMemberReference=(),PinType.PinValueType=(),PinType.ContainerType=None,PinType.bIsReference=False,PinType.bIsConst=False,PinType.bIsWeakPointer=False,PinType.bIsUObjectWrapper=False,PinType.bSerializeAsSinglePrecisionFloat=False,LinkedTo=(K2Node_CallFunction_22 C76381B647F4248340D42CBDBE453D51,),PersistentGuid=00000000000000000000000000000000,bHidden=False,bNotConnectable=False,bDefaultValueIsReadOnly=False,bDefaultValueIsIgnored=False,bAdvancedView=False,bOrphanedPin=False,)
   CustomProperties Pin (PinId=AD62F1C545C6F6F6CDD649A8C17F13CE,PinName="then",PinToolTip="
Exec",Direction="EGPD_Output",PinType.PinCategory="exec",PinType.PinSubCategory="",PinType.PinSubCategoryObject=None,PinType.PinSubCategoryMemberReference=(),PinType.PinValueType=(),PinType.ContainerType=None,PinType.bIsReference=False,PinType.bIsConst=False,PinType.bIsWeakPointer=False,PinType.bIsUObjectWrapper=False,PinType.bSerializeAsSinglePrecisionFloat=False,PersistentGuid=00000000000000000000000000000000,bHidden=False,bNotConnectable=False,bDefaultValueIsReadOnly=False,bDefaultValueIsIgnored=False,bAdvancedView=False,bOrphanedPin=False,)
   CustomProperties Pin (PinId=DFCC12C6483CC2142B29189EF200FC52,PinName="self",PinFriendlyName=NSLOCTEXT("K2Node", "Target", "Target"),PinToolTip="Target
Self Object Reference",PinType.PinCategory="object",PinType.PinSubCategory="self",PinType.PinSubCategoryObject=None,PinType.PinSubCategoryMemberReference=(),PinType.PinValueType=(),PinType.ContainerType=None,PinType.bIsReference=False,PinType.bIsConst=False,PinType.bIsWeakPointer=False,PinType.bIsUObjectWrapper=False,PinType.bSerializeAsSinglePrecisionFloat=False,PersistentGuid=00000000000000000000000000000000,bHidden=False,bNotConnectable=False,bDefaultValueIsReadOnly=False,bDefaultValueIsIgnored=False,bAdvancedView=False,bOrphanedPin=False,)
End Object
Begin Object Class=/Script/BlueprintGraph.K2Node_IfThenElse Name="K2Node_IfThenElse_0" ExportPath="/Script/BlueprintGraph.K2Node_IfThenElse'/Game/CharacterSelection/CohCharacterBP.CohCharacterBP:changeActiveCharacter.K2Node_IfThenElse_0'"
   NodePosX=-672
   NodePosY=32
   NodeGuid=EFE3D04144A8742126FE59BBD2A7F25F
   CustomProperties Pin (PinId=D723DB8E477797FACA660AB03F29D6EA,PinName="execute",PinType.PinCategory="exec",PinType.PinSubCategory="",PinType.PinSubCategoryObject=None,PinType.PinSubCategoryMemberReference=(),PinType.PinValueType=(),PinType.ContainerType=None,PinType.bIsReference=False,PinType.bIsConst=False,PinType.bIsWeakPointer=False,PinType.bIsUObjectWrapper=False,PinType.bSerializeAsSinglePrecisionFloat=False,LinkedTo=(K2Node_FunctionEntry_0 866F4EB34E0094C875DB858F50619467,),PersistentGuid=00000000000000000000000000000000,bHidden=False,bNotConnectable=False,bDefaultValueIsReadOnly=False,bDefaultValueIsIgnored=False,bAdvancedView=False,bOrphanedPin=False,)
   CustomProperties Pin (PinId=DEC7C20F473E9C9927AC06A3A1890C7D,PinName="Condition",PinType.PinCategory="bool",PinType.PinSubCategory="",PinType.PinSubCategoryObject=None,PinType.PinSubCategoryMemberReference=(),PinType.PinValueType=(),PinType.ContainerType=None,PinType.bIsReference=False,PinType.bIsConst=False,PinType.bIsWeakPointer=False,PinType.bIsUObjectWrapper=False,PinType.bSerializeAsSinglePrecisionFloat=False,DefaultValue="true",AutogeneratedDefaultValue="true",LinkedTo=(K2Node_FunctionEntry_0 C43C6D7B46A7F88229EA14AA54C23756,),PersistentGuid=00000000000000000000000000000000,bHidden=False,bNotConnectable=False,bDefaultValueIsReadOnly=False,bDefaultValueIsIgnored=False,bAdvancedView=False,bOrphanedPin=False,)
   CustomProperties Pin (PinId=CFA333304DC309D2B9966C921546677C,PinName="then",PinFriendlyName=NSLOCTEXT("K2Node", "true", "true"),Direction="EGPD_Output",PinType.PinCategory="exec",PinType.PinSubCategory="",PinType.PinSubCategoryObject=None,PinType.PinSubCategoryMemberReference=(),PinType.PinValueType=(),PinType.ContainerType=None,PinType.bIsReference=False,PinType.bIsConst=False,PinType.bIsWeakPointer=False,PinType.bIsUObjectWrapper=False,PinType.bSerializeAsSinglePrecisionFloat=False,LinkedTo=(K2Node_IfThenElse_2 2BD39A1349AE1E72B9AE0BA2CF09D645,),PersistentGuid=00000000000000000000000000000000,bHidden=False,bNotConnectable=False,bDefaultValueIsReadOnly=False,bDefaultValueIsIgnored=False,bAdvancedView=False,bOrphanedPin=False,)
   CustomProperties Pin (PinId=EC3F09C84D8797DC93262EBE29230F12,PinName="else",PinFriendlyName=NSLOCTEXT("K2Node", "false", "false"),Direction="EGPD_Output",PinType.PinCategory="exec",PinType.PinSubCategory="",PinType.PinSubCategoryObject=None,PinType.PinSubCategoryMemberReference=(),PinType.PinValueType=(),PinType.ContainerType=None,PinType.bIsReference=False,PinType.bIsConst=False,PinType.bIsWeakPointer=False,PinType.bIsUObjectWrapper=False,PinType.bSerializeAsSinglePrecisionFloat=False,LinkedTo=(K2Node_Knot_1 04580BC64AB9152DE801B395B04A1CFE,),PersistentGuid=00000000000000000000000000000000,bHidden=False,bNotConnectable=False,bDefaultValueIsReadOnly=False,bDefaultValueIsIgnored=False,bAdvancedView=False,bOrphanedPin=False,)
End Object
Begin Object Class=/Script/BlueprintGraph.K2Node_VariableGet Name="K2Node_VariableGet_12" ExportPath="/Script/BlueprintGraph.K2Node_VariableGet'/Game/CharacterSelection/CohCharacterBP.CohCharacterBP:changeActiveCharacter.K2Node_VariableGet_12'"
   VariableReference=(MemberName="Current character",MemberGuid=437F78C54D4E7B31937A989B5D56CB25,bSelfContext=True)
   NodePosX=-400
   NodePosY=400
   bCommentBubbleVisible=True
   ErrorType=1
   NodeGuid=390EF8D34B9ECF21A75769AD72275AD1
   CustomProperties Pin (PinId=5C3F7071401834FBA049BEB273220AFC,PinName="Current character",Direction="EGPD_Output",PinType.PinCategory="int",PinType.PinSubCategory="",PinType.PinSubCategoryObject=None,PinType.PinSubCategoryMemberReference=(),PinType.PinValueType=(),PinType.ContainerType=None,PinType.bIsReference=False,PinType.bIsConst=False,PinType.bIsWeakPointer=False,PinType.bIsUObjectWrapper=False,PinType.bSerializeAsSinglePrecisionFloat=False,DefaultValue="0",AutogeneratedDefaultValue="0",LinkedTo=(K2Node_PromotableOperator_12 945A0C7449ED90184D69A3A73D2BC271,K2Node_PromotableOperator_11 57C23F0E415ADD8EB8DE309B789F0D51,),PersistentGuid=00000000000000000000000000000000,bHidden=False,bNotConnectable=False,bDefaultValueIsReadOnly=False,bDefaultValueIsIgnored=False,bAdvancedView=False,bOrphanedPin=False,)
   CustomProperties Pin (PinId=EC803DC648E3156418083E8A88F9FDEF,PinName="self",PinFriendlyName=NSLOCTEXT("K2Node", "Target", "Target"),PinType.PinCategory="object",PinType.PinSubCategory="",PinType.PinSubCategoryObject="/Script/Engine.BlueprintGeneratedClass'/Game/CharacterSelection/CohCharacterBP.CohCharacterBP_C'",PinType.PinSubCategoryMemberReference=(),PinType.PinValueType=(),PinType.ContainerType=None,PinType.bIsReference=False,PinType.bIsConst=False,PinType.bIsWeakPointer=False,PinType.bIsUObjectWrapper=False,PinType.bSerializeAsSinglePrecisionFloat=False,PersistentGuid=00000000000000000000000000000000,bHidden=True,bNotConnectable=False,bDefaultValueIsReadOnly=False,bDefaultValueIsIgnored=False,bAdvancedView=False,bOrphanedPin=False,)
End Object
Begin Object Class=/Script/BlueprintGraph.K2Node_IfThenElse Name="K2Node_IfThenElse_1" ExportPath="/Script/BlueprintGraph.K2Node_IfThenElse'/Game/CharacterSelection/CohCharacterBP.CohCharacterBP:changeActiveCharacter.K2Node_IfThenElse_1'"
   NodePosX=-32
   NodePosY=272
   NodeGuid=F84456B14815849CCCDBEDA4804906E7
   CustomProperties Pin (PinId=2BD39A1349AE1E72B9AE0BA2CF09D645,PinName="execute",PinType.PinCategory="exec",PinType.PinSubCategory="",PinType.PinSubCategoryObject=None,PinType.PinSubCategoryMemberReference=(),PinType.PinValueType=(),PinType.ContainerType=None,PinType.bIsReference=False,PinType.bIsConst=False,PinType.bIsWeakPointer=False,PinType.bIsUObjectWrapper=False,PinType.bSerializeAsSinglePrecisionFloat=False,LinkedTo=(K2Node_Knot_1 75AFA3654F6A6B32AD48A987E8383998,),PersistentGuid=00000000000000000000000000000000,bHidden=False,bNotConnectable=False,bDefaultValueIsReadOnly=False,bDefaultValueIsIgnored=False,bAdvancedView=False,bOrphanedPin=False,)
   CustomProperties Pin (PinId=8F6BCF4840252679BFB86DA67250DAC4,PinName="Condition",PinType.PinCategory="bool",PinType.PinSubCategory="",PinType.PinSubCategoryObject=None,PinType.PinSubCategoryMemberReference=(),PinType.PinValueType=(),PinType.ContainerType=None,PinType.bIsReference=False,PinType.bIsConst=False,PinType.bIsWeakPointer=False,PinType.bIsUObjectWrapper=False,PinType.bSerializeAsSinglePrecisionFloat=False,DefaultValue="true",AutogeneratedDefaultValue="true",LinkedTo=(K2Node_PromotableOperator_12 5C6D9DC943C4ED1997A766B724F99B69,),PersistentGuid=00000000000000000000000000000000,bHidden=False,bNotConnectable=False,bDefaultValueIsReadOnly=False,bDefaultValueIsIgnored=False,bAdvancedView=False,bOrphanedPin=False,)
   CustomProperties Pin (PinId=7D1B0FC24F15A60D9A95EF9325E9358E,PinName="then",PinFriendlyName=NSLOCTEXT("K2Node", "true", "true"),Direction="EGPD_Output",PinType.PinCategory="exec",PinType.PinSubCategory="",PinType.PinSubCategoryObject=None,PinType.PinSubCategoryMemberReference=(),PinType.PinValueType=(),PinType.ContainerType=None,PinType.bIsReference=False,PinType.bIsConst=False,PinType.bIsWeakPointer=False,PinType.bIsUObjectWrapper=False,PinType.bSerializeAsSinglePrecisionFloat=False,LinkedTo=(K2Node_VariableSet_1 8DA5A71A400F4A521FFF93B06E7AAED5,),PersistentGuid=00000000000000000000000000000000,bHidden=False,bNotConnectable=False,bDefaultValueIsReadOnly=False,bDefaultValueIsIgnored=False,bAdvancedView=False,bOrphanedPin=False,)
   CustomProperties Pin (PinId=49119A5E4B22241E0881EB89D5FB6E22,PinName="else",PinFriendlyName=NSLOCTEXT("K2Node", "false", "false"),Direction="EGPD_Output",PinType.PinCategory="exec",PinType.PinSubCategory="",PinType.PinSubCategoryObject=None,PinType.PinSubCategoryMemberReference=(),PinType.PinValueType=(),PinType.ContainerType=None,PinType.bIsReference=False,PinType.bIsConst=False,PinType.bIsWeakPointer=False,PinType.bIsUObjectWrapper=False,PinType.bSerializeAsSinglePrecisionFloat=False,LinkedTo=(K2Node_Knot_0 CF70438D4EB5D0197AE8719A89B87129,),PersistentGuid=00000000000000000000000000000000,bHidden=False,bNotConnectable=False,bDefaultValueIsReadOnly=False,bDefaultValueIsIgnored=False,bAdvancedView=False,bOrphanedPin=False,)
End Object
Begin Object Class=/Script/BlueprintGraph.K2Node_VariableSet Name="K2Node_VariableSet_1" ExportPath="/Script/BlueprintGraph.K2Node_VariableSet'/Game/CharacterSelection/CohCharacterBP.CohCharacterBP:changeActiveCharacter.K2Node_VariableSet_1'"
   VariableReference=(MemberName="Current character",MemberGuid=437F78C54D4E7B31937A989B5D56CB25,bSelfContext=True)
   NodePosX=416
   NodePosY=288
   ErrorType=1
   NodeGuid=5424FF064C6958E5746F5F9B8FBD92D0
   CustomProperties Pin (PinId=8DA5A71A400F4A521FFF93B06E7AAED5,PinName="execute",PinType.PinCategory="exec",PinType.PinSubCategory="",PinType.PinSubCategoryObject=None,PinType.PinSubCategoryMemberReference=(),PinType.PinValueType=(),PinType.ContainerType=None,PinType.bIsReference=False,PinType.bIsConst=False,PinType.bIsWeakPointer=False,PinType.bIsUObjectWrapper=False,PinType.bSerializeAsSinglePrecisionFloat=False,LinkedTo=(K2Node_IfThenElse_1 7D1B0FC24F15A60D9A95EF9325E9358E,),PersistentGuid=00000000000000000000000000000000,bHidden=False,bNotConnectable=False,bDefaultValueIsReadOnly=False,bDefaultValueIsIgnored=False,bAdvancedView=False,bOrphanedPin=False,)
   CustomProperties Pin (PinId=70715F8745549821FC419787D95693D9,PinName="then",Direction="EGPD_Output",PinType.PinCategory="exec",PinType.PinSubCategory="",PinType.PinSubCategoryObject=None,PinType.PinSubCategoryMemberReference=(),PinType.PinValueType=(),PinType.ContainerType=None,PinType.bIsReference=False,PinType.bIsConst=False,PinType.bIsWeakPointer=False,PinType.bIsUObjectWrapper=False,PinType.bSerializeAsSinglePrecisionFloat=False,LinkedTo=(K2Node_CallFunction_22 77FF95C945E0EB19D6B4AC9D66B5405F,),PersistentGuid=00000000000000000000000000000000,bHidden=False,bNotConnectable=False,bDefaultValueIsReadOnly=False,bDefaultValueIsIgnored=False,bAdvancedView=False,bOrphanedPin=False,)
   CustomProperties Pin (PinId=C2996CF742DE9F384CEF43BCC4FD163A,PinName="Current character",PinType.PinCategory="int",PinType.PinSubCategory="",PinType.PinSubCategoryObject=None,PinType.PinSubCategoryMemberReference=(),PinType.PinValueType=(),PinType.ContainerType=None,PinType.bIsReference=False,PinType.bIsConst=False,PinType.bIsWeakPointer=False,PinType.bIsUObjectWrapper=False,PinType.bSerializeAsSinglePrecisionFloat=False,DefaultValue="0",AutogeneratedDefaultValue="0",LinkedTo=(K2Node_PromotableOperator_11 24BC2743448279E4913794B8FA309ACD,),PersistentGuid=00000000000000000000000000000000,bHidden=False,bNotConnectable=False,bDefaultValueIsReadOnly=False,bDefaultValueIsIgnored=False,bAdvancedView=False,bOrphanedPin=False,)
   CustomProperties Pin (PinId=CAA3B27E484216ADE10207B672F808EA,PinName="Output_Get",PinToolTip="Retrieves the value of the variable, can use instead of a separate Get node",Direction="EGPD_Output",PinType.PinCategory="int",PinType.PinSubCategory="",PinType.PinSubCategoryObject=None,PinType.PinSubCategoryMemberReference=(),PinType.PinValueType=(),PinType.ContainerType=None,PinType.bIsReference=False,PinType.bIsConst=False,PinType.bIsWeakPointer=False,PinType.bIsUObjectWrapper=False,PinType.bSerializeAsSinglePrecisionFloat=False,DefaultValue="0",AutogeneratedDefaultValue="0",PersistentGuid=00000000000000000000000000000000,bHidden=False,bNotConnectable=False,bDefaultValueIsReadOnly=False,bDefaultValueIsIgnored=False,bAdvancedView=False,bOrphanedPin=False,)
   CustomProperties Pin (PinId=C5B52CCB4F3D520B27F30BAA69E1EAAD,PinName="self",PinFriendlyName=NSLOCTEXT("K2Node", "Target", "Target"),PinType.PinCategory="object",PinType.PinSubCategory="",PinType.PinSubCategoryObject="/Script/Engine.BlueprintGeneratedClass'/Game/CharacterSelection/CohCharacterBP.CohCharacterBP_C'",PinType.PinSubCategoryMemberReference=(),PinType.PinValueType=(),PinType.ContainerType=None,PinType.bIsReference=False,PinType.bIsConst=False,PinType.bIsWeakPointer=False,PinType.bIsUObjectWrapper=False,PinType.bSerializeAsSinglePrecisionFloat=False,PersistentGuid=00000000000000000000000000000000,bHidden=True,bNotConnectable=False,bDefaultValueIsReadOnly=False,bDefaultValueIsIgnored=False,bAdvancedView=False,bOrphanedPin=False,)
End Object
Begin Object Class=/Script/BlueprintGraph.K2Node_VariableSet Name="K2Node_VariableSet_2" ExportPath="/Script/BlueprintGraph.K2Node_VariableSet'/Game/CharacterSelection/CohCharacterBP.CohCharacterBP:changeActiveCharacter.K2Node_VariableSet_2'"
   VariableReference=(MemberName="Current character",MemberGuid=437F78C54D4E7B31937A989B5D56CB25,bSelfContext=True)
   NodePosX=416
   NodePosY=496
   ErrorType=1
   NodeGuid=02B3EE78428C64F06AF58EB599460F5C
   CustomProperties Pin (PinId=132D606B4E8272EA12F77AA6B400D941,PinName="execute",PinType.PinCategory="exec",PinType.PinSubCategory="",PinType.PinSubCategoryObject=None,PinType.PinSubCategoryMemberReference=(),PinType.PinValueType=(),PinType.ContainerType=None,PinType.bIsReference=False,PinType.bIsConst=False,PinType.bIsWeakPointer=False,PinType.bIsUObjectWrapper=False,PinType.bSerializeAsSinglePrecisionFloat=False,LinkedTo=(K2Node_Knot_0 B83B0FC4401941C5FA82F58C01799E6C,),PersistentGuid=00000000000000000000000000000000,bHidden=False,bNotConnectable=False,bDefaultValueIsReadOnly=False,bDefaultValueIsIgnored=False,bAdvancedView=False,bOrphanedPin=False,)
   CustomProperties Pin (PinId=31A7526D4F4FB70B5854328EDE4AB375,PinName="then",Direction="EGPD_Output",PinType.PinCategory="exec",PinType.PinSubCategory="",PinType.PinSubCategoryObject=None,PinType.PinSubCategoryMemberReference=(),PinType.PinValueType=(),PinType.ContainerType=None,PinType.bIsReference=False,PinType.bIsConst=False,PinType.bIsWeakPointer=False,PinType.bIsUObjectWrapper=False,PinType.bSerializeAsSinglePrecisionFloat=False,LinkedTo=(K2Node_CallFunction_22 77FF95C945E0EB19D6B4AC9D66B5405F,),PersistentGuid=00000000000000000000000000000000,bHidden=False,bNotConnectable=False,bDefaultValueIsReadOnly=False,bDefaultValueIsIgnored=False,bAdvancedView=False,bOrphanedPin=False,)
   CustomProperties Pin (PinId=1210C0F34FF82B94EE2C9591126CC218,PinName="Current character",PinType.PinCategory="int",PinType.PinSubCategory="",PinType.PinSubCategoryObject=None,PinType.PinSubCategoryMemberReference=(),PinType.PinValueType=(),PinType.ContainerType=None,PinType.bIsReference=False,PinType.bIsConst=False,PinType.bIsWeakPointer=False,PinType.bIsUObjectWrapper=False,PinType.bSerializeAsSinglePrecisionFloat=False,DefaultValue="0",AutogeneratedDefaultValue="0",LinkedTo=(K2Node_Knot_3 C10B1B4C466D9122A122E88C23266AB3,),PersistentGuid=00000000000000000000000000000000,bHidden=False,bNotConnectable=False,bDefaultValueIsReadOnly=False,bDefaultValueIsIgnored=False,bAdvancedView=False,bOrphanedPin=False,)
   CustomProperties Pin (PinId=119FDD44442B4D9ACEAF319BE973A708,PinName="Output_Get",PinToolTip="Retrieves the value of the variable, can use instead of a separate Get node",Direction="EGPD_Output",PinType.PinCategory="int",PinType.PinSubCategory="",PinType.PinSubCategoryObject=None,PinType.PinSubCategoryMemberReference=(),PinType.PinValueType=(),PinType.ContainerType=None,PinType.bIsReference=False,PinType.bIsConst=False,PinType.bIsWeakPointer=False,PinType.bIsUObjectWrapper=False,PinType.bSerializeAsSinglePrecisionFloat=False,DefaultValue="0",AutogeneratedDefaultValue="0",PersistentGuid=00000000000000000000000000000000,bHidden=False,bNotConnectable=False,bDefaultValueIsReadOnly=False,bDefaultValueIsIgnored=False,bAdvancedView=False,bOrphanedPin=False,)
   CustomProperties Pin (PinId=DC336F204C126647773EF7ACB01AD16D,PinName="self",PinFriendlyName=NSLOCTEXT("K2Node", "Target", "Target"),PinType.PinCategory="object",PinType.PinSubCategory="",PinType.PinSubCategoryObject="/Script/Engine.BlueprintGeneratedClass'/Game/CharacterSelection/CohCharacterBP.CohCharacterBP_C'",PinType.PinSubCategoryMemberReference=(),PinType.PinValueType=(),PinType.ContainerType=None,PinType.bIsReference=False,PinType.bIsConst=False,PinType.bIsWeakPointer=False,PinType.bIsUObjectWrapper=False,PinType.bSerializeAsSinglePrecisionFloat=False,PersistentGuid=00000000000000000000000000000000,bHidden=True,bNotConnectable=False,bDefaultValueIsReadOnly=False,bDefaultValueIsIgnored=False,bAdvancedView=False,bOrphanedPin=False,)
End Object
Begin Object Class=/Script/BlueprintGraph.K2Node_PromotableOperator Name="K2Node_PromotableOperator_11" ExportPath="/Script/BlueprintGraph.K2Node_PromotableOperator'/Game/CharacterSelection/CohCharacterBP.CohCharacterBP:changeActiveCharacter.K2Node_PromotableOperator_11'"
   bIsPureFunc=True
   FunctionReference=(MemberParent="/Script/CoreUObject.Class'/Script/Engine.KismetMathLibrary'",MemberName="Subtract_IntInt")
   NodePosX=240
   NodePosY=400
   NodeGuid=52946B504CB68A1A3D91478CB5DD50E2
   CustomProperties Pin (PinId=57C23F0E415ADD8EB8DE309B789F0D51,PinName="A",PinToolTip="A
Integer",PinType.PinCategory="int",PinType.PinSubCategory="",PinType.PinSubCategoryObject=None,PinType.PinSubCategoryMemberReference=(),PinType.PinValueType=(),PinType.ContainerType=None,PinType.bIsReference=False,PinType.bIsConst=False,PinType.bIsWeakPointer=False,PinType.bIsUObjectWrapper=False,PinType.bSerializeAsSinglePrecisionFloat=False,LinkedTo=(K2Node_VariableGet_12 5C3F7071401834FBA049BEB273220AFC,),PersistentGuid=00000000000000000000000000000000,bHidden=False,bNotConnectable=False,bDefaultValueIsReadOnly=False,bDefaultValueIsIgnored=False,bAdvancedView=False,bOrphanedPin=False,)
   CustomProperties Pin (PinId=D7905EAD406C9A7E8CE497B1B4303FB0,PinName="B",PinToolTip="B
Integer",PinType.PinCategory="int",PinType.PinSubCategory="",PinType.PinSubCategoryObject=None,PinType.PinSubCategoryMemberReference=(),PinType.PinValueType=(),PinType.ContainerType=None,PinType.bIsReference=False,PinType.bIsConst=False,PinType.bIsWeakPointer=False,PinType.bIsUObjectWrapper=False,PinType.bSerializeAsSinglePrecisionFloat=False,DefaultValue="1",PersistentGuid=00000000000000000000000000000000,bHidden=False,bNotConnectable=False,bDefaultValueIsReadOnly=False,bDefaultValueIsIgnored=False,bAdvancedView=False,bOrphanedPin=False,)
   CustomProperties Pin (PinId=24BC2743448279E4913794B8FA309ACD,PinName="ReturnValue",PinToolTip="Return Value
Integer

Subtraction (A - B)",Direction="EGPD_Output",PinType.PinCategory="int",PinType.PinSubCategory="",PinType.PinSubCategoryObject=None,PinType.PinSubCategoryMemberReference=(),PinType.PinValueType=(),PinType.ContainerType=None,PinType.bIsReference=False,PinType.bIsConst=False,PinType.bIsWeakPointer=False,PinType.bIsUObjectWrapper=False,PinType.bSerializeAsSinglePrecisionFloat=False,LinkedTo=(K2Node_VariableSet_1 C2996CF742DE9F384CEF43BCC4FD163A,),PersistentGuid=00000000000000000000000000000000,bHidden=False,bNotConnectable=False,bDefaultValueIsReadOnly=False,bDefaultValueIsIgnored=False,bAdvancedView=False,bOrphanedPin=False,)
End Object
Begin Object Class=/Script/BlueprintGraph.K2Node_PromotableOperator Name="K2Node_PromotableOperator_12" ExportPath="/Script/BlueprintGraph.K2Node_PromotableOperator'/Game/CharacterSelection/CohCharacterBP.CohCharacterBP:changeActiveCharacter.K2Node_PromotableOperator_12'"
   bIsPureFunc=True
   FunctionReference=(MemberParent="/Script/CoreUObject.Class'/Script/Engine.KismetMathLibrary'",MemberName="Greater_IntInt")
   NodePosX=-208
   NodePosY=320
   NodeGuid=7B355714436E5A5D36D7A1869BB03B15
   CustomProperties Pin (PinId=945A0C7449ED90184D69A3A73D2BC271,PinName="A",PinToolTip="A
Integer",PinType.PinCategory="int",PinType.PinSubCategory="",PinType.PinSubCategoryObject=None,PinType.PinSubCategoryMemberReference=(),PinType.PinValueType=(),PinType.ContainerType=None,PinType.bIsReference=False,PinType.bIsConst=False,PinType.bIsWeakPointer=False,PinType.bIsUObjectWrapper=False,PinType.bSerializeAsSinglePrecisionFloat=False,LinkedTo=(K2Node_VariableGet_12 5C3F7071401834FBA049BEB273220AFC,),PersistentGuid=00000000000000000000000000000000,bHidden=False,bNotConnectable=False,bDefaultValueIsReadOnly=False,bDefaultValueIsIgnored=False,bAdvancedView=False,bOrphanedPin=False,)
   CustomProperties Pin (PinId=A35C089F461BA374EC65DDBFCB274F26,PinName="B",PinToolTip="B
Integer",PinType.PinCategory="int",PinType.PinSubCategory="",PinType.PinSubCategoryObject=None,PinType.PinSubCategoryMemberReference=(),PinType.PinValueType=(),PinType.ContainerType=None,PinType.bIsReference=False,PinType.bIsConst=False,PinType.bIsWeakPointer=False,PinType.bIsUObjectWrapper=False,PinType.bSerializeAsSinglePrecisionFloat=False,PersistentGuid=00000000000000000000000000000000,bHidden=False,bNotConnectable=False,bDefaultValueIsReadOnly=False,bDefaultValueIsIgnored=False,bAdvancedView=False,bOrphanedPin=False,)
   CustomProperties Pin (PinId=5C6D9DC943C4ED1997A766B724F99B69,PinName="ReturnValue",PinToolTip="Return Value
Boolean

Returns true if A is greater than B (A > B)",Direction="EGPD_Output",PinType.PinCategory="bool",PinType.PinSubCategory="",PinType.PinSubCategoryObject=None,PinType.PinSubCategoryMemberReference=(),PinType.PinValueType=(),PinType.ContainerType=None,PinType.bIsReference=False,PinType.bIsConst=False,PinType.bIsWeakPointer=False,PinType.bIsUObjectWrapper=False,PinType.bSerializeAsSinglePrecisionFloat=False,LinkedTo=(K2Node_IfThenElse_1 8F6BCF4840252679BFB86DA67250DAC4,),PersistentGuid=00000000000000000000000000000000,bHidden=False,bNotConnectable=False,bDefaultValueIsReadOnly=False,bDefaultValueIsIgnored=False,bAdvancedView=False,bOrphanedPin=False,)
   CustomProperties Pin (PinId=1B4A060C4EFACC35D2AD86BCFAB56011,PinName="ErrorTolerance",PinToolTip="Error Tolerance
",PinType.PinCategory="",PinType.PinSubCategory="",PinType.PinSubCategoryObject=None,PinType.PinSubCategoryMemberReference=(),PinType.PinValueType=(),PinType.ContainerType=None,PinType.bIsReference=False,PinType.bIsConst=False,PinType.bIsWeakPointer=False,PinType.bIsUObjectWrapper=False,PinType.bSerializeAsSinglePrecisionFloat=False,PersistentGuid=00000000000000000000000000000000,bHidden=True,bNotConnectable=False,bDefaultValueIsReadOnly=False,bDefaultValueIsIgnored=False,bAdvancedView=False,bOrphanedPin=False,)
End Object
Begin Object Class=/Script/BlueprintGraph.K2Node_Knot Name="K2Node_Knot_0" ExportPath="/Script/BlueprintGraph.K2Node_Knot'/Game/CharacterSelection/CohCharacterBP.CohCharacterBP:changeActiveCharacter.K2Node_Knot_0'"
   NodePosX=192
   NodePosY=512
   NodeGuid=7EBD018641120BC05A5B318DB9DE1222
   CustomProperties Pin (PinId=CF70438D4EB5D0197AE8719A89B87129,PinName="InputPin",PinType.PinCategory="exec",PinType.PinSubCategory="",PinType.PinSubCategoryObject=None,PinType.PinSubCategoryMemberReference=(),PinType.PinValueType=(),PinType.ContainerType=None,PinType.bIsReference=False,PinType.bIsConst=False,PinType.bIsWeakPointer=False,PinType.bIsUObjectWrapper=False,PinType.bSerializeAsSinglePrecisionFloat=False,LinkedTo=(K2Node_IfThenElse_1 49119A5E4B22241E0881EB89D5FB6E22,),PersistentGuid=00000000000000000000000000000000,bHidden=False,bNotConnectable=False,bDefaultValueIsReadOnly=False,bDefaultValueIsIgnored=True,bAdvancedView=False,bOrphanedPin=False,)
   CustomProperties Pin (PinId=B83B0FC4401941C5FA82F58C01799E6C,PinName="OutputPin",Direction="EGPD_Output",PinType.PinCategory="exec",PinType.PinSubCategory="",PinType.PinSubCategoryObject=None,PinType.PinSubCategoryMemberReference=(),PinType.PinValueType=(),PinType.ContainerType=None,PinType.bIsReference=False,PinType.bIsConst=False,PinType.bIsWeakPointer=False,PinType.bIsUObjectWrapper=False,PinType.bSerializeAsSinglePrecisionFloat=False,LinkedTo=(K2Node_VariableSet_2 132D606B4E8272EA12F77AA6B400D941,),PersistentGuid=00000000000000000000000000000000,bHidden=False,bNotConnectable=False,bDefaultValueIsReadOnly=False,bDefaultValueIsIgnored=False,bAdvancedView=False,bOrphanedPin=False,)
End Object
Begin Object Class=/Script/BlueprintGraph.K2Node_Knot Name="K2Node_Knot_1" ExportPath="/Script/BlueprintGraph.K2Node_Knot'/Game/CharacterSelection/CohCharacterBP.CohCharacterBP:changeActiveCharacter.K2Node_Knot_1'"
   NodePosX=-384
   NodePosY=304
   NodeGuid=395455AC433907DC1509FE8988A66B76
   CustomProperties Pin (PinId=04580BC64AB9152DE801B395B04A1CFE,PinName="InputPin",PinType.PinCategory="exec",PinType.PinSubCategory="",PinType.PinSubCategoryObject=None,PinType.PinSubCategoryMemberReference=(),PinType.PinValueType=(),PinType.ContainerType=None,PinType.bIsReference=False,PinType.bIsConst=False,PinType.bIsWeakPointer=False,PinType.bIsUObjectWrapper=False,PinType.bSerializeAsSinglePrecisionFloat=False,LinkedTo=(K2Node_IfThenElse_0 EC3F09C84D8797DC93262EBE29230F12,),PersistentGuid=00000000000000000000000000000000,bHidden=False,bNotConnectable=False,bDefaultValueIsReadOnly=False,bDefaultValueIsIgnored=True,bAdvancedView=False,bOrphanedPin=False,)
   CustomProperties Pin (PinId=75AFA3654F6A6B32AD48A987E8383998,PinName="OutputPin",Direction="EGPD_Output",PinType.PinCategory="exec",PinType.PinSubCategory="",PinType.PinSubCategoryObject=None,PinType.PinSubCategoryMemberReference=(),PinType.PinValueType=(),PinType.ContainerType=None,PinType.bIsReference=False,PinType.bIsConst=False,PinType.bIsWeakPointer=False,PinType.bIsUObjectWrapper=False,PinType.bSerializeAsSinglePrecisionFloat=False,LinkedTo=(K2Node_IfThenElse_1 2BD39A1349AE1E72B9AE0BA2CF09D645,),PersistentGuid=00000000000000000000000000000000,bHidden=False,bNotConnectable=False,bDefaultValueIsReadOnly=False,bDefaultValueIsIgnored=False,bAdvancedView=False,bOrphanedPin=False,)
End Object
Begin Object Class=/Script/BlueprintGraph.K2Node_VariableGet Name="K2Node_VariableGet_8" ExportPath="/Script/BlueprintGraph.K2Node_VariableGet'/Game/CharacterSelection/CohCharacterBP.CohCharacterBP:changeActiveCharacter.K2Node_VariableGet_8'"
   VariableReference=(MemberName="Character cameras",MemberGuid=BA6B8C2945790F525BAAEB82CA6723D0,bSelfContext=True)
   NodePosX=-1104
   NodePosY=320
   ErrorType=1
   NodeGuid=C3E7365942CA963B433415888AD0D2BB
   CustomProperties Pin (PinId=9D5FADAF44EB647B878DF59C6BEBD992,PinName="Character cameras",Direction="EGPD_Output",PinType.PinCategory="object",PinType.PinSubCategory="",PinType.PinSubCategoryObject="/Script/CoreUObject.Class'/Script/Engine.CameraActor'",PinType.PinSubCategoryMemberReference=(),PinType.PinValueType=(),PinType.ContainerType=Array,PinType.bIsReference=False,PinType.bIsConst=False,PinType.bIsWeakPointer=False,PinType.bIsUObjectWrapper=False,PinType.bSerializeAsSinglePrecisionFloat=False,LinkedTo=(K2Node_CallArrayFunction_0 4AE933FA43055667DFE578AF6197E34C,),PersistentGuid=00000000000000000000000000000000,bHidden=False,bNotConnectable=False,bDefaultValueIsReadOnly=False,bDefaultValueIsIgnored=False,bAdvancedView=False,bOrphanedPin=False,)
   CustomProperties Pin (PinId=FA792AC74D11398DEED7309463283732,PinName="self",PinFriendlyName=NSLOCTEXT("K2Node", "Target", "Target"),PinType.PinCategory="object",PinType.PinSubCategory="",PinType.PinSubCategoryObject="/Script/Engine.BlueprintGeneratedClass'/Game/CharacterSelection/CohCharacterBP.CohCharacterBP_C'",PinType.PinSubCategoryMemberReference=(),PinType.PinValueType=(),PinType.ContainerType=None,PinType.bIsReference=False,PinType.bIsConst=False,PinType.bIsWeakPointer=False,PinType.bIsUObjectWrapper=False,PinType.bSerializeAsSinglePrecisionFloat=False,PersistentGuid=00000000000000000000000000000000,bHidden=True,bNotConnectable=False,bDefaultValueIsReadOnly=False,bDefaultValueIsIgnored=False,bAdvancedView=False,bOrphanedPin=False,)
End Object
Begin Object Class=/Script/BlueprintGraph.K2Node_CallArrayFunction Name="K2Node_CallArrayFunction_0" ExportPath="/Script/BlueprintGraph.K2Node_CallArrayFunction'/Game/CharacterSelection/CohCharacterBP.CohCharacterBP:changeActiveCharacter.K2Node_CallArrayFunction_0'"
   bIsPureFunc=True
   FunctionReference=(MemberParent="/Script/CoreUObject.Class'/Script/Engine.KismetArrayLibrary'",MemberName="Array_Length")
   NodePosX=-912
   NodePosY=304
   NodeGuid=4F2C187E44CFDF050469E8ABC67B05E6
   CustomProperties Pin (PinId=EE9281BA40701B070D3AB9969B2469E2,PinName="self",PinFriendlyName=NSLOCTEXT("K2Node", "Target", "Target"),PinToolTip="Target
Kismet Array Library Object Reference",PinType.PinCategory="object",PinType.PinSubCategory="",PinType.PinSubCategoryObject="/Script/CoreUObject.Class'/Script/Engine.KismetArrayLibrary'",PinType.PinSubCategoryMemberReference=(),PinType.PinValueType=(),PinType.ContainerType=None,PinType.bIsReference=False,PinType.bIsConst=False,PinType.bIsWeakPointer=False,PinType.bIsUObjectWrapper=False,PinType.bSerializeAsSinglePrecisionFloat=False,DefaultObject="/Script/Engine.Default__KismetArrayLibrary",PersistentGuid=00000000000000000000000000000000,bHidden=True,bNotConnectable=False,bDefaultValueIsReadOnly=False,bDefaultValueIsIgnored=False,bAdvancedView=False,bOrphanedPin=False,)
   CustomProperties Pin (PinId=4AE933FA43055667DFE578AF6197E34C,PinName="TargetArray",PinToolTip="Target Array
Array of Camera Actor Object References

The array to get the length of *",PinType.PinCategory="object",PinType.PinSubCategory="",PinType.PinSubCategoryObject="/Script/CoreUObject.Class'/Script/Engine.CameraActor'",PinType.PinSubCategoryMemberReference=(),PinType.PinValueType=(),PinType.ContainerType=Array,PinType.bIsReference=True,PinType.bIsConst=True,PinType.bIsWeakPointer=False,PinType.bIsUObjectWrapper=False,PinType.bSerializeAsSinglePrecisionFloat=False,LinkedTo=(K2Node_VariableGet_8 9D5FADAF44EB647B878DF59C6BEBD992,),PersistentGuid=00000000000000000000000000000000,bHidden=False,bNotConnectable=False,bDefaultValueIsReadOnly=False,bDefaultValueIsIgnored=True,bAdvancedView=False,bOrphanedPin=False,)
   CustomProperties Pin (PinId=8F28912B48A6D6E8F0B40CB55BA03EC7,PinName="ReturnValue",PinToolTip="Return Value
Integer

The length of the array",Direction="EGPD_Output",PinType.PinCategory="int",PinType.PinSubCategory="",PinType.PinSubCategoryObject=None,PinType.PinSubCategoryMemberReference=(),PinType.PinValueType=(),PinType.ContainerType=None,PinType.bIsReference=False,PinType.bIsConst=False,PinType.bIsWeakPointer=False,PinType.bIsUObjectWrapper=False,PinType.bSerializeAsSinglePrecisionFloat=False,DefaultValue="0",AutogeneratedDefaultValue="0",LinkedTo=(K2Node_PromotableOperator_3 40BC860E40046D6B62EF09AECC771F56,),PersistentGuid=00000000000000000000000000000000,bHidden=False,bNotConnectable=False,bDefaultValueIsReadOnly=False,bDefaultValueIsIgnored=False,bAdvancedView=False,bOrphanedPin=False,)
End Object
Begin Object Class=/Script/BlueprintGraph.K2Node_PromotableOperator Name="K2Node_PromotableOperator_3" ExportPath="/Script/BlueprintGraph.K2Node_PromotableOperator'/Game/CharacterSelection/CohCharacterBP.CohCharacterBP:changeActiveCharacter.K2Node_PromotableOperator_3'"
   bIsPureFunc=True
   FunctionReference=(MemberParent="/Script/CoreUObject.Class'/Script/Engine.KismetMathLibrary'",MemberName="Subtract_IntInt")
   NodePosX=-656
   NodePosY=320
   NodeGuid=B0B5511B425E21668894F3A7BC0FAA14
   CustomProperties Pin (PinId=40BC860E40046D6B62EF09AECC771F56,PinName="A",PinToolTip="A
Integer",PinType.PinCategory="int",PinType.PinSubCategory="",PinType.PinSubCategoryObject=None,PinType.PinSubCategoryMemberReference=(),PinType.PinValueType=(),PinType.ContainerType=None,PinType.bIsReference=False,PinType.bIsConst=False,PinType.bIsWeakPointer=False,PinType.bIsUObjectWrapper=False,PinType.bSerializeAsSinglePrecisionFloat=False,LinkedTo=(K2Node_CallArrayFunction_0 8F28912B48A6D6E8F0B40CB55BA03EC7,),PersistentGuid=00000000000000000000000000000000,bHidden=False,bNotConnectable=False,bDefaultValueIsReadOnly=False,bDefaultValueIsIgnored=False,bAdvancedView=False,bOrphanedPin=False,)
   CustomProperties Pin (PinId=DBC89A9B49D94641C01094B81FC7A7A3,PinName="B",PinToolTip="B
Integer",PinType.PinCategory="int",PinType.PinSubCategory="",PinType.PinSubCategoryObject=None,PinType.PinSubCategoryMemberReference=(),PinType.PinValueType=(),PinType.ContainerType=None,PinType.bIsReference=False,PinType.bIsConst=False,PinType.bIsWeakPointer=False,PinType.bIsUObjectWrapper=False,PinType.bSerializeAsSinglePrecisionFloat=False,DefaultValue="1",PersistentGuid=00000000000000000000000000000000,bHidden=False,bNotConnectable=False,bDefaultValueIsReadOnly=False,bDefaultValueIsIgnored=False,bAdvancedView=False,bOrphanedPin=False,)
   CustomProperties Pin (PinId=985B62C44AFABD83E539FDB2AC47F6AF,PinName="ReturnValue",PinToolTip="Return Value
Integer

Subtraction (A - B)",Direction="EGPD_Output",PinType.PinCategory="int",PinType.PinSubCategory="",PinType.PinSubCategoryObject=None,PinType.PinSubCategoryMemberReference=(),PinType.PinValueType=(),PinType.ContainerType=None,PinType.bIsReference=False,PinType.bIsConst=False,PinType.bIsWeakPointer=False,PinType.bIsUObjectWrapper=False,PinType.bSerializeAsSinglePrecisionFloat=False,LinkedTo=(K2Node_Knot_2 539C78154006668C2CEF2491A42CFC0A,K2Node_Knot_3 B88AD40A479975A5CD4A29B3B70B9FFF,),PersistentGuid=00000000000000000000000000000000,bHidden=False,bNotConnectable=False,bDefaultValueIsReadOnly=False,bDefaultValueIsIgnored=False,bAdvancedView=False,bOrphanedPin=False,)
End Object
Begin Object Class=/Script/BlueprintGraph.K2Node_Knot Name="K2Node_Knot_2" ExportPath="/Script/BlueprintGraph.K2Node_Knot'/Game/CharacterSelection/CohCharacterBP.CohCharacterBP:changeActiveCharacter.K2Node_Knot_2'"
   NodePosX=-368
   NodePosY=160
   NodeGuid=959E0FB74B571A492A2322AE7213D5E7
   CustomProperties Pin (PinId=539C78154006668C2CEF2491A42CFC0A,PinName="InputPin",PinType.PinCategory="int",PinType.PinSubCategory="",PinType.PinSubCategoryObject=None,PinType.PinSubCategoryMemberReference=(),PinType.PinValueType=(),PinType.ContainerType=None,PinType.bIsReference=False,PinType.bIsConst=False,PinType.bIsWeakPointer=False,PinType.bIsUObjectWrapper=False,PinType.bSerializeAsSinglePrecisionFloat=False,LinkedTo=(K2Node_PromotableOperator_3 985B62C44AFABD83E539FDB2AC47F6AF,),PersistentGuid=00000000000000000000000000000000,bHidden=False,bNotConnectable=False,bDefaultValueIsReadOnly=False,bDefaultValueIsIgnored=True,bAdvancedView=False,bOrphanedPin=False,)
   CustomProperties Pin (PinId=371458CE4E1CEBD898BCBCBF862F5719,PinName="OutputPin",Direction="EGPD_Output",PinType.PinCategory="int",PinType.PinSubCategory="",PinType.PinSubCategoryObject=None,PinType.PinSubCategoryMemberReference=(),PinType.PinValueType=(),PinType.ContainerType=None,PinType.bIsReference=False,PinType.bIsConst=False,PinType.bIsWeakPointer=False,PinType.bIsUObjectWrapper=False,PinType.bSerializeAsSinglePrecisionFloat=False,LinkedTo=(K2Node_PromotableOperator_4 E3DEF2514BFC84F3B4A3AC988D80916E,),PersistentGuid=00000000000000000000000000000000,bHidden=False,bNotConnectable=False,bDefaultValueIsReadOnly=False,bDefaultValueIsIgnored=False,bAdvancedView=False,bOrphanedPin=False,)
End Object
Begin Object Class=/Script/BlueprintGraph.K2Node_Knot Name="K2Node_Knot_3" ExportPath="/Script/BlueprintGraph.K2Node_Knot'/Game/CharacterSelection/CohCharacterBP.CohCharacterBP:changeActiveCharacter.K2Node_Knot_3'"
   NodePosX=-384
   NodePosY=544
   NodeGuid=DC800E72469DBBAF6AE7F390EFA28AE2
   CustomProperties Pin (PinId=B88AD40A479975A5CD4A29B3B70B9FFF,PinName="InputPin",PinType.PinCategory="int",PinType.PinSubCategory="",PinType.PinSubCategoryObject=None,PinType.PinSubCategoryMemberReference=(),PinType.PinValueType=(),PinType.ContainerType=None,PinType.bIsReference=False,PinType.bIsConst=False,PinType.bIsWeakPointer=False,PinType.bIsUObjectWrapper=False,PinType.bSerializeAsSinglePrecisionFloat=False,LinkedTo=(K2Node_PromotableOperator_3 985B62C44AFABD83E539FDB2AC47F6AF,),PersistentGuid=00000000000000000000000000000000,bHidden=False,bNotConnectable=False,bDefaultValueIsReadOnly=False,bDefaultValueIsIgnored=True,bAdvancedView=False,bOrphanedPin=False,)
   CustomProperties Pin (PinId=C10B1B4C466D9122A122E88C23266AB3,PinName="OutputPin",Direction="EGPD_Output",PinType.PinCategory="int",PinType.PinSubCategory="",PinType.PinSubCategoryObject=None,PinType.PinSubCategoryMemberReference=(),PinType.PinValueType=(),PinType.ContainerType=None,PinType.bIsReference=False,PinType.bIsConst=False,PinType.bIsWeakPointer=False,PinType.bIsUObjectWrapper=False,PinType.bSerializeAsSinglePrecisionFloat=False,LinkedTo=(K2Node_VariableSet_2 1210C0F34FF82B94EE2C9591126CC218,),PersistentGuid=00000000000000000000000000000000,bHidden=False,bNotConnectable=False,bDefaultValueIsReadOnly=False,bDefaultValueIsIgnored=False,bAdvancedView=False,bOrphanedPin=False,)
End Object
Begin Object Class=/Script/UnrealEd.EdGraphNode_Comment Name="EdGraphNode_Comment_1" ExportPath="/Script/UnrealEd.EdGraphNode_Comment'/Game/CharacterSelection/CohCharacterBP.CohCharacterBP:changeActiveCharacter.EdGraphNode_Comment_1'"
   CommentColor=(R=1.000000,G=1.000000,B=1.000000,A=0.162000)
   bCommentBubbleVisible_InDetailsPanel=False
   MoveMode=NoGroupMovement
   NodePosX=-448
   NodePosY=240
   NodeWidth=1136
   NodeHeight=368
   bCommentBubblePinned=False
   bCommentBubbleVisible=False
   NodeComment="Change to previous character"
   NodeGuid=17C96903454A4D3B2ED68184761EEED7
End Object
Begin Object Class=/Script/UnrealEd.EdGraphNode_Comment Name="EdGraphNode_Comment_0" ExportPath="/Script/UnrealEd.EdGraphNode_Comment'/Game/CharacterSelection/CohCharacterBP.CohCharacterBP:changeActiveCharacter.EdGraphNode_Comment_0'"
   CommentColor=(R=1.000000,G=1.000000,B=1.000000,A=0.162000)
   bCommentBubbleVisible_InDetailsPanel=False
   MoveMode=NoGroupMovement
   NodePosX=-448
   NodePosY=-128
   NodeWidth=1136
   NodeHeight=368
   bCommentBubblePinned=False
   bCommentBubbleVisible=False
   NodeComment="Change to next character"
   NodeGuid=D61B6D59483357489A27C9B7ED6581F2
End Object
Getting started - Frontend
Once the game logic is fully implemented in the CohCharacterBP, it’s time to build the UI and bind it to the game data.
We’ll begin by creating an index.html file in the uiresources folder.
Import cohtml.js
To enable communication between the UI and the game, the cohtml.js library must first be imported.
1<body>2 <script src="./cohtml.js"></script>3</body>Displaying the character’s name
Next, we’ll display the current character’s name. This can be easily achieved using the data-bind-value attribute.
1<body>2 <div class="wrapper">3 <div class="stat-name" data-bind-value="{{Character.name}}"></div>4 </div>5 <script src="./cohtml.js"></script>6</body>Add logic for switching characters
We’ll create a new JavaScript file and import it into our HTML page. Make sure to include this file after the cohtml.js script.
1<body>2 <div class="wrapper">3 <div class="stat-name" data-bind-value="{{Character.name}}"></div>4 </div>5 <script src="./cohtml.js"></script>6 <script src="./index.js"></script>7</body>To allow players to change characters, in index.js, we’ll define two methods, changePrev and changeNext, that will switch between characters. Additionally, we’ll add a listener for the keydown event, allowing players to use the left and right arrow keys for navigation.
1function changePrev() {2    engine.trigger('prevCharacter');3}4
5function changeNext() {6    engine.trigger('nextCharacter');7}8
9document.addEventListener('keydown', (event) => {10    if (event.keyCode === 37) changePrev();11    if (event.keyCode === 39) changeNext();12});
Adding arrows for character switching
Although arrow keys allow character switching, it’s helpful to add on-screen arrows for this purpose. We’ll place these on either side of the character name and wrap everything in an element with class - controls.
1<body>2 <div class="wrapper">3 <div class="controls">4 <div class="arrow" onclick="changePrev()"><</div>5 <div class="stat-name" data-bind-value="{{Character.name}}"></div>6 <div class="arrow" onclick="changeNext()">></div>7 </div>8 <div class="stat-name" data-bind-value="{{Character.name}}"></div>9 </div>10 <script src="./cohtml.js"></script>11 <script src="./index.js"></script>12</body>In the end, the result will look like this:

Show the stats of the character

To show character stats, we’ll again use data binding attributes. For each stat, we’ll display a label for the stat name, a progress bar made of skull icons, and the stat value as text to the right of the bar.
The label will be bound using the data-bind-value attribute.
For the progress bar, we’ll use data-bind-style-background-position-x, which will adjust the background’s X-axis position, simulating the skulls filling up based on the stat value. We’ll also use data-bind-class-toggle to change the background color based on the value: red for values below 25, yellow for values between 25 and 50, and white for values above 50.
For the stat value text, we’ll implement a custom binding attribute, data-bind-progress, to animate the text representing the stat value.
Finally, we’ll use the data-bind-for attribute to generate all the character stats dynamically, reducing repetitive code.
1<body>2 <div class="wrapper">3 <div class="controls">4 <div class="arrow" onclick="changePrev()"><</div>5 <div class="stat-name" data-bind-value="{{Character.name}}"></div>6 <div class="arrow" onclick="changeNext()">></div>7 </div>8 <div class="stats">9 <div class="stat" data-bind-for="iter:{{Character.stats}}">10 <div class="stat-label"11 data-bind-class-toggle="text-red:{{iter.value}} < 25;text-yellow:{{iter.value}} >=25 && {{iter.value}} <=50"12 data-bind-value="{{iter.name}}"13 >14 </div>15 <div class="stat-value-data"16 data-bind-style-background-position-x="100-({{iter.value}}) + '%'"17 data-bind-class-toggle="bg-red:{{iter.value}} < 25;bg-yellow:{{iter.value}} >=25 && {{iter.value}} <=50;bg-white:{{iter.value}} > 50;"18 >19 </div>20 <span class="stat-value-text" data-bind-progress="{{iter.value}}"></span>21 </div>22 </div>23 </div>24 </div>25 <script src="./cohtml.js"></script>26 <script src="./index.js"></script>27</body>Fill the stat progress bar
To fill the progress bar, we’ll use a mask image with a linear gradient background in the stat-value-data CSS class. The mask will be an SVG of five skulls, and the background will be controlled by classes bg-red, bg-white, and bg-yellow. These classes define a gradient that changes from filled (50%) to unfilled based on the stat value.
For the mask image we will use the following svg that was created with the help of the skull icon linked in the resources section:
1<svg width="2691" height="496" viewBox="0 0 2691 496" fill="none"2 xmlns="http://www.w3.org/2000/svg">3 <path d="M240.673 4.115H240.173L276.773 44.125L381.573 70.185L413.573 39.795C361.873 11.925 296.273 2.845 240.673 4.115ZM215.273 4.665C173.273 6.475 134.873 12.855 102.773 24.085C64.303 37.535 34.463 58.085 19.953 87.075C-4.05702 135.075 2.65298 185.475 16.463 233.675L17.943 238.775L23.153 240.075C58.553 249.075 89.973 261.675 117.673 277.575C160.773 311.075 181.173 352.175 182.473 405.175C183.173 435.075 192.273 467.975 210.473 480.475C209.373 460.275 211.073 417.575 215.773 399.275L239.673 481.075L264.173 397.575C269.173 416.275 270.573 459.675 269.473 480.475C287.573 467.975 296.773 435.075 297.473 405.175C298.773 353.775 318.073 313.475 358.573 280.475C387.473 263.175 420.573 249.675 458.073 240.075L463.273 238.775L464.773 233.675C478.573 185.475 485.273 135.075 461.273 87.075C454.173 72.825 443.373 60.635 429.673 50.305L395.673 82.575L355.873 166.875L371.473 86.975L275.373 63.045C242.773 74.755 218.273 94.175 200.873 123.975L259.873 199.375L147.673 231.875C156.273 249.375 162.873 268.175 167.273 288.475C130.273 259.375 85.573 237.475 33.113 223.475C21.993 183.075 17.283 144.075 31.583 106.875C46.073 116.975 59.803 127.475 72.603 138.475C96.573 98.475 128.573 73.755 174.473 57.435C135.573 87.575 110.773 117.075 97.573 161.975C113.373 178.375 127.173 195.875 138.573 214.975L228.073 189.075L178.473 125.675L181.373 120.375C198.873 87.675 224.573 64.625 257.073 50.295L215.273 4.665ZM449.673 106.875C463.973 144.075 459.273 183.075 448.173 223.475C395.673 237.475 350.973 259.375 314.073 288.475C339.673 209.175 394.973 145.575 449.673 106.875ZM300.173 256.275L241.173 377.775L182.073 256.275L241.173 321.775C260.873 299.975 280.473 278.075 300.173 256.275Z" stroke="white" fill="white" stroke-width="8"/>4 <path d="M792.896 4.115H792.396L828.996 44.125L933.796 70.185L965.796 39.795C914.096 11.925 848.496 2.845 792.896 4.115ZM767.496 4.665C725.496 6.475 687.096 12.855 654.996 24.085C616.526 37.535 586.686 58.085 572.176 87.075C548.166 135.075 554.876 185.475 568.686 233.675L570.166 238.775L575.376 240.075C610.776 249.075 642.196 261.675 669.896 277.575C712.996 311.075 733.396 352.175 734.696 405.175C735.396 435.075 744.496 467.975 762.696 480.475C761.596 460.275 763.296 417.575 767.996 399.275L791.896 481.075L816.396 397.575C821.396 416.275 822.796 459.675 821.696 480.475C839.796 467.975 848.996 435.075 849.696 405.175C850.996 353.775 870.296 313.475 910.796 280.475C939.696 263.175 972.796 249.675 1010.3 240.075L1015.5 238.775L1017 233.675C1030.8 185.475 1037.5 135.075 1013.5 87.075C1006.4 72.825 995.596 60.635 981.896 50.305L947.896 82.575L908.096 166.875L923.696 86.975L827.596 63.045C794.996 74.755 770.496 94.175 753.096 123.975L812.096 199.375L699.896 231.875C708.496 249.375 715.096 268.175 719.496 288.475C682.496 259.375 637.796 237.475 585.336 223.475C574.216 183.075 569.506 144.075 583.806 106.875C598.296 116.975 612.026 127.475 624.826 138.475C648.796 98.475 680.796 73.755 726.696 57.435C687.796 87.575 662.996 117.075 649.796 161.975C665.596 178.375 679.396 195.875 690.796 214.975L780.296 189.075L730.696 125.675L733.596 120.375C751.096 87.675 776.796 64.625 809.296 50.295L767.496 4.665ZM1001.9 106.875C1016.2 144.075 1011.5 183.075 1000.4 223.475C947.896 237.475 903.196 259.375 866.296 288.475C891.896 209.175 947.196 145.575 1001.9 106.875ZM852.396 256.275L793.396 377.775L734.296 256.275L793.396 321.775C813.096 299.975 832.696 278.075 852.396 256.275Z" stroke="white" fill="white" stroke-width="8"/>5 <path d="M1345.12 4.115H1344.62L1381.22 44.125L1486.02 70.185L1518.02 39.795C1466.32 11.925 1400.72 2.845 1345.12 4.115ZM1319.72 4.665C1277.72 6.475 1239.32 12.855 1207.22 24.085C1168.75 37.535 1138.91 58.085 1124.4 87.075C1100.39 135.075 1107.1 185.475 1120.91 233.675L1122.39 238.775L1127.6 240.075C1163 249.075 1194.42 261.675 1222.12 277.575C1265.22 311.075 1285.62 352.175 1286.92 405.175C1287.62 435.075 1296.72 467.975 1314.92 480.475C1313.82 460.275 1315.52 417.575 1320.22 399.275L1344.12 481.075L1368.62 397.575C1373.62 416.275 1375.02 459.675 1373.92 480.475C1392.02 467.975 1401.22 435.075 1401.92 405.175C1403.22 353.775 1422.52 313.475 1463.02 280.475C1491.92 263.175 1525.02 249.675 1562.52 240.075L1567.72 238.775L1569.22 233.675C1583.02 185.475 1589.72 135.075 1565.72 87.075C1558.62 72.825 1547.82 60.635 1534.12 50.305L1500.12 82.575L1460.32 166.875L1475.92 86.975L1379.82 63.045C1347.22 74.755 1322.72 94.175 1305.32 123.975L1364.32 199.375L1252.12 231.875C1260.72 249.375 1267.32 268.175 1271.72 288.475C1234.72 259.375 1190.02 237.475 1137.56 223.475C1126.44 183.075 1121.73 144.075 1136.03 106.875C1150.52 116.975 1164.25 127.475 1177.05 138.475C1201.02 98.475 1233.02 73.755 1278.92 57.435C1240.02 87.575 1215.22 117.075 1202.02 161.975C1217.82 178.375 1231.62 195.875 1243.02 214.975L1332.52 189.075L1282.92 125.675L1285.82 120.375C1303.32 87.675 1329.02 64.625 1361.52 50.295L1319.72 4.665ZM1554.12 106.875C1568.42 144.075 1563.72 183.075 1552.62 223.475C1500.12 237.475 1455.42 259.375 1418.52 288.475C1444.12 209.175 1499.42 145.575 1554.12 106.875ZM1404.62 256.275L1345.62 377.775L1286.52 256.275L1345.62 321.775C1365.32 299.975 1384.92 278.075 1404.62 256.275Z" stroke="white" fill="white" stroke-width="8"/>6 <path d="M1897.34 4.115H1896.84L1933.44 44.125L2038.24 70.185L2070.24 39.795C2018.54 11.925 1952.94 2.845 1897.34 4.115ZM1871.94 4.665C1829.94 6.475 1791.54 12.855 1759.44 24.085C1720.97 37.535 1691.13 58.085 1676.62 87.075C1652.61 135.075 1659.32 185.475 1673.13 233.675L1674.61 238.775L1679.82 240.075C1715.22 249.075 1746.64 261.675 1774.34 277.575C1817.44 311.075 1837.84 352.175 1839.14 405.175C1839.84 435.075 1848.94 467.975 1867.14 480.475C1866.04 460.275 1867.74 417.575 1872.44 399.275L1896.34 481.075L1920.84 397.575C1925.84 416.275 1927.24 459.675 1926.14 480.475C1944.24 467.975 1953.44 435.075 1954.14 405.175C1955.44 353.775 1974.74 313.475 2015.24 280.475C2044.14 263.175 2077.24 249.675 2114.74 240.075L2119.94 238.775L2121.44 233.675C2135.24 185.475 2141.94 135.075 2117.94 87.075C2110.84 72.825 2100.04 60.635 2086.34 50.305L2052.34 82.575L2012.54 166.875L2028.14 86.975L1932.04 63.045C1899.44 74.755 1874.94 94.175 1857.54 123.975L1916.54 199.375L1804.34 231.875C1812.94 249.375 1819.54 268.175 1823.94 288.475C1786.94 259.375 1742.24 237.475 1689.78 223.475C1678.66 183.075 1673.95 144.075 1688.25 106.875C1702.74 116.975 1716.47 127.475 1729.27 138.475C1753.24 98.475 1785.24 73.755 1831.14 57.435C1792.24 87.575 1767.44 117.075 1754.24 161.975C1770.04 178.375 1783.84 195.875 1795.24 214.975L1884.74 189.075L1835.14 125.675L1838.04 120.375C1855.54 87.675 1881.24 64.625 1913.74 50.295L1871.94 4.665ZM2106.34 106.875C2120.64 144.075 2115.94 183.075 2104.84 223.475C2052.34 237.475 2007.64 259.375 1970.74 288.475C1996.34 209.175 2051.64 145.575 2106.34 106.875ZM1956.84 256.275L1897.84 377.775L1838.74 256.275L1897.84 321.775C1917.54 299.975 1937.14 278.075 1956.84 256.275Z" stroke="white" fill="white" stroke-width="8"/>7 <path d="M2449.57 4.115H2449.07L2485.67 44.125L2590.47 70.185L2622.47 39.795C2570.77 11.925 2505.17 2.845 2449.57 4.115ZM2424.17 4.665C2382.17 6.475 2343.77 12.855 2311.67 24.085C2273.2 37.535 2243.36 58.085 2228.85 87.075C2204.84 135.075 2211.55 185.475 2225.36 233.675L2226.84 238.775L2232.05 240.075C2267.45 249.075 2298.87 261.675 2326.57 277.575C2369.67 311.075 2390.07 352.175 2391.37 405.175C2392.07 435.075 2401.17 467.975 2419.37 480.475C2418.27 460.275 2419.97 417.575 2424.67 399.275L2448.57 481.075L2473.07 397.575C2478.07 416.275 2479.47 459.675 2478.37 480.475C2496.47 467.975 2505.67 435.075 2506.37 405.175C2507.67 353.775 2526.97 313.475 2567.47 280.475C2596.37 263.175 2629.47 249.675 2666.97 240.075L2672.17 238.775L2673.67 233.675C2687.47 185.475 2694.17 135.075 2670.17 87.075C2663.07 72.825 2652.27 60.635 2638.57 50.305L2604.57 82.575L2564.77 166.875L2580.37 86.975L2484.27 63.045C2451.67 74.755 2427.17 94.175 2409.77 123.975L2468.77 199.375L2356.57 231.875C2365.17 249.375 2371.77 268.175 2376.17 288.475C2339.17 259.375 2294.47 237.475 2242.01 223.475C2230.89 183.075 2226.18 144.075 2240.48 106.875C2254.97 116.975 2268.7 127.475 2281.5 138.475C2305.47 98.475 2337.47 73.755 2383.37 57.435C2344.47 87.575 2319.67 117.075 2306.47 161.975C2322.27 178.375 2336.07 195.875 2347.47 214.975L2436.97 189.075L2387.37 125.675L2390.27 120.375C2407.77 87.675 2433.47 64.625 2465.97 50.295L2424.17 4.665ZM2658.57 106.875C2672.87 144.075 2668.17 183.075 2657.07 223.475C2604.57 237.475 2559.87 259.375 2522.97 288.475C2548.57 209.175 2603.87 145.575 2658.57 106.875ZM2509.07 256.275L2450.07 377.775L2390.97 256.275L2450.07 321.775C2469.77 299.975 2489.37 278.075 2509.07 256.275Z" stroke="white" fill="white" stroke-width="8"/>8</svg>And the styles for the progress bar will be:
1.bg-red {2    background: linear-gradient(90deg, rgb(255 0 0) 0%, rgb(255 0 0) 50%, rgb(100, 100, 100) 50%, rgb(100, 100, 100) 100%);3}4
5.bg-white {6    background: linear-gradient(90deg, rgb(255, 255, 255) 0%, rgb(255, 255, 255) 50%, rgb(100, 100, 100) 50%, rgb(100, 100, 100) 100%);7}8
9.bg-yellow {10    background: linear-gradient(90deg, rgb(255, 255, 55) 0%, rgb(255, 255, 55) 50%, rgb(100, 100, 100) 50%, rgb(100, 100, 100) 100%);11}12
13.stat-value-data {14    flex: 1 0 0;15    height: 100%;16    mask-image: url(./Vector.svg);17    mask-size: 100% 100%;18    mask-position: 0% 50%;19    mask-repeat: no-repeat;20    background-size: 200% 100%;21    background-position: 50% 0;22    transition: background-position 500ms ease-out, background-image 500ms ease-out;23}
Animate the text showing the stat value
We’ll animate the stat value text so it dynamically updates while switching between characters. To achieve this, we’ll create a custom data-bind-progress attribute in index.js that smoothly increments or decrements the stat value over time.
The animation works by:
- Calculating the difference between the old and new stat value.
- Setting an interval to increment or decrement the value over time, simulating the stat change.
- Clearing the interval once the value matches the new stat or if time of 500ms exceeds.
1class Progress {2    constructor() {3        this.textValueChangeInterval = null;4        this.textValueChangeTimeout = null;5    }6
7    init(element, model) {8        this.value = model;9        this.currentValue = this.value;10        this.textElement = element;11        this.textElement.textContent = `${this.currentValue}/100`;12    }13
14    animateText() {15        if (this.textValueChangeInterval) clearInterval(this.textValueChangeInterval);16        if (this.textValueChangeTimeout) clearInterval(this.textValueChangeTimeout);17
18        const diff = this.value < this.currentValue ? this.currentValue - this.value : this.value - this.currentValue;19        if (!diff) return;20        const intervalTime = parseInt(500 / diff);21
22        this.textValueChangeInterval = setInterval(() => {23            if (this.currentValue === this.value) return clearInterval(this.textValueChangeInterval);24            if (this.value < this.currentValue) this.currentValue--;25            if (this.value > this.currentValue) this.currentValue++;26
27            this.textElement.textContent = this.value < this.currentValue ? `${this.currentValue}/100` : `${this.currentValue}/100`;28        }, intervalTime);29
30        this.textValueChangeTimeout = setTimeout(() => {31            clearInterval(this.textValueChangeInterval);32            this.currentValue = this.value;33            this.textElement.textContent = `${this.currentValue}/100`;34        }, 500);35    }36
37    update(element, model) {38        this.value = model;39        this.animateText();40    }41}42engine.registerBindingAttribute('progress', Progress);
Full source of the tutorial
The complete source code for this tutorial is available below, including additional styles used to enhance the UI.
1<!DOCTYPE html>2<html lang="en">3
4<head>5 <link rel="stylesheet" href="style.css">6</head>7
8<body>41 collapsed lines
9 <div class="wrapper">10 <div class="controls">11 <div12 class="arrow"13 onclick="changePrev()"14 ><</div>15 <div16 class="stat-name"17 data-bind-value="{{Character.name}}"18 ></div>19 <div20 class="arrow"21 onclick="changeNext()"22 >></div>23 </div>24 <div class="stats">25 <div26 class="stat"27 data-bind-for="iter:{{Character.stats}}"28 >29 <div30 class="stat-label"31 data-bind-class-toggle="text-red:{{iter.value}} < 25;text-yellow:{{iter.value}} >=25 && {{iter.value}} <=50"32 data-bind-value="{{iter.name}}"33 >34 </div>35 <div36 class="stat-value-data"37 data-bind-style-background-position-x="100-({{iter.value}}) + '%'"38 data-bind-class-toggle="bg-red:{{iter.value}} < 25;bg-yellow:{{iter.value}} >=25 && {{iter.value}} <=50;bg-white:{{iter.value}} > 50;"39 >40 </div>41 <span42 class="stat-value-text"43 data-bind-progress="{{iter.value}}"44 ></span>45 </div>46 </div>47 </div>48 <script src="./cohtml.js"></script>49 <script src="./index.js"></script>50</body>51
52</html>1@font-face {2 font-family: jacksonvile;3 src: url(./Jacksonville.ttf);4}5
6body {7 width: 100vw;8 height: 100vh;9 margin: 0;10 font-family: jacksonvile;11}136 collapsed lines
12
13.wrapper {14 width: 100vw;15 height: 100%;16 display: flex;17 justify-content: flex-end;18 flex-direction: column;19 background-image: linear-gradient(79deg, rgba(0, 0, 0, 0.8) 10%, rgba(0, 0, 0, 0.6) 38%, rgba(255, 255, 255, 0) 55%);20 visibility: visible;21 animation: in-left 500ms ease-in forwards;22}23
24@keyframes in-left {25 0% {26 transform: translateX(-100vw);27 }28
29 100% {30 transform: translateX(0);31 }32}33
34.stat-name {35 color: white;36 font-size: 5vw;37 text-shadow: 10px 10px 20px black;38}39
40.stats {41 width: 50%;42 position: relative;43 display: flex;44 font-size: 2.3vw;45 flex-direction: column;46 align-items: center;47 justify-content: flex-end;48 padding-bottom: 2vw;49}50
51.controls {52 width: 50%;53 display: flex;54 align-items: center;55 flex-direction: row;56 justify-content: space-between;57 transform: scale(0) rotateZ(-7deg) translateX(3vw) translateY(-4vw);58 animation: scale 300ms 500ms ease-in forwards;59}60
61@keyframes scale {62 0% {63 transform: scale(0) rotateZ(-7deg) translateX(3vw) translateY(-4vw);64 }65
66 100% {67 transform: scale(1) rotateZ(-7deg) translateX(3vw) translateY(-4vw);68 }69}70
71.stat {72 width: 50%;73 height: 2.5vw;74 margin: 0.5vw;75 display: flex;76 align-items: center;77 flex-direction: row;78 justify-content: space-between;79}80
81.arrow {82 font-size: 4vw;83 transition: transform 300ms;84 transform-origin: center center;85 transform: scale(1);86 color: white;87 cursor: pointer;88}89
90.arrow:hover {91 transform: scale(1.5);92}93
94.stat-label {95 color: white;96 flex-basis: 9vw;97 text-align: right;98 margin-right: 1vw;99 transition: color 500ms ease-out;100}101
102.stat-value {103 flex: 1 0 0;104 height: 70%;105}106
107.stat-value-text {108 height: 100%;109 width: 5.5vw;110 padding-left: 0.8vw;111 font-size: 2vw;112 color: white;113 font-weight: bold;114 align-items: center;115}116
117.bg-red {118 background: linear-gradient(90deg, rgb(255 0 0) 0%, rgb(255 0 0) 50%, rgb(100, 100, 100) 50%, rgb(100, 100, 100) 100%);119}120
121.bg-white {122 background: linear-gradient(90deg, rgb(255, 255, 255) 0%, rgb(255, 255, 255) 50%, rgb(100, 100, 100) 50%, rgb(100, 100, 100) 100%);123}124
125.text-red {126 color: rgba(202, 22, 13, 1);127}128
129.bg-yellow {130 background: linear-gradient(90deg, rgb(255, 255, 55) 0%, rgb(255, 255, 55) 50%, rgb(100, 100, 100) 50%, rgb(100, 100, 100) 100%);131}132
133.text-yellow {134 color: rgba(255, 243, 0, 1);135}136
137.stat-value-data {138 flex: 1 0 0;139 height: 100%;140 mask-image: url(./Vector.svg);141 mask-size: 100% 100%;142 mask-position: 0% 50%;143 mask-repeat: no-repeat;144 background-size: 200% 100%;145 background-position: 50% 0;146 transition: background-position 500ms ease-out, background-image 500ms ease-out;147}1class Progress {2 constructor() {3 this.textValueChangeInterval = null;4 this.textValueChangeTimeout = null;46 collapsed lines
5 }6
7 init(element, model) {8 this.value = model;9 this.currentValue = this.value;10 this.textElement = element;11 this.textElement.textContent = `${this.currentValue}/100`;12 }13
14 animateText() {15 if (this.textValueChangeInterval) clearInterval(this.textValueChangeInterval);16 if (this.textValueChangeTimeout) clearInterval(this.textValueChangeTimeout);17
18 const diff = this.value < this.currentValue ? this.currentValue - this.value : this.value - this.currentValue;19 if (!diff) return;20 const intervalTime = parseInt(500 / diff);21
22 this.textValueChangeInterval = setInterval(() => {23 if (this.currentValue === this.value) return clearInterval(this.textValueChangeInterval);24 if (this.value < this.currentValue) this.currentValue--;25 if (this.value > this.currentValue) this.currentValue++;26
27 this.textElement.textContent = this.value < this.currentValue ? `${this.currentValue}/100` : `${this.currentValue}/100`;28 }, intervalTime);29
30 this.textValueChangeTimeout = setTimeout(() => {31 clearInterval(this.textValueChangeInterval);32 this.currentValue = this.value;33 this.textElement.textContent = `${this.currentValue}/100`;34 }, 500);35 }36
37 update(element, model) {38 this.value = model;39 this.animateText();40 }41}42engine.registerBindingAttribute('progress', Progress);43
44function changePrev() {45 engine.trigger('prevCharacter');46}47
48function changeNext() {49 engine.trigger('nextCharacter');50}51
52document.addEventListener('keydown', (event) => {53 if (event.keyCode === 37) changePrev();54 if (event.keyCode === 39) changeNext();55});