In-world hologram UI - In world inventory (Frontend) (Part 4)
1/9/2025
Kaloyan Geshev
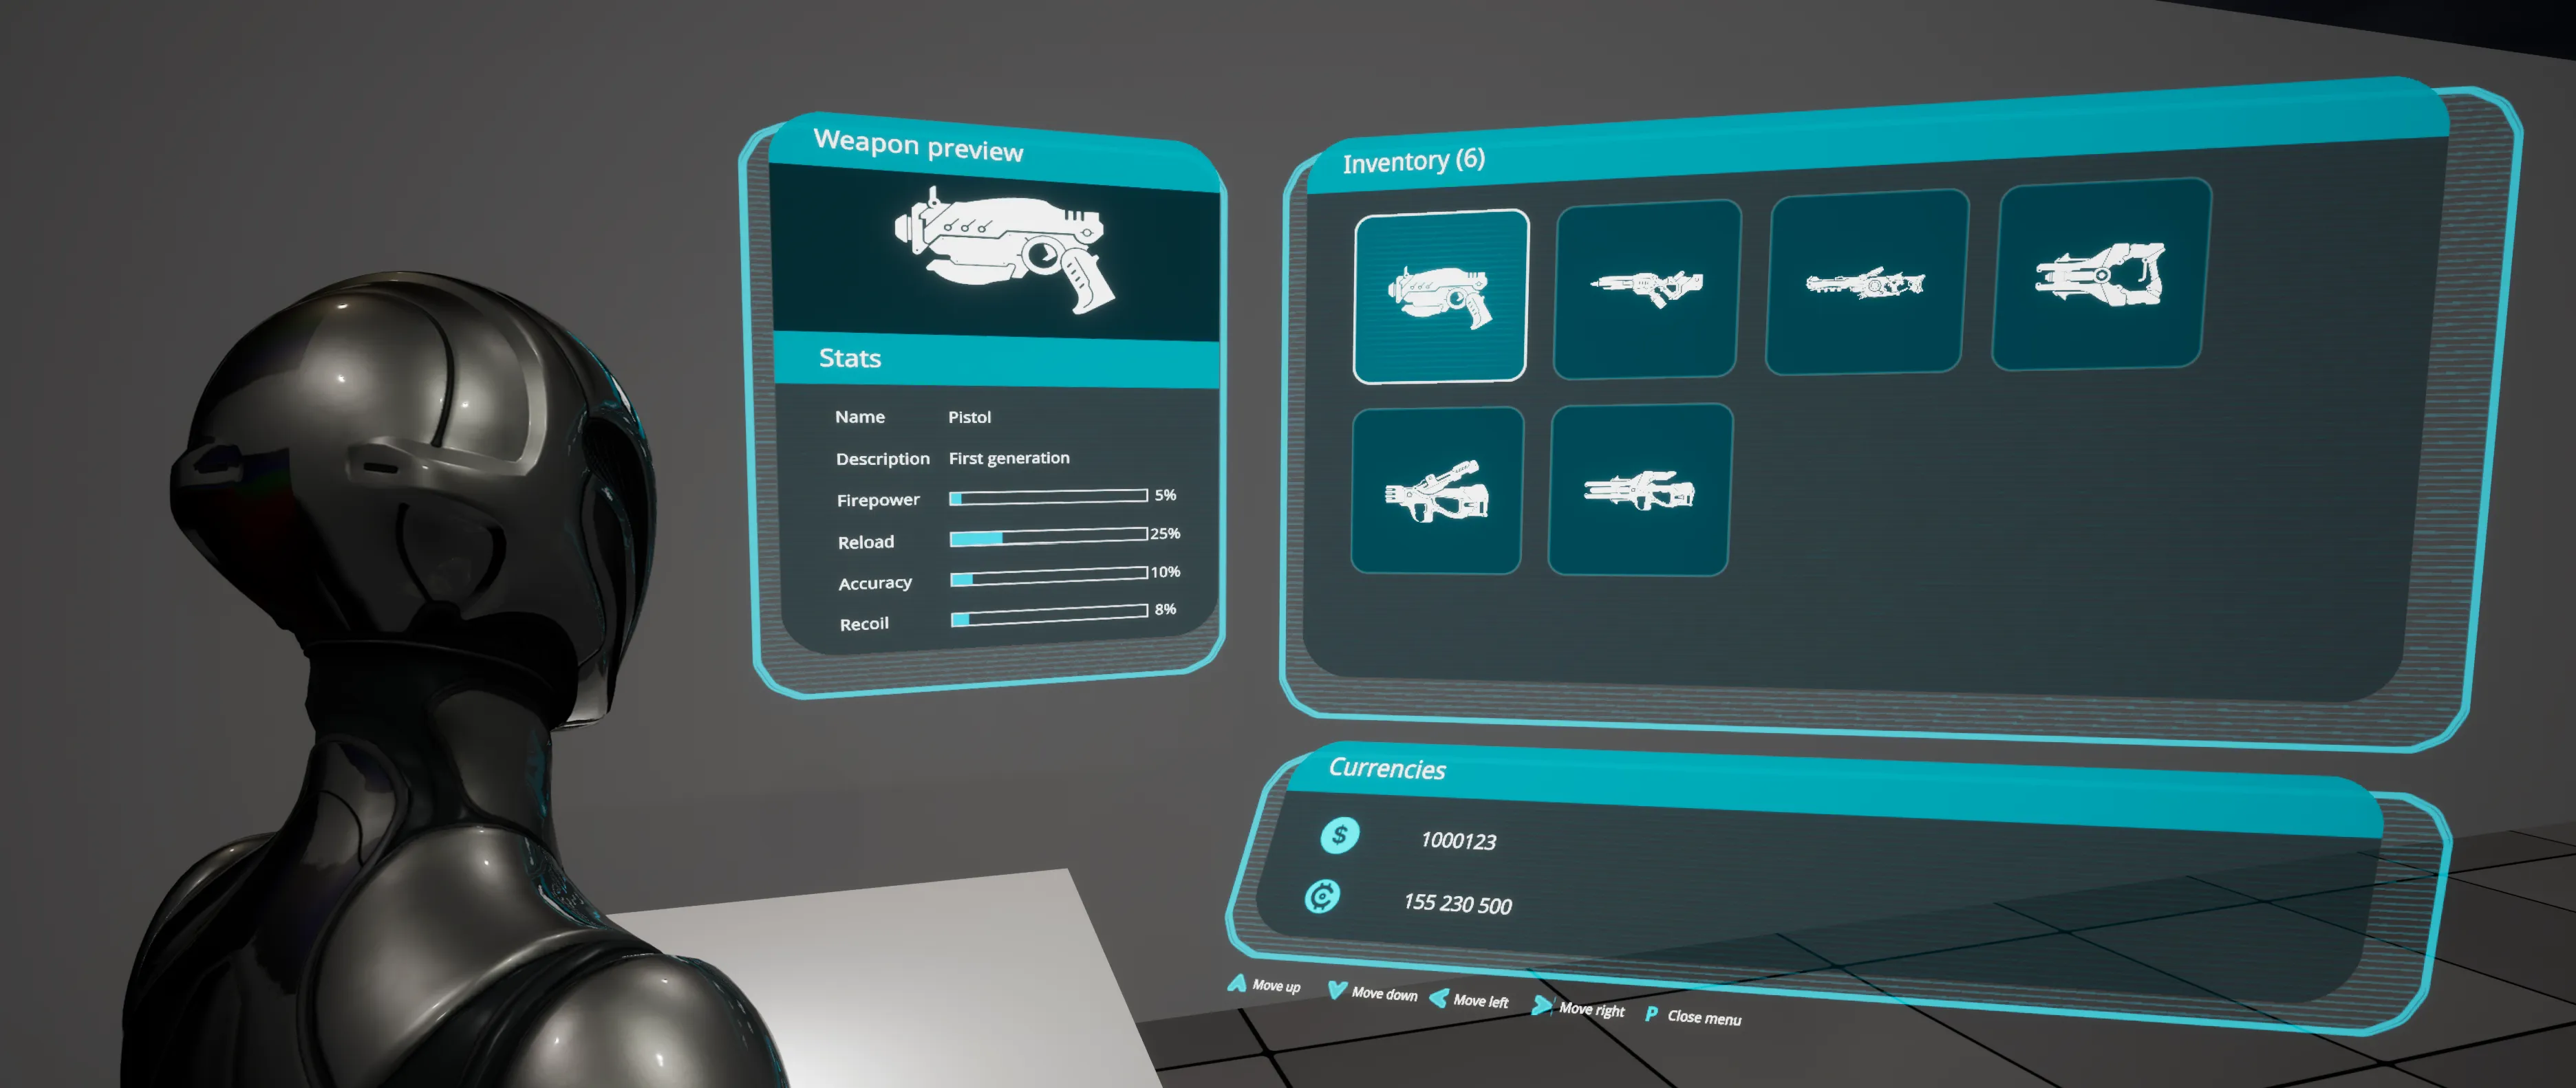
In the final tutorial of this series, we will design the UI for the inventory menu, allowing the player to interact with the items.
You can find the rest Hologram UI series here.
Showcase Overview
This part will focus on creating the UI for the inventory.
We will achieve this by:
- Using Gameface data binding to generate and render the inventory items.
- Applying
CSStransforms to create the screens from the image. - Utilizing the progress bar Gameface component to display weapon stats.
- Utilizing the interaction manager to allow the player to navigate through the items list using the keyboard.
Getting started - UI layout overview
To create the inventory UI, we will divide the screens into three parts:
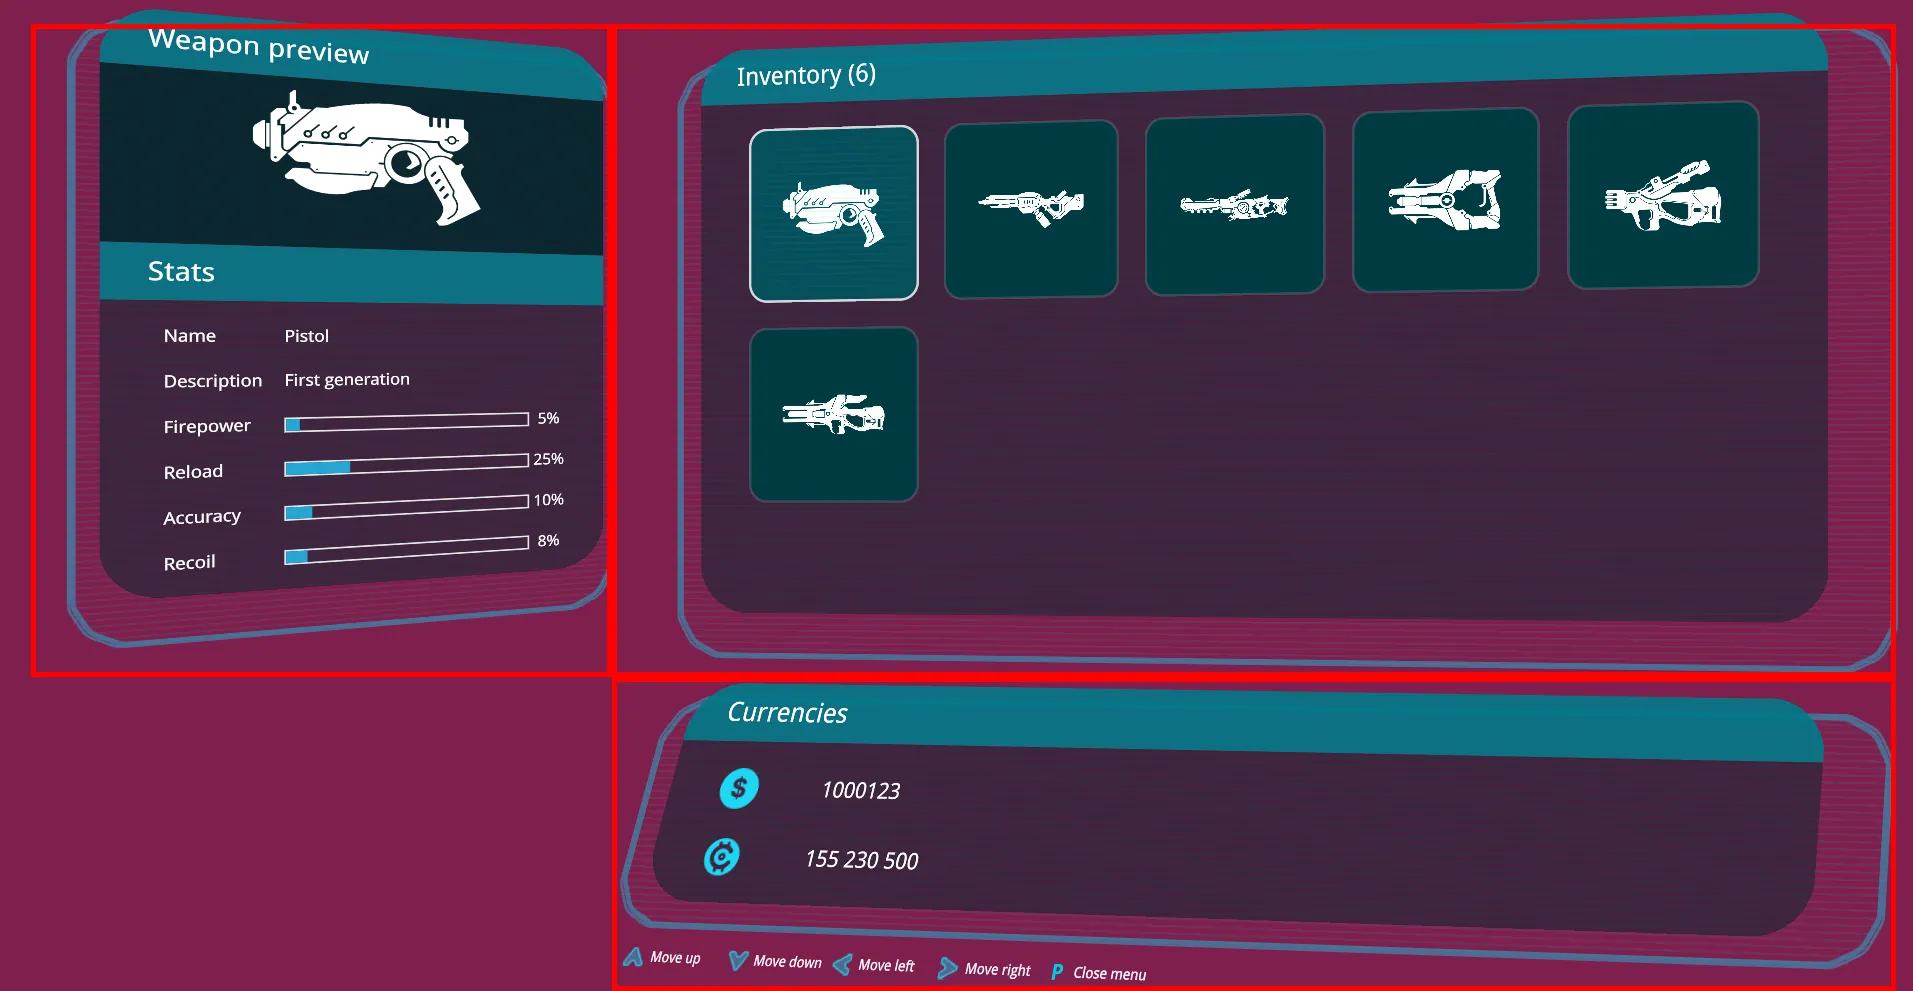
We will create a main wrapper element for all UI parts using display flex in a row direction. Inside this wrapper, we will have two elements that together occupy 100% of the wrapper’s width.
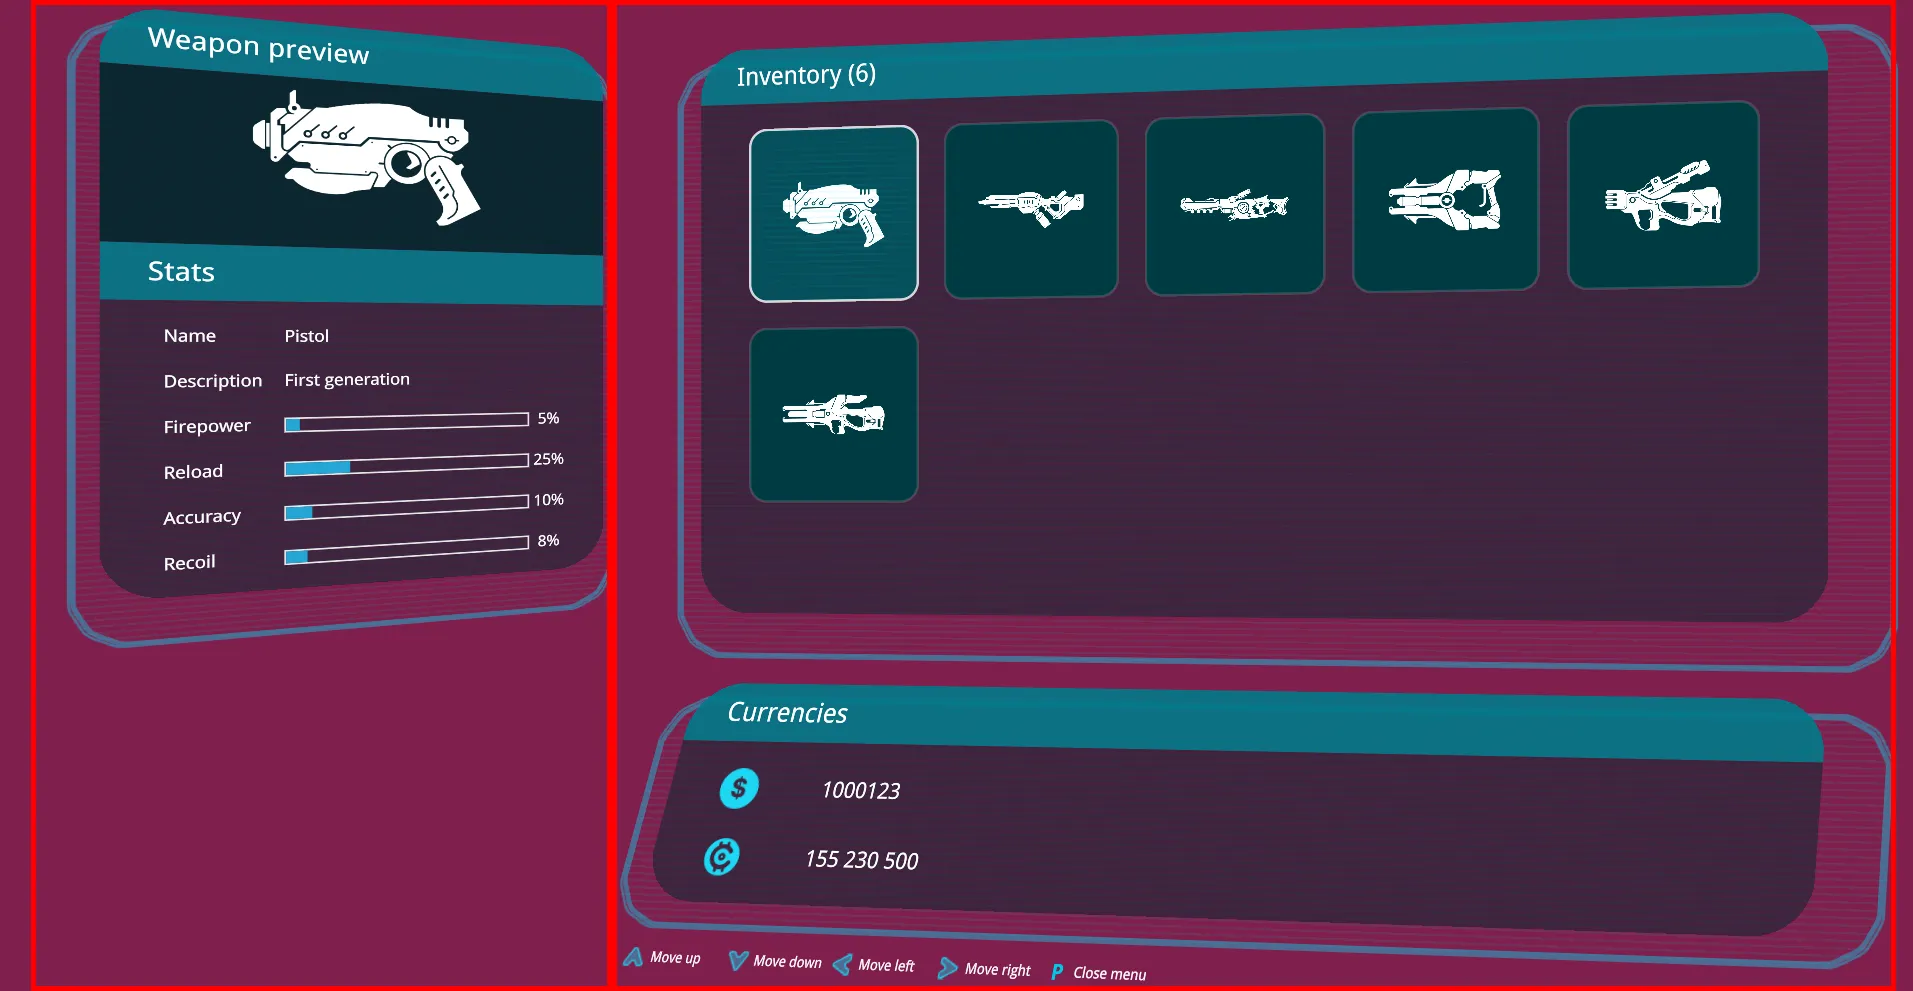
The first element will display the weapon stats and preview screen.
The second element will use display flex in a column direction and contain two children:
- The first child will display the inventory items.
- The second child will display the currencies.
Setting the wrappers
The HTML representation of the above layout is as follows:
1<div class='menu'>2 <div class="menu-left">3 <div class="submenu-top"></div>4 </div>5 <div class="menu-right">6 <div class="submenu-top"></div>7 <div class="submenu-bottom"></div>8 </div>9</div>The main wrapper element is menu. Inside it, we have menu-left and menu-right to split the screen into two parts as described. Inside them, we add submenu-top and submenu-bottom elements. Since the left menu only shows weapon stats, we omit submenu-bottom. The right menu’s submenu-top shows the inventory, and submenu-bottom shows the currencies.
The wrappers will have the following styles:
1.menu {2 background-color: rgb(0, 0, 0, 0);3 color: white;4 width: 100vw;5 height: 100vh;6 position: absolute;7 display: flex;8 align-items: center;9 justify-content: center;10 perspective: 1000px;11 opacity: 1;12}13
14.menu-left,15.menu-right {16 height: 100%;17 padding: 1rem;18}19
27 collapsed lines
20.menu-left {21 margin-left: 1rem;22 flex: 1 1 30%;23 transform: rotateY(20deg) skewY(-3deg) translateY(-1rem);24 transform-origin: center left;25}26
27.menu-right {28 transform: translateX(-5rem);29 flex: 1 1 70%;30 perspective: 1000px;31}32
33.submenu-top {34 transform: scale(0.9) rotateY(-4deg);35 transform-origin: top right;36 height: 70%;37 position: relative;38}39
40.submenu-bottom {41 width: 97.5%;42 transform: scale(0.9) rotateY(-4deg) rotateX(10deg) skewY(0deg) skewX(-10deg) translateX(5%) translateY(-5%);43 transform-origin: center;44 height: 25%;45 position: relative;46}As you can see, we also set the transformations for each screen. To achieve a 3D effect, we use the perspective CSS property on the menu wrapper. For the other elements, we use different transform properties to achieve the effect shown in the video or images.
To simplify the process, we used our Inspector to transform the wrappers, allowing temporary updates to the UI that are immediately visible in our standalone application called the Player. Once satisfied with the result, you can copy the CSS from the Styles tab and paste it into your CSS file.
Note: Since the Gameface view in the game created in the previous tutorial also has transformations, it is advisable to check the final result directly in the game. You can open the inspector while the game is running and use the same approach to temporarily edit the elements as with the standalone application.
Creating the holographic background for menus
To achieve the holographic effect for the menu background, follow these steps:
- First, create a border as a PNG image for the element. Then, use the
border-imageCSS property to apply a nine-slice scaling technique, ensuring the border’s edges maintain their ratio when the wrapper element is scaled. We will use the following image:
- Next, add the noise animation created earlier in the series. To ensure it stays within the border image boundaries and acts as a background, use the
border-radiusCSS property. - Finally, translate and scale the wrapper slightly to create an offset behind the menu wrapper, producing a depth effect.
For each submenu, add this element that is positioned absolutely to the menu. Here is an example in our HTML page:
1<div class='menu'>2 <div class="menu-left">3 <div class="submenu-top">4 <div class="border-bg border-bg-weapon-preview">5 <div class="overlay-lines border-radius-lines"></div>6 </div>7 </div>8 </div>9 <div class="menu-right">10 <div class="submenu-top">11 <div class="border-bg border-bg-inventory">12 <div class="overlay-lines border-radius-lines"></div>13 </div>14 </div>15 <div class="submenu-bottom">16 <div class="border-bg border-bg-currencies">17 <div class="overlay-lines border-radius-lines"></div>18 </div>19 </div>20 </div>21</div>Each background is tagged with a specific class to apply different transition animations. For example, the weapon preview background is tagged with the border-bg-weapon-preview class.
The styles are defined as follows:
1.overlay,2.overlay-lines,3.overlay-radial {4 pointer-events: none;5 position: absolute;6 width: 100%;7 height: 100%;8 top: 0;9 left: 0;38 collapsed lines
10 right: 0;11 bottom: 0;12 z-index: 999;13}14
15.overlay-lines {16 background-image: linear-gradient(rgba(0, 200, 228, 0.1) 0%, rgba(0, 200, 228, 0.1) 30%, rgba(255, 255, 255, 0) 30%, rgba(255, 255, 255, 0) 100%);17 background-size: 100% 0.5rem;18 animation: overlay-anim 3s forwards linear infinite;19}20
21@keyframes overlay-anim {22 from {23 background-position: 0% 0%;24 }25
26 to {27 background-position: 0% -10%;28 }29}30
31.border-radius-lines {32 border-radius: 4rem;33}34
35.border-bg {36 position: absolute;37 width: 108%;38 height: 106%;39 border-image-source: url(./assets/border.png);40 border-image-slice: 60;41 border-image-width: 3.5rem;42 border-image-outset: 0;43 border-image-repeat: stretch;44 z-index: -1;45 transform: translateX(-2rem) scale(1);46 top: 1rem;47}This will result in a similar effect:
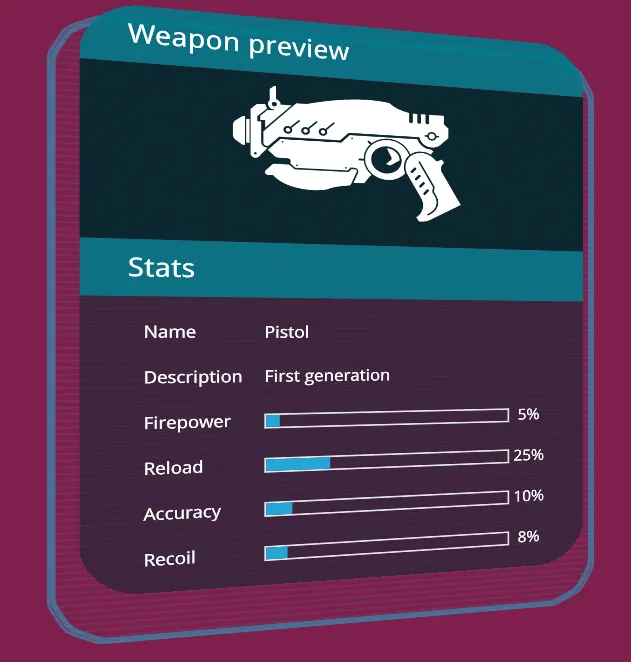
Weapon preview and stats menu
To create the weapon preview menu, we will design a separate submenu wrapper element that displays its children in a column layout.
Next, we will create two reusable elements within the submenu wrapper: one for the menu item title and one for the menu item container. This will help us define the layout based on images and videos.
Weapon preview
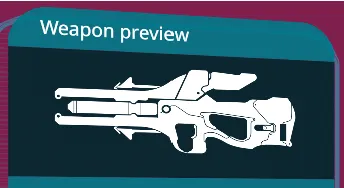
We will use the following structure in our HTML file:
1<div class='menu'>2 <div class="menu-left">3 <div class="submenu-top">4 <div class="border-bg border-bg-weapon-preview">5 <div class="overlay-lines border-radius-lines"></div>6 </div>7 <div class="submenu-wrapper weapon-preview-wrapper">8 <div class="menu-item-title">Weapon preview</div>9 <div class="menu-selected-item-preview">10 <div11 class="selected-item-image"12 data-bind-style-background-image-url="{{activeState.selectedItem.image}}"13 ></div>14 </div>We use the menu-item-title to display the text “Weapon preview” and the menu-selected-item-preview to show a preview image of the currently selected weapon. The data-bind-style-background-image-url attribute ensures that the image updates when the selected weapon changes. We will later set up all data models using mock models.
To match the submenu with the previously created background, we will set a border radius and overflow to hidden on the submenu-wrapper:
1.submenu-wrapper {2 border-radius: 4rem;3 overflow: hidden;4 height: 100%;5}Progress bar initialization
To use the progress bar in our UI, run npm i coherent-gameface-progress-bar inside the Content/uiresources/HologramUI/ folder and then import its styles and JavaScript into the page.
1<head>2 <link rel="stylesheet" href="node_modules/coherent-gameface-progress-bar/coherent-gameface-components-theme.css">3 <link rel="stylesheet" href="node_modules/coherent-gameface-progress-bar/style.css">4 ...5</head>6<body>7 ...8 <script src="./node_modules/coherent-gameface-progress-bar/dist/progress-bar.production.min.js"></script>9</body>Weapon stats
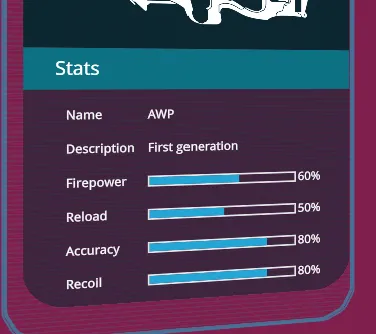
For the weapon stats, we will add a menu-item-title with the text “Stats” and use the menu-item-container to display all the stats. Each stat will be wrapped in a menu-item-stat element, with menu-item-stat-label displaying the stat name and menu-item-stat-value showing the stat value using the gameface progress bar or simple text via the data-bind-value attribute.
Here is a snippet demonstrating how different stats are structured in the HTML page:
1<div class="submenu-wrapper weapon-preview-wrapper">2 ...3 <div class="menu-item-title">Stats</div>4 <div class="menu-item-container">5 <div class="menu-item-stats-wrapper">6 <div class="menu-item-stat">7 <div class="menu-item-stat-label">Name</div>8 <div9 class="menu-item-stat-value"10 data-bind-value="{{activeState.selectedItem.name}}"11 ></div>12 </div>13 ...14 <div class="menu-item-stat">15 <div class="menu-item-stat-label">Firepower</div>16 <div class="menu-item-stat-value">17 <gameface-progress-bar18 animation-duration="500"19 data-bind-progress="{{activeState.selectedItem.firepower}}"20 ></gameface-progress-bar>21 <span22 class="stat-text-value"23 data-bind-value="{{activeState.selectedItem.firepower}}+'%'"24 ></span>25 </div>26 </div>27 ...28 </div>29 </div>30</div>We apply values from the active item in our model via data binding attributes, which we will set up later. To dynamically change the progress bar value, we will use the data-bind-progress custom attribute, which we will define later as well.
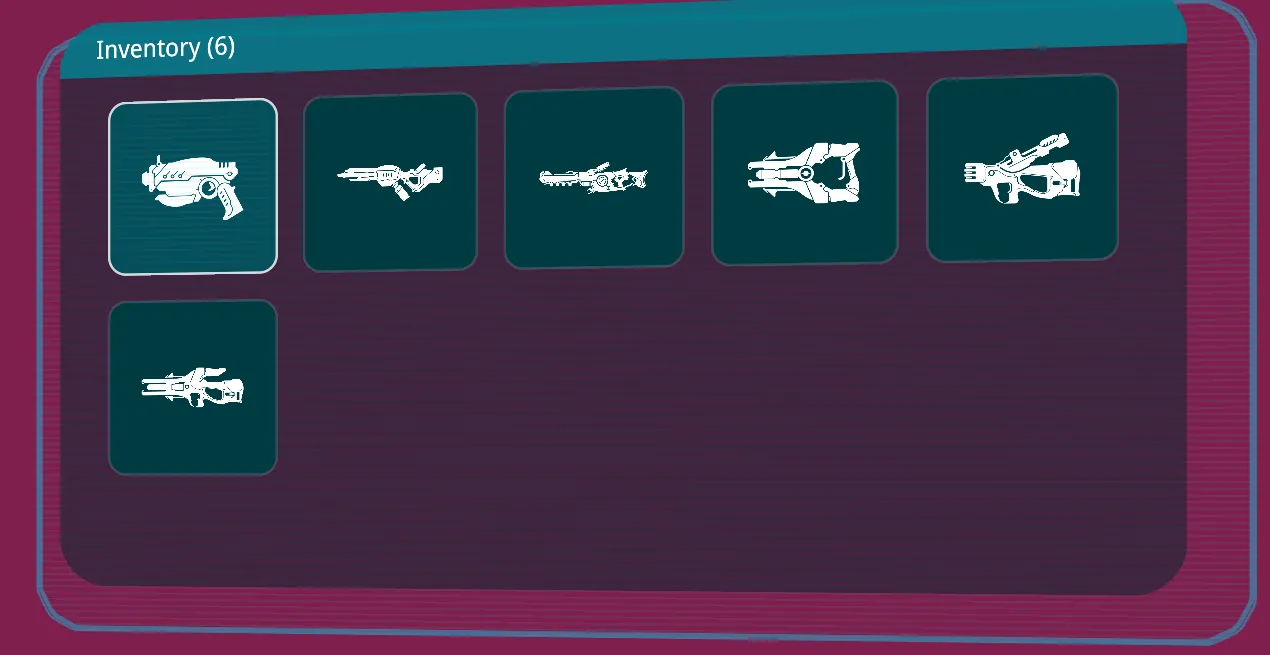
Inventory menu
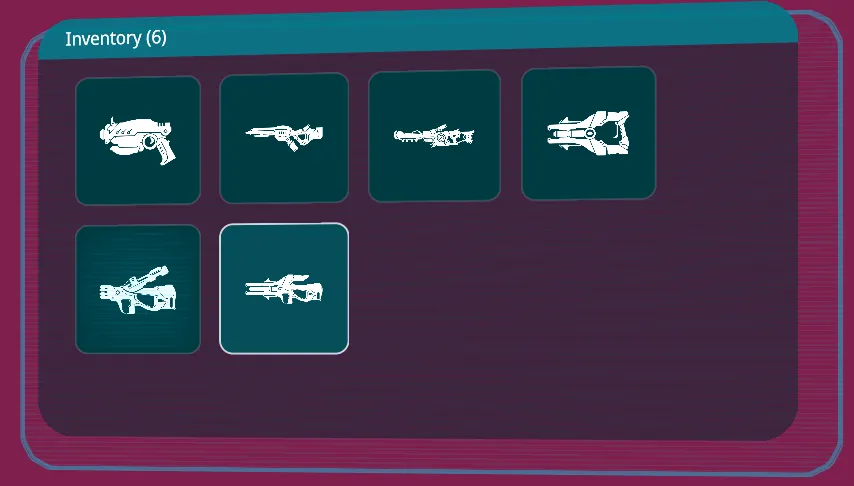
To build the inventory, we will reuse some elements from the weapon stats. We’ll create a new submenu-top inside the menu-right wrapper, adding the border-bg and submenu-wrapper elements.
For displaying all items, we’ll use a grid-like layout. Each item from our data model will be rendered using the data-bind-for attribute.
1<div class="menu-right">2 <div class="submenu-top">3 <div class="border-bg border-bg-inventory">4 <div class="overlay-lines border-radius-lines"></div>5 </div>6 <div class="submenu-wrapper inventory-wrapper">7 <div class="menu-item-title">Inventory (6)</div>8 <div class="menu-item-container">9 <div10 class="player-item-wrapper"11 data-bind-for="item:{{player.items}}"12 >13 <div14 class="player-item"15 data-bind-mouseover="onItemFocused(event,this,{{item}})"16 data-bind-focus="onItemFocused(event,this,{{item}})"17 >18 <div19 data-bind-class-toggle="player-item-selected:{{item}}==={{activeState.selectedItem}}"20 class="player-item-background"21 ></div>22 <div23 data-bind-if="{{item}}==={{activeState.selectedItem}}"24 class="overlay"25 >26 <div class="overlay-lines"></div>27 <div class="overlay-radial"></div>28 </div>29 <div30 class="player-item-image"31 data-bind-style-background-image-url="{{item.image}}"32 ></div>33 </div>34 </div>35 </div>36 </div>37 </div>Each player-item has data-bind-mouseover and data-bind-focus events. These events mark the item as active when the player hovers over or clicks on it. The onItemFocused function, defined later in our JavaScript file, handles these events.
The player-item-selected class styles the active item by changing its background. This class is toggled using the data-bind-class-toggle attribute.
When an item is active, an overlay is added to highlight it. The overlay is shown only when the item is active using the data-bind-if attribute.
The player-item-image element displays the item image, setting the background image using the data-bind-style-background-image-url attribute.
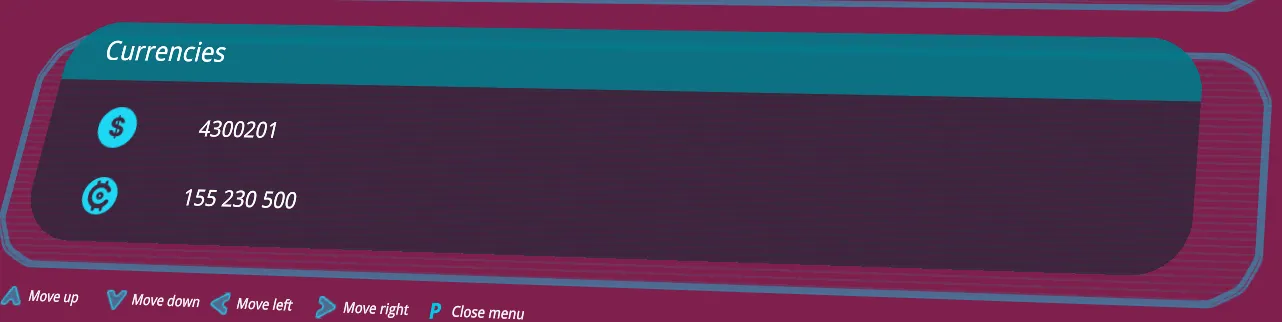
Currencies menu
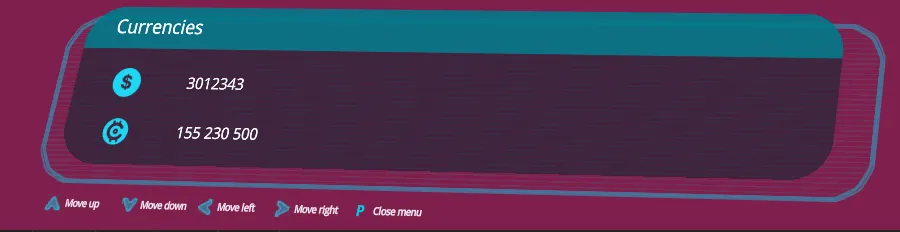
The currencies menu uses the same structure as the inventory menu. We’ll create a new submenu-bottom inside the menu-right wrapper, adding the border-bg and submenu-wrapper elements.
To dynamically show the active item’s price, we’ll use the data-bind-value attribute.
1<div class="submenu-bottom">2 <div class="border-bg border-bg-currencies">3 <div class="overlay-lines border-radius-lines"></div>4 </div>5 <div class="submenu-wrapper currencies-wrapper">6 <div class="menu-item-title">Currencies</div>7 <div class="menu-item-container">8 <div class="menu-item-stat">9 <div class="menu-item-stat-label">10 <div class="icon icon-money"></div>11 </div>12 <div13 class="menu-item-stat-value currency"14 data-bind-value="{{activeState.selectedItem.gold}}"15 ></div>16 </div>17 <div class="menu-item-stat">18 <div class="menu-item-stat-label">19 <div class="icon icon-currency"></div>20 </div>21 <div class="menu-item-stat-value currency">155 230 500</div>22 </div>23 </div>24 </div>25</div>Showing menu controls hints
To guide the player on navigating through the items, we’ll add hints at the bottom of the screen, positioned after the currencies wrapper.
1<div class="submenu-bottom">22 collapsed lines
2 <div class="border-bg border-bg-currencies">3 <div class="overlay-lines border-radius-lines"></div>4 </div>5 <div class="submenu-wrapper currencies-wrapper">6 <div class="menu-item-title">Currencies</div>7 <div class="menu-item-container">8 <div class="menu-item-stat">9 <div class="menu-item-stat-label">10 <div class="icon icon-money"></div>11 </div>12 <div13 class="menu-item-stat-value currency"14 data-bind-value="{{activeState.selectedItem.gold}}"15 ></div>16 </div>17 <div class="menu-item-stat">18 <div class="menu-item-stat-label">19 <div class="icon icon-currency"></div>20 </div>21 <div class="menu-item-stat-value currency">155 230 500</div>22 </div>23 </div>24 </div>25 <div class="controls">26 <div class="arrow">27 <div class="arrow-icon up"></div>28 <div>Move up</div>29 </div>30 <div class="arrow">31 <div class="arrow-icon down"></div>32 <div>Move down</div>33 </div>34 <div class="arrow">35 <div class="arrow-icon left"></div>36 <div>Move left</div>37 </div>38 <div class="arrow">39 <div class="arrow-icon right"></div>40 <div>Move right</div>41 </div>42 <div class="arrow">43 <div class="arrow-icon p">P</div>44 <div>Close menu</div>45 </div>46 </div>47</div>The arrow icon is an SVG that will be rotated using the transform: rotate CSS property based on the arrow direction.
![]()
1.arrow {2 width: 8rem;3 height: 5rem;4 display: flex;5 flex-direction: row;6 align-items: center;7}8
9.arrow-icon {28 collapsed lines
10 background-image: url(./assets/arrow.svg);11 background-size: 100% 100%;12 width: 1.5rem;13 height: 1.5rem;14 margin-right: 0.5rem;15}16
17.arrow-icon.up {18 transform: rotate(-90deg);19}20
21.arrow-icon.down {22 transform: rotate(90deg);23}24
25.arrow-icon.left {26 transform: rotate(-180deg);27}28
29.arrow-icon.p {30 background-image: none;31 display: flex;32 align-items: center;33 justify-content: center;34 font-weight: bold;35 font-size: 1.5rem;36 color: rgba(0, 201, 228, 1);37}Setting up the data model
In this tutorial, we will mock our data directly in JavaScript for faster iteration. However, it is necessary to create all the models directly in the game and use the Gameface data binding to display them in the UI.
To set up the mock data model, first, we will import the cohtml.js library and the player-inventory.js file in our player-inventory.html file.
1<body>2 ...3 <script src="cohtml.js"></script>4 <script src="./js/player-inventory.js"></script>5</body>After that, we can proceed with the data model setup:
1engine.whenReady.then(() => {2 const NO_ACHIEVEMENT_TITLE = "No achievements unlocked";3 const FIRST_GENERATION_DESCRIPTION = "First generation";4
5 const TYPE_LABEL_ENUM = {6 Shuko: "Shuko",7 Ucolos: "Ucolos",8 Arachod: "Arachod"9 };10
11 const QUALITY_LABEL_ENUM = {12 Poor: "Poor",13 Common: "Common",14 Rare: "Rare",15 Unique: "Unique"16 };17
18 const GUNS_DATA = [19 {107 collapsed lines
20 name: "Pistol",21 description: FIRST_GENERATION_DESCRIPTION,22 gold: 1000123,23 image: "assets/weapon1.png",24 quality: QUALITY_LABEL_ENUM.Poor,25 type: TYPE_LABEL_ENUM.Ucolos,26 grade: 5,27 achievementTitle: NO_ACHIEVEMENT_TITLE,28 achievementValue: " ",29 dmgRating: 15,30 rof: 300,31 rounds: 24,32 firepower: "5",33 reload: "25",34 accuracy: "10",35 recoil: "8"36 },37 {38 name: "Rifle",39 description: FIRST_GENERATION_DESCRIPTION,40 gold: 2015017,41 image: "assets/weapon2.png",42 quality: QUALITY_LABEL_ENUM.Poor,43 type: TYPE_LABEL_ENUM.Shuko,44 grade: 25,45 achievementTitle: "Cold Marksman",46 achievementValue: "120% Critical Damage",47 dmgRating: 35,48 rof: 600,49 rounds: 90,50 firepower: "25",51 reload: "55",52 accuracy: "50",53 recoil: "60"54 },55 {56 name: "Blaster",57 description: FIRST_GENERATION_DESCRIPTION,58 gold: 199999,59 image: "assets/weapon3.png",60 quality: QUALITY_LABEL_ENUM.Poor,61 type: TYPE_LABEL_ENUM.Arachod,62 grade: 30,63 achievementTitle: NO_ACHIEVEMENT_TITLE,64 achievementValue: " ",65 dmgRating: 35,66 rof: 900,67 rounds: 60,68 firepower: "55",69 reload: "55",70 accuracy: "5",71 recoil: "60"72 },73 {74 name: "Knife",75 description: FIRST_GENERATION_DESCRIPTION,76 gold: 501010,77 image: "assets/weapon4.png",78 quality: QUALITY_LABEL_ENUM.Poor,79 type: TYPE_LABEL_ENUM.Shuko,80 grade: 15,81 achievementTitle: NO_ACHIEVEMENT_TITLE,82 achievementValue: " ",83 dmgRating: 25,84 rof: 0,85 rounds: 0,86 firepower: "0",87 reload: "0",88 accuracy: "0",89 recoil: "0"90 },91 {92 name: "RPG",93 description: FIRST_GENERATION_DESCRIPTION,94 gold: 3012343,95 image: "assets/weapon5.png",96 quality: QUALITY_LABEL_ENUM.Poor,97 type: TYPE_LABEL_ENUM.Ucolos,98 grade: 70,99 achievementTitle: NO_ACHIEVEMENT_TITLE,100 achievementValue: " ",101 dmgRating: 60,102 rof: 250,103 rounds: 5,104 firepower: "60",105 reload: "25",106 accuracy: "80",107 recoil: "30"108 },109 {110 name: "AWP",111 description: FIRST_GENERATION_DESCRIPTION,112 gold: 4300201,113 image: "assets/weapon6.png",114 quality: QUALITY_LABEL_ENUM.Poor,115 type: TYPE_LABEL_ENUM.Arachod,116 grade: 75,117 achievementTitle: NO_ACHIEVEMENT_TITLE,118 achievementValue: " ",119 dmgRating: 60,120 rof: 250,121 rounds: 35,122 firepower: "60",123 reload: "50",124 accuracy: "80",125 recoil: "80"126 },127 ];128 engine.createJSModel('player', {129 items: GUNS_DATA130 });131
132 engine.synchronizeModels();133});Active item selection
To retrieve the active item, we will use an observable model that will hold the currently selected item. We will create a new model called activeState and set the selectedItem to the first item in the player.items array.
1engine.createJSModel('player', {2   items: GUNS_DATA3});4
5engine.createObservableModel("activeState");6activeState.selectedItem = player.items[0];7
8engine.synchronizeModels();
Focusing the items
To focus the items, we will create a function called onItemFocused that will set the activeState.selectedItem to the item that is currently focused.
1function onItemFocused(event, element, item) {2 activeState.selectedItem = item;3 engine.synchronizeModels();4}Updating the progress bar value
To dynamically update the progress bar value, we will create a new custom data binding attribute called data-bind-progress.
1engine.whenReady.then(() => {2   class Progress {3      init(element, value) {4         element.targetValue = value;5      }6
7      update(element, value) {8         element.targetValue = value;9      }10   }11
12   engine.registerDataBinding('progress', Progress);13});
We will modify the progress bar value using the targetValue property of the element whenever the model’s value changes.
Inventory items navigation
To enable the player to navigate through the items, install the interaction manager library by running npm i coherent-gameface-interaction-manager inside the Content/uiresources/HologramUI/ folder and then import it:
1<script src="./node_modules/coherent-gameface-interaction-manager/dist/interaction-manager.min.js"></script>Once the library is imported, initialize spatial navigation and set the focusable elements to the items in the inventory.
1 interactionManager.spatialNavigation.init(['.player-item']);2 interactionManager.spatialNavigation.focusFirst();We also focus the first item in the inventory so the player can start navigating through the items when the menu opens.
Enabling entry animations for the menus when the player opens the inventory
When the player presses the P button in the game, it will trigger a JS event from the game to the UI as set in the previous tutorial. To handle this event and start the opening animations of our menu, we will subscribe to the openMenu engine event in the player-inventory.js file.
1engine.on('openMenu', () => {2 menu.classList.toggle('hide-screen', false);3});When the event is triggered, we remove the hide-screen class from the menu element so the menu becomes visible and animations start.
Closing the menu
As mentioned in the previous tutorial, closing the menu will be handled from the UI side. We will add a keypress event responsible for this operation. When the player presses the P button, we will close the menu by adding the hide-screen class and enabling the closing animations. Also, we will trigger an event to the engine indicating that the menu is closed.
1document.addEventListener('keypress', (event) => {2 if (event.key === 'p') {3 engine.trigger('closeMenu');4 menu.classList.toggle('hide-screen', true);5 }6});Animations for the menu
For the closing and opening animations of our menu, we will use transitions. We will change the transform property for each screen so they are opened or closed based on whether the hide-screen class is set on the menu element.
1.border-bg-weapon-preview {2 transition: transform 500ms;3}4
5.border-bg-inventory {6 transition: transform 300ms;7}8
9.border-bg-currencies {10 transition: transform 400ms;11}12
13.hide-screen .border-bg-weapon-preview {14 transform: translateX(-2rem) scale(0);15 transition: transform 500ms 300ms;16}17
18.hide-screen .border-bg-inventory {19 transform: translateX(-2rem) scale(0);56 collapsed lines
20 transition: transform 300ms 500ms;21}22
23.hide-screen .border-bg-currencies {24 transform: translateX(-2rem)scale(0);25 transition: transform 400ms 400ms;26}27
28.weapon-preview-wrapper {29 transform-origin: top;30 transform: scale(1);31 transition: transform 500ms 500ms;32}33
34.hide-screen .weapon-preview-wrapper {35 transform: scaleY(0);36 transition: transform 500ms;37}38
39.inventory-wrapper {40 transform-origin: right;41 transform: scale(1);42 transition: transform 500ms 500ms;43}44
45.hide-screen .inventory-wrapper {46 transform: scaleX(0);47 transition: transform 300ms;48}49
50.currencies-wrapper {51 transform-origin: bottom;52 transform: scale(1);53 transition: transform 500ms 500ms;54}55
56.hide-screen .currencies-wrapper {57 transform: scaleY(0);58 transition: transform 400ms;59}60
61.controls {62 display: flex;63 flex-direction: row;64 align-items: center;65 width: 100%;66 margin-top: 1.5rem;67 transform-origin: bottom;68 transform: scale(1);69 transition: transform 500ms 500ms;70}71
72.hide-screen .controls {73 transform: scaleY(0);74 transition: transform 400ms;75}As you can see, we added a small delay between the animations so they do not all start at the same time. This will give a better visual effect when the menu is opened or closed.
Full source code
1<!DOCTYPE html>2<html lang="en">3
4<head>5 <link6 rel="stylesheet"7 href="node_modules/coherent-gameface-progress-bar/coherent-gameface-components-theme.css"8 >9 <link188 collapsed lines
10 rel="stylesheet"11 href="node_modules/coherent-gameface-progress-bar/style.css"12 >13 <link rel="stylesheet" href="player-inventory-styles.css">14</head>15
16<body>17 <div class='menu'>18 <div class="menu-left">19 <div class="submenu-top">20 <div class="border-bg border-bg-weapon-preview">21 <div class="overlay-lines border-radius-lines"></div>22 </div>23 <div class="submenu-wrapper weapon-preview-wrapper">24 <div class="menu-item-title">Weapon preview</div>25 <div class="menu-selected-item-preview">26 <div27 class="selected-item-image"28 data-bind-style-background-image-url="{{activeState.selectedItem.image}}"29 ></div>30 </div>31 <div class="menu-item-title">Stats</div>32 <div class="menu-item-container">33 <div class="menu-item-stats-wrapper">34 <div class="menu-item-stat">35 <div class="menu-item-stat-label">Name</div>36 <div37 class="menu-item-stat-value"38 data-bind-value="{{activeState.selectedItem.name}}"39 ></div>40 </div>41 <div class="menu-item-stat">42 <div class="menu-item-stat-label">Description</div>43 <div44 class="menu-item-stat-value"45 data-bind-value="{{activeState.selectedItem.description}}"46 ></div>47 </div>48 <div class="menu-item-stat">49 <div class="menu-item-stat-label">Firepower</div>50 <div class="menu-item-stat-value">51 <gameface-progress-bar52 animation-duration="500"53 data-bind-progress="{{activeState.selectedItem.firepower}}"54 ></gameface-progress-bar>55 <span56 class="stat-text-value"57 data-bind-value="{{activeState.selectedItem.firepower}}+'%'"58 ></span>59 </div>60 </div>61 <div class="menu-item-stat">62 <div class="menu-item-stat-label">Reload</div>63 <div class="menu-item-stat-value">64 <gameface-progress-bar65 animation-duration="500"66 data-bind-progress="{{activeState.selectedItem.reload}}"67 ></gameface-progress-bar>68 <span69 class="stat-text-value"70 data-bind-value="{{activeState.selectedItem.reload}}+'%'"71 ></span>72 </div>73 </div>74 <div class="menu-item-stat">75 <div class="menu-item-stat-label">Accuracy</div>76 <div class="menu-item-stat-value">77 <gameface-progress-bar78 animation-duration="500"79 data-bind-progress="{{activeState.selectedItem.accuracy}}"80 ></gameface-progress-bar>81 <span82 class="stat-text-value"83 data-bind-value="{{activeState.selectedItem.accuracy}}+'%'"84 ></span>85 </div>86 </div>87 <div class="menu-item-stat">88 <div class="menu-item-stat-label">Recoil</div>89 <div class="menu-item-stat-value">90 <gameface-progress-bar91 animation-duration="500"92 data-bind-progress="{{activeState.selectedItem.recoil}}"93 ></gameface-progress-bar>94 <span95 class="stat-text-value"96 data-bind-value="{{activeState.selectedItem.recoil}}+'%'"97 ></span>98 </div>99 </div>100 </div>101 </div>102 </div>103 </div>104 </div>105 <div class="menu-right">106 <div class="submenu-top">107 <div class="border-bg border-bg-inventory">108 <div class="overlay-lines border-radius-lines"></div>109 </div>110 <div class="submenu-wrapper inventory-wrapper">111 <div class="menu-item-title">Inventory (6)</div>112 <div class="menu-item-container">113 <div114 class="player-item-wrapper"115 data-bind-for="item:{{player.items}}"116 >117 <div118 class="player-item"119 data-bind-mouseover="onItemFocused(event,this,{{item}})"120 data-bind-focus="onItemFocused(event,this,{{item}})"121 >122 <div123 data-bind-class-toggle="player-item-selected:{{item}}==={{activeState.selectedItem}}"124 class="player-item-background"125 ></div>126 <div127 data-bind-if="{{item}}==={{activeState.selectedItem}}"128 class="overlay"129 >130 <div class="overlay-lines"></div>131 <div class="overlay-radial"></div>132 </div>133 <div134 class="player-item-image"135 data-bind-style-background-image-url="{{item.image}}"136 ></div>137 </div>138 </div>139 </div>140 </div>141 </div>142 <div class="submenu-bottom">143 <div class="border-bg border-bg-currencies">144 <div class="overlay-lines border-radius-lines"></div>145 </div>146 <div class="submenu-wrapper currencies-wrapper">147 <div class="menu-item-title">Currencies</div>148 <div class="menu-item-container">149 <div class="menu-item-stat">150 <div class="menu-item-stat-label">151 <div class="icon icon-money"></div>152 </div>153 <div154 class="menu-item-stat-value currency"155 data-bind-value="{{activeState.selectedItem.gold}}"156 ></div>157 </div>158 <div class="menu-item-stat">159 <div class="menu-item-stat-label">160 <div class="icon icon-currency"></div>161 </div>162 <div class="menu-item-stat-value currency">155 230 500</div>163 </div>164 </div>165 </div>166 <div class="controls">167 <div class="arrow">168 <div class="arrow-icon up"></div>169 <div>Move up</div>170 </div>171 <div class="arrow">172 <div class="arrow-icon down"></div>173 <div>Move down</div>174 </div>175 <div class="arrow">176 <div class="arrow-icon left"></div>177 <div>Move left</div>178 </div>179 <div class="arrow">180 <div class="arrow-icon right"></div>181 <div>Move right</div>182 </div>183 <div class="arrow">184 <div class="arrow-icon p">P</div>185 <div>Close menu</div>186 </div>187 </div>188 </div>189 </div>190 </div>191 <script src="../javascript/cohtml.js"></script>192 <script src="./node_modules/coherent-gameface-progress-bar/dist/progress-bar.production.min.js"></script>193 <script src="./node_modules/coherent-gameface-interaction-manager/dist/interaction-manager.min.js"></script>194 <script src="./js/player-inventory.js"></script>195</body>196
197</html>1html {2 font-size: 1.5vh;3}4
5body {6 width: 100vw;7 height: 100vh;8 margin: 0;9}427 collapsed lines
10
11.overlay,12.overlay-lines,13.overlay-radial {14 pointer-events: none;15 position: absolute;16 width: 100%;17 height: 100%;18 top: 0;19 left: 0;20 right: 0;21 bottom: 0;22 z-index: 999;23}24
25.overlay {26 mask-image: radial-gradient(circle, rgba(0, 0, 0, 1) 0%, rgba(0, 0, 0, 0.5327380952380952) 65%, rgba(255, 255, 255, 0) 100%);27 mask-size: 90% 90%;28 mask-position: center;29}30
31.overlay-lines {32 background-image: linear-gradient(rgba(0, 200, 228, 0.1) 0%, rgba(0, 200, 228, 0.1) 30%, rgba(255, 255, 255, 0) 30%, rgba(255, 255, 255, 0) 100%);33 background-size: 100% 0.5rem;34 animation: overlay-anim 3s forwards linear infinite;35}36
37@keyframes overlay-anim {38 from {39 background-position: 0% 0%;40 }41
42 to {43 background-position: 0% -10%;44 }45}46
47.overlay-radial {48 background-image: radial-gradient(circle, rgba(0, 200, 228, 0.2) 0%, rgba(255, 255, 255, 0) 90%, rgba(255, 255, 255, 0) 100%);49 background-size: 200%;50 background-position: center;51 background-repeat: no-repeat;52 opacity: 0;53 animation: overlay-radial-anim 3s forwards linear infinite;54 z-index: 998;55}56
57@keyframes overlay-radial-anim {58 0% {59 opacity: 0;60 }61
62 1% {63 opacity: 1;64 }65
66 5% {67 opacity: 0;68 }69
70 19% {71 opacity: 0;72 }73
74 20% {75 opacity: 1;76 }77
78 25% {79 opacity: 0;80 }81
82 59% {83 opacity: 0;84 }85
86 60% {87 opacity: 1;88 }89
90 65% {91 opacity: 0;92 }93
94 100% {95 opacity: 0;96 }97}98
99.menu {100 background-color: rgb(0, 0, 0, 0);101 color: white;102 width: 100vw;103 height: 100vh;104 position: absolute;105 display: flex;106 align-items: center;107 justify-content: center;108 display: flex;109 perspective: 1000px;110 opacity: 1;111}112
113.menu-left,114.menu-right {115 height: 100%;116 padding: 1rem;117}118
119.menu-left {120 margin-left: 1rem;121 flex: 1 1 30%;122 transform: rotateY(20deg) skewY(-3deg) translateY(-1rem);123 transform-origin: center left;124}125
126.menu-right {127 transform: translateX(-5rem);128 flex: 1 1 70%;129 perspective: 1000px;130}131
132.submenu-top {133 transform: scale(0.9) rotateY(-4deg);134 transform-origin: top right;135 height: 70%;136 position: relative;137}138
139.submenu-bottom {140 width: 97.5%;141 transform: scale(0.9) rotateY(-4deg) rotateX(10deg) skewY(0deg) skewX(-10deg) translateX(5%) translateY(-5%);142 transform-origin: center;143 height: 25%;144 position: relative;145}146
147.menu-item-title {148 background-color: rgba(0, 121, 137, 0.9);149 display: flex;150 font-size: 2rem;151 padding: 1rem 3rem 1rem 3rem;152}153
154.menu-item-container {155 background-color: rgba(0, 39, 44, 0.5);156 display: flex;157 flex-wrap: wrap;158 align-content: flex-start;159 flex: 1 0 auto;160 padding: 1rem 3rem 1rem 3rem;161
162}163
164.menu-selected-item-preview {165 background-color: rgba(0, 39, 44, 0.9);166 display: flex;167 align-content: center;168 justify-content: center;169 width: 100%;170 height: 30%;171 padding: 1rem 3rem 1rem 3rem;172}173
174.player-item-wrapper {175 z-index: 1001;176}177
178.player-item {179 margin: 1rem;180 position: relative;181 width: 14rem;182 height: 14rem;183 display: flex;184 justify-content: center;185 align-items: center;186 z-index: 2001;187}188
189.player-item-background {190 pointer-events: none;191 width: 100%;192 height: 100%;193 position: absolute;194 background-color: rgb(0, 59, 67);195 border: 0.2rem solid rgba(255, 255, 255, 0.133);196 transition: background-color 0.3s, border 0.3s;197 z-index: 1;198 border-radius: 1.5rem;199
200}201
202.player-item-selected {203 background-color: rgba(0, 83, 94, 0.9);204 border: 0.2rem solid rgba(255, 255, 255, 0.8);205}206
207.player-item-image {208 pointer-events: none;209 width: 60%;210 height: 60%;211 background-size: contain;212 background-repeat: no-repeat;213 background-position: center;214 z-index: 1;215}216
217.menu-bottom {218 transform: rotateX(-4deg);219}220
221.h-30 {222 height: 30%;223}224
225.h-60 {226 height: 60%;227}228
229.h-70 {230 height: 70%;231}232
233
234.selected-item-image {235 width: 90%;236 height: 90%;237 background-size: contain;238 background-repeat: no-repeat;239 background-position: center;240}241
242.menu-item-stats-wrapper {243 display: flex;244 flex-direction: column;245 width: 100%;246 height: 100%;247}248
249.menu-item-stat {250 display: flex;251 flex-direction: row;252 align-items: center;253 width: 100%;254 padding: 1rem;255 font-size: 1.3rem;256}257
258.menu-item-stat-label {259 flex-basis: 8rem;260}261
262.menu-item-stat-value {263 height: 1.2rem;264 flex: 1 0 0;265 display: flex;266 flex-direction: row;267 align-items: center;268}269
270gameface-progress-bar {271 flex: 1 0 0;272}273
274.stat-text-value {275 width: 5%;276 margin-left: 1rem;277 display: flex;278 justify-content: center;279}280
281.icon {282 background-repeat: no-repeat;283 background-position: left center;284 background-size: contain;285 height: 3rem;286}287
288.icon-currency {289 background-image: url(./assets/iconCurrency.png);290}291
292.icon-money {293 background-image: url(./assets/money.png);294}295
296.currency {297 font-size: 1.6rem;298}299
300.border-bg {301 position: absolute;302 width: 108%;303 height: 106%;304 border-image-source: url(./assets/border.png);305 border-image-slice: 60;306 border-image-width: 3.5rem;307 border-image-outset: 0;308 border-image-repeat: stretch;309 z-index: -1;310 transform: translateX(-2rem) scale(1);311 top: 1rem;312}313
314.border-bg-weapon-preview {315 transition: transform 500ms;316}317
318.border-bg-inventory {319 transition: transform 300ms;320}321
322.border-bg-currencies {323 transition: transform 400ms;324}325
326.hide-screen .border-bg-weapon-preview {327 transform: translateX(-2rem) scale(0);328 transition: transform 500ms 300ms;329}330
331.hide-screen .border-bg-inventory {332 transform: translateX(-2rem) scale(0);333 transition: transform 300ms 500ms;334}335
336.hide-screen .border-bg-currencies {337 transform: translateX(-2rem)scale(0);338 transition: transform 400ms 400ms;339}340
341.border-radius-lines {342 border-radius: 4rem;343}344
345.submenu-wrapper {346 border-radius: 4rem;347 overflow: hidden;348 height: 100%;349}350
351.weapon-preview-wrapper {352 transform-origin: top;353 transform: scale(1);354 transition: transform 500ms 500ms;355}356
357.hide-screen .weapon-preview-wrapper {358 transform: scaleY(0);359 transition: transform 500ms;360}361
362.inventory-wrapper {363 transform-origin: right;364 transform: scale(1);365 transition: transform 500ms 500ms;366}367
368.hide-screen .inventory-wrapper {369 transform: scaleX(0);370 transition: transform 300ms;371}372
373.currencies-wrapper {374 transform-origin: bottom;375 transform: scale(1);376 transition: transform 500ms 500ms;377}378
379.hide-screen .currencies-wrapper {380 transform: scaleY(0);381 transition: transform 400ms;382}383
384.controls {385 display: flex;386 flex-direction: row;387 align-items: center;388 width: 100%;389 margin-top: 1.5rem;390 transform-origin: bottom;391 transform: scale(1);392 transition: transform 500ms 500ms;393}394
395.hide-screen .controls {396 transform: scaleY(0);397 transition: transform 400ms;398}399
400.arrow {401 width: 8rem;402 height: 5rem;403 display: flex;404 flex-direction: row;405 align-items: center;406}407
408.arrow-icon {409 background-image: url(./assets/arrow.svg);410 background-size: 100% 100%;411 width: 1.5rem;412 height: 1.5rem;413 margin-right: 0.5rem;414}415
416.arrow-icon.up {417 transform: rotate(-90deg);418}419
420.arrow-icon.down {421 transform: rotate(90deg);422}423
424.arrow-icon.left {425 transform: rotate(-180deg);426}427
428.arrow-icon.p {429 background-image: none;430 display: flex;431 align-items: center;432 justify-content: center;433 font-weight: bold;434 font-size: 1.5rem;435 color: rgba(0, 201, 228, 1);436}1const menu = document.querySelector('.menu');2
3engine.whenReady.then(() => {4 class Progress {5 init(element, value) {6 element.targetValue = value;7 }8
9 update(element, value) {10 element.targetValue = value;11 }12 }13 engine.registerBindingAttribute('progress', Progress);14 engine.on('openMenu', () => {15 menu.classList.toggle('hide-screen', false);16 });17
18 document.addEventListener('keypress', (event) => {19 if (event.key === 'p') {148 collapsed lines
20 engine.trigger('closeMenu');21 menu.classList.toggle('hide-screen', true);22 }23 });24
25 const NO_ACHIEVEMENT_TITLE = "No achievements unlocked";26 const FIRST_GENERATION_DESCRIPTION = "First generation";27
28 const TYPE_LABEL_ENUM = {29 Shuko: "Shuko",30 Ucolos: "Ucolos",31 Arachod: "Arachod"32 };33
34 const QUALITY_LABEL_ENUM = {35 Poor: "Poor",36 Common: "Common",37 Rare: "Rare",38 Unique: "Unique"39 };40
41 const GUNS_DATA = [42 {43 name: "Pistol",44 description: FIRST_GENERATION_DESCRIPTION,45 gold: 1000123,46 image: "assets/weapon1.png",47 quality: QUALITY_LABEL_ENUM.Poor,48 type: TYPE_LABEL_ENUM.Ucolos,49 grade: 5,50 achievementTitle: NO_ACHIEVEMENT_TITLE,51 achievementValue: " ",52 dmgRating: 15,53 rof: 300,54 rounds: 24,55 firepower: "5",56 reload: "25",57 accuracy: "10",58 recoil: "8"59 },60 {61 name: "Rifle",62 description: FIRST_GENERATION_DESCRIPTION,63 gold: 2015017,64 image: "assets/weapon2.png",65 quality: QUALITY_LABEL_ENUM.Poor,66 type: TYPE_LABEL_ENUM.Shuko,67 grade: 25,68 achievementTitle: "Cold Marksman",69 achievementValue: "120% Critical Damage",70 dmgRating: 35,71 rof: 600,72 rounds: 90,73 firepower: "25",74 reload: "55",75 accuracy: "50",76 recoil: "60"77 },78 {79 name: "Blaster",80 description: FIRST_GENERATION_DESCRIPTION,81 gold: 199999,82 image: "assets/weapon3.png",83 quality: QUALITY_LABEL_ENUM.Poor,84 type: TYPE_LABEL_ENUM.Arachod,85 grade: 30,86 achievementTitle: NO_ACHIEVEMENT_TITLE,87 achievementValue: " ",88 dmgRating: 35,89 rof: 900,90 rounds: 60,91 firepower: "55",92 reload: "55",93 accuracy: "5",94 recoil: "60"95 },96 {97 name: "Knife",98 description: FIRST_GENERATION_DESCRIPTION,99 gold: 501010,100 image: "assets/weapon4.png",101 quality: QUALITY_LABEL_ENUM.Poor,102 type: TYPE_LABEL_ENUM.Shuko,103 grade: 15,104 achievementTitle: NO_ACHIEVEMENT_TITLE,105 achievementValue: " ",106 dmgRating: 25,107 rof: 0,108 rounds: 0,109 firepower: "0",110 reload: "0",111 accuracy: "0",112 recoil: "0"113 },114 {115 name: "RPG",116 description: FIRST_GENERATION_DESCRIPTION,117 gold: 3012343,118 image: "assets/weapon5.png",119 quality: QUALITY_LABEL_ENUM.Poor,120 type: TYPE_LABEL_ENUM.Ucolos,121 grade: 70,122 achievementTitle: NO_ACHIEVEMENT_TITLE,123 achievementValue: " ",124 dmgRating: 60,125 rof: 250,126 rounds: 5,127 firepower: "60",128 reload: "25",129 accuracy: "80",130 recoil: "30"131 },132 {133 name: "AWP",134 description: FIRST_GENERATION_DESCRIPTION,135 gold: 4300201,136 image: "assets/weapon6.png",137 quality: QUALITY_LABEL_ENUM.Poor,138 type: TYPE_LABEL_ENUM.Arachod,139 grade: 75,140 achievementTitle: NO_ACHIEVEMENT_TITLE,141 achievementValue: " ",142 dmgRating: 60,143 rof: 250,144 rounds: 35,145 firepower: "60",146 reload: "50",147 accuracy: "80",148 recoil: "80"149 },150 ];151 engine.createJSModel('player', {152 items: GUNS_DATA153 });154
155 engine.createObservableModel("activeState");156 activeState.selectedItem = player.items[0];157
158 engine.synchronizeModels();159
160 interactionManager.spatialNavigation.init(['.player-item']);161 interactionManager.spatialNavigation.focusFirst();162});163
164function onItemFocused(event, element, item) {165 activeState.selectedItem = item;166 engine.synchronizeModels();167}