In-game highlights
5/16/2024
Kaloyan Geshev
Engaging with objects in a game’s 3D environment becomes intuitive when players receive guidance on how to interact with and identify each item.
Implementing such guidance over highlighted objects within a game is straightforward with Gameface. Achieving this involves creating UI elements using HTML, CSS, and JavaScript, then positioning them over in-game objects using its built-in data binding feature.
Showcase Overview
In this demonstration, we’ve accomplished the following:
- Developed UI elements using HTML and CSS to present game tips.
- Linked these elements with a mock game model to simulate the visualization of tips over items in the game. Utilizing data binding instead of plain JavaScript ensures the UI is structured for easy integration with the game engine.
- Introduced dummy items and applied 3D transforms to mimic the in-game experience.
The primary focus of this demonstration is to showcase how to display item tips and highlights using data binding in Gameface, with additional enhancements for a more immersive experience.
In this sample we have done the following:
- Created UI elements via HTML and CSS that presenting game tips.
- Bounded the elements with a mock game model to simulate tips visualization over items in the game. The purpose of using data-binding over plain javascript is to struct the UI for easy binding it with the game from the engine when it is integrated.
- Added dummy items with 3d transforms to simulate in-game experience.
The focus of this sample is to demonstrate how to render tips using the data-binding in Gameface and with a bonus for a greater experience.
Source location
You can find the complete sample source within the ${Gameface package}/Samples/uiresources/UITutorials/InGameHighlights directory.
To review it, simply run the index.html page in Gameface.
Showing tips in detail
Defining the data model structure that the UI receives
The structure of the game model, which the UI receives, is as follows:
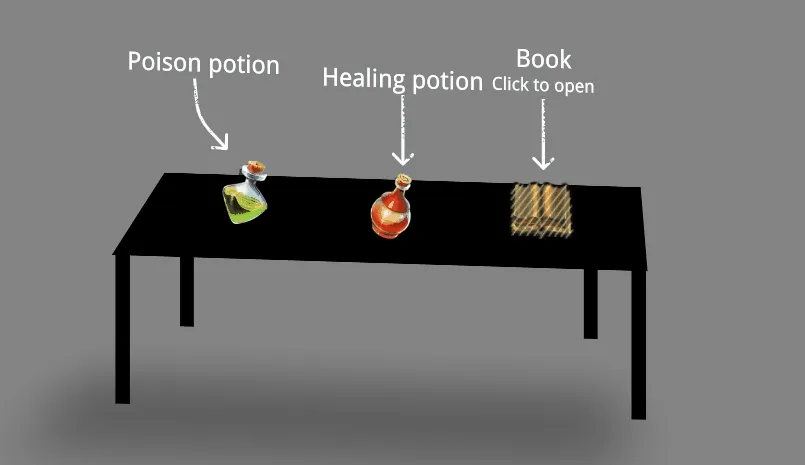
1const model = {2 items: [3 {4 label: 'Poison potion',5 isShown: true,6 highlightTip: 'Click to use',7 transform: '1,0,0,1,420,360',8 arrowDirection: 'down-right',9 },10 {11 label: 'Healing potion',12 isShown: true,13 highlightTip: 'Click to use',14 transform: '1,0,0,1,625,370',15 arrowDirection: 'down',16 },17 {18 label: 'Book',19 isShown: true,20 highlightTip: 'Click to open',21 transform: '1,0,0,1,770,370',22 arrowDirection: 'down',23 },24 ],25 currentItem: 0,26};label- Specifies the item’s label.highlightTip- Indicates the tip message displayed when the item is highlighted.arrowDirection-Determines the arrow to display; the sample usesdownanddown-right.transform- Specifies the tip’s position. This crucial property should originate from the game model when injecting UI into the engine. Upon integration, the position is calculated within the game and should be updated in the model based on the item’s position. The sample includes mock values for demonstration purposes.currentItem- Identifies the currently highlighted item.zIndexandisShown- Control the tip’s visibility or its visibility over another tip.
Setting up the UI elements
Initially, we create UI elements to present tips when an item is highlighted in the game. This is achieved through the following HTML structure:
1<body>2 <div3 class="item-wrapper"4 data-bind-for="index,item:{{model.items}}"5 >6 <div7 class="item"8 data-bind-style-transform2d="{{item.transform}}"9 data-bind-style-z-index="{{item.zIndex}}"10 data-bind-if={{item.isShown}}11 >12 <div class="item-label" data-bind-value="{{item.label}}"></div>13 <div14 class="item-highlight-tip"15 data-bind-class-toggle="active:{{model.currentItem}} === {{index}}"16 data-bind-value="{{item.highlightTip}}"17 ></div>18 <div class="item-arrow-hightlight" data-bind-class="{{item.arrowDirection}}"></div>19 </div>20 </div>21 </div>22</body>Through data binding, the UI elements are linked with data from the game model, ensuring that changes in the model reflect in the UI.
Item styles specifics
For data-bind-transform2d to function properly, it’s essential to position the items absolutely on the page. Additionally, in our sample, we’ve implemented the highlight tip by elevating the label of each item. This is accomplished by applying display: flex to the item and configuring the flex-direction as column. Furthermore, to move the label upwards, we adjust the bottom and left properties to 0.
1.item {2 position: absolute;3 bottom: 0;4 left: 0;5 display: flex;6 flex-direction: column;7 align-items: center;8}This setup establishes in-game highlight tips, assuming the presence of a game with a defined and updated data model.
Additional details for the demo
To enhance the sample’s presentation and simulate a realistic game experience, additional modifications have been made. These modifications aim to mimic a genuine game experience when previewing the sample in the standalone Gameface Player. As they are not integral to the actual in-game highlights, we won’t elaborate on them here. However, you can preview all changes in the sample’s source, available at the URL mentioned in the sample source section.