Multiplayer UI - Create login screen and friends list (Part 1)
7/31/2024
Kaloyan Geshev
This tutorial is the first part of the posts about creating a UI for a multiplayer game.
You can find the rest Multiplayer UI series here.
Making a multiplayer game requires users to log into their account before playing. User accounts are essential for connecting players in the game and lobby. They also enable features like adding friends, chatting, viewing other players’ stats, and inviting users to game sessions.
Prerequisites
In this tutorial, we will use React 18 with React Router 6 for the frontend and Express for the Backend part.
Additionally, we’ll utilize our components: scrollable container and Grid .
Showcase Overview
In this example, we will create a multiplayer game UI featuring login and registration screens, and a friends list that shows their names, with options to add or remove friends.
The game server will handle API calls from the UI.
Note: When testing the sample, avoid entering sensitive information during registration. Passwords are stored as plain text in the database for testing purposes.
Source location
You can find the complete sample source within the ${Gameface package}/Samples/uiresources/UITutorials/MultiplayerUI directory.
srcfolder contains the UI source code.apifolder contains the Express server source code.
Refer to the README.md file in this directory for information on running the sample locally or previewing it without building or starting any processes.
Getting started - Backend
We will begin by setting up the backend using Express. To start, install the required modules:
1npm i express mongoose express-session cors connect-mongoServer index
The index.js file for our server will establish a connection to the database and start the server on port 3000. We have already set up a cloud MongoDB database and hardcoded the URL into the server index file.
1const express = require('express');2const mongoose = require('mongoose');3const router = require('./config/router');4const session = require('express-session');5const cors = require('cors');6const app = express();7const port = 3000;8const MongoStore = require('connect-mongo');9const { createServer } = require('node:http');10const path = require('node:path');11const server = createServer(app);12
13app.use(express.static(path.join(__dirname, '../dist'))); // Serve the frontend build folder if we choose to load the UI from the server. However, we suggest not loading your UI from the server and instead directly loading the index.html file in Gameface14
15app.use(cors())16app.use(express.json());17const mongoUrl = 'mongodb+srv://kaloyang:788DaVnkzXAfh8Q6@clsamples.pgjogro.mongodb.net/CLSampleDB?retryWrites=true&w=majority&appName=CLSamples';18mongoose.connect(mongoUrl);19
20const db = mongoose.connection;21db.on('error', console.error.bind(console, 'connection error:'));22db.once('open', () => {23    console.log('Connected to MongoDB');24});25
26app.set('trust proxy', 1)27app.use(session({28    secret: 'some secret',29    resave: false,30    name: 'api-session-key',31    saveUninitialized: true,32    store: MongoStore.create({ mongoUrl }),33    cookie: { maxAge: 1000 * 60 * 60 }, // 1 hour34}))35
36app.use('/api', router);37
38// Serve the index.html for any GET requests if we load the UI from the server, which is an option that works in Gameface but not suggested.39app.get('*', (req, res) => {40    res.sendFile(path.join(__dirname, '../dist', 'index.html'));41});42
43// Start the server44server.listen(port, () => {45    console.log(`Server is running at http://localhost:${port}`);46});
Here, the frontend is expected to be built inside the ../dist folder so the server can serve it.
API routes
With the entry file for the server set up, we need to configure API routes. In this sample, we have user-related routes with the following entry points:
1const express = require('express');2const router = express.Router();3
4require('./routes/user')(router);5
6module.exports = router;1const UserController = require('../../controllers/userController');2const auth = require('../../middlewares/auth');3const idValidator = require('../../middlewares/idValidator');4
5module.exports = (router) => {6 router.post('/login', UserController.login); // Handle user login7 router.post('/logout', UserController.logout); // Handle user logout8 router.post('/register', UserController.register); // Handle new user registration9 router.get('/users/:id', auth, idValidator, UserController.getUser); // Get the user data10 router.put('/users/:id', auth, idValidator, UserController.updateUser); // Update the user data11 router.get('/users/:id/potential-friends', auth, UserController.getPotentialFriends); // Get potential friends for a specific user12 router.get('/users/:id/friends', auth, idValidator, UserController.getUserFriends); // Get the friends list of a user13 router.post('/users/:id/add-friend', auth, idValidator, UserController.addFriend); // Add another user as a friend14 router.post('/users/:id/remove-friend', auth, idValidator, UserController.removeFriend); // Remove user from friends list15};Middlewares
Certain routes are protected using middlewares such as auth, which verifies if a user is logged in, and idValidator, which checks if a valid user ID is present in the request parameters.
1const sessions = require("../db/sessions");2
3module.exports = async (req, res, next) => {4    const sessionId = req.headers['session-id'];5    if (!sessionId) return res.status(404).send('Unauthorized');6
7    const session = await sessions.findOne({ _id: sessionId });8    if (session && session.expires >= new Date()) return next();9
10    res.status(404).send('Unauthorized');11}
To authenticate a user, we check for an existing session and confirm that it has not expired. The session expiration date is stored in the database. Since Gameface does not store session cookies on the frontend, requests should include the session-id header containing the session ID generated by the backend and stored in Gameface’s localStorage.
1const { ObjectId } = require("mongodb");2
3module.exports = (req, res, next) => {4    if (!ObjectId.isValid(req.params.id)) return res.status(404).send('Not valid id!');5    next();6}
This middleware validates whether the request from the frontend includes a valid MongoDB ID in the id parameter.
User database schema
After connecting to the database, we need to define the schema for the users table.
1const mongoose = require('mongoose');2
3const schema = new mongoose.Schema({4    firstName: String,5    lastName: String,6    email: String,7    password: String,8    status: Boolean,9    friends: [{ type: String }]10});11
12module.exports = mongoose.model('user', schema);
Once the schema is defined, we can use the model to access user data in the database.
Sessions database schema
To store user sessions when they log in, we need an additional table in the database with the following structure.
1const mongoose = require('mongoose');2
3const schema = new mongoose.Schema({4    expires: Date,5    session: String,6    _id: String,7});8
9module.exports = mongoose.model('sessions', schema);
User controller
The User Controller manages requests and returns relevant responses by performing operations with the database.
For example, fetching user data is accomplished with the following code:
1...2const User = require('../db/users'); // Get the user model so we can make calls to the database3...4class UserController {5 ...6 async getUser(req, res) {7 const user = await User.findById(req.params.id); // Find the user by id and return its data8 if (!user) {9 return res.status(404).send('User not found');10 }11 res.json(user);12 }13 ...14}Attention needs to be given to how users can log in or log out of our game. For user login, the backend should receive the user’s email, password, and session data. As previously mentioned, we store the session-id in localStorage in Gameface since there are no cookies. The frontend must pass the session-id header when making a login request to check if the user is already logged in.
Once the session is checked, we need to validate the user’s email and password. If the database does not contain a user with the provided email and password, the login request is denied. If the credentials are correct, the user’s status is set to true, and the sessionId along with user data is returned so the frontend can recognize a successful login.
Logging out is straightforward: change the user’s status to false and delete the relevant session from the database.
1class UserController {2   ...3   async login(req, res) {4      const sessionId = req.headers['session-id'];5      if (sessionId && await sessions.findOne({ _id: sessionId })) return res.send(sessionId);6
7      const user = await User.findOne({ email: req.body.email, password: req.body.password });8      if (!user) return res.status(404).send('Wrong email or password!');9      user.status = true; // Change the user status to true10      await user.save(); // Save the changed status11      res.json({ id: user._id.toString(), sessionId: req.sessionID, firstName: user.firstName, lastName: user.lastName });12   }13   ...14   async logout(req, res) {15      const sessionId = req.headers['session-id'];16      const userId = req.headers['user-id'];17      if (!sessionId) return res.status(200).send(); // If there is no session there is no user for logging out18
19 if (!await changeUserStatus(userId, sessionId, false)) return res.status(200).send(); // Change the status to false20 await sessions.deleteOne({ _id: sessionId }); // Delete the session from the sessions table21 res.status(200).send();22 }23 ...24}1async function changeUserStatus(userId, sessionId, status) {2 if (!userId) return false;3 if (!sessionId && !await sessions.findOne({ _id: sessionId })) return false;4
5 const user = await users.findById(userId);6 if (!user) return false;7 user.status = status;8 await user.save();9
10 return true;11}For more information on other handlers, refer to /api/controllers/userController.js.
With this basic backend setup, we can proceed to the frontend.
Getting started - Frontend
For the frontend, we will use the React framework. To avoid going into extensive detail, you can open the entire project in ${Gameface package}/Samples/uiresources/UITutorials/MultiplayerUI and check the following:
- README.md - Contains information on how to run the sample.
- package.json - Includes scripts for building the frontend, starting the server, etc.
- webpack.config.js - Contains the webpack configuration that bundles the frontend source.
- src folder - Holds the frontend source code.
Now, let’s focus on some details about the frontend.
React router and routes
We want our sample to have three pages: Login, Register, and Home. For this, we can use React Router. The home screen will have sub-routes for the friends list and adding friends.
1const App = () => (2 <HashRouter basename='/'>3 <AuthProvider>4 <Routes>5 <Route path='/' element={<ProtectedRoute><Home /></ProtectedRoute>} >6 <Route index element={<Friends />} />7 <Route path="/add-friends" element={<AddFriends />} />8 </Route>9 <Route path='/register' element={<Register />} />10 <Route path='/login' element={<Login />} />11 </Routes>12 </AuthProvider>13 </HashRouter>14);Here, the <ProtectedRoute> component acts as a wrapper to grant access to the home page if you are logged in. If not, you will be redirected to the login page.
1export const ProtectedRoute = ({ children }) => {2    const { user } = useAuth();3    if (!user) return <Navigate to="/login" />4
5    return children;6}
The protected route checks for a logged-in user via the useAuth hook, which utilizes the AuthContext to provide user data.
1import React, { createContext, useContext, useMemo } from "react";2import { useNavigate } from "react-router-dom";3import { useLocalStorage } from "./useLocalStorage";4const AuthContext = createContext();5
6export const AuthProvider = ({ children }) => {7    const [user, setUser] = useLocalStorage("user", null);8    const navigate = useNavigate();9
10    const login = async (data) => {11        setUser(data);12    };13
14    const logout = () => {15        setUser(null);16        navigate("/login", { replace: true });17    };18
19    const value = useMemo(20        () => ({21            user,22            login,23            logout,24        }),25        [user]26    );27    return <AuthContext.Provider value={value}>{children}</AuthContext.Provider>;28};29
30export const useAuth = () => {31    return useContext(AuthContext);32};
To handle user data in localStorage, we use an additional hook, useLocalStorage. This hook stores or retrieves an item from localStorage based on the provided key. It also uses a default value if the key is not found in localStorage.
1import { useState } from "react";2
3export const useLocalStorage = (key, defaultValue = null) => {4    const [storedValue, setStoredValue] = useState(() => {5        try {6            const value = localStorage.getItem(key);7            if (value) return JSON.parse(value);8
9            localStorage.setItem(key, JSON.stringify(defaultValue));10            return defaultValue;11        } catch (err) {12            return defaultValue;13        }14    });15
16    const setValue = (newValue) => {17        try {18            localStorage.setItem(key, newValue);19        } catch (err) {20            console.log(err);21        }22        setStoredValue(newValue);23    };24
25    return [storedValue, setValue];26};
Making requests to the backend
As a frontend developer, you typically use the fetch method to make requests to the backend. However, fetch is not supported by Gameface, so you should use XMLHttpRequest instead. Since we’ll be making these requests frequently, it’s practical to create a reusable hook. Additionally, we need to send the session ID and user ID as headers with each request. To facilitate this, we can use other hooks like useLocalStorage within our custom useFetch hook to retrieve the user data.
1import { useNavigate } from 'react-router-dom';2import { useLocalStorage } from './useLocalStorage';3
4const useFetch = () => {5    const [user, setUser] = useLocalStorage('user');6    const navigate = useNavigate();7
8    const fetch = (method, url, body) => {9        return new Promise((resolve, reject) => {10            const xhr = new XMLHttpRequest();11            xhr.open(method, url);12            if (user) {13                xhr.setRequestHeader('session-id', user.sessionId);14                xhr.setRequestHeader('user-id', user.id);15            }16            xhr.setRequestHeader('Content-Type', 'application/json;charset=UTF-8');17            xhr.send(JSON.stringify(body));18            xhr.onload = function () {19                if (xhr.status === 200) return resolve([xhr, null]);20
21                if (xhr.responseText === 'Unauthorized') {22                    setUser(null);23                    navigate('/login');24                }25                console.error(`Error ${xhr.status}: ${xhr.responseText}`);26                return resolve([xhr, `${xhr.responseText}`]);27            };28            xhr.onerror = function () {29                resolve([xhr, `An error occured!`]);30            };31        })32    }33
34    return fetch;35}36
37export default useFetch;
In this hook, const [user, setUser] = useLocalStorage('user'); retrieves the user data.
If user data is stored in localStorage, we set the request headers after opening the xhr.
1const xhr = new XMLHttpRequest();2xhr.open(method, url)3if (user) {4 xhr.setRequestHeader('session-id', user.sessionId);5 xhr.setRequestHeader('user-id', user.id);6}We also handle Unauthorized responses, ensuring that if the user is not authorized by the server, they are redirected to the login page to log in and try again.
1xhr.onload = function () {2      if (xhr.status === 200) return resolve([xhr, null]);3
4      if (xhr.responseText === 'Unauthorized') {5         setUser(null); // Remove the user data from the localstorage6         navigate('/login'); // Navigate to the login page7      }8      console.error(`Error ${xhr.status}: ${xhr.responseText}`);9      return resolve([xhr, `${xhr.responseText}`]);10};
Login and register pages
These pages are straightforward as they include a few input fields for user data. Since Gameface does not support the form element, we need to handle data submission manually. Here is an example for the login page, which is similar to the register page.
1const Login = () => {2    const [user] = useLocalStorage('user');3    const navigate = useNavigate();4    const [error, setError] = useState('');5    if (user) {6        return <Navigate to='/' />; // Navigate to home page if user is already logged in.7    }8
9    // Keep references to the email and password inputs to access their values on submit.10    const [emailRef, passowrdRef] = [useRef(null), useRef(null)];11    const { login } = useAuth();12    const fetch = useFetch();13    const onSubmit = async () => {14        setError(''); // Reset error message15        const email = emailRef.current.value;16        const password = passowrdRef.current.value;17        const [xhr, error] = await fetch('POST', `${process.env.SERVER_URL}/api/login`, { email, password }); // Make login POST request18        if (error) {19            setError(error); // Display error if any20            return console.error(error);21        }22
23        login(xhr.responseText); // Log in the user and save user data from the server to localStorage24    }25
26    return (27        <div className="login-wrapper">28            <div className="login-screen">29                <div className='form-item email'>30                    <span className='label'>Email:</span>31                    <input ref={emailRef} type="text" />32                </div>33                <div className='form-item password'>34                    <span className='label'>Password:</span>35                    <input ref={passowrdRef} type="password" />36                </div>37                {error && <span className='error-message'>{error}</span>}38                <button className="login" onClick={onSubmit}>Login</button>39            </div>40        </div>41    )42}43
44export default Login;
The register page follows a similar pattern. Here is a snippet for handling the submit request:
1const onSubmit = async () => {2 setMessage({ text: '', type: '' });3 const email = emailRef.current.value;4 const firstName = firstNameRef.current.value;5 const lastName = lastNameRef.current.value;6 const password = passowrdRef.current.value;7 const [xhr, error] = await fetch('POST', `${process.env.SERVER_URL}/api/register`, { email, password, firstName, lastName }); // Make post register request to the server8 if (error) {9 setMessage({ text: error, type: 'error' }); // Display error if any10 return console.error(error);11 }12 setMessage({ text: 'Successfully registered! You will be redirected to the login page in a few seconds', type: 'success' });13 // Redirect to the login page after 3 seconds14 setTimeout(() => {15 navigate("/login");16 }, 3000);17}
Home page
The home page contains a container with friends and a logout button. To display the subroutes defined for the home page, we use the Outlet component from React Router.
1const Home = () => {2    const { logout } = useAuth();3    const fetch = useFetch();4    const onLogout = useCallback(async () => {5        const [xhr, error] = await fetch('POST', `${process.env.SERVER_URL}/api/logout`);6        if (error) return;7        logout();8    }, []);9
10    return (11        <div id="main-screen">12            <div className='friends-container-wrapper'>13                <div className='friends-navigation'>14                    <NavLink className='nav-btn' to="/">Friends</NavLink >15                    <NavLink className='nav-btn' to="/add-friends">Add friends</NavLink >16                </div>17                <div className="friends-container">18                    <Outlet />19                </div>20            </div>21            <button className='logout-btn nav-btn' onClick={onLogout}>Log out</button>22        </div>23    )24}25
26export default Home;
Friends list page
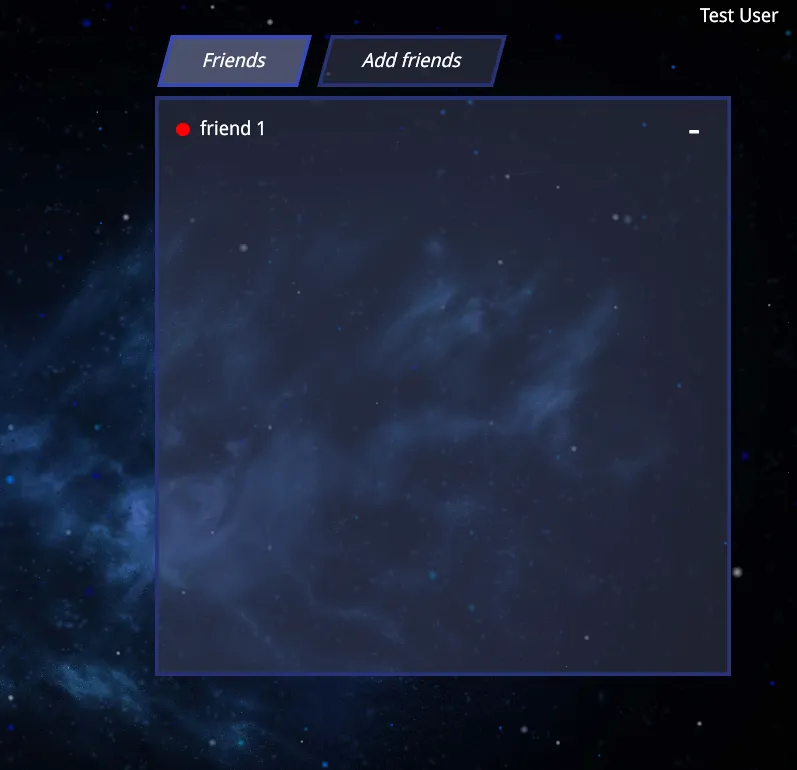
For the friends list page, we’ll use gameface-scrollable-container to enable scrolling through the list and gameface-grid to structure the list items. Our database schema stores an array of friend IDs for each user. Since this array doesn’t contain full friend information, we’ll fetch detailed data for each friend when needed.
1const Friends = () => {2   const [user] = useLocalStorage('user');3   const [friends, setFriends] = useState([]);4   const fetch = useFetch();5
6   useEffect(() => {7      updateFriendsList();8   }, []);9
10   const removeFriend = useCallback(async (event) => {11      const userId = event.target.dataset.userId;12
13      const [xhr, error] = await fetch('POST', `${process.env.SERVER_URL}/api/users/${user?.id}/remove-friend`, { friendId: userId }); // Remove friend form the user's friends list14      if (error) return console.error(error);15
16      await updateFriendsList();17   }, [])18
19   const updateFriendsList = useCallback(async () => {20      const [xhr, error] = await fetch('GET', `${process.env.SERVER_URL}/api/users/${user?.id}/friends`); // The the user's friends ids21      if (error) return;22
23      const friendsIds = JSON.parse(xhr.responseText);24      const friendsArr = [];25
26      for (const friendId of friendsIds) {27         const [friendXhr, errorFriend] = await fetch('GET', `${process.env.SERVER_URL}/api/users/${friendId}`); // Get data for a user that is a friend to the current one28         if (errorFriend) continue;29
30         const friendData = JSON.parse(friendXhr.responseText);31         friendsArr.push(friendData);32      };33
34      setFriends(friendsArr);35   });36
37   return (38
39      <div className="all-friends-wrapper">40         <div className="friends">41               <gameface-scrollable-container automatic className="scrollable-container-component">42                  <component-slot data-name="scrollable-content">43                     <div className='friends-list'>44                           {friends.map((friend, index) => {45                              return <div key={friend._id} className='friend guic-row'>46                                 <div className='guic-col-11 friend-info'>47                                       <div className='name'>{friend.firstName} {friend.lastName}</div>48                                 </div>49                                 <div className='guic-col-1 remove-btn'>50                                       <span className='remove-icon' data-user-id={friend._id} onClick={removeFriend}>-</span>51                                 </div>52                              </div>53                           })}54                     </div>55                  </component-slot>56               </gameface-scrollable-container>57         </div>58      </div>59   )60}61
62export default Friends;
Adding friends page
This page works similarly to the friends list page. It fetches all users from the database who are not the current user and are not already friends with the current user. These users are displayed in a list, and they can be added as friends by clicking the + button.
1const AddFriends = () => {2 const [user] = useLocalStorage('user');3 const [users, setUsers] = useState([]);4 const fetch = useFetch();5
6 useEffect(() => {7 updateUsersList();8 }, []);9
10 const updateUsersList = useCallback(async () => {11 const [xhr, error] = await fetch('GET', `${process.env.SERVER_URL}/api/users/${user?.id}/potential-friends`); // Gets the potential friends for the current user from the server12 if (error) return;13
14 setUsers(JSON.parse(xhr.responseText));15 }, [])16
17 const addFriend = useCallback(async (event) => {18 const userId = event.target.dataset.userId;19
20 const [xhr, error] = await fetch('POST', `${process.env.SERVER_URL}/api/users/${user?.id}/add-friend`, { friendId: userId });21 if (error) return console.error(error);22
23 await updateUsersList(); // Update the users list when we added a friend24 }, []);25
26 return (27 <div className="all-users-wrapper">28 <div className="all-users">29 <gameface-scrollable-container automatic fixed-slider-height className="scrollable-container-component">30 <component-slot data-name="scrollable-content">31 {users.map((user, index) => {32 return <div key={user.id} className='user guic-row'>33 <div className='guic-col-10 user-info'>34 <div className='name'>{user.firstName} {user.lastName} ({user.email})</div>35 </div>36 <div className='guic-col-1 add-btn'>37 <span className='add-icon' data-user-id={user.id} onClick={addFriend}>+</span>38 </div>39 </div>40 })}41 </component-slot>42 </gameface-scrollable-container>43 </div>44 </div>45 )46}47
48export default AddFriends;