2.9.16.0
Coherent GT for UE4
This tutorial will show you how to add the Coherent GT plugin into a project and create two types of UI elements - a HUD and an in-world UI view . Here are the steps to achieve this:
1. Install the Coherent GT plugin
First, you need to install the Coherent GT plugin using the installer wizard. The installer auto-detects the UE4 engine versions that are available on this computer and gives you the options to install UI kits and a sample game
2. Enable the plugin in your project
Then start the Unreal Editor, and choose either an existing project or create a new one via New Project -> Blueprint -> Blank, and save it in a folder of your choice.
The first thing you have to do is to enable the Coherent GT plugin in the editor. From the main menu click Edit -> Plugins, then navigate to the User Interface section and find the Coherent GT Plugin and click the checkbox Enable. You'll have to restart the editor and when you do a new drop-down menu will appear - Coherent GT.
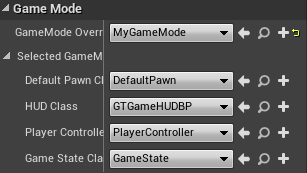
Then create a new level and open the world settings. From the Game Mode section, click the + button to create a new GameMode override, let's name it MyGameMode.
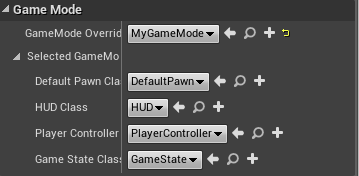
MyGameMode.
3. Add a HUD
From the Coherent GT menu, choose Add HUD. This will change the current GameMode's HUD class to GTGameHUDBP and will initialize it. Also, it will add a hud.html page in YourProjectDir/Content/UIResources/ directory, if not already present; then this page will be opened in your default browser.
coui://uiresources/HUD/MainUI.html.
To see its content, open the GTGameHUDBP blueprint in the Blueprint Editor. If you experience difficulties locating GTGameHUDBP blueprint, you need to set Show Plugin Content and Show Engine Content checkboxes in the Content Browser View Options and search for CoherentUIGTPlugin Content. Here's a brief explanation of what happens:
CoherentUIGTInputActor, and then setting “Accept mouse input” to true.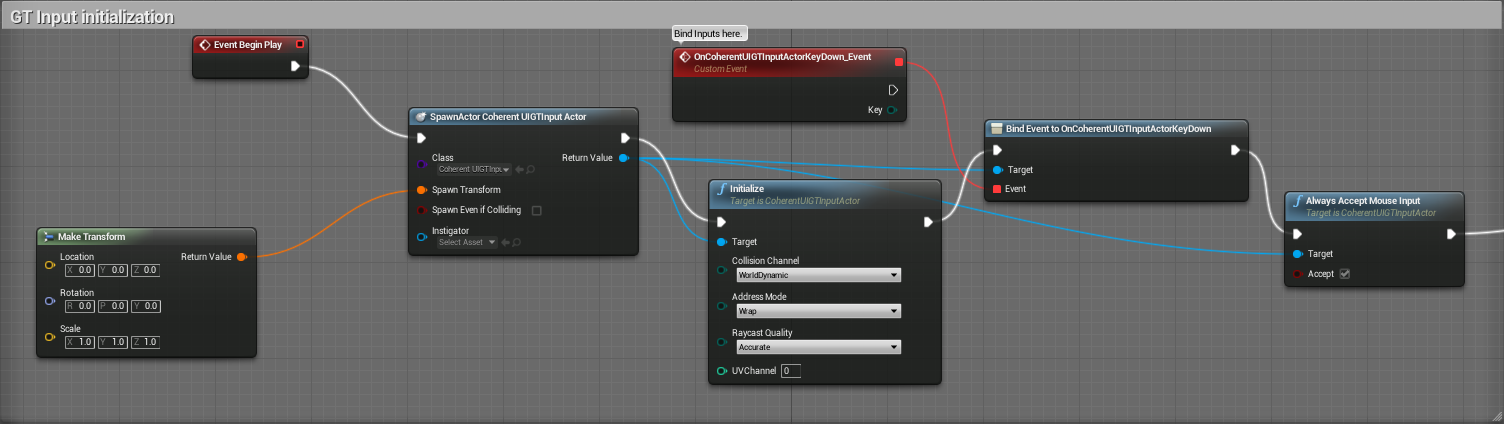
The only part that we cover in this tutorial, is the View setup. The UI Scripting and the input will be covered in upcoming tutorials.
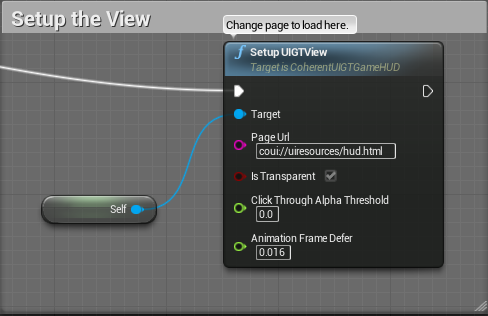
The page is set by default to coui://uiresources/hud.html, so the newly created page by Add HUD will be used if you skip changing it. However, you can change it whenever you want to a local page, placed in the uiresources folder and use the coui:// scheme, or to a page hosted on the web and use a standard scheme like http://.
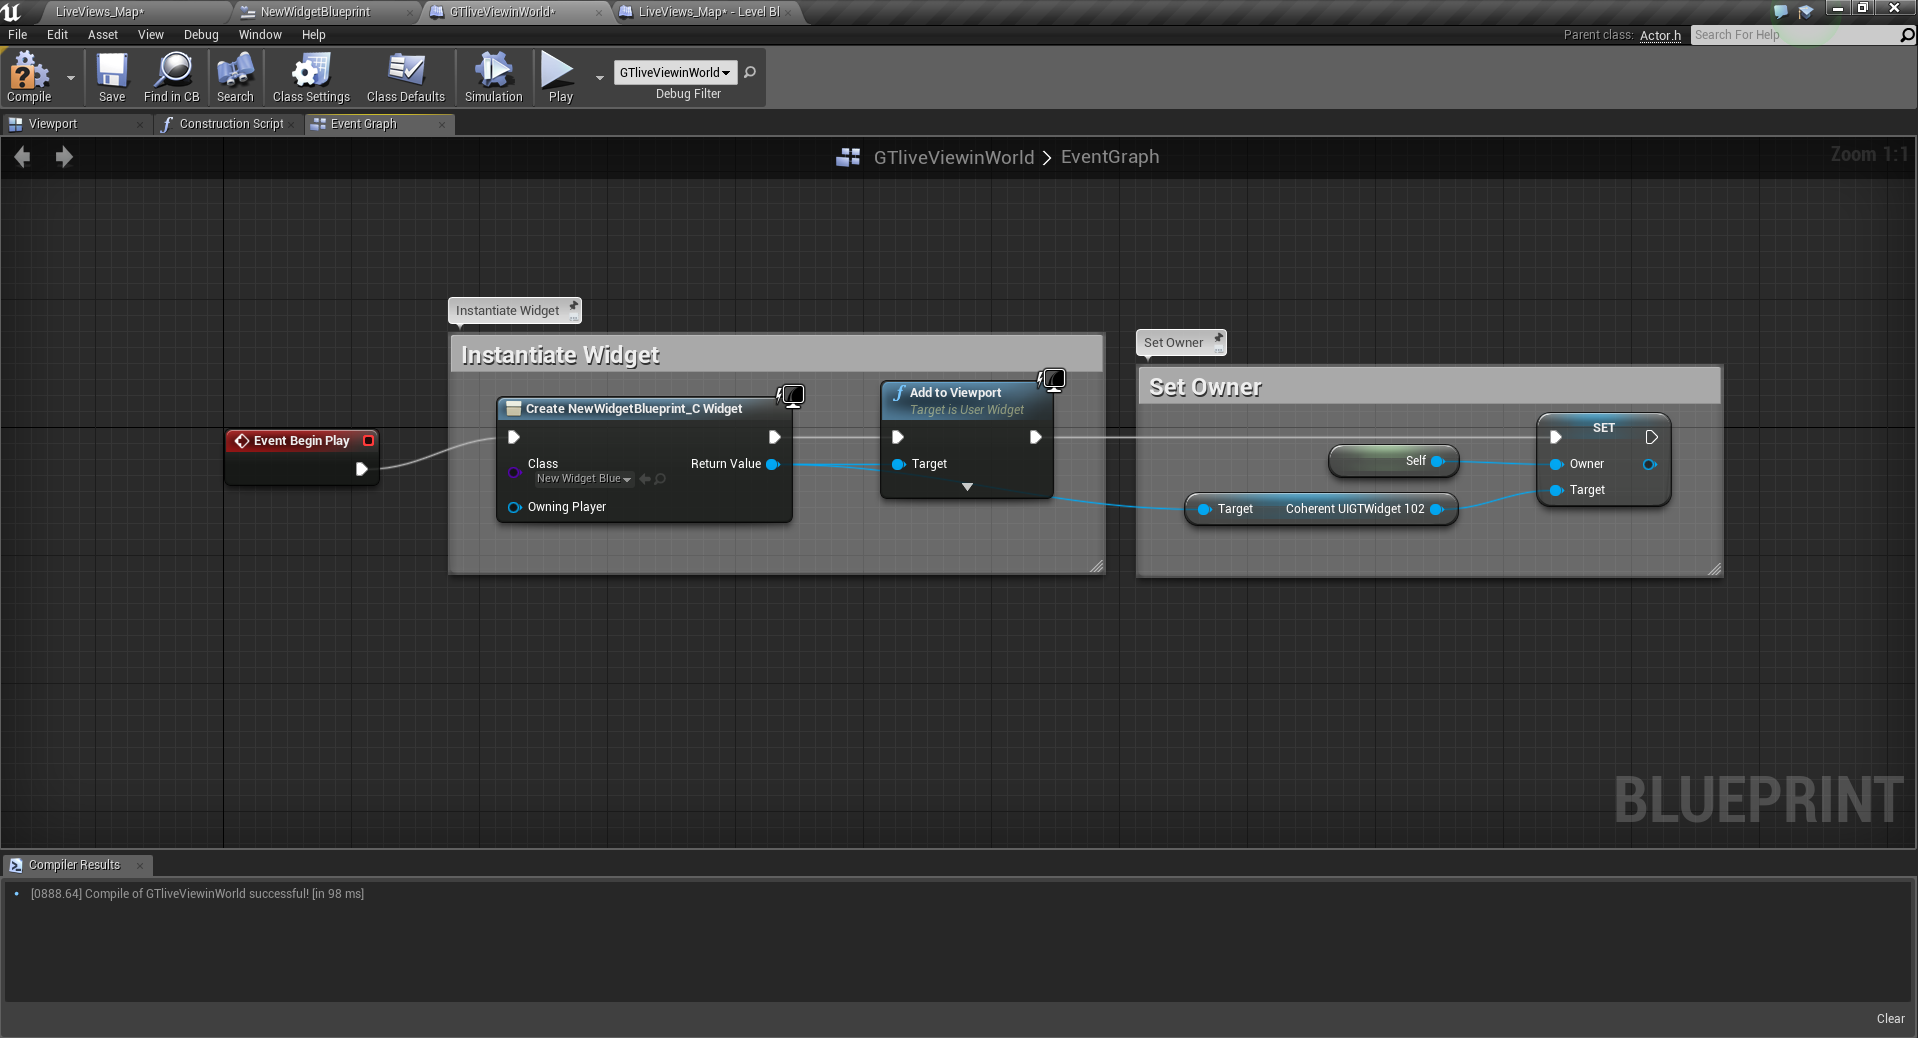
4. Add in-world UI
Choose Coherent GT -> Add In-world UI. This will add a GTPlane to your scene, just in front of the player. You can change its transform via the World Transform in the Details tab of the GTPlane.
Click Edit GTPlane from the same tab and its blueprint will open. As you can see, it has a CoherentUIGT component and the UIScripting already setup for this view.
Follow these steps to setup the view::
CoherentUIGT component in the EventGraph of the GTPlane blueprint.SetURL node and set the url to coui://uiresources/animation-demo.htmlBegin play and connect it with the url setter.Play.
Here is the final result:
CoherentUIGT can be installed as either engine plugin or a game plugin. Each of them having their own merit.
This is the default option of istallation. When you have CoherentUIGT installed as an engine plugin, the plugin will be available for all of the games that are created with that particular instance of the UE4 engine. This is useful when you are working on more than one game at the same tyme, or you are prototyping.
Note: The engine plugin option is only available when using a source built engine. This is due to limitations of the binary engine not being to compile engine / plugins code.
Usually the game plugin option is used when using a binary engine. This is because this is the only way to build a plugin when using a binary engine. Another reason why you would like to use CoherentUIGT as a game plugin would be if you don't want the plugin to be visible to other games using the same engine.
Coherent GT consists of several core classes:
Attaching a Coherent GT View to a 3D object in the game world is actually a very easy thing to do - all you have to do is:
The CoherentUIGT plugin provides a two way binding between the C++ or Blueprints and the HTML/JavaScript. Bofore any events are called, you must first register for receiving them.
CoherentUIGTComponent->GetView()->RegisterForEvent(...)
CoherentUIGTComponent->GetView()->BindCall(...)
engine.on('Click', function()
{
    console.log('Click called');
});
In both cases, the view you must wait until the view is ready for binding and then attach your event handlers.
For a detailed guide on binding you can check the UI Scripting section.
This page will introduce you on how to set-up and use the Coherent GT middleware library with Unreal Engine 4.
Coherent GT is a modern HTML5-based user interface middleware library for real-time applications. It has been pre-integrated with Unreal Engine 4 and all the source of the integration plugin is available to Coherent GT and UE4 licensees.
Coherent GT is based on browser-like technology and can also be used as an in-game browser. It can load and render any page from the web and supports all modern authentication methods and protocols.
This guide requires basic knowledge of both Coherent GT and Unreal Engine 4. For more info on the discussed topics, please refer to the Coherent GT Documentation. and the Unreal Engine Documentation.
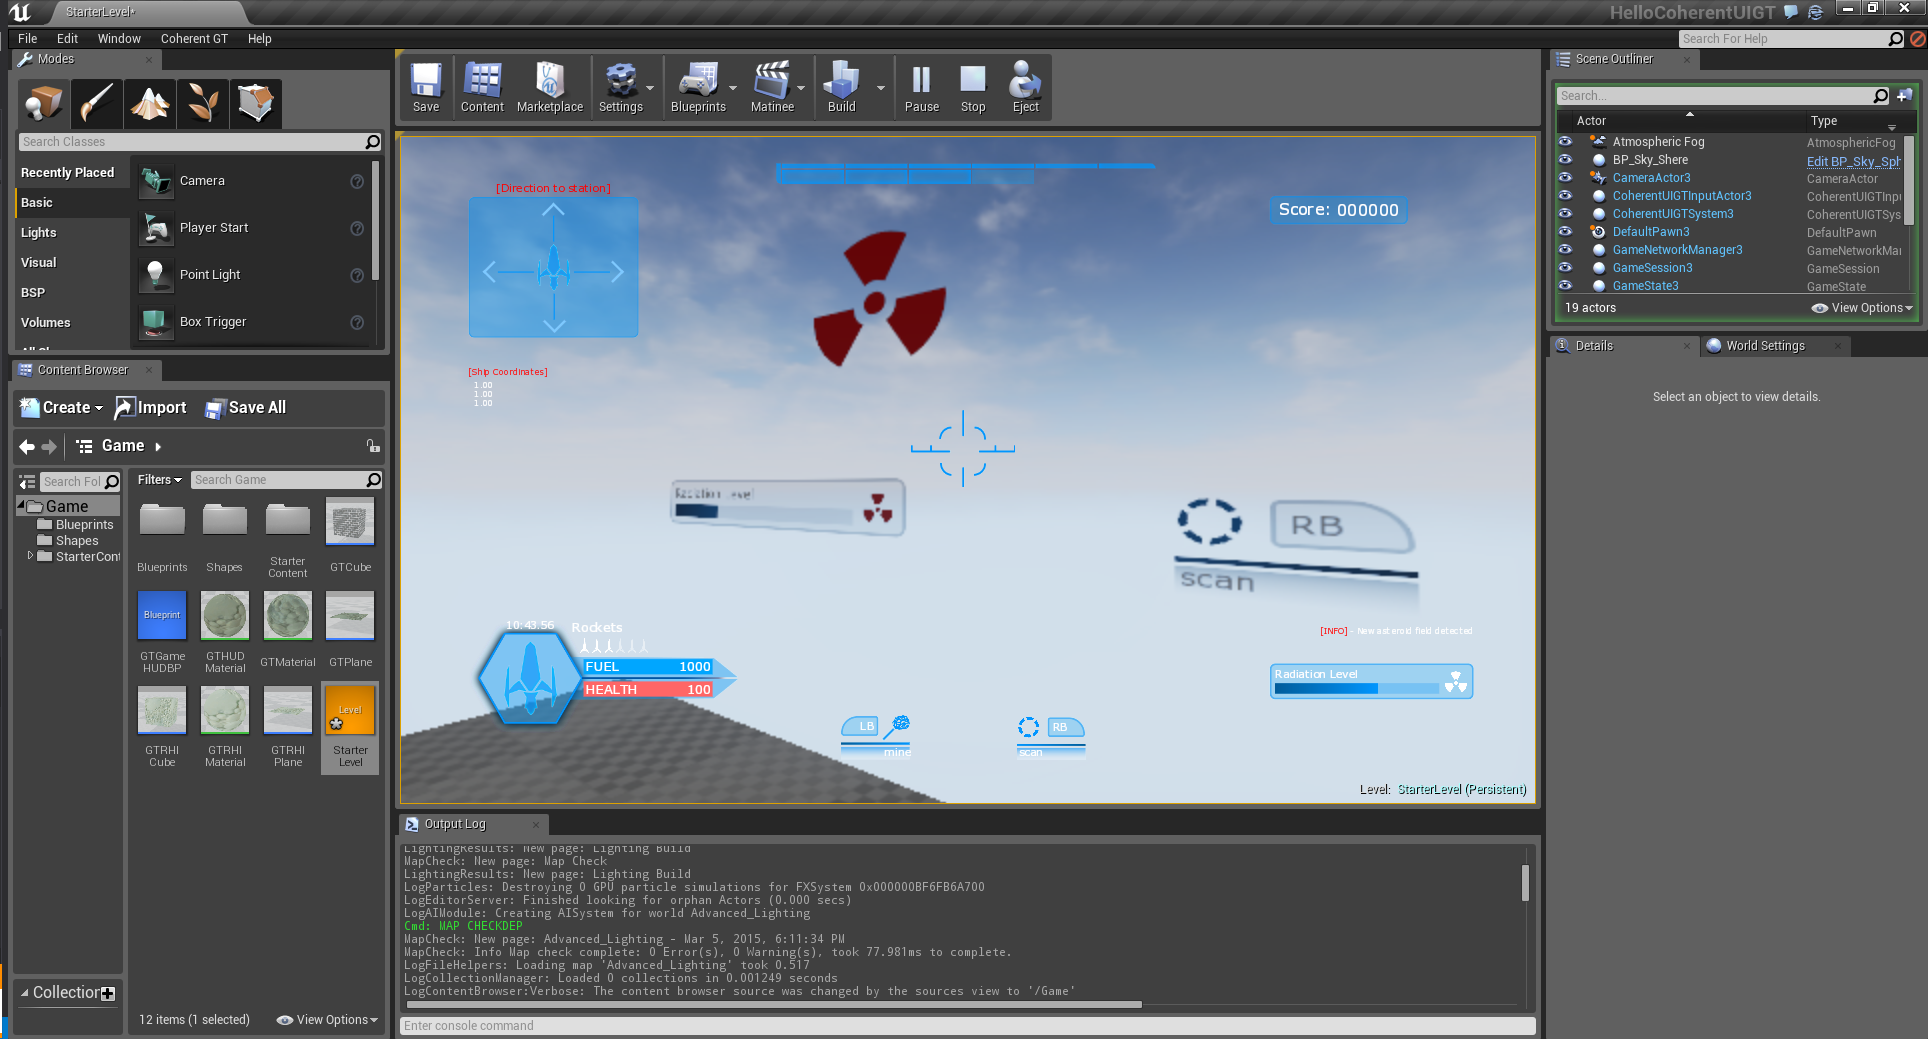
To quickly try out Coherent GT with the provided sample - try the provided CoUIGTTestFPS game.
The first thing you have to do is to install the Coherent GT plugin using the installer wizard. The installer auto-detects the UE4 engine versions that are available on this computer and gives you the options to install UI kits and the Coherent GT sample game.
If you try to directly run the game from VS before having it previously opened, you might receive an error *"Failed to open descriptor file"*.
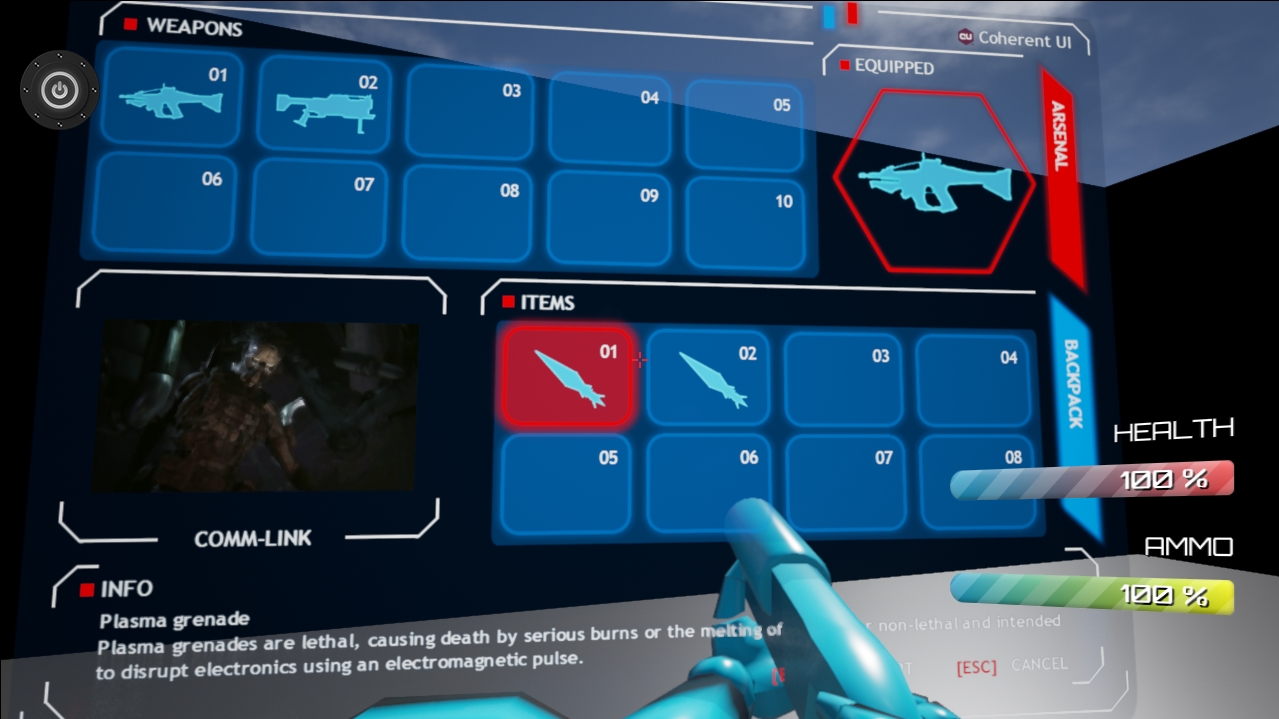
The game shows a simple menu, HUD, and when you press I, an in-game inventory in 3D will pop-up. If you press Tab, you'll be presented with a simple in-game menu.
Coherent GT's plugin uses three modules:
And has one plugin as a dependency - CoherentRenderingPlugin, which in turn consists of two modules:
Coherent GT has to be added as a ThirdParty dependency to UE4. This will make sure that all shared libraries (.dll, .dylib, etc.) are loaded when the game starts and they will be referenced by the engine correctly.
The plugin can be installed either as an 'Engine' or as a 'Game' plugin. In UE4's terminology, an 'Engine' plugin resides in the EngineDir/Plugins directory, whereas a game plugin is installed in GameDir/Plugins. Our installer will choose the 'Engine' option for compiled from source distributions of UE4 and the 'Game' option for binary distributions.
Using an engine plugin has some advantages over the game plugin (for example you only need to install it once for all your projects) which is why we recommend it.
The Coherent GT installer will make sure that all the modules are installed correctly.
The installer provides some other useful items such as a sample game and a collection of ready-to-use HTML5 kits.
After you've installed the plugin, you need to enable it from the UE4 editor:
If you are only going to use Coherent GT through the UE4 Editor / Blueprints, you are done. If you going to to use Coherent GT through C++ code, make sure your game references our plugin in its Build.cs file. Doing so is trivial - open YourGame/Source/YourGame/YourGame.Build.cs. Add the following lines to the constructor of the class YourGame:
PrivateDependencyModuleNames.Add("CoherentUIGTPlugin");
PrivateDependencyModuleNames.Add("CoherentUIGT");
"Plugins": [
    {
        "Name": "CoherentUIGTPlugin",
        "Enabled": true
    }
]
This will tell the engine that it should load the compiled CoherentUIGTPlugin.dll, if your project is using Coherent GT.
These are almost the same steps as in the previous section but generating project files will fail if your game has no C++ code.
Open the editor and enable the Coherent GT plugin for your game using the Window -> Plugins dialog. Coherent GT plugin is in the Installed / User Interface section.
UE4 currently doesn't build plugins in blueprint-only projects, therefore you can't use Coherent GT (or any other runtime plugin) without any C++ code. You can fix this by adding a simple dummy C++ class to your project, which is described in the next paragraph. If your game already has C++ code, skip the next section.
Would you like to edit the code now?. Click yes. (or click no and open the solution in Visual Studio manually)Note: Step 5 is done automatically by the plugin for all platforms. The information above can be used as a guide in case the packaged game does not run out of the box.
Note: Previous Coherent GT versions loaded UIResources from the root of your game directory (as opposed to YourGameDir/Content). That behaviour is still supported but it is deprecated, and will be removed in future versions.
If you are still using that behaviour, you are required to manually copy the UIResources folder to YourPackageDir/WindowsNoEditor/YourGameDir, next to the Content and Binary folders.
Your package directory structure should resemble this:
|-YourPackageDir
  |-WindowsNoEditor
    |-Engine
      |-Build
      |-Binaries
        |-ThirdParty
          |-CoherentUIGT
            |-Win64
              |-CoherentUIGT.dll
              |-CoherentGTCore.dll
              |-...
            |-Mac
              |-CoherentUIGT.dylib
              |-CoherentGTCore.dylib
              |-...
          |-Renoir
            |-Win64
              |-RenoirCore.WindowsDesktop.dll
              |-RenoirCore.WindowsDesktop.pdb
            |-Mac
              |-RenoirCore.Mac.dylib
    |-YourGameDir
      |-Saved
      |-Content
        |-UIResources
      |-Binaries
        |-Win64
          |-YourGame.exe
        |-<any_other_platform>
          |-YourGame.exe
You may want to automatically load a certain set of fonts (instead of using the CSS property @font-face). You can do so by adding them in the folder YourGameDir/Content/Fonts. Please note that Coherent GT requires the raw *.ttf* and *.otf* files and not the *.uasset* files UE4 will generated which also means that in order to distribute them you'll need to add the Fonts directory under Additional Non-Asset Directories to Package just as we did above for the UIResources directory.
The Coherent GT plugin allows to easily add Coherent GT Views to UE4 HUDs as well as surfaces in the world - this means having UI Views as textures on objects.
All exported Components inherit the CoherentUIGTViewListener class. It takes care of managing the creation/destruction of Coherent GT View resources and textures, and also listens for View events.
Some of the View events are broadcasted through Unreal Engine Delegates, too. Almost all interactions can be achieved through the Unreal Editor and the Blueprint Editor, and all View properties are exposed to them.
Coherent GT comes to Unreal with an editor module that eases your workflow. This section describes the editor module. For detailed information about each feature scroll past the section.
Coherent GT's Editor Module adds a pull-down menu to the main toolbar in your Unreal Editor, to the right of the Window menu.
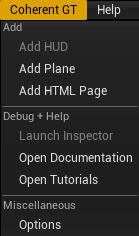
Changes the GameMode's HUD class to the one provided with Coherent GT - CoherentUIGTGameHUD and adds a HTML file named hud.html to YourGame/Content/UIResources.
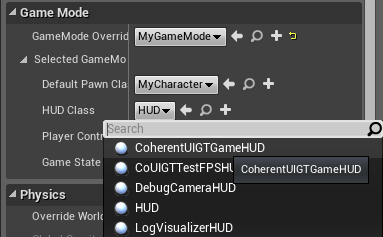
This item is only available if the current default GameMode is a Blueprint class. To see or change your current default GameMode, go to Edit -> Project Settings -> Maps and Modes -> Selected GameMode. GameMode classes written in C++ can't be changed from the editor which is why to use this option you would need to create a new blueprint that inherits from AGameMode. For further information, please refer to the UE4 docs.
By default, CoherentUIGTGameHUD will try to load hud.html (and use several other sensible default settings). If you'd like to customize the HUD's settings, you can do so with the following Blueprint:
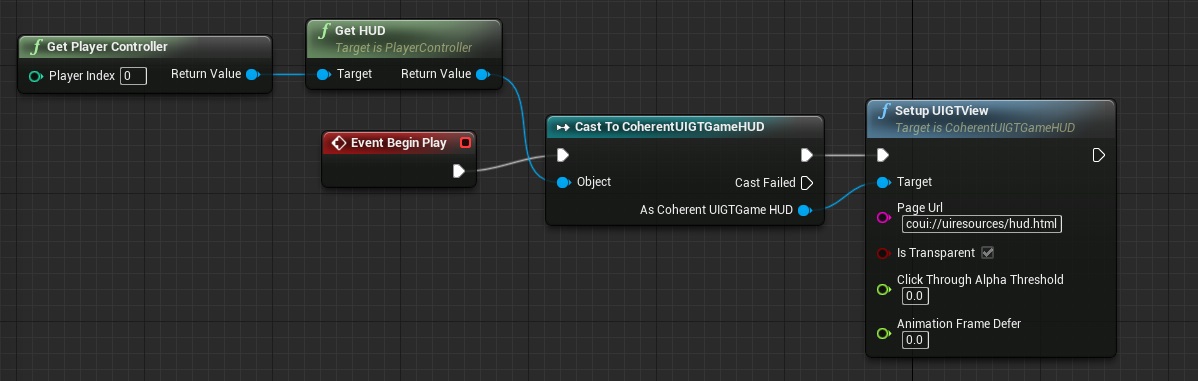
It's important to call SetupUIGTView as shown in the image above during Event Begin Play or otherwise the HUD will fall-back to its default settings.
Adds a 3D Plane with a CoherentUIGTComponent to the scene, facing current camera's position. The plane is an instance of GTPlane - a Coherent GT asset, which will be copied to YourGame/Content in case it's missing.
Adds a HTML page to YourGame/Content/UIResources and launches it in your default browser.
Launches Coherent GT's debugger. You can change the path to the inspector in the Settings menu (see below). For more information about the debugger, see the Coherent GT Debugger section.
This item is only available if the game is not currently running in PIE.
Opens Coherent GT's documentation on http://coherent-labs.com.
Opens Coherent GT's tutorials on http://coherent-labs.com.
Opens Coherent GT's settings (you can also access them from Edit -> Project Settings -> Plugins -> Coherent GT. This allows you to change the Inspector's port.
At the core of Coherent GT stays the View. A Coherent GT View is basically an HTML5 page and the JavaScript context for it. Coherent GT will render the View, execute the JavaScript and provide UE4 with a texture with what it has drawn.
Views provide methods to change the current page, use local resources and interact with JavaScript. In UE4 you'll seldom have to use them directly since they are encapsulated in Components that can be manipulated in C++ code and in Blueprints.
The Coherent GT UE4 plugin has two main Components - UCoherentUIGTHUD and UCoherentUIGTComponent and an actor - ACoherentUIGTSystem. This section, together with Coherent GT System, covers in detail all of them.
All Coherent GT UE4 Components inherit from the UCoherentUIGTBaseComponent Component. It exports the most important Coherent GT properties and events to the UE4 Engine and Blueprint Editor.
UCoherentUIGTBaseComponent should NOT be used directly by itself.The system actor takes care of the properties that are global for all Components. If you don't create one, a default will be created in the game for you.
You'll need a game mode override, which uses the CoherentUIGTGameHUD HUD class, in the Editor's World Settings.
If you don't initialize the HUD, Coherent GT will try to load your HUD from coui://uiresources/hud.html and use default view settings.
In case you already have your own HUD class, you can just add a Coherent GT component in your HUD blueprint.
Next, make sure that you select the Manual texture option in the Coherent GT component's properties.
Last, draw the texture given by the Coherent GT component in the "Receive Draw HUD" event. Here's a sample blueprint for doing that:
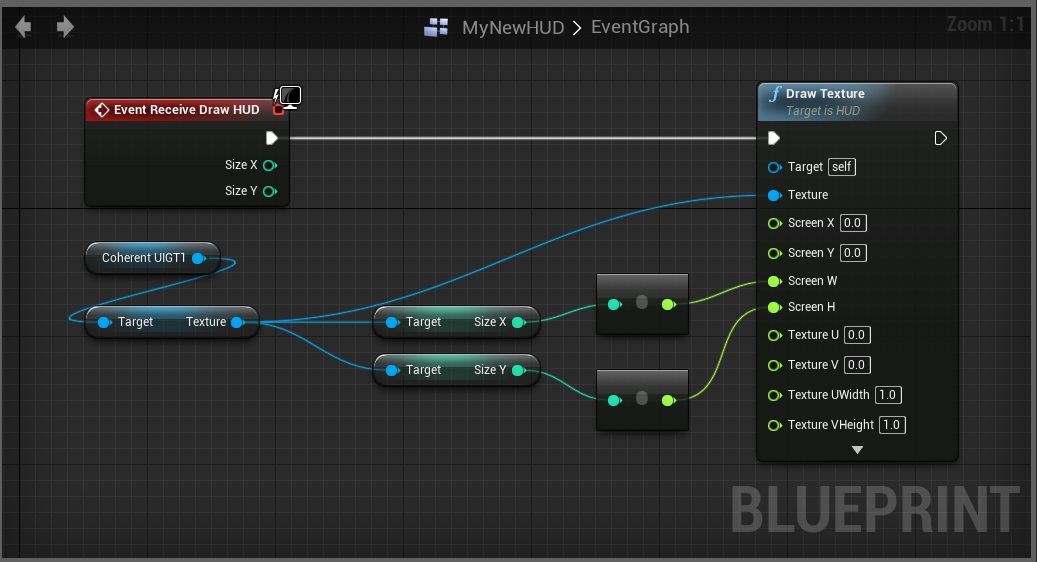
Usually you'd be able to use the "Draw Simple Texture" function for doing simple drawing like this, but as of UE 4.7 there is a bug in the engine.
Coherent GT uses a render target texture and UE4 doesn't override the methods FTextureRenderTarget2DResource::GetSizeX() / GetSizeY() for it and instead return 0. These methods are used by "Draw Simple Texture" for obtaining the size so you cannot use that function. Instead, you'll have to use the more complex "Draw Texture".
You can get the size of the texture using the properties SizeX/SizeY and set them to the Screen W/H input pins of "Draw Texture".
Next, you need to set the the texture coordinates that will be used for sampling. If you want to draw the whole texture, use the following values for U/V/UWidth/VWidth: 0 / 0 / 1 / 1.
You can also do some simple effects like flipping the texture by modifying these values. For example, if you want to flip the texture vertically, use the following values for U/V/UWidth/VWidth: 0 / 1 / 1 / -1.
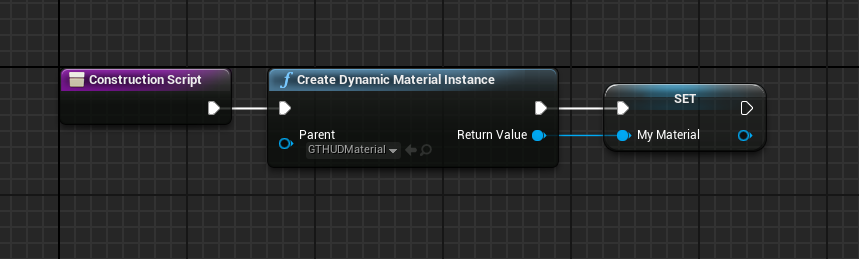
If you need to achieve some special effect using a material, you can also use the "Draw material" node. You just need to create a dynamic material instance that has a TextureSampleParameter2D which will be updated using the "Set Texture Parameter Value" function in the HUD blueprint:

The CoherentUIGTHUD component is used to easily add Coherent GT Views to a game HUD. A sample game accompanies this guide and details can be seen there.
The Component must be added to the HUD Actor of the game, and then the HUD is in charge of creating its View, and must call the CoherentUIGTHUD::DrawHUD method inside it's own DrawHUD method (see CoUIGTTestFPSHUD.h and CoUIGTTestFPSHUD.cpp files for details).
The UCoherentUIGTHUD class is a Component that takes care of loading the HTML page with the HUD interface and draw it in the Canvas of the HUD Actor.
In the sample the CoherentUIGTHUD Component is created and added to the ACoUIGTTestFPSHUD Actor with the following code:
CoherentUIGTHUD = PCIP.CreateDefaultSubobject<UCoherentUIGTHUD>(this, TEXT("CoherentUIGTHUD"));
Then on every DrawHUD event the Coherent HUD is checked for readiness and eventually draw the HUD.
if (CoherentUIGTHUD)
{
    auto view = CoherentUIGTHUD->GetView();

    if (!view && !CoherentUIGTHUD->HasRequestedView() && CoherentUIGTHUD->IsReadyToCreateView())
    {
        CreateView();
    }
    // check that the size matches
    if (view)
    {
        if (view->GetWidth() != Canvas->ClipX
            || view->GetHeight() != Canvas->ClipY)
        {
            CoherentUIGTHUD->Resize(Canvas->ClipX, Canvas->ClipY);
        }
    }

    CoherentUIGTHUD->DrawHUD(Canvas, 0, 0);
}
In the snippet above you can see that the Component is checked for readiness and if it has already requested the creation of a View for itself. It it hasn't, it'll call the CreateView method.
If we already have a View we check if it has to be resized (for instance after we've resized the game window), and then call the DrawHUD method with the current Canvas and the screen coordinates where we want our View to draw itself.
The following code requests the creation of a View:
void ACoUIGTTestFPSHUD::CreateView()
{
    Coherent::UIGT::ViewInfo info;
    info.Width = Canvas->ClipX;
    info.Height = Canvas->ClipY;
    info.IsTransparent = true;

    CoherentUIGTHUD->ReadyForBindings.AddDynamic(this, &ACoUIGTTestFPSHUD::BindUI);

    CoherentUIGTHUD->CreateHUDView(info, TEXT("coui://UIResources/MainUI.html"));
}
All properties are self-explanatory, but in case you need more detail on any of them please consult with the Coherent GT C++ documentation.
The line
CoherentUIGTHUD->CreateHUDView(info, TEXT("coui://UIResources/MainUI.html"));
is the one that actually initiates the creation of the View. The coui://UIResources/MainUI.html page is the initial page that will be loaded. Note that coui is a special protocol that denotes local resources in the game. coui is read through a FCoherentUIGTFileHandler that for UE4 can be found in the CoherentUIGTBaseComponent.cpp file.
It will take care to read all files relative to the current game's content directory, so you can put your UI resources in the folder of your game. Coherent GT supports all standard protocols too, so you can load pages from the Internet.
The more interesting part from the code snippet above is this one:
CoherentUIGTHUD->ReadyForBindings.AddDynamic(this, &ACoUIGTTestFPSHUD::BindUI);
It binds a method that will be called when the View is ready to accept its bindings. Binding is the facility that allows the communication between C++ and JavaScript code in the page. For more information please refer to the Scripting section of this document.
Coherent GT Views can be used as textures on in-game objects to create interactive displays, call-outs and many other interesting effects. The component used is called CoherentUIGTComponent.
The steps to add a View to an object in the world are straight-forward.
Convertto Parameter.CoherentUIGTComponent to the Blueprint and set all the parameters you need for it - size, URL etc.Now you can use the Blueprint and add it in the world. The UI GT Component will automatically update the UITexture parameter with the texture of the View.
A material ready to use by Coherent GT can be found at Engine/Plugins/CoherentUIGTPlugin/Content/GTMaterial.uasset. In the sample game please check the GTPlane (which can also be found under Engine/Plugins/CoherentUIGTPlugin/Content/) objects that has the material setup and a "CoherentUIGTComponent" and can show pages on the in-world.
The properties of each View can be edited in the Blueprint editor in the Components menu under the CoherentUIGTComponent View section.
In UE4 it is possible to see bluriness in the in-game UI when moving. This is caused by the anti aliasing algorithm used by the engine. When Temporal AA is used (Unreal's default choice) in-game UI will be blurry.
How to fix it: Change AA algorithm to FXAA or disable AA.
If Temporal AA is needed:
Note: If the in-game surface is transparent the objects behind the surface will be aliased. Unfortunately, this is an issue with the way UE4 handles in-game UI.
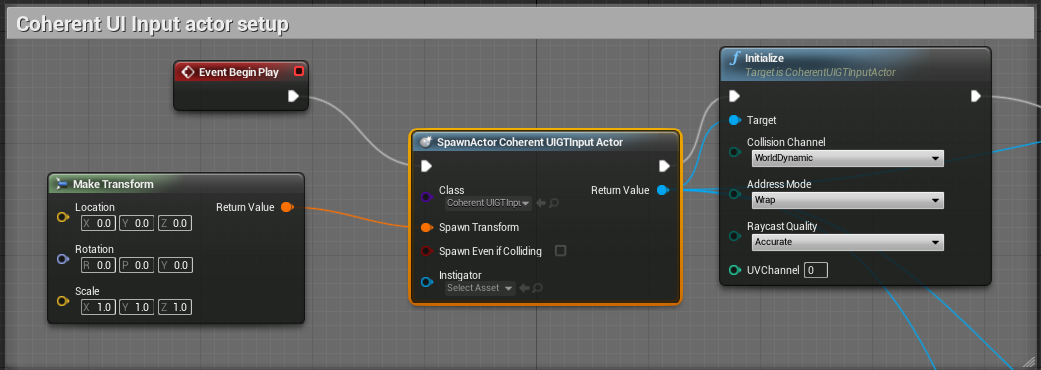
The input in Coherent GT is managed through a Slate widget (SCoherentUIGTInputForward). This widget is an empty widget that covers the whole screen and forwards input to a Coherent GT View. For simplicity we have created the ACoherentUIGTInputActor actor, which encapsulates the logic behind the widget and is accessible through both C++ and blueprints. All you have to do is spawn the actor and call its initialize method.
Keyboard focus, in UE4 terms, means that the Coherent GT Input Forward widget has keyboard focus. When the widget has keyboard focus, it is able to receive keyboard events, otherwise it is not.
Mouse events don't require focus and they are propagated to the widgets under the cursor until one of the widgets handles the event. The Coherent GT Input Forward widget is generally on the top of the viewport so it can process mouse events first. The processing in the widget works as follows:
Joystick input works by default when the viewport widget has focus. Keyboard focus implies joystick focus, which means that if the Coherent GT widget has keyboard focus, the joystick events will stop working. If that's not intended, the input actor has a method for keeping joystick focus to the viewport after setting keyboard focus.
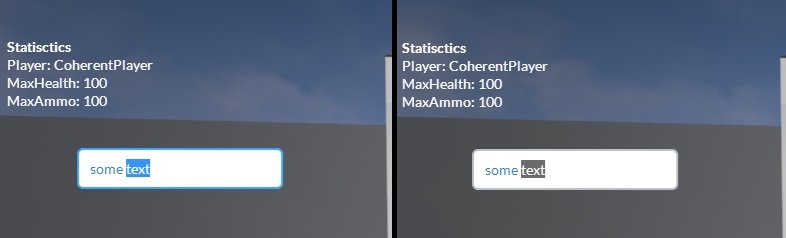
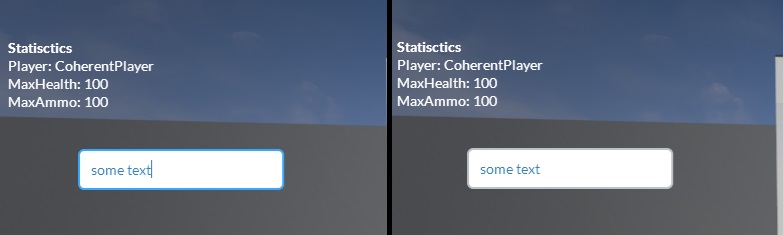
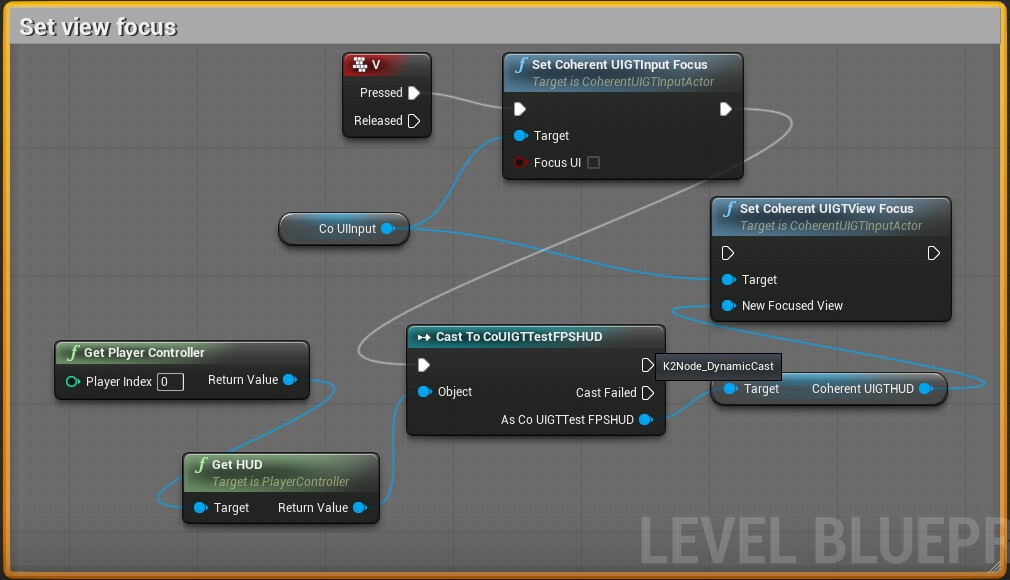
Each view can be focused, regardless of the widget focus in UE4. This is core functionality and it's independent of any other focus mechanics. The view focus controls the color of selected text, whether you have a blinking caret in input fields and the like.
Here are a few examples for views that have focus (left) and ones that don't (right):
The current implementation of the input actor/widget allow for only one focused view at a time. If you need some custom behaviour you'll have to modify the plugin's code.
Each view component has a property (Receive Input) that controls whether a specific view takes part in the mouse event forwarding.
To add input in a blueprint only game, you need to spawn an actor that will set up the SCoherentInputForward widget. This is an empty widget that covers the whole screen and forwards input to a Coherent GT View.
The widget should be added in the front of the viewport so it can process mouse and keyboard messages first. Due to Unreal Engine 4's architecture, the widget can process keyboard messages only if it's focused.
Here's a sample blueprint that enables the input:
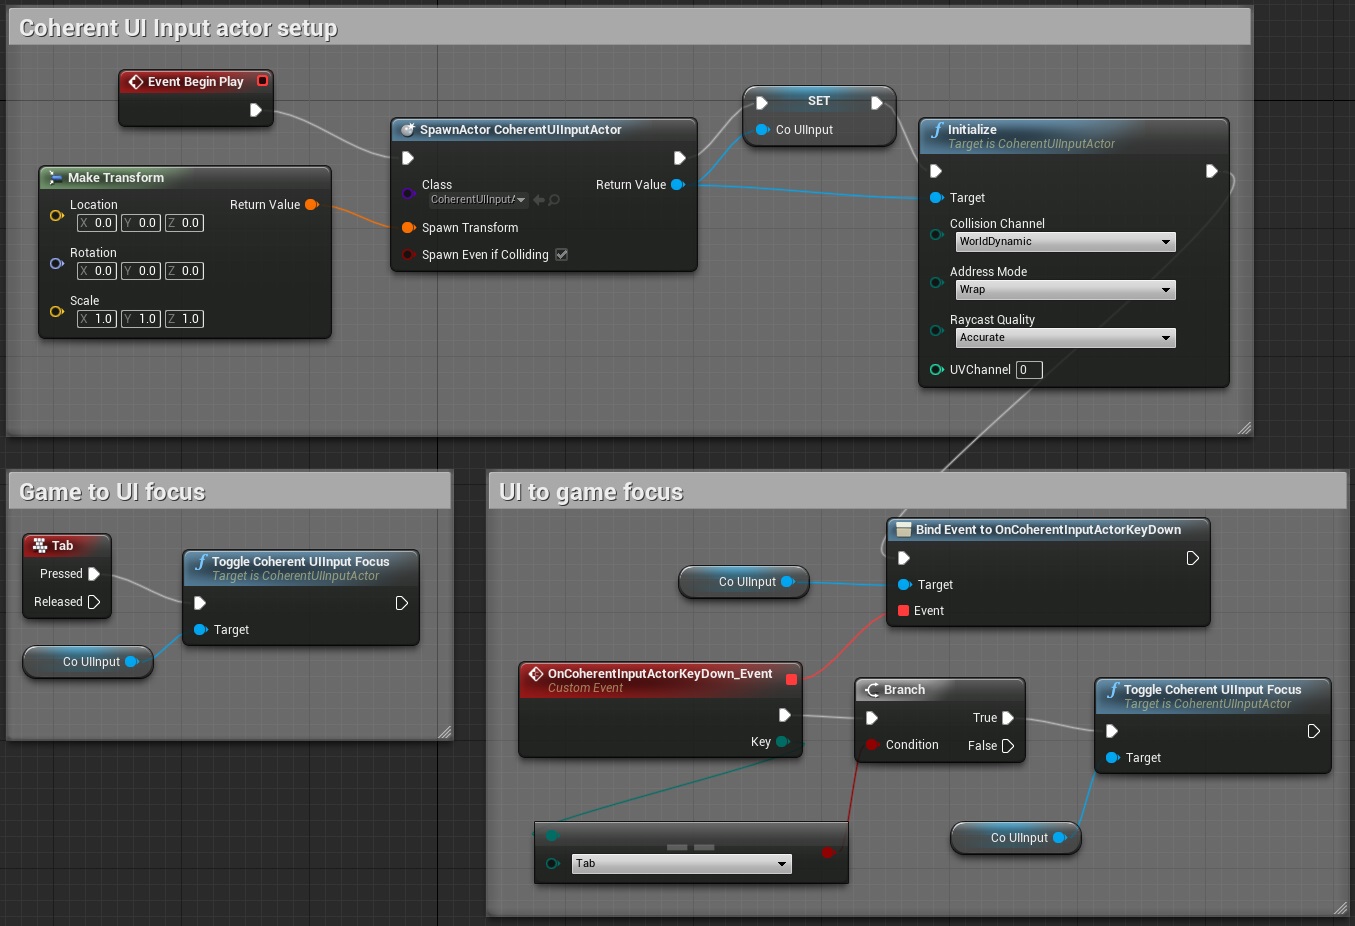
The Coherent GT Input actor setup part shows how to spawn and initialize the input actor, which in turn adds the SCoherentUIGTInputForward widget to the viewport.
The Game to UI Focus part is for managing input focus - when you press Tab, the character input will stop and the UI will take it. This would seem to be enough, but currently UE4 stops firing key events when the focus is not on the viewport so we need other means to get focus back to the game. This is shown in the UI to game focus part. The Coherent GT input actor provides events for key/mouse up/down - in the sample we're using the key down event. When it's fired there's a check for the key enum to see if it's the Tab key, and if it is, the focus is toggled.
The "Toggle Coherent GT Input Focus" function provides means for toggling input without tracking it. If you want to, there are also functions for querying and setting the focus explicitly.
The input in Coherent GT is managed through a Slate widget (SCoherentUIGTInputForward). This widget is an empty widget that covers the whole screen and forwards input to a Coherent GT View. The widget should be added in the front of the viewport so it can process mouse and keyboard messages first. Due to Unreal Engine 4's architecture, the widget can process keyboard messages only if it's focused. To focus the widget, you can use the FSlateApplication::Get().SetKeyboardFocus(Widget) method. Focus management must be implemented by the client.
You can also show the system mouse cursor using FSlateApplication::Get().ResetToDefaultInputSettings();. If you want to set focus back to the game, FSlateApplication::Get().SetFocusToGameViewport(); will do that.
If the SCoherentUIGTInputForward widget has focus, then keyboard events are sent to the focused Coherent GT View. To focus a view, you should click anywhere on it.
Mouse events are sent only to the Coherent GT View that is below the cursor. The code is inside the SCoherentUIGTInputForward::OnMouseEvent method. The method does roughly the following:
View::IssueMouseOnUIQuery, View::FetchMouseOnUIQuery and View::IsMouseOnView APIs. If any of the HUD Views is below the mouse, the appropriate mouse event is sent to it.SCoherentUIGTInputForward::SetRaycastCollisionGroup API. Currently, the collision group is set for all objects. If an object is hit and it has a UCoherentUIGTComponent, the mouse coordinates re converted in Coherent GT View space and sent to the View. The conversion is done using the UV coordinates of the static mesh. By default, the first UV channel is used, but that can be changed with SCoherentUIGTInputForward::SetRaycastUVChannel.To setup the widget in the CoUIGTTestFPSSample the following code is added in CoUIGTTestFPSCharacter.h:
TSharedPtr<class SCoherentUIGTInputForward> CoherentUIGTInputForwardWidget;
Then in ACoUITestFPSCharacter::SetupCoherentUIGTInput in CoUITestFPSCharaceter.cpp the widget is instanced and initialized:
CoherentInputForwardWidget = SNew(SCoherentInputForward).Owner(this);
if (GEngine->IsValidLowLevel())
{
    GEngine->GameViewport->AddViewportWidgetContent(
        SNew(SWeakWidget).PossiblyNullContent(
            CoherentInputForwardWidget.ToSharedRef()));
}
if (CoherentInputForwardWidget.IsValid())
{
    CoherentInputForwardWidget->SetVisibility(EVisibility::Visible);
}
The code above creates and adds the SCoherentUIGTInputForward widget to the front of the viewport. After that the widget takes care for sending input to Coherent GT as explained above.
Of course, you can also use the Coherent GT View API to create your own input events and send them to Coherent GT. The View provides the MouseEvent, KeyEvent and TouchEvent methods that send input to the it. Each Coherent GT input event has to be populated with properties that can be trivially translated from the UE4 events.
Here we outline some common usages of the input system. The examples are given using blueprints and the Coherent GT Input actor as these maps directly to C++ code. We'll assume that you already have a spawned and initialized Coherent GT Input actor:
Toggling input focus can be done 2 ways:
ToggleCoherentUIGTInputFocus method. The actor keeps track of the current focus internally so it can toggle between game and UI at any time. If you want to set it explicitly, you can use SetCoherentUIGTInputFocus, or query the state with IsCoherentUIGTFocused.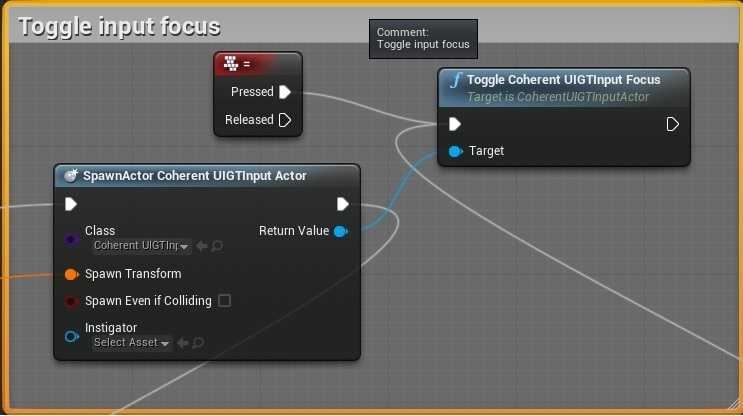
After the Coherent GT Input Actor has focused the input forwarding widget, you need to set which view should receive the keyboard input. This can be done with the SetCoherentUIGTViewFocus method. An alternative is to simply let the user click on the input field that she wants to type in.
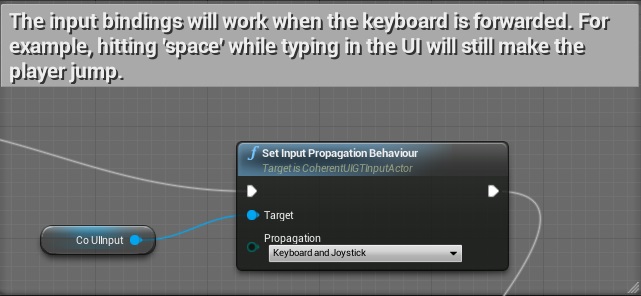
When the UI is focused, keyboard events are consumed by the Coherent GT Input forward widget by default. You can change that using the SetInputPropagationBehaviour method. The available options are to forward keyboard events, joystick events, both or none to other widgets.
This can be useful if you need to have your action handlers (e.g. "Jump", "Fire", etc.) executed even if the focused widget isn't the game viewport.
Note that joystick forwarding is only taken into account when using the Coherent GT Input actor's methods for setting (or toggling) focus.
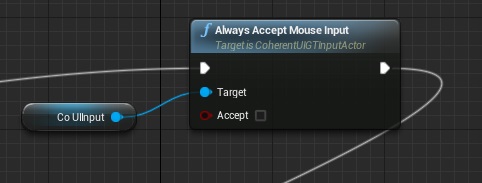
If you want your mouse input to be forwarded to Coherent GT first for hover events, but still receive keyboard events in your game, then you can use the AlwaysAcceptMouseInput method. When set to true, mouse events will be received by Coherent GT, regardless of whether the input forward widget is focused or not.
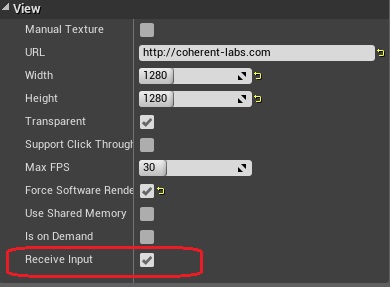
To control whether a Coherent GT view receives mouse events you can change the View component's Receive Input property. Only when this property is set to true will the component be considered for receiving input events.
When you have multiple views on 3D objects and they are overlapping when viewed with the current camera, the front one will receive the mouse input events, and the back one will get nothing. If, for example, you have disabled input on the front one, the back one will still get nothing, because 3D objects under the cursor are gathered with a raycast from UE4, which is independent from the input forward widget's logic.
For performance reasons, by default the raycast returns only the first hit object. In a scenario like above, when you have 2 objects and you want to forward input to the back one when the front one is marked as not receiving input, you have to change the raycast type from returning single object to returning multiple objects.


It's common in some cases (e.g. in-game menu) that you'd pause your game and show a menu that doesn't cover the whole screen.
With the default implementation of the input widget, mouse events will be passed on to the viewport (or other 3D views) when they happen in a transparent area of the HUD. This may not be desired with in-game menus, since the designer would likely want to have the menu focused until the player explicitly resumes the game.
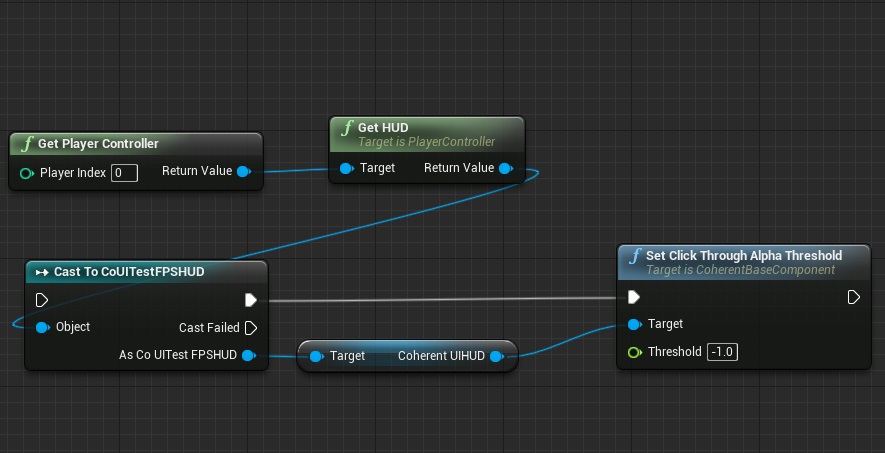
There's a simple solution for that - setting the click-through alpha threshold. This value determines the maximum alpha value of a pixel so it's considered transparent and input is passed on the next handler. If you set that to 0, only completely transparent pixels pass input. If you set that to a negative value, e.g. -1, every pixel is assumed to be solid since its alpha is in the range [0, 1], thus never passing input to other handlers.
You can also do this with Blueprints as the CoherentUIGTComponent has the whole Coherent::UIGT::View API exposed.
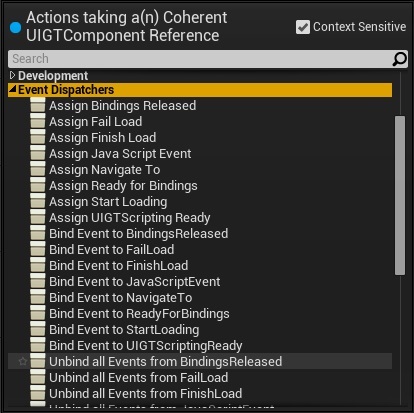
Almost all View methods have been exposed to the Blueprint visual editing system. Coherent GT Components also trigger dynamic multicast delegates on a variety of events that users can subscribe to and use either from C++ or Blueprint.
A sample of the Blueprint usage is given if you open the Blueprint editor on the StaticActorCoherent object in the sample game.
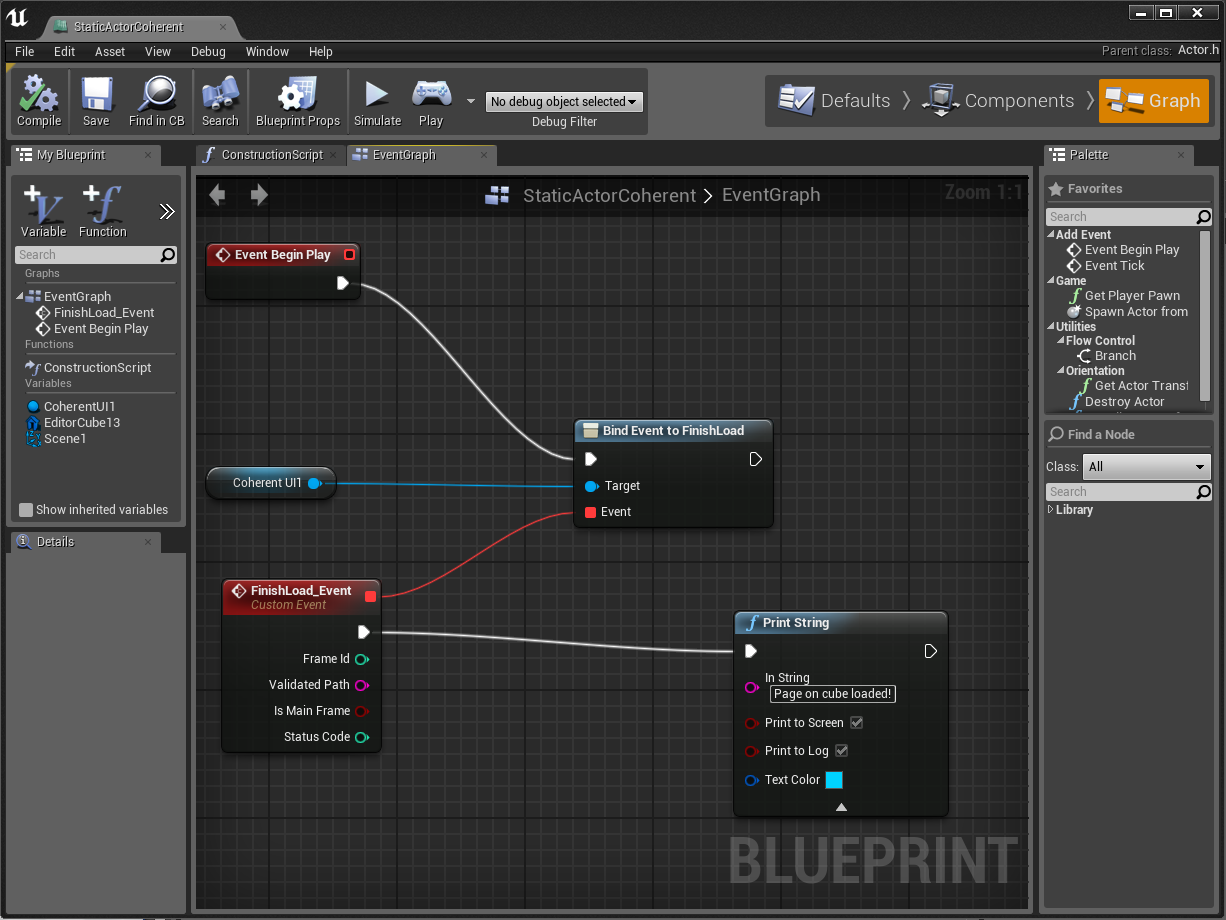
In this case the FinishLoad event (a dynamic multicast delegate) of the Coherent GT Component will trigger a Print String with the text "Page on cube loaded!". FinishLoad is triggered by the Component when its page has been successfully loaded.
For a full list of the events exposed by the Coherent GT Components please refer to the CoherentUIGTBaseComponent.h file or review them in the Blueprint editor.
For a full list of the provided methods please refer to the CoherentUIGTBaseComponent.h file or review them in the Blueprint editor.
Coherent GT is also integrated into Unreal Motion Graphics using the provided UCoherentUIGTWidget which can be found under Coherent GT category in the UMG editor.
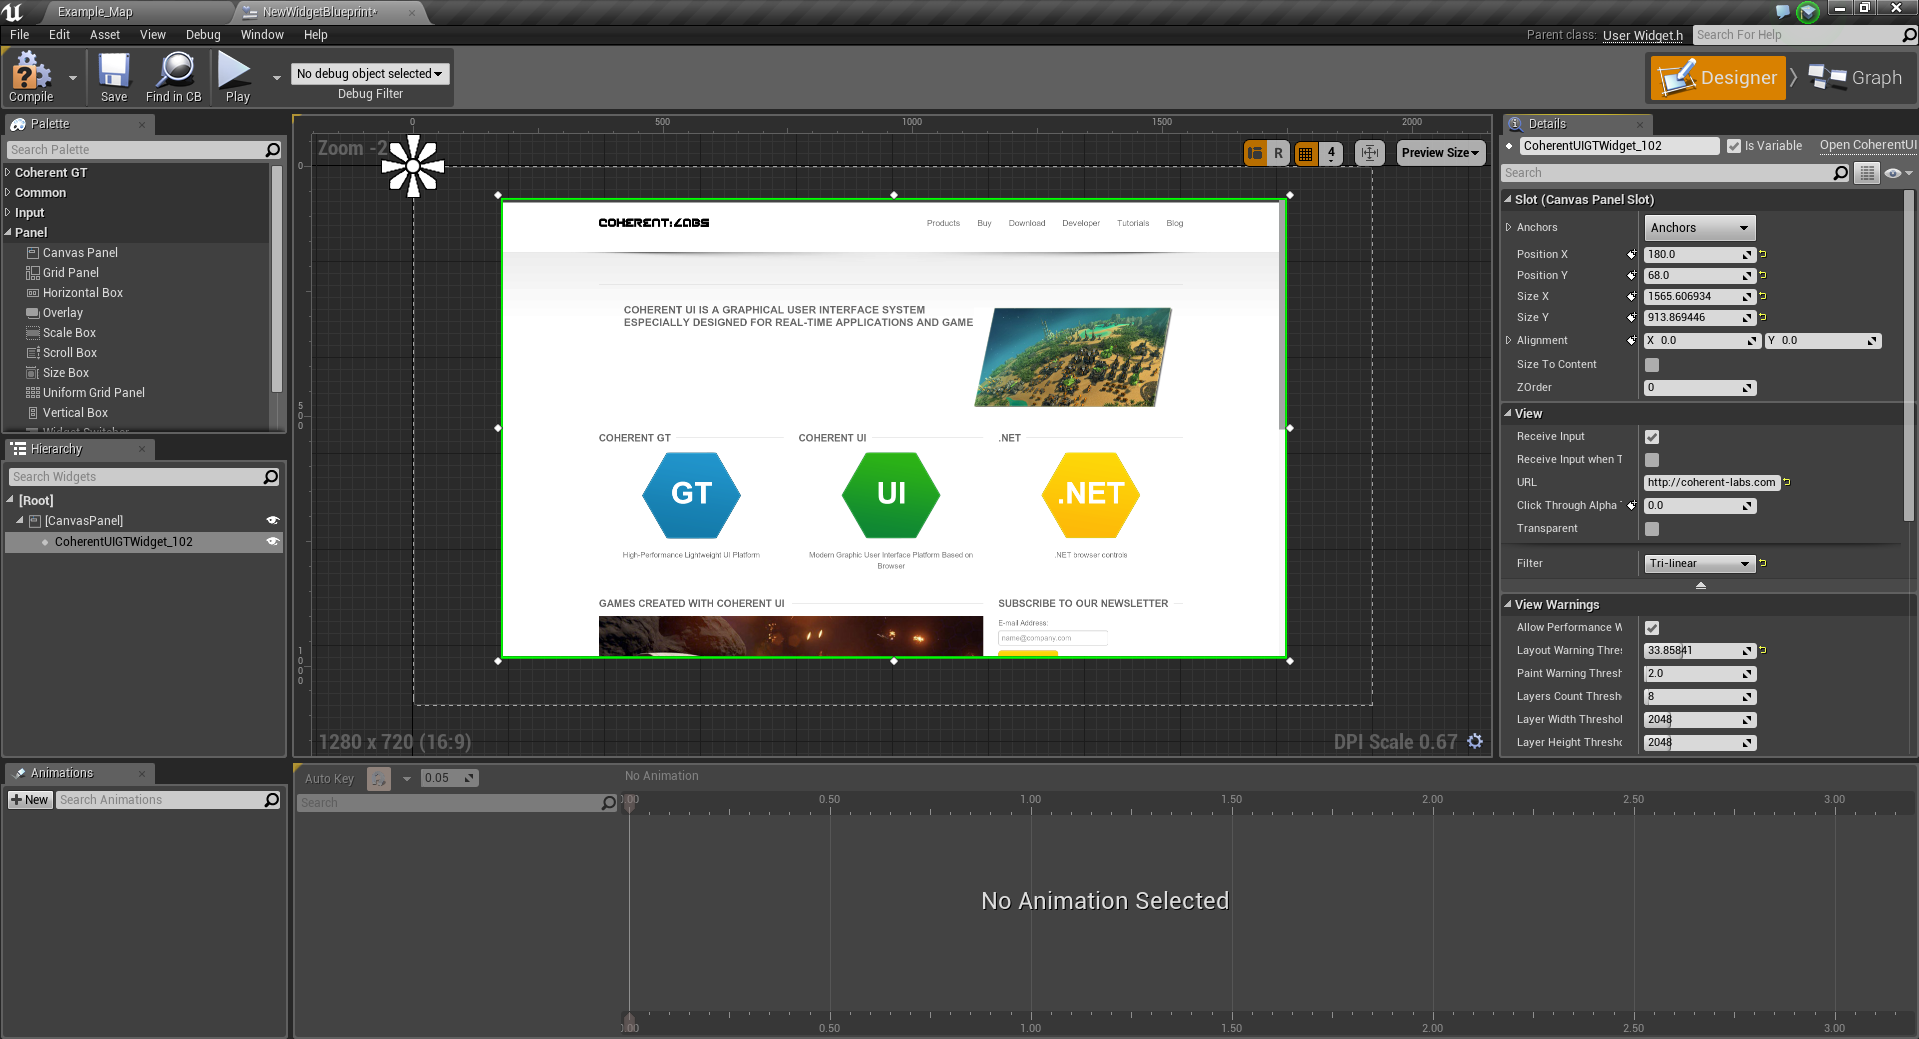
An example usage of the UMG widget can be seen in the provided UMG_Map found in CoUIGTTestFps/Content/Maps. The map uses the UMGHUD widget blueprint found in CoUIGTTestFPS/Content which contains a single CoherentUIGTWidget stretched across the screen.
The widget behaves akin to the components we talked above but due to limitations of Unreal Engine there are some differences. The following properties and methods are present in UCoherentUIGTComponent but not in UCoherentUIGTWidget:
bool ManualTextureint32 Widthint32 Heightvirtual void Resize(uint32 width, uint32 height)FUIGTOnLiveViewSizeRequest LiveViewSizeRequestedThe rest of the public interface is the same and you can use the UMG widget wherever you are using the actor components.
Note that to have sound with the UMG widget you must assign an actor to UCoherentUIGTWidget::Owner after the game has started. This can be done like this:
You can use Coherent's UMG Widget (UCoherentUIGTWidget) within UMG widgets attached as components on objects in the game world. To get optimal visual quality in this case it is required to:
Binding is the Coherent GT name for the communication between the game and the JavaScript pages. In this document we'll use the terms binding and UI scripting interchangeably. This section covers UE4-specifics for communication between the game and the UI. For a more detailed look into the workings of our binding system, see the binding section in our native docs
There are two major ways to transfer data between your game and the UI. One is via message passing (e.g. calling a UI function from the game) and the other one is data-binding - the ability to expose game objects in the UI and directly access them there.
The following sections cover how to use message passing and data-binding, from both C++ and Blueprints to do your UI Scripting.
The data-binding feature allows you to populate your HTML elements based on the current state of the game. For example, if you want to display the player's health somewhere on the page this can be achieved with a one-liner:
<div data-bind-value="{{player.health}}"></div>
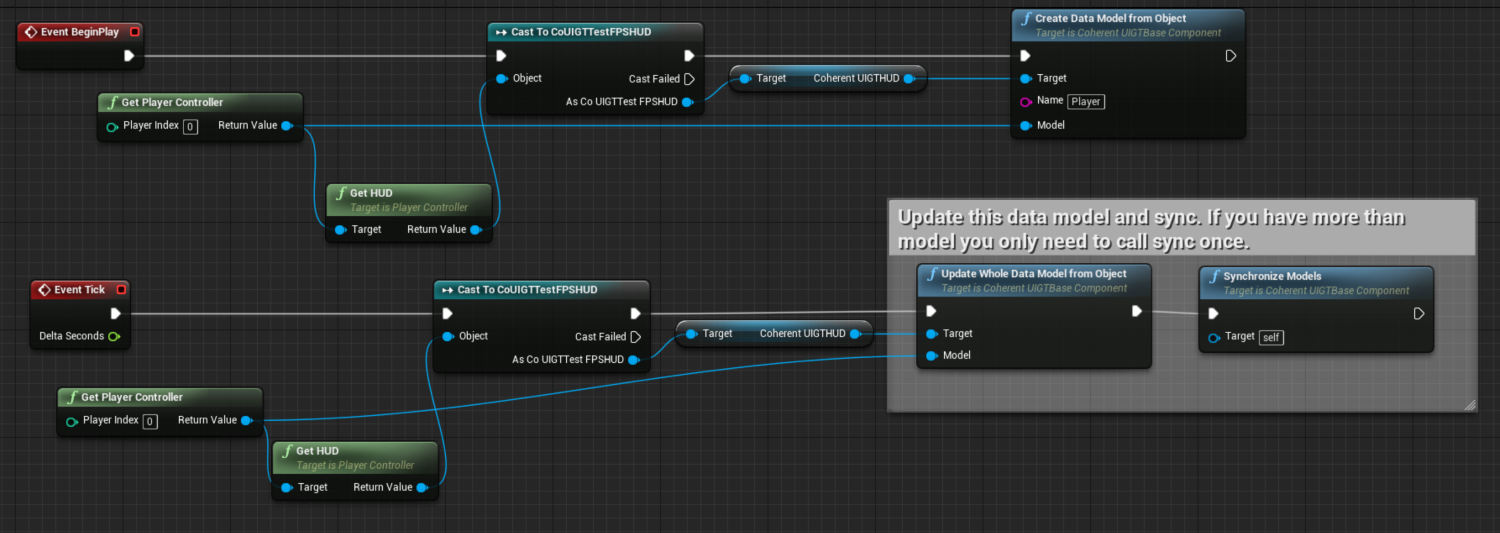
Our system will make sure that anytime the player's health changes, the UI is updated. On the game side, this feature requires you to do 3 things:
From Blueprints call the UCoherentUIGTBaseComponent::CreateDataModelFromStruct / UCoherentUIGTBaseComponent::CreateDataModelFromObject depending on whether you want to expose a UObject instance or a USTRUCT. From C++ the same can be achieved from the Coherent::UIGT::View::CreateModel method:
GTComponent->GetView()->CreateModel("player", Player);
From Blueprints use UCoherentUIGTBaseComponent::UpdateWholeDataModelFromStruct / UCoherentUIGTBaseComponent::UpdateWholeDataModelFromObject. From C++ use Coherent::UIGT::View::UpdateWholeModel:
GTComponent->GetView()->UpdateWholeModel(Player);
C++ code can do more than Blueprints and you can also mark only certain parts of your data model for update instead of the entire model. This can improve performance when you are data-binding complex objects. See the <Coherent/UIGT/View.h> header and our native docs for more info.
From Blueprints use UCoherentUIGTBaseComponent::SynchronizeModels From C++ use Coherent::UIGT::View::SynchronizeModels`:
GTComponent->GetView()->SynchronizeModels();
A complete Blueprint script may look like this:
This was only a very brief introduction to data-binding. For full information about the data-binding feature - e.g. what the other bindings are available (aside from data-bind-value), how does it work under the hood, our complimentary component system and advanced usage - see our native docs at http://coherent-labs.com/Documentation/cpp-gt/.
Coherent GT supports scripting the UI via Blueprints. This allows developers to expose game objects to the UI to populate the interface and trigger actions from the UI like starting a new game when the player clicks "Start game" in a menu.
With Coherent GT you can script the whole UI via Blueprints without any C++ code.
Developers can trigger events in the UI JavaScript code via Blueprints. They can also listen to events triggered in JavaScript and implement game logic on such events. Developers can expose primitive types or any UObject to JavaScript to populate the UI.
In this section we'll introduce a small example that shows two-way communication between Blueprints and the UI JavaScript. The example is available in the Coherent GT sample game.
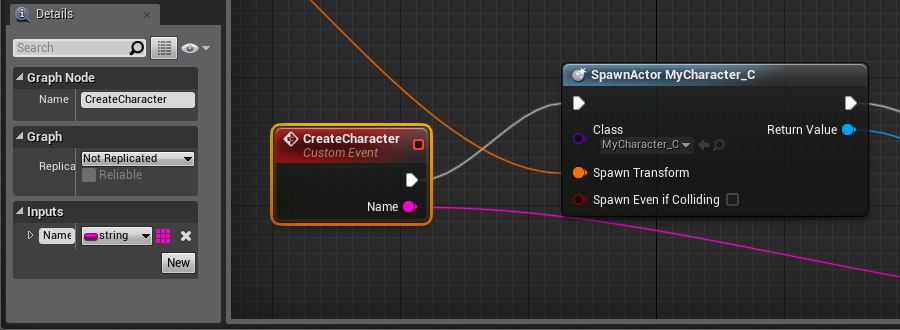
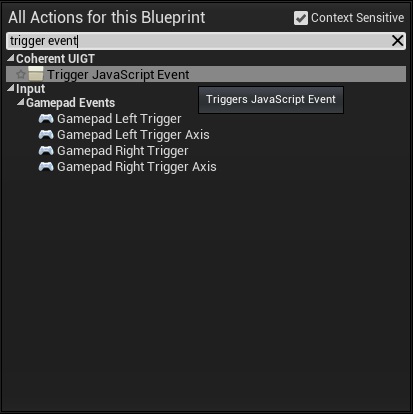
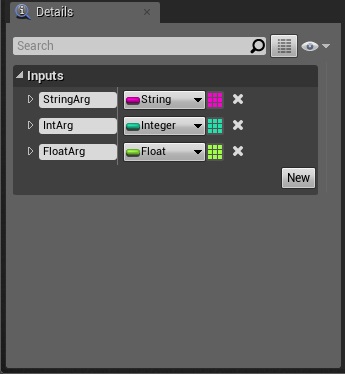
Coherent GT supports triggering Custom Events defined in Blueprints. The event must be declared in the Blueprint that contains the UCoherentUIGTComponent component. To use this functionallity, simply right click on the Event Graph and choose Add Event -> Custom Event from the menu. Name the event and add the necessary input arguments, if any. Let's have the event CreateCharacter which takes the character's name as only argument. Here is how the custom event looks in the Blueprint editor:
Now you can trigger this event from your UI like this:
engine.trigger('CreateCharacter', 'Joe Monster');
Coherent GT will automatically trigger the custom event with its argument from JavaScript. Please note that currently only primitive types are supported as arguments - bool, byte, int, string, float.
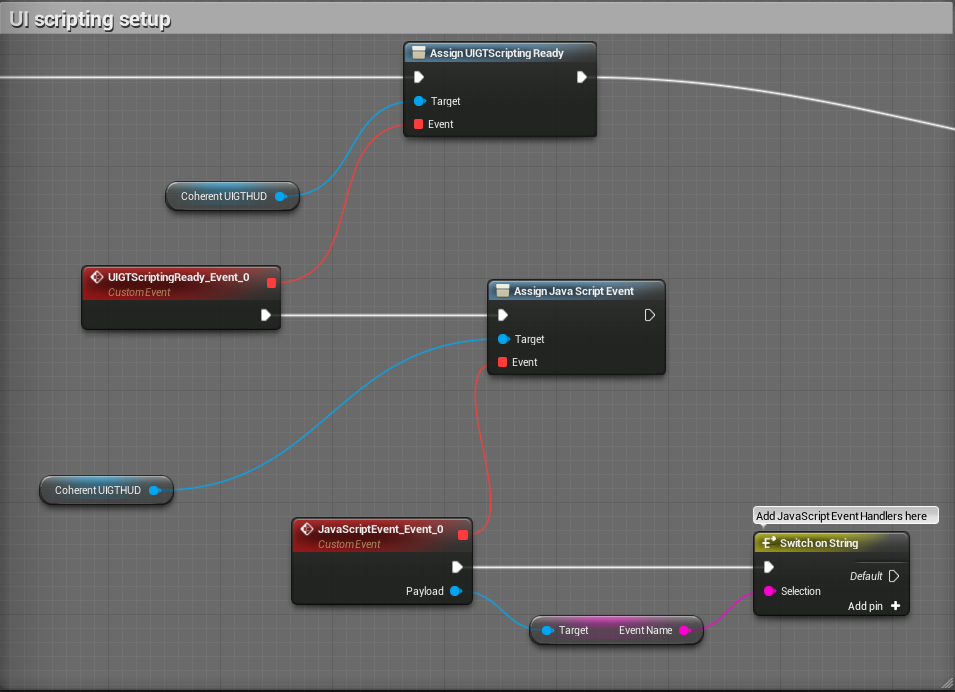
In this section we'll show an example showing how to send data from a Blueprint to the UI. The first part of the example, will show you how to trigger a simple event from a Blueprint. The second one expands it with exporting whole game objects to the UI.
There are two ways of triggering JavaScript events from a blueprint.
We'll start with the easier one first. It encapsulates all the required logic that you would otherwise have to do yourself with multiple blueprint nodes.
UIGTScriptingReady event.Here's how the final blueprint looks like:
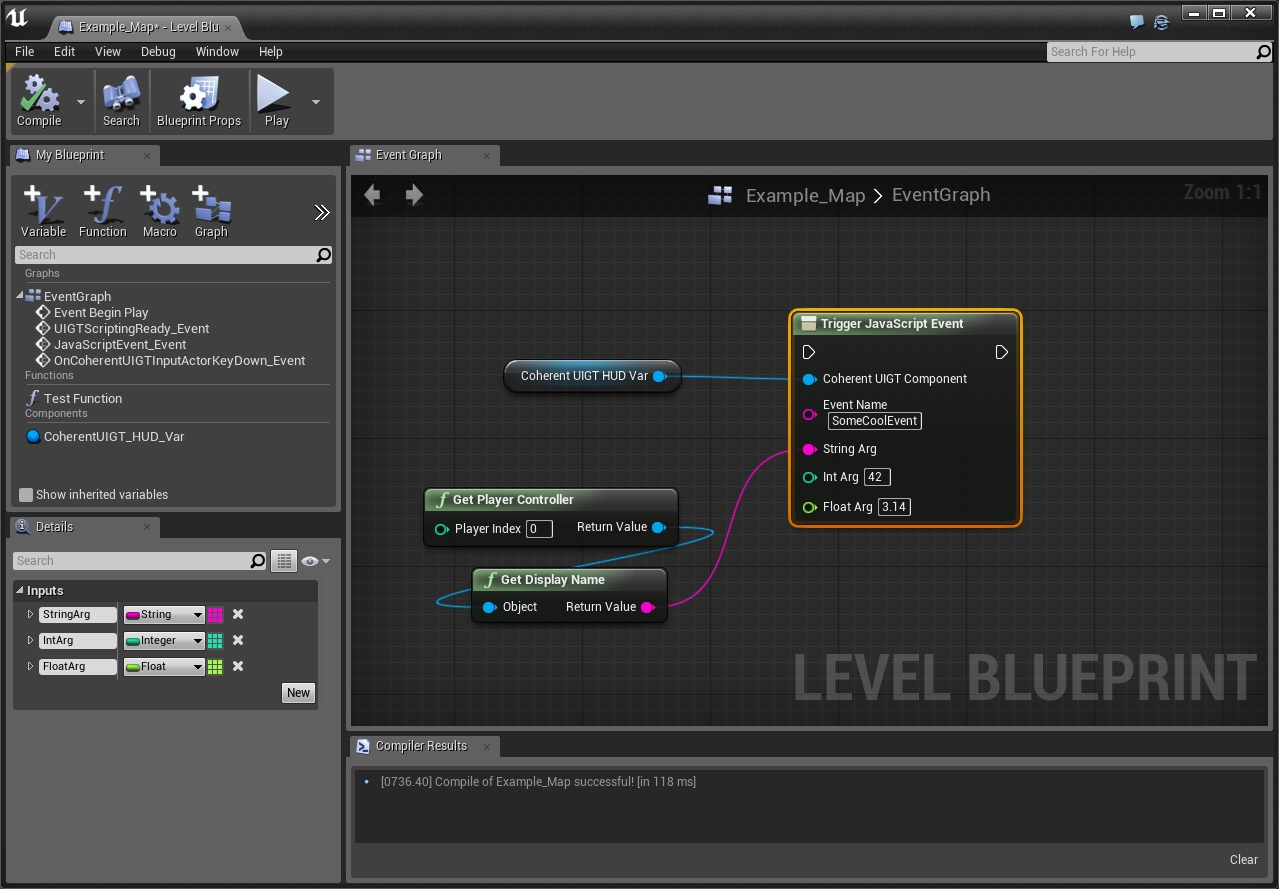
The second ways is more verbose and explicit. We'll examine it in the context of the sample game:
Get Player Controller node.Get HUD Node from the PlayerControllerGet HUD node, drag a pin and add a Cast to CoUIGTTestFPSHUD Node.CoUIGTTestFPSHUD node, drag a pin and get its Coherent GT HUD property.Coherent GT HUD object and select Assign UIGT Scripting Ready. The UIGTScriptingReady_Event event will be triggered when the page is ready to receive events. Note that you MUST add call to this event manually to your JavaScript code in the UI AFTER all your initial engine.on event subscriptions.Create JSEvent node. This node produces the object that will represent our event.Assign to UIGTScriptingReady with Create JS Event. This means that as soon as the page is ready to receive events, we'll send this one.Create JS Event node and create a Sequence node.Then 0 of the Sequence node, and create Add String node. The JS event object that we just created can carry an arbitrary amount of arguments that will be available to the JavaScript of the page (each parameter must be added to the event with the appropriate Add XXXX node before the event is triggered; the order by which arguments are added to the event will be the order the JavaScript code receives them).Create JSEvent with the target of the Add String node.Trigger JSEvent node. This is the node that will effectively execute the event and send it to JavaScript. It must happen after all arguments have been added.Then 0 in the Sequence node, drag a pin and create Add String node.Then 1 to the EventData pin of Trigger JSEvent.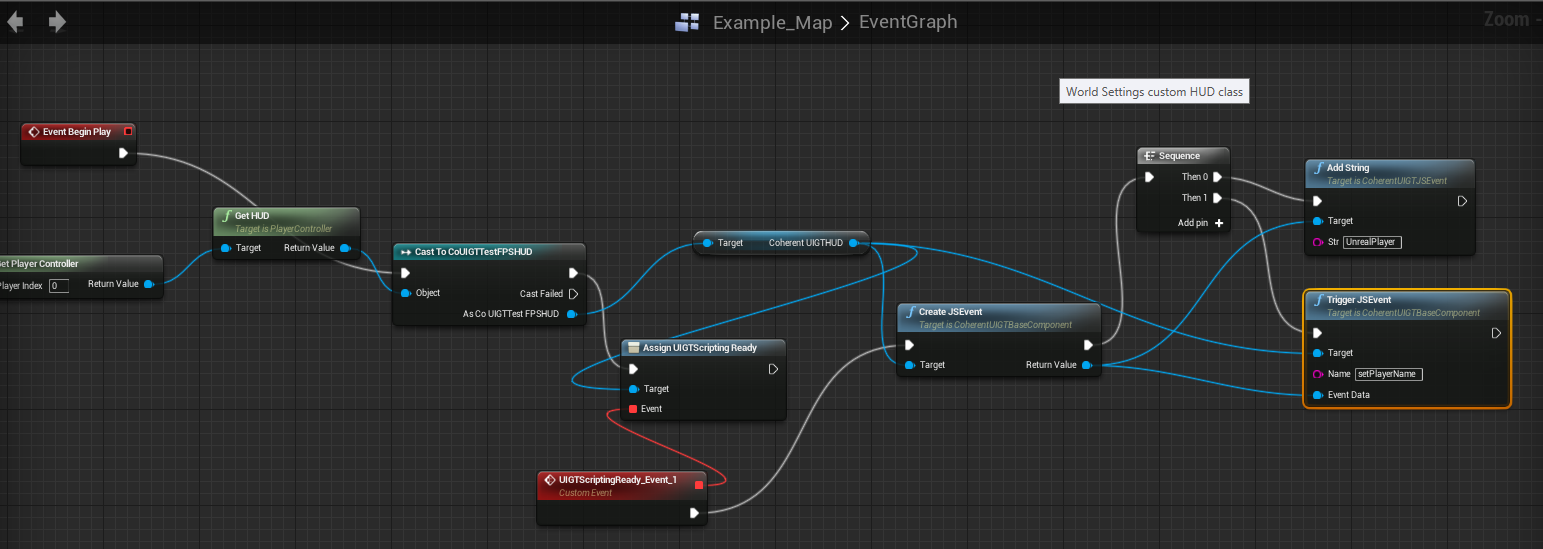
This guide assumes you have completed the first part of the sample, creating and sending a simple JS event, steps 1 to 13.
We'll make available the whole PlayerCharacter object to the UI and we'll show on-screen the player name, the max health she can have and the max ammo she can carry.
In the "hud.html" page you can see that there is a "playerInfo" element that contains the player data we want to show. We'll populate this data from the game through Blueprints.
Get Player Character node.Create JS Event node and create a Add Object node. The JS event object that we just created can carry an arbitrary amount of arguments that will be available to the JavaScript of the page. Each parameter must be added to the event with the appropriate Add XXXX node before the event is triggered. The order by which arguments are added to the event will be the order the JavaScript code receives them.Add Object. This means that our event will send the whole player character object to JavaScript and we'll be able to use it's properties in the UI.Trigger JS Event node. This is the node that will effectively execute the event and send it to JavaScript. It must happen after all arguments have been added.SetPlayerState.Add Object node and the Then 1 to the Trigger JS event node.The screenshot below shows the complete Blueprint.
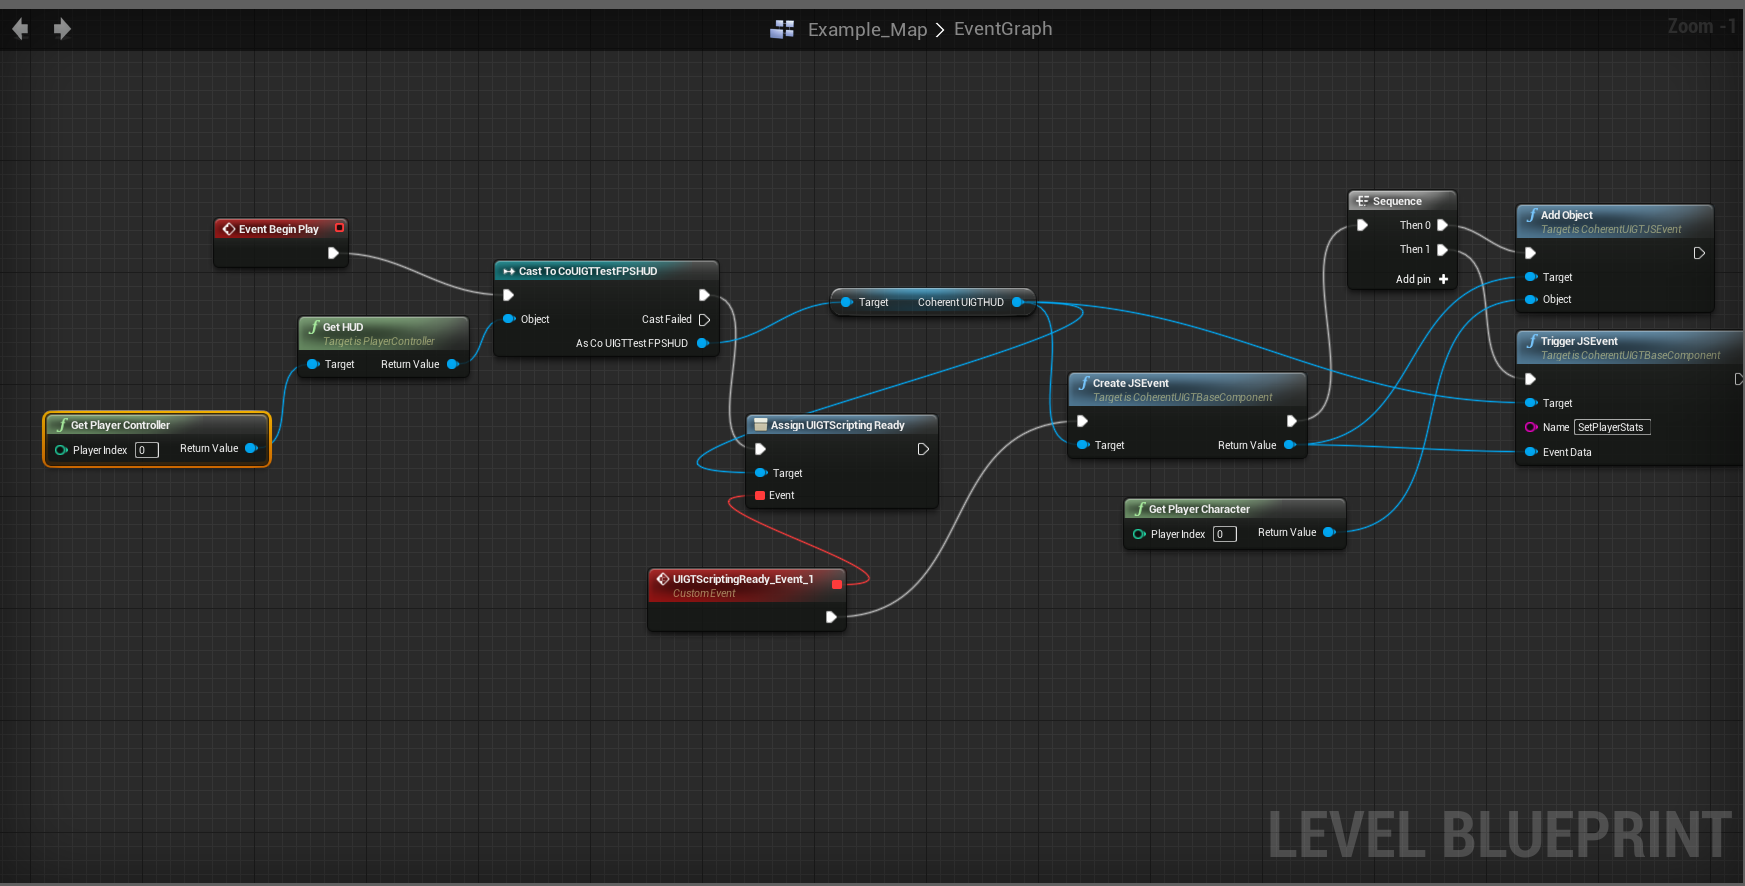
As soon as the game starts and the HUD loads, the SetPlayerStats event will be triggered and the corresponding JavaScript code that populates the Statistics fields in the UI will execute.
In JavaScript we've added a handler for the SetPlayerStats event (see CoUIGTTestFPS/Content/Resources/uiresources/MainUI.html.
engine.on('SetPlayerStats', function (character) {
    $("#playerName").html(character.PlayerName);
    $("#playerMaxHealth").html(character.MaxHealth);
    $("#playerMaxAmmo").html(character.MaxAmmo);

    $("#playerInfo").css("display", "initial");
});
// IMPORTANT: Signal the game we are redy to receive events
// We have setup all JS event listeners (the 'engine.on' calls)
engine.call("UIGTScriptingReady");
The character variable contains all the properties of the APlayerCharacter actor in the game. Now we can use them to populate the "Statistics" of our UI.
Note that when exporting UObjects, only their primitive type UPROPERTY-tagged fields are exported. UObjects contained in exported UObjects are not recursively exported because they might contain circular dependencies and cause memory outages.
The object in JavaScript is a copy of the original one, so changing directly its properties won't affect the object in the game. You can however call events back in the game with parameters and use this mechanism to update logic in the game from the UI. This is explained in the next section.
This section show the other way of communication - from the UI to the game. We'll use the Menu level from the Coherent GT sample game. When the player clicks on the "Start game" button we'll send an event from JavaScript to the game and change the level.
First, let's see what happens in JavaScript when the player clicks Start game:
document.getElementById('play').onclick = function () {
    engine.call('onStartGame', 'Example_Map');
};
The code is pretty self-explanatory - when the 'play' button is clicked call an event in the game called onStartGame. Example_Map is a parameter for this event and is the name of the level to load.
Now lets create the Blueprint that will handle this event and actually load the new level.
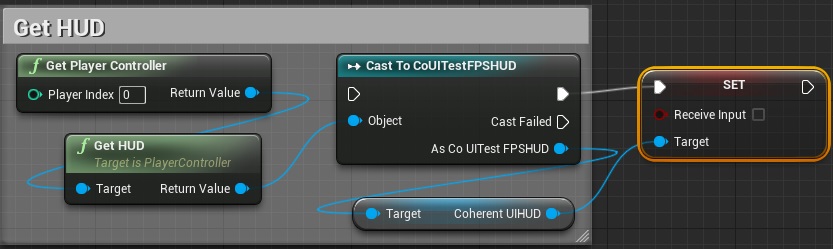
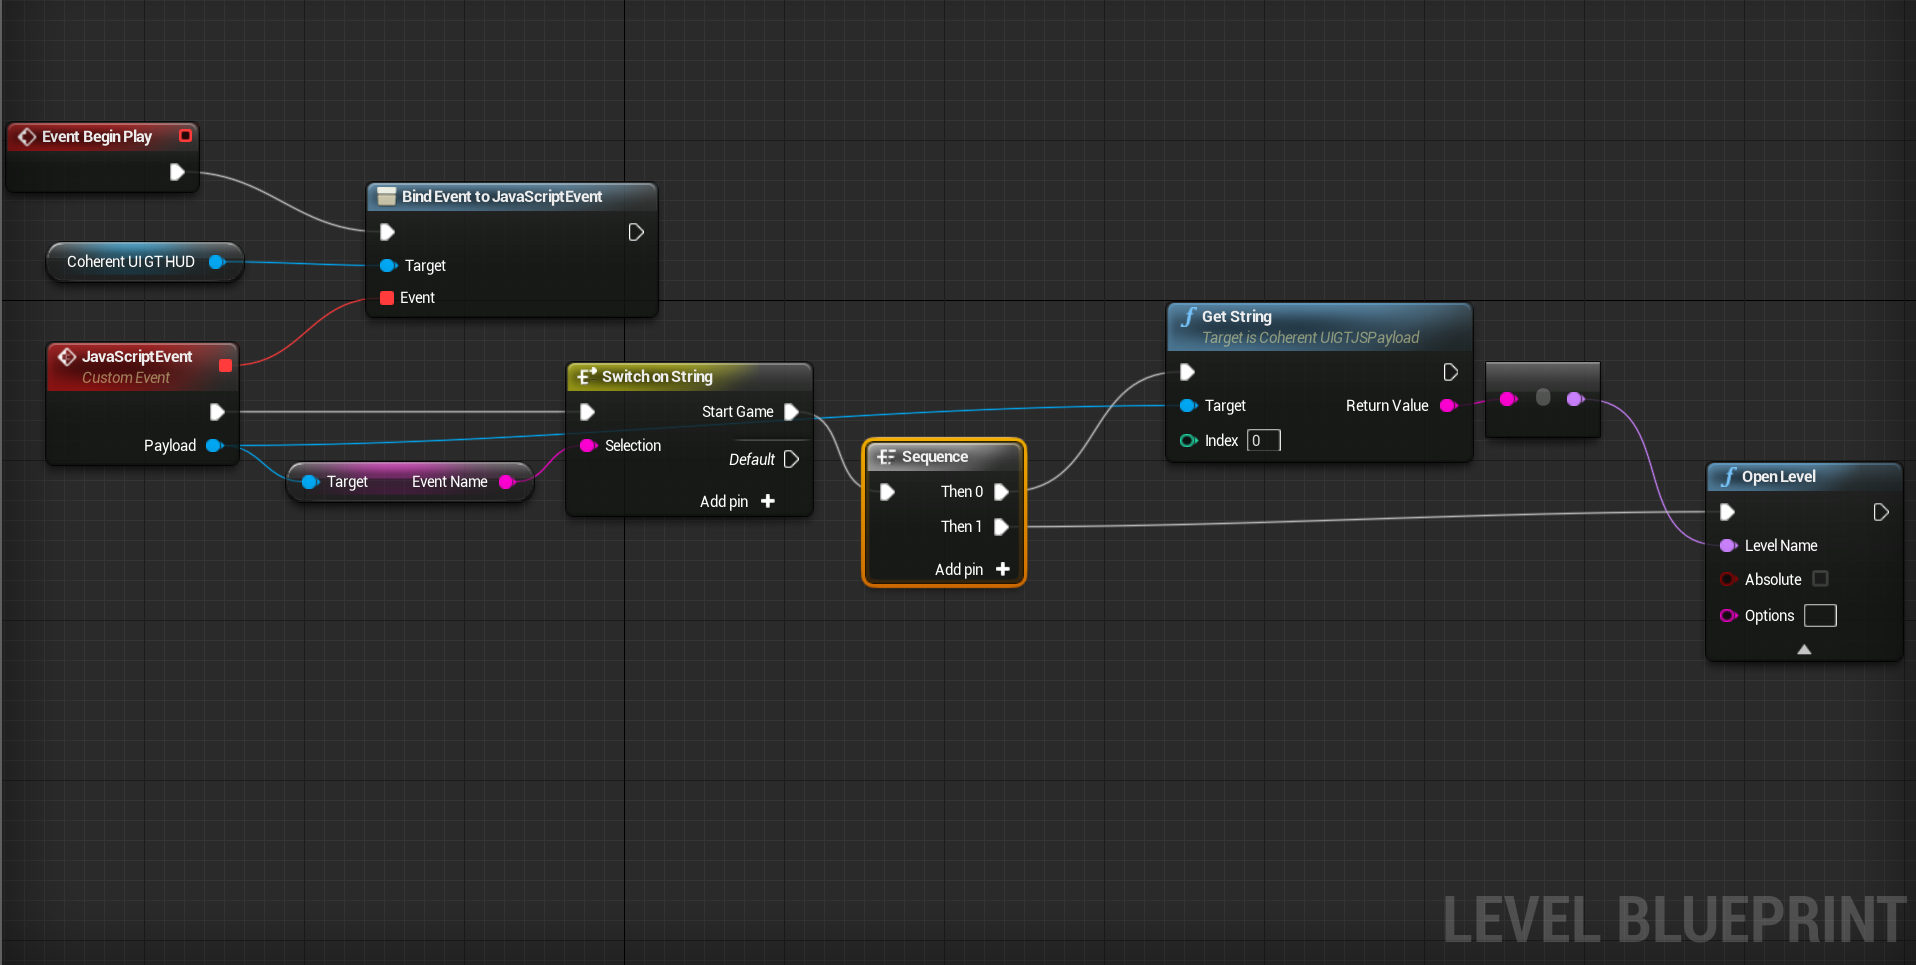
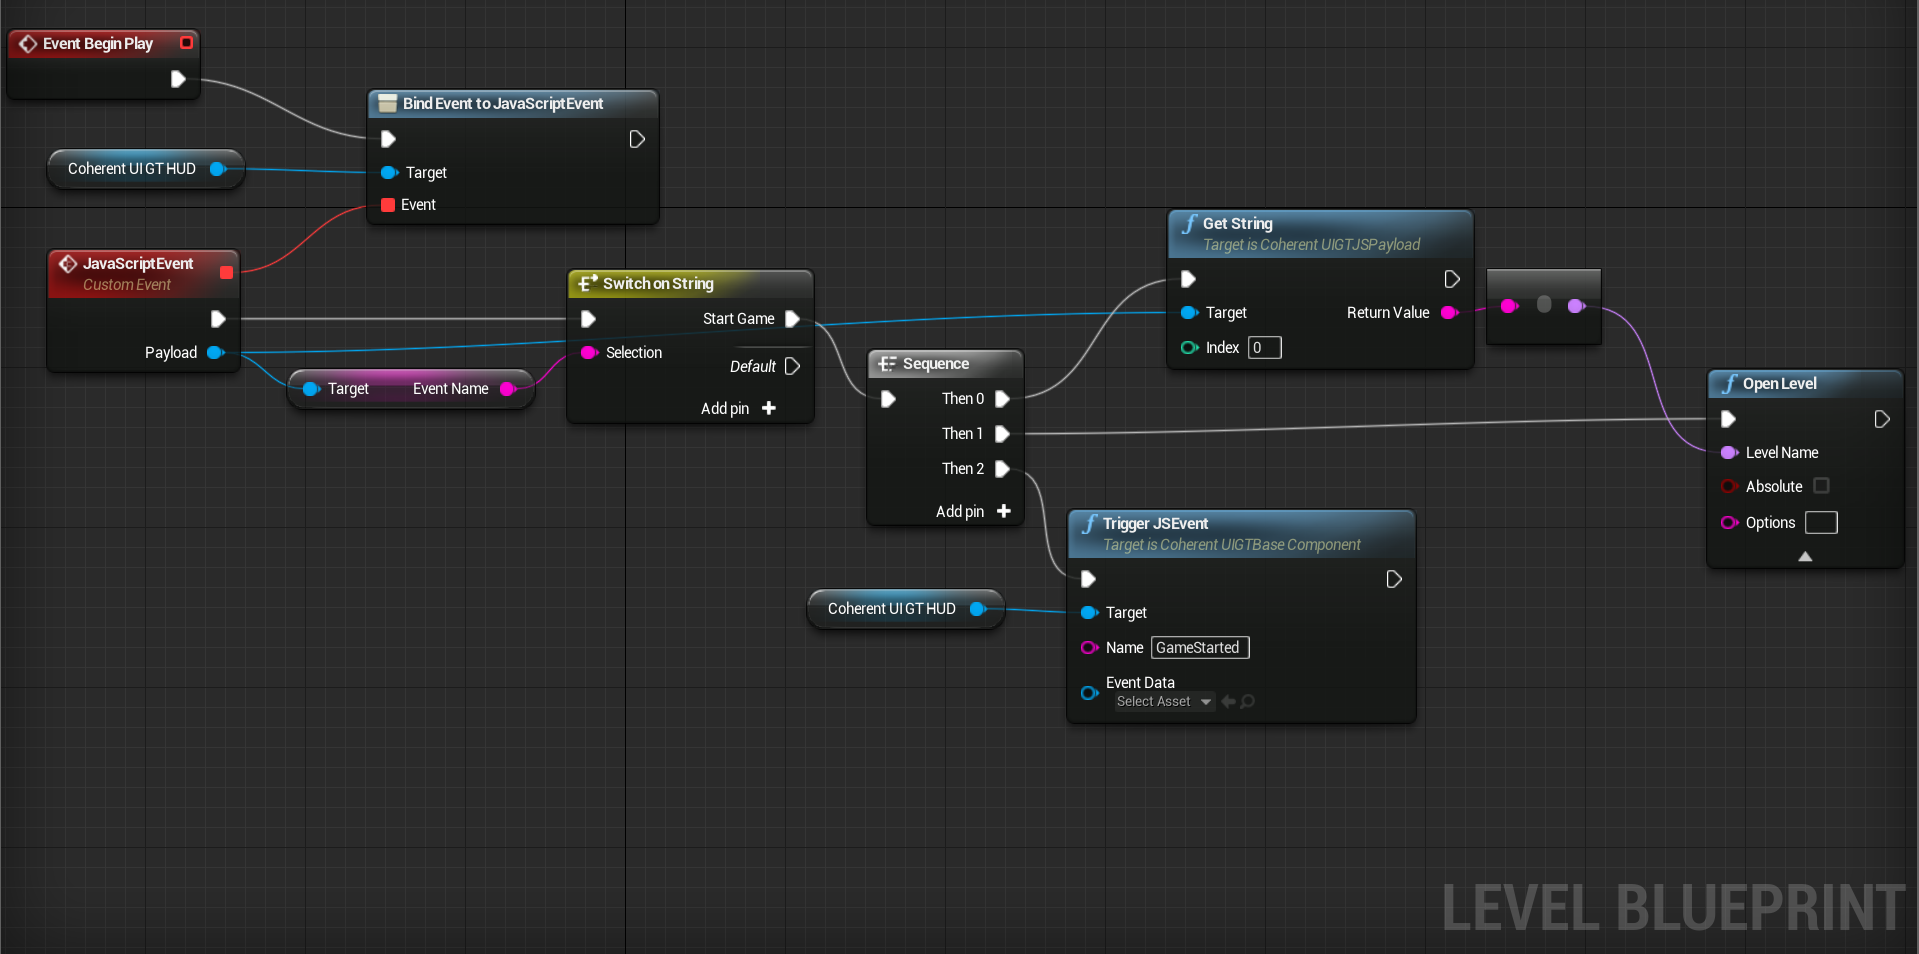
CoUIGTTestFPSHUD Node.CoUIGTTestFPSHUD object get the Coherent GT HUD View so as to get the Coherent GT HUD property.Assign to UIGTScriptingReady. The UIGTScriptingReady event will be triggered when the page sends an event to the game.JavaScriptEvent_Event node and assign it a Switch on String. The JavaScriptEvent_Event will fire each time a call is made from JavaScript. However, we are interested in only one type of event - onStartGame.JavaScriptEvent_Event Payload property. This is an object of type CoherentUIGTJSPayload that contains the name of the event fired as well as all the parameters passed by JavaScript. Get the Event Name property and connect it to the Switch on String node.Switch on String node and set its name to onStartGame.Sequence node and connect it to the Switch on String. Our sequence will be getting the name of the level passed from JS through the Payload object and then loading a new level with that name.Payload object and create a Get String node. This will be the node that retrieves the name of our level. Coherent GT supports all primitive UE4 types as well as UObjects. Note the index property of this node. It tells the node which parameter to select from the ones passed by JavaScript. You can pass multiple parameters, their order is the same from left to right as passed in JS starting from 0. If we had a second parameter of type "int", we'd have to add a second Get Int 32 node with index = 1.Open Level node. Connect the pin Return value from the Get String node to the Level Name.This is how the final blueprint looks like:
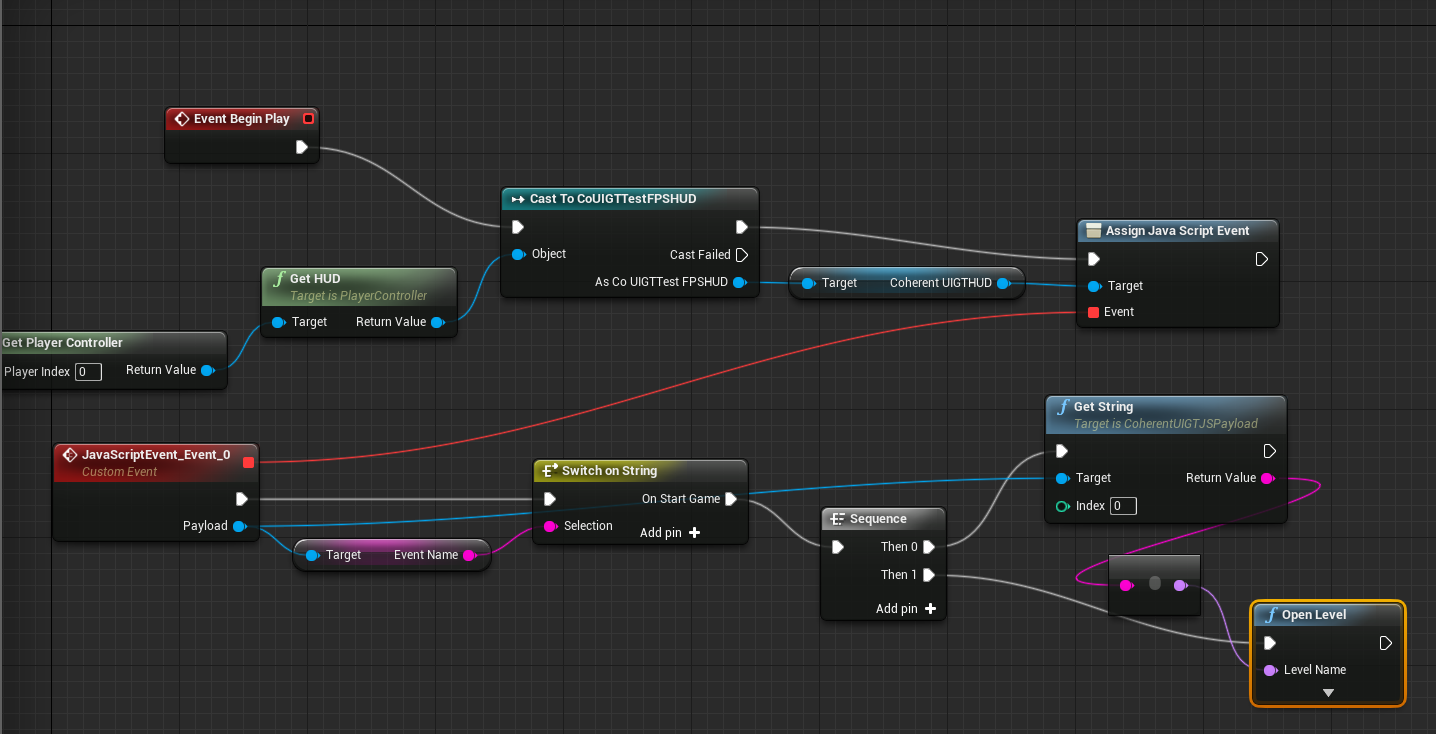
Remember that Coherent GT supports as many arguments as you need in both directions of scripting and you can send UObjects both ways, too - they work automatically.
Coherent GT supports automatic export of instances of USTRUCT and UCLASS (e.g. UObject) from the game to the UI. Just send a UObject parameter and all its UProperties will be available in the UI page. Only first level properties are sent, UObjects inside other UObjects are not recursively expanded.
You can also update values in UObjects from JavaScript. To do this create a JavaScript object with the properties you want to change named the same way as in the game. The object must also contain a special property __Type with the name of the C++ type. For instance:
var myCharacter = {
    __Type: 'PlayerCharacter',
    PlayerName: "MyJSPlayer",
    MaxAmmo: 800
};
Now you can send an event to the game with this object:
engine.call("UpdatePlayer", myCharacter);
In the game Blueprint, when you receive the event, you can create a Read Object node from the CoherentUIGTJSPayload object and pass it to the APlayerCharacter of your game. All properties that have the same types and names as the ones passed from JavaScript will be updated. You can do this with any UObject. As long as the names and types of the objects coincide, they'll be updated by the "Read Object" node.
Currently returning values from the game to JavaScript events is not supported for Blueprints (it is possible with the C++ interface) but will soon be available.
Objects sent to JavaScript are copies of the ones in the game. Therefore, sending smaller objects less often is preferable as it incurs less resource usage.
As a general note the best way to structure the scripting is to create blueprint functions for every interaction and call them when needed from the master Blueprint. This makes the master Event Graph much less cluttered and more readable.
Coherent GT provides a very powerful binding framework that can be used to connect the C++ logic of the game with the UI JavaScript code and vice-versa.
A detailed guide on Binding is also given in the C++ documentation of Coherent GT.
To use the Coherent GT Binding feature, your page MUST include the coherent.js file.
To trigger events from C++ to JavaScript you can use the TriggerEvent method of the View.
void ACoUIGTTestFPSCharacter::OnTabReleased()
{
    Coherent::UIGT::View* View = GetCoherentUIGTView();
    if (View)
    {
        View->TriggerEvent("ToggleMenu");
    }
}
Any parameters you pass to it will be also sent to the JavaScript code. In JavaScript you must define which function should be called when an event is triggered from C++. The coherent.js file exposes a special JavaScript object named engine that provides the glue and connections between the events in C++ and JS. You must use that object to define all your event handlers. The on method will bind an event to a JS handler.
engine.on('ToggleMenu', toggleMenu);
In this case as soon as C++ calls TriggerEvent("ToggleMenu"), the toggleMenu function will be executed in JavaScript.
Triggering events from JavaScript to C++ is analogous. First, in C++ you need to define which method (or UE4 delegate) will handle a specific event triggered from JS.
Defining C++ handlers must happen after the View has triggered the ReadyForBindings event. If you want to handle this event, you must subscribe to it and in its handler you should declare all your bindings. In the ACoUIGTTestFPSHUD Actor in the sample game this is done with the following line:
CoherentUIGTHUD->ReadyForBindings.AddDynamic(this, &ACoUIGTTestFPSHUD::BindUI);
Now, as soon as the View has been loaded, it will invoke the BindUI method where you can declare all the bindings for the View.
The BindUI method is straight-forward:
void ACoUIGTTestFPSHUD::BindUI(int32 frameid, const FString& path, bool isMain)
{
    CoherentUIGTHUD->GetView()->BindCall("CallFromJavaScript",
        Coherent::UI::MakeHandler(&CalledFromJSSampleDelegate,
        &(FCalledFromJSSample::ExecuteIfBound)));
    CoherentUIGTHUD->GetView()->BindCall("CalledFromJSString",
        Coherent::UI::MakeHandler(this,
        &ACoUIGTTestFPSHUD::CalledFromJSStringHandler));
    CoherentUIGTHUD->GetView()->RegisterForEvent(
        "CalledFromJSUStruct",
        Coherent::UIGT::MakeHandler(this, &ACoUIGTTestFPSHUD::CalledFromJSUStructHandler));
}
Essentially we say: "When JavaScript fires the **CallFromJavaScript** event, in C++ you must execute **CalledFromJSSampleDelegate** delegate". The same applies for the second binding but in that case it'll call the CalledFromJSStringHandler method of the class.
In JavaScript you just have to use:
engine.call("CallFromJavaScript", 123);
engine.call("CalledFromJSString", "Hello from JavaScript!");
var ustructData = { ... };
engine.trigger("CalledFromJSUStruct", ustructData);
Please note that you can pass arguments from JS to C++ again but the handler signatures must coincide with the arguments passed, otherwise an error is generated.
In the sample game the handlers for those methods are very simple:
void ACoUIGTTestFPSHUD::CalledFromJSHandler(int32 number)
{
    UE_LOG(LogScript, Log, TEXT("UE4 Delegate called from JavaScript"));
}

void ACoUIGTTestFPSHUD::CalledFromJSStringHandler(const FString& str)
{
    UE_LOG(LogScript, Log, TEXT("String received from JS: %s"), *str);
}
We just log that we were called from JS, so that we know everything works fine. Coherent GT supports passing parameters to/from JS for all primitive types, STL containers as well as UE4's strings (FString, FText, FName), containers (TMap, TArray) and colors & vectors. In addition, any type that UE4 knows about i.e. USTRUCTs and UCLASSs can be automatically bound. In order to use these types you must include the relevant headers available in the Coherent/UIGT/Binding and CoherentUIGTPlugin/Public folders.
UCLASS and USTRUCT typesTo enable the automatic binding support for Unreal Engine types you have to:
#include "CoherentUIGTUTypeBinder.h"
Please note that nested USTRUCT types are going to be recursively exposed as well:
USTRUCT()
struct FBar
{
    int32 Value;
};
USTRUCT()
struct FFoo
{
    FString String; // Will be exposed; strings are considered primitive types
    TArray<int32> SomeValues; // Will be exposed; containers of primitive types are exposed.
    // Will NOT export nested types unless they are of type USTRUCT.
    FBar Bar; // Will be exposed as it is USTRUCT.
};
UPROPERTY. To work around this, you can force lowercase exposure for all properties.Nested USTRUCT types will be exposed recursively by default. Note that nested UObjects are currently not bound recursively as their sheer size makes recursive binding unusable for performance reasons (a recursive binding to an AActor for example would also need to bind the entire ULevel as the actor holds a pointer to it).
Coherent GT also has support for binding user defined types that don't fit the categories above. For a detailed guide on this topic, please consult the native Coherent GT C++ documentation.
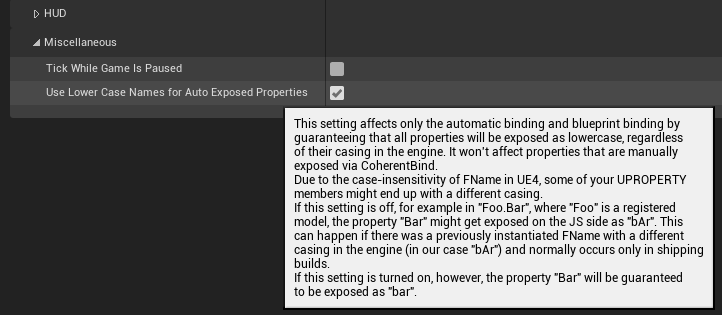
UCLASS and USTRUCT typesFor instance, if we have a class Foo and a property called Bar, like the example above, JavaScript might receive a value such as Foo.bar or Foo.bAr. For this to occur, there needs to be an FName in the Engine/Game that shares its content with the name of your property, but has a different casing. This usually occurs only in shipping builds and happens because in Unreal Engine properties are stored as FNames, which are case-insensitive. There is no supported way in UE4 to know the casing in advance, but you can work around this by turning on the Use Lower Case Names For Auto Exposed Properties in Coherent GT Plugin's miscellaneous settings, which will guarantee that property names will be exposed as lowercase, regardless of their casing in the engine.
If you want to keep the HUD or UMG Widget, Player Character and any other actor alive while changing levels, we strongly recommend using Seamless Travel.
If however, that is not an option for you for whatever reason, yet you want to keep the Coherent GT ViewState inside the HUD or UMG Widget, you can achieve that by binding functions to the delegates listed below.
HUD's UCoherentUIGTBaseComponent ViewState delegates:
UCoherentUIGTBaseComponent::OnViewStateAdoptionUCoherentUIGTBaseComponent::OnViewStatePostAdoptionUCoherentUIGTBaseComponent::OnViewStatePutForAdoptionUCoherentUIGTWidget ViewState delegates:
UCoherentUIGTWidget::OnViewStateAdoptionUCoherentUIGTWidget::OnViewStatePostAdoption,UCoherentUIGTWidget::OnViewStatePutForAdoption.These delegates are part of the public API of the HUD's UCoherentUIGTBaseComponent and UCoherentUIGTWidget, and they will let you preserve and reuse the already created Coherent GT View and System, while recreating the HUD or UMG Widget.
Some of these delegates are going to be executed early on in the initialization of the component or in the recreation of the widget, and there might not be an easy way of getting the HUD or Widget that early to bind them. We suggest creating your own HUD actor or UMG widget class, inherited from ACoherentUIGTGameHUD or UCoherentUIGTWidget respectively and bind delegates in the constructor. This will also help in reusing the ViewState only on the same type of HUD actor or UMG Widget.
You can check the implementation of the ACoUIGTKeepViewStateHUD and UCoUIGTKeepViewStateWidget, that are included in the CoUIGTTestFPS sample game as an example of how this can be setup.
If you are running into performance problems, you can make use of Coherent UI GT's asynchronous mode. Enabling this mode, moves most of the computations into a separate thread and effectively reduces the overhead of your UI almost to zero. Multithreading is an advanced feature and using it requires understanding of the possible consequences such as race conditions. Coherent UI GT provides some solutions for these problems and does its best to hide any differences with the synchronous mode.
To enable the asynchronous mode go to Coherent GT -> Options and check Run Asynchronous. Note that you must restart the editor in order for the effect to take change. This is because of a limitation of WebKit that cannot be avoided.
To see the async mode in action, load the AsyncSample_Map provided in the CoUIGTTestFPS sample game. The map shows how to properly setup the communication between JavaScript and the game by featuring a simple transition from a main menu to in-game menu and ability for the UI to ask the game for new data. As noted above, you must restart the editor in order to try out the map with both modes.
See Asynchronous mode usage for further details.
In async mode calls to Coherent GT will not complete immediately. Consider the following code:
CoherentHUD->TriggerEvent("ShowEULA"); // Show the EULA in a modal window
// ..
CoherentHUD->DrawHUD();
The TriggerEvent call will put a task on underlying task queue and will get executed whenever the UI thread can do so. This means that there's a chance that the EULA will not actually show before the DrawHUD. Most of the time this will not be a problem as Coherent GT makes sure to synchronize the main and UI threads during UCoherentUIGTBaseComponent::Tick and ACoherentUIGTSystem::Tick but if you absolutely need to manually synchronize the threads we provide a fencing API akin to the UE4's rendering fences.
The relevant methods are ACoherentUIGTSystem::Fence and ACoherentUIGTSystem::WaitFor and can be used like so:
CoherentHUD->TriggerEvent("ShowEULA"); // Show the EULA in a modal window
auto FenceId = CoherentSystemActor->Fence(); // Issue a fence immediatly after the trigger event
// ..
CoherentSystemActor->WaitFor(FenceId); // Make sure the trigger event has been completed
CoherentHUD->DrawHUD();
ACoherentUIGTSystem::Fence() and ACoherentUIGTSystem::WaitFor(unsigned) do nothing when invoked on a synchronous system so feel safe to use them without changing any of your code.
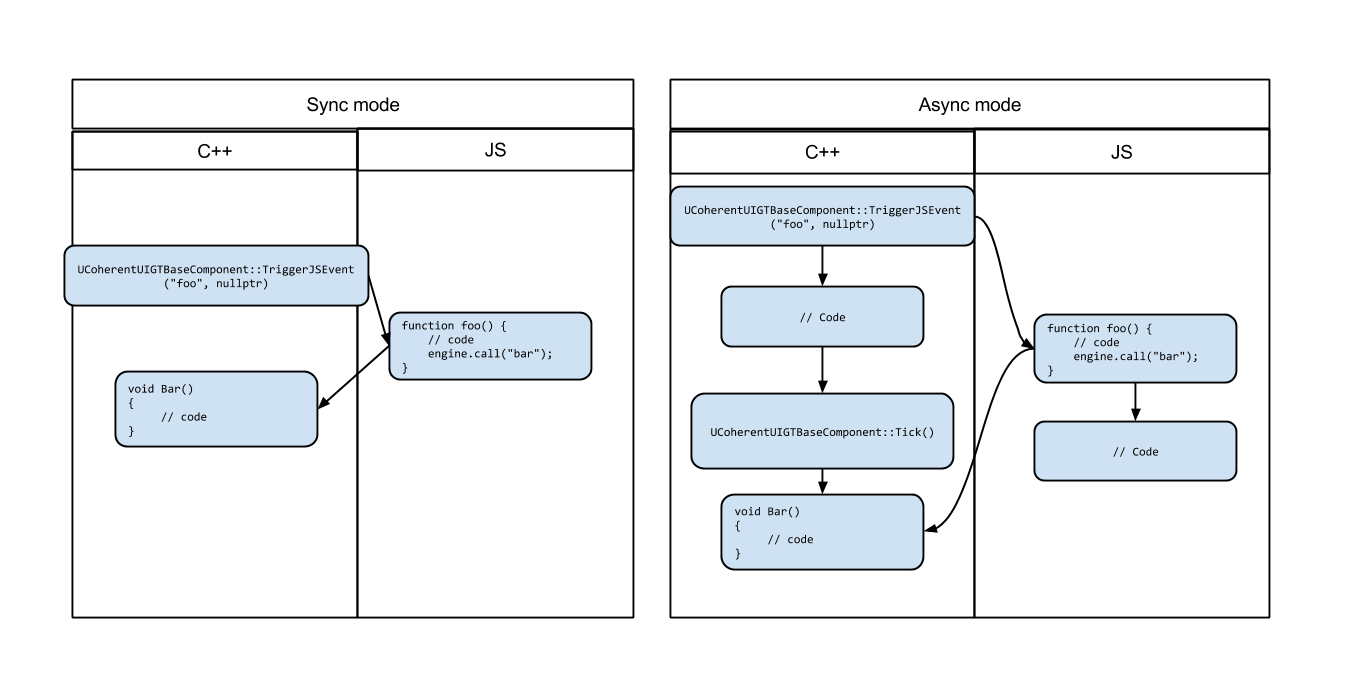
Asynchronicty implies that the JavaScript execution is also deferred on the UI thread. This may require some changes if your existing code depends on the fact that up to now, callbacks were executed in the same stack.
Consider the following communication:
C++:
void Bar()
{
    // Code
}

// During initialization
CoherentComponent->GetView()->BindCall("bar", Bar);

// During your main loop
CoherentComponent->TriggerJSEvent("foo", nullptr);
JS:
engine.on("foo", function fooHandler() {
    // Code
    engine.trigger("bar");
});
Calling view->TriggerEvent("foo") in the synchronous mode will execute the methods in the following simplified callstack:
| Callstack |
|---|
| Bar |
| JavaScript::fooHandler |
| CoherentUIGTBaseComponent::TriggerJSEvent |
| GameLoop |
In the async mode you get no such guarantee. fooHandler will be executed whenever the UI thread gets to it and Bar will be executed during the first View::Layout or View::ExecuteJSTimers after fooHandler has completed. The following diagram demonstrates that:
Let's look at a more concrete example
C++:
void StartGame()
{
    // Initialize the game
}

// During initialization
CoherentUIGTHUD->GetView()->BindCall("StartGame", StartGame);
or the same code in Blueprints:
JS:
startButton.addEventListener("click", function () {
    engine.trigger("StartGame");
    doSomethingAssumingTheGameHasStarted();
});
If you are running in a synchronous mode, this code will work fine. When the button is clicked, the engine will call StartGame immediately, which will in turn initialize the game. Thus, by the time engine.call("StartGame") returns you can assume that everything is ready.
This assumption does not hold in asynchronous mode as the execution of StartGame will be delayed. To cope with this, use another event to notify the JS that everything is ready:
C++:
void StartGame()
{
    // Initialize the game
    CoherentHUD->TriggerJSEvent("GameStarted", nullptr);
}

// During initialization
CoherentUIGTHUD->GetView()->BindCall("StartGame", StartGame);
or the same code in Blueprints:
JS:
startButton.addEventListener("click", function () {
    engine.call("StartGame");
});

engine.on("GameStarted", function () {
    doSomethingAssumingTheGameHasStarted();
});
To use Coherent GT during gameplay a UISystem object has to be created and live somewhere. The plugin automatically takes care of the creation and management of the UISystem, using a default set of options. This is done by spawning a ACoherentUIGTSystem Actor in the world that will set everything up.
If you would like to customize the UISystem properties, you can spawn a ACoherentUIGTSystem Actor of your own and edit its properties in the Defaults tab of the Blueprint Editor. The UISystem properties define many aspects of the runtime such as to whether support cookies, the UI Debugger port etc. If you don't add a ACoherentUIGTSystem Actor, then a default one will be created as soon as you try to create a View.
The easiest way to spawn a custom UISystem is to drag the CoUIGTSystemBlueprint blueprint into the world in editor mode and then edit its settings by clicking the Edit CoUIGTSystemBlueprint in the Scene Outliner window.
Sometimes it may be the case that the UI should be paused when the UE4 engine is paused. There is an option for that, which requires using a custom Coherent UISystem (Refer to the Using custom UI System section for details).
Note: The default value of the UpdateWhenPaused option is set to true. To change it:
CoUIGTSystemBlueprint in the world.CoUIGTSystemBlueprint.Edit CoUIGTSystemBlueprint.Coherent GT provides several console commands that can help during development. The following commands are supported:
cohgt.list - lists the id and document of all viewscohgt.reload [<id>] - reload the view with the specified <id> or all views if no <id> is specifiedcohgt.redirect [<id>] <url> - change the page of the view with the specified <id> or all views if no <id> is specified. The <url> must be surrounded by double quotes (e.g. "http://coherent-labs.com")cohgt.debug [<id>] - toggles paint rectangles on the view with the specified <id> or all views if no <id> is specifiedcohgt.track [<id>] - toggles whether the view with the specified <id> is tracked during stat CoherentGT. Only tracked views are profiled with stat CoherentGT. If no views are explicitly profiled, we profile all views. Don't pass <id> to reset all tracking information.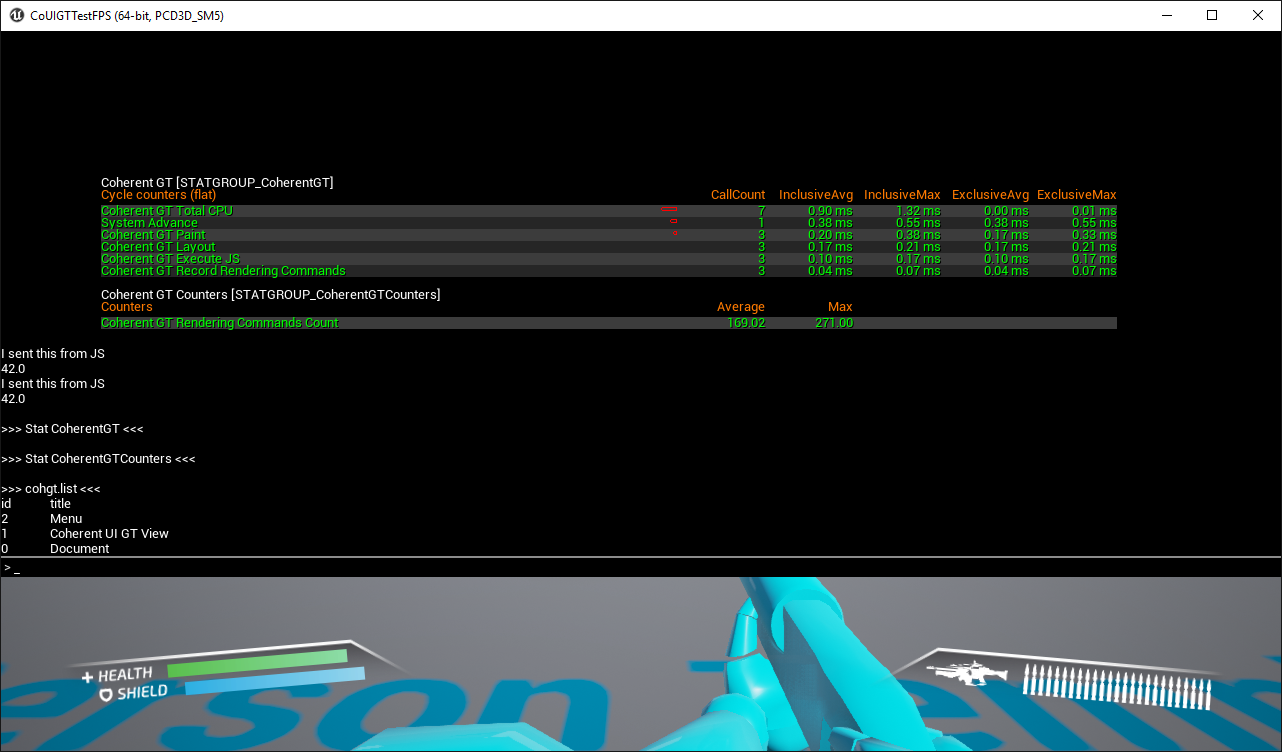
Coherent GT comes with a powerful tool for live-debugging and editing your UI. To start the debugger, go to the Coherent GT menu in the editor, and choose Launch Debugger.
It is advisable to use the debugging functionality only during development. Leaving it active on a shipped product leaves the UI accessible to users. This might be a desired feature as it aids UI modding but should be something to keep in mind when deploying a final product. The debugger is implemented in the CoherentUIGTDevelopment library. During development you should put the library in the same folder as the main CoherentUIGT module. If the library is missing, the debugging functionality will not be enabled. You can safely remove CoherentUIGTDevelopment from your shipped product.
The Inspector works over the network, so you can attach it either to you local machine or to a remote one. The debugging port is selected in the Coherent::UIGT::SystemSettings::DebuggerPort field. If you pass -1, debugging will be disabled.
Debugging is done live, so start your application and have a Coherent GT running.
Use the menu "Coherent GT -> Launch Inspector" to run the Inspector in the Editor. The Inspector can only be started if your game is not currently running. You can also keep it running and debug other running games, provided that the ports don't collide.
You'll be presented with a list of Coherent GT Views that can be explored, debugged and edited.
The debugger allows live viewing/editing of CSS styles, JavaScript debugging (setting breakpoints, watches, editing variables), resource load inspection, profiling.
The tool uses the WebKit Inspector UI, so for more information please refer to: Apple's Introduction to the Inspector
With the Inspector you can manually change all aspects of the elements within the page as well as adding/removing whole sections of it. This makes prototyping and iterating on the UI very easy. Go to the Elements tab. The page with all its current state will be shown. You can hover elements and they will be highlighted in the View in the application. All properties of the elements are editable and changes will be immediately mirrored in the live application.
A complete JavaScript debugger is included in the Inspector. To use it go to the Sources tab, click Enable Debugging. On the left side a list of the loaded JS sources is given. Users can add breakpoints, watches, step through expressions and catch exceptions.
A key feature of Coherent GT that makes it generally faster than alternatives like the UE4 bundled UMG, is that it re-draws just parts of the screen and UI layers that have changed. Users are encouraged to follow our guidelines to get the best from the toolkit.
A detailed performance guide comes bundled in the package alongside this one. Please check it out when you start UI development to get useful tips and tricks for developing optimal UI.
By default, in the UE4 Editor, Coherent GT will generate performance warnings when it detects issues. The warnings will not be fired in shipped games.
Warnings help developers notice eventual inefficiencies as early as possible. They will be printed both in the Output Log and on-screen. The warning thresholds are arbitrary and can be modified any specific scenarios. Warnings can be disabled altogether form the menu "Coherent GT -> Options -> Allow Performance Warnings In Editor". You can disable on-screen warnings, but leave them in the log by un-checking the "Show Warnings On Screen" option in the same menu.
Warning can be customized per-View. You can disable warnings and change thresholds for a View in the "Defaults" section of the View component, using the "View warnings" category of options.
For HUD Views you can modify the thresholds or disable the warnings by modifying the properties in the component via C++ code or Blueprints.
When you receive a performance warning, you can use the Inspector to profile eventual inefficiencies in the interface. To use the Inspector just click "Coherent GT -> Launch Inspector". Please consult also the "Performance guide" that gives plenty of information about the characteristics of different workloads and tips on how to optimize the UI. The guide is accessible by clicking "Coherent GT -> Open Performance Guide".
Coherent GT's heaviest computations are tracked using UE4's stat subsystem. You can use the usual Unreal's toolset to track down problems:
stat CoherentGT will display information about the time spent in each major function:stat CoherentGTCounters will display information about GT's total CPU memory usagestat CoherentRenderingCounters will display the number of draw calls and rendering commands. It will also display information about the total GPU memory usage:cohgt.track. See Console Commands section for more information.profilegpu or stat GPU (the latter being available only on UE4 4.14+)In addition to the warnings, Coherent GT can also audit HTML pages and check for suboptimal CSS and HTML usage. To launch the performance auditor, go to Coherent GT -> Launch Performance Auditor.
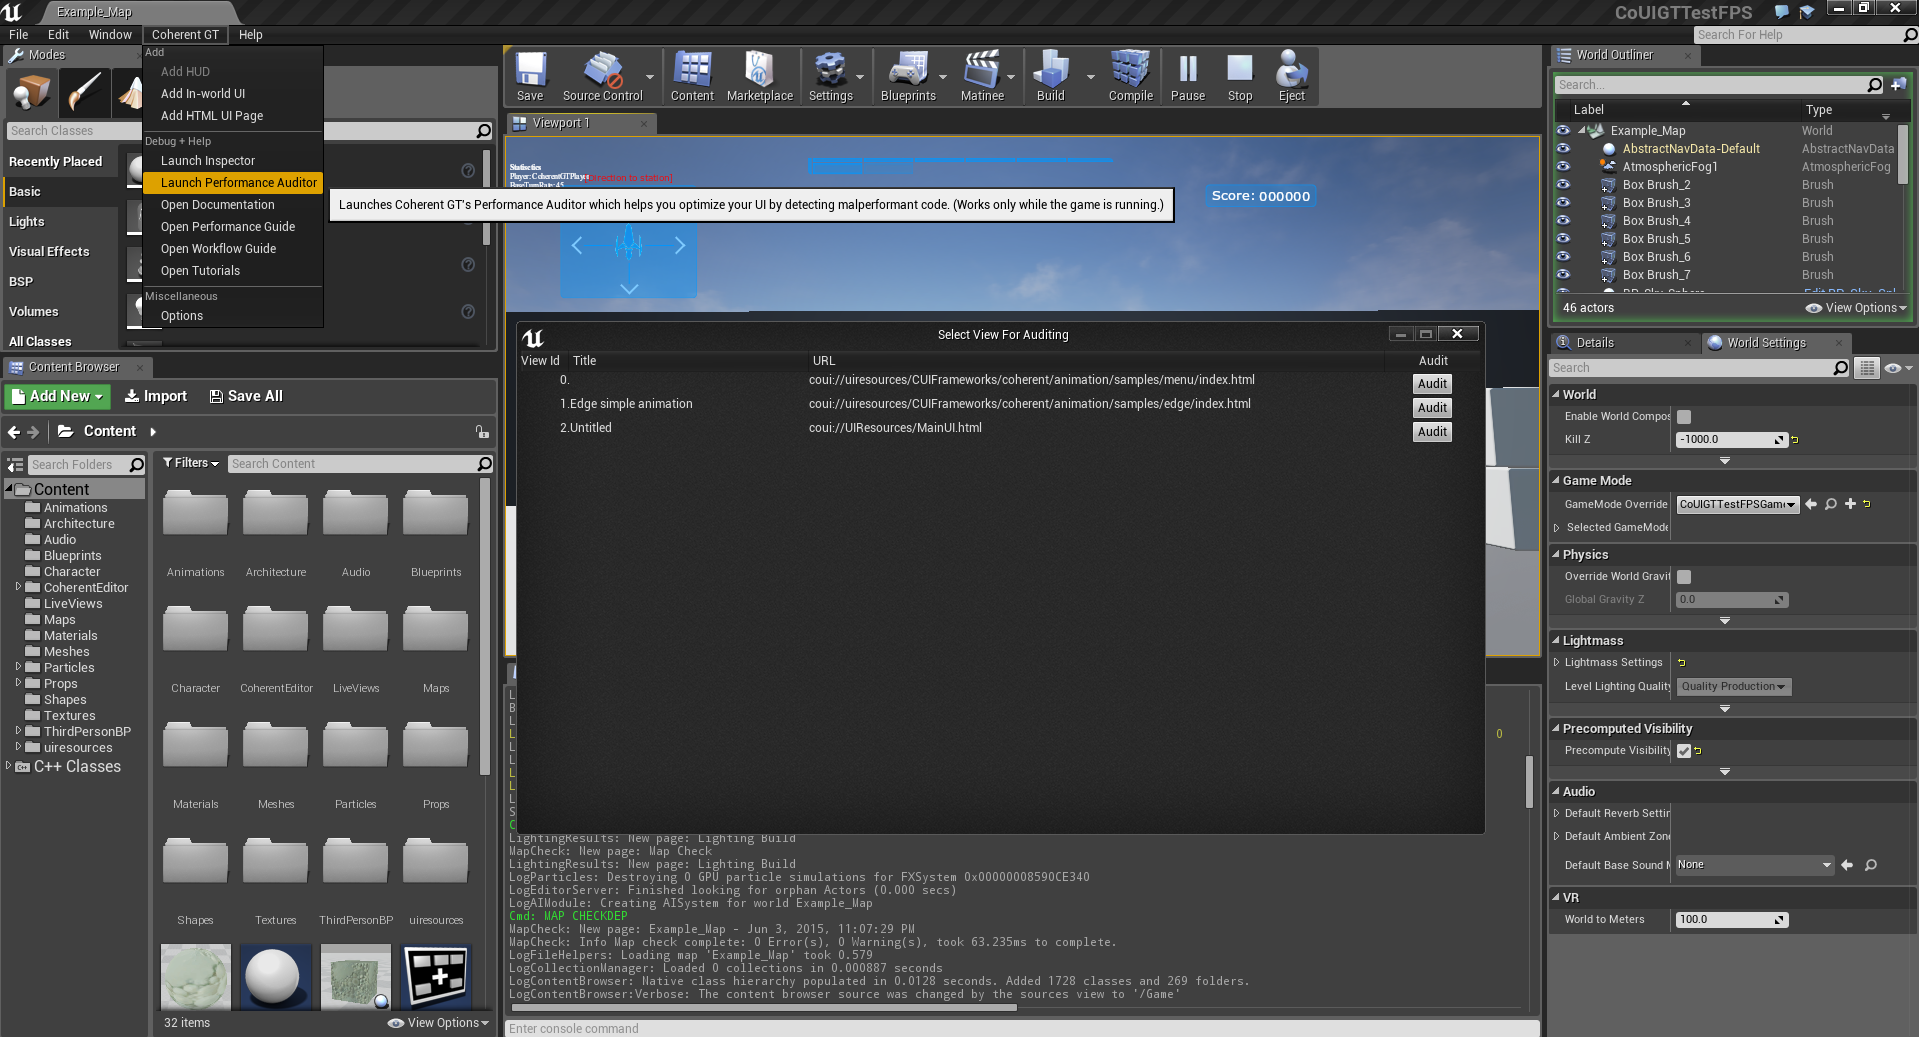
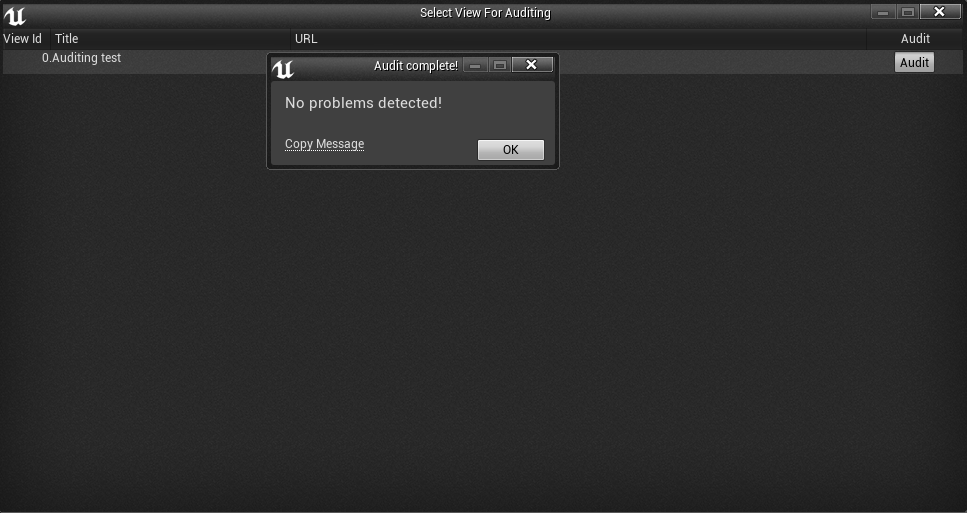
You'll be presented with all views currently loaded in the level (be it components or UMG widgets). Clicking any of the Audit buttons will trigger a performance audit for the selected view. After the audit is completed, a messagebox will display the results. Closing the messagebox will also trigger a pulsating animation for several seconds on all faulty HTML elements so that they can be easily seen.
The auditor has some limitations:
Coherent GT supports a powerful feature called Live Views. With it developers can embed content rendered by Unreal Engine 4 in their UI. The feature is ideal for 3D player portraits, equipment screens, rear view mirrors in racing games but also advanced effects like adding particle effects or complex 3D content inside the interface.
A complete Live View sample can be seen in the "LiveView_Map" world that comes in the CoUIGTTestFPS game distributed in the package.
Setting up and using Live Views in Unreal Engine 4 is very easy. The Live View is represented by a specially set "img" tag inside the HTML page of the UI.
<img id="myLiveView" src="TextureRenderTarget2D\'/Game/LiveViews/LiveViewRT.LiveViewRT\'">
The image source is a reference to an Unreal Render Target asset. To create such an asset:
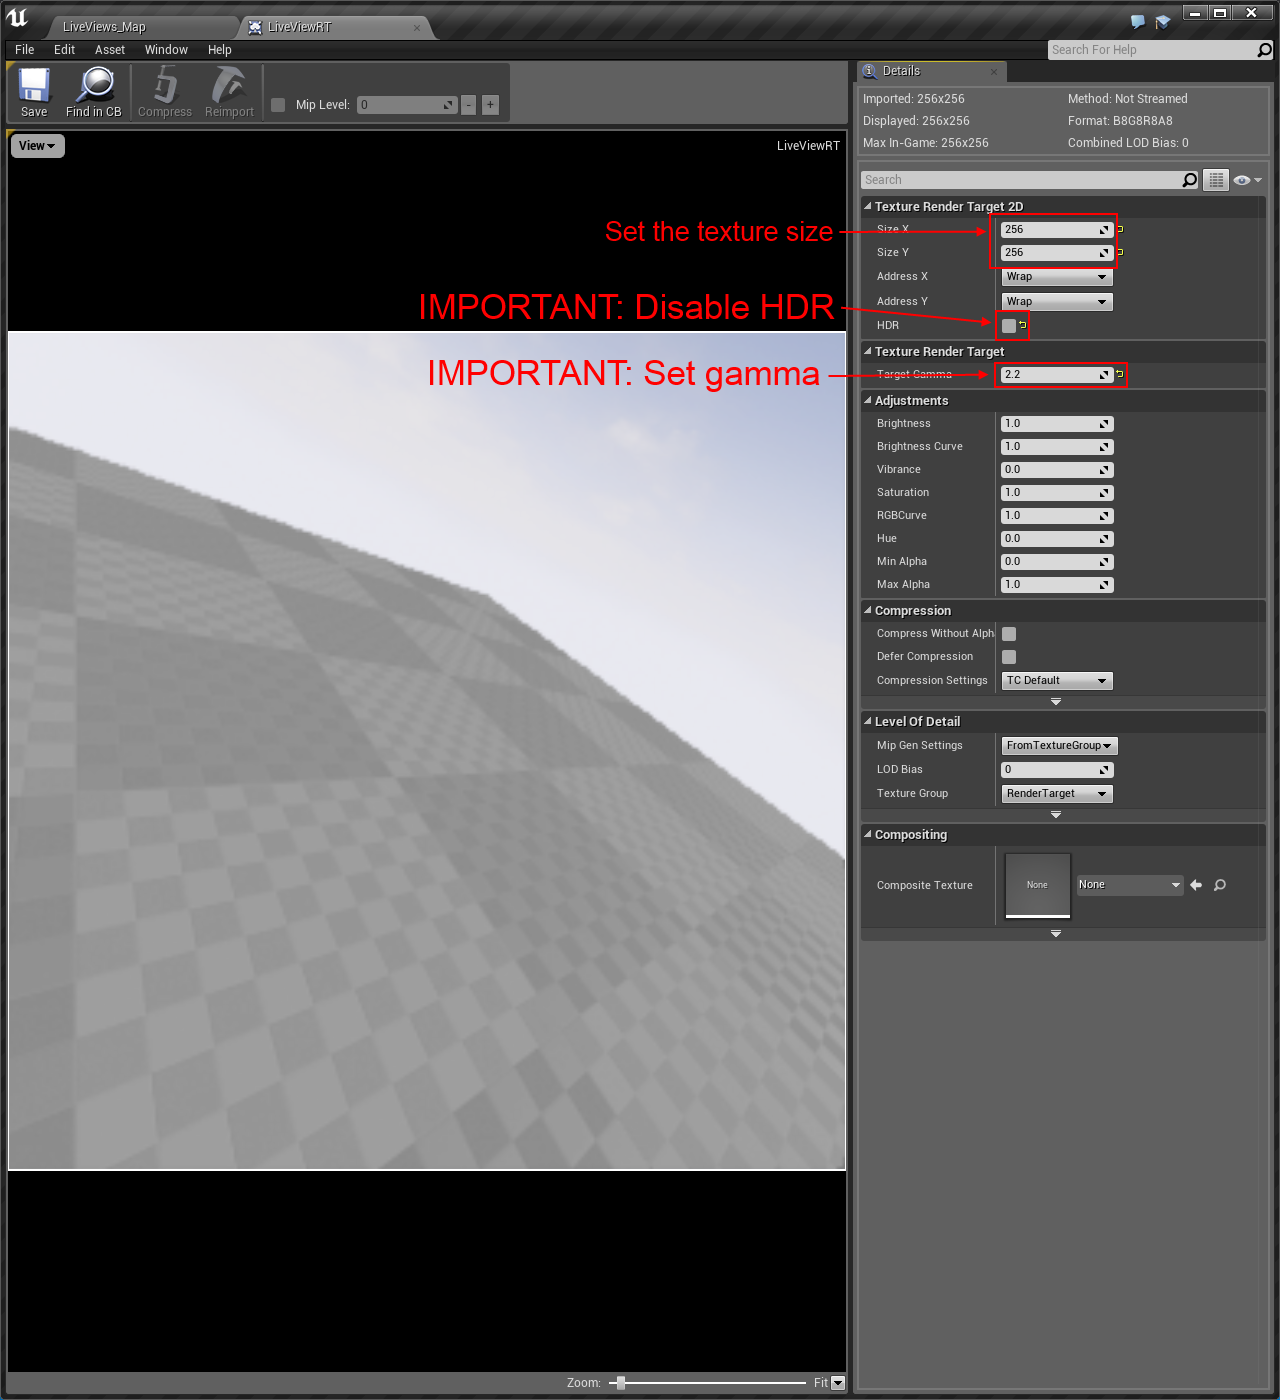
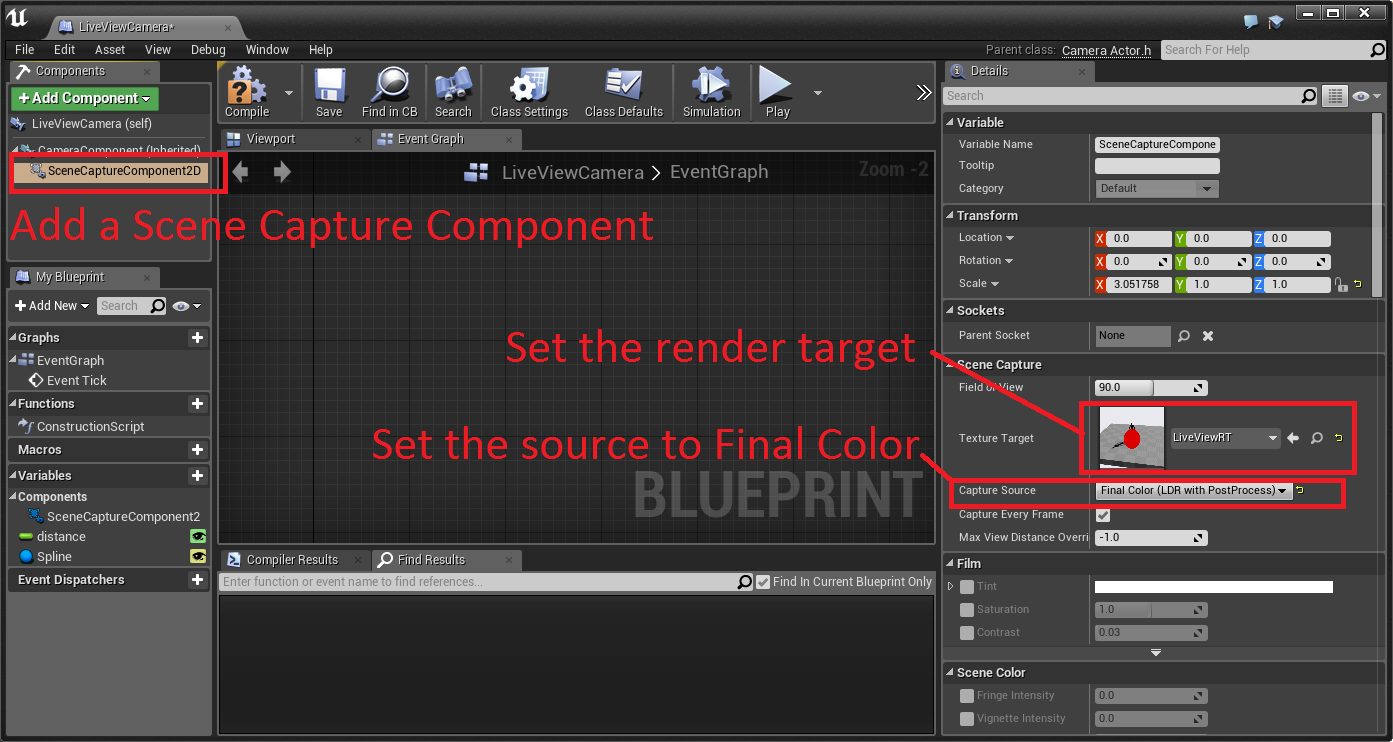
<img> tagThere are many ways to draw in the Render Target, the simplest one is to use an Unreal Engine 4 Camera with a SceneCaptureComponent2D component. The camera will render what it captures in the world in the Render Target that will then be rendered in the UI by Coherent GT.
In the Content Browser add a new Blueprint and set its parent to "CameraActor". Edit the Blueprint and add a "SceneCaptureComponent2D". Then set the "Texture Target" to the one that will be used by the Live View and set the "Capture Source" to "Final Color".
Now when you Play your level, everything that is rendered by the camera will be available in the HTML UI page. The Live View inside the interface will work the same as a normal image (but will be automatically updated) and content can be drawn over it, it can be animated, scaled etc.
Usually Coherent GT would read from disk, decode and upload to the GPU all textures it is using whenever a texture is needed. There are use cases when this would not be the optimal thing to do. For example:
The loading of textures happens when Coherent GT requests them which invokes the asynchronous loading of the uassets. This will happen when the whole HTML page is parsed and its resources are requested, which includes the preloaded images/live views present in the page declaration. UE4 will not load them into memory in advance when Coherent GT is initialized.
Once the HTML page is parsed and the preloaded resources are requested, their loading will be handled by the FStreamableManager class. The FStreamableManager implementation in Unreal Engine could load the texture instantly in case the .uasset is already loaded into memory, otherwise it will be streamed from disk.
To use preloaded images, use UE4 object paths to reference your images from HTML / CSS instead of standard urls e.g. instead of this:
<img src="coui://uiresources/foo.png"></img>
use this
<img src="coui://Texture2D'/Game/uiresources/foo.foo'"></img>
To get the object path for your texture you can right-click it in the editor's content browser and click Copy Reference, then paste the result in your HTML.
Note that system cannot freely preload all images because there may be visual differences between using images the usual way and having them preloaded. This is due to the fact that Coherent GT has some expectations on the way images are treated. To make sure that there are no visual differences follow these guidelines:
If an image cannot be preloaded, the system will attempt to decode it from the raw file. Check the PreloadedImages_Map level to see this feature in action.