Getting the graphics device in CryEngine 3.5.4… the hard way

Have you you ever tried adding some custom rendering functionality using the graphics device to the free SDK of CryEngine? If you did, you probably had some trouble doing that. If you didn’t, you saved yourself from a lot of pain :). Having low-level access to the device opens up a lot of possibilities – you could create your own textures, buffers, graphics states and whatever else you want. In some cases the CE3 FreeSDK API isn’t rich enough for you to make the changes you want. This is the case with our integration of Coherent UI for CryEngine where we need this low-level access and can’t do anything useful without it.
A LITTLE BACKGROUND
Let’s start from the beginning. First, you could query the IRenderer interface for the DirectX device, then it was removed, then it came back. Now, after a long wait for the 3.5 SDK, the query is gone again. It will be back in a future version but we need it now.
So how did we cope with all this madness? Fortunately, Hendrik Polczynski did a great job with his D3D Plugin (based on his Plugin SDK) at adding an abstract layer that lets you get the DirectX device with ease. It also had some other helpful functions such as adding a texture that CE3 is aware about and returning the texture ID within the engine. Having all this is great but unfortunately Hendrik didn’t have the time to update the plugin for the latest version of CE3 and it isn’t working as it is. That’s why I began updating it myself so Coherent UI can be ran in the 3.5.4 version of the FreeSDK. Currently my changes are a bit hacky so when I make a more “production-ready” version without breaking backwards compatibility I’ll open a pull request so the changes will be in the original repository as well. For the rest of the article I’ll assume that you already have the Plugin SDK in place.
LET’S GET HACKING!
Okay, where do we even start from? For starters, we could find the address of the DirectX device in a running game so we can try making some general math that will find it for us in the future. We could probably use PIX to attach to our executable and get the device’s address, but since I’m using Windows 8 which PIX has a lot of issues with, that wasn’t an option. There is of course the new and improved Visual Studio Graphics Debugger but that would be too easy… and I didn’t think about it at the time.
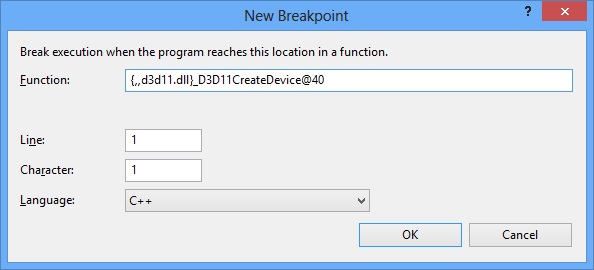
Plan B: let’s try to set a breakpoint just before we create the DirectX device. That would be in the D3D11CreateDevice function (it is, of course, possible that CE3 uses D3D11CreateDeviceAndSwapChain but let’s try the former first, sounds more general). How do we do that? Well, fortunately, Visual Studio has this great functionality where you can set a breakpoint on a function in some dynamic library. To do that we need to use this fancy syntax: {,,<DllName>}<DecoratedFunctionName> (you’ll need the library symbols for this to work). For our D3D11CreateDevice case we have an extern "C" function so it’s not a mangled name and we should just follow the rules described in this article to get the decorated name. We have a WINAPI function (i.e. __stdcall) and 10 parameters, 4 bytes each (for the 32-bit version) so the conversion is easy: what we get is {,,d3d11.dll}_D3D11CreateDevice@40. Add a new breakpoint in VS with that location and we’re set:
APPLYING THE THEORY
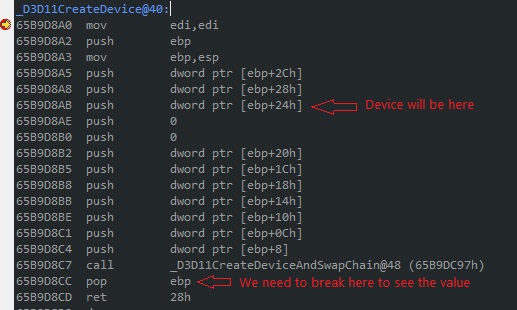
Now if we’re lucky we’ll fire up the GameSDK.exe and get a device pointer! Starting up we should see something like this when the breakpoint is hit (in assembly view, hit Alt+8 if it doesn’t show):
The ID3D11Device parameter is third last in the function so it will be placed in the third pushed address (parameters are pushed in reverse order). We also see that D3D11CreateDevice actually calls D3D11CreateDeviceAndSwapChain so we made the wrong choice for function to break at but we got lucky :). To get the address of the newly created device we must set a breakpoint after the call and before ebp is popped, so that would be on the pop ebp line. The ID3D11Device** parameter that we’re interested in will be the value that is pointed by ebp + 0x24. To get the value of the actual ID3D11Device* we want, just set a watch for **(size_t***)(ebp+0x24) (if you cast it to ID3D11Device*** VS will complain that this is an unknown type for some reason). When the "pop ebp" breakpoint is hit all we have to do is save the value in our watch, set another breakpoint in the CD3DSystem11 constructor so we can modify the m_pDevice variable and move on.
Moving on, expecting the game to start and… we hit the D3D11CreateDevice breakpoint again? Well, let’s just save the value for now and continue… until we hit the breakpoint for a third time. Well, save again for now and deal with it later, maybe something will come up… Finally, the breakpoint in the CD3DSystem11‘s constructor is hit. If we cast the saved 3 values to ID3D11Device pointers, this is an example of what we get:
Luckily, 2 out of the 3 possibilities seem to be out of the question, possibly a device was created for the splash screen or something similar. In any case, we only have one candidate now – in the case I’m showing it’s 0x002e1214. Now, what do we do with that? Well, we can make a wild guess that this pointer should be somewhere around the CE3’s gEnv->pRenderer IRenederer instance and scan the memory. We have a few possibilities for that:
- The ID3D11Device pointer is somewhere around
gEnv->pRenderer - The ID3D11Device pointer is stored in another pointer that’s around
gEnv->pRenderer
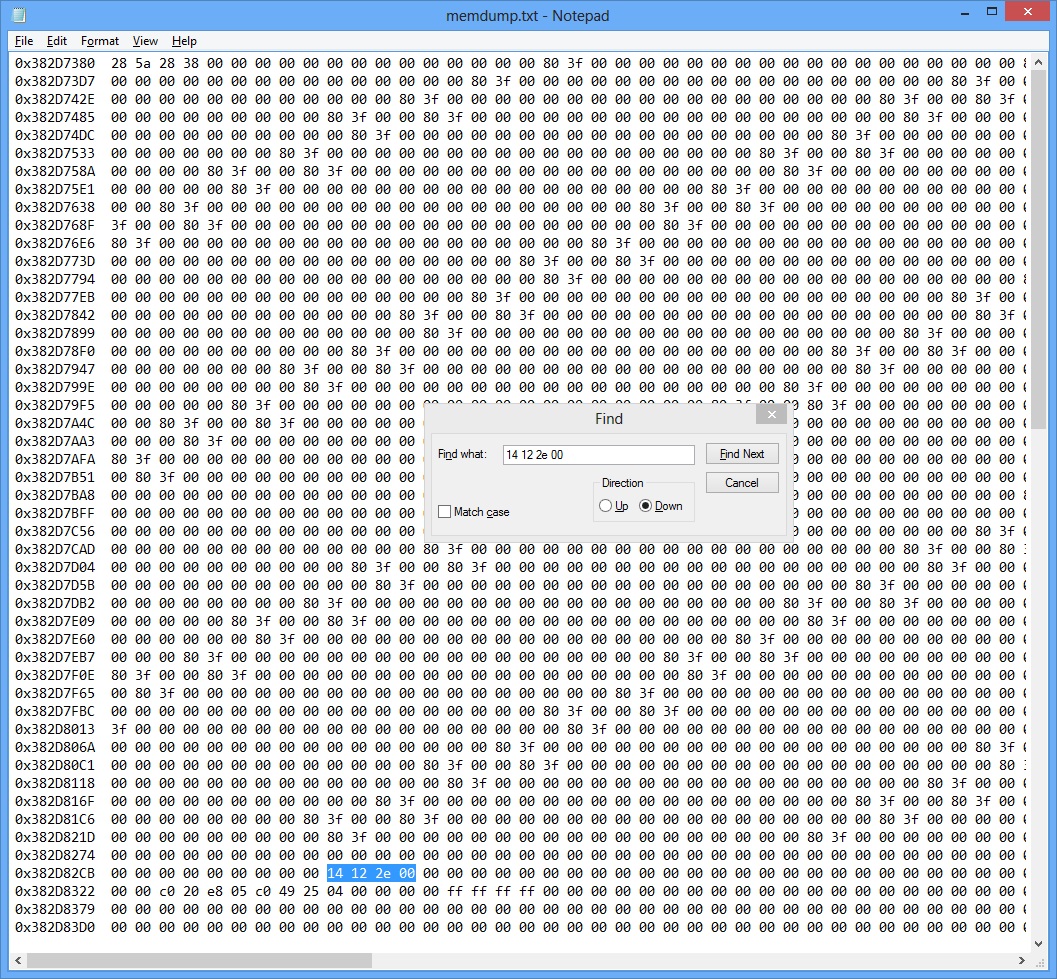
Since we’re currently debugging and don’t want to write code that scans indirections around the renderer, we’ll take a shot at the first option and scan the memory for our pointer. To do that (manually), just open up the memory view in VS (Alt + 6, not available in Express versions), set the address to gEnv->pRenderer and copy a sizable region of bytes, starting from the renderer offset.
Paste that in some text editor (I used Notepad) and search for the pointer we have (0x002e1214). Note that due to endianness of x86 machines we’ll have to search for “14 12 2E 00“.
All right! Lucky us, we didn’t have to write any more code for memory scanning! Now all we have to do is count the bytes between the addresses. That would be 0x382D82CB - 0x382D7380 + 9 (the bytes on the line before our pointer), which equals (courtesy of calc.exe) 0xF54. And that’s it – the CryEngine DirectX11 device for the 32-bit build is located at gEnv->pRenderer + 0xF54.
MAKING SURE WE GOT THE RIGHT POINTER
To be thorough, we can use the existing code in the Plugin_D3D that was used for the time the device query was not available in the FindD3D11Device function. What it does is in its first part is just check that a pointer at some predefined address is a COM object with QI/AddRef/Release functions in its vtable that are the same as the one for ID3D11Device, and if it is it just uses QueryInterface on that COM object for a ID3D11Device interface.
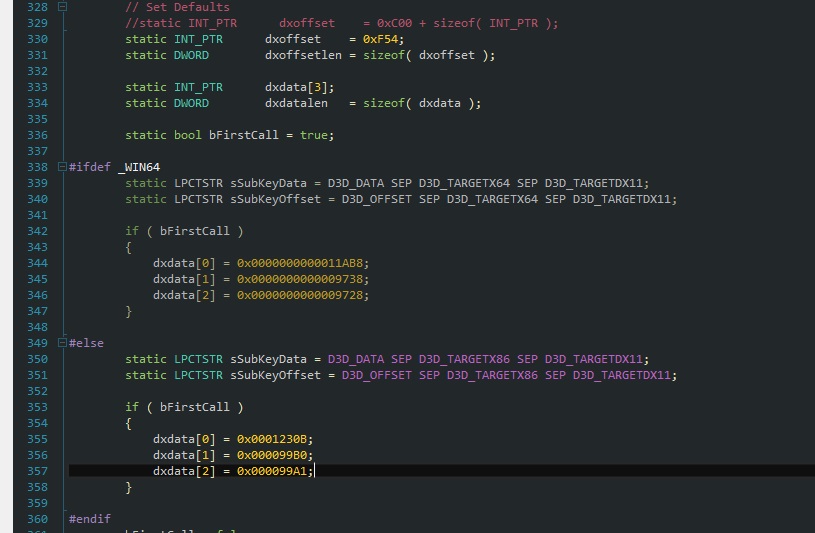
To make the checks valid for the 3.5.4 version we need to change the dxoffset variable to 0xF54 and fix the relative offsets that are used to check if the pointer is a COM object. To do that I wrote a simple program:
It will print the offsets for you so you can set them in the dxdata array. The same process can be repeated for the x64 version so the starting offset is correct. For the time being I cannot find it because all the machines I can install CE3 on are using Windows 8 and the 64-bit version of CE3 doesn’t run.
With all that said, we can finally enjoy our plugin at work 🙂
Learn more about Coherent UI in CryEngine:
– Coherent UI in CryEngine 3 (Redux)
– CryEngine 3 minimap made with Coherent UI
Follow Nick on Twitter: @Nikxio

