Create animated game HUD with Adobe Edge Animate and Coherent UI (Part 1)
Hey everybody,
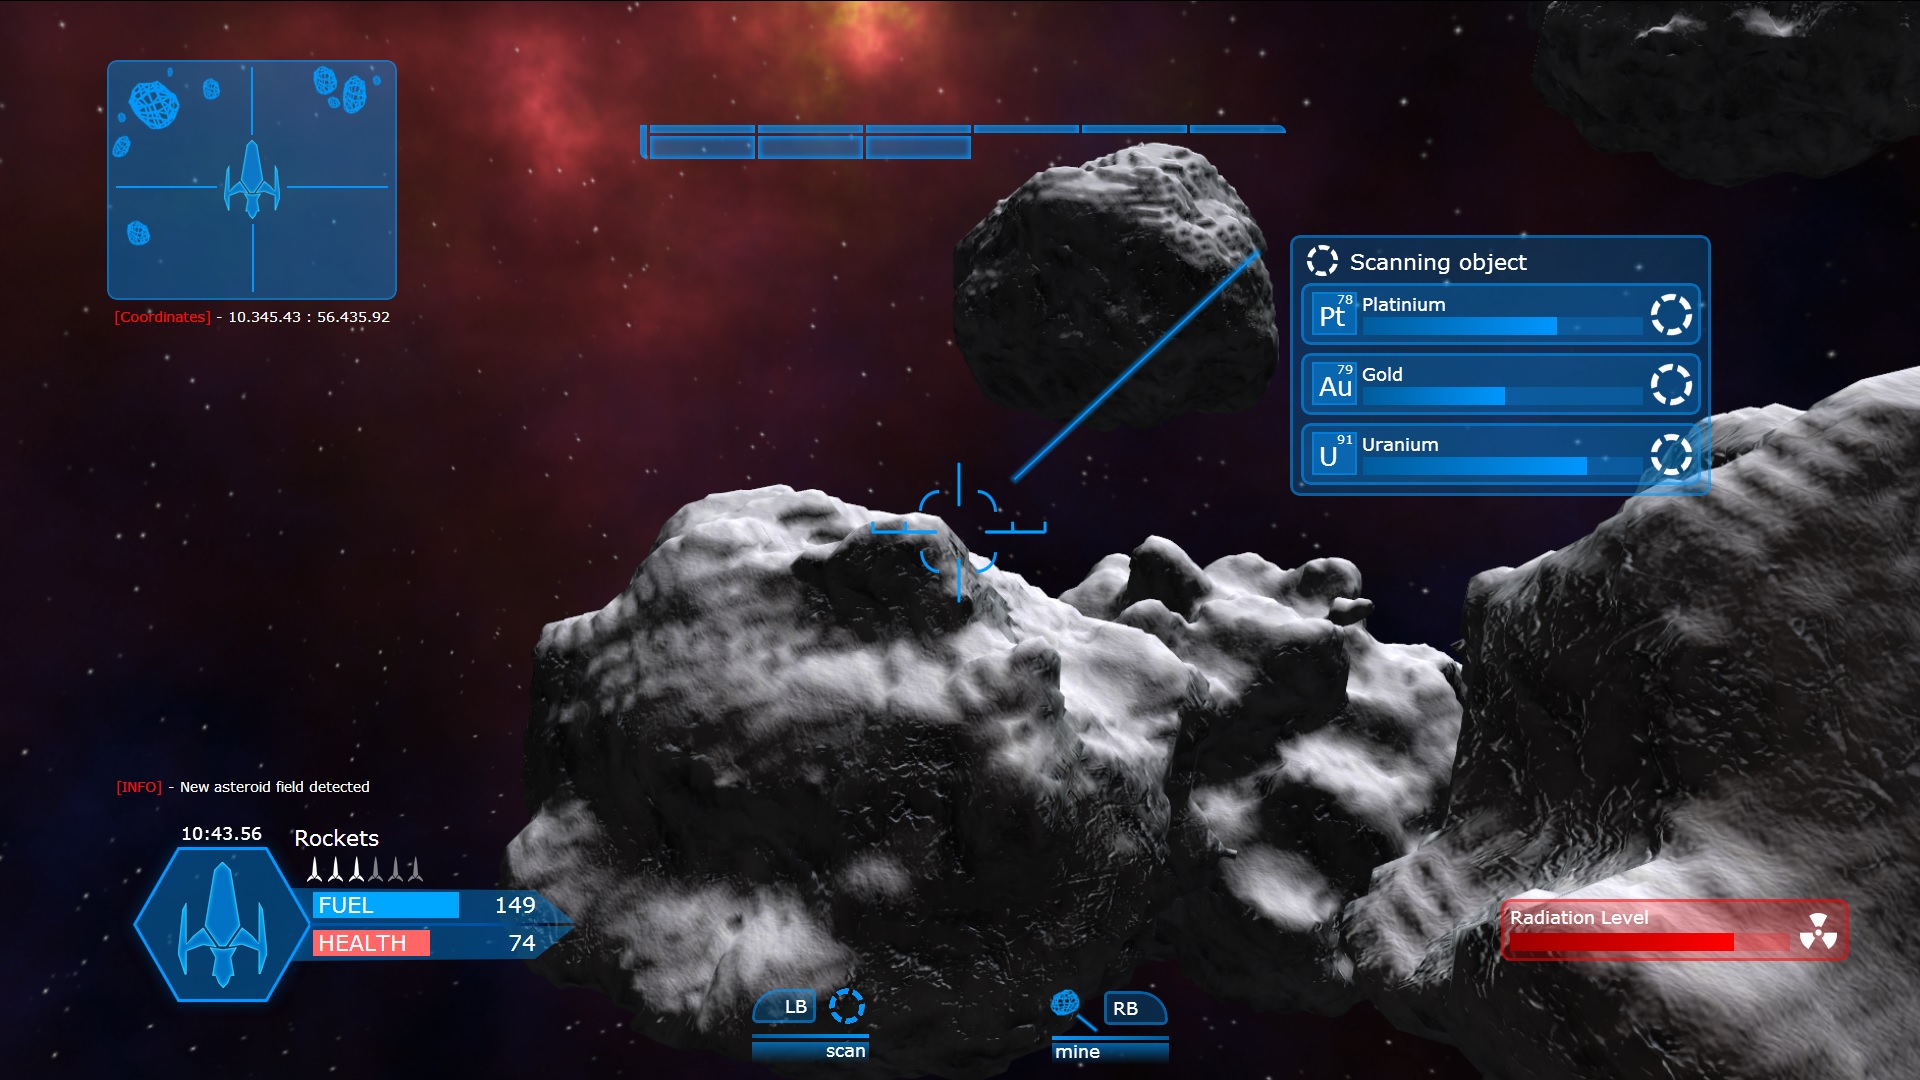
In this tutorial I would like to show you how easy it is to create great looking animated UI using Coherent UI and Adobe Edge Animate. To demonstrate this we will create a HUD for one of our new samples.
1. What is Adobe Edge?
Adobe Edge Animate is a great tool that allows you to quickly create and animate HTML content. It provides visual interface that you can use to create all kinds of HTML elements without any programming whatsoever. Once the HTML content is created it can be quickly integrated as game UI with Coherent UI.
2. Designing UI elements in Adobe Edge
2.1 The interface of Adobe Edge
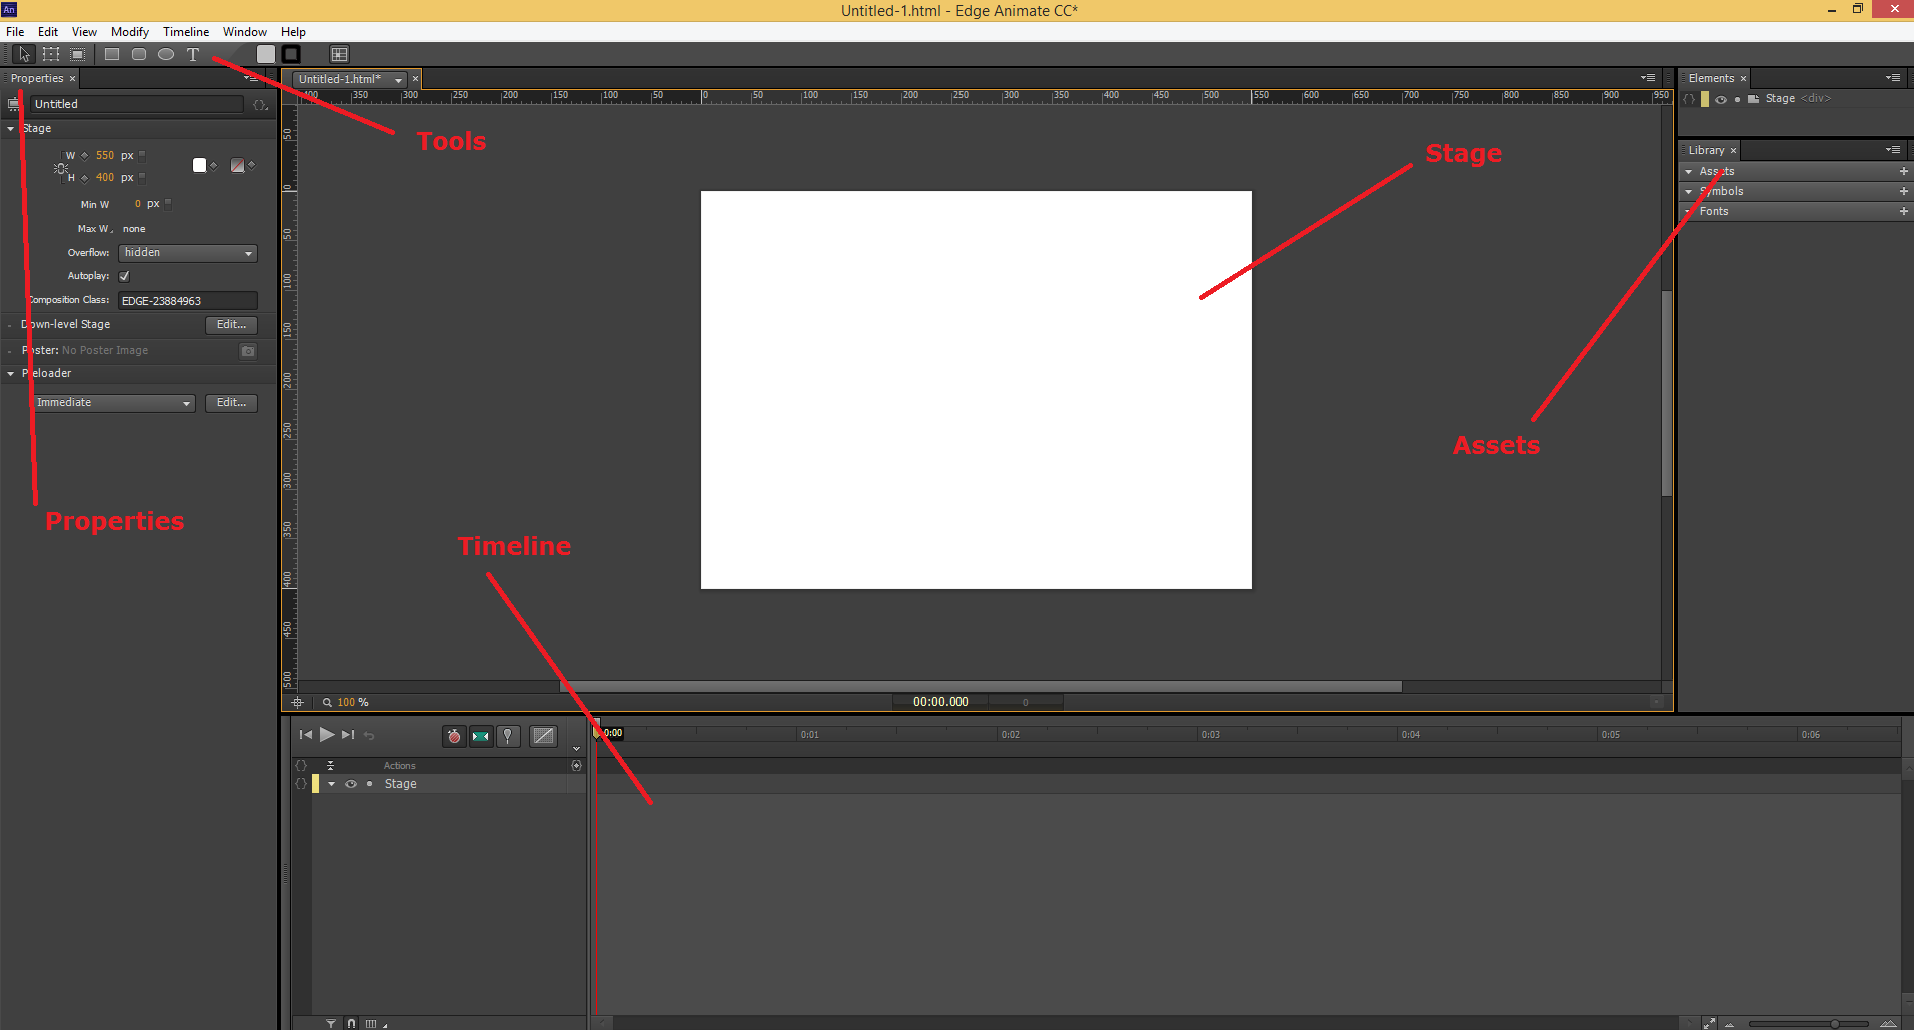
The interface of Adobe Edge is quite simple. In the center there is an area called “stage”. This is where all the HTML elements are created and positioned. On the left side you will find the tools bar (which has all the tools used to create HTML elements) and properties panel (which has all the properties of the selected object – size, position, color, etc.). On the right you will see the assets that are used in the project. On the bottom is the timeline which is used for animation.
2.2 Objects
To create HTML elements you just have to use the appropriate tool from the tools bar. For this tutorial we will create a HUD for a space ship. We will start by creating a bar that will measure imaginary radiation level (show below).

Using the rounded rectangle tool we create a rounded rectangle on the stage. Using the mouse we resize it and position it. With the object still selected we set the background and border color in the properties inspector under section “color”.

Next will create the the background for the animated bar. To to this we use the Rectangle tool. Using the mouse we resize it and position it. With the object still selected we set the background and border color in the properties inspector under section “color”.

Finally we create the animated bar. We again use the Rectangle tool.

However, this time we will set a gradient. To do so we use background image property in the properties panel. There we set the colors and angles of the gradient.

2.3 Text
To create the text we just use the Text tool. Again we set the properties in the properties panel.

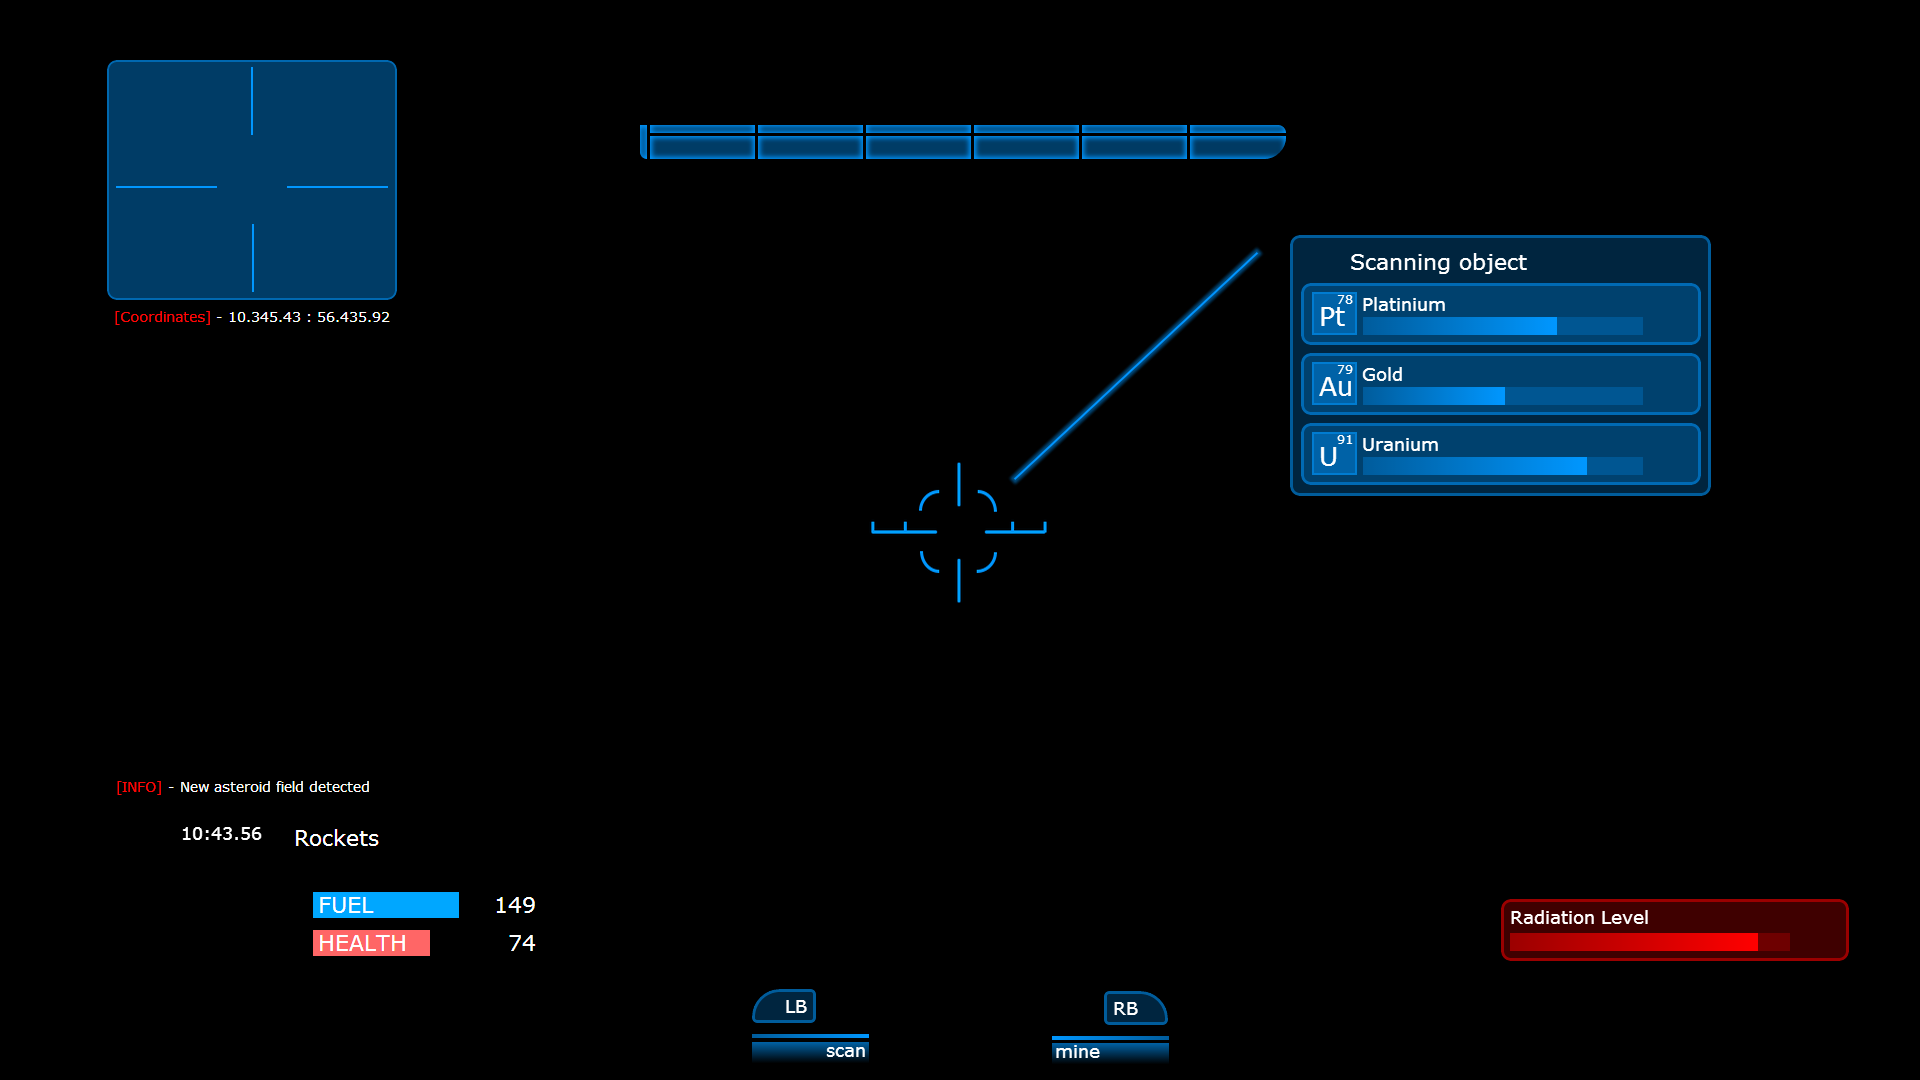
As we can see, to create HTML content you just need to use the tools on the stage and set the properties of the created objects in the properties panel. Using this technique we create the rest of the html elements in the stage.
3. Using external assets
3.1 Importing images
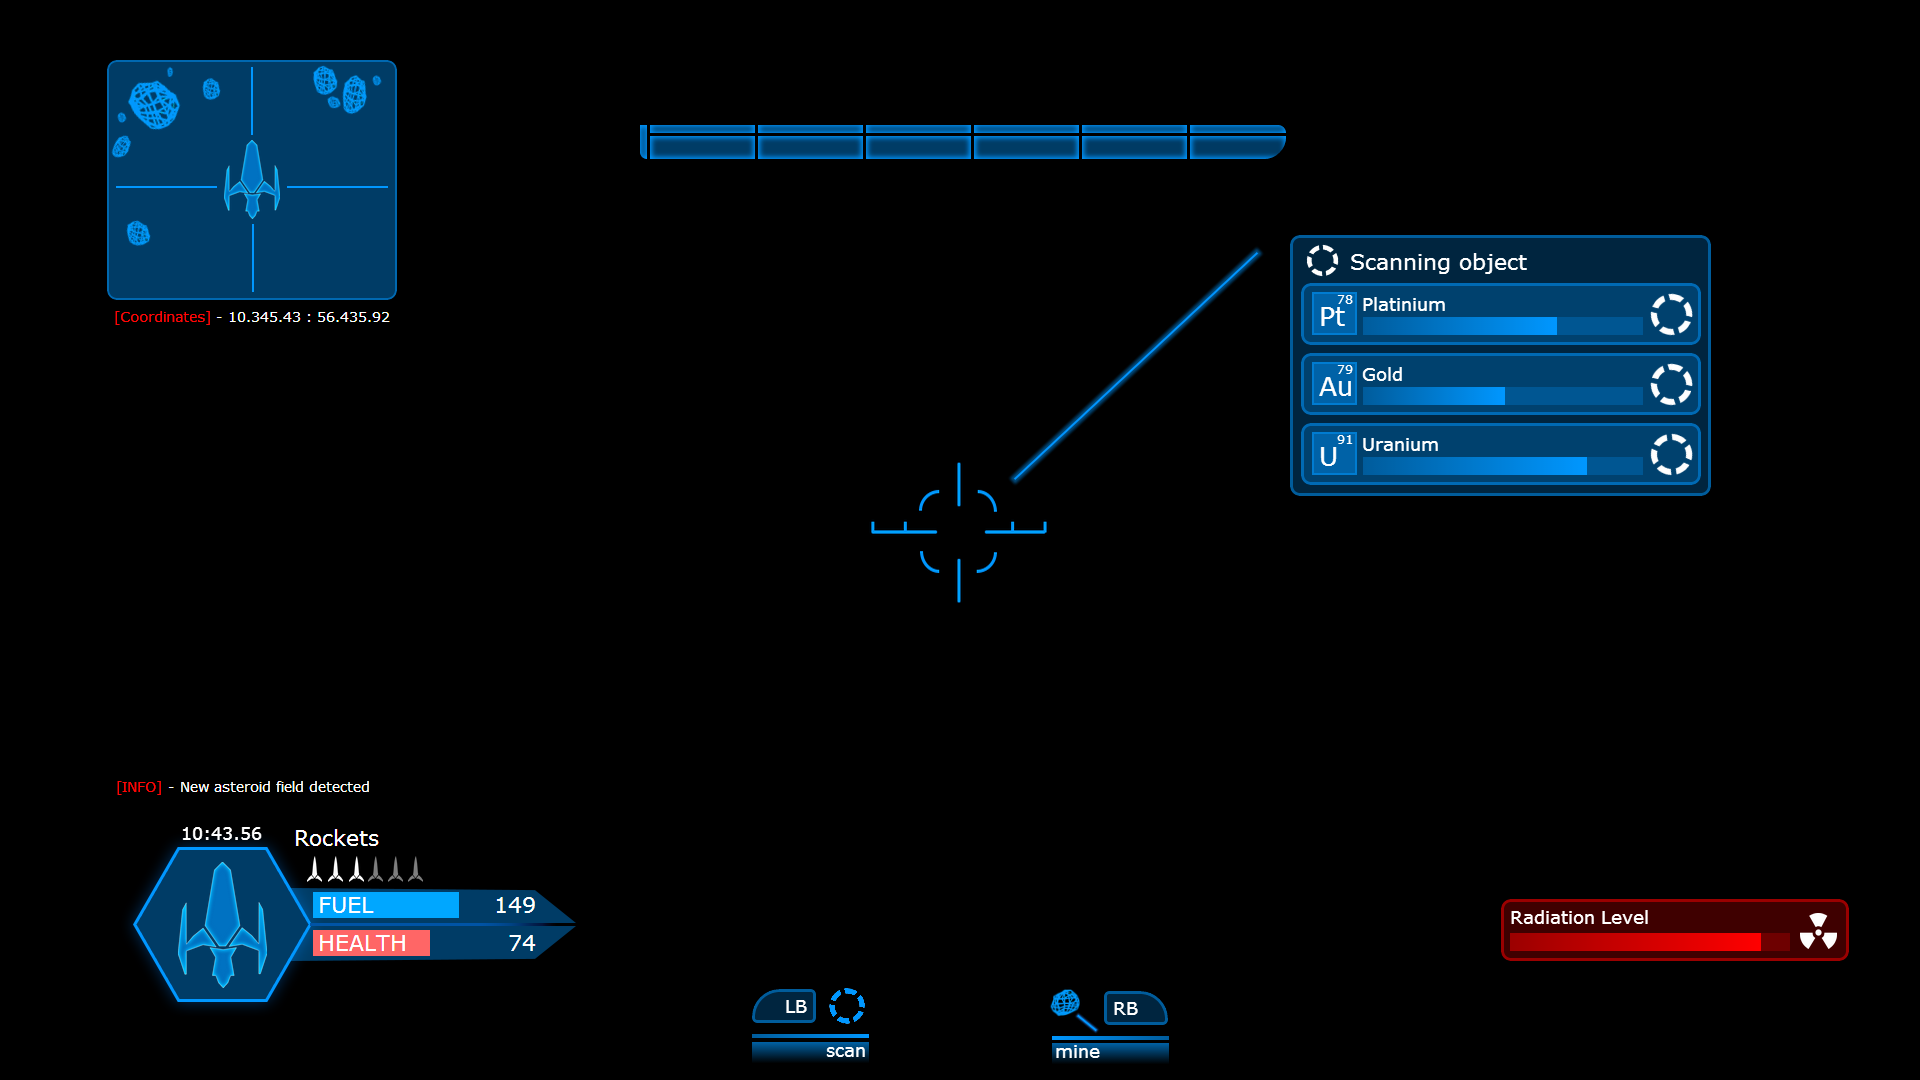
Apart from the HTML elements we can use image files that we designed in some external program (Photoshop, Illustrator, Corel Draw, etc.) or pictures. To import them in edge we just go to File/import. The imported files will be listed in the assets panel. From there we can drag and drop them in the scene. This way we import image file for radioactive symbol for our radiation scanner.

The same way we import the images files for the rest of the UI.
3.2 External CSS classes
Even though you can set all the HTML/CSS properties inside Edge, sometimes you might want to use external CSS classes. Edge allows you to do this by using “class” button in the properties panel.

Once you set the class of the object there, we need to add the external classes. To do so, we need to edit the HTML file generated by Edge. We open it in a text editor and in the “head” section we add the styles that we want.
|
1 2 3 4 5 6 7 8 9 10 11 |
<head> <title>Tutorial</title> <style> div.weapon:hover { -webkit-transition-property: all; -webkit-transition-duration: 0.2s; -webkit-transform: scaleX(1.1) scaleY(1.1); } </style> </head> |
In this case an object with the class “weapon” set in Edge will be scaled by external CSS styles when the mouse hovers above it.
3.3 Embeding video
Currently Adobe Edge doesn’t allow you to import video files from the file/import menu. However you can edit the HTML file, include the video as a video tag.
|
1 2 3 |
<video width="314px" height="214px" style="position: absolute; top: 392px; left: 73px; z-index: 100;" autoplay loop> <source src="comm-link.ogg" type="video/ogg"> </video> |
3.4 Using JavaScript functions to control the scene
You can also use external JavaScript functions to control the scene. To show this we will create custom JavaScript function to play and stop the stage.
First we bootstrap the Edge compositions with bootstrapCallback:
|
1 2 3 4 |
var comp; AdobeEdge.bootstrapCallback(function(compId) { comp = AdobeEdge.getComposition(compId).getStage(); }); |
Then we define two functions – vc_stop and vc_start. They will start or stop the composition.
|
1 2 3 4 5 6 |
function vc_stop(){ comp.stop(); } function vc_play(){ comp.play(); } |
Then we save the code in a file called edge-animation-handler.js and include it in the head section of the Edge HTML file.
|
1 2 3 |
... <script src="edge-animation-handler.js"></script> </head> |
To test the created JavaScript functions we add two buttons to the body of the Edge HTML page.
|
1 2 3 4 |
<body> <button onclick="vc_stop();">Stop</button> <button onclick="vc_play();">Play</button> ... |
Now when we press the buttons they call the JavaScript functions and they start/stop the Edge composition.
4. Animating the HUD
Once the HUD is ready we can animate it. There are three main things that we need – the timeline, keyframes and transitions.

4.1 Timeline
If you have some experience in Adobe Flash, After Effects or some video editing software you probably already know what this is. If not – don’t worry. It’s just a place that has your objects and their status over time. On the left side are our objects and on the right the panel is divided in time segments. The red line is called the Playhead. We can move it ot change the current time. To animate an object we just need to set different settings for one property in different time segments.
4.2 Keyframes
To set different properties of an object in different time segments we need to use keyframes. In the properties panel next to each property there is a small diamond shaped symbol. So to animate the property of object we need to click on it and set it’s new value in this moment (Playhead position) of time. Then we move the Playhead to another position click on the keyframe button for the same property and set its new value. Now when we preview the HTML page in browser we can see that the property will be animated (will change overtime). Instead of manually adding keyframes, you can also click on the Auto keyframe mode. It will automatically create keyframes when you change properties in the inspector. You just have to make sure that the Playhead is on the right time in the timeline.
4.3 Transitions
Although the object and its property are animated, the animation is not smooth. It will act as a flip of switch. Once it reaches the second keyframe it will immediately change to the new value. To solve this we need transitions. They will gradually change the value of the property between the two keyframes. To create transitions we just need to click on Auto transition mode icon. It will automatically create transitions for our animations when we create keyframes. That way the created animation will be smooth.
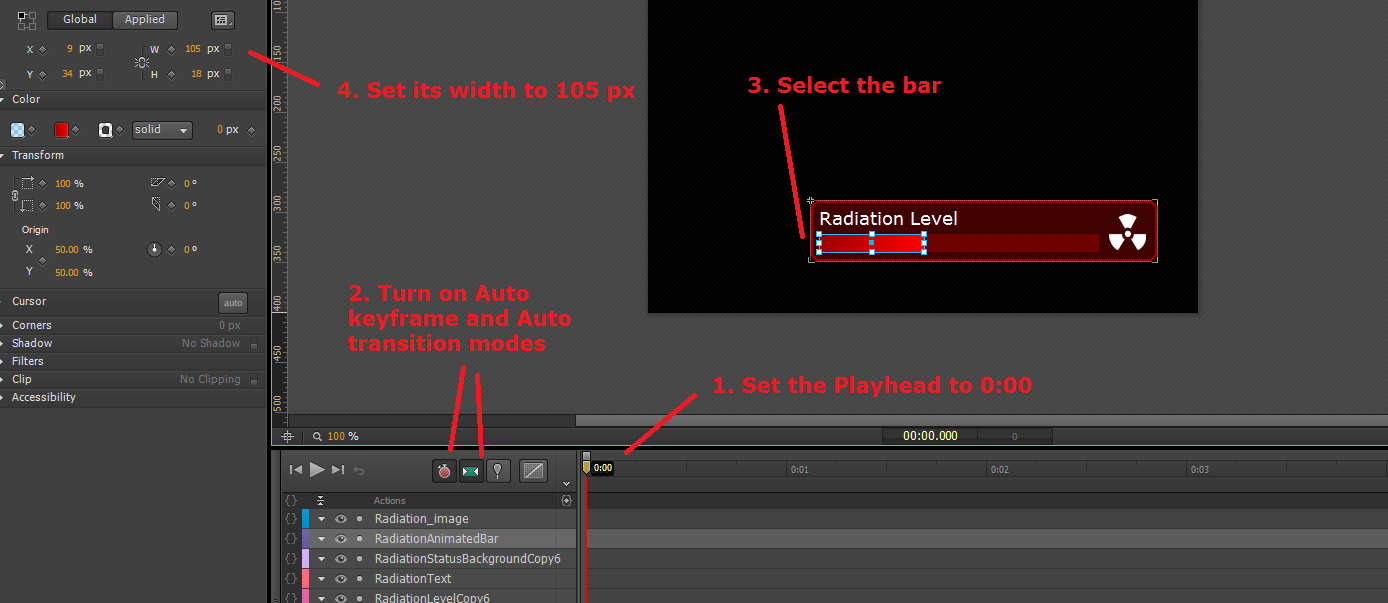
So to animate our radiation bar we have to animate its width property. To do so, we enable Auto keyframe mode and Auto transition mode. Then we move the playhead in 0:0 position of the timeline. We set the width property to 105px.
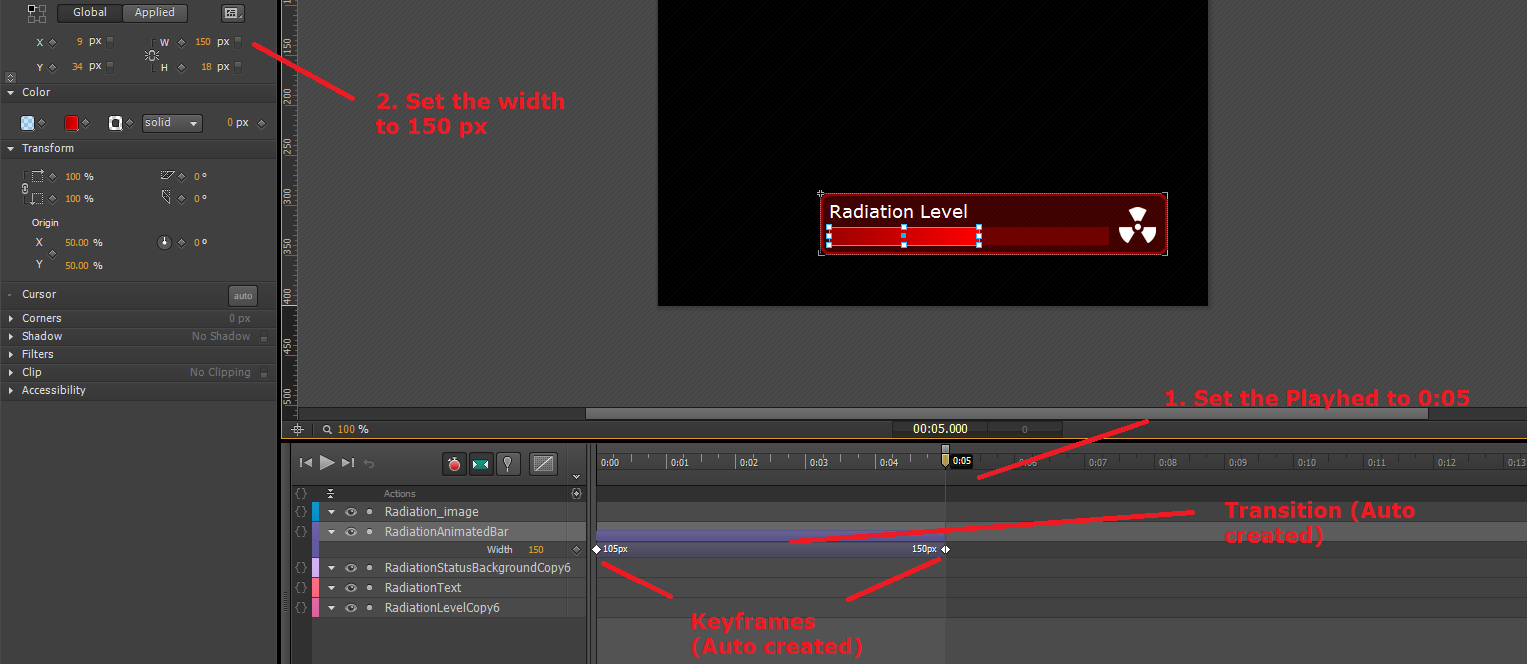
Then we move playhead to 0:05 and set the width property to 150px. That’s it. The animation, keyframes and transition are automatically created. The animation will smoothly transition the width of the bar from 105px to 150px for 5 seconds.
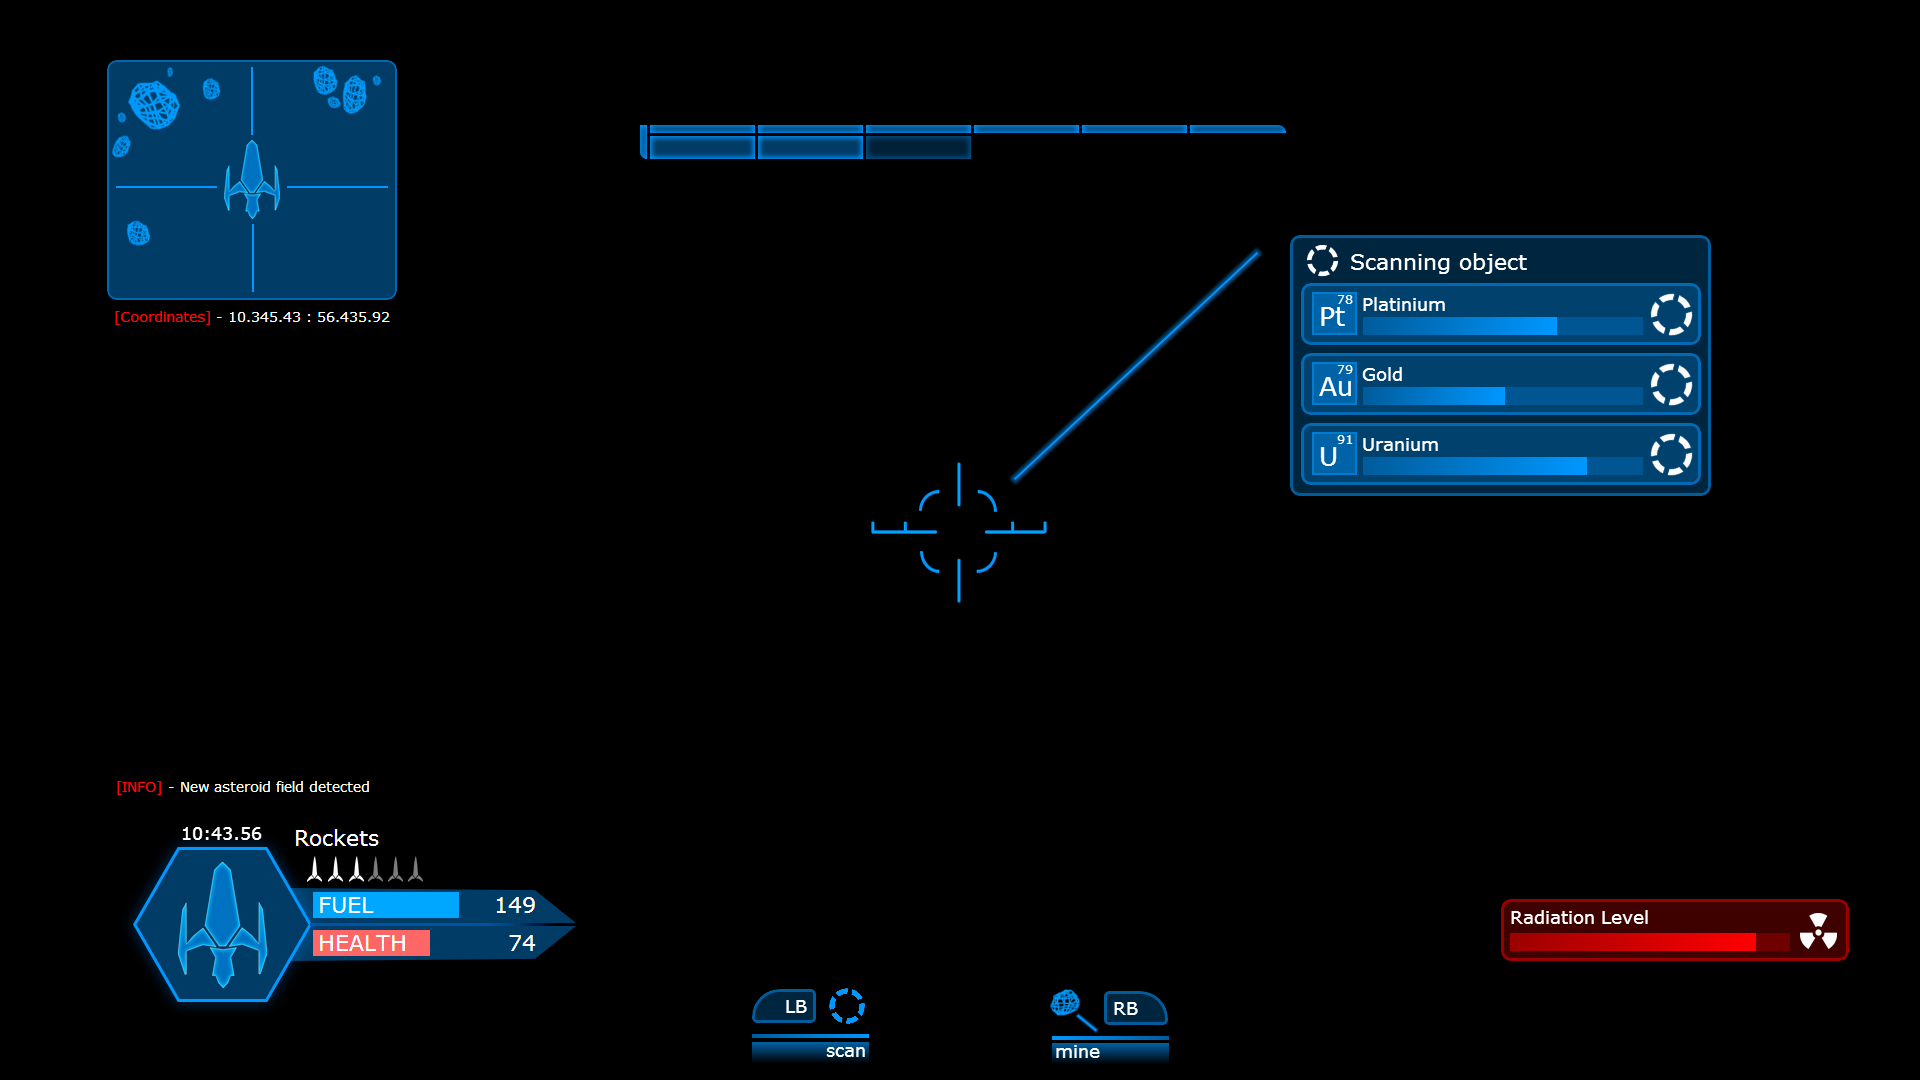
Now we have an animated radiation scanner bar.
Using the same way the timeline, keyframes and transitions we animate the rest of the elements of the UI.
5. Integrating the created HUD into a game with Coherent UI.
To integrate the created HTML file in a game with Coherent UI you just need to set the URL address of the Coherent UI View to the page and we are done.

Now you see how easy it is to create great looking animated game UI with Adobe Edge and Coherent UI!
For more tutorials about Adobe Edge you can check out these links :
http://helpx.adobe.com/edge-animate/tutorials/creating-new-edge-animate-project.html
http://helpx.adobe.com/edge-animate/tutorials/adding-text-your-project.html
http://www.adobe.com/inspire/2014/01/parallax-edge-animate.html
Other cool features of Adobe Edge that you might want to check out are:
– Toggle Pin (provides easier keyframe creation)
– Group elements in DIV (option when you right click on a group of selected elements)
– Easing (you can use it to set different ways for the transitions to be carried out)
I hope you enjoy this tutorial and find it useful 🙂 If you have any questions or comments please post them in our forum.
Hristo
