
How to automate the testing of game UI with Selenium and JS
In this tutorial, we’ll show you how you can use Selenium to automate the testing of game UI. Selenium is by far the most popular web-application testing framework currently available. It works with various scripting languages such as Java, JavaScript, C#, PHP, Ruby, Python, Perl, has integrations with build systems and broad cross-browser support. Furthermore, Selenium has a very large community, it’s open source and freeware!
For this tutorial, we are going to use Data-Binding Sample that comes with Coherent GT. Using a similar approach, you can integrate the Selenium testing framework in your own game UI scenes.
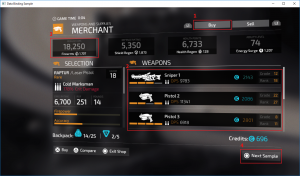
Coherent GT Data-Binding Sample
JS Installation
The first thing you need to do is to install the node.js and the npm.
Build sample
Next, you need to open the project solution in Visual Studio, which you can find in the following directory:
CoherentUIGT\Samples\UI\C++\Sample_DataBinding\Sample_DataBinding.slnAfter you open the solution, you need to build the project. This will generate an exe file with the name Sample_DataBinding, and it will be located in the following directory:
CoherentUIGT\Samples\UI\bin\Sample_DataBinding.exe
Configuration and run
Then you need to copy the folder with name test_driven in the sample folder, which has the same directory as the Sample_DataBinding.exe. After this, you need to install selenium-webdriver in the folder of the JS, which you can do by running the following commands from cmd.
cd CoherentUIGT\Samples\UI\C++\Sample_SeleniumUIAutomation
npm install selenium-webdriver
After you install the selenium-webdriver, you need to change the current cmd location to the folder where the sample is located:
cd ..\..\binAfter you change the cmd location, you need to run the sample test with the command:
node ..\C++\Sample_SeleniumUIAutomation\JSSample.jsFinally, you need to make sure to provide the correct paths for your project if different.
Creating and editing the test
In order to create and edit the test, you need to launch the sample. Then, launch the debugger and open the web view of the test. Next, you can use the debugger to identify elements for the tests and change whatever you want. Finally, if you want to see the actual HTML document, which is loaded in the sample, you can find it in the following directory:
CoherentUIGT\Samples\UI\bin\uiresources\Sample_DataBinding\WeaponsShop.html
JS Sample Test File
Here, you can see a basic sample test file written in JS:
'use strict';

var webdriver = require('selenium-webdriver');
var capabilities = webdriver.Capabilities.phantomjs();

// The correct path to the sample
capabilities.set('phantomjs.binary.path', './Sample_DataBinding.exe');
var driver = new webdriver.Builder().withCapabilities(capabilities).build();

// TEST 1
// Verify that a displayed text label value is as expected
function getTextTest() {
    console.log('Test 1 starting: Verify a simple text label');
    console.log('Expected text: Buy');

    return driver.wait(webdriver.until.elementLocated(webdriver.By.xpath("//div[@id='buyButtonText']")), 5 * 1000)
        .then(el => {
            return el.getText();
        })
        .then(text => {
            console.log('Actual text: ', text);

            if (text === 'Buy'){
                console.log('Text label is correct!\n');
            } else {
                console.log('\x1b[31m', 'WARNING: Text label is not correct!!!\n', '\x1b[0m');
            }
        });
}

// TEST 2
// Verify the count of multiple similar elements.
// The elements are added from the Structural Data-binding and are coming from the C++ side of the sample.
function getWeaponsCountTest() {
    console.log('Test 2 starting: Verify the count of multiple similar elements');
    console.log('Expected count: 6');

    return driver.wait(webdriver.until.elementsLocated(webdriver.By.xpath("//div[@data-bind-for='i:']")), 5 * 1000)
    .then(el => {
        return el.length;
    })
    .then(count => {
        console.log('Actual count: ', count);
        if(count === 6){
            console.log('Count is correct!\n');

        } else {
            console.log('\x1b[31m', 'WARNING: Count is wrong!!!\n', '\x1b[0m');
        }
    });
}

// TEST 3
// Verify hover element transformation
function getHoverStateTest() {
    console.log('Test 3 starting: Verify hover element transformation');
    console.log('Expected transformation matrix: matrix(1.1, 0, 0, 1.1, 0, 0)');

    var sequence = new webdriver.ActionSequence(driver);

    return driver.wait(webdriver.until.elementsLocated(webdriver.By.xpath("//div[@id='damageStat']")), 5 * 1000)
    .then(loaded => {
        driver.findElement(webdriver.By.xpath("//div[@id='damageStat']"))
        .then(element => {

            sequence.mouseMove(element).perform();

            // This sleep is needed as the button transformation is not instant and we need the end state
            driver.sleep(2000);

            element.getCssValue('-webkit-transform').then(transform => {
                console.log('Actual matrix: ', transform);

                if (transform === 'matrix(1.1, 0, 0, 1.1, 0, 0)') {
                    console.log('Transformation is applied!\n');
                } else {
                    console.log('\x1b[31m', 'WARNING: Transformation is not applied!!!\n', '\x1b[0m');
                }
            });
        });
    });
}

// TEST 4
// Verify hover element color change
function getRGBColorValueTest() {
    console.log('Test 4 starting: Verify hover element color change');
    console.log('Expected default color: rgba(255, 255, 255, 0.0980392)');

    var sequence = new webdriver.ActionSequence(driver);

    return driver.wait(webdriver.until.elementsLocated(webdriver.By.xpath("//div[@id='nextSample']")), 5 * 1000)
    .then(loaded => {
        driver.findElement(webdriver.By.xpath("//div[@id='nextSample']"))
        .then(element => {
            element.getCssValue('background-color').then(defColor => {
                console.log('Actual default color: ', defColor);

                if (defColor === 'rgba(255, 255, 255, 0.0980392)') {
                    console.log('Default color is correct!\n');
                } else {
                    console.log('\x1b[31m', 'WARNING: Default color is not correct!!!\n', '\x1b[0m');
                }
            });

            sequence.mouseMove(element).perform();

            driver.sleep(1000);

            element.getCssValue('background-color').then(hoverColor => {
                console.log('Expected hover color: rgba(227, 141, 39, 0.298039)');
                console.log('Actual hover color: ', hoverColor);

                // The hoverColor is coming from shop.css file line 95.
                // Selenium is not returning the last value as 0.3 but 0.298039 instead - floating point error.
                if (hoverColor === 'rgba(227, 141, 39, 0.298039)') {
                    console.log('Hover color is correct!\n');
                } else {
                    console.log('\x1b[31m', 'WARNING: Hover color is not correct!!!\n', '\x1b[0m');
                }
            });
        });
    });
}

// Function needed to run the tests in order
function runTestsOrdered() {
    return getTextTest()
    .then(() => getWeaponsCountTest())
    .then(() => getHoverStateTest())
    .then(() => getRGBColorValueTest());
}

// This is where we start the execution
runTestsOrdered();
Successful Test Run
Once the test is executed, the sample will be launched and log messages will be printed in the console. Then, if the test is a successful run, it will look like this:

Unsuccessful Test Run
However, if the test is an unsuccessful run, it will produce the following log:

This concludes this tutorial. If you would like to learn more about Selenium here are a few links to get you started:
http://www.seleniumhq.org/docs/01_introducing_selenium.jsp
http://www.tutorialspoint.com/selenium/
http://www.guru99.com/introduction-to-selenium.html
http://www.pushtotest.com/selenium-tutorial-for-beginners-tutorial-1
Your feedback is important for us! If you have any questions about how to automate the testing of game UI using Selenium and JS, write a comment below or start a discussion in our Forum.


