Data Binding
This tutorial uses the "Creating a Healtbar Tutorial" as a starting point and describes in details how to add data-binding properties to a Healthbar FPS HUD Screen which change the top, left and width values of the HUD elements.
In the previous tutorial, we created the symbol HealthBarWrapper that holds a bunch of elements. Now we can continue with adding data-binding properties to the text fields, the condition bar, and the whole symbol. First of all, we have to convert each of these elements to symbols in order to add data-binding attributes to them.
Initial Environment
Double click on the HealthBarWrapper symbol to inspect its contents. Right click on the text field with the value 3 in it and select the Convert to Symbol option from the drop-down.
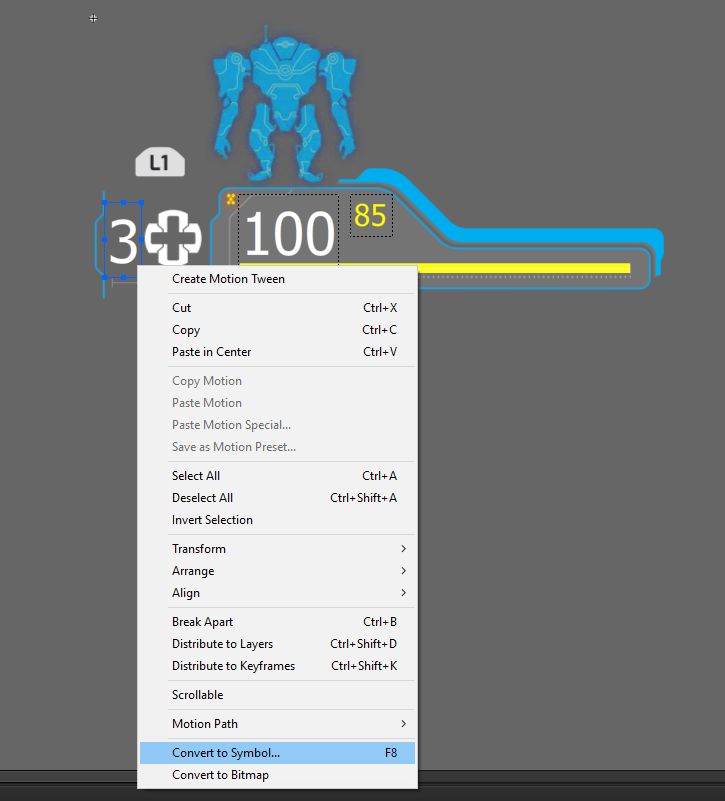
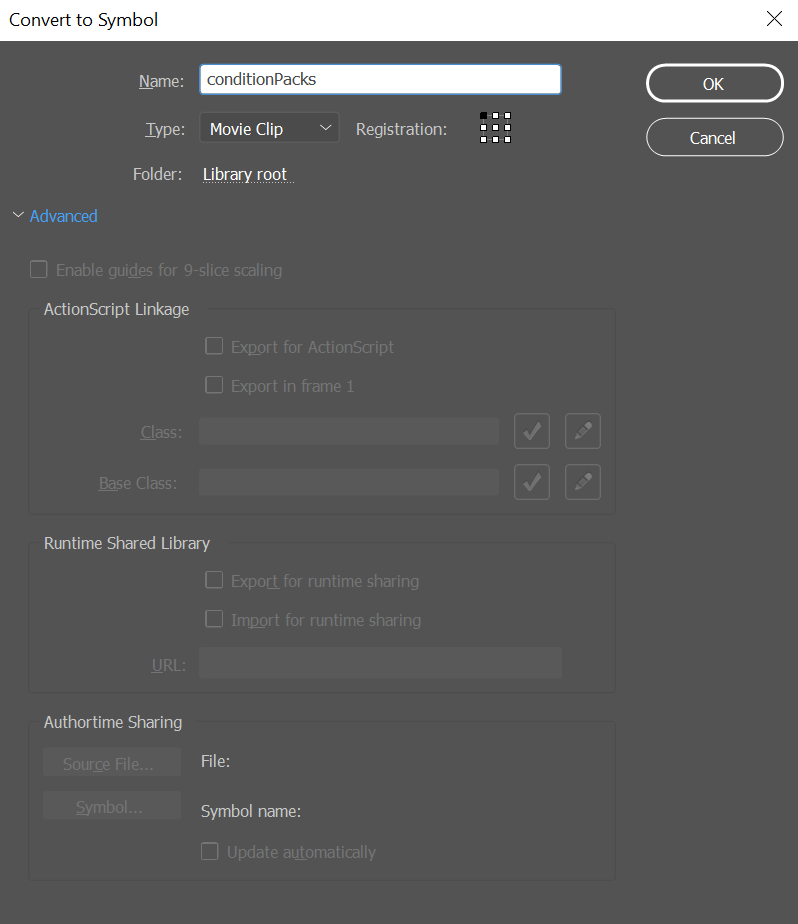
Insert conditionPacks as the name of the symbol.
Do the same for the rest of the elements, and give them the following names:
- Text field with value 100 - maxCondition
- Text field with value 85 - conditionState
- Yellow line - conditionBar
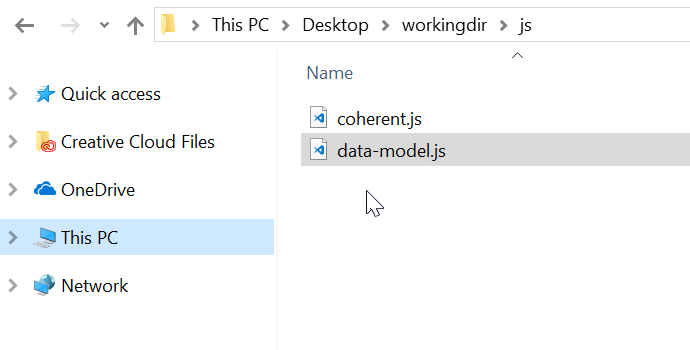
In your working directory create a folder, named js and add the cohtml.js library in it.
Afterward, create a data-model.js file in the same directory. This file will contain the JavaScript Data Model.
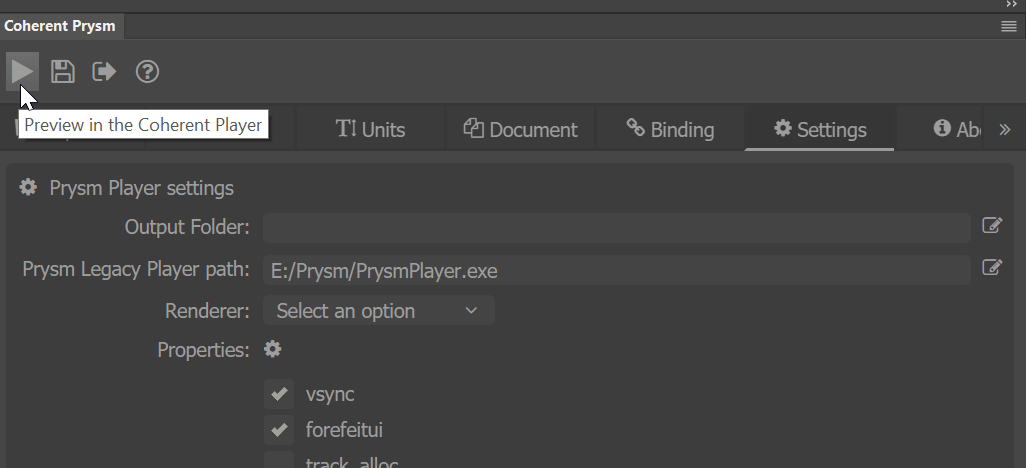
Finally, we have to include this file in the Animate composition. From the Prysm panel, go to Document tab, JavaScript Files and click on the + sign to add both of the JavaScript files that we created.
Then go to the Settings tab and set the Player path to your Prysm Player location, furthermore from the properties drop down menu add a tick to forefeitui check box. The player path is needed to launch the correct executable, while the forfeitui option is needed so that the data-binding works correctly in the player.

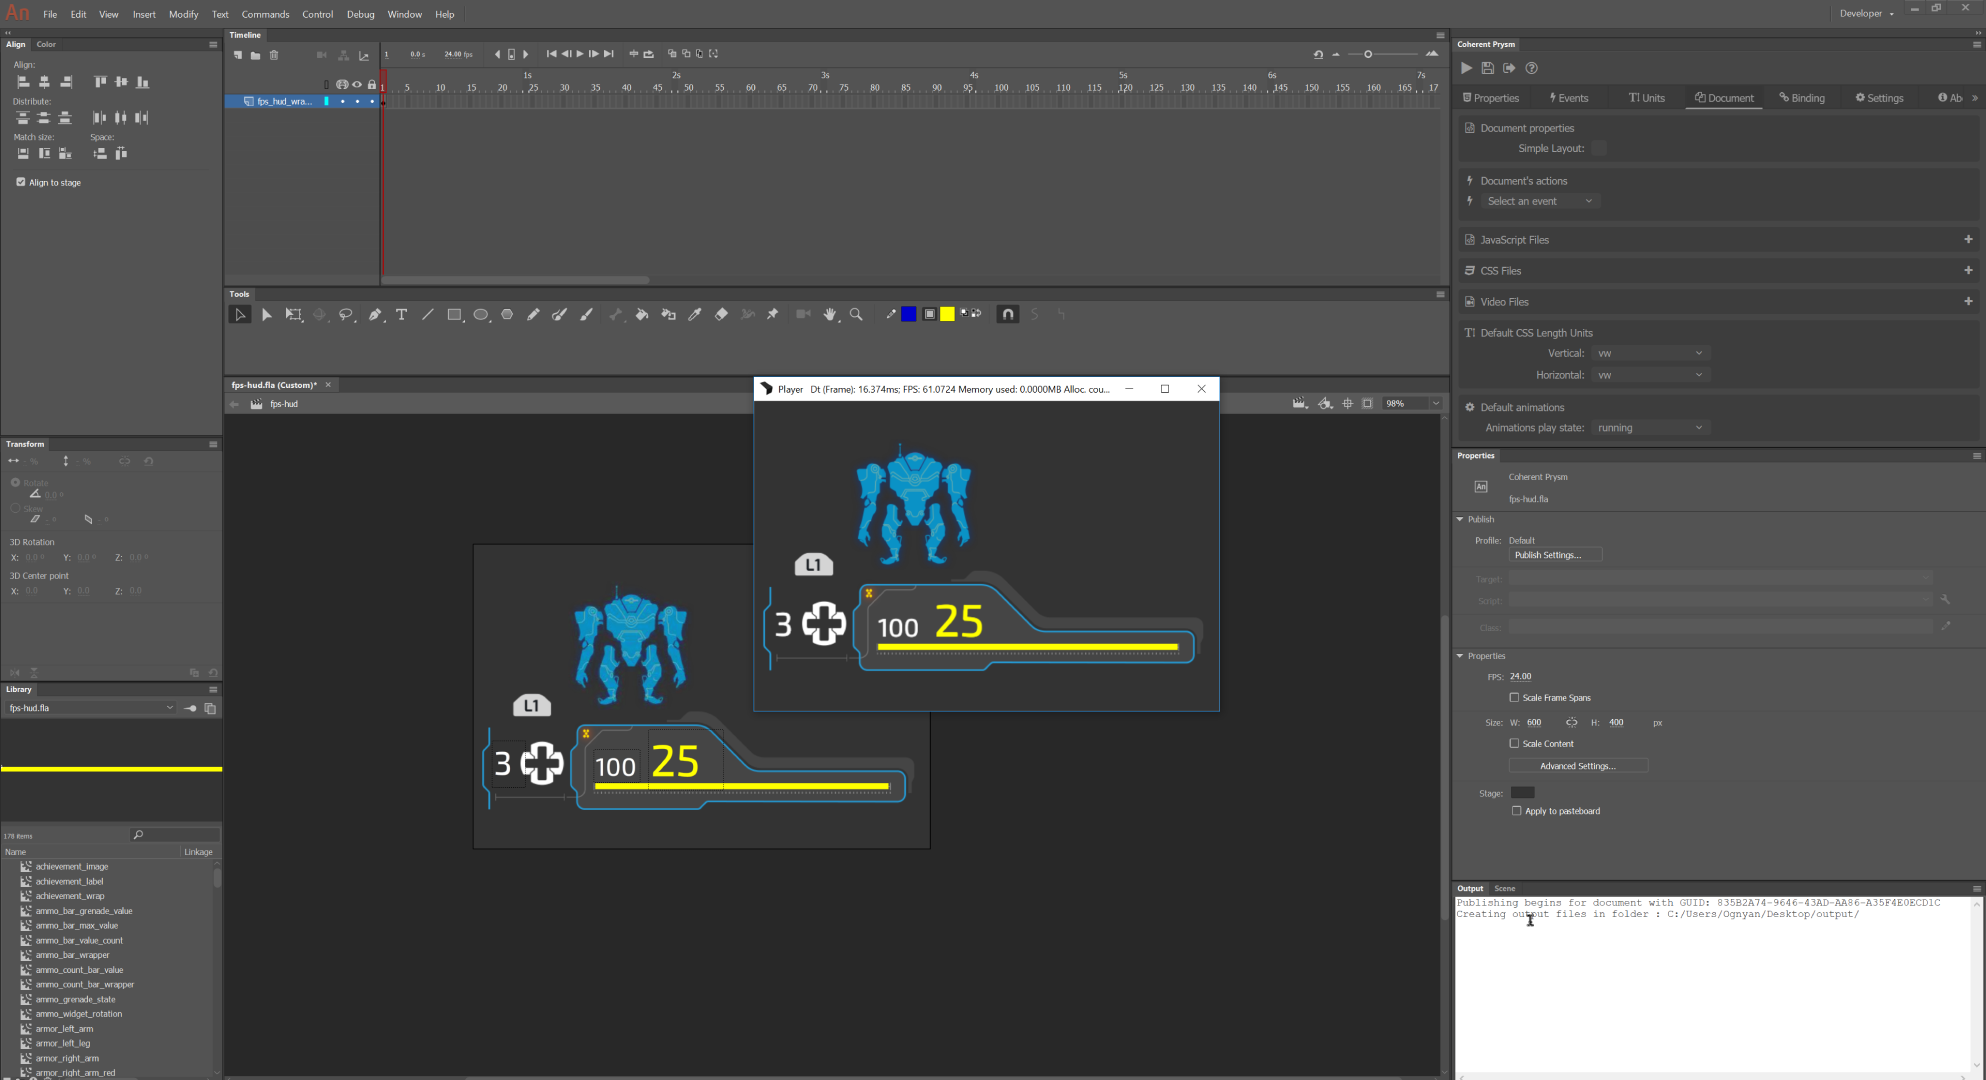
Let's check if everything is set correctly. From the icons on the top of the Prysm panel click the play button to preview the scene in the player.
Data-binding attributes
Our plugin supports all data-binding-* attributes. You can read more about them here.
To add a binding property, make sure that a symbol is selected, then navigate to the Binding tab and click the + icon.
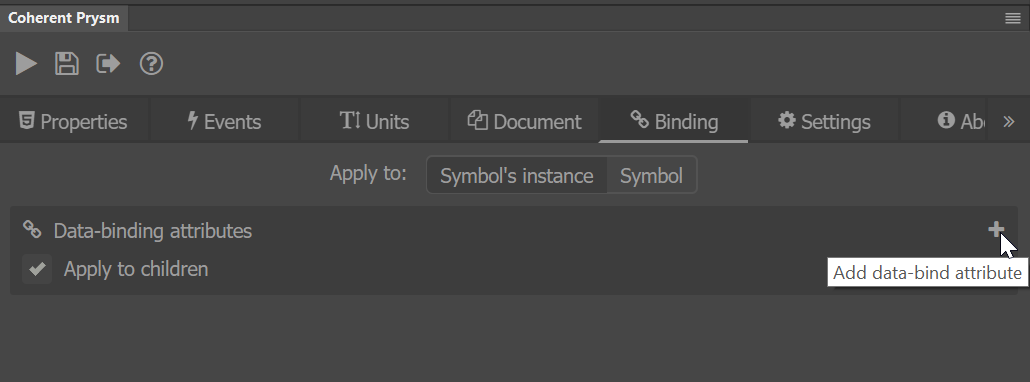
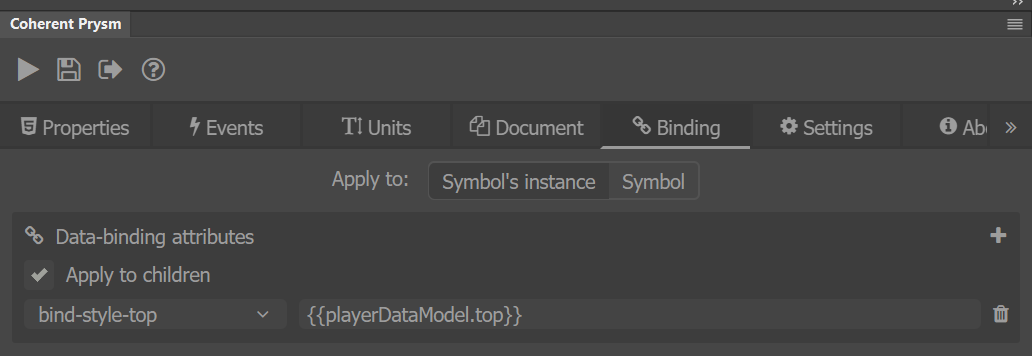
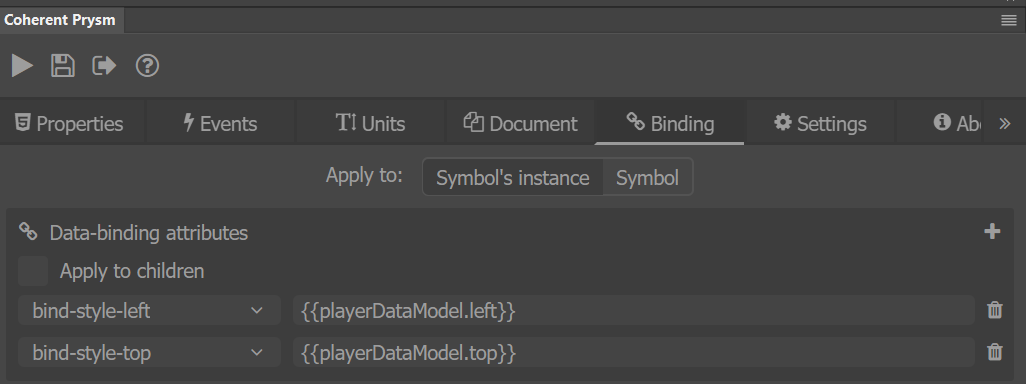
Now if you select a data-binding attribute from the dropdown and type in its value in the text field proper data-binding will be exported in the HTML. At the end of the tutorial, the selected attribute of the element will be changed based on the value of a field in the JS model(the purpose of the text field).
Add the data-binding attributes as illustrated in the images.
- Add left and top to the HealthBarWrapper symbol.
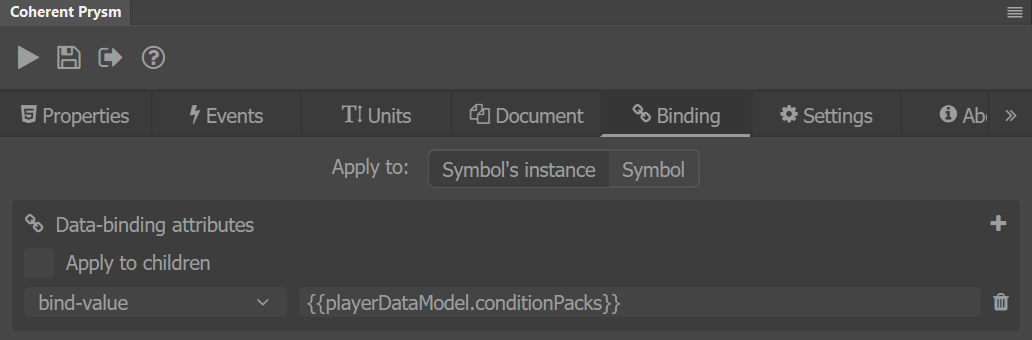
- Add value to the conditionPacks text.
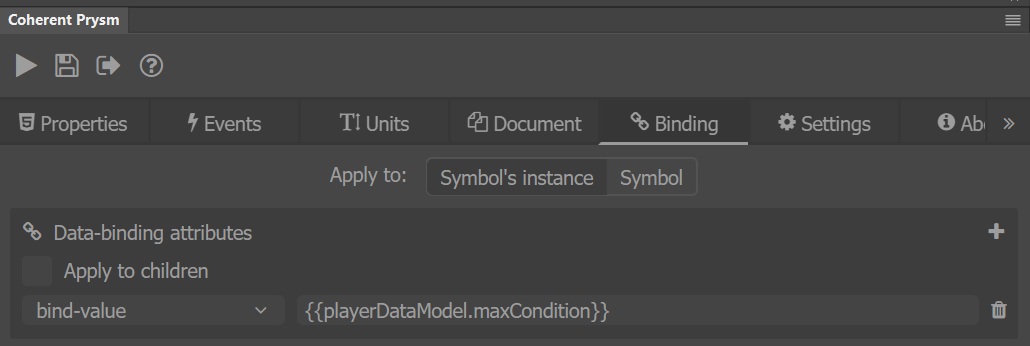
- Add value to the maxCondition text.
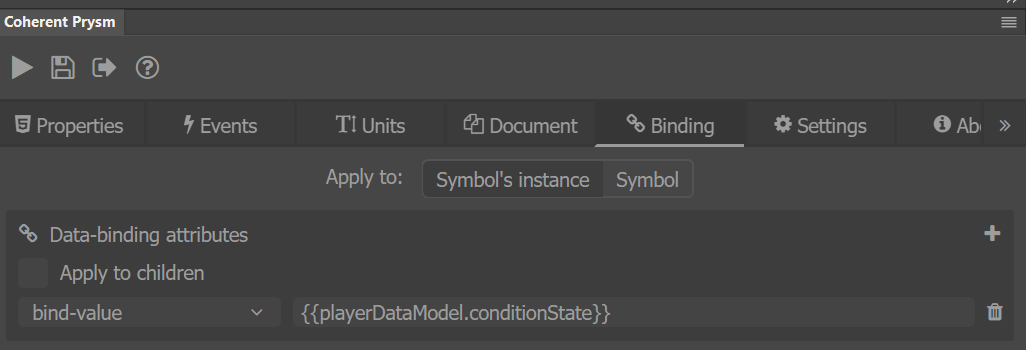
- Add value to the conditionState text.
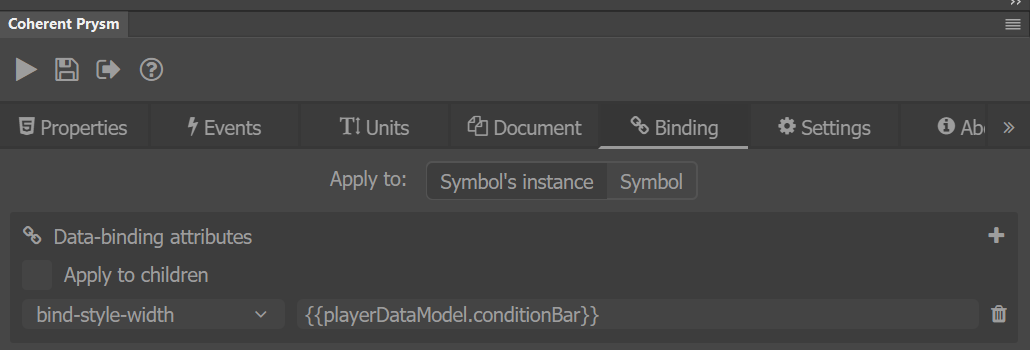
- Add width to the conditionBar.
Save the project and look at your .html file, if everything went well all data-bind attributes should be nested correctly and added to the correct element. At the end of the markup cohtml.js and data-model.js should be linked.
Data-binding events
Using data-binding events is an alternative for attaching event listeners to DOM elements. They are the preferred way to attach events to dynamically generated elements e.g. through data-bind-for.
You can read more about how to add a binding event manually and the supported event types here.
The binding events container is located in the Bindings tab.
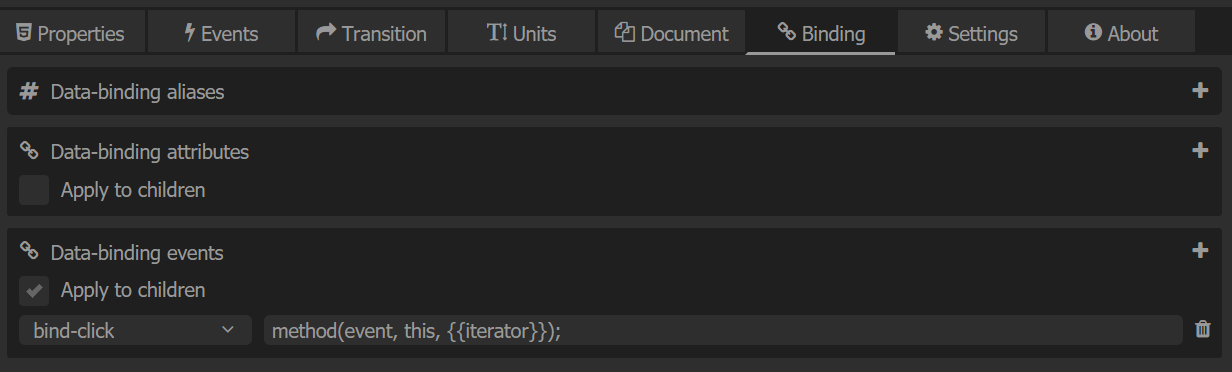
The syntax for adding an binding events is method(parameter1, parameter2, parameter3, parameter4), where you can have a variable number of parameters.
To be a valid data-binding event there needs to be atleast 1 data-binding expression.
You can call a random method or function in the callback of the data-binding event.
Furthermore, you can use the following variables inside the callback:
- event - The JavaScript Event object from the fired event.
- this - The DOM element on which the handler is registered.
You can also use the Events tab to add events to elements generated via bind-for. You can read more about how to do that here.
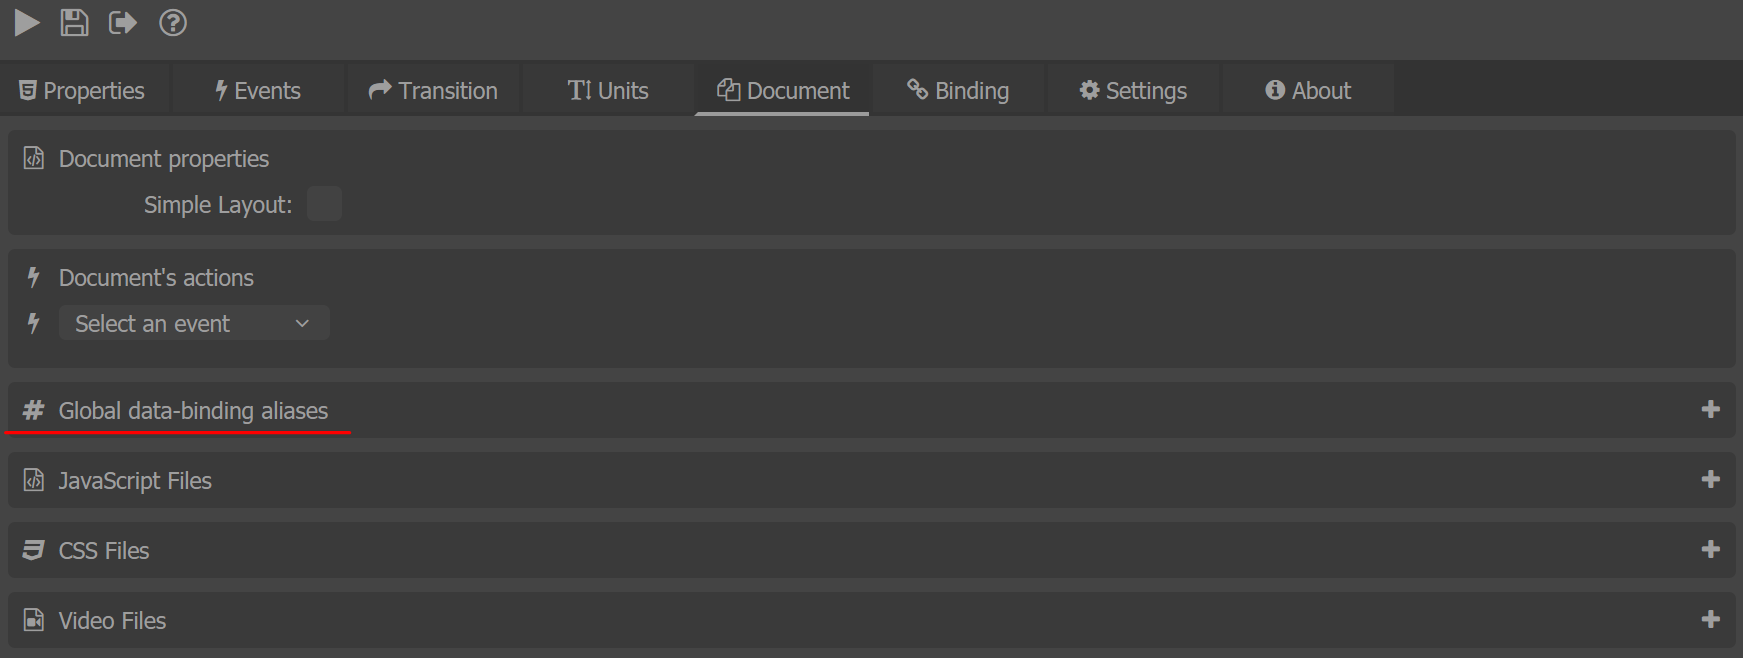
Data-binding aliases
Overview
Up until now you couldn't have different data-binding on different instances of the same symbol. The best thing to do was to duplicate the symbol and change the needed data-binding properties. The problem is that you ended up with two identical symbols with different bindings.
To address that concern, we added data-binding aliases. They enable you to apply different data-binding properties to different instances of the same symbol easily.
They work by changing the data-binding expressions applied to elements and that happens by changing certain parts of the expression.
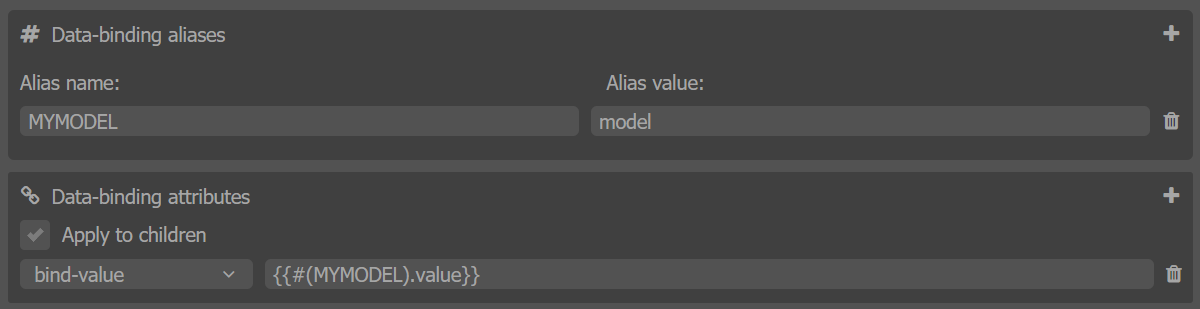
Data-binding aliases are extremely simple. In fact, they are key-value pairs, where you define the key and the value. Whenever Prysm finds an expression that uses an alias it substitutes the key with the value.
To figure out where aliases are used we use a special kind of syntax #(KEY), where KEY can be any alias name.
Lets say that in Prysm we have an alias with the key METHOD and value sum and the a data-binding expression {{model.#(METHOD)}}, Prysm will change the expression and export this HTML {{model.sum}}.
How to use data-binding aliases
There are two scopes in which you can generate aliases:
-
Global scope - Created in the Document tab
-
Symbol scope - Attached to symbols through the Binding tab.

Aliases are generated by pressing the "plus" button on the desired aliases container. When you create an alias two input fields will be displayed.
- Alias name
- This is the key of the alias.
- Alias value
![]()
After you've typed an alias name and alias value it is time to set the alias in action.
When you add a binding attribute - for example, data-bind-value, instead of using the model name you can use the alias name. This will make the widget that you are creating able to receive its model depending on its position in the DOM tree.
Resolving data-binding aliases
Adobe Animate scenes can be represented as a stage with content in it. The content can include symbols which can include content, etc. This forms a tree like structure.
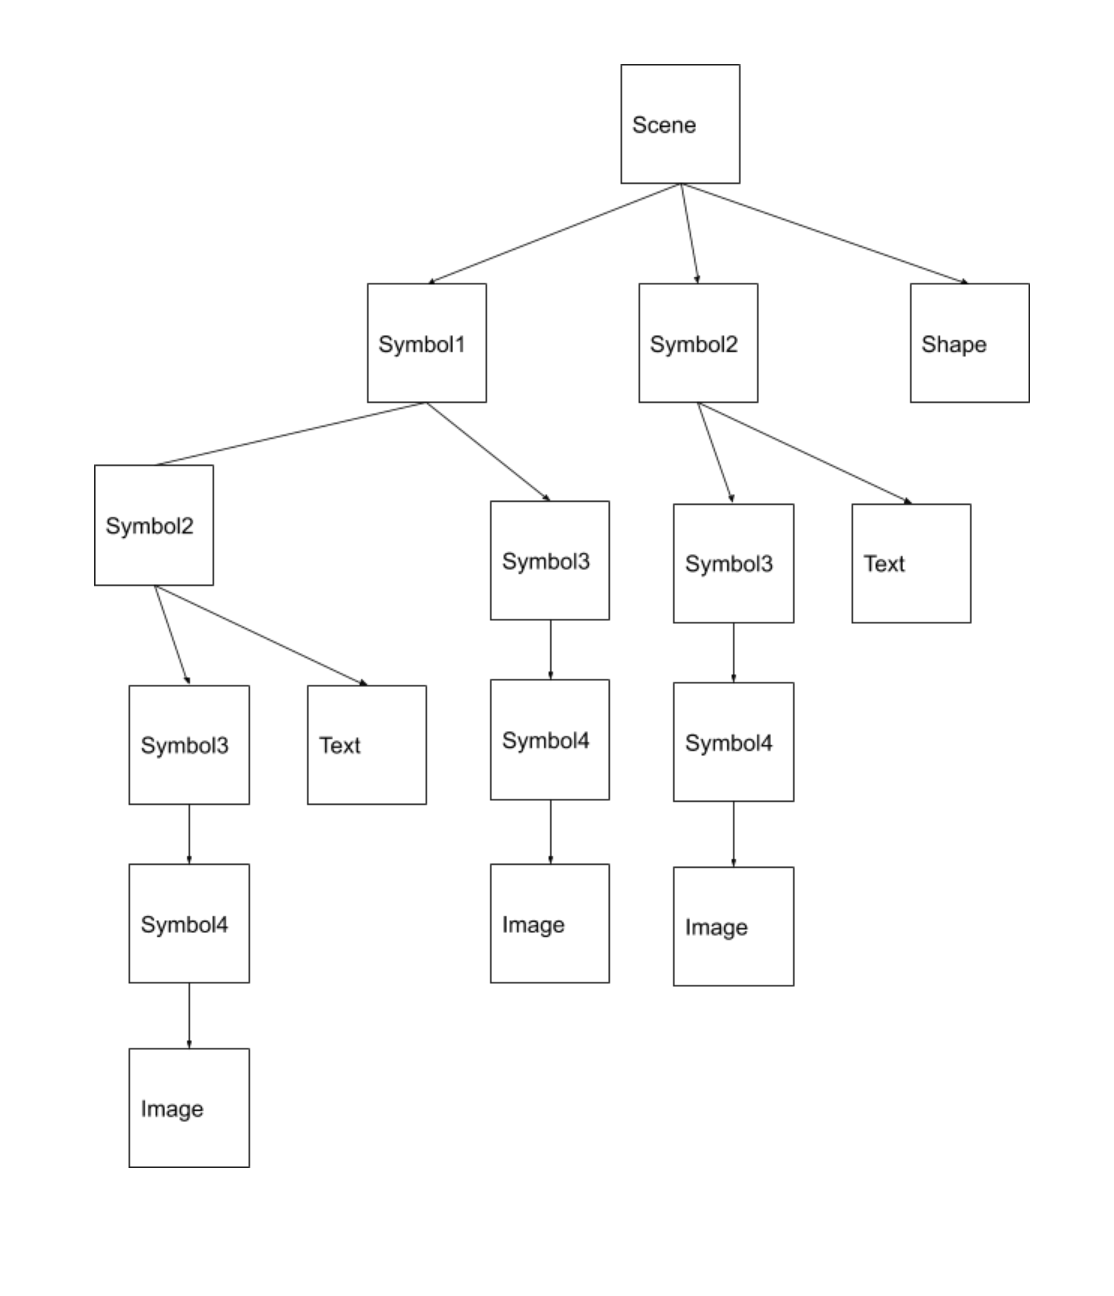
We resolve data-binding aliases by starting from the root of that tree(the scene) and going down. Resolving data-binding aliases cascades much like CSS. We start with the data-binding aliases of the document and go down. Every time that we encounter a symbol we extend the current data-binding aliases. If there are duplicating aliases we overwrite them with the symbol ones.
Why this is useful?
Data-binding aliases might seem simple, but is in fact extremely powerful, as it enables you to create components that receive data-binding based on the file that they are included in.
For example, to have different data-binding on different instances we wrap one of the instances in a new symbol and overwrite the aliases of that symbol which will cause the two instances to have different data-binding expressions.
Moreover, this can be used with author time shared symbols, which makes the feature even more powerful.
They can be used in:
- Bindings tab
- Data-binding attributes
- Data-binding events
- Events tab
- Bind value - You can check this tutorial.
- Properties tab
- Custom attributes
- Children options -> Custom attributes
Mock Binding Model
Before continuing check the Data-binding for JavaScript docs.
Insert all of the code in each step below in your data-model.js file.
Let's start by registering a JavaScript model by calling engine.createJSModel(modelName, model).
This will create a JS object that the binding attributes set on the HTML can be linked to.
engine.createJSModel('playerDataModel', {
    top: 0,
    left: 0,
    nextLeft: true,
    nextTop: true,
    conditionPacks: 3,
    maxCondition: 100,
    conditionState: 85,
    conditionBar: 258,
    updateModel: function () {
        engine.updateWholeModel(playerDataModel);
        engine.synchronizeModels();
    }
});
To update the JavaScript models we use engine.updateWholeModel(model). This function informs Prysm that the model has changed. To force an update of the data-bound values (update the DOM) you must also call engine.synchronizeModels().
In order to make the whole symbol move through the screen, we'll manipulate the top and left position attributes with the following function.
function movement() {
    var curLeft = Math.abs(playerDataModel.left);
    var curTop = Math.abs(playerDataModel.top);

    if (playerDataModel.nextLeft) {
        playerDataModel.left += 2;
        if(curLeft >= 600) {
            playerDataModel.nextLeft = false;
        }
    } else {
        playerDataModel.left -= 2;
        if (curLeft <= 0) {
            playerDataModel.nextLeft = true;
        }
    }

    if (playerDataModel.nextTop) {
        playerDataModel.top += 2;
        if (curTop >= 300) {
            playerDataModel.nextTop = false;
        }
    } else {
        playerDataModel.top -= 2;
        if (curTop <= 0) {
            playerDataModel.nextTop = true;
        }
    }

    playerDataModel.updateModel();
    requestAnimationFrame(movement);
}

movement();
Save the code and Play the preview in the Player. The symbol should float through the screen. Basically, on each frame the values of the model are updated. When the model is synchronized(in our example right after update) the top and left CSS values of the bound element are changed to the value in the model.
We can also change the value of the text fields and the width of the yellow line.
engine.createJSModel('playerDataModel', {
    top: 0,
    left: 0,
    nextLeft: true,
    nextTop: true,
    conditionPacks: 3,
    maxCondition: 100,
    conditionState: 85,
    conditionBar: 258,
    getRandomInt: function (min, max) {
        return Math.floor(Math.random() * (max - min + 1)) + min;
    },
    toggle: function () {
        if (playerDataModel.maxCondition === 100 && playerDataModel.conditionBar === 258) {
            playerDataModel.maxCondition = 25;
            playerDataModel.conditionBar = 64;
        } else {
            playerDataModel.maxCondition = 100;
            playerDataModel.conditionBar = 258;
        }
    },
    updateModel: function () {
        engine.updateWholeModel(playerDataModel);
        engine.synchronizeModels();
    }
});
At the bottom of the data-model.js file initiate an interval to invoke the new methods.
setInterval(function () {
    playerDataModel.conditionPacks = playerDataModel.getRandomInt(0, 9);
    playerDataModel.conditionState = playerDataModel.getRandomInt(0, 100);
    playerDataModel.toggle();
    playerDataModel.updateModel();
}, 800);
That's it, now our mock model is done. The new methods do a similar job as the changes on the top and left values but they use an interval to be invoked rather than a frame request. Click on the Play button in Prysm panel to preview the final result.