Events
Overview
You can use visual Prysm events to make your content from Animate interactable. This saves time by avoiding the need to manually write JavaScript code.
Events are located in the events tab.
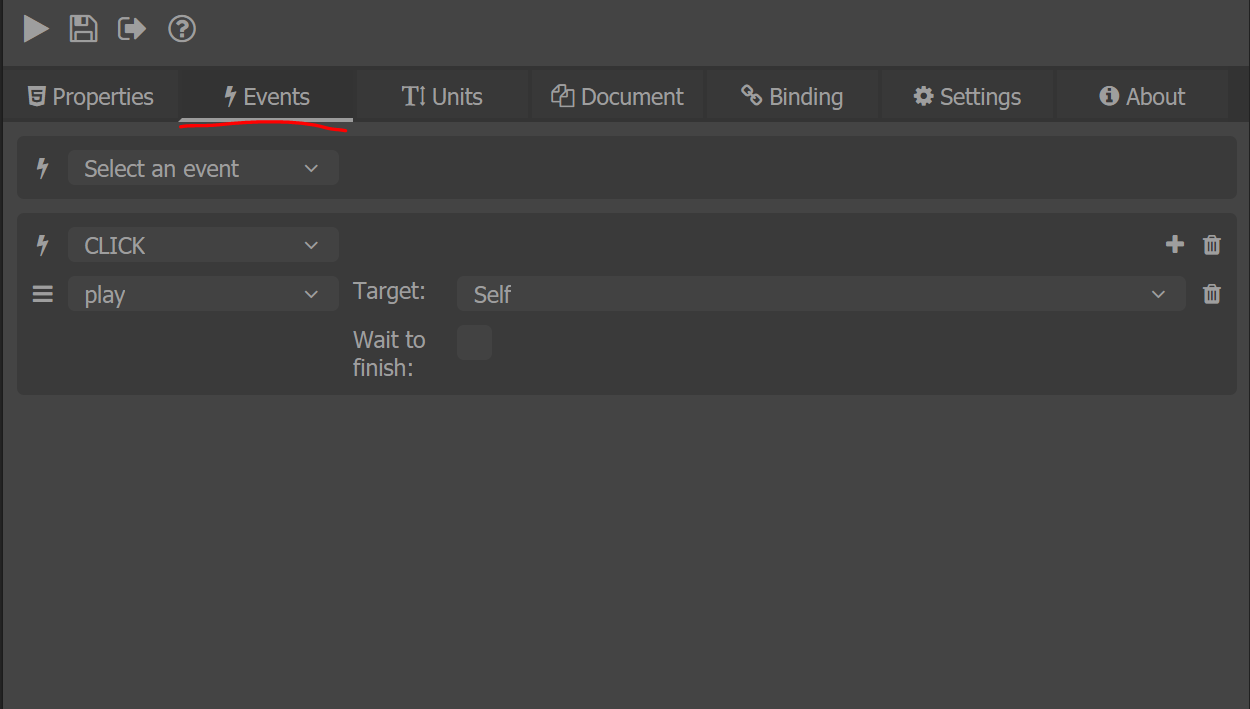
You can add any number of events and script the behavour of elements.
Document events
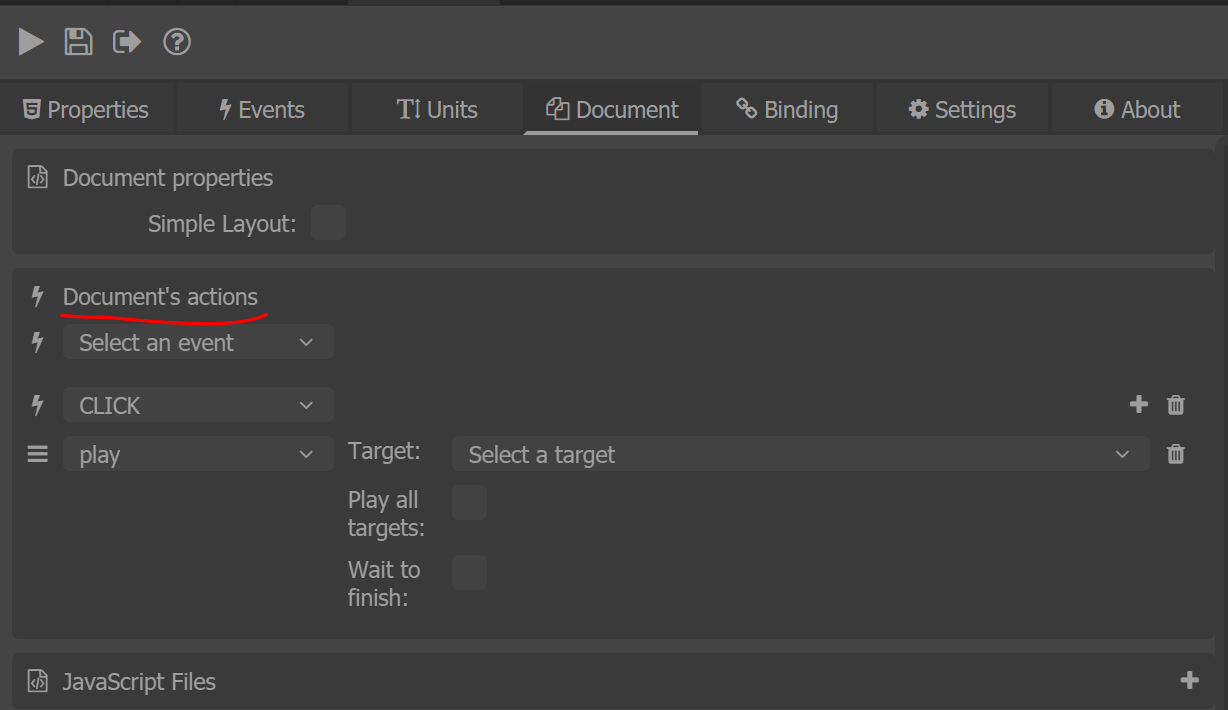
Also you can add an events to the document using the document tab. This will attach the event listeners in the exported HTML to the document. Document events are usually global per-page events.
For more information about events in JavaScript you can check: Here.
Supported event types
- BLUR
- CHANGE
- CLICK
- DBLCLICK
- FOCUS
- FOCUSIN
- FOCUSOUT
- KEYDOWN
- KEYPRESS
- KEYUP
- MOUSEDOWN
- MOUSELEAVE
- MOUSEENTER
- MOUSEMOVE
- MOUSEOUT
- MOUSEOVER
- MOUSEUP
- SELECT
- WHEEL
- CUSTOM
- CUSTOM-BOUND
For the document events there is one more event type:
Custom event
The custom event type is used to add a custom event to an element. What are custom events you can check here.
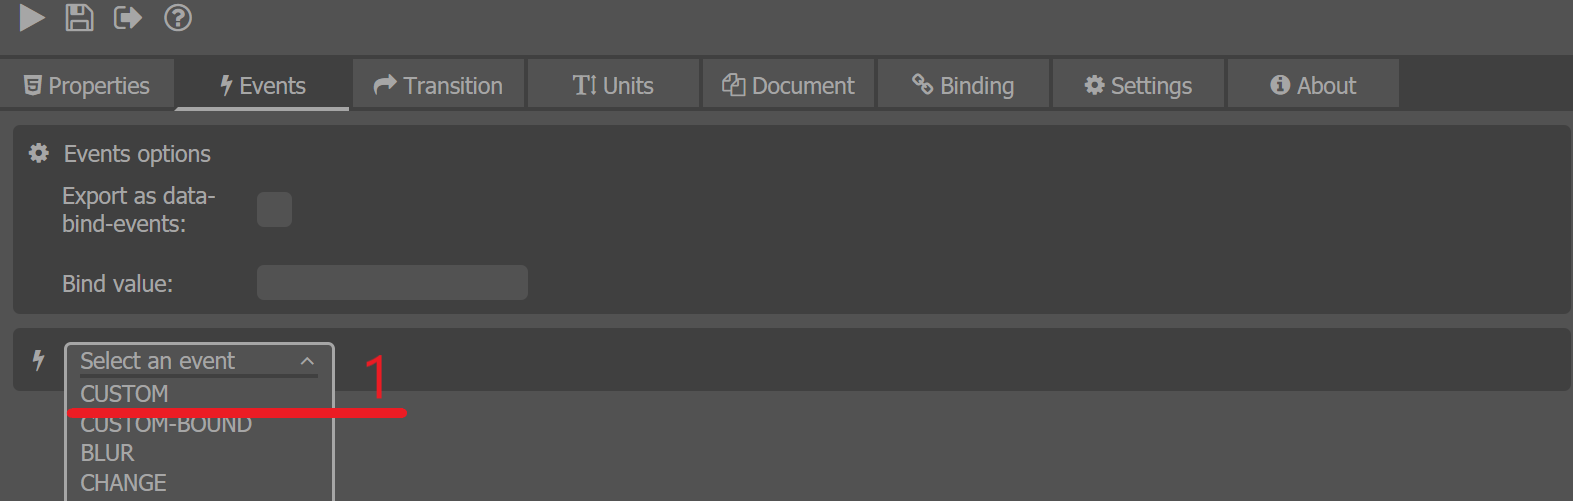
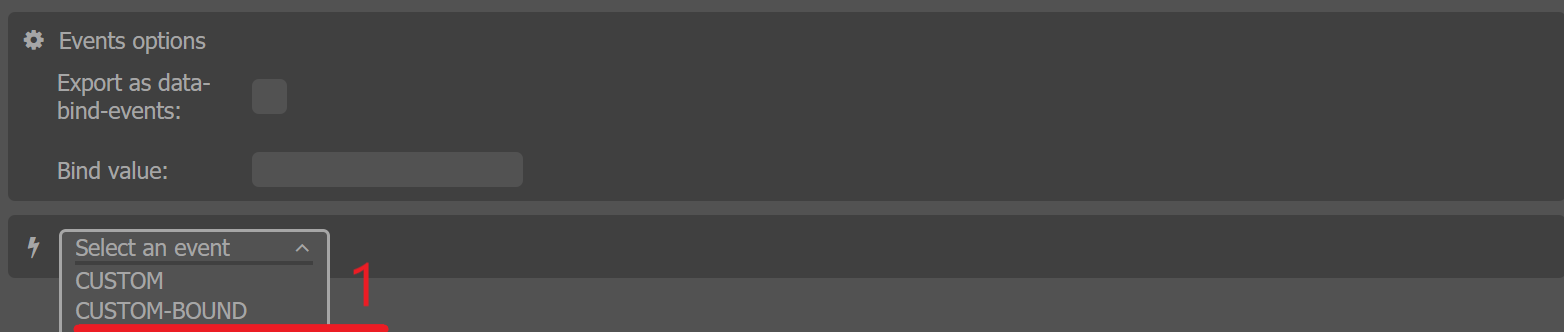
To add a CUSTOM event from the panel you can do the following:
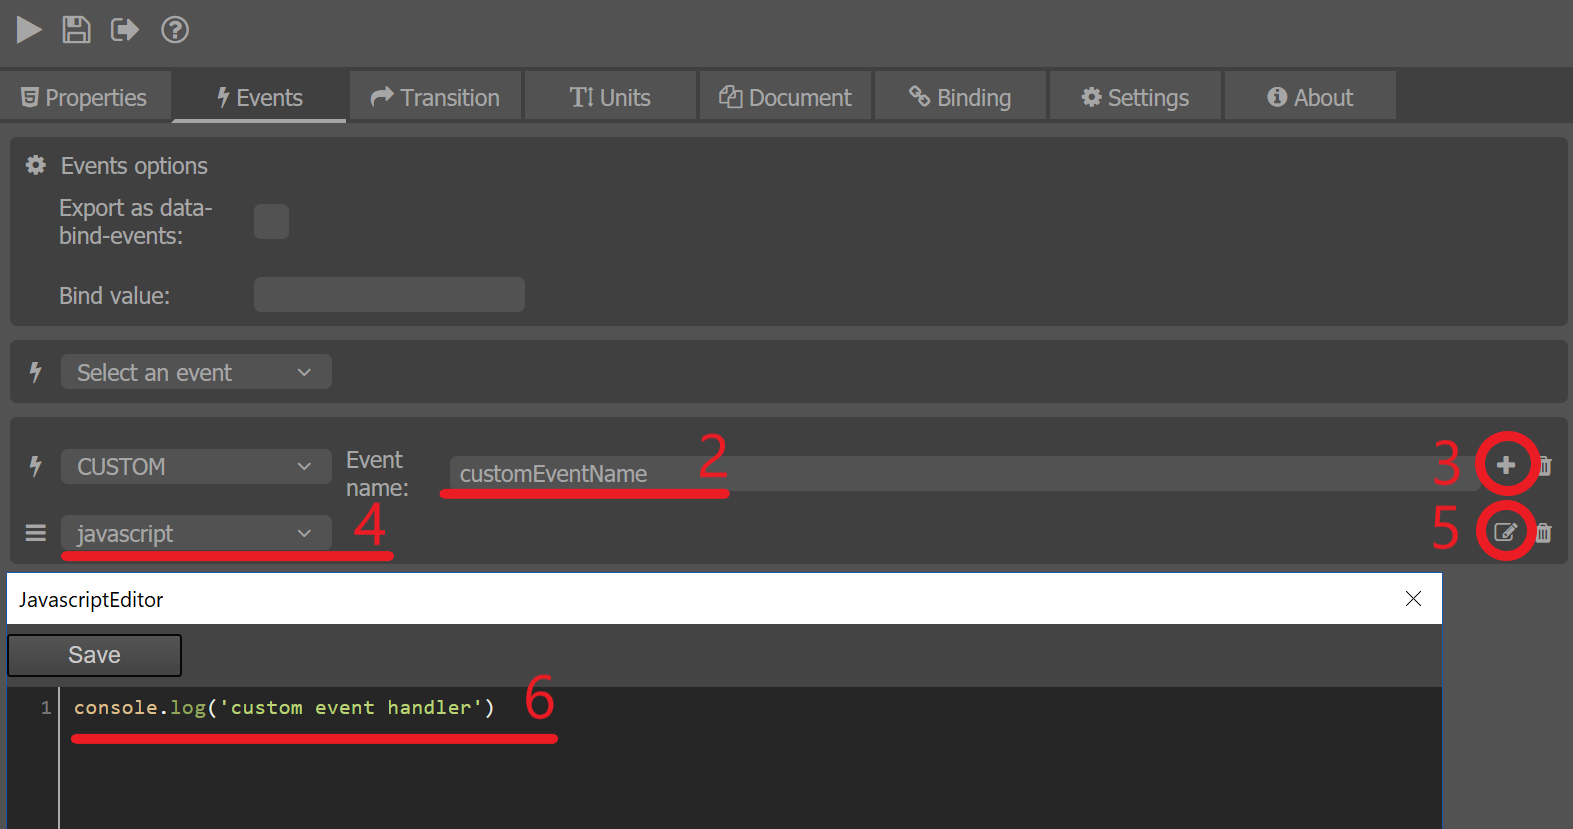
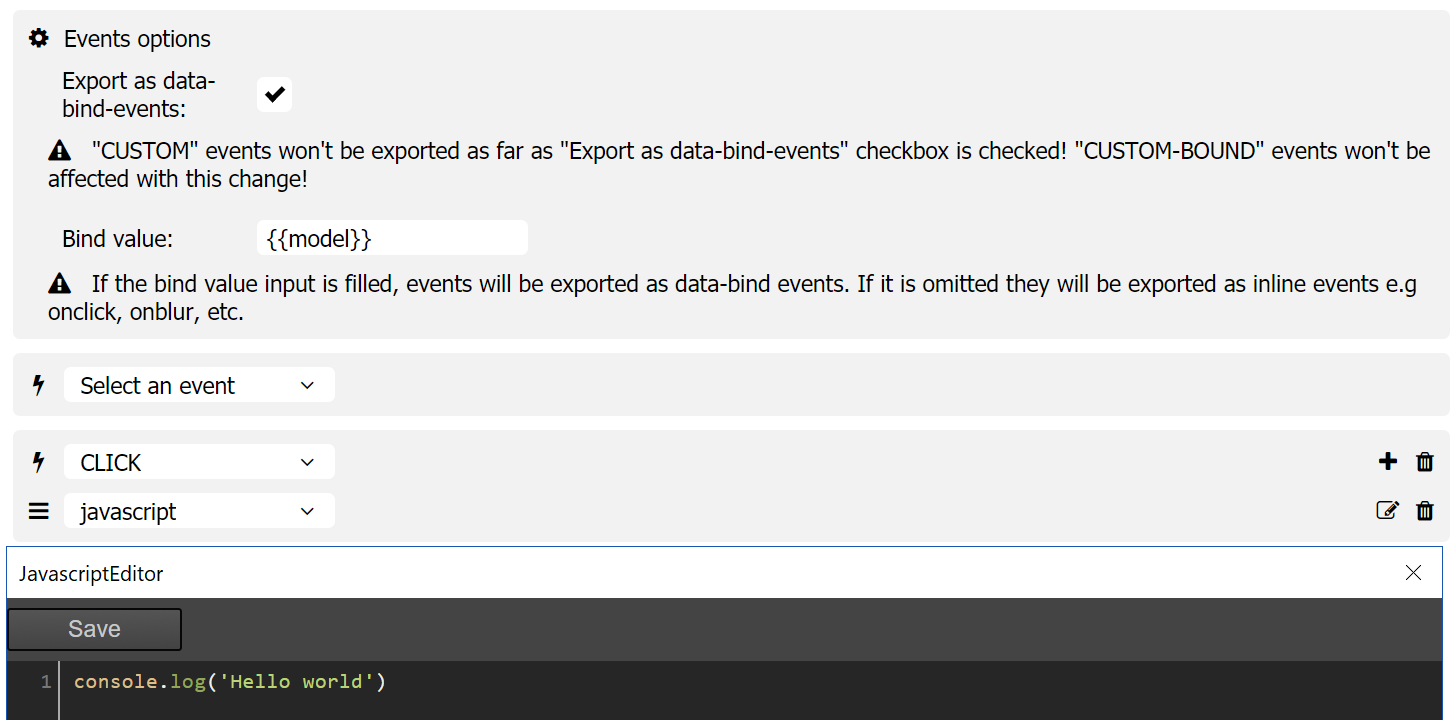
- Navigate to the Events tab and select an event - CUSTOM.
- Name the custom event by typing whatever name you want inside the Event name input field.
- Add a new handler.
- Select a javascript handler for example.
- Open JavaScript editor.
- Type
console.log('custom event handler')inside the editor and save.
Export a custom event
Exporting a custom event will lead to generation of the following lines of code to the JavaScript file:
${element}.addEventListener(${custom event name added from the panel}, (event) =>{
    // the handlers added from the panel will be generated here
});
The result of exporting the example above is:
element.addEventListener("customEventName", (event) =>{
    const eventTarget = event.currentTarget;

    console.log('custom event handler');
});
Custom bound event
Custom bound event is similar to the custom event but this type is used to attach custom events to elements generated with data binding. This event type is working in the panel similar to the custom event - adding event name, adding handlers and etc.
The differences are:
- To make working custom events on elements generated with binding we use the custom binding attributes feature added in the Player.
- We generate custom attribute for the element on which is attached CUSTOM-BOUND event in the exported HTML -
<div data-bind-some-attrubute=""></div>. -
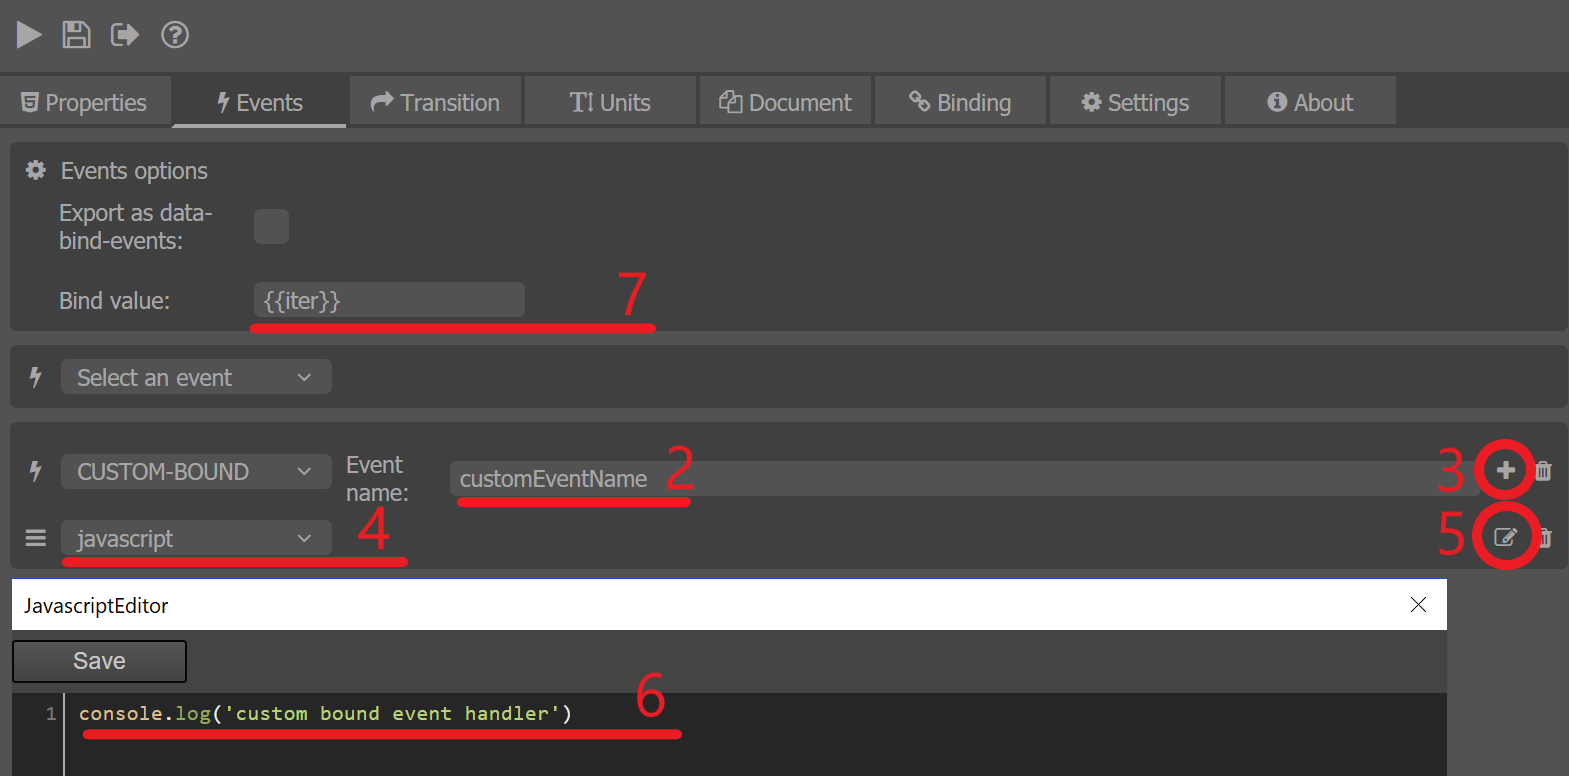
If the user wants to pass a value, model or iterator via the custom bind attribute, that we generate for the element, then the Bind value input can be used for this purpose.

- In this input, you can type a valid data-bind expression which will be evaluated from the Player.
- Typing
{{iter}}, for example, inside this input will result in the HTML to -<div data-bind-some-attrubute="{{iter}}"></div>.
Example
For this example, we will use a symbol with the name Symbol 1. First of all select this symbol!
To add a CUSTOM-BOUND event to an element using the panel you need to:
- Navigate to the Events tab and select an event - CUSTOM-BOUND.
- Name the custom event by typing whatever name you want inside the Event name input field.
- Add a new handler.
- Select a javascript handler for example.
- Open JavaScript editor.
- Type
console.log('custom bound event handler')inside the editor and save. - Add a bind value for the currently selected element
- This value will be used in the generated custom attribute
When you export the result will be the following:
- HTML -
<div data-bind-Symbol-1="{{iter}}"where Symbol-1 is the symbol name. - JavaScript
For registering the custom attribute we will export a class holding the state of the attribute value, update and init method which will be used to update the state and attach the custom event to the element.
class Symbol_1 {
    constructor() {
        this.state = null;
    }

    update(element, value) {
        this.state = value;
    }

    init(element, value) {
        element.addEventListener("customEventName", (event) => {
            const eventTarget = event.currentTarget;
            console.log('custom bound event handler')
        });
    }
}
To register the newly created attribute we will use the engine.registerBindingAttribute method.
engine.on('Ready', () => {
    engine.registerBindingAttribute("Symbol-1", Symbol_1);
});
What is {{iter}} and more about the data-binding in the Player you can check here.
Also you can check our section about the data-binding here
Event handlers
Default handlers
Handlers for playing an animation
Show/Hide handler
Show and hide handlers are used to show or hide the target element.
Options
- Target - Specify the event target.
- Self - Will show/hide the current selected element.
- Other - Will expand more options for the target element.
Extended options
-
Targets query root - Specify from where the targets will be queried.
- Self - The list with target names will be generated starting to query from the current selection timeline.
- Root - The list with target names will be generated starting to query from the main (Scene) timeline.
-
Target name - Specify the target element which will be shown/hidden.
- Show/Hide all targets - Specify if all the elements with instance name choosen from the target list should be shown/hidden.
- Checked - Will show/hide all the encounters.
- Unchecked - Will show/hide the first encounter.
Example
- Let's create two symbols which will behave as a buttons - "Show" and "Hide".
-
Add instance name - "HideElement" to the "Hide" symbol.
.PNG)
-
Select the symbol named "Hide" and go to the Events tab.
- Add a "CLICK" event and a "Hide" handler.
-
In the handler options select the target to be "Self".
.PNG)
-
Select the symbol named "Show" and go to the Events tab.
- Add a "CLICK" event and a "Show" handler.
-
Set the following handler options:
- Target: "Other".
- Targets query root: "Root".
- Target name: "HideElement (Hide)".
.PNG)
-
Export and preview the result.
Play/Pause handler
Play and pause handlers are used to play or pause the animation of the target element.
Options
- Target - Specify the event target.
- Self - Will play/pause the current selected element animation.
- Other - Will expand more options for the target element.
Extended options
-
Targets query root - Specify from where the targets will be queried.
- Self - The list with target names will be generated starting to query from the current selection timeline.
- Root - The list with target names will be generated starting to query from the main (Scene) timeline.
-
Target name - Specify the target element which animation will be played/paused.
- Play/Pause all targets - Specify if all the animations of the elements with instance name chosen from the target list should be played/paused.
- Checked - Will play/pause all the encounters.
- Unchecked - Will play/pause the first encounter.
Example
- Let's create two symbols which will behave as a buttons - "Play" and "Pause".
- Create a symbol - "Animation" with instance name "AnimationElement" and add a Motion tween to it in the main (Scene) timeline.
- Enter in the "Animation" timeline.
-
Convert shape to symbol with name "AnimationNested" and create a Classic Tween for it.
-
Select the symbol named "Play" and go to the Events tab.
- Add a "CLICK" event and a two "Play" handlers.
- Set the following options for the first handler - This handler will play all the animations in the main (Scene) timeline.
- Target: "Other".
- Targets query root: "Self"/"Root" - doesn't matter.
- Target name: "Current scene".
-
Set the following options for the second handler - This handler will play all the animations in the "Animation" timeline.
- Target: "Other".
- Targets query root: "Other".
- Target name: "AnimationElement (Animation)".
.PNG)
-
Repeat the steps from 3. to 6. for the symbol named "Pause" with handlers type - "Pause".
.PNG)
-
Select the "AnimationElement" and add a "CLICK" event.
-
Add "Play" handler with the following options - This will play the animation in "Animation" timeline (The Classic Tween we've created in step 4.).
- Target: "Self".
.PNG)
- Target: "Self".
-
Export and preview the result.
GotoAndPlay/GotoAndStop handler
GotoAndPlay and GotoAndStop handlers are the same as Play/Pause but you have the option to choose a label name from where you want to play or to where you want to pause the animation.
Options
-
Target - Specify the event target.
- Self - Will play/pause the current selected element animation.
- Other - Will expand more options for the target element.
-
From - Specify from where/where the animation will be played/stopped.
- Accepts label names from the selected target's timeline.
Extended options
-
Targets query root - Specify from where the targets will be queried.
- Self - The list with target names will be generated starting to query from the current selection timeline.
- Root - The list with target names will be generated starting to query from the main (Scene) timeline.
-
Target name - Specify the target element which animation will be played/paused.
- Play/Pause all targets - Specify if all the animations of the elements with instance name choosen from the target list should be played/paused.
- Checked - Will play/pause all the encounters.
- Unchecked - Will play/pause the first encounter.
Example
We will extend the sample created in Play/Pause section.
But before that we will:
- Reuse "Play" and "Pause buttons" - You can create a new ones or just duplicate the existing ones.
- Change the text of the buttons with "GotoAndPlay" and "GotoAndStop".
- Reuse the symbol "Animation" and its animations.
After this is done we can continue with the other steps:
- In the main (Scene) timeline create a new Layer - "Labels".
-
Add "start", "mid" and "end" label names corresponding to 1st, 13th and 25th frame boxes.
.PNG)
-
Do the same in the "Animation" timeline.
.PNG)
-
Select the symbol named "GotoAndPlay" and go to the Events tab.
- Add a "CLICK" event and a two "gotoAndPlay" handlers.
- Set the following options for the first handler - This handler will play all the animations in the main (Scene) timeline starting from "mid" label.
- Target: "Other".
- Targets query root: "Self"/"Root" - doesn't matter.
- Target name: "Current scene".
- From: "mid".
-
Set the following options for the second handler - This handler will play all the animations in the "Animation" timeline starting from "mid" label.
- Target: "Other".
- Targets query root: "Other".
- Target name: "AnimationElement (Animation)".
- From: "mid".
.PNG)
-
Repeat the steps from 4. to 7. for the symbol named "GotoAndStop" with handlers type - "gotoAndStop".
-
Change From handler options to be the "start" frame label - This will stop the animation in the "start" label.
.PNG)
-
Export and preview the result.
PlayFromTo handler
PlayFromTo handler is the same as GotoAndPlay/GotoAndStop but here you have an option to choose from where the animations will start and where they will stop using the label names. This allows you to play an animation between two different times.
Options
-
Target - Specify the event target.
- Self - Will play/pause the current selected element animation.
- Other - Will expand more options for the target element.
-
From - Specify from where the animation will be played.
- Accepts label names from the selected target timeline.
-
To - Specify where the animation will be stopped.
- Accepts label names from the selected target timeline.
Extended options
-
Targets query root - Specify from where the targets will be queried.
- Self - The list with target names will be generated starting to query from the current selection timeline.
- Root - The list with target names will be generated starting to query from the main (Scene) timeline.
-
Target name - Specify the target element which animation will be played.
- Play all targets - Specify if all the animations of the elements with instance name choosen from the target list should be played.
- Checked - Will play/pause all the encounters.
- Unchecked - Will play/pause the first encounter.
Example
We will extend the sample created in GotoAndPlay/GotoAndStop section.
But before that we will:
- Reuse one of the "GotoAndPlay" or "GotoAndStop" buttons - You can create a new one or just duplicate the existing one.
- Change the text of the buttons with "PlayFromTo".
- Reuse the symbol "Animation" and its animations.
- Reuse the Layer with label names.
After this is done we can continue with the other steps:
- Select the symbol named "PlayFromTo" and go to the Events tab.
- Add a "CLICK" event and a two "playFromTo" handlers.
- Set the following options for the first handler - This handler will play all the animations in the main (Scene) timeline starting from the "start" label and finish in the "mid" label.
- Target: "Other".
- Targets query root: "Self"/"Root" - doesn't matter.
- Target name: "Current scene".
- From: "start".
- To: "mid".
-
Set the following options for the second handler - This handler will play all the animations in the "Animation" timeline starting from the "start" label and finish in the "mid" label.
- Target: "Other".
- Targets query root: "Other".
- Target name: "AnimationElement (Animation)".
- From: "start".
- To: "mid".
.PNG)
-
Export and preview the result.
JavaScript handler
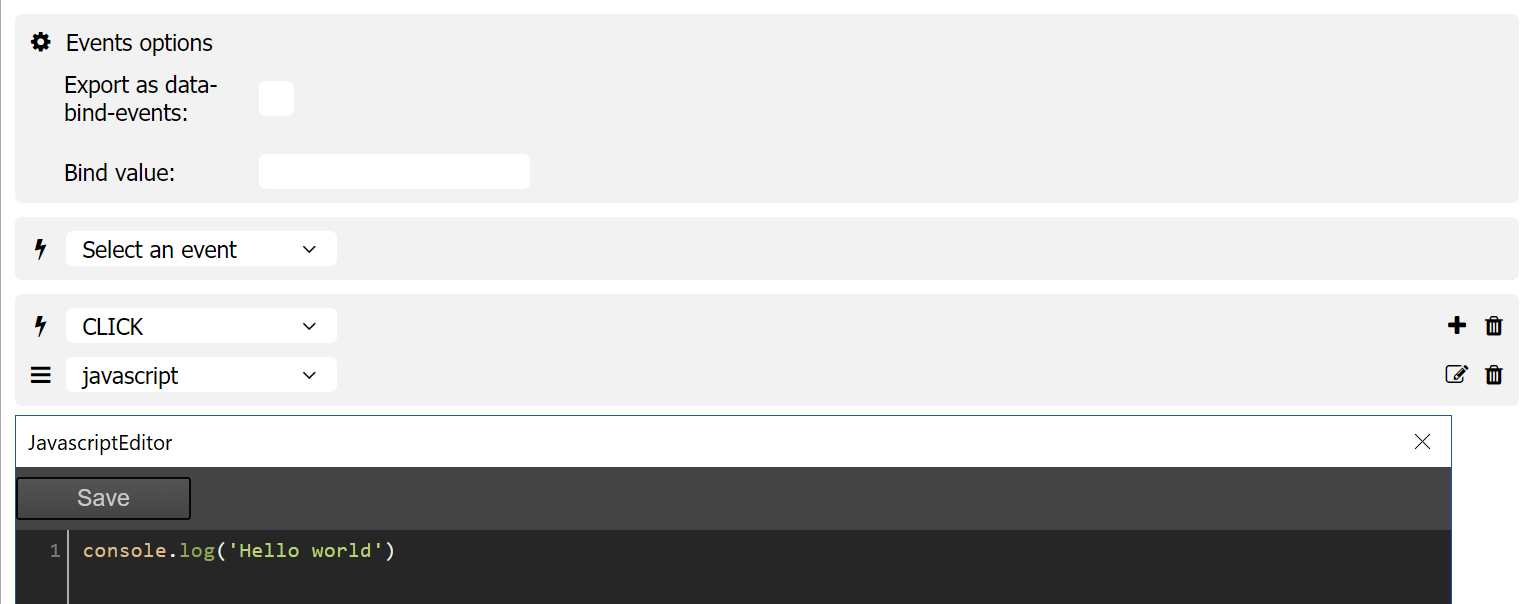
A JavaScript handler is used to add a custom JS code to the event. To type the code, a JavaScript Editor window will open.
Example
We will extend the sample created in PlayFromTo section. What we will gonna do is that when playing the animation finishes we will log a message "Animation finished" using console.log.
- Select the "PlayFromTo" button.
- Check "Wait to finish" checkbox.
- Add "JavaScript" handler and click the button near the bin icon.
-
In other window a text redactor will be opened. There type the following code:
console.log('Animation finished!');..PNG)
-
Export and preview the results - Click on the button and wait the animation to finish. Then check the console.
.PNG)
JavaScript file handler
JavaScript file handler is used to call a function from external file.
.PNG)
Example
We will extend the sample created in PlayFromTo section. What we will gonna do is that when playing the animation finishes we call a function from external JavaScript file.
-
Create a new JS file named "message.js" with the following content:
function onFinish(message) { console.log(message); } -
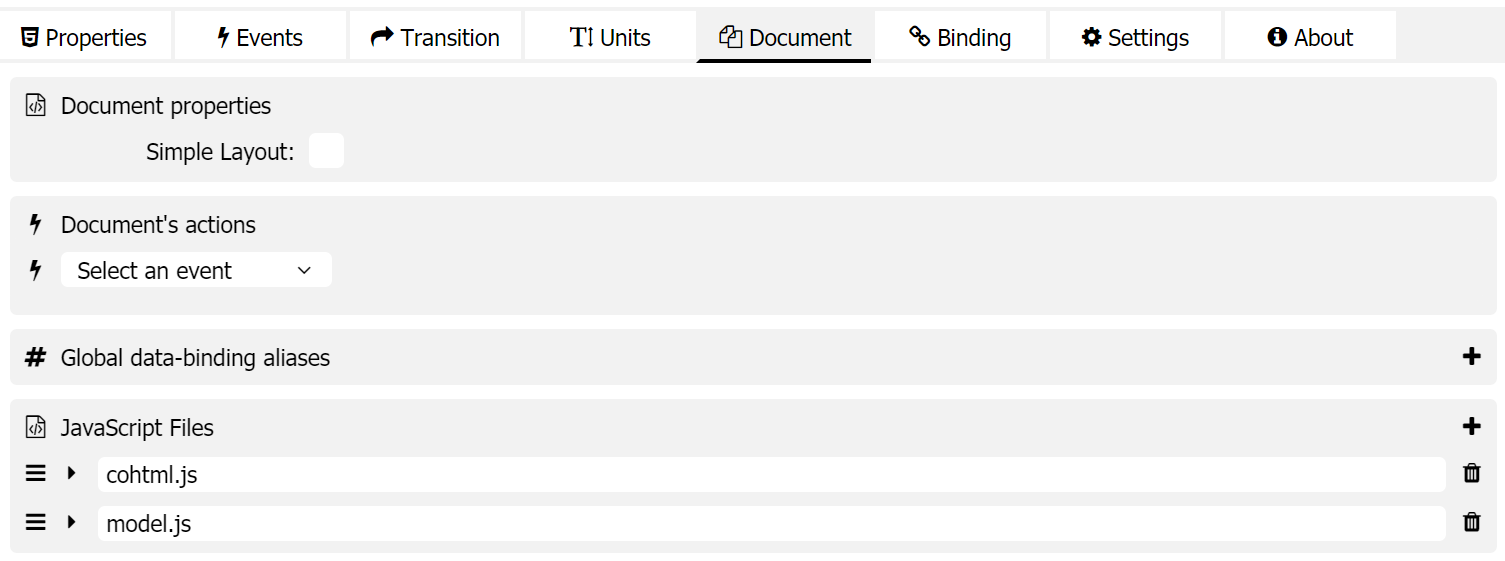
Navigate to the "Document tab" and add this file.
- Select the "PlayFromTo" button.
- Check "Wait to finish" checkbox.
- Add "message.js" handler (JS file will be listed as a handler option in the handler list).
- Select the "onFinish" method.
-
Type in the "message" parameter - "Animation finished!".
-
Export and preview the results - Click on the button and wait the animation to finish. Then check the console.
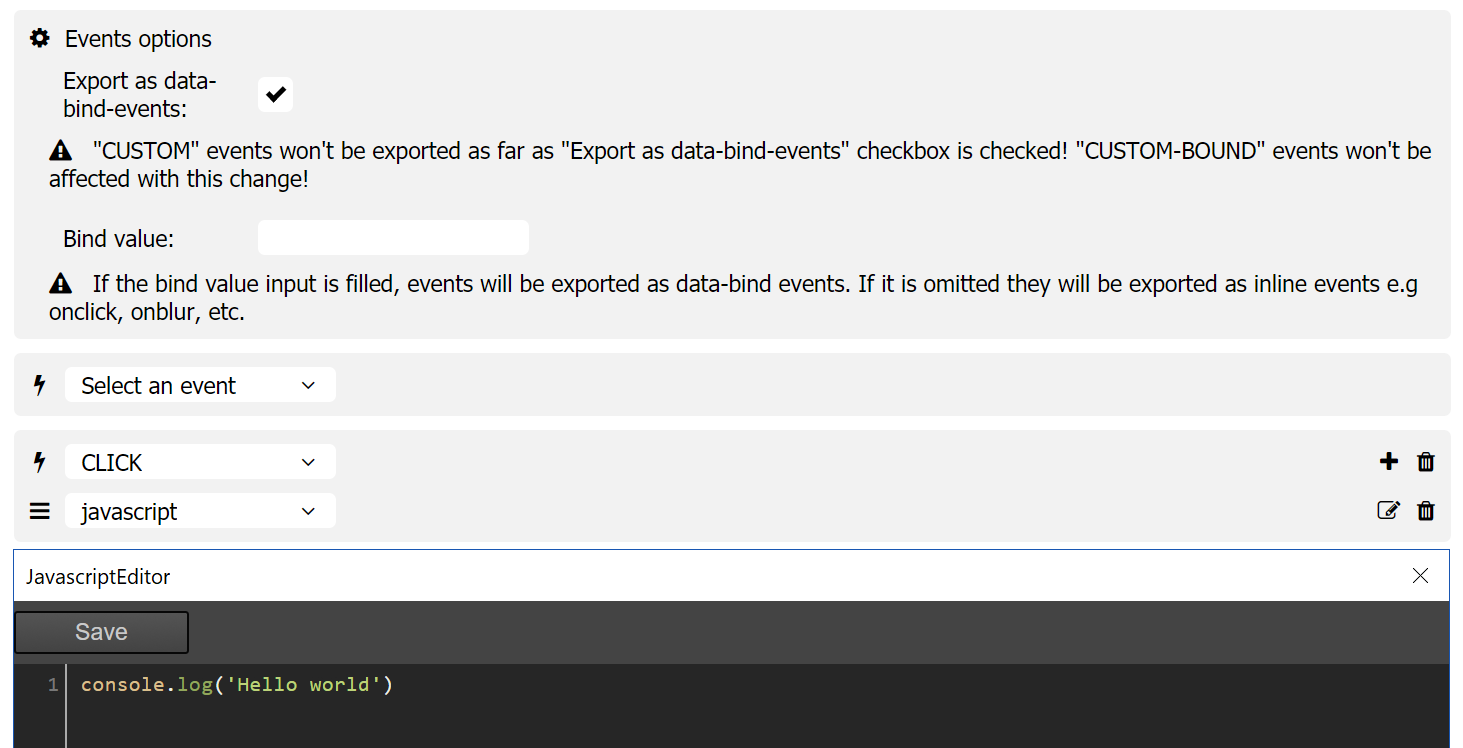
Export as data-bind-events options
A checkbox in the events tab defines whether events will be exporter as data-bind events. All the events added in the events tab will be exported as data-bind-events when this checkbox is checked.
We've created this option to extend the simple UI made in the Binding tab for data-bind-events.
Furthermore, there is an input for the bind value used to pass a model or iterator to the binding event. This is needed if you want to access any model or iterator in the generated event callback.
You can read more about the data-binding models and iterators from bind-for here.
You can read more about the data-binding aliases here.
Example results
-
If the "Export as data-bind-events" option is off the events will be exported as normal event listeners.
<div class="layoutStyle7 positionStyle9 Symbol-1" cl-labels-key="Symbol-1"> <div class="visualStyle1 layoutStyle2 positionStyle0"></div> </div> //Inside the generated CLEvents.js const symbol_Symbol_1 = document.getElementsByClassName("Symbol-1"); //click event for Symbol_1 for (let i_0 = 0; i_0 < symbol_Symbol_1.length; ++i_0) { symbol_Symbol_1[i_0].addEventListener("click", (event) => { const eventTarget = event.currentTarget; console.log("Hello world!") }); } -
If the "Export as data-bind-events" option is on and the Bind value input is empty the events will be exported as inline HTML events.
<div class="layoutStyle7 positionStyle9 Symbol-1" onclick="cb_0(event);" cl-labels-key="Symbol-1"> <div class="visualStyle1 layoutStyle2 positionStyle0"></div> </div> //Inside the generated CLEvents.js const symbol_Symbol_1 = document.getElementsByClassName("Symbol-1"); //Callback for click in Symbol_1 function cb_0(event) { const eventTarget = event.currentTarget; console.log('Hello world') } -
If the "Export as data-bind-events" option is on and the Bind value input has a binding expression typed in the events will be exported as a data-bind-[eventName].
<div class="layoutStyle7 positionStyle9 Symbol-1" data-bind-click="cb_0(event, this, {{model}});" cl-labels-key="Symbol-1">
    <div class="visualStyle1 layoutStyle2 positionStyle0"></div>
</div>

//Inside the generated CLEvents.js

const symbol_Symbol_1 = document.getElementsByClassName("Symbol-1");

//Callback for click in Symbol_1
function cb_0(event, element, model) {
    const eventTarget = event.currentTarget;
    console.log('Hello world')
}
The last example illustrates how you can access events, elements or models inside the handler, where the model is associated with the evaluated binding expression you've typed inside the Bind value input.
Example
The following example will illustrate how you can attach a click event on different buttons, using different binding models via binding aliases and how you can access different models' properties.
Prerequisites
-
A JavaScript file with the different models should be created and a method "playSound" which will be used for logging the soundId and the contextId.
const buttonModel = { soundId: 1, contextId: 1, color: 'red' } const buttonModel2 = { soundId: 2, contextId: 2, color: 'green' } engine.createJSModel('buttonModel', buttonModel); engine.createJSModel('buttonModel2', buttonModel2); engine.synchronizeModels(); function playSound(eventTarget, soundId, contextId) { console.log('soundId: ' + soundId); console.log('contextId: ' + contextId); console.log(eventTarget.className); } -
The file should be attached to the document via the Document tab. Also, you need the cohtml.js file to be attached to the document tab.
After you are done with the prerequisites you can continue with the actual example.
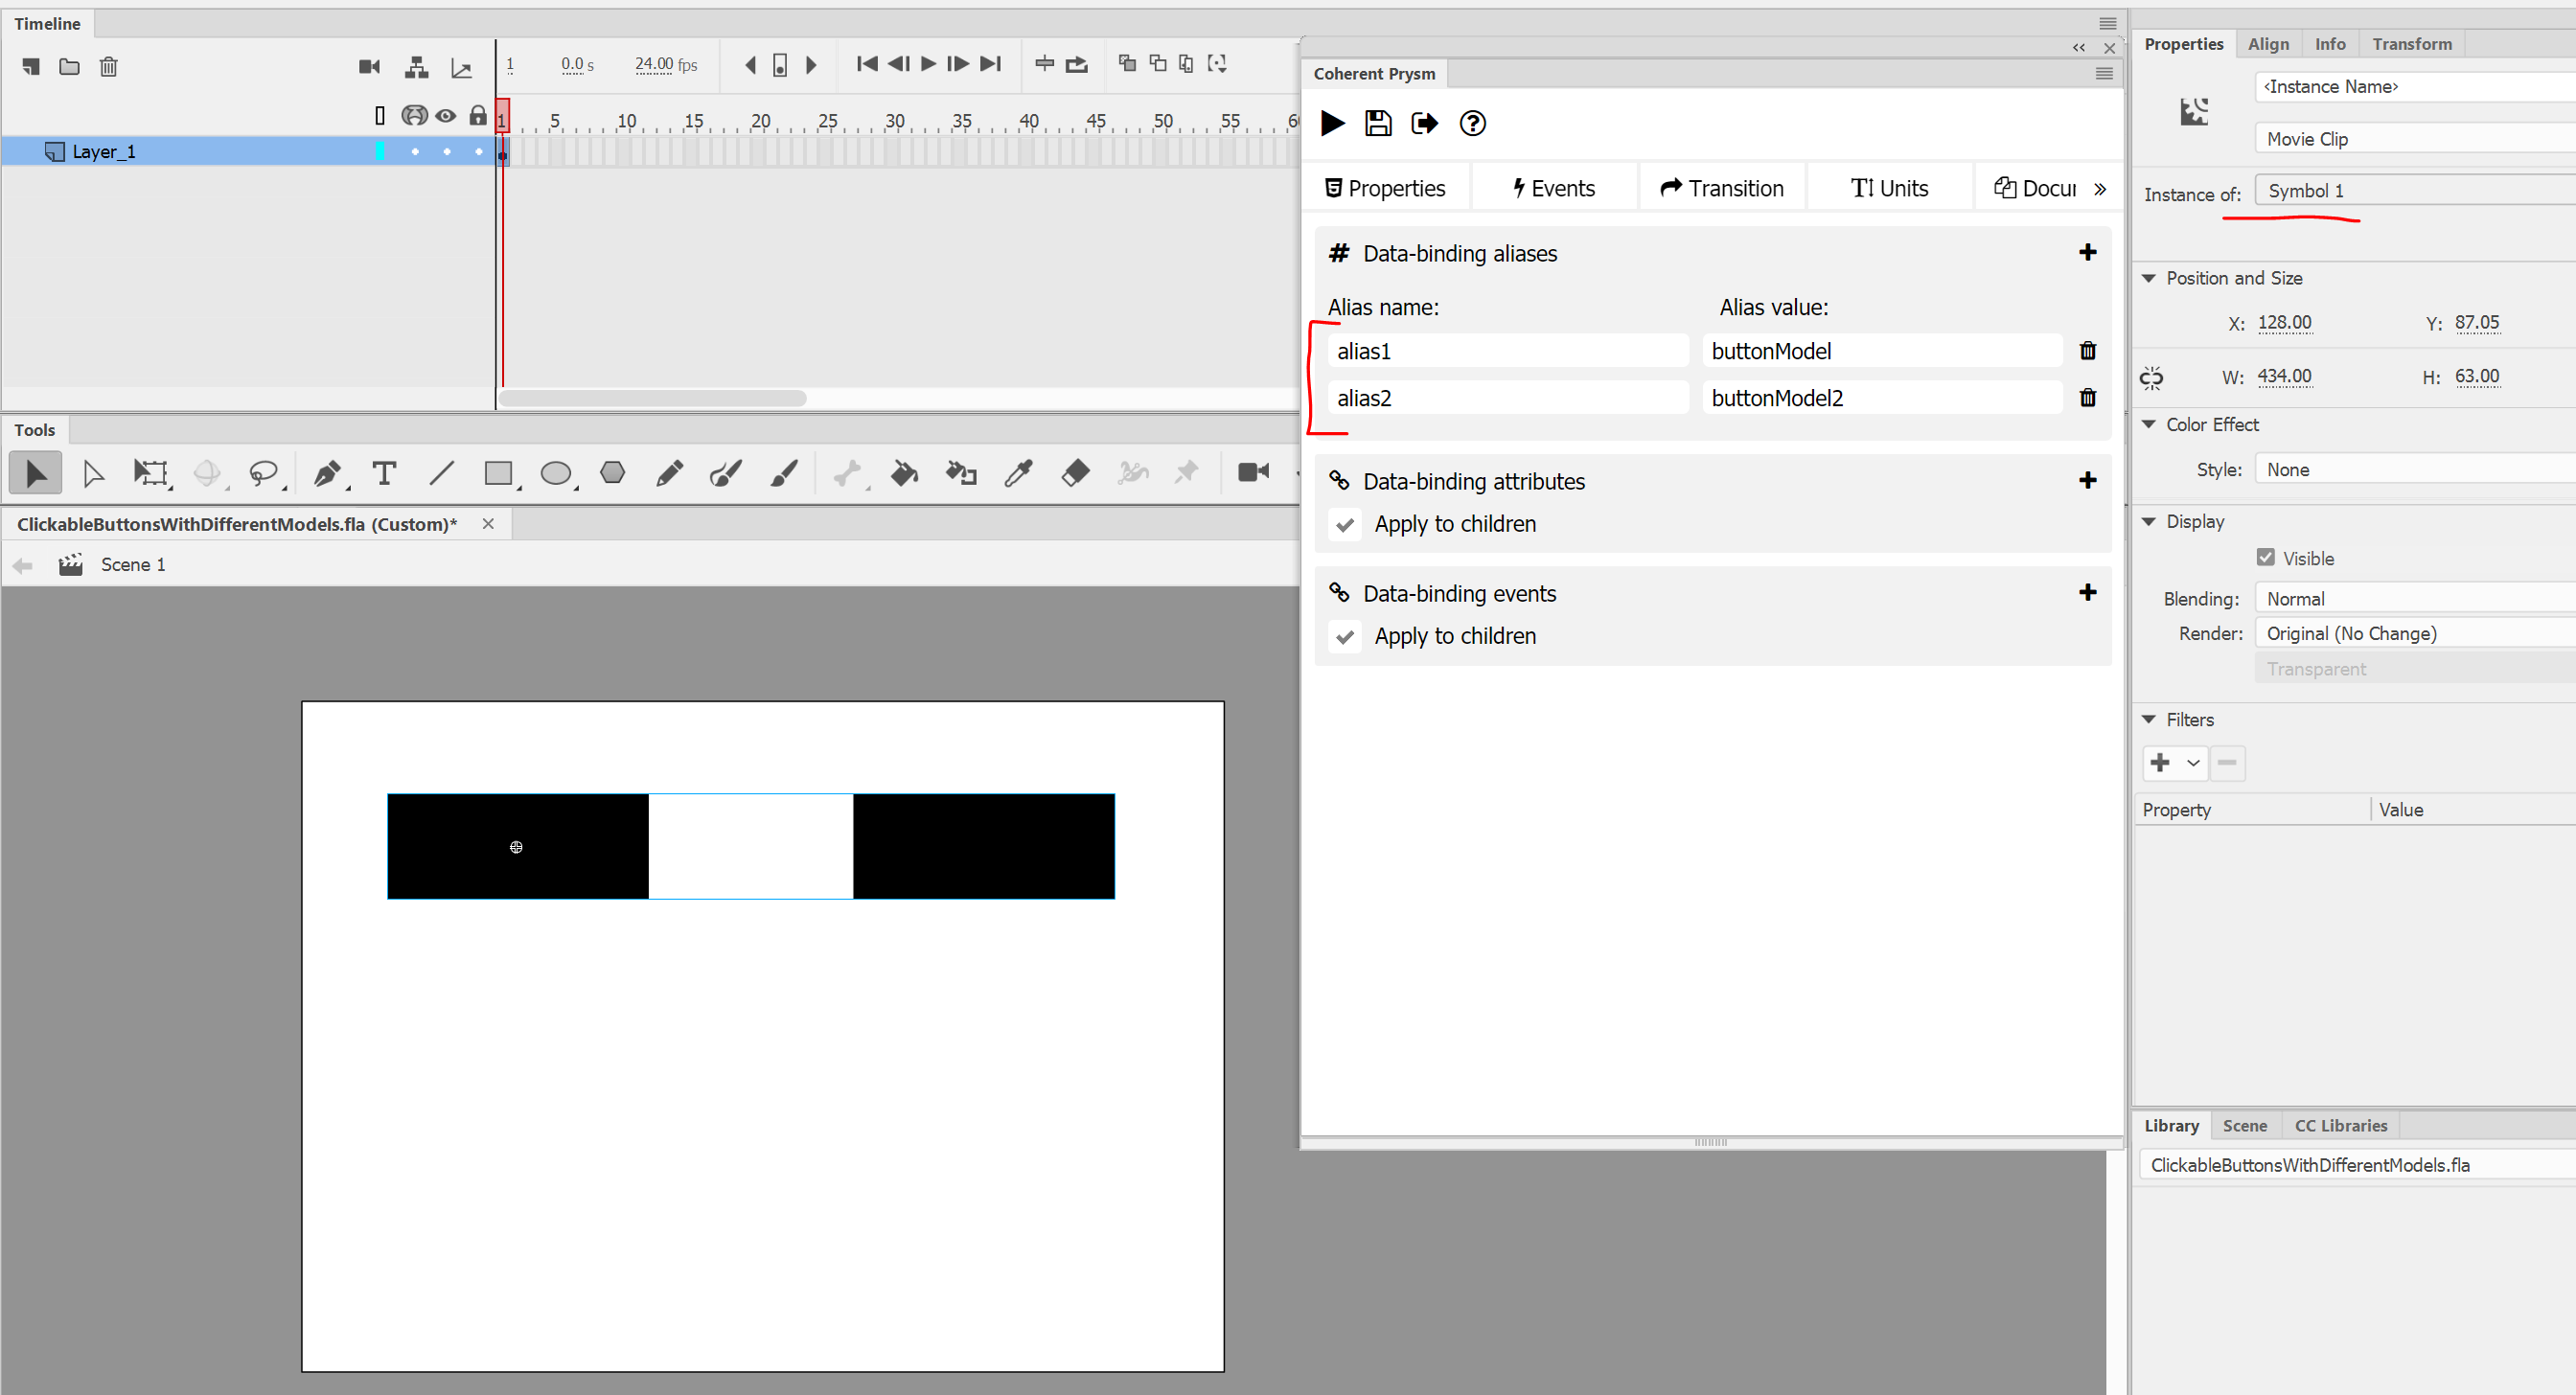
- Create a symbol "Symbol 1" and navigate to the Bindings tab.
-
Add two aliases
- alias name - alias1 and alias value - buttonModel.
-
alias name - alias2 and alias value - buttonModel2.
-
Enter in the "Symbol 1" timeline.
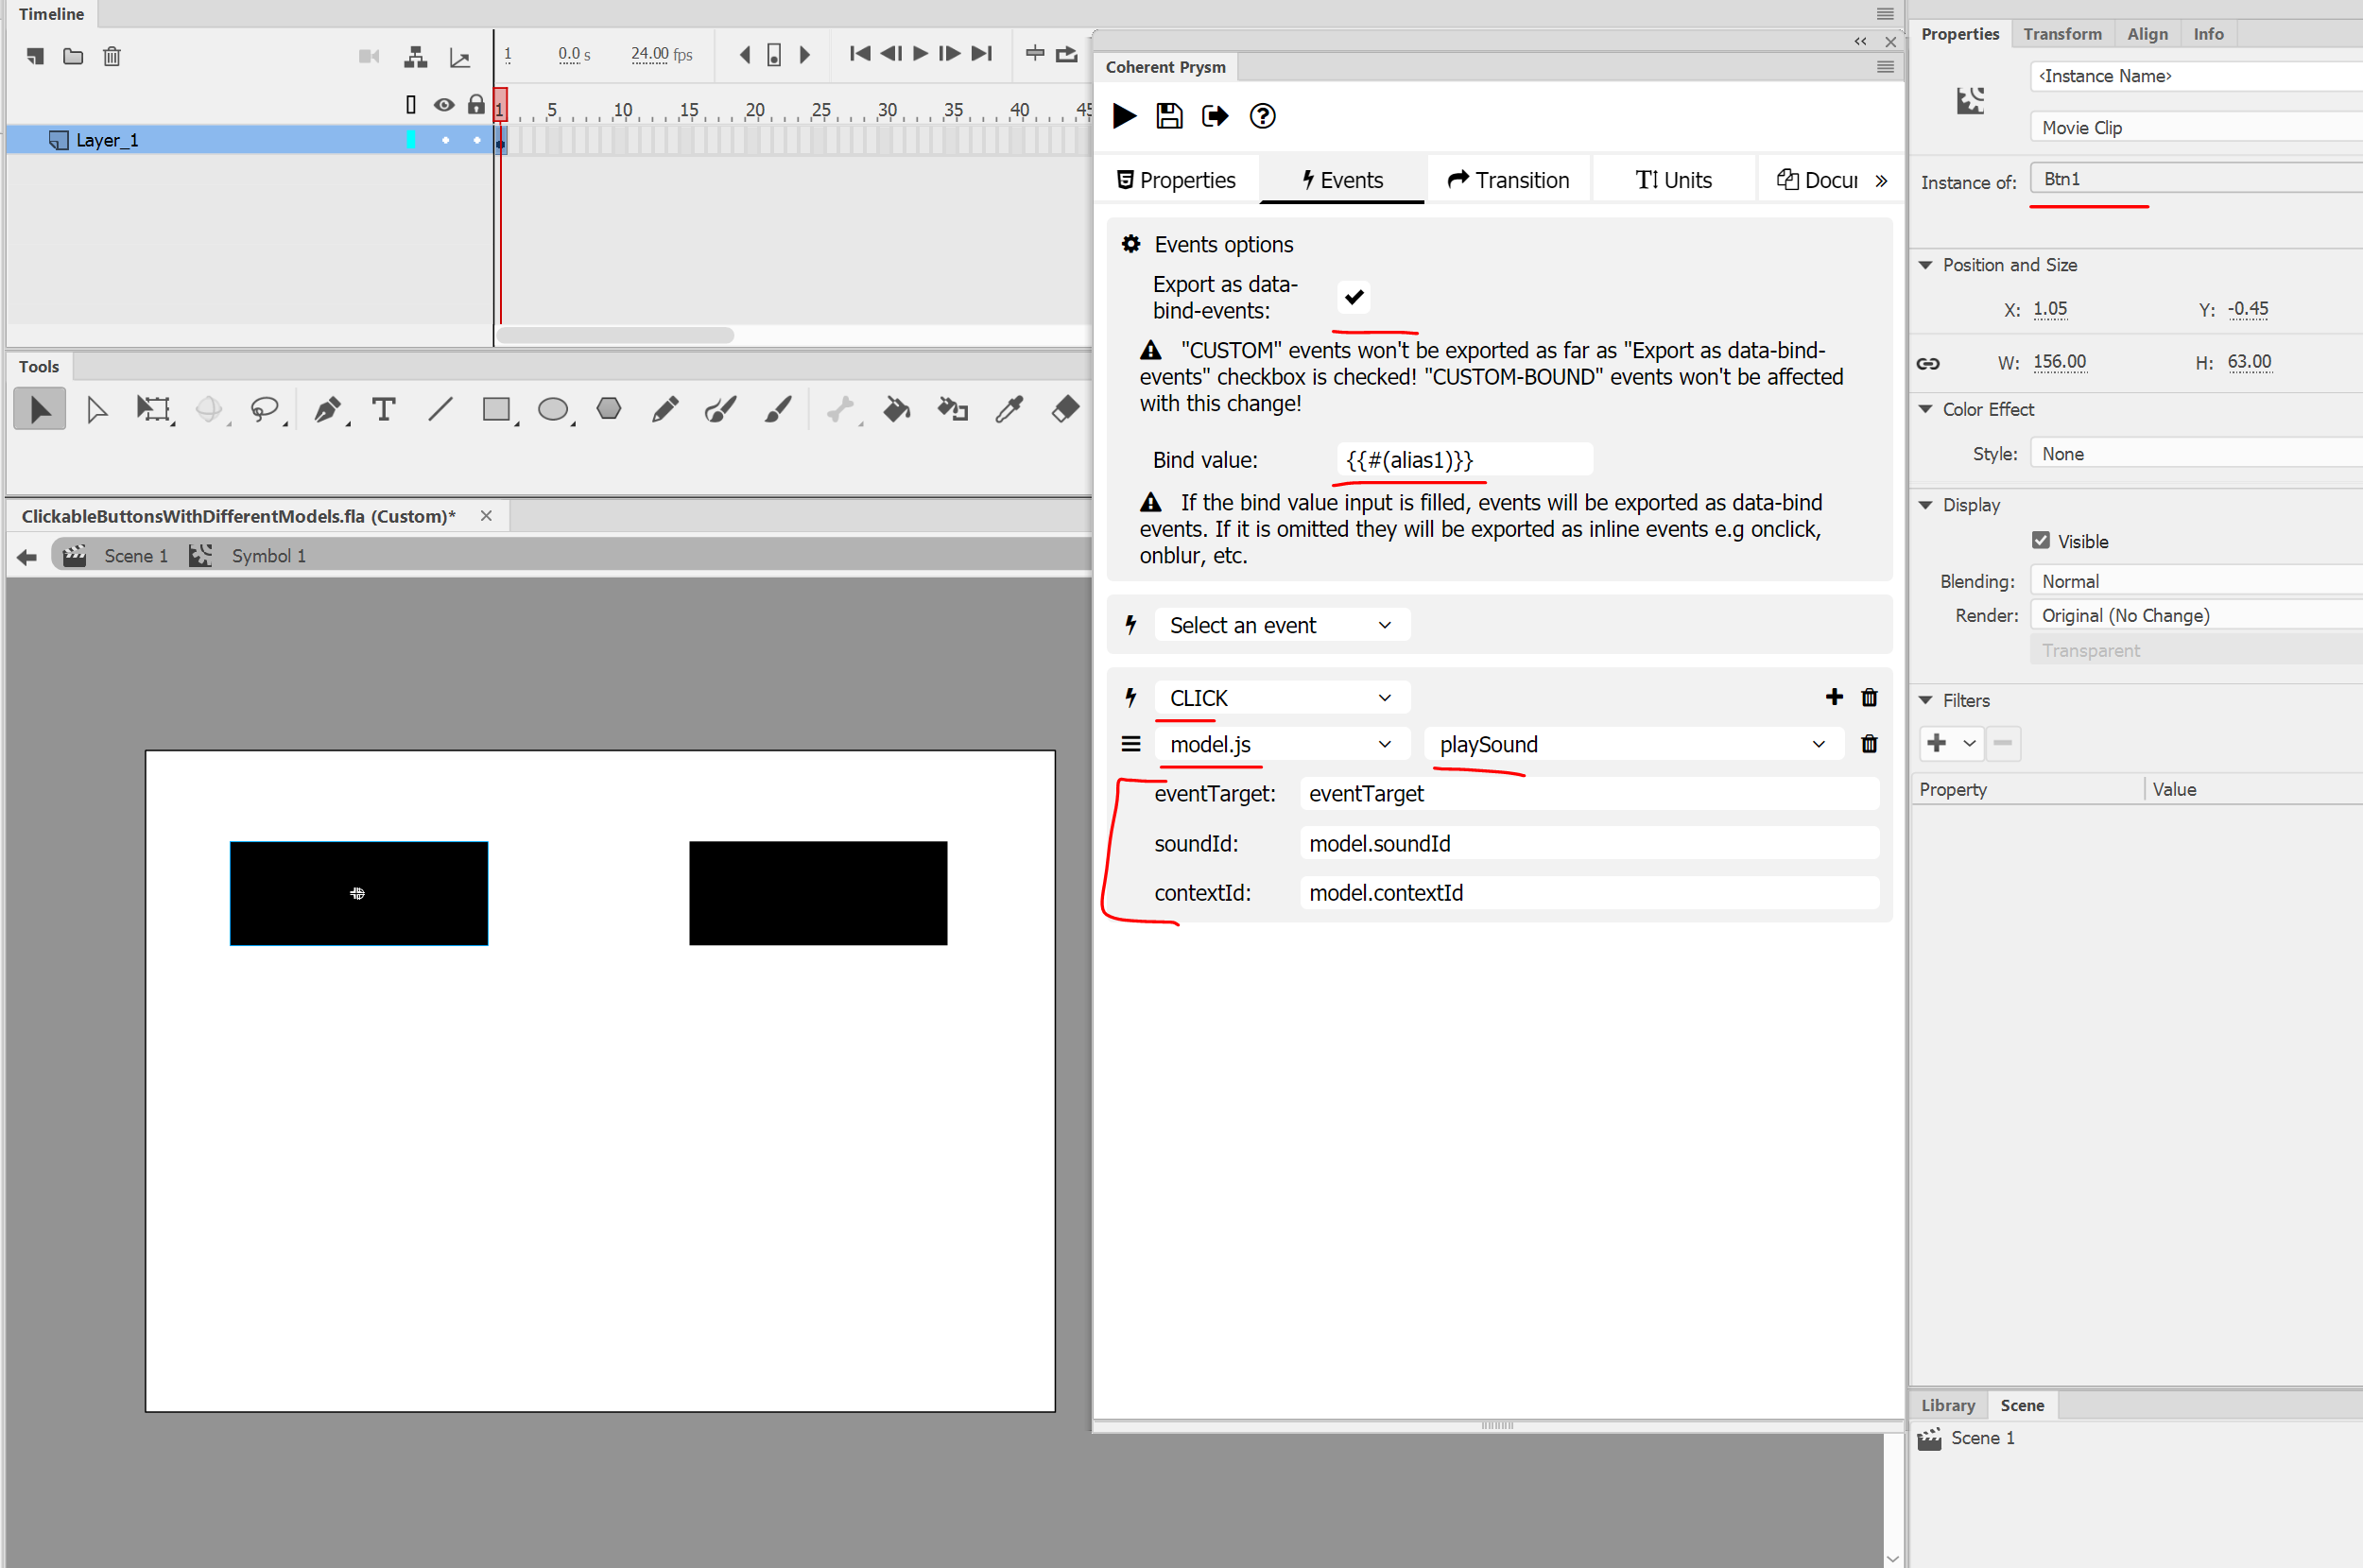
- Create a symbol "Btn1" and navigate to the Events tab.
- Check "Export as data-bind-events".
- Add a Bind value - {{#(alias1)}}.
- Add a CLICK event with handler model.js.
- Select playSound method from the functions dropdown.
-
Fill the input fields for the methods params.
- eventTarget - eventTarget
- soundId - model.soundId
-
contextId - model.contextId
-
Create another symbol in "Symbol 1"'s timeline - "Btn2" and navigate to the Events tab.
-
Redo steps 5 to 9 with Bind value type - {{#(alias2)}}.

-
Export and preview the result
You can find an example fla file and the resulting documents - here.
Events on elements created using bind-for
If you want to add events from the pannel to an element which is generated using bind-for you should check the option inside Events options container - Export as data-bind-events. This is necessary because without this option choosen the events won't be attached to this element - listeners will try to be added before the models are synchronized. Doing this you will have working events on the dinamically generated elements.

How to use
- Let Wrapper is the symbol where the elements will be generated using data-bind-for.
-
Element is a symbol inside wrapper and having data-bind-for with value
item:{{model.arrayOfItems}}for example.- The model is having the following structure for example:
var modelData = {
    arrayOfItems: [],
};

for (let i = 0; i < 40; i++) {
modelData.arrayOfItems.push({ value: 1 });
}

engine.createJSModel('model', modelData);
engine.synchronizeModels();
- The model is having the following structure for example:
-
Inside Element there is Circle symbol with animation inside it's timeline.
- If you want to play this animation you will add event to the Circle symbol via Events tab - for example Click event with handler play self.
- If you export you will realize that when you click the Circle element the animation won't be played.
- Turn back to the Events tab, select Circle symbol and check the option - Export as data-bind-events.
-
Now check the results - When you click on some of the Circle elements the animation inside it will be played.